Simfer 8661 User manual

Instruction Manual
Priručnik za uporabu
DECORATIVE CHIMNEY HOOD
DEKORATIVNAKAMINSKANAPA
GB
HR
H10-20-300-088 Rev 001

Dear Customer,
Thank you very much for your preference for Simfer products. Our
objective is to ensure that you enjoy this product, manufactured
environmentally-friendly with a total sense of quality in a precise working
environment at our modern facilities, most efficiently.
We recommend you to read the instruction manual carefully and keep
it handy before you use this Simfer chimney hood so that it maintains its
quality just like the first day you bought it and serves you most efficiently.
NOTE:
This Instruction Manual has been prepared for a variety of models.
Some of the features specified in the Manual may not exist in your device.
These features are marked with *.
Our devices are designed for domestic use. They are not for
professional use.
"PLEASE READ THE INSTRUCTIONS BEFORE YOU INSTALL OR
USE THIS DEVICE."
This product has been manufactured in an environmentally-friendly
and modern plants without harming the nature.
“Conforms with the EEE Regulations."
GB

CONTENTS:
1.SAFETY INTRODUCTIONS.................................................... 3
2. INTRODUCTION AND TECHNICAL DRAWING OF THE CHIMNEY HOOD... 4
3.INSTALLATION OF CHIMNEY HOOD....................................... 5
3.1.Location of the Chimney Hood...........................
3.2.Mounting Chimney Hood On The Wall................
3.3.Mounting the Aluminum Pipe ...........................
3.4.Installation of Outer Duct...................................
3.5.Installation of Inner Duct Mounting Bracket ......
4. .................................... 7FUNCTIONS OF THE CHIMNEY HOOD
4.1.Control Panel and its Functions........................
4.2.Operating the Chimney Hood...........................
4.3.In ducted use.................................................
4.4.Round Charcoal Filter......................................
4.5.Use of Charcoal Filter......................................
4.6.Installation of Charcoal Filter...........................
4.7.Use of Aluminum Cartridge Filter......................
5.REPLACING THE BULB..................................................... 9
5.1.Led................................................................
5.2.Candle Type Halogen Bulb...............................
6.MAINTENANCE OF THE CHIMNEY HOOD............................... 10
7.IF CHIMNEY HOOD DOES NOT WORK.................................... 11

1.SAFETY INSTRUCTIONS
ŸThis product is designed for domestic use.
ŸProduct Voltage is 220-240 Volts 50Hz.
ŸPower cord of your product is fitted with grounded plug. This cord must be
plugged into a grounding socket.
ŸAll electrical installation must be done by a qualified electrician.
ŸInstallation by unqualified persons may lead the product run with lower
performance, be damaged or cause accidents.
ŸPower supply cord should not be jammed or crushed. Power cord should
not be close to hobs, etc, otherwise it may melt and cause fire.
ŸDo not plug in the product into a socket before the installation is complete.
ŸMake sure the mains switch is easily accessible in order to cut the power of
the product in case of any danger.
ŸDo not touch the bulbs of your product if used for a long period of time. The
bulbs will be hot and may burn your hand.
ŸKitchen chimneys are designed for domestic use. If used for other
purposes, it may lead to a failure and not be covered under the warranty.
ŸFollow the authorized agencies' rules and regulations regarding letting out
the air. (This warning does not apply to usage with non-ducted chimney
hoods.)
ŸFood that may burst into flames should not be cooked under the device.
ŸTurn on the product after you place pots, pans, etc on the hobs. Otherwise
excess heat may cause deformation of some parts of your product.
ŸDo not leave hot oil on the hobs. Pans with hot oil inside may cause self-
ignition.
ŸWhen cooking i.e. deep frying, hot oil may burst into flames. Be careful on
your curtains and cloths.
ŸMake sure you replace the filters at the recommended intervals. Filters not
replaced on time carry fire risk due to increase of grease on them.
ŸDo not use non-fire-resistant materials instead of filters.
ŸKeep the potentially dangerous packaging materials away from children.
ŸDo not use your product without a filter, do not remove filters when the
product is operating.
ŸIn case of start of flames, cut off the power of the chimney fan and cooker.
(Cut off the power by unplugging the device).
GB
3
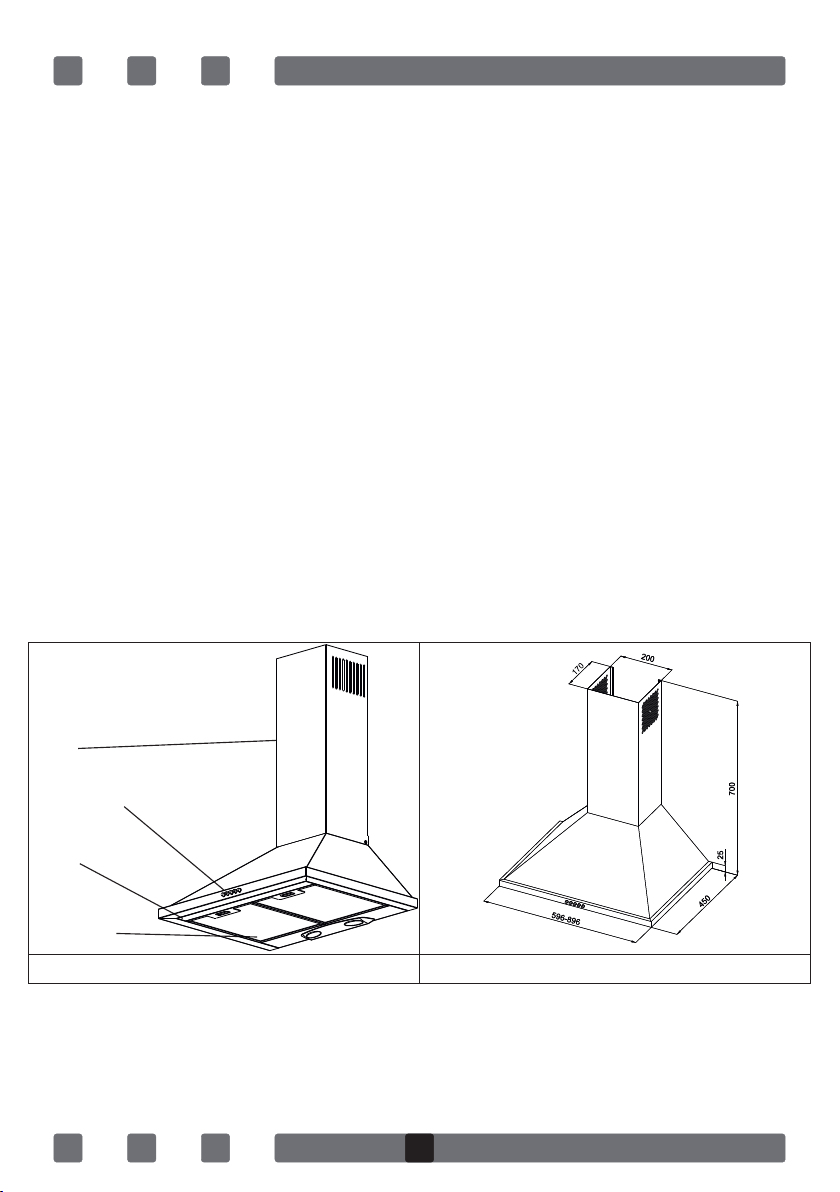
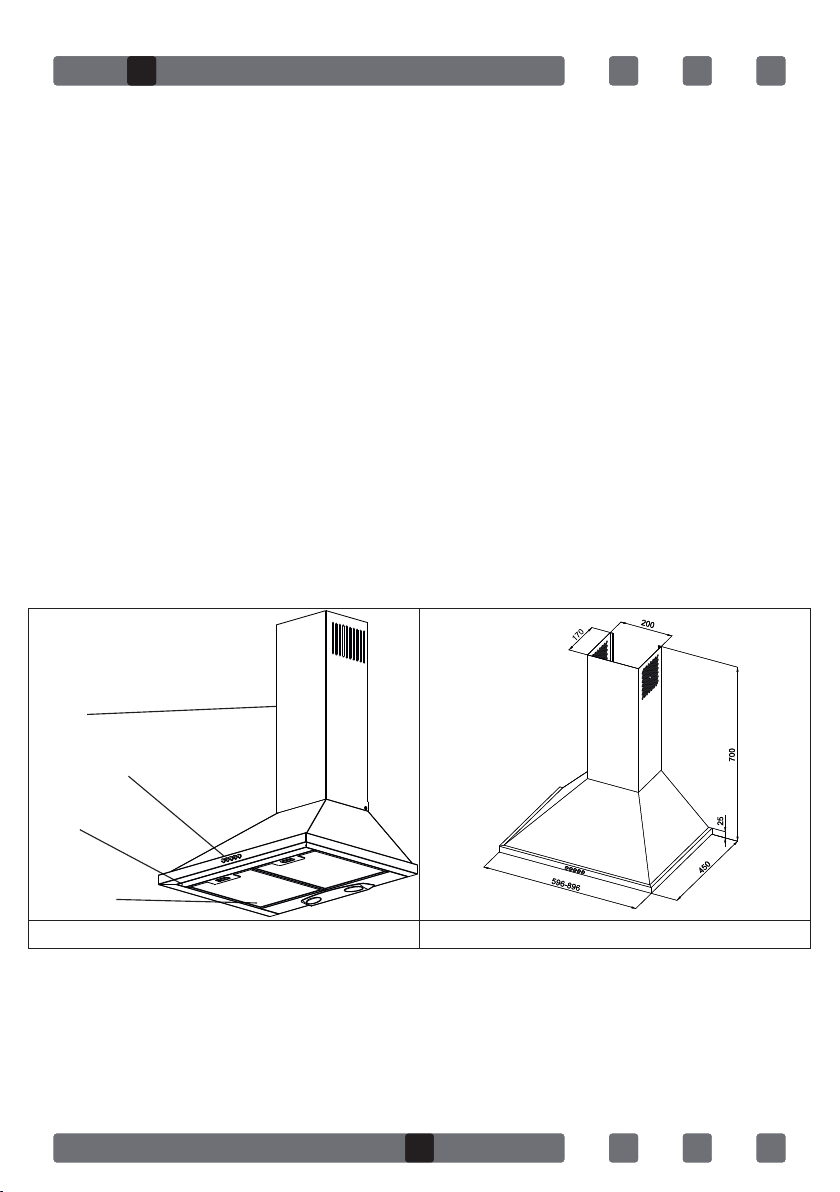
Lightining
Filter
Control Panel
Duct
1.SAFETY INSTRUCTIONS
ŸTurn off the hobs before you remove pots, pans, etc.
ŸIf the cleaning is not done periodically, your product may carry fire risk.
ŸCut off the power supply before any maintenance work. (Cut off the power by
unplugging the device.)
ŸFor duct-out chimney hoods, use pipes with a diameter of 150mm or
120mm. You should minimize the ducting distance with minimum bends.
ŸMake sure your children do not play with the product. Do not let young
children operate the product.
ŸIf the power cord is damaged, the damaged cord should be replaced by the
manufacturer or its service agent or similarly specialized personnel in order
to avoid a dangerous situation.
ŸIn case of start of flames, cut off the power of the chimney fan and cooker
and cover the flame. Do not use water to extinguish the fire.
Install "MAX 6 A" fuse for the extractor fan.
2. INTRODUCTION AND TECHNICAL DRAWING OF THE CHIMNEY HOOD
4
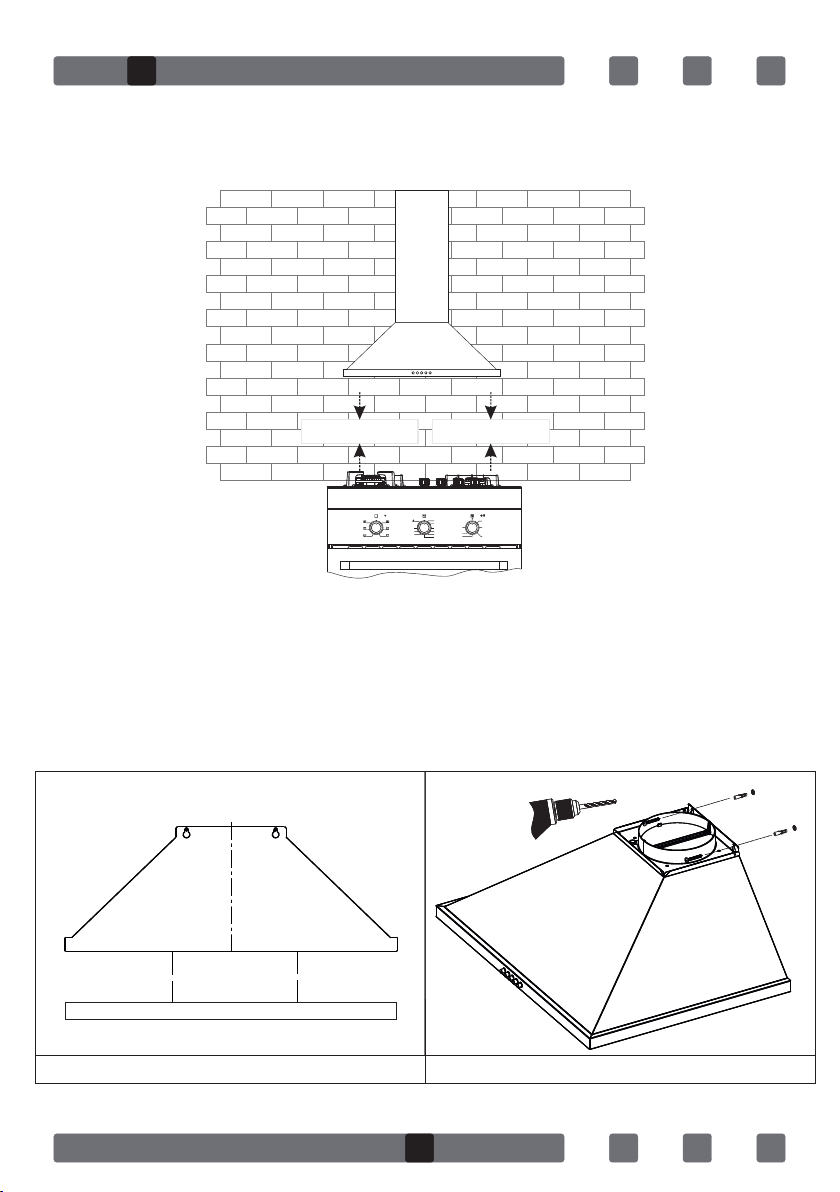
Installation Template Fig 1
3.INSTALLATION OF CHIMNEY HOOD
3.1.Location of the Chimney Hood
3.2.Mounting Chimney Hood On The Wall
2 drywall (8mm) anchors are nailed into the holes drilled according to
installation template (A,B). They are fixed into the wall through 2 key holes by
screws as shown in Figure 2.
GB
5
Electric Stove
Min.: 650 mm. / Max.:750 mm.
Gas Stove
Min.: 750 mm. / Max.:800 mm.
0
80
50
130
220
180
250
MAX
90
80
70
40
30
10
20
50
0
60

3.3.Mounting the Aluminum Pipe
Place the aluminum pipe on the plastic duct. Place the other end of the pipe
into the air outlet in the kitchen. Figure 2
Twists and bends on the aluminum pipe may cause minimizing the air suction
so avoid unnecessary bends and twists as much as possible. Figure 3-4
Place the inner duct and outer duct carefully on the product. Fix the inner
duct to inner duct connection plate with 2 screws.
3.4.Installation of Outer Duct
Put the outer duct on the chimney hood and fix to it by 2 screws (Figure 5)
3.5.Installation of Inner Duct Mounting Bracket
2 fixing holes are drilled on the wall with Ø6mm electric drill at a suitable
height and place to fix the inner duct hanger plate onto the wall. 6mm drywall
anchors are nailed into those holes and inner duct mounting brackrets are
pinned down. (Figure 6)
At the last step of chimney hood installation, the inner duct is screwed on the
inner duct mounting brackets.
NOTE: Packaging may not include inner duct according to model.
6
Fig 2 Fig 3 Fig 4
Fig 5 Fig 6

4.FUNCTIONS OF THE CHIMNEY HOOD
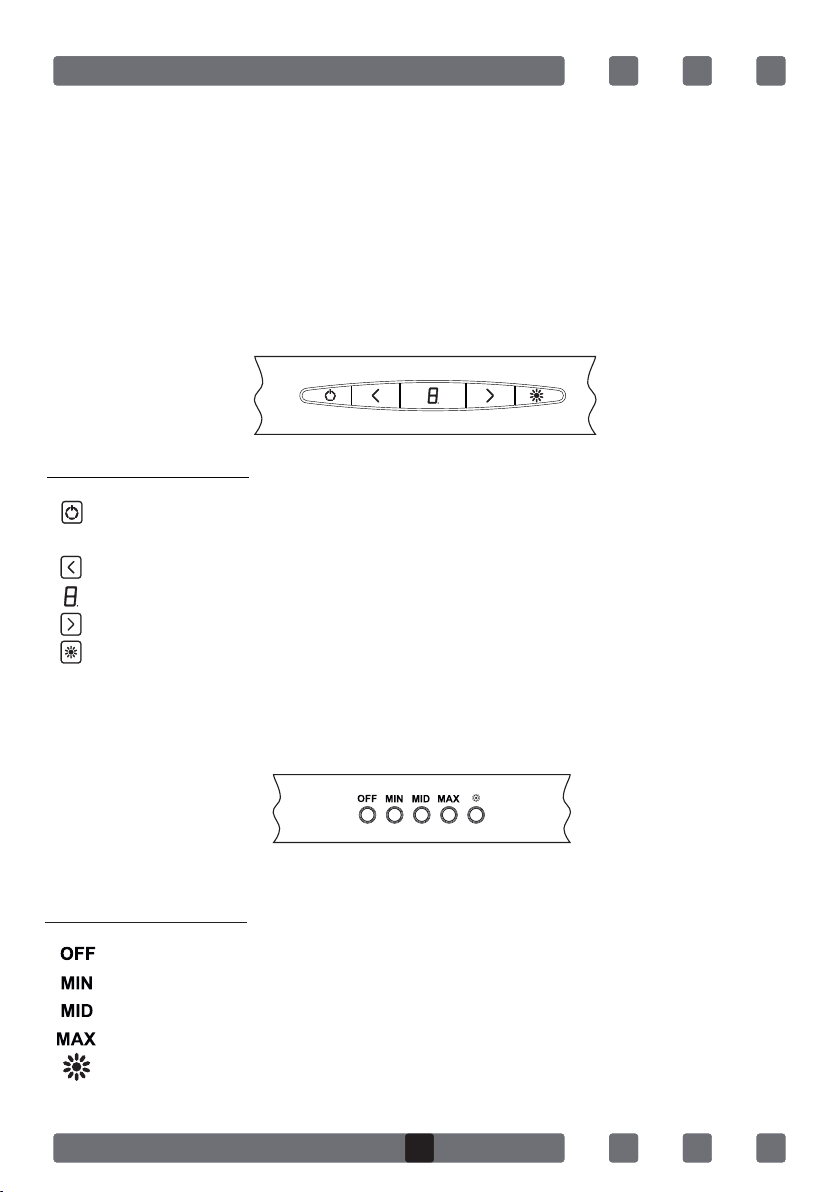
4.1.Control Panel
ŸDigital Control: touch the symbols on the keys. (On/Off function and timer
are on the same key; if pressed for 1 sec on-off function will operate. If
pressed for 3 sec. 15 minutes timer will operate.
NOTE: When the product operates for a certain time, the aluminum filters get
dirty and the digital display shows "C" Clean sign. This means the filters
should be cleaned. Press the speed reduction key for 5 secs in order to delete
"C" sign from the display.
ŸPush Buton: Pressing the buttons will enable different functions.
In order to disable them, press the button OFF.
7
ŸStops the motor, except for the lighng system.
ŸLow speed
ŸMedium speed
ŸIntense speed
ŸIt turns on and off the lighting system only.
SYMBOL FUNCTIONS
ŸSwitches on and off the motor. (Except for the lighting) If
pressed for 3 sec. motor switch off itself after15 minutes.
ŸDecreases the speed when the motor is running.
ŸDisplay
ŸIncreases the speed when the motor is running.
ŸOnly switches on and off the lighting system.
SYMBOLS FUNCTIONS

4.2.Operating the Chimney Hood
Extractor hood is used in ducted and non-ducted kitchens.
4.3.In ducted use;
In ducted use, extractor fan should be connected to an air outlet to send the
air out. In order to use your extractor hood efficiently, make sure length of the
pipe system between the extractor hood and the air outlet should be short.
Your product has been manufactured suitable for ducted and non-ducted
use.
4.4.Round Charcoal Filter
In kitchens with no duct, a round charcoal filter should be reintroduced the
clean air into the kitchen. You can obtain the round filter from your service or
dealer.
4.5.Use of Charcoal Filter
ŸOur products allow the installation of charcoal filter
ŸRegardless of use of charcoal filters or not, grease filters should be
installed on the product. Do not use your product without grease filter.
ŸUse of charcoal filteris as follows.
ŸCut off the device power before replacing charcoal filter.
ŸCharcoal filter is used in the kitchens with no duct therefore should be
replaced in every 3-5 months depending on the frequency of use.
ŸCharcoal filter should never be washed.
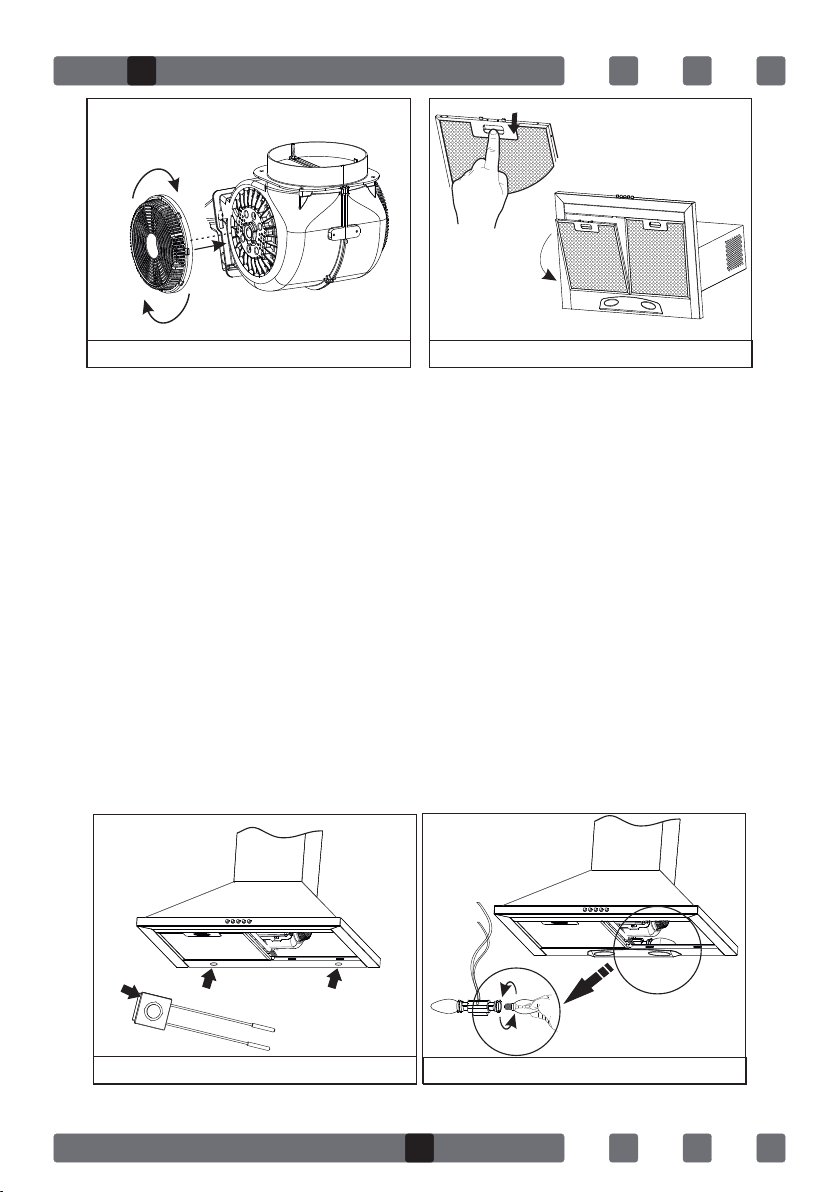
4.6Installation of Charcoal Filter
ŸCharcoal filters are used in the kitchens with no duct.
ŸCharcoal filters are installed onto both sides of the fan as shown in by
turning 10 degrees clock-wise. Figure 7
ŸWhen uninstalling, reverse the same procedure.
4.7Use of Aluminum Cartridge Filter
ŸAluminum cartridge filter holds dust and grease in the air. Extractor hood
should never be used without aluminum cartridge filter. Figure 8
GB
8
5.REPLACING THE BULB
Always switch off the electrical supply before carrying out any operation.
5.1.LED
ŸLED bulb does not operate is possible to remove as shown in Figure 9
ŸA new bulb to be supplied from service points is replaced with the same
reoperation.
ŸCables are designed with sockets. The plug in should be made according
to previous connection.
5.2.Candle Type Halogen Bulb
ŸBulb does not operate is possible to remove as shown in.
ŸA new bulb with the same features is replaced with removed bulb.
Note: Remove the holder on the LED bulb. Put the new LED bulb on the
holder housing of the LED bulb you removed as shown in Figure 10.
GB
9
Fig 7 Fig 8
Installing Posion
Fig 9
Kırmızı
Siyah
Fig 10

6.MAINTENANCE OF THE CHIMNEY HOOD
ŸDevice should be unplugged or switch should be turned off before cleaning
and maintenance procedures.
ŸMetal filter should be cleaned once a month with hot soapy water or in the
dishwasher, if possible. (60 °C)
ŸRemove the aluminum cartridge filter by pressing on the spring catches on
the side. Do not refit before drying after wash.
ŸOuter surface of the extractor hood should be wiped with a damp cloth
soaked with soapy water.
ŸMake sure electronic parts do not contact with water or similar materials.
ŸFor inox products, using inox cleaning and maintenance products
available in the market will provide longer usage life for your device.
ŸAluminum filters can be washed in dishwasher. After several washes,
aluminum filters may change colour. This is normal and filters do not need
to be replaced.
WARNING
When used with devices which use fuel (heaters working with gas, diesel fuel,
coal or firewood, water heaters, etc) and the air in the environment; should be
used cautiously. The chimney hood sending the air out in the environment
may affect the burning adversely.
This warning is not applicable to non-ducted use.
Efficient use of Chimney Hood
ŸWhen installing the chimney hood to the air duct, use 150/120 mm
diameter pipes and use bends as minimum as possible.
ŸBe ware of cleaning periods of metal filters and replacing times of charcoal
filters.
ŸWhen dense suction power is not required, use the product in medium
setting.
ŸFor right ventilation, the windows in the kitchen leading to the outside
should be kept closed.
10
X X
X XX
X XX
XX
Chimney Hood does not
work
Light bulb is not
working
Chimney hood air
suction is poor
Do not send air out (in
non-ducted cases)
Check electricity connection (mains voltage
should be 220-240 V, Chimney hood
should be connected to grounding socket.)
Check motor switch (Motor switch should
be on.)
Check bulb switch (Bulb switch should be
on.)
Check aluminum filter (Aluminum cartridge
filter should be washed once a month in
normal use.)
Check bulbs (Bulbs should be in working
condition.)
Check air outlet shaft (Air outlet shaft
should be unblocked.)
Check charcoal filter (Charcoal filters
should be replaced quarterly in normal
use.)
7.IF CHIMNEY HOOD DOES NOT WORK
Before contacting the service, make sure the product is plugged and the fuse
in the electrical installation is working. Do not do anything that may harm the
product.
Service and spare parts:
Have one of our authorized services install your device free of charge.
You can supply spare parts of your device from your dealer or authorized
services.
The package includes a list of authorized services with the product.
When you contact your service or dealer to ask for any spare parts, notify them
of product model name shown in the product label. When you remove the
aluminum cartridge filter, you will see the product label.
Before contacting your service, check your chimney hood against the table
below. If problem persists, contact your dealer or authorized service point.
TR
GB
11

12
TR
HR
Cijenjeni kupci,
Srdačno Vam zahvaljujemo što ste izabrali uređaj Simfer . Naš je cilj pobrinuti
se da Vaša uporaba ovog uređaja proizvedenog u ekološki prijateljskim
uvjetima bez narušavanja kvalitete i preciznom radnom okruženju naših
modernih objekata bude ugodna i maksimalno učinkovita.
Preporučamo Vam da pažljivo pročitate ovaj priručnik te ga držite pri ruci prije
nego počnete rabiti kuhinjsku napu Simfer kako biste osigurali da bude kvalitetna
kao i prvog dana te kako bi Vam ona služila na najučinkovitiji način.
NAPOMENA:Ovaj Priručnik za uporabu odnosi se na nekoliko različitih
modela. Vaš uređaj ne mora sadržavati neke karakteristike navedene u
priručniku. Takve karakteristike označene su zvjezdicom (*).
Naši su uređaji dizajnirani za kućnu uporabu i nisu namijenjeni profesionalnoj
uporabi.
"MOLIMO PROČITAJTE UPUTE PRIJE POSTAVLJANJA ILI UPORABE
UREĐAJA.»
Ovaj uređaj proizveden je u ekološki prijateljskim i modernim tvornicama bez
štetnog djelovanja na okoliš.
"Uređaj je u skladu s EEE Direktivama."

TR
HR
13
SADRŽAJ:
1.UPUTE ZA SIGURNU UPORABU 14
2. I GRAFIČKI PRIKAZ NAPEUVOD 15
3. POSTAVLJANJE KUHINJSKE NAPE 16
3.1.Položaj kuhinjske nape
3.2.Postavljanje montažnog nosača kuhinjske nape
3.3.Postavljanje montažnog nosača na zid
3.4Postavljanje vanjskog ventilacijskog kanala
3.5.Postavljanje montažnog nosača unutarnjeg ventilacijskog kanala
4.FUNKCIJE KUHINJSKE NAPE 18
4.1.Upravljačka ploč
4. Upravljanje kuhinjskom napom2.
4. Uporaba kuhinjske nape s ventilacijskim kanalom3.
4. Okrugli ugljeni filtar4.
4. Uporaba ugljenog filtra5.
4.6.Postavljanje ugljenog filtra
4.7.Uporaba aluminijskog kasetnog filtra
5.ZAMJENA ŽARULJE 21
5 LED.1.
5.2.Halogena žarulja oblika svijeće
6.ODRŽAVANJE KUHINJSKE NAPE 21
7.UPOZORENJE
7.1.Učinkovita uporaba kuhinjske nape
8.AKO KUHINJSKA NAPA NE RADI 21
8.1.Servis i rezervni dijelovi

14
1.UPUTE ZA SIGURNU UPORABU
ŸOvaj proizvod namijenjen je kućnoj uporabi.
ŸVoltaža proizvoda iznosi 220-240 volti 50 Hz.
ŸKabel za napajanje Vašeg uređaja opremljen je utikačem s uzemljenjem te
se obavezno mora uključiti u utičnicu s uzemljenjem.
ŸSve električne instalacije mora obaviti kvalificirani električar.
ŸAko instalaciju obavinekvalificirana osoba,može uzrokovati smanjenu
učinkovitost uređaja, njegovo oštećenje ili nezgodu.
ŸKabel za napajanje ne smije se gnječiti ili lomiti. Također ne smije biti
preblizu ploči za kuhanje i sl. jer se može istopiti i uzrokovati požar.
ŸNe spajajte uređaj na električnu mrežu prije završetka instalacije.
ŸPobrinite se da glavna sklopka bude lako dostupna u slučaju potrebe za
brzim isključenjem uređaja.
ŸNe dirajte žarulje na uređaju koji je uključen neko vrijeme. Žarulje će se
zagrijati i mogu Vas opeći.
ŸKuhinjske nape namijenjene su kućnoj uporabi. Ako se rabe u druge svrhe,
na njima mogu nastati oštećenja koja neće biti pokrivena jamstvom.
ŸSlijedite upute i pravila ovlaštenih servisa o ispuhu zraka. (Ovo se
upozorenje ne odnosi na kuhinjske napebez ventilacijskog kanala.)
ŸHrana koja se može zapaliti ne smije se kuhati ispod uređaja.
ŸUključite uređaj nakon postavljanja lonaca, tavi, i dr. na ploču za kuhanje. U
protivnome bi prevelika toplina mogla deformirati dijelove Vašeg uređaja.
ŸNe ostavljajte vrućeulje na ploči za kuhanje. Tave s vrućimuljem mogu se
zapaliti.
ŸPrilikom kuhanja, tj. prženja u „dubokom“ ulju, vrućeulje može se zapaliti.
Pazite na zavjese i druge platnene materijale.
ŸZamijenite filtre u preporučenom roku. Filtri koji se ne zamijene na vrijeme
predstavljaju opasnost od požara zbog povećanja masnoće na njima.
ŸNemojte rabiti materijale neotporne na vatru umjesto filtra.
ŸDržite potencijalno opasan ambalažni materijal daleko od djece.
ŸNemojte rabiti uređaj bez filtra, nemojte skidati filtre dok je uređaj uključen.
ŸU slučaju požara, isključite napu i štednjak. (Izvucite utikače iz struje.)
Ÿ Ako ga redovito ne čistite, Vaš uređaj predstavljat će rizik od požara.
Ÿ Isključite ploču za kuhanje (plamenike) prije nego što sklonite lonce, tave, i
sl.
15
TRHR
1.UPUTE ZA SIGURNU UPORABU
ŸIsključite uređaj iz električne mreže prije bilo kakvog održavanja.
(Izvucite utikač kabela za napajanje iz utičnice.)
ŸZa kuhinjske nape s ventilacijskim kanalima, rabite cijevi promjera 150
ili 120 mm. Nastojte minimizirati udaljenost cijevi s najmanjim
mogućim brojem savijanja.
ŸPobrinite se da se Vaša djeca ne igraju s uređajem. Ne dopuštajte djeci da
upravljaju uređajem.
ŸAko je kabel za napajanje oštećen, zamijeniti ga treba proizvođač,
ovlašteni serviser ili kvalificirana osoba kako bi se uklonio rizik od
opasnosti.
ŸU slučaju pojave vatre, isključite napu i štednjak iz električne mreže
te pokrijte plamen. Nemojte vatru gasiti vodom.
ŸInstalirajte "MAX6A" osigurač za ventilator.
2. I GRAFIČKI PRIKAZ NAPE UVOD
Svjetlo
Filter
Upravljačkaploča
Cicev

16
3. POSTAVLJANJE KUHINJSKE NAPE
3.1. Položaj kuhinjske nape
3.2.Postavljanje montažnog nosača kuhinjske nape
2 zidna tipla (8mm) postavljaju se u rupe izbušene prema shemi za postavljanje
(A,B). Učvršćuju se na zid vijcima kroz dvije rupe kako je prikazano na slici 2.
Electric Stove
Min.: 650 mm. / Max.:750 mm.
Gas Stove
Min.: 750 mm. / Max.:800 mm.
0
80
50
130
220
180
250
MAX
90
80
70
40
30
10
20
50
0
60
Shema za postavljanje Slika 1

17
TRHR
3.3. Postavljanje montažnog nosača na zid
Postavite aluminijsku cijev na plastični ventilacijski kanal. Postavite drugi kraj cijevi
na ispušni otvor u kuhinji. Slika 2.
Zakretanje i savijanje aluminijske cijevi može smanjiti usisavanje zraka, stoga
izbjegavajte nepotrebno zakretanje i savijanje cijevi koliko god je moguće.
Slika 3-4.
Pažljivo postavite unutarnji i vanjski ventilacijski kanal na uređaj. Pričvrstite
unutarnji ventilacijski kanal za njegove nosače dvama vijcima.
3.4.Postavljanje vanjskog ventilacijskog kanala
Postavite vanjski ventilacijski kanal na kuhinjsku napu i pričvrstite ga na nju uz
pomoć dva vijka (Slika 5.).
3.5.Postavljanje montažnog nosača unutarnjeg ventilacijskog kanala
Dvije rupe za postavljanje izbuše se u zidu pomoću električne bušilice promjera 6
mm na prikladnoj visini i mjestu za fiksiranje nosača unutarnjeg ventilacijskog
kanala na zid. U te se rupe postavljaju zidni tiplovi promjera 6 mm i na njih se
pričvršćuju zidni nosači unutarnjeg ventilacijskog kanala. (Slika 6)
U zadnjem koraku postavljanja nape, unutarnji se ventilacijski kanal pričvršćuje na
montažne nosače unutarnjeg ventilacijskog kanala.
NAPOMENA: Unutarnji se ventilacijski kanal ne nalazi nužno u Vašem kompletu;
to ovisi o modelu uređaja.
Slika 2 Slika 3 Slika 4
Slika 5 Slika 6
18
4.FUNKCIJE KUHINJSKE NAPE
4.1.Upravljačka ploča
· Digitalno upravljanje: pritisnite simbole na gumbima. (Gumb za
uključivanje/isključivanje i vrijeme na istome su gumbu; pritisak od 1 sekunde
ugasit će uređaj, pritisak od 3 sekunde aktivirat će 15-minutni timer.
NAPOMENA: Kada je uređaj u uporabi duže vrijeme, aluminijski se filtar
uprlja te digitalni zaslon pokazuje „C“, odnosno znak da je potrebno očistiti
filtar. Za uklanjanje oznake „C“ sa zaslona držite pritisnut gumb za smanjenje
brzine 5 sekundi.
Gumb na pritisak: Pritisak na gumb aktivirat će različite funkcije. Kako biste ih
zaustavili, pritisnite gumb OFF (Isključi).
ŸŸUključuje i isključuje uređaj. (Ne i svjetlo.)
ŸSmanjuje brzinu rada motora.
ŸZaslon
ŸPovećava brzinu rada motora.
ŸUključuje i isključuje svjetlo.
ŸSIMBOLIF UNKCIJE
ŸUključuje i isključuje motor. (Izuzevši svjetlo.) Ako se pritišće 3
sekunde, motor će se ugasiti nakon 15 minuta.
ŸSmanjuje brzinu rada motora.
ŸZaslon
ŸPovećava brzinu rada motora.
ŸUključuje i isključuje svjetlo.
SIMBOLIF UNKCIJE

19
TRHR
4.2.Upravljanje kuhinjskom napom
Nape se rabe u kuhinjama s ventilacijskim kanalom i bez njega
4.3.Uporaba kuhinjske nape s ventilacijskim kanalom
Kod uporabe nape s ventilacijskim kanalom ventilator se mora se spojiti na
ispušni otvor kako bi ispuhivao zrak. Kako biste učinkoviti rabili svoju napu,
pobrinite se daduljina cijevi između nape i ispušnog otvora bude kratka. Vaš
uređaj može raditi s ventilacijskim kanalom i bez njega.
4.4.Okrugli ugljeni filtar
U kuhinjama bez ventilacijskog kanala, okrugli ugljenifiltra trebao bi vraćati čist
zrak u kuhinju. Okrugli filtar možete kupiti u servisu ili trgovini.
4.5.Uporaba ugljenog filtra
ŸNaši proizvodi omogućuju postavljanje ugljenog filtra.
ŸBez obzira na to upotrebljavate li ugljeni filtar ili ne, filtri za masnoću
trebaju se postaviti na uređaj. Ne rabite uređaj bez filtra za masnoću.
ŸUgljeni se filtri upotrebljavaju na sljedeći način:
ŸIsključite uređaj iz električne mreže prije zamjene ugljenog filtra.
ŸUgljeni filtar koji se rabi u kuhinjama bez ventilacijskog kanala potrebno
je zamijeniti svakih 3 – 5 mjeseci, ovisno o učestalosti uporabe.
ŸUgljene filtre nikad ne smijete prati.
4.6.Postavljanje ugljenog filtra
ŸUgljeni filtri rabe se u kuhinjama bez ventilacijaskog kanala.
ŸUgljeni filtri postavljaju se na obje strane ventilatora kako je prikazano na
slici 10. tako što se zakreću za 10 stupnjeva u smjeru kazaljke na
satu.Slika 7
ŸKada skidate ugljeni filtar, ponovite postupak odvrćući filtar u suprotnom
smjeru.
4.7.Uporaba aluminijskog kasetnog filtra
Aluminijski kasetni filtar zadržava prašinu i masnoću u zraku. Nape se nikad
ne bi smjele koristiti bez aluminijskog kasetnog filtra. Slika 8.
This manual suits for next models
1
Table of contents
Languages:
Other Simfer Ventilation Hood manuals


