Simico Roadview User manual

EAN: 8719326008493
WiFi dashcam Roadview 16GB

Thank you for buying our product. Before using the
product, we suggest you refer to this user manual in order
to get the best possible user experience.
1

1 × WiFi dash cam, 1 × cigarette lighter charger, 1 × USB
cable, 1 × user manual
1. What’s Included
2. Installation and Wiring
2.1. Turn off the engine.
2.2. Stick the dash cam to the upper side of the front
windshield.
2.3. Rotate the body of the dash cam to adjust the angle
of the lens.
2.4. Wiring
The input voltage of the dash cam is 5V.
Only use original cables in the box.
2

2.4.1. If the dash cam comes with a cigarette lighter
charger, make the wiring as follows.
Cigarette
lighter socket
Dash cam
Cigarette
lighter charger
3

Notes:
The input voltage of the cigarette lighter charger is
12/24V, while the output voltage is 5V.
Do not use a cigarette lighter multi-socket splitter
(adapter) with the cigarette lighter charger in the box.
4

2.5. Removing and Inserting the Body of the Dash Cam
2.5.1. To remove the body of the dash cam from its
bracket, press the LOCK button and pull the body of the
dash cam out of the mounting bracket.
2.5.2. To insert the body of dash cam into its bracket,
push the body of the dash cam into the mounting bracket.
5

APP(Android ) APP(IOS )
Note:
The operating system requirement of the HDcam APP:
iOS: 8.0 or above
Android: 4.4 or above
3. How to Use
3.1. APP Download and Installation
Scan the QR codes below and then download the HDcam
APP and install it in your smartphone or tablet.
You can also search for the HDcam APP in the Google
Play Store or Apple App Store and then download and
install it.
6

3.2. Inserting Micro SD Card
Make sure that the dash cam is off and insert the Micro
SD card into the card slot.
Note:
Make sure that you use a genuine Micro SD card and it is
class 10 or above and it is with 8-32GB memory.
Don't insert the Micro SD card or take it out when the
dash cam is on.
3.3. WiFi Connection
3.3.1. Turn on the dash cam. Take you smartphone or
tablet near to the dash cam, within 10 meters for good
WiFi connection.
3.3.2. Go to your smartphone's or tablet's Settings and
then select Wi-Fi. Turn on Wi-Fi.
3.3.3. The dash cam's default SSID begins with HDcam
(e.g. HDcam_******). Find it from the network list and
select it. Enter the default password "12345" and then
connect. Please make sure that it is connected successfully.
7

Notes:
For Android smartphones, 4G/3G data function is not
available after connecting to the dash cam's WiFi
hotspot. It is not about the quality of the dash cam. For
Android smartphones, 4G/3G data function is not
available after connecting to any WiFi hotspot.
For iPhones, 4G/3G data function is available after
connecting to the dash cam's WiFi hotspot. The WiFi icon
[ ] won't show in the top right corner of the iPhone even if
it is connected to the dash cam's WiFi successfully.
3.4. App Instruction
3.4.1. After the WiFi connection, open the App and go to
Settings. Tap the menu "Sync Time" and then check
whether the time is automatically synchronized with the
smartphone or tablet. If not, tap the button "Sync Time" to do
time synchronization.
Note:
If the dash cam has been off for 7 or more days and after
the dash cam is turned on again, please connect the
dash cam's WiFi hotspot with your smartphone or tablet
and then open the App to do time synchronization.
3.4.2. Tap "Format SD Card" to format the Mircro SD card.
8

3.4.3. Camera Preview
Tap "Camera Preview" to go to the UI below. When the
dash cam is recording, the red dot blinks and the blue
LED in the dash cam blinks.
Tap the [ ] icon to stop recording and tap it again to
restart recording.
Tap the [ ] icon to take a picture.
2017/01/01 18:00:20
9
Camera Preview
<

3.4.4. Settings
Tap "Settings" to go to the UI below.
New SSID
1.07
Link Setting: You can change
the WiFi SSID and password
in Link Setting. Tap the button
"Setup" to confirm the change.
The password can be a-z
letters, digits or combination,
but it can only contain 5
characters.
Please remember the new
SSID and password.
10
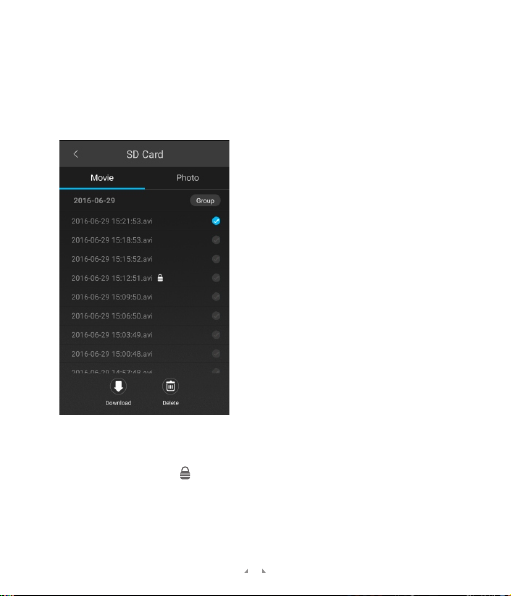
3.4.5. SD Card
Tap "SD Card" to go to the UI below. You can see the
videos and photos stored in the Micro SD card. Select the
videos or photos to download or delete.
If you tap a video to play it, the dash cam will stop
recording. It will restart recording after you close the App.
The vidoe with a [ ] icon is a protected video. When the
G-sensor detects an impact or collison, it will save a
protected video.
The video duration is from 6 seconds before the collision
to 6 seconds after the collision.
11

3.4.6. Mobile
Tap "Mobile" to go to the UI below. The video clips and
photos here are downloaded from the Micro SD card.
3.5. Playing Videos
Download the videos from the Micro SD card to your
smartphone or tablet. Go to Internal Storage\HDcam\record
and you will see the videos. You can play them in the
original resolution with a good video player in your
smartphone or tablet.
12

You can also copy the videos in the Micro SD card to a PC
and play them in the original resolution with a good video
player in the PC.
13

5. Special Function
5.1. Parking Mode
Open Parking Mode in the Settings of the App. If the dash
cam is turned off and it is connected to a permanent
power source and the G-sensor detects an impact or
collison,the dash cam will turn on automatically and keep
recording for 30 seconds, and then turn off automatically.
Note:
To realize the function of parking mode, a hardwiring kit
is required. The hardwiring kit powers the dash cam
when the engine is off by hardwiring it to the vehicle's
battery in the fuse box. The function of low voltage
detection and then power cut-off can prevent the
vehicle's battery from being drained.
14

5.2. Storage Partition
The storage of the Mircro SD card will be partitioned.
Normal videos stored in the "record" folder in the Micro
SD card occupy 70% of the storage at most; protected
videos stored in the "protect" folder occupy 25% of the
storage at most; photos stored in the "picture" folder
occupy 5% of the storage at most.
If the dash cam starts warning with the sound of ticking, it
means that the "protect" folder is full of protected
videos.Please delete some or all of the protected videos
after checking whether they are important or not.
6. Troubleshooting
6.1. Can't connect to the dash cam's WiFi hotspot
(1) Close the App thoroughly. Reopen the App and try the
WiFi connection again.
(2) Insert a needle into the reset hole on the dash cam.
Reset the dash cam and then try the WiFi connection
again.
(3) Try the WiFi connection at another place. (Because
there might be a WiFi interference source nearby).
15

6.2. Can't record videos
(1) After inserting the Micro SD card for the first time,
please format it in the App.
(2) Please check whether the Micro SD card meets the
requirements and whether it is damaged.
16

www.simico.nl
Table of contents


