70mai Pro Plus A500 User manual

70mai Dash Cam Pro Plus User Manual

Contents
English …………………………………………………………………………………………1
Русский …………………………………………………………………………………………10
Español …………………………………………………………………………………………17
Português ………………………………………………………………………………………24
日本語……………………………………………………………………………………………31
한국어……………………………………………………………………………………………38
繁體中文…………………………………………………………………………………………45

1
Product Overview
Note: Illustrations of the product, accessories, and user interface in the user manual are for reference
purposes only. The actual product and functions may vary due to product enhancements.
Please read this manual carefully before using the product and keep it in a safe place.
Function Buttons
Power Button
Display
Power Port
Memory Card Slot
Speaker
Camera
Mounting Slot
Microphone
Indicator

2
Installation
1. Installing the electrostatic sticker.
Clean your windshield and put the electrostatic sticker on the
recommended area as shown in the figure. Make sure you remove
air bubbles between the sticker and the glass.
2. Installing the memory card.
Insert the memory card into the card slot with its contacts facing
up until you hear a click. The memory card is well-installed.
3. Installing the mount.
Attach the mount to the slot and slide up, as shown in the figure.
You will hear a snap when it is in place. Make sure the mount is
securely installed to the dash cam.
Note: Make sure to stick the electrostatic sticker on a flat and smooth part of the windshield, press it firmly,
and avoid sticking it on the edge of the windshield's film to prevent it from falling down.
'&,1 0LFUR6'

3
4. Mounting the dash cam.
Peel off the protective film from the adhesive sticker on the base of the
mount, and paste the dash cam onto the electrostatic sticker in the
dotted area.
Note:
Use the included crowbar to hide the power cord underneath the vehicle's headliner and rubber seal
along the A-pillar.
Depending on the vehicle, the cigarette lighter socket may be located in a different position. The above
figure is for reference only.
5. Connecting the power supply.
As shown in the figure, run the power cord along the top of the
windshield, down the A-pillar, and around the glove compartment,
so that the power connector is near the cigarette lighter. Connect the
power cord to the car charger, then plug the charger into the cigarette
lighter socket.
6. Adjusting the dash cam angle.
Turn on the dash cam and adjust the camera angle based on the preview
screen to ensure that the camera is facing the front of the vehicle.

4
Download 70mai App
This product may be used in conjunction with the 70mai App. Please search for "70mai" in the
App Store or scan the following QR code to download and install the App.
Note: Android 4.4 & iOS 9.0 or above is required to connect to the dash cam's Wi-Fi hotspot with a mobile
phone.
Online Guide
Scan the below QR code to access the online guide. The guide provides detailed product
information including descriptions of functions. Please carefully read this guide before use in
order to avoid damage due to incorrect use.

5
Memory Card Instructions
A memory card (sold separately) must be installed in the dash cam before use.
The dash cam supports standard MicroSD cards. Please use memory cards with the capacity
of 16 GB ~ 128 GB and a speed rating of Class 10 or higher.
The default file partition format of the memory card may be inconsistent with the format
supported by the dash cam. When inserting the memory card for the first time, please format
it in the dash came before use. Formatting the memory card will delete all files on the card.
Please back up important data to another device beforehand.
The memory card may become damaged or deteriorate after repeated cycles of overwriting,
and this may affect its ability to save video and image files. If this occurs, immediately replace
it with a new memory card.
Please use a high-quality memory card purchased from a reputable vendor. Inferior memory
cards may have issues such as actual reading/writing speeds that do not match the stated
speeds, and an actual storage capacity that does not match the stated storage capacity.
We shall not be held liable for lost or damaged videos caused by the use of a low-quality
memory card.
In order to avoid reading and writing speeds decreasing after prolonged use, it is
recommended to format the memory card in the dash cam every two weeks.
Do not insert or remove a memory card while the dash cam is turned on.

6
Precautions
Before using this dash cam, please read all the precautions and the online guide to ensure correct and safe
use.
●This dash cam is intended to assist drivers with the purpose of recording the environment outside the
vehicle. The dash cam does not guarantee the user's driving safety. We shall not be held liable for any
accident, damage, or loss of information caused by operating the dash cam while driving.
●Due to differences in vehicle conditions, driving style, driving environment, etc., some functions may
not work properly. A power failure, usage in environments outside the normal operating temperature or
humidity range, a collision, or a damaged memory card may cause the dash cam to function abnormally.
There is no guarantee that this dash cam will function normally under all circumstances. Videos recorded
by this dash cam are for reference only.
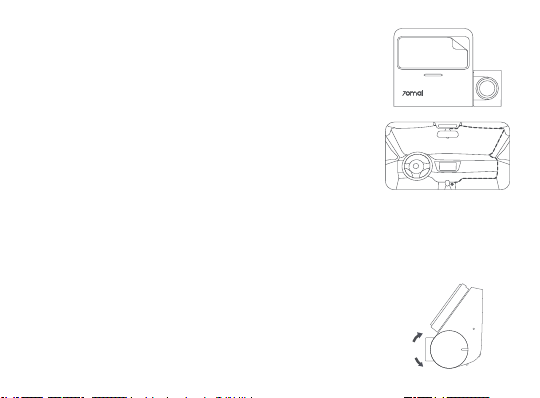
●Please install this dash cam correctly, and do not block the driver's line of sight, nor block the vehicle's
airbag, in order to avoid product failure or personal injury.
●Please use the included car charger, power cord, and other accessories in order to avoid product failure
due to non-conformance. We shall not be held liable for any loss or damage caused by the use of a non-
genuine car charger or power cord.
●If the battery becomes deformed, swollen, or starts leaking during use or storage, stop using the dash
cam immediately in order to avoid safety issues, and contact after-sales service.
●Please keep this dash cam away from any strong magnetic fields, as they may cause damage to the dash
cam.
●Do not use this dash cam in environments with temperatures over 60°C or below -10°C.
●Please only use this dash cam within the scope permitted by law.

7
Specifications
Product: 70mai Dash Cam Pro Plus
Model: A500
Input: 5V 2A
Wireless Connectivity: Wi-Fi IEEE 802.11 b/g/n
2.4 GHz
Power Supply: Car cigarette lighter socket
Battery Type: Lithium polymer battery
Battery Capacity: 500 mAh
Packing list
1. 70mai Dash Cam Pro Plus ×1
2. Mount ×1
3. Power cord×1
4. Dual USB Car Charger×1
5. Wiring crowbar×1
6. Electrostatic Sticker × 2
7. Adhesive Sticker × 2 (with 1 pre-applied to
the mount)
8 . User manual×1

8
Safety information
Caution
Battery abuse or mishandling can cause overheat, liquid leakage, or an explosion. To avoid possible injury,
do the following:
●Do not open, disassemble, or service any battery.
●Do not attempt to replace the internal rechargeable lithium batteries.
●Do not crush or puncture the battery.
●Do not short-circuit the battery, or expose it to water or other liquids.
●Keep the battery away from children.
●Keep the battery away from fire.
●Do not leave the battery in an extremely high-temperature environment or an extremely low air pressure
environment.
●Stop using the battery if it is damaged, or if you notice any discharge or the buildup of foreign materials
on the battery leads. We recommend that the batteries be charged about once every three months to
prevent overcharge.
●Do not put the battery in trash that is disposed of in landfills. When disposing of the battery, comply with
local laws or regulations.

9
FCC
Changes or modifications not expressly approved by the party responsible for compliance could void the
user's authority to operate the equipment.
This equipment has been tested and found to comply with the limits for a Class B digital device, pursuant
to Part 15 of the FCC Rules. These limits are designed to provide reasonable protection against harmful
interference in a residential installation. This equipment generates, uses and can radiate radio frequency
energy and, if not installed and used in accordance with the instructions, may cause harmful interference
to radio communications. However, there is no guarantee that interference will not occur in a particular
installation.
If this equipment does cause harmful interference to radio or television reception, which can be determined
by turning the equipment off and on, the user is encouraged to try to correct the interference by one or
more of the following measures:
- Reorient or relocate the receiving antenna.
- Increase the separation between the equipment and receiver.
- Connect the equipment into an outlet on a circuit different from that to which the receiver is connected.
- Consult the dealer or an experienced radio/TV technician for help.
This device complies with Part 15 of the FCC Rules. Operation is subject to the following two conditions: (1)
this device may not cause harmful interference, and (2) this device must accept any interference received,
including interference that may cause undesired operation.
This equipment complies with FCC radiation exposure limits set forth for an uncontrolled environment.
This equipment should be installed and operated with a minimum distance of 20 cm between the radiator
& your body. This transmitter must not be co-located or operating in conjunction with any other antenna or
transmitter.

10
WEEE Information
CE Information
All products bearing this symbol are waste electrical and electronic equipment
(WEEE as in directive 2012/19/EU) which should not be mixed with unsorted
household waste. Instead, you should protect human health and the environment
by handing over your waste equipment to a designated collection point for
the recycling of waste electrical and electronic equipment, appointed by the
government or local authorities. Correct disposal and recycling will help prevent
potential negative consequences to the environment and human health. Please
contact the installer or local authorities for more information about the location
as well as terms and conditions of such collection points.
The manufacturer hereby, declares that this equipment is in compliance with
the applicable Directives and European Norms, and amendments. The full text
of the EU declaration of conformity is available at the following internet address:
https://help.70mai.asia/1193.html
Service: [email protected]
For further information, please go to www.70mai.com
Manufacturer: 70mai Co., Ltd.
Address: Room2220, building2, No.588, Zixingroad, MinHangDistrict, Shanghai, China

11
Обзор устройства
Примечание: Изображения продукта, аксессуаров и пользовательского интерфейса в руководстве
пользователя приведены только для справки. Фактический продукт и функции могут отличаться в
результате внесения изменений в продукт.
Внимательно прочитайте данное руководство перед использованием продукта и храните
его в надежном месте.
1
2
3
4
5
6
8
7
9
10
Функциональные кнопки
Кнопка питания
Монитор
Порт электропитания
Слот для карты памяти
Динамик
Камера
Монтажный слот
Микрофон
Индикатор
12
3
4
5
6
8
7
9
10

12
Установка
1. Наклейте электростатическую наклейку.
Очистите лобовое стекло и прикрепите электростатическую
наклейку на рекомендуемой области, как показано на
рисунке. Удалите все пузырьки воздуха между наклейкой и
стеклом.
2. Установка карты памяти.
Вставьте карту памяти в слот для карт до щелчка так,
чтобы ее контакты были направлены вверх. Карта памяти
установлена надлежащим образом.
3. Установка крепления.
Установите крепление в слот и сдвиньте его вверх, как
показано на рисунке. При правильной фиксации раздастся
щелчок. Убедитесь, что крепление надежно установлено на
передней панели.
Примечание: Убедитесь в креплении электростатической наклейки на плоском и гладком участке
лобового стекла, плотно прижмите и избегайте крепления на краю пленки лобового стекла для
предупреждения отпадания устройства.
'&,1 0LFUR6'

13
4. Установка видеорегистратора.
Снимите защитную пленку с наклейки на основании крепления и
приклейте видеорегистратор на электростатическую наклейку в
месте, обозначенном точками.
Примечание:
●Используйте комплектное приспособление, чтобы скрыть шнур питания под обшивкой
автомобиля и резиновым уплотнением вдоль передней стойки.
●В зависимости от автомобиля гнездо прикуривателя может быть расположено в разных местах.
Рисунок приведен только для справки.
5. Подключите источник питания.
Как показано на рисунке, проложите кабель питания вдоль
верхней части лобового стекла, вниз по передней стойке и
вокруг бардачка так, чтобы разъем питания находился рядом с
прикуривателем. Подсоедините кабель питания к автомобильному
зарядному устройству, затем подключите зарядное устройство к
гнезду прикуривателя.
6. Настройте угол видеорегистратора.
Включите видеорегистратор и настройте угол камеры с помощью
экрана предварительного просмотра, чтобы камера была
направлена вперед.

14
Загрузка приложения 70mai
Данное устройство может использоваться с приложением 70mai. Выполните поиск
«70mai» в App Store или отсканируйте следующий QR-код, чтобы загрузить и установить
приложение.
Примечание: Для подключения видеорегистратора к точке доступа Wi-Fi с помощью мобильного
телефона требуется Android 4.4 и iOS 9.0 или выше.
Онлайн-руководство
Отсканируйте приведенный ниже QR-код для доступа к онлайн-руководству. Руководство
содержит подробную информацию о продукте, включая описание его функций. Во
избежание повреждения часов вследствие некорректного использования внимательно
изучите руководство перед их эксплуатацией.

15
Указания по работе с картой памяти
●Карту памяти (в комплект не входит) устанавливают в видеорегистратор
непосредственно перед использованием.
●Видеорегистратор поддерживает стандартные карты MicroSD. Пожалуйста, используйте
карты памяти емкостью 16 ГБ ~ 128 ГБ и скоростью, соответствующей классу 10 или
выше.
●Файловый формат раздела по умолчанию на карте памяти может быть несовместим
с форматом, поддерживаемым видеорегистратором. При установке карты памяти
в первый раз, отформатируйте ее в видеорегистраторе перед использованием.
Форматирование карты памяти уничтожит все файлы на карте памяти. Заранее
сделайте резервную копию важных данных на другом устройстве.
●Многократные циклы перезаписи могут способствовать повреждению карты памяти,
что может повлиять на способность хранить файлы видео и изображений. В этом случае
немедленно установите новую карту памяти.
●Используйте карту памяти высокого качества, выпущенную авторитетным
производителем. У карт памяти плохого качества могут возникнуть неполадки, такие
как фактическая скорость чтения/записи, которая не соответствует заявленной, и
фактическая емкость хранилища, которая не соответствует заявленной. Наша компания
не несет ответственности за утерянные или поврежденные видеоматериалы из-за
использования низкокачественной карты памяти.
●Чтобы избежать снижения скорости чтения и записи после длительного использования,
рекомендуется форматировать карту памяти видеорегистратора каждые две недели.
●Не вставляйте и не удаляйте карту памяти при включенном видеорегистраторе.

16
Меры предосторожности
Перед использованием видеорегистратора ознакомьтесь со всеми мерами предосторожности и
онлайн-руководствами для обеспечения правильного и безопасного использования.
●Этот видеорегистратор предназначен для того, чтобы водитель мог записывать события вне
автомобиля. Наличие видеорегистратора не гарантирует безопасного вождения. Мы не несем
ответственности за несчастные случаи, повреждения или потерю информации, вызванные
использованием видеорегистратора во время вождения.
●Из-за различий в конфигурации автомобиля, стиле, условиях вождения и т.д. некоторые
функции могут работать неправильно. Сбой питания, использование в условиях, выходящих за
пределы нормальной рабочей температуры или диапазона влажности, удары или повреждение
карты памяти могут привести к неправильной работе видеорегистратора. Нет гарантии, что
видеорегистратор будет нормально функционировать при любых обстоятельствах. Видеоролики,
записанные этим видеорегистратором, предназначены только для ознакомления.
●Установите видеорегистратор правильно и не блокируйте поле зрения водителя или подушку
безопасности автомобиля, чтобы избежать травм и сбоев в работе продукта.
●Используйте стандартное автомобильное зарядное устройство, кабель питания и другие
комплектные приспособления во избежание сбоев, связанных с несоответствием деталей.
Компания не несет ответственности за любые убытки или повреждения, связанные с
использованием нестандартных автомобильных зарядных устройств и кабелей питания.
●Если батарея деформируется, разбухает или начинает протекать во время использования или
хранения, немедленно прекратите использование видеорегистратора во избежание проблем с
безопасностью и обратитесь в службу послепродажного обслуживания.
●Держите видеорегистратор подальше от сильных магнитных полей, поскольку они могут
привести к повреждению видеорегистратора.
●Не используйте видеорегистратор при температуре выше 60℃ или ниже -10℃.
●Используйте этот видеорегистратор только для целей, разрешенных законом.

17
Характеристики
Изделие: 70mai Dash Cam Pro Plus
Модель: A500
Вход: 5V 2A
Беспроводная связь: Wi-Fi IEEE 802.11 b/g/n
2,4 ГГц
Источник питания: Разъем автомобильного
прикуривателя
Тип аккумулятора: Литий-полимерная
батарея
Емкость аккумулятора: 500 mAh
Комплектация
1. 70mai Dash Cam Pro Plus, 1 шт.
2. Крепление, 1 шт.
3. Кабель питания, 1 шт.
4. Двойное автомобильное USB-зарядное
устройство, 1 шт.
5. Ломик, 1 шт.
6. Электростатическая наклейка, 2 шт.
7. Наклейка, 2 шт. (1 предварительно
нанесена на крепление)
8. Руководство пользователя, 1 шт.
Справочная служба: [email protected]om
Для получения дополнительной информации перейдите на сайт www.70mai.com
Производитель: 70mai Co., Ltd.
Адрес: Room2220, building2, No.588, Zixingroad, MinHangDistrict, Shanghai, China

18
Descripción general del producto
Nota: Las ilustraciones del producto, los accesorios y la interfaz del usuario en el manual del usuario
solo sirven como referencia. El producto actual y sus funciones pueden variar debido a mejoras de los
productos.
Por favor, lea este manual con atención antes de utilizar el producto y consérvelo en un lugar
seguro.
1
2
3
4
5
6
8
7
9
10
Botones de función
Botón de encendido
Pantalla
Puerto de alimentación
Ranura de la tarjeta de memoria
Altavoz
Cámara
Ranura de montaje
Micrófono
Indicador
12
3
4
5
6
8
7
9
10
This manual suits for next models
1
Table of contents
Languages:
Other 70mai Dashcam manuals

70mai
70mai Cam 1S User manual

70mai
70mai A800S User manual

70mai
70mai Midrive D06 User manual

70mai
70mai A800S-1 User manual

70mai
70mai M200 User manual

70mai
70mai A810 Series User manual

70mai
70mai M500 User manual

70mai
70mai Midrive UP04 User manual

70mai
70mai Midrive D05 User manual

70mai
70mai X200 User manual