Simkar Sports Pro 5 User manual

SLFL Instructions –LED Sports Light
Simkar Lighting 700 Ramona Ave, Philadelphia, PA 215-831-7700
www.simkar.com 70-62938
1
SAFETY INSTRUCTIONS
Read and understand this entire manual before attempting to assemble, operate, or install the LED Luminaire. If you have
any questions regarding the product, please call Simkar Customer Service at (800) 523-3602
1. All electrical work must conform to the National Electric Code (NEC) and all applicable local codes and
ordinances.
2. Only qualified personnel shall install and maintain the luminaires. Simkar recommends that a licensed electrician
install and maintain the luminaire. Verify the safety of existing power distribution system before beginning
installation. Failure to follow Operating instructions may lead to death, severe injury, or property damage.
SLFL Instructions –LED Sports Light
Simkar Lighting 700 Ramona Ave, Philadelphia, PA 215-831-7700
www.simkar.com 70-62938
2
Re-assemble Glare Shield
Important
Please read all instructions before installing light fixture. If
you have any questions. Contact your local
representative. Retain this instruction sheet for future
reference.
Disconnect power before performing installation or
maintenance. Failure to do so may cause injury or death
due to electrical shock.
To be installed ONLY by a qualified electrician.
Do not make or alter any open holes in the luminaire. Do
not modify the luminaire!
Fixture is not intended to be connected to a two wire
ungrounded supply. Fixture must be grounded!
Always compare driver voltage with voltage available at
jobsite.
Fixture must be grounded and wired with proper polarity
to insure reliable staring and avoid the possibility of
electric shock. Should your building service not have a
black, white and ground wire, consult a qualified
electrician.
Handle fixture with care to avoid possible cuts or
abrasions from exposed metal edges. We suggest gloves
be worn when installing this fixture.
All fixtures must be installed in accordance with local and
National Electric Code. Manufacture assumes no
responsibility for improper or application of this lighting
fixture.
Re-assemble Mounting Bracket
Note
Upon receipt of the fixture, thoroughly inspect for any freight
damages. This should be brought to the attention of the
delivery carrier. Examine contents of carton(s) and fixture.
Be sure you have received the correct merchandise.
Before Installation
1. Remove the glare shield, re-assemble the shield to
face forward. Shield is shipped in reverse to protect
from damage. Failure to reverse the shield will void
your warranty. Remove caution label on top of the
glare shield when this complete.
2. Assemble the support bracket to the main housing
fixture. The support bracket is shipped detached for
packaging.
Installation
Make certain that the supplied voltage matches the pre-
wired voltage, which is being installed.
U1 = 120 Volt –270 Volt
U3 = 347 Volt –480 Volt

SLFL Instructions –LED Sports Light
Simkar Lighting 700 Ramona Ave, Philadelphia, PA 215-831-7700
www.simkar.com 70-62938
3
POWER SUPPLY SPECIFICATIONS
Simkar LED light fixtures are not traditional incandescent lights, they are high-tech, new solid-state devices. To protect
your valuable investment, the electrical power shall be clean and have stable voltage and current, undistorted waveforms.
Power Quality
High frequency voltage shall be below -40dB or .01V between 3 KHz and 100 KHz.
High frequency current shall be below -50dB or .019A between 3 KHz and 100 KHz.
The lighting circuits shall have surge protection. Simkar highly recommends installing a waveform correction technology
device. Environmental Potentials EP-2000 or EP-2500 or approved equal on each panel or supply feed powering Simkar
luminaires.
If you require assistance in checking your power system or designing or implementing solutions, contact Simkar
engineering at (800) 523-3602.
Failure to ensure power quality requirements shall void warranty.

SLFL Instructions –LED Sports Light
Simkar Lighting 700 Ramona Ave, Philadelphia, PA 215-831-7700
www.simkar.com 70-62938
4
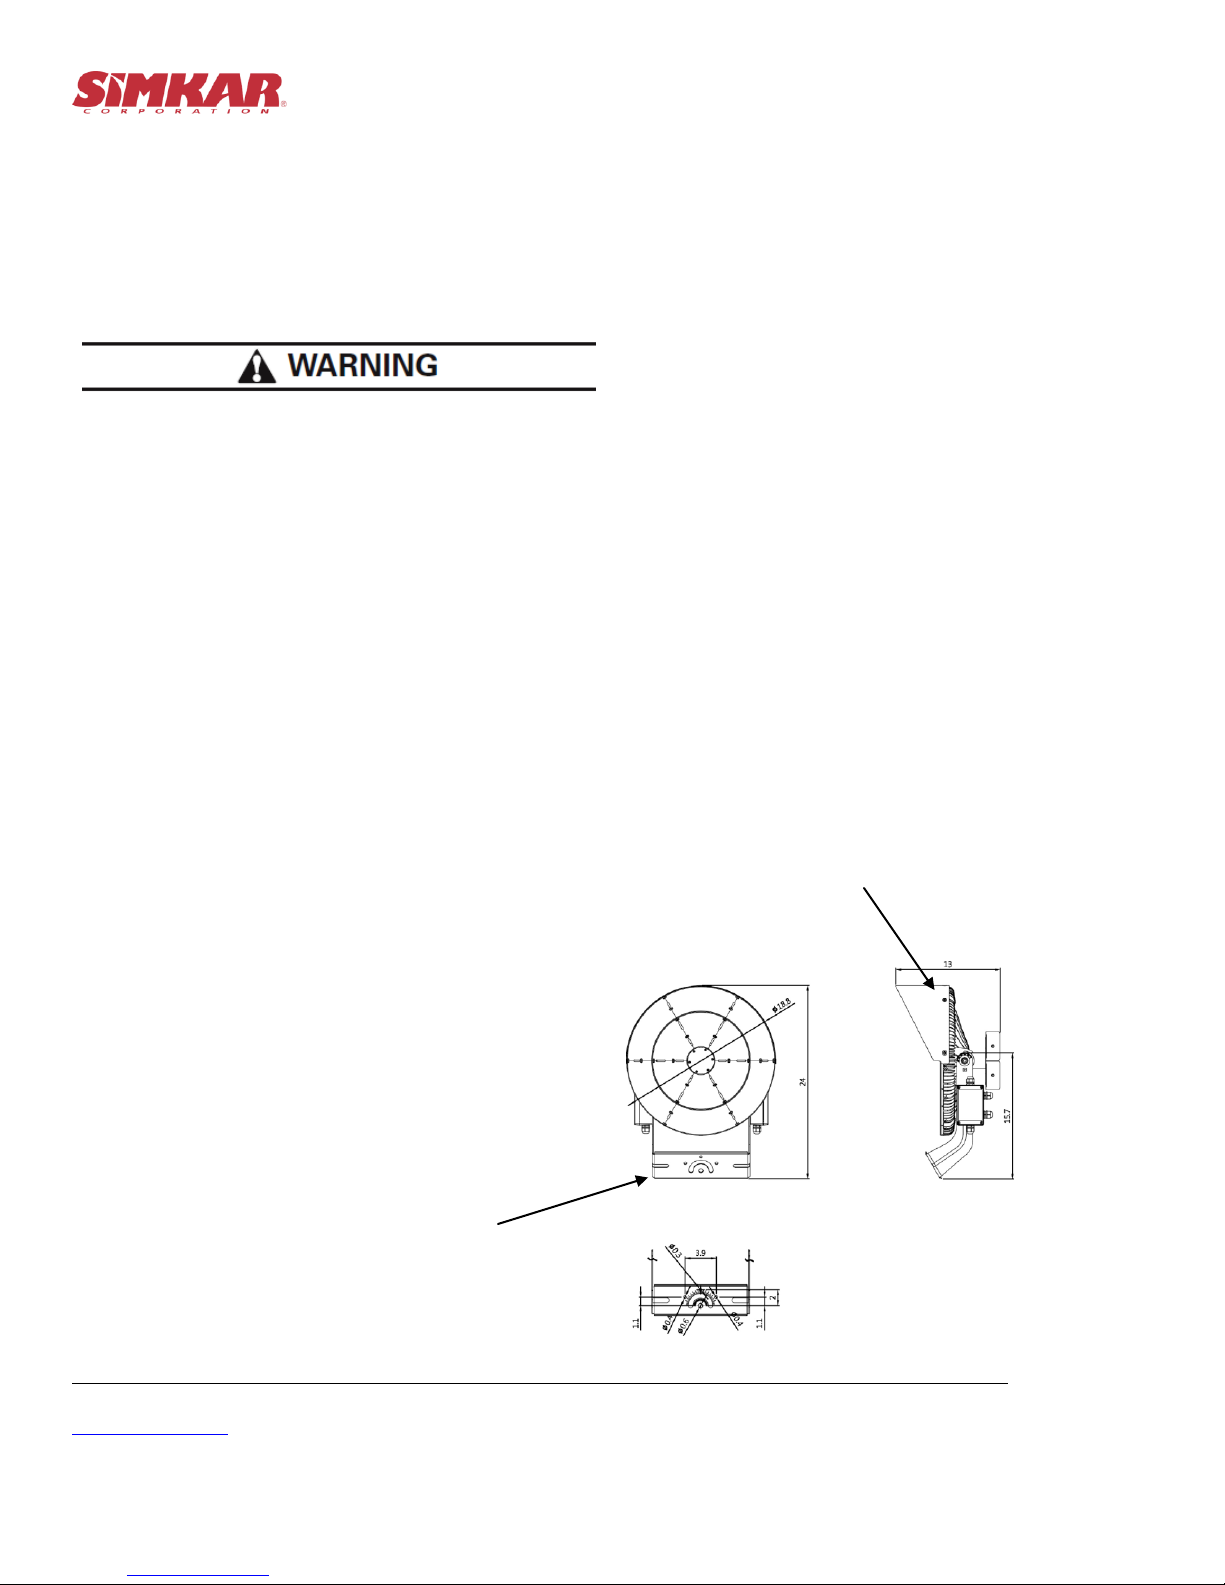
Drill Pattern for Cross Arm if different than Simkar mounting pattern
Fixture Mounting:
1. Review the hole pattern on the
large yoke and drill the mounting
arm or supporting bracket. Caution:
Make certain that the mounting
bracket can support the weight of
the fixture
2. Install the large yoke as shown
using the following supplied
hardware:
(2) M14 –30MM Bolt
(2) M14 Nut
(2) Lock Washers
(4) Flat Washers
Always install with two bolts!

SLFL Instructions –LED Sports Light
Simkar Lighting 700 Ramona Ave, Philadelphia, PA 215-831-7700
www.simkar.com 70-62938
5
Glare Shield
Note: Always install facing forward.
Aiming:
1. Loosen, do not remove, the large yoke bolts that
attach the yoke to the cross arm, adjust the fixture
left or right to the desired design plan. Use the
degree dial on the bottom of the yoke mounting
plate. Note: The degree markings on the aiming
label should only be used as an estimate.
2. After aiming your fixture secure the large yoke
bolts to the cross arm.
3. To adjust your vertical plane to the field loosen
the left and right socket bolt as shown. Aim the
fixture with the desired tilt towards the field use
the degree dial located on the side of the fixture
as a guide. Tighten the sockets after the desired
design plan is determined.
Adjust the angle, and tighten screws
SLFL Instructions –LED Sports Light
Simkar Lighting 700 Ramona Ave, Philadelphia, PA 215-831-7700
www.simkar.com 70-62938
6
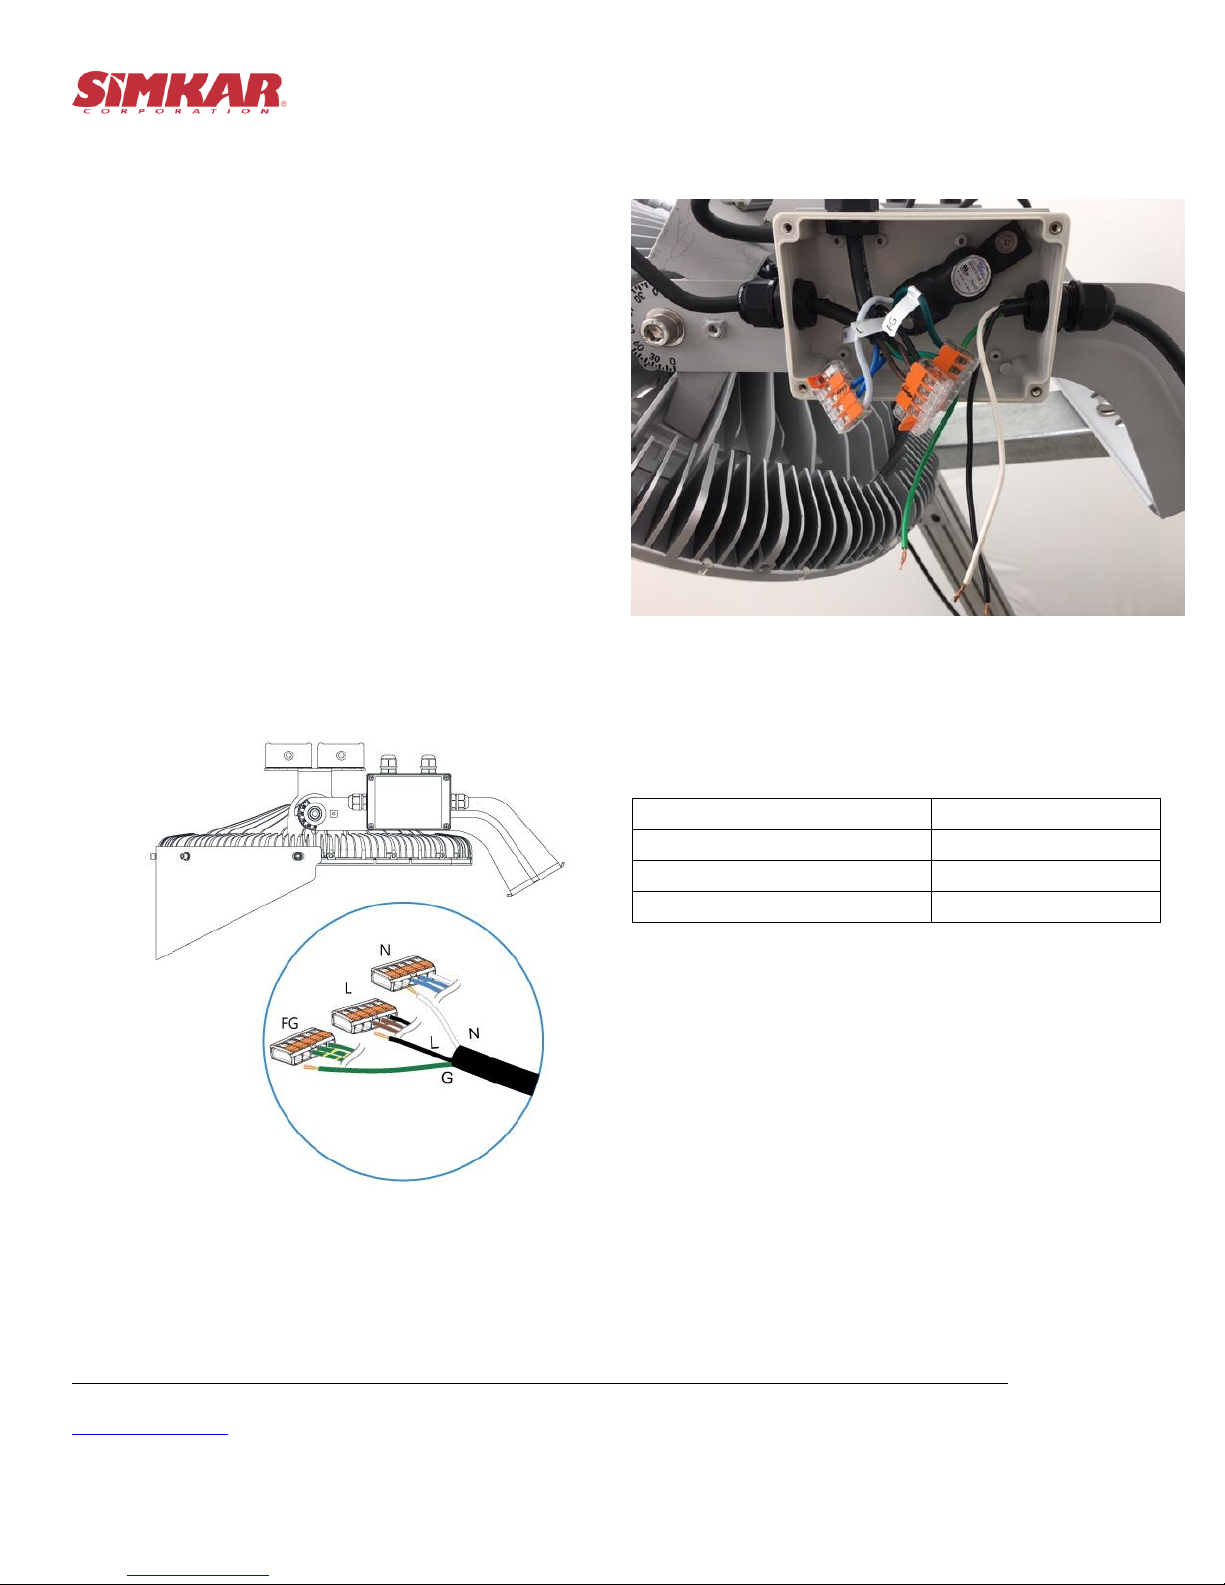
Power wiring
Incoming power cable shall be a minimum of 18 AWG
annealed stranded bare copper per ASTM B-174.Cable
must be water resistant, UV rated/sunlight resistant, UL
listed and CSA certified for indoor and outdoor use.
1. Remove cover from line voltage input junction box at
the side of the fixture.
2. Route incoming power cable through cord grip in the
input junction box, provided.
3. Strip outer jacket of incoming power cable as
required. Connect the incoming power wires to the
fixture power wires on the side of the input junction
box.
4. Close the input junction box, note: 10Kv surge
protection is located inside the input junction box.
Fixture power and cable
Designation
Black
Line
White
Neutral
Green
Ground

SLFL Instructions –LED Sports Light
Simkar Lighting 700 Ramona Ave, Philadelphia, PA 215-831-7700
www.simkar.com 70-62938
7
Troubleshooting:
In the event that your fixture fails to operate properly first check that:
Symptom
Possible Cause
Corrective Action
No light output
Power is off
Check if circuit power is on
Bad wire connection
Check input wiring
connections
Line voltage (at fixture)
Check line voltage
Fixture is grounded
Check unit is grounded
correctly
Fuse blows or circuit breaker
trips
Crossed wires or a supply wire is
grounding out
Check wiring connections.
Improperly sized fuse or breaker
Refer to minimum Fuse
Ratings
If replacing existing HID fixtures, disposal are to be followed.
Notice: If existing lamp is marked it contains mercury. Follow disposal laws. See www.lamprecycle.org

SLFL Instructions –LED Sports Light
Simkar Lighting 700 Ramona Ave, Philadelphia, PA 215-831-7700
www.simkar.com 70-62938
8
Care and Maintenance
All luminaires are prepared with a powder-coated finish. The finish on exterior luminaires may weather over time,
depending on the environmental conditions at the installation site. Proper care of the luminaires will maintain their
performance and appearance. Follow a regular maintenance schedule to retain optimal light output and thermal
performance. Remove any dirt, leaves and other foreign debris from luminaires housing. Wipe the optical lenses with a
clean, dry, cotton cloth to remove dust and other contaminants. A non-abrasive polycarbonate cleanser may be used
periodically.
This manual suits for next models
1
Popular Light Fixture manuals by other brands

Chauvet Professional
Chauvet Professional ROGUEOUTCAST2BEAM Quick reference guide

Lightolier
Lightolier 16FR2X6 specification

Chauvet Professional
Chauvet Professional MAVERICK FORCE S PROFILE user manual

Lightolier
Lightolier Calculite DC specification

Cooper Lighting
Cooper Lighting IRiS M32T Specification sheet

BlissLights
BlissLights BlissEmber user guide

Lightolier
Lightolier Coffaire II CFH1GPF specification

Lightolier
Lightolier Lytecaster 604SQMR specification

Signature Hardware
Signature Hardware LODELLE 484485 Install

American DJ
American DJ Profile Panel RGB User instructions

Elumen8
Elumen8 Stage Par 90 Cold White user manual

Larson Electronics
Larson Electronics HAL-16BS-1X185LED-CPR-100 Instruction guide


