Simple Motors Kit 17 User manual

Assembly instructions for kit #17 1
All rights reserved. 2014 Simple Motors, LLC ♦www.simplemotor.com ♦
Assembly Instructions: Kit #17
Conventional Brushed Motor
1. Leave about 3" (7-8 cm) and wind the wire 10-20 times around the AA battery. You do not
have to be neat as some randomness does not affect the motor performance and may help
the coil to hold its shape better. Leave 3" (7-8 cm) at the other end of the coil.

Assembly instructions for kit #17
All rights reserved. 2014 Simple Motors, LLC ♦www.simplemotor.com ♦ 2
2. Carefully remove the battery and wrap the ends around the coil 2-3 times to hold the coil
together with both ends extending perpendicular to the coil as shown below. The ends
should be aligned in a straight line to form a good axle. This step requires a lot of accuracy
because the balance of the coil is extremely important.
3. Strip off the insulation completely at one end and only half of it at the other. This step is
very important, try to be very accurate.
The following picture shows how to remove the insulation using the knife. Do not scratch
the table - put a piece of cardboard or similar material on it. Hold the coil in vertical position
with one of the ends lying on the surface and remove the insulation by moving the knife in
the direction shown with the arrow. Hold the blade of the knife in vertical position. You will
need to rotate the coil slightly in both clockwise and counterclockwise directions to remove
half of insulation, and rotate the coil 360° to remove the insulation completely from the
other end. Apply only a slight pressure or you may cut the wire end off.

Assembly instructions for kit #17
All rights reserved. 2014 Simple Motors, LLC ♦www.simplemotor.com ♦ 3
4. Fully insert two metallic stands into predrilled holes in the board. You might need to push
hard or even hammer the stands into the board.
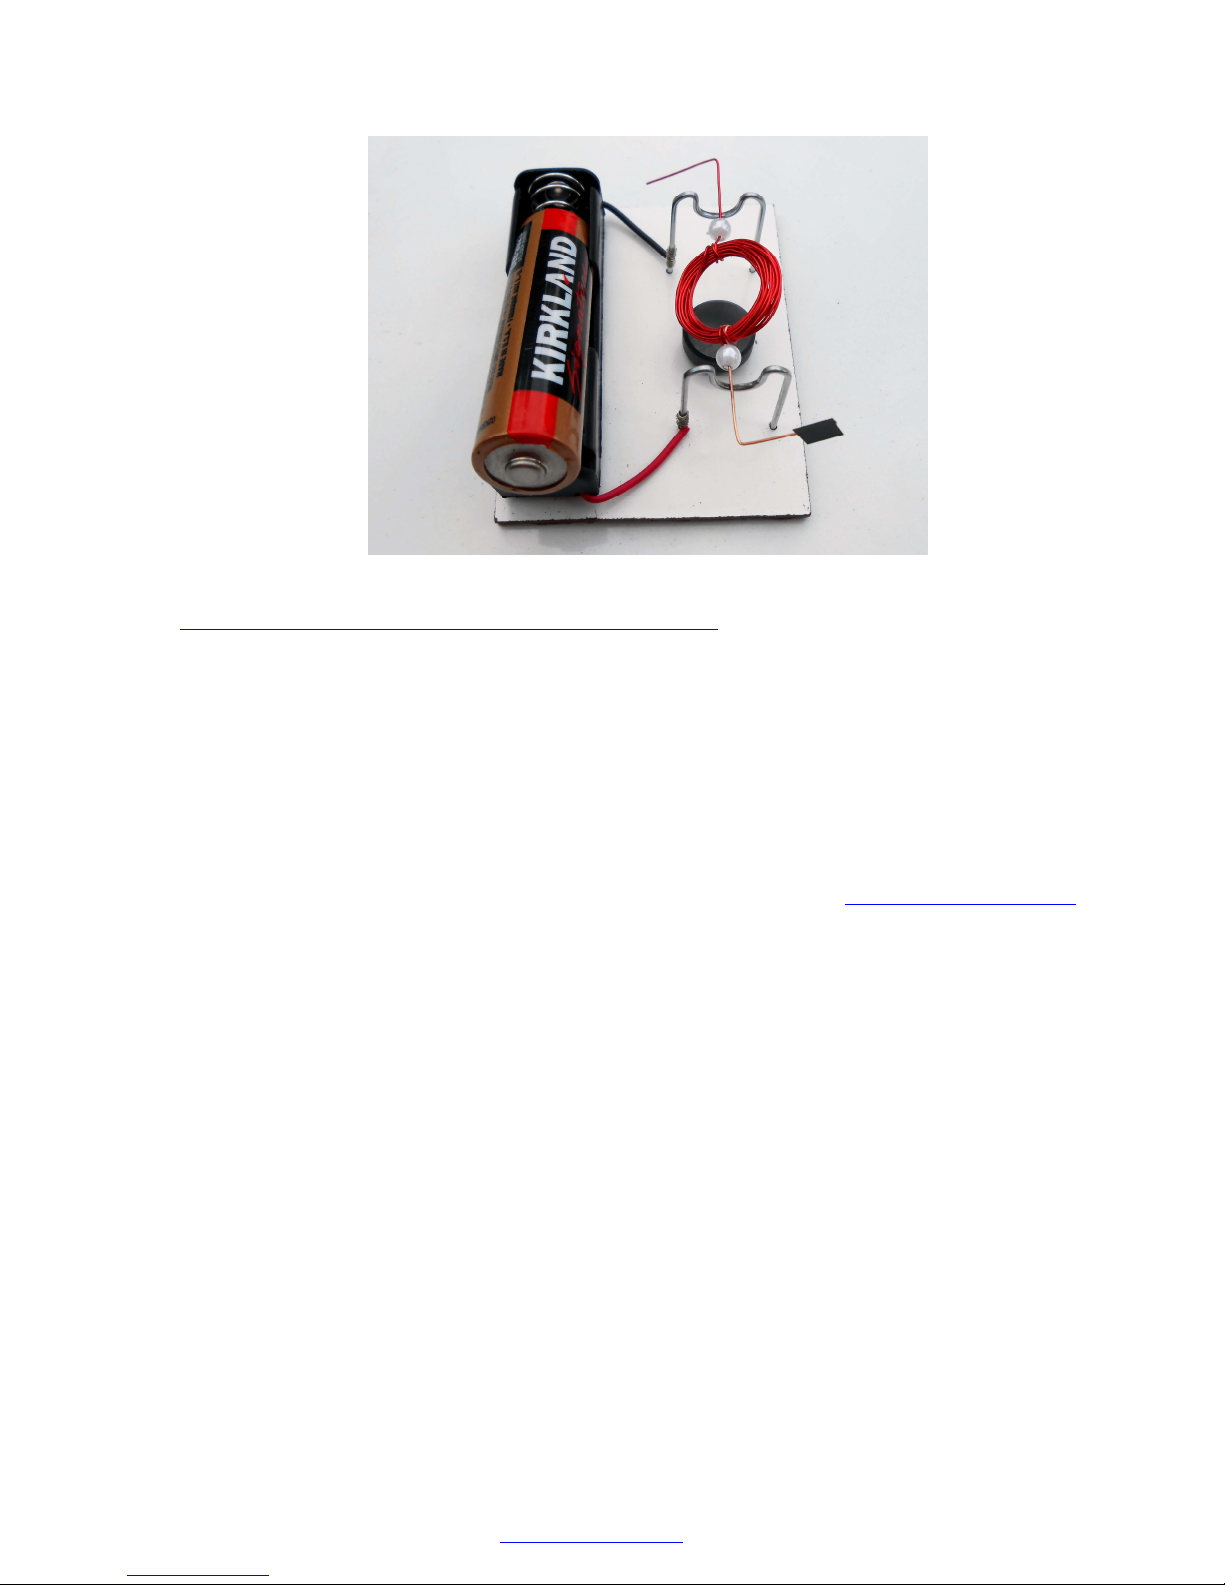
5. Attach the battery holder to the board and connect its wires to the stands as shown below.

Assembly instructions for kit #17
All rights reserved. 2014 Simple Motors, LLC ♦www.simplemotor.com ♦ 4
6. Attach double sided sticky pad to the magnet.
7. Attach the magnet to the board between the stands.
8. Place the coil on the stands and try to spin it slightly. Well balanced coil should spin freely.
Ideally it should stop in random positions. Take time to balance it. You might need to move
the ends up and down along the coil slightly to find the most balanced position.
Assembly instructions for kit #17
All rights reserved. 2014 Simple Motors, LLC ♦www.simplemotor.com ♦ 5
9. You may add two beads on the coil ends. These beads reduce the friction between the coil
and the stands.
If you want to measure the speed of your motor bend the coil ends as shown. Visit
http://simplemotor.com/motor-speed-measurement/ for information on how to measure
the speed of rotating coil in RPM.
Your motor is ready! Depending on the coil position the motor may start immediately or you
might need to give it a slight push. The motor usually spins in one direction so you should
try to spin it slightly in both directions.
If your motor doesn't work, ensure that the rotor is balanced and can rotate freely and
check the insulation. Properly removed insulation leaves shiny copper on one end. Half of
the other end should also have shiny copper color while the other half should be the color of
the original insulation as shown in step 3. Make sure the battery is fresh. If the motor still
does not work – check Troubleshooting section at our web site at www.simplemotor.com.
Clean carbon buildup (black stuff) on coil ends and metal stands often.
CAUTION: Do not leave the motor connected to the batteries if the rotor is stalled. This
motor consumes a lot of electricity and could drain the batteries quickly even if it does not
spin.
How it works
When un-insulated (bare copper) parts of the coil wire contact the metal stands the current
from the battery flows through the coil making it an electromagnet with North and South
poles. This electromagnet interacts with the permanent magnet (North and South poles
attract each other while the same poles repel). Motor starts to spin until the contact is
broken when an insulated part of the coil end comes into contact with the stand. However,
the coil continues to spin due to inertia and then the process continues. Technically
speaking this motor is a single pole pulse motor.
Table of contents
Other Simple Motors Engine manuals

Simple Motors
Simple Motors Kit 9 User manual

Simple Motors
Simple Motors Kit 12 User manual

Simple Motors
Simple Motors Kit 5 User manual

Simple Motors
Simple Motors Kit 6 User manual

Simple Motors
Simple Motors Kit 11 User manual

Simple Motors
Simple Motors Kit 13 User manual

Simple Motors
Simple Motors Kit 16 User manual

Simple Motors
Simple Motors Kit 2 User manual

Simple Motors
Simple Motors Kit 8 User manual

Simple Motors
Simple Motors Kit 15 User manual


