SimplyMed SMM048 User manual
SimplyMed User Instructions
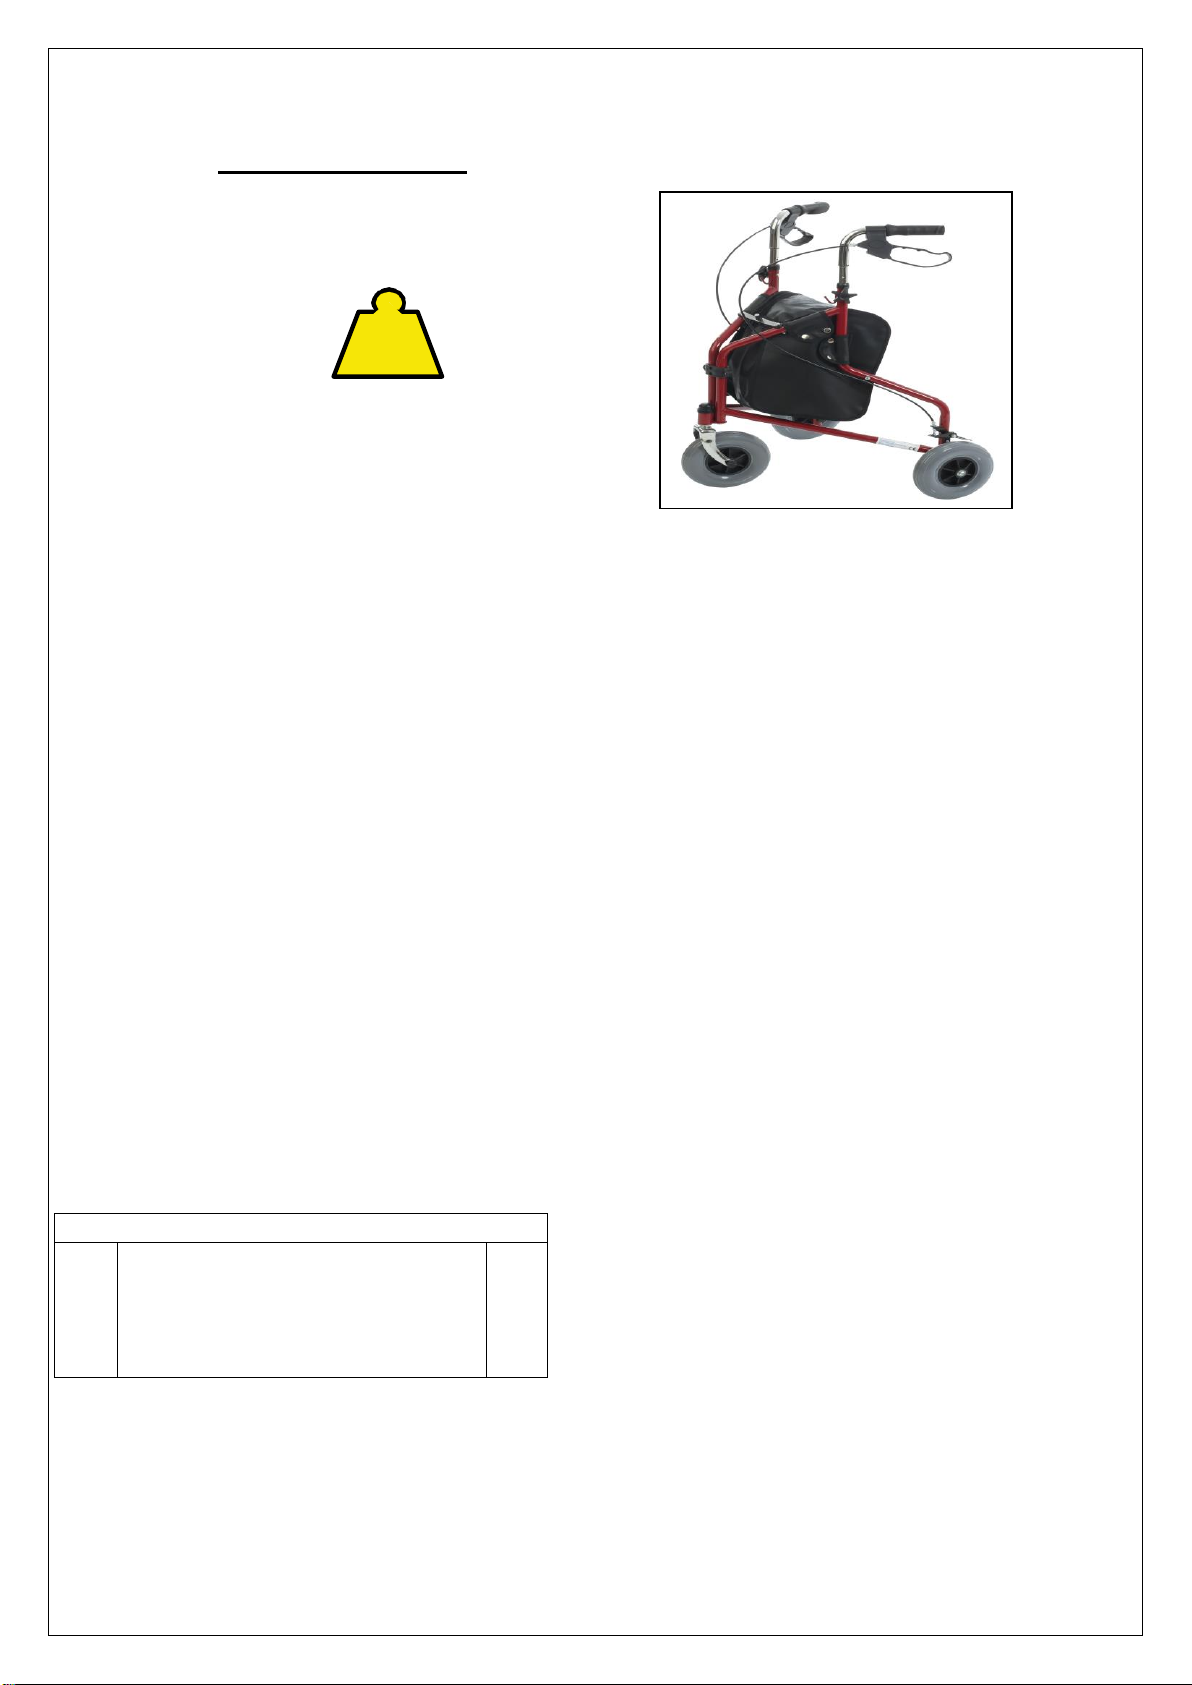
SMM048 SimplyMed Tri-walker
General Safety Warning
Please ensure these instructions are fully read and
understood before use.
Retain these instructions in a safe place for future
reference.
Intended Use
MAXIMUM
USER
WEIGHT
18st
115kg
The Simplymed Three Wheeled Rollator comes
complete with Bag, Basket and tray and is
designed to provide support and assistance to
those unable to, or who lack the confidence to,
walk without some level of support. This rollator is
intended for indoor and outdoor use.
Safety Precautions
•Do not exceed the maximum user weight limit of
115Kg (18st).
•Ensure Rollator is locked open before use.
•Check the brakes before use.
•Only use the rollator as a walking support.
•Do not use the rollator on stairs or an escalator.
•Exercise caution when there is a heavy load in
the bag (max. 5Kg) or basket /tray (max. 5Kg)
•Loads should only be transported using the bag
or basket/tray (where fitted). Do not hang heavy
items from the handles as this may affect the
stability of the Rollator.
•Do not use the rollator to walk backwards.
•Caution must be taken when negotiating curbs
and other obstacles, or when using on sloping,
uneven or slippery surfaces. Failure to do so
may result in a serious risk of a fall or injury.
•Do not perform any adjustments to the rollator
while it is in use.
•Wheels must be in contact with floor at all times.
•When using the rollator in a stationary position,
the brakes must be locked.
CONTENTS LIST
Item
Description
Qty.
1
Rollator Frame with braked handles
1
2
Basket with lid/tray
1
3
Bag
1
4
Hand wheels with bolts/plastic washers
2
5
User instructions.
1
Unpacking
Assembly and Height Adjustment
NOTE: Before assembly consult a suitably qualified
healthcare professional regarding the correct height
adjustment for maximum support; and correct brake
activation.
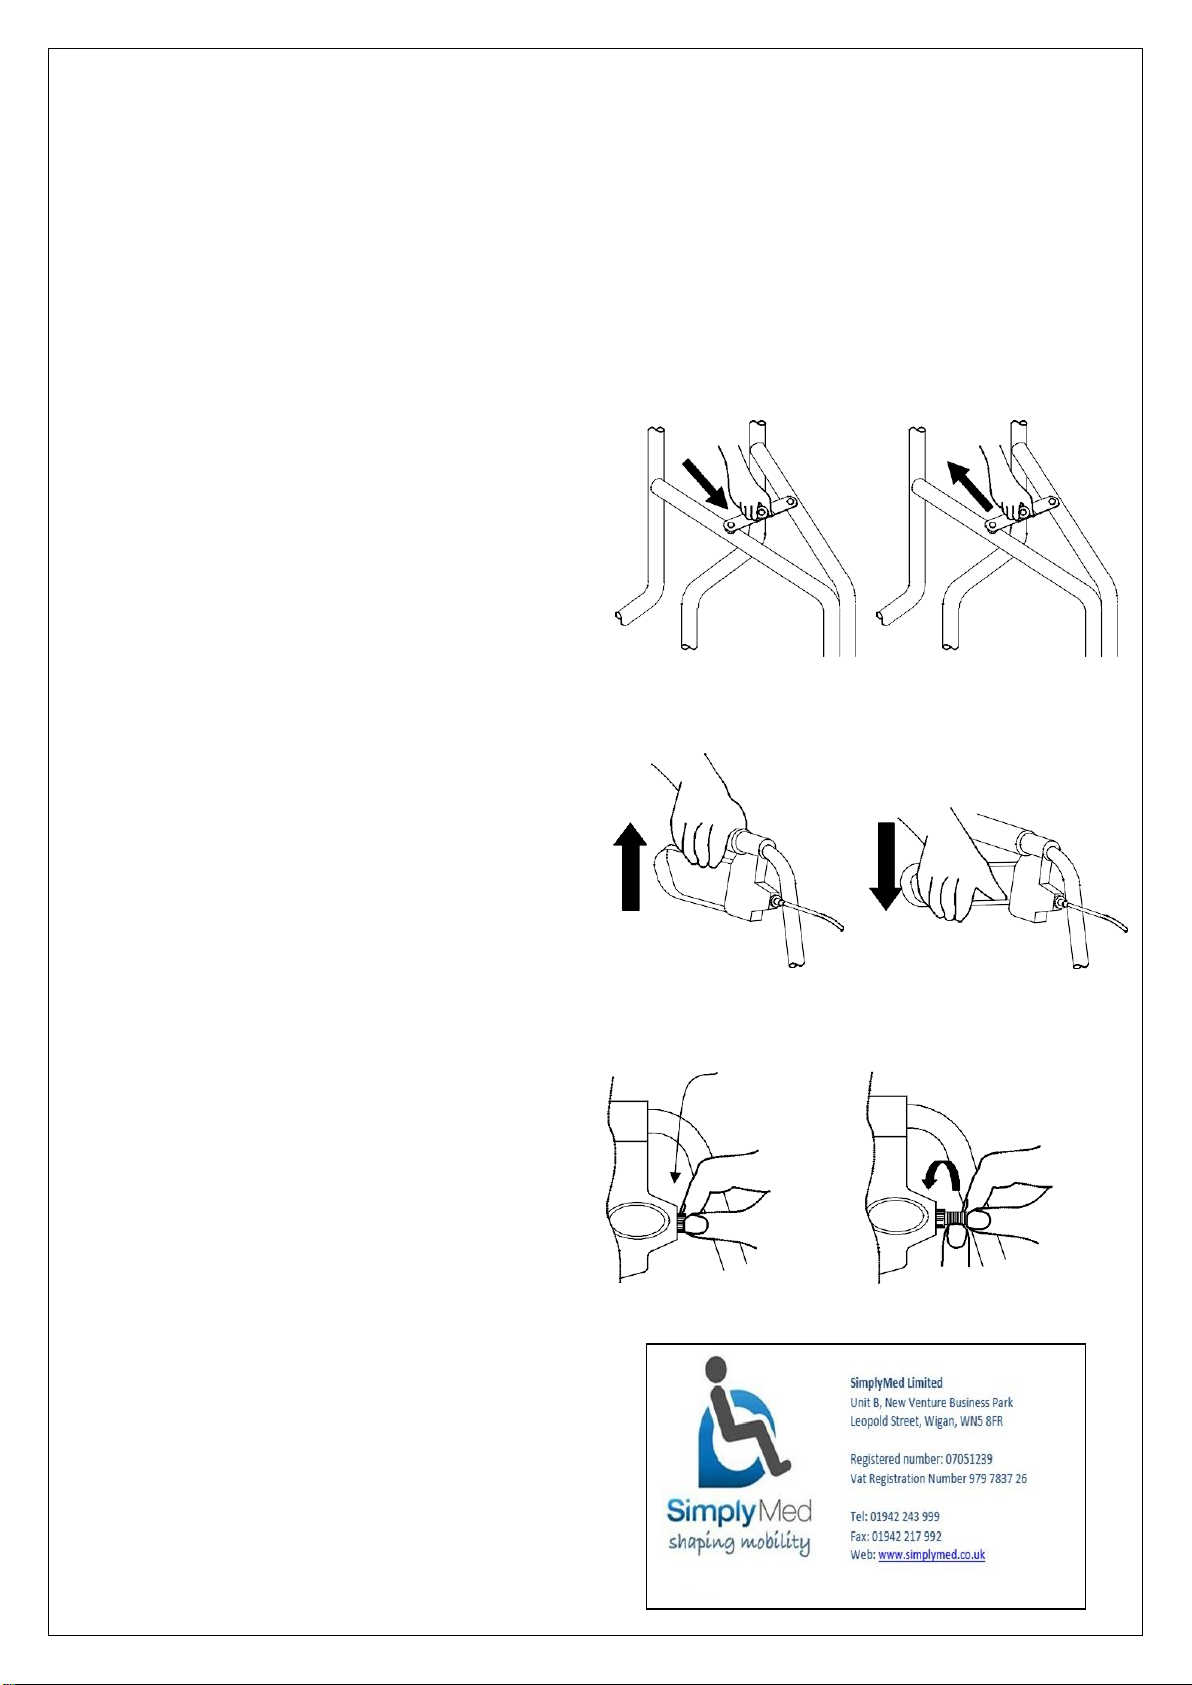
1. Open the Rollator into operating position (see
overleaf)
2. Insert the Handlebars into the framing tubes and
set to the correct height as follows;
•Stand upright behind the rollator with your
shoulders relaxed and your arms by your side,
looking straight ahead.
•In this position, the handgrips of the rollator
should be adjusted to a height level with your
wrists.
•This will position your arms at an approximate
20º to 30º bend when using the rollator.
•Check that the holes in the handle bars and the
frame are aligned.
•Place the supplied bolt through the aligned holes
in the handlebar and frame. The holes in the
frame are hexagonal in shape to accommodate
the head of the bolt.
•Place the washer over the bolt and then apply the
hand nut. Hand-tighten firmly, but do not over
tighten
3. Check the brakes thoroughly before use. NOTE:
The brakes are factory set, and if assembled
correctly do not need adjusting. To check; Apply
and release the parking brake on each side 10
times (see diagram 2b) The brake should grip the
wheel and prevent any movement when applied,
when released, the gap between the brake and
Check all parts carefully before assembling the product.
Do not assemble if any parts are damaged.
Do not assemble if any parts from the list are missing.
the wheel should be between 1 to 3 mm. If either
of the above conditions is not correct adjust the
brakes as detailed in the maintenance section,
and re-check.
Assembly continued:
1.Fit the bag if not already fitted
Using the Three Wheeled Rollator
Opening: Fold out the Rollator and push down the
cross bar fully. (See Diagram 1a) –It is very
important that the crossbar is pushed fully down
to prevent the Rollator folding during use. Fit
basket/tray in correct position (if provided)
Folding: Remove basket (if present) and Pull up the
cross bar. (See Diagram 1b) The Rollator will then
close inwards for storage. Take care to keep fingers
out of frame when folding. The bag should be empty
before folding.
Walking: This unit is to be used as a mobility aid,
creating a natural gait as the user walks securely
with their primary weight distribution between the
handlebars and with the unit in front of the user.
Braking: The locking brakes are intended to assist
the user to control the Rollator. To apply the brakes
•Caution: After making any adjustments to the
brakes, you must test them before the rollator is
used.
•If adjustment does not tighten the brakes, do
not use the rollator. Contact your dealer or
SimplyMed Customer services, details below.
Cleaning Instructions
Clean regularly, wipe down with a soft, non
abrasive cloth.
Ensure there is no build up of dirt or debris around
the axle, brakes and wheels.
Diagram 1a Diagram 1b
when in motion, pull up both of the loop handles.
(See diagram 2a).
To apply the parking brakes, push down the handles
until they lock down. A distinct click indicates that
the brake is in the correct position. (See Diagram
2b) It is important that both the brakes are put in the
parking position when they are to be used. Lift up
the handle to release.
If you apply the parking brakes, or pull up the brakes
to stop whilst moving, and the rear wheels on the
Push down fully to lock
the rollator in the open
position
Pull up to fold the rollator.
Take care to keep fingers
away from frame when
folding
rollator still move, stop use immediately. Do not use
again until the brakes have been checked and
correctly adjusted. Refer to the maintenance
section.
Maintenance
•Regularly check for wear and tear and that all
screws and knobs are securely fastened.
•Check brakes are working satisfactorily by both
walking and squeezing the brakes and by
braking to a stop.
•Check the parking brakes by pushing the
handles into the locked position, and then trying
to push the rollator.
•If the brakes do not completely lock the wheels
the brakes need to be adjusted, as detailed
below.
•Brake Adjustment: The brake adjusters are
situated in front of the brake handles, as shown
in diagram 3. To adjust, loosen the lock nut, turn
the adjuster anticlockwise to tighten the brake
then retighten the lock nut.
•For correct adjustment the brake mechanism
should not touch the wheel, but the gap should
be no greater than 3mm.
Diagram 2a Diagram 2b
Diagram 3 Locknut Turn Adjuster
Anti-clockwise
to tighten brake
Other SimplyMed Mobility Aid manuals


Popular Mobility Aid manuals by other brands


R82
R82 Crocodile 1 user guide

Vermeiren
Vermeiren 286B instruction manual

Decon wheel
Decon wheel MED3099 Assembly instructions

Xtreme Power
Xtreme Power 90030 Owner's manual and safety instructions

Quantum Rehab
Quantum Rehab Synergy Solution 1 INFMANU3281 Installation and care guide

Drive
Drive Diamond Deluxe operating instructions