Dietz Tomtar TSU-2 User manual

DE
EN
IT
NL
FR
TSU-2 / TSU-4
Universal commode chair
User manual
Version 2.0.0

Record of product identication data
We recommend that you write down your product identication data below (found on product
label), so that you have them on hand should you require any further information about your
product (see chapter "Product labelling").
Type / model
Item No. / REF:
Serial number (21):
Date of manufacture:
Other information/notes:

Thank you for choosing to purchase the
universal commode chair TSU-2/-4
from DIETZ.
This commode chair is a medical aid. In order to use it properly and avoid
possible risks due to unintended use, you must become thoroughly familiar
with its operation.
Read this user manual carefully before you begin using your TSU-2/-4. They
contain important safety instructions and valuable tips on correctly using
the commode chair.
In addition, you will receive information that will aid with maintaining
operational safety and the preservation of your investment in your com-
mode chair.
If you have any questions or require additional information, please contact
the specialist retailer which supplied the commode chair to you.
You will always nd the latest information about your product on our
website. For information or queries concerning product safety and on
recalls, please contact DIETZ in writing or by telephone. You will nd our
contact information on the back of these operating instructions.
NOTE
A large-print version of the operating instructions is
available for visually impaired persons at
www.dietz-rehab.de in PDF format.
3
EN
EN
FR
IT
NL
FOREWORD

4
DIETZ GmbH // User manual for commode chair TSU-2/-4 / Version 2.0.0 EN
TABLE OF CONTENTS
01 Important information
General information . . . . . . . . . . . . . . . . . . . .5
Intended purpose . . . . . . . . . . . . . . . . . . . . . .5
Indications . . . . . . . . . . . . . . . . . . . . . . . . . . .5
Contraindications . . . . . . . . . . . . . . . . . . . . . .5
Symbols . . . . . . . . . . . . . . . . . . . . . . . . . . . . .5
02 Product description
Scope of delivery . . . . . . . . . . . . . . . . . . . . . .6
Accessories (optional) . . . . . . . . . . . . . . . . . . .6
Sample illustration for TSU-2 . . . . . . . . . . . . . .6
03 Preparing the product for use
Assembly instructions . . . . . . . . . . . . . . . . . . .7
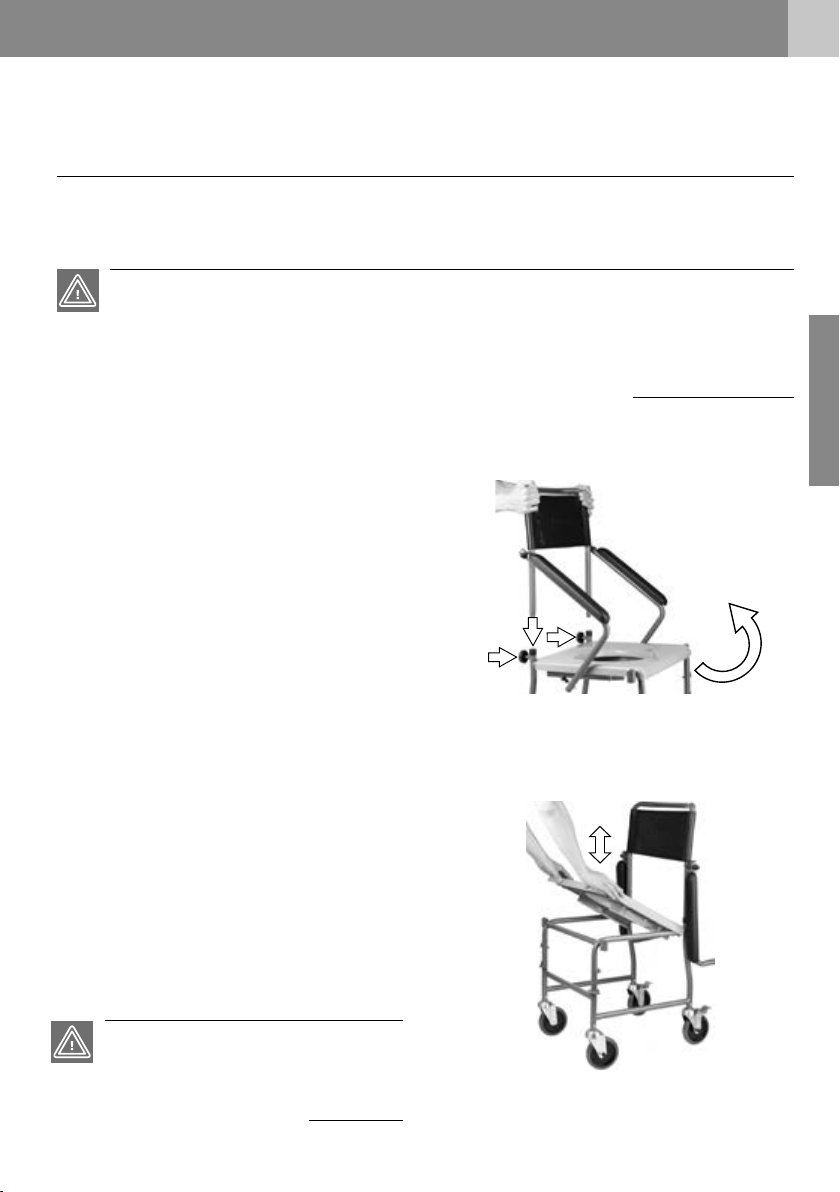
3.1 Mounting the backrest . . . . . . . . . . . . . .7
3.2 Fitting the seat / upholstery. . . . . . . . . . .7
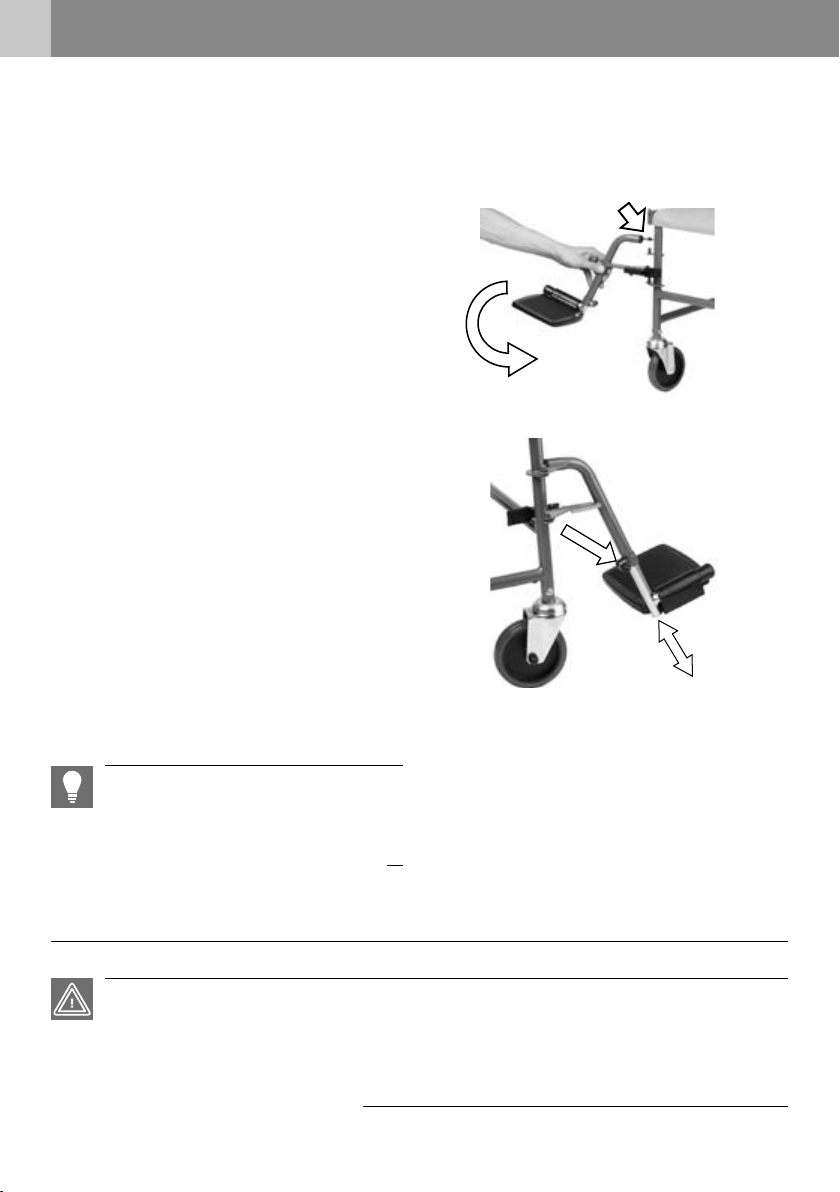
3.3 Attaching the leg rests . . . . . . . . . . . . . .8
3.4 Adjusting the height of the foot plates . .8
04 Using the commode chair
Instructions for use . . . . . . . . . . . . . . . . . . . . .8
4.1 Locking brakes . . . . . . . . . . . . . . . . . . . .9
4.2 Getting in and out from the side . . . . . . .9
4.3 Getting in and out from the front . . . . .10
4.4 Use as a commode chair . . . . . . . . . . . .10
4.5 Transport . . . . . . . . . . . . . . . . . . . . . . .11
4.6 Accessories and add-ons from
external suppliers . . . . . . . . . . . . . . . . .11
05 Technical data
Commode chair dimensions. . . . . . . . . . . . . .12
Dimensions and mass . . . . . . . . . . . . . . . . . .13
Product tests. . . . . . . . . . . . . . . . . . . . . . . . .13
Further information . . . . . . . . . . . . . . . . . . . .14
Materials . . . . . . . . . . . . . . . . . . . . . . . . . . .14
06 Safety instructions
Safety instructions. . . . . . . . . . . . . . . . . . . . .15
07 Instructions for general use
Servicing / maintenance. . . . . . . . . . . . . . . . .16
Tools for TSU-2 / TSU-4 . . . . . . . . . . . . . . . . .16
Maintenance schedule . . . . . . . . . . . . . . . . .17
Fault-nding and rectication . . . . . . . . . . . .18
Repair / replacement of swivel castor . . . . . .18
Cleaning . . . . . . . . . . . . . . . . . . . . . . . . . . . .19
Disinfection. . . . . . . . . . . . . . . . . . . . . . . . . .19
Handing over and reuse. . . . . . . . . . . . . . . . .19
Storage. . . . . . . . . . . . . . . . . . . . . . . . . . . . .20
Disposal . . . . . . . . . . . . . . . . . . . . . . . . . . . .20
Product labelling . . . . . . . . . . . . . . . . . . . . . .21
08 Manufacturer declarations
Warranty . . . . . . . . . . . . . . . . . . . . . . . . . . .22
Lifetime. . . . . . . . . . . . . . . . . . . . . . . . . . . . .22
Liability. . . . . . . . . . . . . . . . . . . . . . . . . . . . .22

5
EN
EN
FR
IT
NL
01 IMPORTANT INFORMATION
GENERAL INFORMATION
This user manual is included in the scope of
delivery. The user should keep this manual on
hand at all times and it must remain with the
product if the product is passed on to a third
party. We reserve the right to make changes to
the versions shown in this manual as a result
of technical further development. Reprints,
translations and reproductions of this manual
in any form, in whole or in part, require the
written approval of DIETZ GmbH. The copy-
right is owned by the manufacturer. You can
obtain the latest version of the user manual by
contacting DIETZ GmbH.
INTENDED PURPOSE
The commode chair (max. user load 120 kg)
was designed for people with limited mobility
who require flexible toilet facilities in their im-
mediate vicinity due to their disability or ill-
ness. It is intended exclusively for persons to
relieve themselves or for temporary use as a
mobile chair in living areas. It is designed for
indoor use. If the commode chair is moved by
an accompanying person, this person must be
physically capable of pushing and braking the
occupied wheelchair. The commode chair is
not to be used by children and persons who
are smaller than 146 cm or weigh less than 40
kg (BMI < 17). The TSU-2/-4 is not suitable for
use as permanent seating.
INDICATIONS
The use of a TSU-2/-4 as a commode chair is
indicated when physically handicapped per-
sons cannot use the existing toilet or have dif-
ficulty reaching it due to:
tParalysis
tLoss of / defective / deformed limbs
tJoint contracture / joint damage
CONTRAINDICATIONS
The use of the commode chair is not indicated
for:
tFalse sensations
tSevere disequilibrium
tInability to sit
tA body weight exceeding 120 kg.
SYMBOLS
These symbols indicate passages of text that
are helpful for using and operating the prod-
uct in every day life.
WARNING
It is mandatory to observe and comply with
warnings. They draw your attention to the fact
that failure to comply with them may result in
injury and/or damage to the product or the en-
vironment.
NOTE
Tips and advice to simplify using the
functions.

6
DIETZ GmbH // User manual for commode chair TSU-2/-4 / Version 2.0.0 EN
SCOPE OF DELIVERY
The commode chair is partially assembled at the
factory and packaged in a box.
On receipt of the commode chair, please imme-
diately check to make sure that the contents are
complete and undamaged. If the contents are
noticeably damaged, inform the freight compa-
ny immediately.
The contents consist of:
t1 commode chair TSU-2/-4 incl. seat with
opening and closed seat cushion
t1 user’s manual
tIn separate box: 2 leg rests incl. foot
plates with heel strap,
1 universal hexagon spanner (13, 10, 8,
6 and 4 mm) and 2 locking screws, 1
toilet pail
tAccessories (if selected)
WARNING
Risk of poisoning: When burnt, packaging
lms can release toxic gases.
Risk of suffocation: Keep the plastic bags
out of the reach of children.
ACCESSORIES (OPTIONAL)
Acessories available from the manufacturer:
tUpholstered seat with opening for
commode seat, black
tSecond pail
02 PRODUCT DESCRIPTION
SAMPLE ILLUSTRATION FOR TSU-2
The TSU-4 differs from the TSU-2 only in the
number of locking brakes. It is outtted with 4
instead of 2 locking brakes.
1. Armrests
2. Seat cushion, closed (black)
3. Leg rest, swivelling and removable
4. Swivel castors without locking brake
(only TSU-2 / 2 ea.)
5. Push bar
6. Backrest upholstery
7. Backrest (incl. side elements, sliding handle
and backrest upholstery)
8. Locking screw
9. Seat surface with opening (grey)
10. Toilet pail
11. Swivel castors with locking brake
(TSU-2, rear / 2 ea. // TSU-4 / 4 ea.)
2
3
4
5
11
16
10
8
Fig.1
9
7

7
EN
EN
FR
IT
NL
3.1 Mounting the backrest
1. Lift the backrest with both hands on the side
of the backrest upholstery and insert the
backrest tubes vertically from above into the
mounting tubes (1, Fig. 2).
2. Secure the backrest with the locking screws;
see "Scope of delivery" (2, Fig 2).
3. Fold the side elements upwards into the
working position (3, Fig. 2). Ensure that the
locking bolts engage.
3.2 Fitting the seat / upholstery
1. Remove the lm from the seat. Now press the
seat plate onto the frame until it fully snaps in
place (Fig. 3).
2. Place the closed seat cushion (see scope of
delivery) on the recess in the seat.
3. The upholstered seat with opening (optional)
is also placed on the recess of the seat.
WARNING
Risk of trapping: Please ensure that the seat
fully snaps into place on the frame.
02 PRODUCT DESCRIPTION 03 PREPARING THE PRODUCT FOR USE
Fig.3
ASSEMBLY INSTRUCTIONS
The assembly and the functional check are performed by the specialist dealer. The dealer's technician
adapts the commode chair to the respective user.
WARNING
Risk of rolling away: Before any action while stationary, actuate the full brakes on the commode
chair.
Risk of trapping: Pay attention to your hands when adjusting moving parts.
Fig.2
1
23
2

8
DIETZ GmbH // User manual for commode chair TSU-2/-4 / Version 2.0.0 EN
03 PREPARING THE PRODUCT FOR USE
3.3 Attaching the leg rests
1. To hang the leg rests in place on the sides,
pick them up by the leg rest tubes and insert
them into the mounting pins on the frame (1,
Fig. 4).
2. Swivel the leg rest forwards until the clamp-
ing lever engages (2, Fig. 4).
3.4 Adjusting the height of the foot
plates
1. Use pliers to remove the black cover cap from
the screw connection on the lower leg rest
tubes (1, Fig. 5).
2. Loosen the screw connection with the en-
closed universal hexagon spanner (13 mm).
3. Adjust the desired height of the foot plate by
pulling the foot plate downwards, out of the
leg rest tube (2, Fig.5).
4. Tighten the threaded connection securely
again.
NOTE
The setting is correct when your thighs are hori-
zontal with the feet placed on the foot plates.
1
2
04 USING THE COMMODE CHAIRFig.5
Fig.4
1
2
INSTRUCTIONS FOR USE
WARNING
Risk of rolling away: Before any action while stationary, actuate the full brakes on the commode
chair.
Risk of trapping: on all movable parts!

9
EN
EN
FR
IT
NL
03 PREPARING THE PRODUCT FOR USE
4.1 Locking brakes
The TSU-2/-4 is equipped with four 5-inch swivel
castors. Depending on the model selected, the
two rear swivel castors or all four swivel castors
are equipped with brakes. When the respective
locking brake is engaged, the swivel castor is
braked and also prevented from rotating. For
stability and to prevent the commode chair from
rolling sideways, the two rear locking brakes
must always be engaged.
1. Actuate the locking brake by stepping on the
locking rocker (1, Fig. 6).
2. To release the locking brake, step on the small
rocker lever (2, Fig. 6).
04 USING THE COMMODE CHAIR
4.2 Getting in and out from the side
1. Move as close as possible with the commode
chair to the spot where you want to transfer
from or to the commode chair.
2. Engage the locking brakes.
3. To swivel the side element, release the lock-
ing bolt by pulling it backwards (1, Fig. 7).
4. The side element can now be swung down
(2, Fig. 7).
5. You can now transfer to or from the commode
chair sideways.
We recommend that the transfer from the com-
mode chair be carried out with an assistant.
Fig.7
1
2
Fig.6
2
1
WARNING
Usage hazard: If the locking brakes are dam-
aged or unusable, discontinue use of the com-
mode chair immediately.
WARNING
Risk of trapping: When swivelling the side
elements, body parts and pieces of clothing
may get caught in them.

10
DIETZ GmbH // User manual for commode chair TSU-2/-4 / Version 2.0.0 EN
4.3 Getting in and out from the front
1. Where possible, push the commode chair
against a wall or a solid piece of furniture.
2. Engage the locking brakes.
3. Fold the foot plates upwards (1, Fig. 8).
4. To fold the leg rest, operate the lever (1, Fig.
9) and rotate the leg rest to the side (2, Fig.
9).
5. Slowly bend your knees and try to grip the
armrests of the side elements.
6. You can now sit down on the commode chair.
7. Swivel the leg rests back in place until they
snap into position. Now fold the foot plates
down and place the feet in front of the heel
straps.
8. Subsequently, perform these steps in reverse
to get up from the commode chair.
WARNING
Danger of falling: When sitting down and
standing up, always fold the footrests off to the
side. Never stand on the foot plates.
Fig.8
Fig.9
Fig.10
04 USING THE COMMODE CHAIR
2
1
1
4.4 Use as a commode chair
Before use:
1. First, engage the locking brakes.
2. Slide the pail without a lid over the slide rail
from behind under the seat until it locks in
place (1, Fig. 10).
3. Remove the seat cushion if necessary.
1

11
EN
EN
FR
IT
NL
04 USING THE COMMODE CHAIR04 USING THE COMMODE CHAIR
4.5 Transport
The commode chair is not a device for fre-
quent transport. Should it be necessary to
transport the chair, we recommend disassem-
bling it according above assembly instruc-
tions in reverse. The chair should be packed
such that it is in a stable position and there is
no danger of sudden and dangerous move-
ments in the means of transport.
If you have to carry the assembled commode
chair, we recommend that you remove the
footrests before lifting the commode chair by
using both sides of the frame.
WARNING
Risk of injury: Never lift the commode chair
by the footrest supports or the leg rests.
4.6 Accessories and add-ons from
external suppliers
In general only original accessories from DIETZ
may be used. If third-party products are in-
stalled on the wheelchair, responsibility for the
safety of the product passes to the person who
installs the accessories or carries out the instal-
lation. The compliance of the combination of
accessories or add-on and product is then new,
and must be declared by the person who
attaches it. The compliance declared by DIETZ
according to MDR 2017/745, Annex II expires.
WARNING
Safety hazard: Should add-ons or accessories
that are not sold by DIETZ are used, the safety of
the product can not be guaranteed.
If accessories or add-ons are added to the com-
mode chair, then the safety instructions in the
operating instructions for the accessories or add-
ons must be observed.
After use:
1. To empty the pail, pull it out carefully towards
the rear.
2. After emptying, clean/disinfect the pail and
seat as instructed.
3. Replace the seat cushion.
WARNING
Risk of trapping: Do not insert the pail or
pull it out while a person is still sitting on the
commode chair.

12
DIETZ GmbH // User manual for commode chair TSU-2/-4 / Version 2.0.0 EN
05 TECHNICAL DATA
COMMODE CHAIR DIMENSIONS
The dimensions given here refer to the standard conguration of the commode chair.
NOTE
All dimensions taken on textile parts (e.g. back
upholstery) are to be understood with a toler-
ance of +/– 1 cm.
Fig.12
Fig.13

13
EN
EN
FR
IT
NL
05 TECHNICAL DATA
Technical specifications TSU-2 / -4
Min. Max.
kTotal length with leg rests mm 815 825
jTotal length without leg rests mm 555
bTotal width mm 560
iTotal height mm 980
Mass of the heaviest part1kg 6.06 6.26
aEffective seat width mm 470
fEffective seat depth mm 440
dSeat surface height (front edge)2mm 510
gBackrest angle ° 3
hBack height mm 450
cDistance from foot plate to seat² mm 37 48
eArmrest height mm 270
Static stability towards front °10
Static stability towards rear °10
Static stability sideways °10
Armrest length from rear frame mm 370
Minimum turning diameter mm 1050 1050
Steering range mm 950 1000
Total weight² kg 12.9 13.1
Maximum user weight³ kg 120
¹ Commode chair weight without removable parts (here: without backrest/side element, leg rests, seat, upholstery and toilet pail)
² Without seat cushion
³ Maximum user weight including load/The weight of the load reduces the maximum user weight.
05 TECHNICAL DATA
PRODUCT TESTS
ISO 17966 Tested according to the requirements and test methods for
personal hygiene aids
EN 1021-2 Tested for resistance to ignition by a ame for upholstery
materials and plastic components
ISO 10993-5 Tested for toxicity in the material
Test dummy weight 120 kg
DIMENSIONS AND MASS

14
DIETZ GmbH // User manual for commode chair TSU-2/-4 / Version 2.0.0 EN
05 TECHNICAL DATA
FURTHER INFORMATION
Technical specifications TSU-2 TSU-4
Colours Manganese grey metallic
Max. drive-over height mm 420
Armrest (W × L) mm 50 x 360
Opening in seat mm 258 x 225
Toilet pail (diameter) mm 305
Toilet pail lid (diameter) mm 288
Toilet pail (H) mm 165
Handle height mm 980
Swivel castors (diameter x width) mm/“ 127 × 28 / 5 x 1.1
No. of locking brakes 2 ea. 4 ea.
Leg rest incl. heel strap kg 0.78
Backrest incl. side elements kg 2.34
Seat kg 1.96
Seat cushion kg 1.21
Toilet pail incl. lid kg 0.55
Ambient operation temperature 10°C to +40°C
Ambient storage conditions 0°C to 45°C // 20% to 75% relative humidity
Frame Steel (powder-coated)
Backrest upholstery PVC
Seat surface (grey) PP
Seat cushion PVC
Armrests Plastic (PU)
Screws, joints Stainless steel
Tyres Plastic (PU)
Heel strap Nylon (PA)
Leg rests, upper section Steel (powder-coated)
Leg rests, lower section Steel (chrome-plated) + plastic (PP)
Wheel spokes Galvanised steel
Note: All materials used are corrosion-resistant and latex-free.
MATERIALS
06 SAFETY INSTRUCTIONS

15
EN
EN
FR
IT
NL
05 TECHNICAL DATA 06 SAFETY INSTRUCTIONS
SAFETY INSTRUCTIONS
When using the commode chair, always observe
the following safety instructions to prevent falls,
hazardous situations and damage to the com-
mode chair:
tThe commode chair is only to be used in-
doors and on a firm, level surface.
tAlways secure the commode chair against
rolling away, even when not in use.
tThe commode chair is not to be used to
transport multiple individuals or loads.
Only use it for the intended purpose.
tThe commode chair must stand securely
upright on all four wheels.
tAlways remember that there is a general
risk of fingers, other parts of the body, or
pieces of clothing getting caught in all
the moving parts (leg rests, side elements,
toilet pail etc.). For this reason, operate
the commode chair with the necessary
care.
tWhen overcoming obstacles, please make
sure to use ramps. If the inclination is
greater than 10°, there is an increased
risk of tipping over in all directions. When
there is no user, the commode chair can
be carried by the frame under the seat. In
both cases, ensure that the toilet pail is
empty.
tTipping danger! Please note that body
movements shift the centre of gravity,
which can increase the risk of the com-
mode chair tipping over.
tAvoid wet spots – danger of slipping.
tNever exceed the maximum load of 120 kg
for users, incl. additional loads and add-
ons.
tNever use the commode chair under the
influence of alcohol or other substances
that can negatively affect your attentive-
ness and ability to react!
tAvoid exposing the commode chair to
sunlight (e.g. via a window, balcony) or
low temperatures for long periods of
time, as parts of the product (e.g. frame,
leg rests, and side elements) can become
very hot (> 41 ° C) or very cold (<0 ° C)
and may cause skin injuries.
tAny severe incidents associated with the
product must be reported to the manu-
facturer and responsible authority.

16
DIETZ GmbH // User manual for commode chair TSU-2/-4 / Version 2.0.0 EN
07 INSTRUCTIONS FOR GENERAL USE
SERVICING / MAINTENANCE
We recommend performing the inspections listed in the maintenance schedule at regular intervals to
ensure that the commode chair is always safe to use.
Failure to ensure care and maintenance or insufcient care and maintenance of the commode chair
leads to a restriction of liability. The maintenance schedule does not provide any information on the
amount of work that will actually need to be performed on the commode chair.
NOTE
As the user, you will be the rst to notice any
damage. If you notice a fault as described in the
maintenance schedule or further defects and
functional impairments, contact an authorised
specialist dealer immediately.
NOTE
The inspections and measures stipulated in the
maintenance schedule must be performed by the
user or assistant if not otherwise stated.
WARNING
Repairs on the commode chair must only be per-
formed by specialist shops using DIETZ original
spare parts to maintain the operational safety of
the commode chair. The relevant spare parts cat-
alogue can be found on our website in the infor-
mation of the product in question.
NOTE FOR SPECIALIST DEALERS:
If the user reports abnormalities on the com-
mode chair, please check all the inspection points
listed in the maintenance schedule. The checks
must also be performed before putting the
wheelchair back into operation and after longer
storage periods (> 4 months).
07 INSTRUCTIONS FOR GENERAL USE
TOOLS FOR TSU-2 / TSU-4
Tools are required for some of the individual setting tasks and checks on the TSU-2/-4:
tHexagon/open-end spanner (13, 10, 8 mm)
tAllen key (5 & 4 mm)
tPhillips screwdriver

17
EN
EN
FR
IT
NL
MAINTENANCE SCHEDULE
What Description
Locking brake on the
swivel castors
Check for proper functioning
• When the locking brakes are engaged, the swivel castors
must not be able to rotate.
If the locking brake is damaged, the swivel castor
must be replaced by a specialist dealer.
x
Seats and upholstery
Check for contamination/damage
• If the seat or upholstered parts are dirty, clean them
according to the cleaning instructions.
• Have damaged seats and upholstered parts replaced.
x
Moving parts
Check for correct function and wear
• Check all moving parts (leg rests, backrest incl. side
elements and toilet pail) to ensure that they function
smoothly and without noise.
x
• The side elements must lock properly and fold away
without any play.
• It must be possible to remove, attach and lock the leg
rests without any issues.
• In the event of functional or surface damage, the
components must be replaced by a specialist dealer.
x
Screw joints
Check that they are rmly seated
• All screw joints must be rmly tightened.
Self-locking nuts and screws loose their efcacy
through being repeatedly released and tightened.
Therefore, they must be replaced by an authorised
specialist dealer.
x
Swivel castors
Check for correct function and
damage
• The swivel castors must run in a straight line and swivel
smoothly.
• Have damaged and heavily worn swivel castors replaced.
x
• Remove dirt and deposits from the swivel castors. x
Frame, entire
Functioning and damage
• The frame parts and hinges must not be damaged or
cracked.
• Functional and surface defects must be remedied.
x
Visual inspection
check for loose parts, breaks,
corrosion or other damage
I f damage of this type is found, discontinue use of
the commode chair, as safe use can no longer be
guaranteed.
x
before using
Monthly
07 INSTRUCTIONS FOR GENERAL USE

18
DIETZ GmbH // User manual for commode chair TSU-2/-4 / Version 2.0.0 EN
07 INSTRUCTIONS FOR GENERAL USE
What Description
Check entire commode
chair
for dirt
• The seat and toilet pail are to be cleaned and disinfected
after every use. x
• Depending on how dirty it is, but at least once a month,
the entire commode chair must be cleaned (see chapter
"Cleaning and disinfection"). x
FAULT-FINDING AND RECTIFICATION
What Possible causes Measures
The commode chair does not move
in a straight line.
• The swivel castor axles are dirty. Remove the dirt
• The swivel castors are worn out or
damaged.
• The swivel castors cannot rotate freely.
Visit an authorised
specialist dealer
The commode chair is hard to push.
• The swivel castor axles are dirty. Remove the dirt
• The fork of the swivel castors is damaged
or the swivel castor suspension is no longer
properly attached.
• The locking brakes are damaged.
Visit an authorised
specialist dealer
Brake function is insufcient and
uneven. • The locking brakes are damaged. Visit an authorised
specialist dealer
Squeaking and grinding noises • Various causes Visit an authorised
specialist dealer
before using
monthly
REPAIR / REPLACEMENT OF SWIVEL CASTOR
Only to be performed by specialist staff:
1. Loosen the screw connection of the swivel castor on the frame tube with a 10 mm open-end span-
ner and 4 mm Allen key.
2. Pull the swivel castor out by the wheel fork, downwards and out of the frame tube, and insert the
new castor. Finally, screw the new swivel castor to the frame tube.

19
EN
EN
FR
IT
NL
07 INSTRUCTIONS FOR GENERAL USE 07 INSTRUCTIONS FOR GENERAL USE
CLEANING
To clean the product, use lukewarm water mixed
with a mild detergent (without solvents and
with a pH value of 5-9). After cleaning, wipe
with clear water and then dry the chair with a
cloth.
The wheels can be cleaned using a damp brush
with soft plastic bristles (do not use a wire
brush!).
WARNING
Material damages: Do not use high-pressure
cleaners, strong, corrosive chemicals or scouring
agents for cleaning purposes.
Risk of corrosion: To avoid corrosion, ensure
that all materials dry completely after cleaning.
DISINFECTION
Wipe down or spray all components thoroughly
with commercially available surface disinfectant.
Take particular care to disinfect surfaces that
come into frequent contact with hands/skin,
such as the seat surface, toilet pail, seat cushion,
and backrest.
Please only use the following disinfectants; use
of other chemicals might damage the commode
chair.
tAldehyde-free disinfectants based on
alcohol (max. 70% propyalcohol)
WARNING
Material damages: During disinfection, observe
the use and application instructions issued by the
cleaning agent / disinfectant manufacturer.
Risk of infection: The commode chair must be
disinfected before each new user.
HANDING OVER AND REUSE
Your product is suitable for transfer to/reuse by
others. The number of times it can be reused de-
pends on the material wear conditions and the
functional capabilities of the respective product.
When handing over the commode chair or re-us-
ing it, please remember to hand over to the new
user or the specialist dealer all the technical
documents necessary for safe handling.
Before being re-used, the commode chair must
be cleaned and disinfected, and must be checked
for damage and approved by a specialist retailer.
To do this, all test points listed in the mainte-
nance plan must be checked on the commode
chair.

20
DIETZ GmbH // User manual for commode chair TSU-2/-4 / Version 2.0.0 EN
07 INSTRUCTIONS FOR GENERAL USE
STORAGE
To store the commode chair, ensure that the
chair is stored in a dry place protected against
direct, strong sunlight and at a temperature of
0°C to +45°C.
Engage the locking brakes on the wheels to pre-
vent the commode chair from inadvertently roll-
ing away.
Removable parts (backrest, seat, seat cushion
and leg rests) can be removed and stored in a
safe place.
After longer periods of storage (> 4 months),
please check all the inspection points on the
commode chair listed in the maintenance sched-
ule before reusing/redeploying the commode
chair.
WARNING
Do not store the commode chair near a heat
source and do not place any objects on the com-
mode chair during storage.
DISPOSAL
If you no longer need the commode chair, please
contact your specialist dealer. They will then pick
up the commode chair and either dispose of it
properly or make further use of it. Otherwise,
please take the commode chair to your local
waste disposal facility.
This manual suits for next models
1
Table of contents
Other Dietz Mobility Aid manuals

Dietz
Dietz tauron dts User manual

Dietz
Dietz Taima M User manual

Dietz
Dietz TAiMA M GT User manual

Dietz
Dietz TAiMA XC User manual

Dietz
Dietz Ligero User manual

Dietz
Dietz Ligero User manual

Dietz
Dietz TAIMA User manual

Dietz
Dietz Rollator XXL User manual

Dietz
Dietz Tomtar VFG User manual

Dietz
Dietz TAIMA User manual
Popular Mobility Aid manuals by other brands

EZee Life
EZee Life CH1025 manual

Columbia Medical
Columbia Medical TheraPedic Explorer manual

MDH
MDH VITEA CARE Premium BMW01 Instructions for use

LifeWalker Mobility Products
LifeWalker Mobility Products UPWalker CardioAccelerator H300 user guide

Vela
Vela Hip Hop 300 user manual

TOPRO
TOPRO TROJA CLASSIC M user manual