Simpson Strong-Tie PT-27 User manual
aa
aa
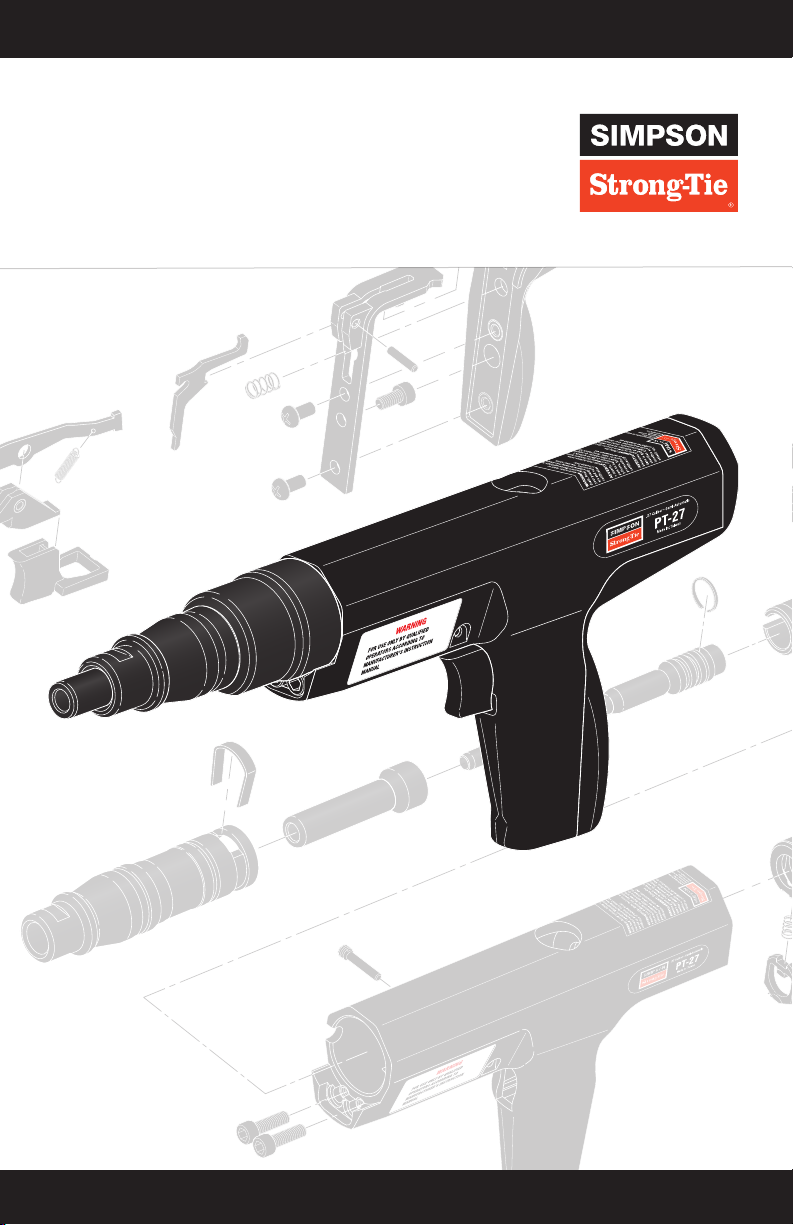
PT-27 .27 Caliber Semi-Automatic Tool Model
Operator’s
Manual
WARNING — Read before operation

2© 2022 Simpson Strong-Tie Company Inc. T-A-PT-27MNL22-R
A. Training
1. All operators must complete the tool manufacturer’s training before attempting to take
an exam or to operate Simpson Strong-Tie®tools. You must obtain certification of training
from an authorized Simpson Strong-Tie instructor. If such training is not available where you
purchased the tool, call or write Simpson Strong-Tie before attempting to operate the tool
for information on the nearest authorized instructor. Simpson Strong-Tie also offers online
training and certification. For more information, visit your local Simpson Strong-Tie website.
2. Obtaining this instruction is your responsibility.
3. Read this manual completely and understand its contents fully before attempting to
operate the tool. If there is anything in this manual that you do not fully understand, ask
your instructor or call Simpson Strong-Tie for information. Reading and understanding this
manual is your responsibility.
B. Limitations
1. Just as no instruction book of any kind can forewarn a learner against all possible situations
or emergencies that may arise, neither can Simpson Strong-Tie instructors or printed
instructions detail all possible conditions or circumstances surrounding the use of this tool
or its supporting products. Recognizing these circumstances and reacting in a safe manner
is your responsibility.
2. Simpson Strong-Tie disclaims any responsibility for injury or death, which may result
from any disregard of this manual or the verbal instruction of the authorized
Simpson Strong-Tie instructor. Following the rules of safe operation given to you
here and verbally is your responsibility.
SAFETY STARTS WITH YOU
OBTAIN AUTHORIZED TRAINING
Safety Overview

© 2022 Simpson Strong-Tie Company Inc. T-A-PT-27MNL22-R 3
Safety Overview.............................................................................................................. 2
Introduction .................................................................................................................... 3
General Handling of PAT and Powder Loads .................................................................. 4
Making Safe Fastenings.................................................................................................. 5
The “Nevers” of PAT Fastening ....................................................................................... 6
Before Chambering a Powder Load................................................................................ 7
Safe Handling Practices of PAT....................................................................................... 8
Operating Principles of PAT ............................................................................................ 9
Schematic and Parts for the PT-27 Tool .................................................................. 10–11
Principles and Guidelines for Proper Fastening ....................................................... 12–13
How to Load and Fire the PT-27............................................................................. 14–15
Dismantling the PT-27 Tool ........................................................................................... 16
Maintenance and Cleaning .......................................................................................... 17
Troubleshooting Tips .................................................................................................... 18
PT-27 Tool Kit ............................................................................................................... 19
Limited Warranty .......................................................................................................... 20
The Simpson Strong-Tie®PT-27 tool is a low-velocity or indirect-acting, powder-actuated tool (PAT).
Do not attempt to operate this or any other tool before obtaining proper training and
operator certification.
Read this manual carefully
Understanding the safety features, operating principles and limitations of the tool will help you
operate the tool with the greatest SAFETY and efficiency. Simpson Strong-Tie disclaims any
responsibility for incidents resulting from the disregard of these instructions.
Table of Contents
Introduction

4© 2022 Simpson Strong-Tie Company Inc. T-A-PT-27MNL22-R
General handling of powder-actuated tools
1. Always point the tool away from yourself and all bystanders.
2. Open the tool before operating to make sure it is not loaded.
3. Never place your hand or any part of your body over the front of the tool.
4. Never operate the tool without checking to see if the barrel is free of obstructions and that
the tool is clean and in good working condition.
5. Never attempt to alter, modify or manufacture parts for use in your Simpson Strong-Tie®tool;
this can cause malfunctions and result in unsafe functioning of the tool. Use only genuine
Simpson Strong-Tie parts, fasteners and powder loads at all times.
6. Always wear eye and ear protection for operators and bystanders. Head protection is
recommended. Serious injury or death can occur if these safety items are not used.
7. Posting a warning sign, “Warning, Powder-Actuated Tool in Use,” is a minimum warning
where PAT tools are in use. Sign to be at least 8" (203.2 mm) by 10" (254 mm) in size with
1" (25.4 mm) font height letters.
8. Always properly brace yourself when working on scaffolding or ladders.
9. Never use powder-actuated tools in flammable atmospheres.
10. Never use the tool for anything other than its intended purpose.
11. Use common sense and good judgment. Know the material you are fastening into,
making certain it is compatible with the powder-actuated tool.
Handling of powder loads and powder-actuated tools
1. Never carry powder loads in the same pocket or container with fasteners
or any other hard objects.
2. Never use powder-actuated loads in firearms. They are more powerful
than normal small arms ammunition.
3. Never carry a loaded tool from job to job.
4. Never use powder-actuated tools in flammable atmospheres.
5. Never discharge the tool without a fastener. Injury or damage to the tool could result.
6. Never attempt to force a load into the chamber of the tool.
7. Never strike or pry a load.
8. Never leave a loaded tool or the powder loads unattended. Store under lock and key.
General Handling of PAT and Powder Loads

© 2022 Simpson Strong-Tie Company Inc. T-A-PT-27MNL22-R 5
Base material suitability and the center punch test
Before loading the tool or fastening into any material, check the suitability and thickness of the
base material. To check base material suitability, give it the center punch test.
Center punch test
Using the fastener as a punch, take a hammer and strike a solid blow to the actual material you
wish to fasten into, then look for these results:
1. If the point of the fastener is blunted, the material is too hard and is unsuitable. If the material
is too hard, the fastener can ricochet, and possibly escape, striking you or bystanders causing
serious injury or death.
2. If the material cracks or shatters, it is too brittle and is unsuitable. This can result in particles
striking the operator or bystanders, or the fastener could pass completely through the base
material causing serious injury or death.
3. If the fastener sinks into the material with the hammer blow, the material is too soft and is
unsuitable. If the material is too soft, the fastener can pass completely through and strike
someone on the other side causing serious injury or death.
4. If the fastener makes a small indentation in the base, the base material is suitable for
fastening into.
Do not use powder-actuated tools for fastening into these materials:
1. Vertical mortar joints
2. Bricks
3. Hollow block or tile
4. Glazed tile
5. Glass
6. Hardened or tool grade steel
7. Cast iron
8. Welded areas or torch cuts
9. Spring steel
10. Natural rock
Base material thickness
Thickness of the base material is perhaps the most important consideration for good safe
fastenings. In concrete, the thickness must be three times the shank penetration; in other words,
for 1" (25.4 mm) of shank penetration, the concrete must be at least 3" (76.2 mm) thick. In steel,
the thickness must be equal to or greater than the diameter of the shank. Fastening into any base
material, which is too thin, may enable the fastener to pass through and escape — resulting in
serious injury or death.
Making Safe Fastenings

6© 2022 Simpson Strong-Tie Company Inc. T-A-PT-27MNL22-R
Guidelines for safe fastening
1. Never hold the tool at any angle other than perpendicular to the work surface. Make sure that
no debris is present on the surface.
2. Never set a fastener too close to another installed fastener as this can cause a ricochet.
3. Never fasten less than 3" (76.2 mm) from the edge of unsupported concrete or masonry, or
less than
½
" (12.7 mm) from the edge of steel, except for specific applications recommended
by the tool manufacturer.
4. Never fasten into rough, spalled, cracked or uneven concrete. Fasten at least 3" (76.2 mm)
from the outer edge of a spalled area.
5. Never fasten into material that is too hard, such as hardened steel, welds, cast steel, marble,
spring steel, natural rock, etc. This could cause the fastener to shatter and escape and result in
serious injury or death.
6. Never fasten into material that is too brittle, such as glass, glazed brick, glazed tile, slate, etc.
This could cause the material to shatter and result in serious injury or death.
7. Never fasten into material that is too soft, such as wood, plaster, drywall composition board,
plywood, etc. This could cause the fastener to pass through and escape resulting in serious
injury or death.
8. Never leave the chamber loaded. If you decide not to make a fastening after having loaded the
tool, remove both the powder load and fastener from the tool before returning it to its case.
9. Never place your hand or any part of your body over the front of the tool.
10. Never point the tool toward any person, loaded or not.
The “Nevers” of PAT Fastening

© 2022 Simpson Strong-Tie Company Inc. T-A-PT-27MNL22-R 7
PT-27
Model
No.
Shank Dia.
(in./mm)
Head Dia.
(in./mm) Accessory Use Pin Length
(in./mm)
PDPA 0.157/4.00 0.3/7.4 —Attachment of cold-formed steel or wood to structure Max. 2
½
/63.5
PDPAWL 0.157/4.00 0.3/7.4 1" (25.4 mm) washer Attachment of cold-formed steel or wood to structure
with additional bearing surface All
PDPAT 0.157/4.00 0.3/7.4 Top hat Attachment of cold-formed steel to structure
with additional clamping All
PCLDPA 0.157/4.00 0.3/7.4 90˚ clip Attachment of suspended ceilings
and overhead applications All
PECLDPA 0.157/4.00 0.3/7.4 120˚ clip Attachment of suspended ceilings
and overhead applications All
PTRHA 0.157/4.00 0.3/7.4 Threaded hanger clip Attachment of suspended ceiling, piping and
other overhead items using threaded rod All
PINW 0.157/4.00 0.3/7.4 1 7/16" (36.5 mm)
metal washer Attachment of insulation board (metal washers) All
PINWP 0.157/4.00 0.3/7.4 13/8" (34.9 mm)
plastic washer Attachment of insulation board (plastic washers) All
PHBC 0.157/4.00 0.3/7.4 Highway basket clip Attachment of rebar and dowel basket anchorage All
PBXDP 0.157/4.00 0.3/7.4 BX cable clip Attachment of BX cables to structure All
PCC 0.157/4.00 0.3/7.4 Conduit clip Attachment of conduits to structure All
Prepare for loading
1. Always check prior to operating a tool that it is not loaded with a powder load or fastener.
2. Always check to be sure that the tool is clean. Excessive dirt or debris can cause
accidental firing or misfiring of the tool.
3. Never load or fire the tool 3" (76.2 mm) from the edge of unsupported concrete or masonry,
or less than
½
" (12.7 mm).
4. Never use improper powder loads or fasteners in the tool, as this may be unsafe or
damage the tool.
5. Always insert the fastener first, and the load last. Make sure you never double load
the fasteners.
6. Always perform the center punch test as described in this manual before fastening into any
unknown base material.
7. Always make a test fastening with the lowest power loads and work your way up in power
as needed.
Fasteners for the PT Tool
Model No. Description
P27SL2/P27SL2A .27 Cal. — Brown (level 2)
P27SL3/P27SL3A .27 Cal. — Green (level 3)
P27SL4/P27SL4A .27 Cal. — Yellow (level 4)
P27SL5/P27SL5A .27 Cal. — Red (level 5)
Powder Loads for PT-27
Before Chambering a Powder Load
Selecting Fasteners and Loads
Only use fasteners and powder loads designed for this tool as supplied by Simpson Strong-Tie.

8© 2022 Simpson Strong-Tie Company Inc. T-A-PT-27MNL22-R
1. If the powder load does not fire after pulling the trigger, hold the tool firmly against the work
surface for at least 30 seconds. Carefully remove the tool from the work surface making sure to
point it away from yourself and bystanders. Remove the load and dispose of it in a can of water.
Unfired loads must never be thrown in trash containers or carelessly discarded in
any way.
2. NEVER attempt to force or pry an unfired powder load from the chamber with a sharp or pointed
object as this may cause an accidental discharge.
3. NEVER attempt to disassemble a jammed tool containing a live powder load. Tag the tool
“DO NOT USE” and store it safely in a locked case. Call your Simpson Strong-Tie®representative
for tool repair.
4. If at any time during the operation of the tool you feel it is not working properly, STOP using it
and call your Simpson Strong-Tie representative.
5. Check the work surface to be sure it is clear of debris. Clear away any debris so that the tool sits
flush on the work surface.
6. Check the work area for explosive or flammable materials. If any are found, remove them before
operating the tool.
7. Check the chamber of the tool to be sure there is no dirt, grit or foreign objects present.
8. Check the nosepiece to make sure you don’t double load it with fasteners and that it is clear
of any obstruction.
9. Any tool found not to be in proper working condition shall be immediately removed from
service and tagged “Defective Tool” until it has been repaired according to the manufacturer’s
instructions.
BEFORE loading the tool, operate it a few times on a solid surface making certain all parts
move freely and that the firing pin clicks when the tool is fully depressed and the trigger is pulled.
Discharging the tool without a load in the chamber will cause “dry firing,” which will not damage
the tool.
Safe Handling Practices of PAT

© 2022 Simpson Strong-Tie Company Inc. T-A-PT-27MNL22-R 9
SAFETY STARTS WITH YOU
As the powder-actuated tool operator, your safety and the safety of those around you should
always be kept in mind. Consider that the least powerful load used in powder-actuated tools
produce approximately ten times the power of a .22 caliber long rifle cartridge. Respect this
power as you would a chain saw, a lawn mower or a rifle.
There are two types of powder-actuated tools.
CAUTION Powder-actuated tools are capable of fastening into concrete and/or steel. The
fastener enters the work surface with an extreme amount of energy. Make certain not to
misdirect the energy.
Indirect-acting type tool
Indirect-acting type tools work by expanding gases that act directly on a
piston, which drives the piston forward to strike the fastener.
Direct-acting type tool
Direct-acting type tools work by expanding gases that act directly on the
fastener without the use of a piston. Direct-acting tools are no longer
manufactured in North America and are regarded as far less safe to operate
than indirect-acting tools. Simpson Strong-Tie only provides indirect-acting
type tools.
1Powder load
releases energy
3
Power fastener installs
into concrete, cement
block or steel
2Piston drives
forward
Operating Principles of PAT
The PT-27 is an indirect-acting type tool.

10 © 2022 Simpson Strong-Tie Company Inc. T-A-PT-27MNL22-R
1
8
9
24
11
32
33
4
34
12
7
35
31
23
19
2
14
13
10
22 3
28
29
30
15
16
21
20 18
17
5
6
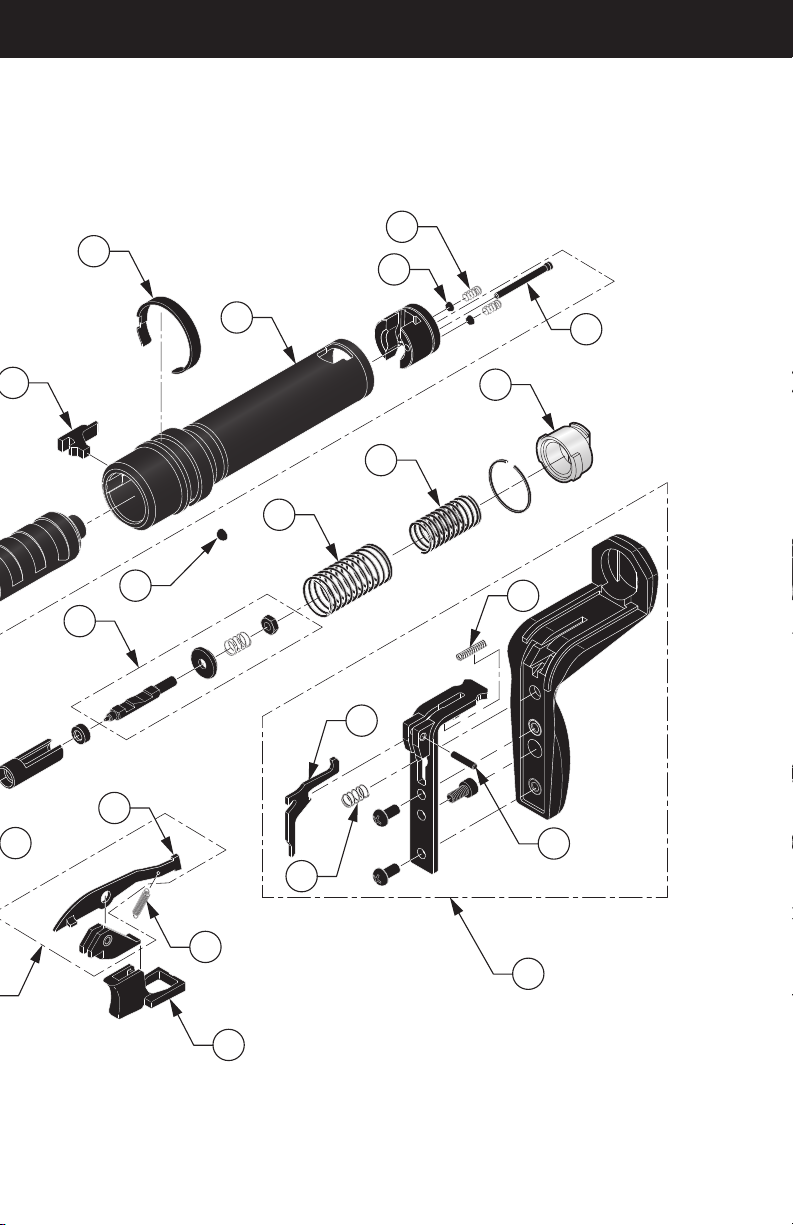
Schematic and Parts for the PT-27 Tool
1. Body Assembly PT-301001
2. Trigger Pin PT-301034
3. Advance Bar Hold PT-301529
4. Advance Bar PT-301530
5. Advance Bar Spr. PT-301531
6. Trigger PT-301533
7. Screw (Bolt) PT-301015
8. Receiver PT-301100
9. Annular Spring PT-301014
10. Ball Bearing (6 mm) PT-301013
11. Piston Stop PT-301012
12. Push Pin PT-301016
13. Ball Bearing (5 mm) PT-301046
14. Spring (Mag. catch) PT-301047
15. Barrel PT-301006
16. Piston PT-301903
17. Piston Ring PT-301208
18. Nosepiece PT-301010
19. Base plate PT-301009
20. Shear Clip PT-301011
21. Sear Holder PT-301300
22. Sear PT-301023
23. Sear Spring PT-301024
24. Firing Pin Assembly PT-301904
28. Spring (Sear holder) PT-301026
29. Spring (Firing pin) PT-301025
30. Plug PT-301028
31. Rubber Pad Assembly PT-301601
32. Rock Arm PT-301844
33. Spring (Lever) PT-301840
34. Trigger Spring PT-301843
35. Pin, Rock Arm PT-301845
© 2022 Simpson Strong-Tie Company Inc. T-A-PT-27MNL22-R 11
1
8
9
24
11
32
33
4
34
12
7
35
31
23
19
2
14
13
10
22 3
28
29
30
15
16
21
20 18
17
5
6

12 © 2022 Simpson Strong-Tie Company Inc. T-A-PT-27MNL22-R
Fastening into masonry materials
Masonry materials suitable for fastening into include:
•Poured concrete
•Precast concrete
•Prestressed concrete
•Grout-filled concrete block
•Horizontal grouted joints
Fasteners are primarily held into masonry by a clamping of the concrete around
the fastener. Factors that influence a fastener driven into concrete include:
•Depth of penetration
•Compressive strength of concrete
•Fastener spacing and edge distance
•Fastener shank diameter
•Concrete aggregate
0.145"– 0.157" (3.68 mm – 4.00 mm)
Diameter Shank Penetration
Soft Concrete/Masonry
2,000 psi (13.8 MPa) – 2,500 psi (17.2 MPa) 9–10 times shank diameter
Average Concrete/Masonry
3,500 psi (24.1 MPa) – 4,000 psi (27.6 MPa) 7–8 times shank diameter
Hard Concrete/Masonry
5,000 psi (34.5 MPa) – 6,000 psi (41.4 MPa) 5–6 times shank diameter
PATMI Minimum Fastener Spacing and Edge Distance into Concrete
Shank Diameter (in./mm)
Minimum Fastener
Spacing (in./mm) Edge Distance (in./mm)
0.100/0.254 to 0.156/0.399 4.0/101.6 3.2/81.3
0.157/4.00 to 0.199/5.07 5.1/129.5 3.5/88.9
0.200/5.08 to 0.250/6.35 5.9/149.9 4.0/101.6
Distances per ASTM E1190 and PATMI. Reference Powder Pin Code listing for specific pin
requirements or conditions.
PATMI Recommended Penetration Depths for Optimal Holding Power
Concrete thickness
Concrete thickness must be at least three times the fastener penetration.
Principles and Guidelines for Proper Fastening

© 2022 Simpson Strong-Tie Company Inc. T-A-PT-27MNL22-R 13
PATMI Minimum Fastener Spacing and Edge Distance into Steel
Shank Diameter (in./mm)
Minimum Fastener
Spacing (in./mm) Edge Distance (in./mm)
0.100/0.254 to 0.156/0.399 1.0/25.4 0.5/12.7
0.157/4.00 to 0.199/5.07 1.0/25.4 0.5/12.7
0.200/5.08 to 0.250/6.35 1.6/40.6 1.0/25.4
Distances per ASTM E1190 and PATMI. Reference Powder Pin Code listing for specific pin
requirements or conditions.
Fish-hooking
“Fish-hooking” is when the fastener curves when driven into concrete, due to the fastener hitting
large, hard, or excessive amounts of aggregate, rebar or any hard object. Fish-hooking can reduce
the holding power of the fastener, result in spalling, and may increase unsafe conditions due to
escaping particles. Fish-hooking can be minimized by:
•Reducing shank penetration.
•Increasing shank diameter.
•Using appropriate powder load level. Excessive power can cause overdriving.
•Fastening through a metal disc.
Fastening into steel
The most common type of steel fastened into are structural steel beams, angles, channels, tees
and plates. The holding power of the powder-actuated fastener is a function of the gripping action
of the steel base material around the fastener and the fusion of the fastener to the base material.
Factors that influence the holding power of fasteners in steel
•Shank diameter: Larger shank diameters increase holding power.
•Thickness of steel base material: Thicker base material increases holding power.
•Fastener point penetration: Getting the point to pass through base material by approximately
¼
" (6.35 mm) maximizes holding power.
•Knurled fasteners: Knurling on the fastener provides interlocking of the shank and the base
material that increases the holding power.
14 © 2022 Simpson Strong-Tie Company Inc. T-A-PT-27MNL22-R
PT-27
PT-27
PT-27
PT-27
PT-27
PT-27
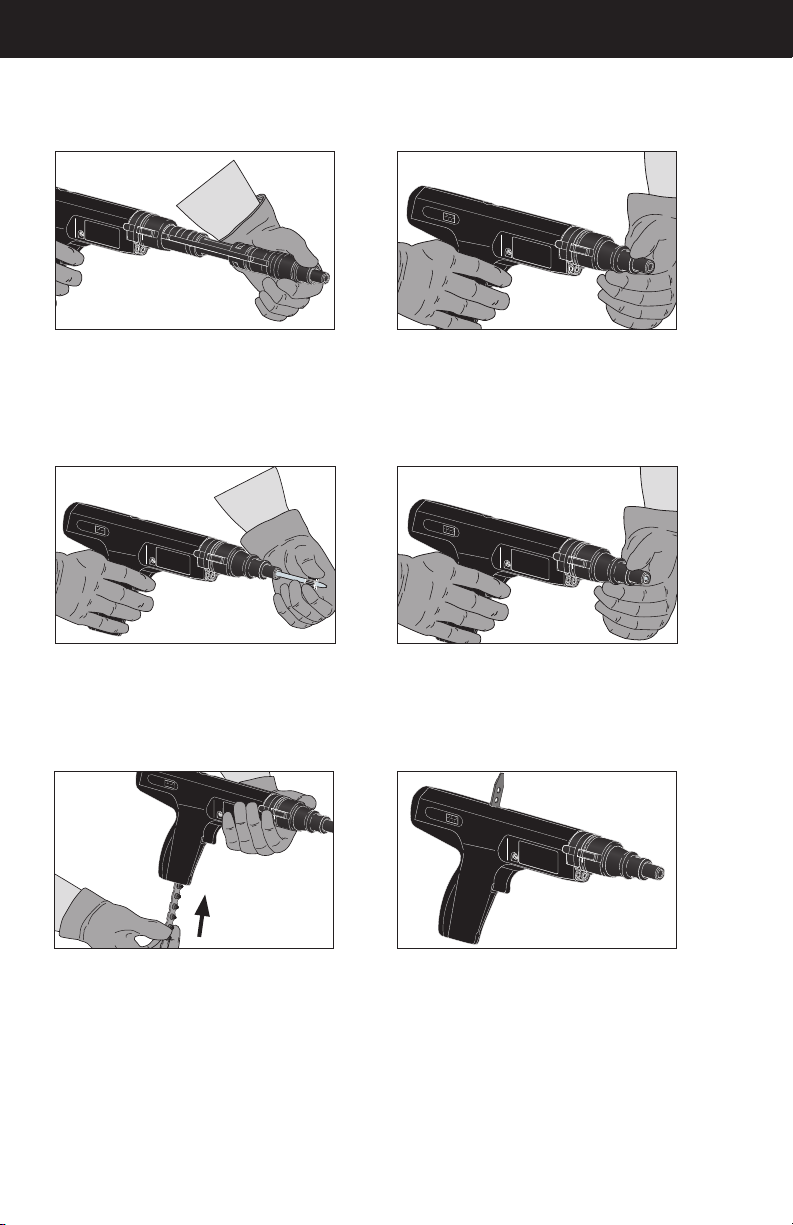
1. Cycle the tool. Grasp the base plate and fastener guide/nosepiece and pull sharply
forward until you feel a positive stop, then pull the base plate and fastener guide/
nosepiece back until it stops and is fully closed. Take care not to pinch your skin
between the base plate and receiver by holding the forward portion of the base plate.
This resets the piston and positions the advance lever in the correct location for
inserting the strip loads.
Never place your hand over the guide/nosepiece of the tool unless inserting a fastener and
then only with the chamber empty.
2. Insert the fastener into the nosepiece of the tool, head or threaded end first. Push
the fastener until the pointed end is even with the face of the nosepiece, or if a
preassembled fastener is used, until the nosepiece is against the fastener accessory.
How to Load and Fire the PT-27 Tool
3. Prior to selecting the power level of the loads, always conduct a center punch test to
determine the suitability of the base material. Always begin with the lowest power loads
(brown) and work your way up in power as needed. Insert the strip load through the
bottom of the handle until it is flush with the bottom.

© 2022 Simpson Strong-Tie Company Inc. T-A-PT-27MNL22-R 15
PT-27
PT-27
PT-27
4. Depress the tool firmly against the work surface using both hands, then pull
the trigger. Make certain you hold the tool perpendicular to the work. Using
the supplied rubber spall stop will help ensure the tool is perpendicular
to the work surface and will help to minimize concrete spalling when the
fastener is installed.
5. After making the fastening, lift the tool off the work surface and pull the base
plate and fastener guide/nosepiece sharply forward. This action resets the
piston and advances the powder load strip to the next powder load.
6. Remove the spent powder strip load by grasping the strip from the top side
of the tool and firmly pull upwards in a smooth motion.
16 © 2022 Simpson Strong-Tie Company Inc. T-A-PT-27MNL22-R
The PT-27 tool has wearable parts that occasionally need replacing, and the tool requires
periodic cleaning. The following is a step-by-step guide to dismantle the tool. Before
dismantling, be sure the tool is not loaded with a powder load or fastener.
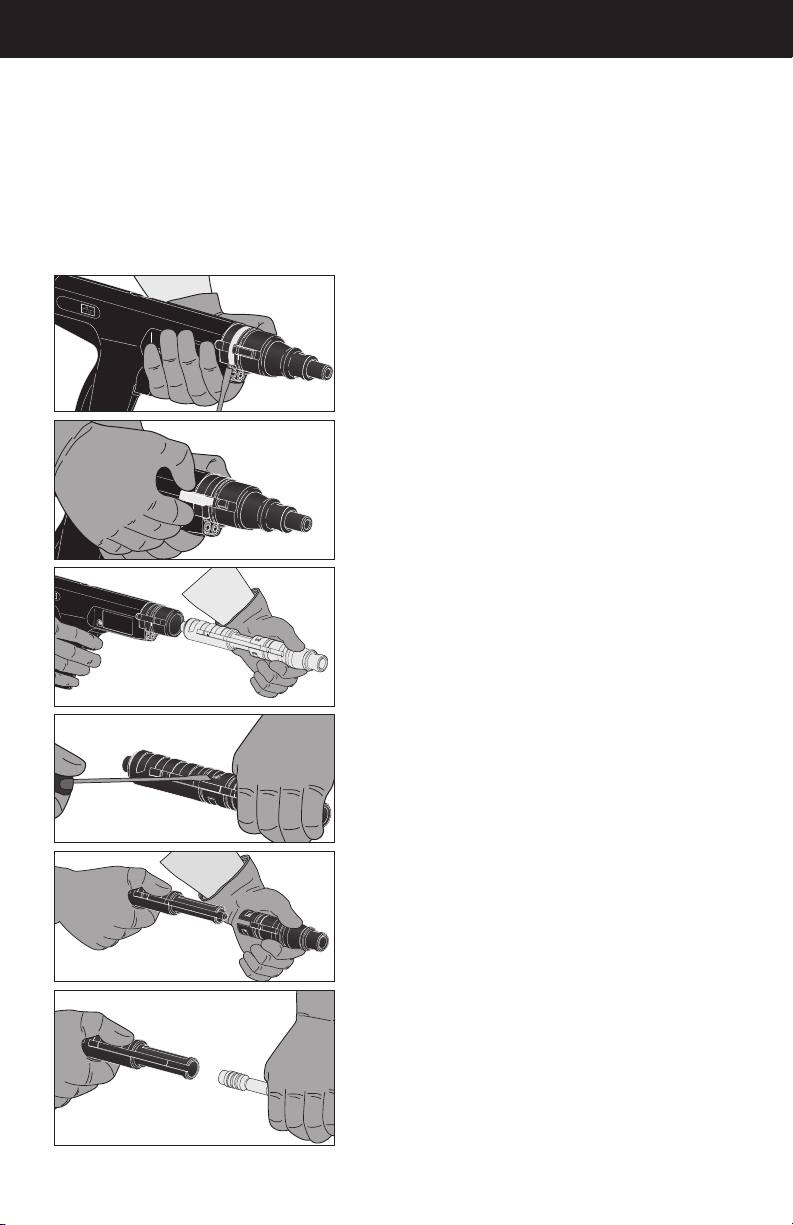
Dismantling the tool
PT-27
(1). Rotate the annular spring off
the piston stop with a flat blade
screw driver or long fastener.
Do not over rotate or remove
the annular spring as it holds
a ball bearing in place on
the opposite side.
PT-27
(2). Lift the piston stop out of
its recess slot.
PT-27
(3). Pull the barrel assembly out
the front of the tool.
(4). Lift and remove the
Shear Clip from its recessed
groove with a flat blade
screw driver.
1. Rotate the annular spring off the piston stop with a flat
blade screw driver or long fastener. Do not over rotate
or remove the annular spring as it holds a ball bearing
in place on the opposite side.
2. Lift the piston stop out of its recess slot.
3. Pull the barrel assembly out the front of the tool.
4. Lift and remove the shear clip from its recessed
groove with a flat blade screw driver.
5. Separate the barrel, base plate and fastener
guide/nosepiece.
6. Pull the piston out of the front of the barrel.
The front of the tool is now disassembled for replacing
wearable components.
Reassemble the tool in reverse order of dismantling.
(6). Pull the piston out of
the front of the barrel.
Dismantling the PT-27 Tool

© 2022 Simpson Strong-Tie Company Inc. T-A-PT-27MNL22-R 17
Cleaning the tool
With the front of the tool disassembled, spray a small amount of detergent oil; brush and wipe
clean with a clean towel the following parts:
1. Piston — make sure to clean the chamber end of the piston and wipe the shaft clean.
2. Barrel — clean inside the breech and on the outside of the chamber end of barrel making
sure the breech is free of any dirt or debris.
3. Base plate — remove dirt and residue from inside the base plate.
4. Receiver — remove dirt and residue from inside the receiver.
5. Nosepiece — remove dirt and residue from outside of nosepiece.
Note: Make sure excess detergent oil is wiped clean. Excessive detergent oil attracts
additional dirt.
Maintaining the PT-27 tool
A clean tool is safer and functions better. This tool should be cleaned after each day of use or
after 1,000 continuous fastenings. While cleaning the tool, check the wearable parts such as
the piston and piston ring for signs of wear or damage.
While cleaning the tool, make sure wearable parts are in good condition
1. Piston — if the end is flared or the shaft bent, replace the piston.
2. Shear clip and connection between barrel and base plate. The shear clip should be
reviewed for deformation/bending and the end of barrel for chipping/wear where the
shear clip contacts.
3. Nosepiece — if damaged or worn.
Tool parts to be cleaned or replaced
Inside Receiver
Annular Spring
Shear Clip Slot
Nose Piece
Piston Stop Shear Clip
Piston
Base plate
Barrel
Chamber End of Barrel
or Breech
Maintenance and Cleaning

18 © 2022 Simpson Strong-Tie Company Inc. T-A-PT-27MNL22-R
Symptom Cause Solution
Overdriving
fasteners
Excessive power Change to next lower power level load strip
Soft base material Check base material – center punch test
Pin too short for application Use longer pin or washer pin
Tool does
not depress
completely
Tool not completely depressed Firmly depress tool before firing
Excessive dirt on chamber, breech or
inside the receiver Properly clean tool
Damaged firing pin or breech Replace damaged parts*
Damaged fastener guide Repair or replace fastener guide
Load misfire Follow safety procedure in manual
Tool did not advance strip See “Strip load will not advance” below
Reduction or
loss of power
Piston is not returned to
rear position
Barrel assembly must be pulled fully forward to
reset piston
Damaged piston or piston ring Replace or repair worn parts*
Damaged piston stop Replace damaged part
Piston will not
fully reset
Excess carbon build-up in barrel Completely clean the tool
Bent or damaged piston Replace piston
Other damaged parts
Tag the tool “Defective – Do not use”
Place the tool in a locked container and
contact your local Simpson Strong-Tie® representative
Plastic debris on piston or
in nosepiece Remove piston, fastener guide and debris
Strip load will
not advance
Strip is inserted incorrectly Check proper installation of strip
Barrel is not fully retracting Remove barrel then reinstall barrel to
reset the strip advance lever
Advance mechanism is damaged Contact your local Simpson Strong-Tie representative
Tag the tool and lock it in a container
Improper strip being used Do not use .25 caliber in this tool
Tool will not
say in closed
position
Ball bearing missing Contact your local Simpson Strong-Tie representative
*Should be performed by qualified individuals.
Troubleshooting Tips
© 2022 Simpson Strong-Tie Company Inc. T-A-PT-27MNL22-R 19
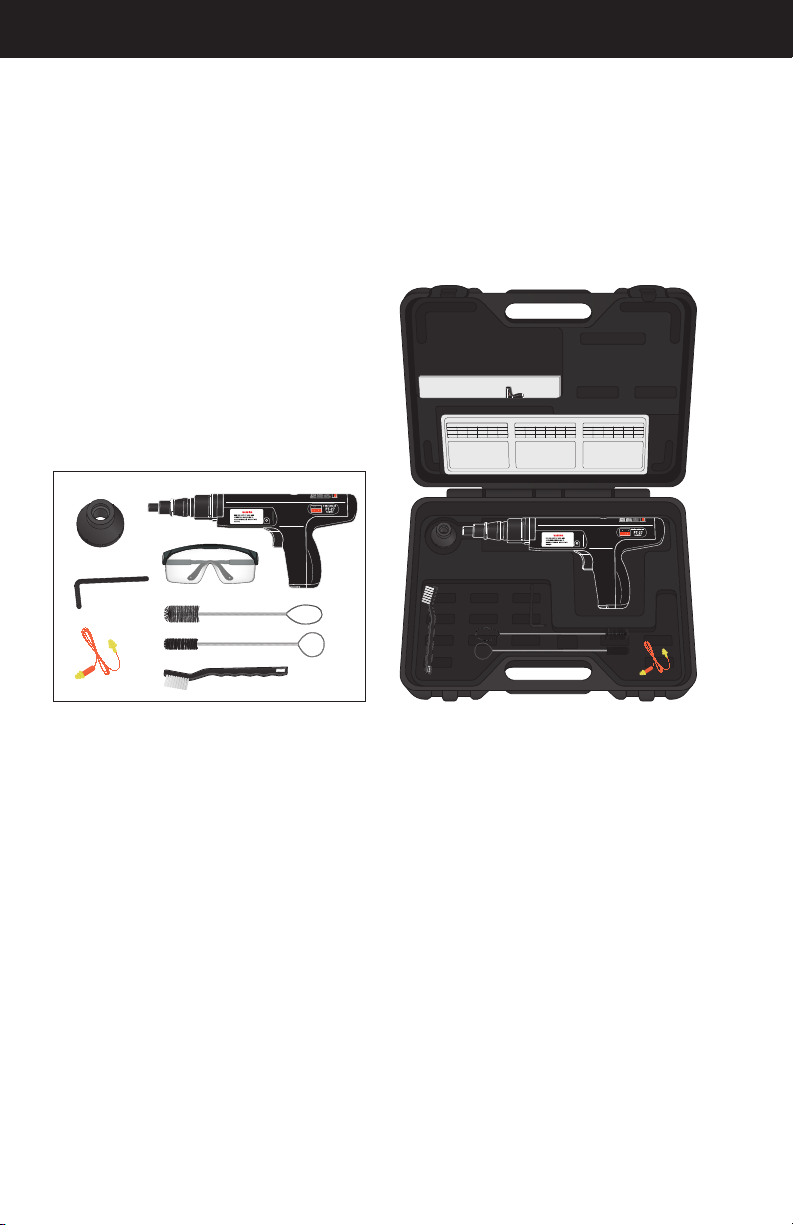
Contents
•Operator’s manual
•Spall suppressor
•Tools for disassembly
•Safety glasses/ear plugs
•Cleaning brushes
•Operator’s exam and caution sign
Tool is sold in a rugged tool box
PT-27 Tool Kit
Allen Wrench
Kit also includes:
- Operators Manual
- Operators Exam
- P.A.T Warning Sign
Spall
PT-27 Tool
Safety Glasses
Large Round Brush
Small Round Brush
Flat Brush
Ear Plugs
CIA
RADOR
PT-27

20 © 2022 Simpson Strong-Tie Company Inc. T-A-PT-27MNL22-R
Simpson Strong-Tie Company Inc. provides this Limited Warranty to original purchasers of the Simpson
Strong-Tie®brand tool product (“Product”). This Limited Warranty is effective as of the date of purchase.
This Product, if properly stored, maintained and used in compliance with all instructions and warnings,
will be free from substantial defects in material and manufacturing for one year of purchase. This Limited
Warranty does not cover normal wear and tear, as determined by Simpson Strong-Tie in its absolute
discretion, and is null and void with respect to: (a) any Product that was purchased from an unauthorized
dealer, retailer or distributor, (b) any Product that was modified or altered, (c) any Product that was
improperly or inadequately serviced or maintained, (d) any Product that was subject to negligence or
excessive or improper use, including use in improper conditions, as determined by Simpson Strong-Tie
in its absolute discretion, (e) any failure or damage caused by the use of a Product with any accessories
other than authentic Simpson Strong-Tie products, or (f) any Product that was subject to any use not
in accordance with the applicable specifications provided with the Product or on the strongtie.com
website. If any Product fails to conform to this Limited Warranty, original purchaser’s sole and exclusive
remedy is either the replacement or repair, at Simpson Strong-Tie election, of the defective Product.
Original purchaser must return the Product to Simpson Strong-Tie along with satisfactory proof of
purchase, with return shipping prepaid by original purchaser. To obtain warranty service, go to strongtie.
com or contact Simpson Strong-Tie promptly at (800) 999-5099. The repaired or replaced Product is
warranted under the terms of this Limited Warranty.
THE LIMITED WARRANTY HEREIN IS EXPRESSLY IN LIEU OF ALL OTHER WARRANTIES, AND,
WHERE LAWFUL, SIMPSON STRONG-TIE DISCLAIMS ALL OTHER WARRANTIES, INCLUDING
BUT NOT LIMITED TO IMPLIED WARRANTIES OF MERCHANTABILITY AND FITNESS FOR A
PARTICULAR PURPOSE AND WARRANTIES ARISING FROM COURSE OF PERFORMANCE,
COURSE OF DEALING OR TRADE USAGE BEYOND THIS WARRANTY PERIOD. SOME STATES
DO NOT ALLOW LIMITATIONS ON HOW LONG AN IMPLIED WARRANTY LASTS, SO THE ABOVE
LIMITATION MAY NOT APPLY TO YOU. WHERE LAWFUL, UNDER NO CIRCUMSTANCES SHALL
SIMPSON STRONG-TIE BE LIABLE FOR INCIDENTAL, CONSEQUENTIAL, PUNITIVE OR SPECIAL
DAMAGES OR DIRECT OR INDIRECT LOSS OF ANY KIND, INCLUDING BUT NOT LIMITED TO
BODILY INJURY, DEATH OR PROPERTY DAMAGE. SIMPSON STRONG-TIE’S ENTIRE LIABILITY
IS LIMITED TO THE PURCHASE PRICE OF THE DEFECTIVE PRODUCT. SOME STATES DO NOT
ALLOW THE EXCLUSION OR LIMITATION OF INCIDENTAL OR CONSEQUENTIAL DAMAGES, SO
THE ABOVE LIMITATION OR EXCLUSION MAY NOT APPLY TO YOU. SIMPSON STRONG-TIE IS
IN NO WAY LIABLE FOR INCIDENTS RESULTING FROM USE WITHOUT PROPER CERTIFICATION
OR DISREGARD OF INSTRUCTIONS AND WARNINGS. THIS LIMITED WARRANTY GIVES YOU
SPECIFIC LEGAL RIGHTS, AND YOU MAY ALSO HAVE OTHER RIGHTS WHICH VARY FROM
STATE TO STATE.
For repair information, go to strongtie.com, type in the tool model number in “Search,” locate the
“Repair Forms” section on the page, and choose the repair form for your region.
The PT-27 complies with OSHA requirements and with ANSI A10.3 standards.
One Year Limited Warranty
5956 West Las Positas Boulevard, Pleasanton, CA 94588 • strongtie.com
Table of contents


