SIMTOO Dragonfly Pro User manual
USER MANUAL
Dragony Pro
Shenzhen Simtoo Intelligent Technology Co., Ltd.
West Industry Building A5, Park Road, Bao An District,
Shenzhen, China 518000
TEL: +86 755 2373 2452
Web: www.simtoo.com
Email: [email protected]
New vision of the world

Precautions
Safe Flying Tips
1. Fly in an open wide area without large obstacles like buidings, trees or electric wires in 30
meters as they may distort the GPS signals or crash the aircraft. Do not fly close to metal
structure with strong magnetic field.
2. Place the aircraft on flat ground before take-off. After powered on, dragonfly will start a
self-checking of fly control system and gimbal by itself. Do not touch or move it during the
self-checking as it may result in failure in self-checking and incorrectness of level calibration.
3. Dragonfly cannot take off until it gets enough GPS satellites and the Remote / Watch
screen shows a “ ”. Do not start follow me flight mode until the watch gets 8 GPS
follow-me satellites and shows a “ ”. If the aircraft cannot find satellites normally,
change to another place and try again.
4. Do not fly in strong winds, rains, lightning, snow or fog. Bad weather may weaken the
GPS signals or even damage the aircraft.Do not fly in water area as dragonfly is not
waterproof.
5. Keep the aircraft 5 meters away from people or animals when it takes off. Do not fly
over the crowds.
6. It is recommended to keep the flight height and range within 100 m even the RC distance
is 1 km. Do not fly across large obstacles. Always keep dragonfly within the visual line of
sight.
7. If dragonfly suddenly deviates or keeps ascending over 6 meters due to surrounding
interference, immediately press the “hover” button and “land” button to force
dragonfly to land.
8. Ensure all components are in well condition and fully charged before every fly.
5meters
100 meters
100 meters

Diagram1:
Battery Charger
Camera Watch remote controller
USB Charge Port
AC Power Cord
Charging Time:
Battery - 2 hours Remote Controller – 6 hours Watch - 1 hour Camera - 2 hours
XH Balance plug
USB Cable
Notes: Insert the XH balance plug into the correct position of battery. Otherwise, the battery
cannot get charged with all 4 LEDs flash continuously. When the remote controller and watch
are charging, the screen will display a indicating the charging progress. The camera will
start charging with red lights on and get fully charged with red lights off.
SD
Box Content
Box Content
Please go through the checklist of items below after unboxing:
The box contents may vary occasionally due to different configurations. Please subject to the
description of the retail store or buying page.
Assembly
Step1.Charging (Diagram 1)
Turn on the battery, remote controller, watch and camera to check
the battery level.
Insert the AC power cord into the charger and plug into a
100-240V AC socket.
Connect the battery with the balance charger with a XH balance
plug.
When the battery is charging, the LEDs will light and indicate the
battery level.
The LEDs on the charger will also flash one by one and indicate the
charging progress.
When all 4 LEDs are lighting, the battery has been fully charged.
The remote controller, watch and camera require the same USB
cable to charge.
Aircraft x1
SD Card x 1
Hardshell Case x 1
Propeller x 4 Landing Gear x 2 Gimbal x 1
Camera x 1 GPS Watch x 1 Remote Controller x 1
Battery x 1 Balance Charger & Cable x 1 USB Cable x 1
Short Circuit Contactor x 1 User Manual x 1

Assembly
Step 4. Propellers ( Diagram 4)
Assembly
Step 2. Unfold the Aircraft ( Diagram 2)
Diagram 2:
Diagram 3:
landing gears
Step 3. Landing Gears (Diagram 3)
front arm
front arm rear arm
rear arm
Push down the spring button under the motor arm and slowly twist
the arm till the end.
The arm will be locked in place with a click.
Unfold the rear arms before unfold the front arms.
To fold the aircraft, push down the spring button and twist the
arms in the reverse order.
Match the landing gears with the gear mounts and push up into
place.To dismount the gears, just pull them down smoothly.
Black Motor
Silver Motor
Black Motor
Silver Motor
Black cap propellers Silver cap propellers
lock
unlock
lock
unlock
Diagram 4:
Notes: Make sure the propellers are tightened on the right motors before fly otherwise the
aircraft may crash.
Attach the silver cap propellers onto the silver motors and secure
them by spinning clockwise.
Attach the black cap propellers onto the black motors and secure
them by spinning counter-clockwise. Arrows around the propeller
cap indicate the directions of tightenning and loosening.
To release the propellers from motors, just spin in the opposite
direction.

Assembly
Assembly
Step 5. Gimbal & Camera (Diagram 5) Step 6. Battery ( Diagram 6)
Camera strap Camera Gimbal Screw
Notes: Do not install or remove gimbal while the aircraft is powered on. Otherwise, the
gimbal will be damaged.
Diagram 5:
Unscrew the camera strap from gimbal.
Attach the camera into the gimbal frame ( the camera lens is on
the right).
Fasten the camera strap with the screw.
Fit the gimbal board under the airframe.
Slide the gimbal board into the mount, match the opening of
gimbal board with the mount screw hole and hold in place with
screw. Diagram 6:
Notes: Do not install or remove battery while it is power on. Otherwise, the battery will be
damaged.
Do not force the battery into airframe if it gets stuck. Wiggle the battery a few times until
the battery plug goes into the PCB slot.
airframe
PCB Slot
Battery Plug
Push
Spring Button battery
Gesture to install or remove battery
battery plug
Pull up the spring button at the airframe tail.Align the battery
with the airframe, match the battery plug with the PCB slot and
slide the battery into the airframe until it is locked with a click.
To remove the battery, pull up the spring button first and pull out
the battery.
Gimbal Mount
Gimbal Board
Assembly
Assembly
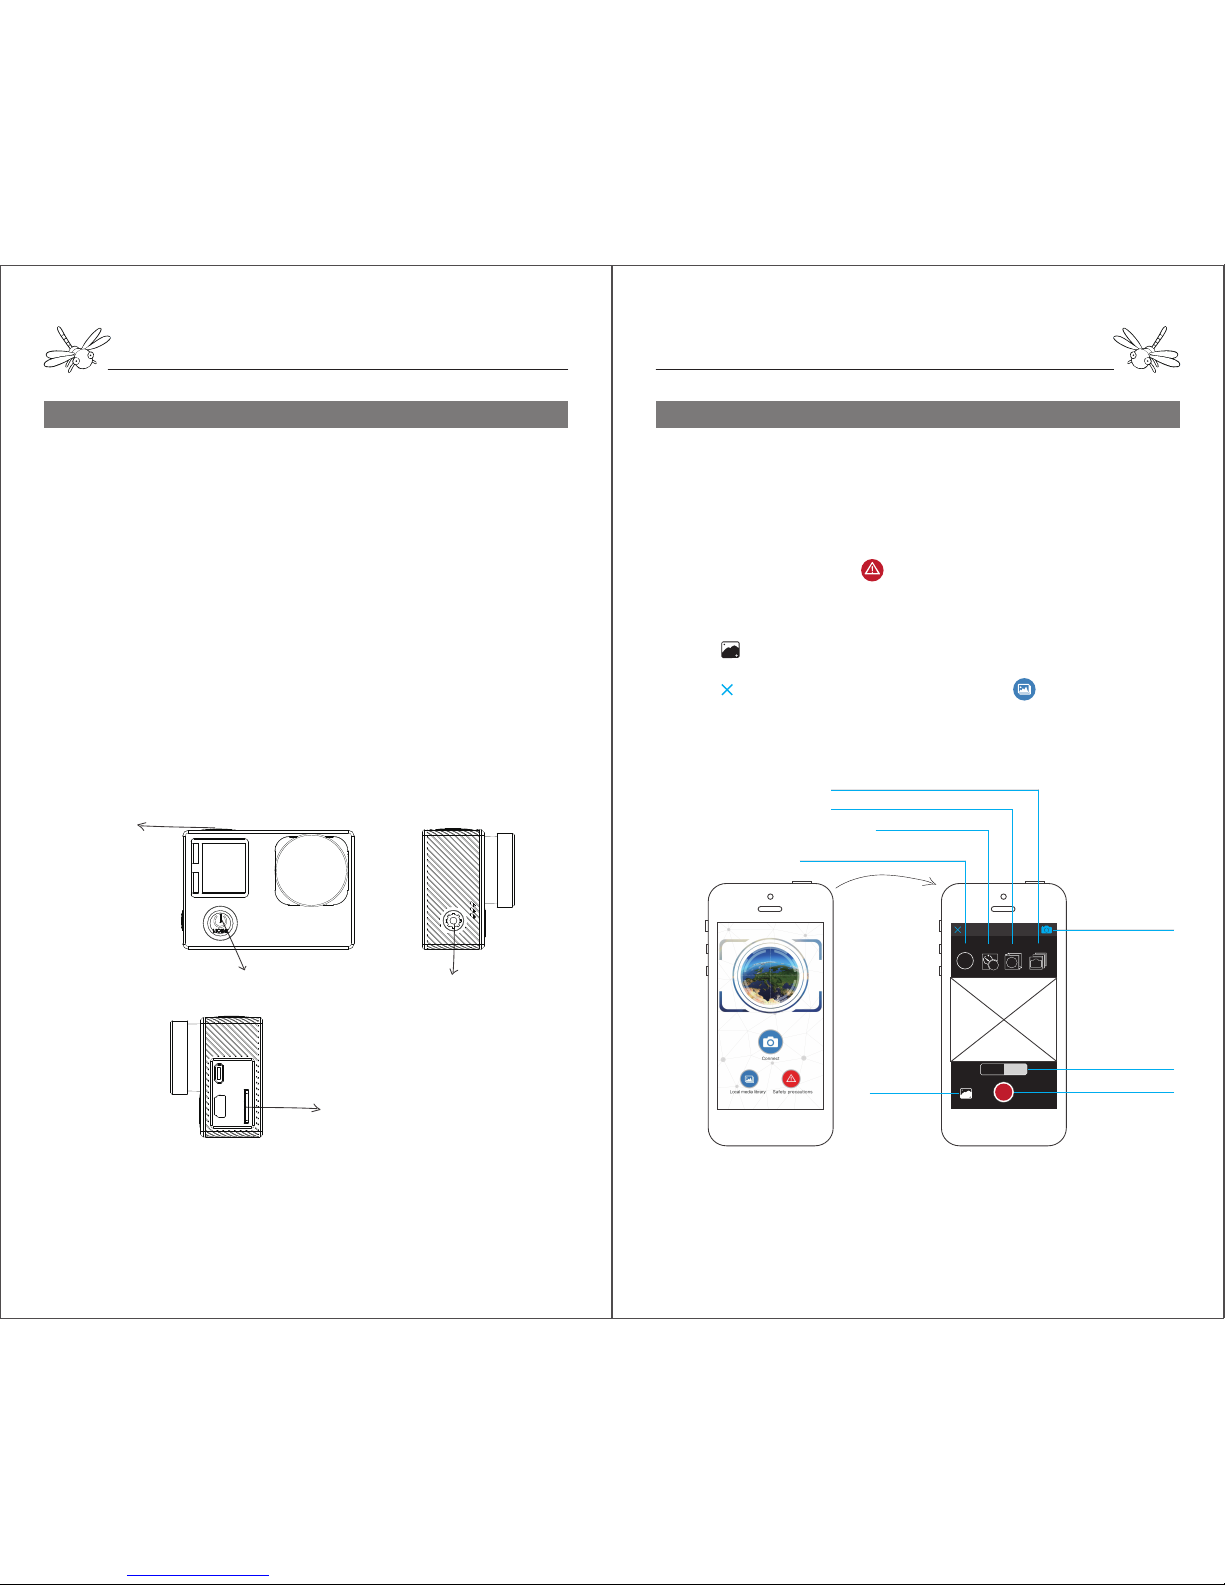
Step 7.Camera Instruction (Diagram 7)
Diagram 7:
Notes:
1. Do not insert or take out the SD card while the camera is power on. The card won’t go
into the slot if inserted in the opposite position.
2. The WI-FI may be weakened when the camera power is low. The WI-FI distance and
image fluency may vary on different mobile devices and different surroundings.
3. The camera can only support 4k or 2.7k video with SD card reading rate over 80MB/S.
Settings/ WIFI on
SD Card Slot
1. Remove the lens cover and film.
2. Insert a Micro SD/TF card into the camera. Micro SD supports
max 64GB.
3. Press and hold “MODE” to turn on the camera. The camera
will automatically turn on the WIFI and display the WI-FI name and
initial password.
4. If you want to change camera settings, press ▼ to close the
WIFI. Press ▲ to enter setting interface. Then press ▲ or ▼ to
select settings options. Press “OK” to enter and confirm the
settings you’ve changed.
5. Press “MODE” once to exit setting interface. Press ▼ to
restart the WIFI if needed.
6. Press and hold “MODE” to turn off the camera.
7. The photos or videos can be transmitted to computer from the
SD card or USB cable.
Step 8. Camera APP (Diagram 8)
Diagram8:App Instruction
Notes:
1.Simtoo APP requires android 4.2 or later and IOS 7.1 or later.
2.The APP cannot shoot if there is no SD card inside the camera.
3.The image transmission range is around 30 meters. The video may delay on the App if the
aircraft gets too far from your mobile device.
resolutions of photo and video
Media Library Shutter Button
Shooting Modes
APP Settings
time of delay shooting
time interval of burst shooting
the numbers of shots in continous shooting
FHM
Resolution Delay Interval
ON ON
ON
Burst
Camera
1. Search “Simtoo” on Apple Store or Google Play and dowload
it to your mobile device.
The APP is also available on our website www.simtoo.com for
Android version.
2. Turn on the camera and connect your mobile device to camera
wifi. (Wifi name: Istarcam Initial Code: 1234567890)
3. Open the APP and tap for safety precautions before fly.
Tap “Connect Camera” to enter the live video interface.
4. Tap“Photo”or“Record”to switch the shooting mode you
want. Tap the shutter button to take photo or video.
4. Tap to albums and tap “save” the download file to your
mobile device.
5. Tap to exit the live video interface. Tap to check the local
files you have downloaded from the camera.
Photos Record
Power Button/ Down Arrow
OK Button
Fly with Remote Controller
Fly with Remote Controller
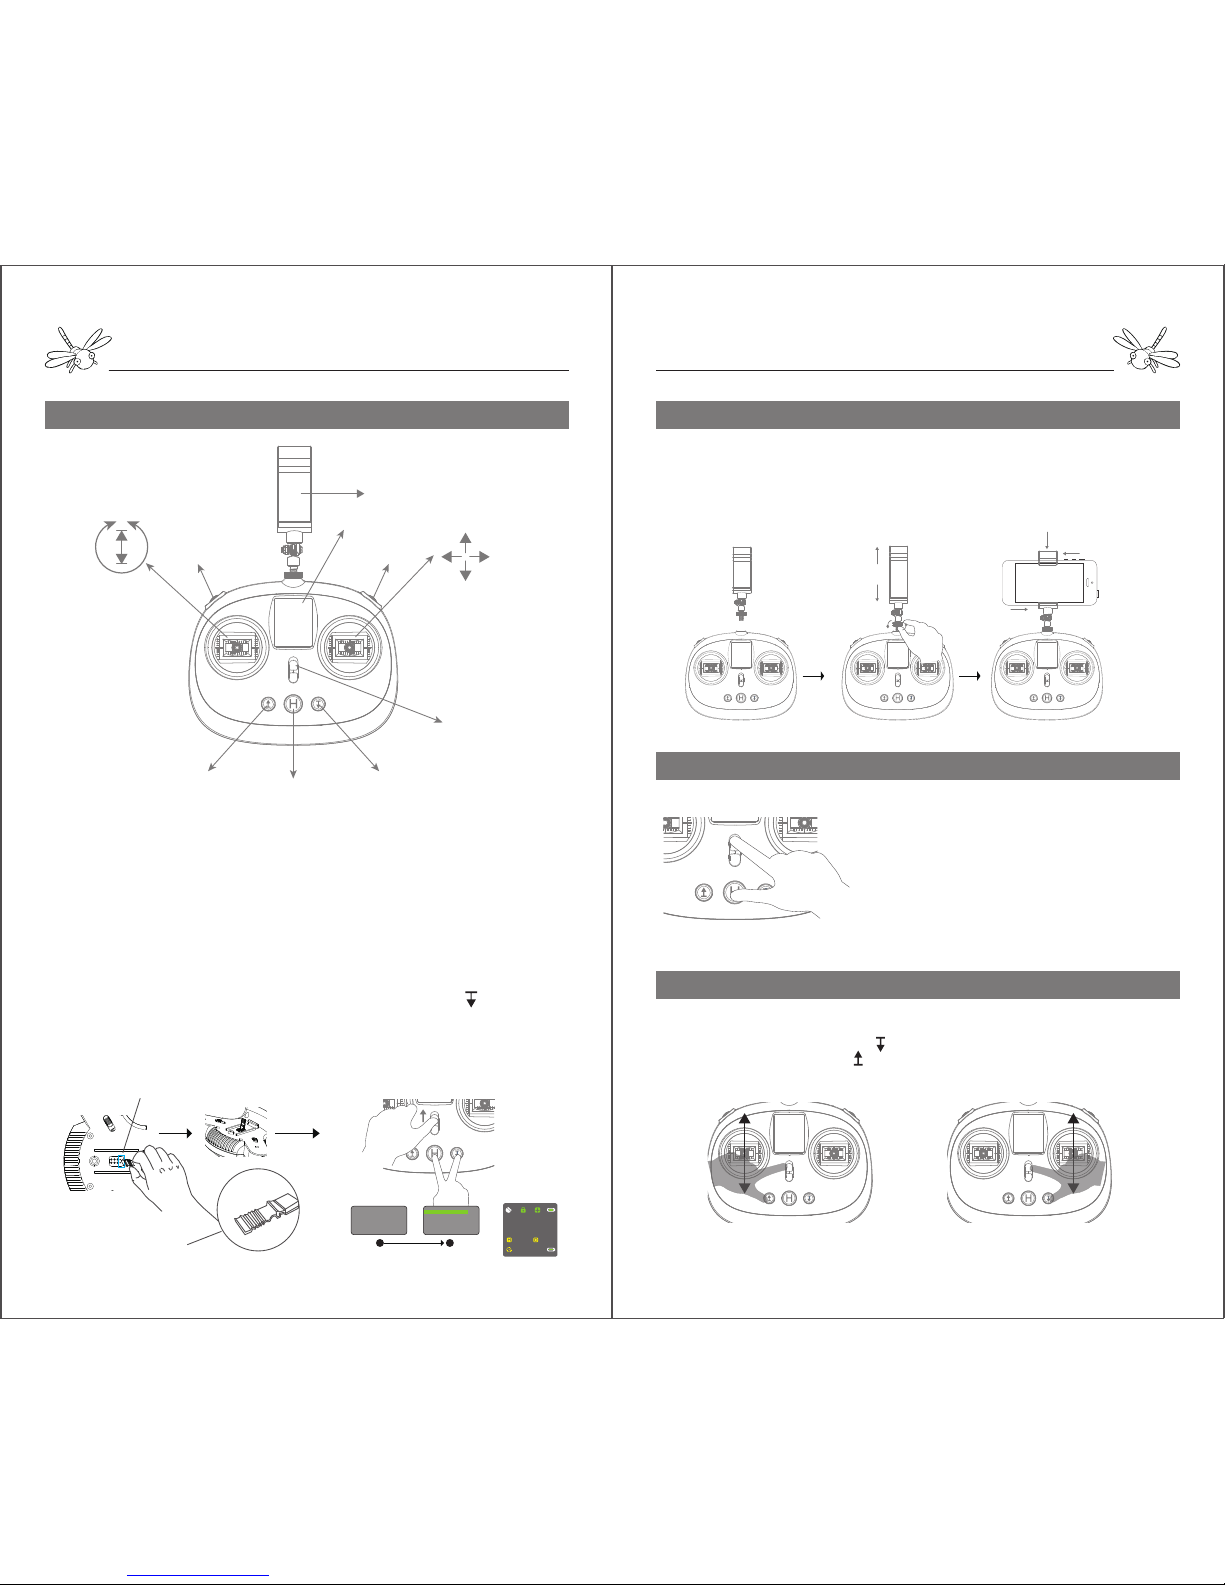
Instruction of Remote Controller
Codes Binding Aircraft to Remote Controller
The aircraft is connected to the remote controller by default. It is
necessary to bind the codes again just in case that dragonfly is
linked with the watch before.
1. Find a short circuit contactor in the plastic bag. Plug the
contactor into the jumper header on the gimbal mount to make
the aircraft a short circuit.
2. Turn on the aircraft and then remove the contactor.
3. Turn on the remote controller and hold the H and at the
same time until the screen says “Binding ID=XXXX”.
4. The remote controller will get connected with the aircraft when
the screen enters the control interface.
TAKE OFF
CIRCLE
HOVER LANDING
RETURN HOME
ON/OFF
LCD Screen
Mobile Holder
Gimbal Pitch Gimbal Yaw
ON
OFF
ON
OFF
Prepare the remote controller
1. Drive the mobile holder into the remote, fix the nut on the
screw bar to make the holder face to you.
2. Adjust the holder to your desired postion, stretch the holder
clamp and attach your mobile device into the clamp.
ON
OFF
ON
OFF
ON
OFF
ON
OFF
Normal Mode & Advance Mode
Left Mode & Right Mode
The default control mode is beginner mode (NOR
MODE) which requires 6 GPS satellites to launch
dragonfly. In professional mode (ADV MODE), dragonfly
can take off without GPS signals limit and fly at a higher
speed and longer range. To switch the control modes,
hold H and turn on the remote at the same time.
However, it is not recommended to choose professional
mode for beginners.
The left stick is set to control the power of motors by default. The power control can be
switched to the right stick by holding and turning on the remote. To switch back to the
left, turn on the remote and hold .
ON
OFF
ON
OFF
Power
Left Mode(American Hand) Right Mode(Japanese Hand)
Power
Jumper Headers
Short Circuit Contactor 1 2
Binding..
Connecting...
ID=XXX
...............
Initialized
00.0m 00.0m
00:00:00
16
Fly with Remote Controller
Fly with Remote Controller
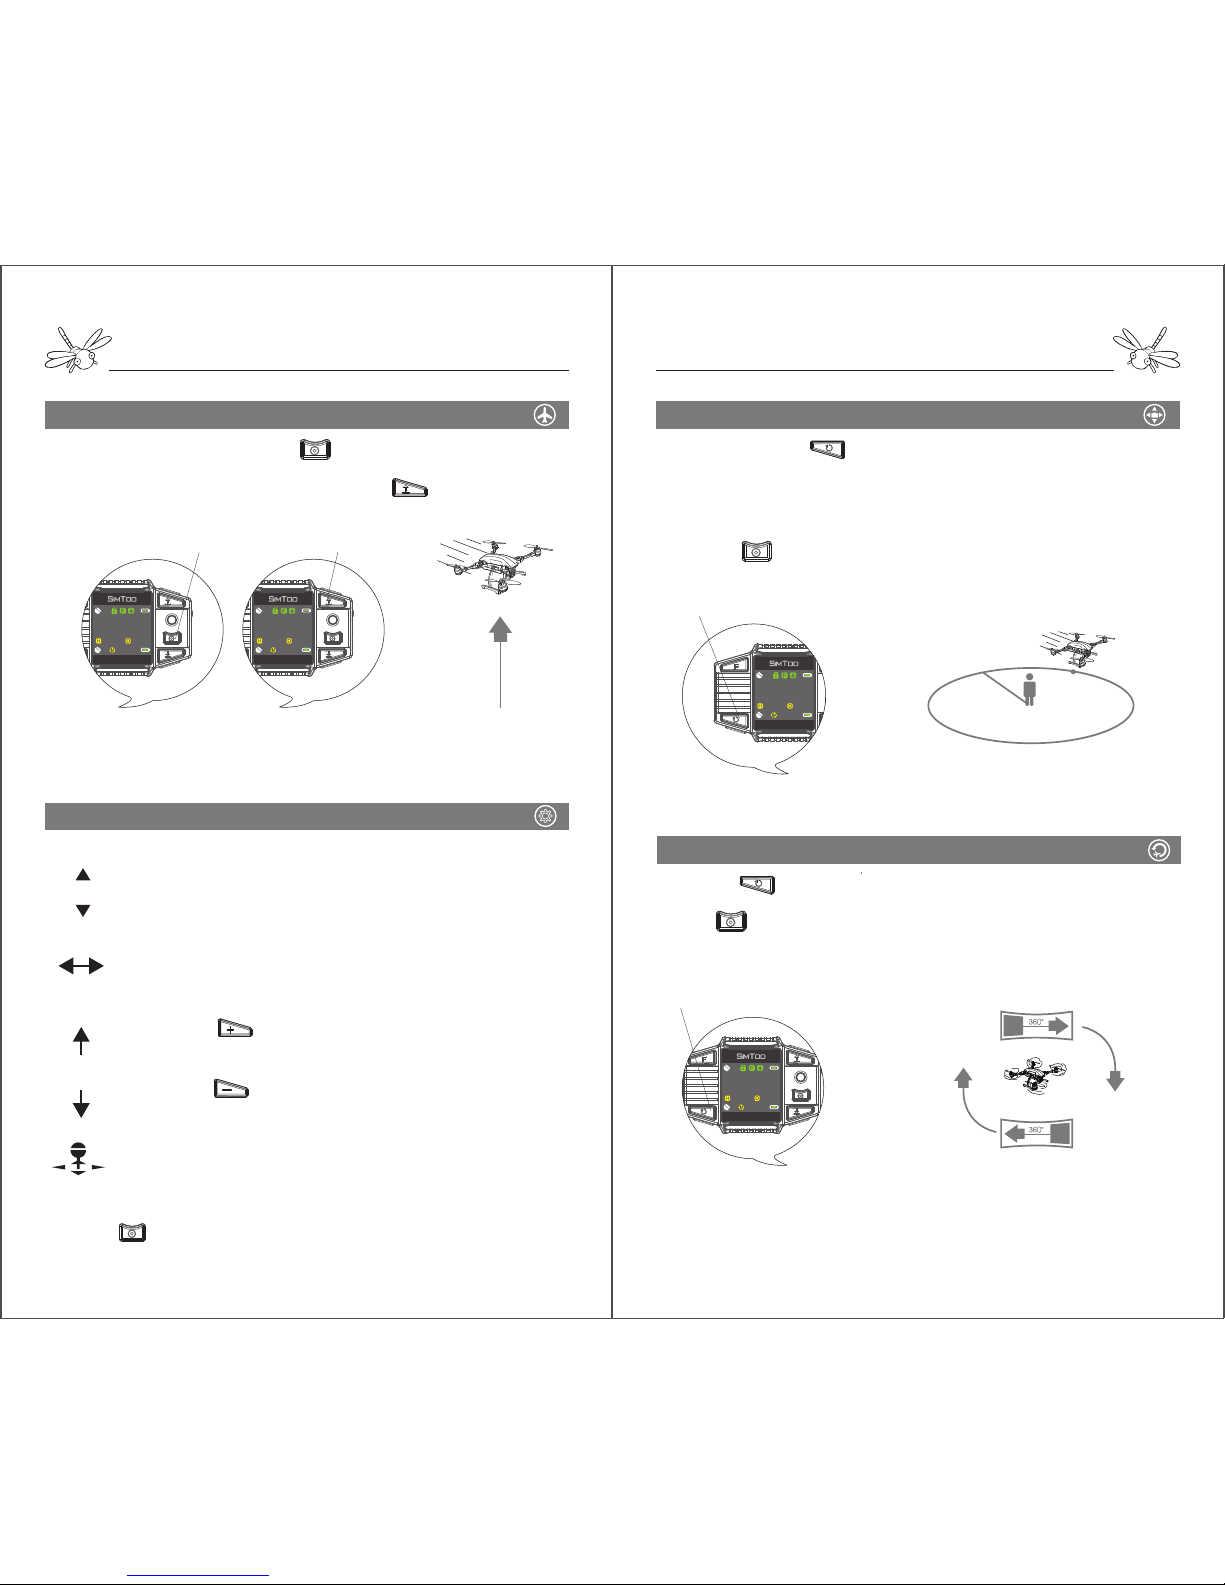
Take Off
Position Control
1. Activate the motors by pushing the left stick to the lower right
corner and hold it for 3 seconds.
2. 2. While the motors are spinning, pull the stick up slowly to take
off dragonfly. Tapping will also make dragonfly ascend to 5
meters high and hover in place autonomously.
Prepare the aircraft
1. Place dragonfly on a flat platform and turn on the battery by
pressing & hold the power button on the tail. Dragonfly will
immediately start system self-checking when the front red LEDs
light once and rear blue LEDs quickly flash.
2. When the blue LEDs slowly flash and the aircraft gives out a beep
sound, it indicates that the fly control system is functioning all
right.
3. When the gimbal is level and the aircraft gives out a second beep
sound, it indicates that the gimbal is functioning all right.
4. Turn on the remote controller by pushing up the power switch. In
a few seconds the remote controller will get connected to the
aircraft when the screen enters the control interface.
5. Wait until the aircraft gets at least 6 GPS satellites and the
screen display a icon before take-off. If the satellite signals are
not stable, try it at another place.
Notes: 1. The red LEDs indicate the front of the aircraft. Always be aware of the orientation
during fly. Pressing and hold the H can turn off the front red LED lights.
2. Slightly push the stick to avoid sudden or unexpected changes of position.
When the stick is back at the center, dragonfly will hover at its current spot.
Notes: If dragonfly doesn’t take off within 6 seconds after the motors are activated, the
motors will shut down and be locked.
Notes:
1. Do not touch or move dragonfly while it is doing self-checking.
2. If dragonfly stands by for 10 minutes with power on, it will emit an alarm sound. To stop that
sound, just turn off the battery.
1.To make dragonfly ascend, push the left stick up.
2. To make dragonfly descend, pull the left stick down.
3. To make dragonlfy rotate left, push the left stick to the
left.
4. To make dragonfly rotate right, push the left stick to
the right.
5. To make dragonfly move forward, push the right stick
up.
6. To make dragonfly move backward, pull the right stick
down.
7. To make dragonfly move leftward, push the right stick
to the left.
8. To make dragonfly move rightward, push the right stick
to the right.
ON
OFF
ON
OFF
Initialized
00:00:00
00.0m 00.0m
6
5m

Fly with Remote Controller
Fly with Remote Controller
Pressing and hold will keep dragonfly moving in a 5m radius
orbit around a center at its front. The aircraft head will point to
the center at all times.
During orbit fly, pulling the right stick left or right can make the
orbit larger or smaller.
Pressing H once can stop the orbit-fly mode.
The left dial is used to control the pitch of the gimbal within 90 degree.
The right dial is used to control the yaw of the gimbal within 90 degree.
Orbit Fly
Gimbal control
ON
OFF 90º
ON
OFF
90º
1.Pulling down the left stick will make dragonfly land. Do not push
down too hard or the aircraft may crash on the ground. After
landing, push the left stick to the lowest point and hold it for 5
seconds to shut down the motors.
2.Pressing once will make dragonfly autonomously land at its
current spot. When dragonfly gets close to the ground, it will jump
a few times to find flat base. The motors will stop rotating in 5
seconds after landing on the ground.
In process of landing, it is still available to control position if the
landing area is not flat or safe.
Land
Pressing and hold will make dragonfly autonomously ascend to
15 meters, slowly fly back to the take-off point and land. If there is
obstacle in the way of return-home, it is still available to get control
of dragonfly with the controller.
Return-home only works when the aircraft is 5 meters away from
the take-off point.
Return Home
5m
15 meters

Stabilize
9
00.0m 00.0m
00:00:00
16
Fly with GPS Watch
Fly with GPS Watch
Instruction of RC Watch Preparations Pre-fly
Notes: Do not press two buttons at the same time which may interfere with each other.
Press the hover button first before switching one flight mode to another.
1 2
Binding.. Process=xx%
Connecting...
ID=XXX
...............
Codes Binding: Dragonfly to watch
The aircraft is linked with remote controller by default. It is
necessary to bind the codes if the dragonfly is going to be
controlled with watch.
1. Find a short circuit contactor in the plastic bag. Plug the
contactor into the jumper header on the gimbal mount to make
the aircraft a short circuit.
2. Turn on the aircraft and then remove the contactor.
3. Turn on the watch and hold the and at the same
time until the watch says “Binding ID=XXXX”.
4. The watch will get connected with the aircraft when the screen
enters the control interface.
1. Place Dragonfly on a flat platform and turn on the battery by
pressing & hold the power button on the tail. Dragonfly will
immediately start system self-checking when the front red LEDs
light once and rear blue LEDs quickly flash.
2. When the blue LEDs slowly flash and the aircraft gives out a
beep sound, it indicates that the fly control system is functioning
all right.
3. When the gimbal is level and the aircraft gives out a second
beep sound, it indicates that the gimbal is functioning all right.
4. Turn on the watch by pressing and hold the power button. In a
few seconds the watch will get connected to the aircraft when the
screen enters the control interface.
5. Wait until the aircraft gets at least 10 GPS satellites and the
screen display a icon before take-off. If the satellite signals are
not stable, try it at another place.
Initialized
9
00.0m 00.0m
00:00:00
16
Flight Height
①Power on/off(press&hold)
⑤Auto-take Off (press once)
⑥Auto land(press once)
Return-home(press&hold)
⑧Descend(press&hold)
Gimbal Right(press&hold)
②Gimbal Up/Down(Rotate
Up/Down)
⑩Auto-rotate(press once)
Orbit fly(press&hold)
④Hover(press once)
Activate Motors(press&hold)
⑨Follow-me(press once)
⑦Ascend(press once)
Gimbal Left (Press&hold)
③Joystick
Aircraft GPS Signals
Watch GPS Signals
Aircraft Battery Level
Ready to fly
Watch Battery Level
Follow Me Mode
Motors Locked
Time Distance
Jumper Headers
Short Circuit Contactor
Stabilize
9
00.0m 00.0m
00:00:00
16
Fly with GPS Watch
Fly with GPS Watch
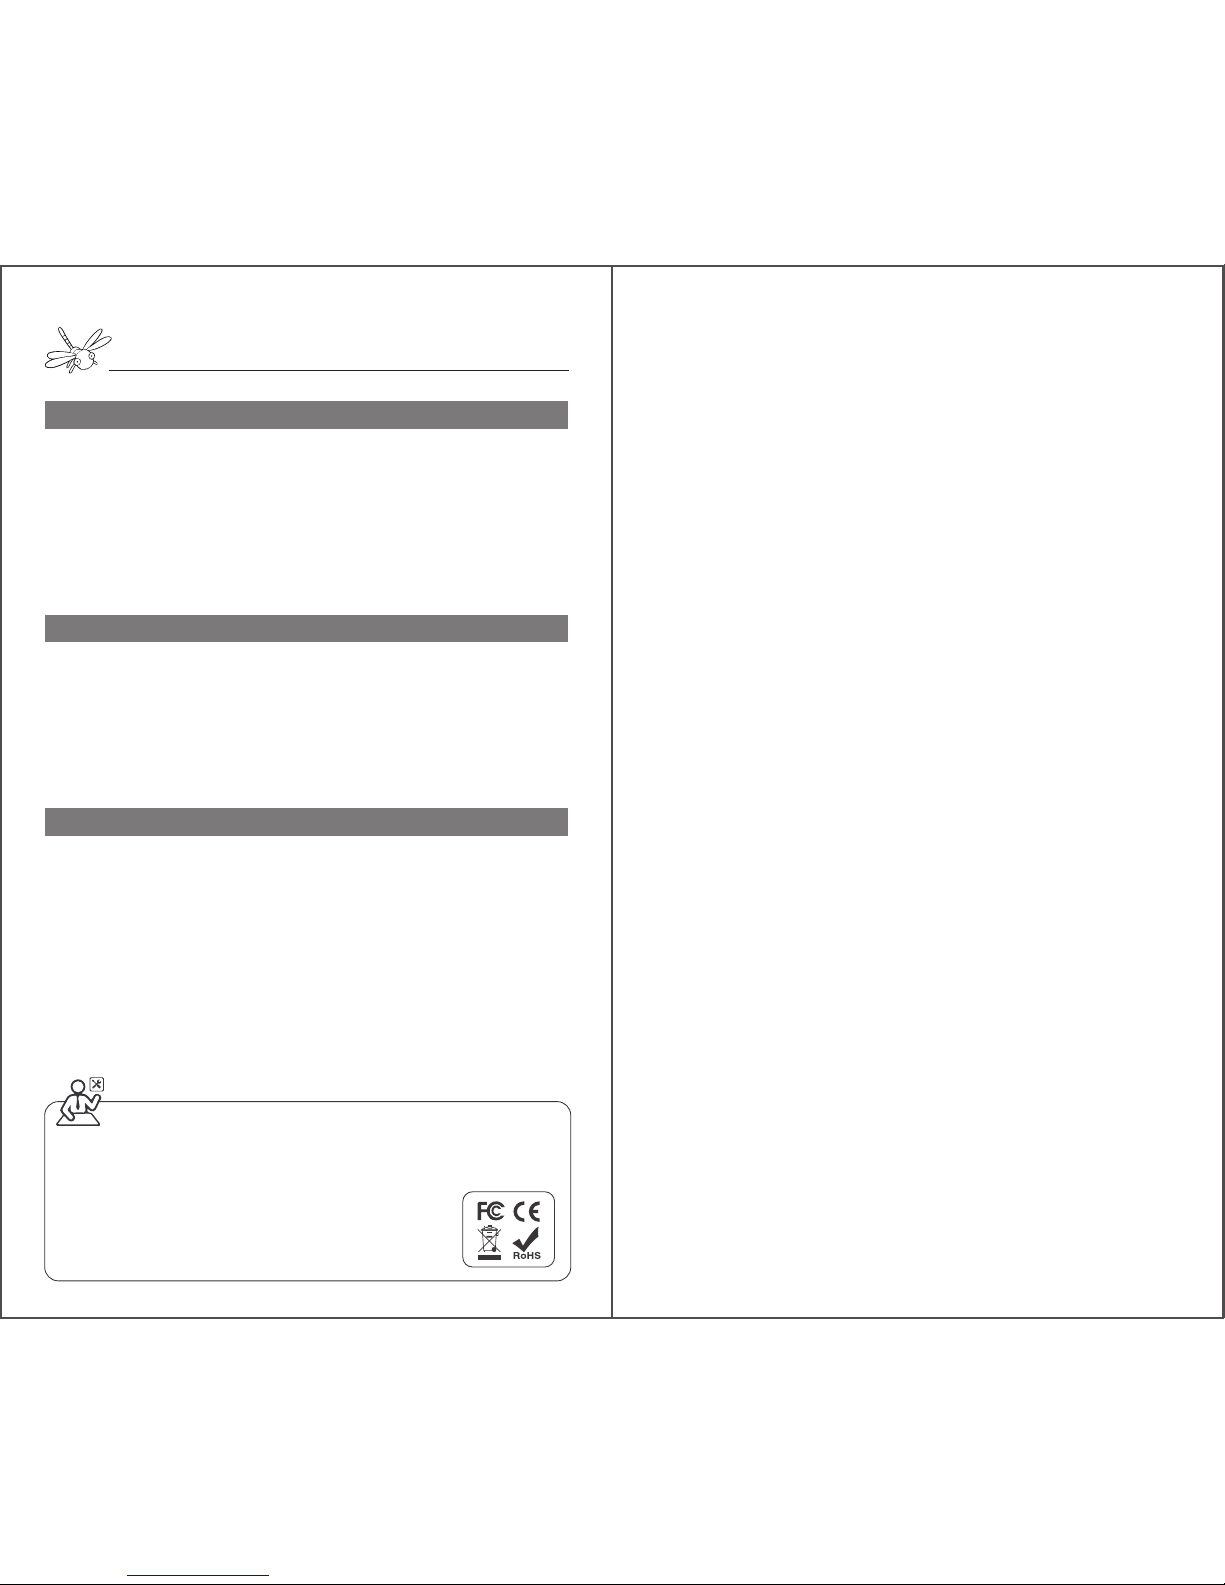
One Key to Take off Orbit Fly ( Point of Interest )
Rotating (Pan Shot)
Pressing and hold will keep dragonfly moving in a 5m
radius orbit around a center at is front. The aircraft’s head will
point to the center at all times.
During orbit fly, pulling the joystick left or right can make the
orbit larger or smaller.
Pressing can stop the orbit fly mode.
Pressing once will keep dragonfly rotating clockwise in place
autonomously.
Press will stop the rotating. Rotating mode is not only used
for pan-shot but also to turn the orientation of the aircraft.
Notes: The motors will stop rotating and stay locked if the aircraft doesn’t take off within 6
seconds after activated.
Basic Fly Control
Before take-off, press and hold to check if the four motors are
rotating properly.
When the motors are still rotating, pressing will make dragonfly
ascend to 5 meters high and hover in place autonomously.
1. Pushing the joystick up will make dragonfly fly
forward. Pushing the joystick down will make dragonfly
fly backward.
2. Pushing the stick to the left will make dragonfly fly
leftward. Pushing the stick to the right will make
dragonfly fly rightward.
3. Pressing once will keep dragonfly ascending
autonomously until 30 meters high.
4. Pressing once will keep dragonfly descending
autonomously until 5 meters high.
5. Pressing the joystick can turn off the red LEDs.
When the stick is released, dragonfly will autonomously hover in place.
Pressing can make dragonfly hover at the desired height during
ascend and descend.
5m
Stabilize
9
00.0m 00.0m
00:00:00
16
Take Off
9
00.0m 00.0m
00:00:00
16
Take off (press once)Motors activated(press&hold)
Rotate
9
00.0m 00.0m
00:00:00
16
5m
Orbit fly (press and hold)
Orbit
9
00.0m 00.0m
00:00:00
16
Rotate (press once)

Fly with GPS Watch
Fly with GPS Watch
Follow Me
Gimbal Control
Pressing and hold can turn the gimbal to the left. Pressing
and hold can turn the gimbal to the right.
Turning the dial up can tilt up the gimbal. Turning the dial down
can tilt down the gimbal.
Notes: keep an eye on the following path and ensure there are no obstacles in the way. Do
not move too fast when dragonfly is following you in case that the aircraft may lose
connection with the watch.
After the watch gets 8 follow-me GPS satellites and show an
“ ”, press once and start to move. Dragonfly will
autonomously follow behind the watch when they are 5 meters
away from one another. The aircraft’s head will point to the
watch at all times.
When the watch stops moving, the aircraft will hover near the
watch.
Pressing can stop the follow-me mode.
Follow-me (press once)
Gimbal Pitch
Land
Return Home
15 meters
Pressing once will make dragonfly slowly land at its
current spot. When dragonfly gets close to the ground, it will
jump a few times to find flat base.
The motors will stop rotating in 5 seconds after landing on the
ground.
In process of landing, it is still available to make it hover and
change its position if the landing area is not flat or safe.
Pressing and hold will make dragonfly autonomously
ascend to 15 meters, slowly fly back to the take-off point and
land. If there is obstacle in the way of return-home, make it
hover and come back in other paths.
Return-home only works when the aircraft is 5 meters away from
the take-off point.
Land(press once)
Return Home(press and hold)
Follow Me
9
00.0m 00.0m
00:00:00
16
Stabilize
9
00.0m 00.0m
00:00:00
16
RTH
9
00.0m 00.0m
00:00:00
16
Land
9
00.0m 00.0m
00:00:00
16
Gimbal Left
Gimbal Right

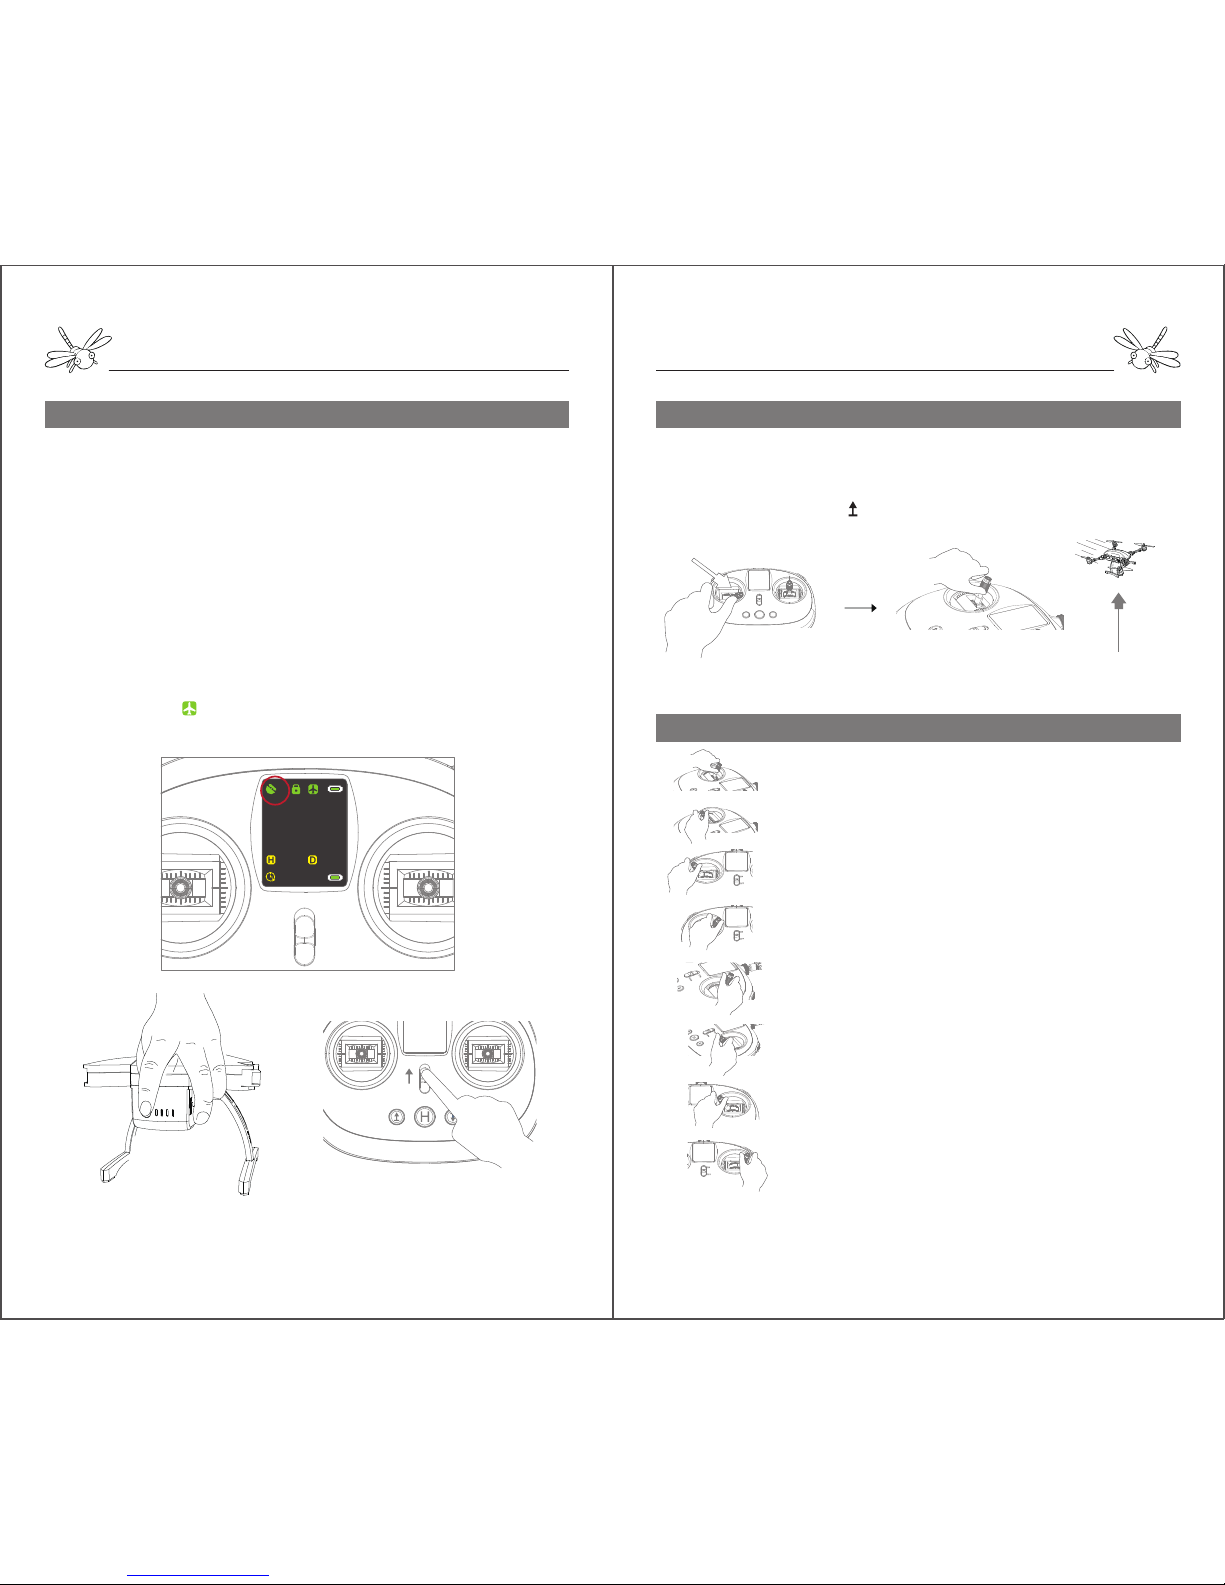
Accessories
1. The handheld gimbal is an extra accessory used to take shots on
the ground with the gimbal and camera from the aircraft.
2. Mount the gimbal board under the handle and fasten with a screw.
3. Drive the mobile holder into the handheld gimbal and attach your
phone. (The holder is originally a part of the remote controller).
4. Turn on the camera and connect to your mobile APP through WIFI.
5. Turn on the handheld gimbal by pushing the switch button under
the handle. The LED on the top will turn green.
6. Pull out the base bracket, place the handheld gimbal on a flat
platform and let it run the self-checking for a few seconds.
7. After the checking is completed, the gimbal will be stabilized with
a beep sound.
8. Spin the dial on the back of the handle to tilt the camera up and
down.
9. Take photo or video by tapping on the mobile APP.
Mobile Holder
Charge time - 4 hours Battery Time - 2 hours
USB Port
Gimbal & Camera
Power Switch
Base Bracket
Gimbal Dial
Notes: Do not hold the handheld gimbal while it is doing self-checking.
Accessories
HD Video Transmitter ( optional part )
An HD Video transmitter extends the transmission range up to 1km
working together with the remote controller. It is an optional
accessory which can be added onto the gimbal board.
1. Fix a larger gimbal board with an inside HD transmitter on the
gimbal mount by driving in a longer screw.
2. Connect the camera to the transmitter with a HDMI cable.
3. Turn on the camera, the aircraft and the remote controller.
4. After powered on, the transmitter will connect to a receiver inside
the remote controller by itself through 5.8G.
5. Connect your mobile device to the image receiver of remote
controller through WIFI. ( Wifi name: FS_5G_XXXXX, no passcode
required )
6. Turn on the APP and tap “Connect Camera” to enter the HD live
video interface.
Notes: With HD transmitter, the media is stored on your mobile device.
The Simtoo APP in Android version can work with HD transmitter directly. For iphone users,
please download another APP “SimtooII” to receive video stream from the HD transmitter.
Handheld Gimbal (Optional accessory)
HD Image Transmitter
1. If the watch or remote controller is powered off, dragonfly will
autonomously return home.
2. When the battery is low, the aircraft will emit an audible alarm
with the red LEDs flashing and autonomously land at its current
spot.
3. The control distance of watch is 50 meters and remote
controller is 1 km. If the aircraft flies out of the range and loses
connection, it will autonomously hover and return home.
Note the dragonfly drone is not a toy for children under the
age of 18.
Do not fly the drone near No-fly zone according to your local
regulations.
Please read through the user manual and make sure your
master full fly skills of dragonfly drone. Simtoo will not take any
responsibilities of damage, injury or financial loss by users’
misoperation.
Failsafe
Warranty
Disclaimer
We guarantee dragonfly drone to be free of manufacturing
and assembly defects for 12 months from the time of
purchase. During that period, we will repair or replace
products free of charge.However, this warranty does not
apply to any damage or subsequent damage due to users’
misuse, modification or as a result of failure to operate
according to instructions in this manual.
For updates of the product and user manual, please log
on our official webiste www.simtoo.com
If any questions about the product after purchase,
you could send email to [email protected]. Our
staff will be at your service 7x24.
Service
This manual suits for next models
1
Other SIMTOO Drone manuals


