SimworX Pro F1/GT LC Series User manual

Thank you for purchasing our latest F1 style LC 2 Pedal Set. We are sure you will enjoy your purchase.
Primarily designed to be used on our SX02Msport series Simulator platforms the design of the Pedals makes it suitable for fitting in
to a variety of cockpits with a little bit of skill.
The Pro Series range of controls are products that were designed and developed by SimworX with the ultimate aim of supplying the
most realistic motorsport inspired controls for the ultimate virtual racing experience. Each product is pre-tested prior to shipping to
ensure your investment is ready to go once you’ve received it. We continually upgrade our controls to ensure the pedals are robust
and give positive feel and feedback. A 16 bit resolution USB interface ensures accurate pedal control whilst the unique Hydraulically
loaded Load Cell activation system enables the braking system to be fully tuned in to your racing style.
A load cell works the way it feels. It is measuring force (same as a brake) and feels like a brake because it gets harder to get it to
"max" due to the progressive resistance that gets harder and harder. The perfect pedal for sim racing is to have hydraulics in the
system because that's what real brakes are, and in conjunction with the load cell, the force outputs to a 16 bit high resolution circuit
board for accuracy. Simworx has also introduced a rocker arm that the load cell cylinder system pressures up, and by introducing
variable durometer dampers that works against the rocker arm’s action, a very finely tuned end stop feel can be attained. In a good
race pedal system, the pedal barely moves once the pads touch the rotor. A good racecar brake pedal feels like stepping on a brick
once full pad pressure has been attained and that is achievable with this system. If that’s not to your liking, you can back it off by
using the thumb screw and/or interchanging the supplied dampers. Brake feel is very subjective, that’s why all of these adjustments
have been introduced.
The following instructions will guide you through the installation process and the various adjustability options built into the
unit
1x Pro Series F1/GT LC Pedal Set
1 x A to B USB Cable
3 x Urethane Load Cell Rocker Arm Dampers
1x Stainless Steel Bolt Pack with Washers
1 x Allen Key Set
1 x 10mm spanner
1 x Heel Riser
INTRODUCTION
CONTENTS

For owners of existing Simworx simulators and/or chassis units, the mounting points for the pedals are already in place. Locate
the pedals and with the supplied bolt set insert them in to the pre-tapped bolt holes. .
For fitting to other simulators, make sure the frame is strong enough to withstand the forces you can exert on the brake pedal.
This is extremely important. If there is too much flex you need to reinforce the mounting surface. It is recommended to run
support braces in line with the pedal base slots and one across the front and back of the pedal base.
Below you will find a drilling guide for your Pedals base plate. Position the pedal set plate at your preferred location and using
the slots either side of the base plate, carefully mark the hole position through the pedal base slots onto your mounting surface. As
a rule we usually recommend marking the mounting bolt holes halfway in the slots so you can move its position backwards and
forwards to your requirements.
Once you are satisfied with its location, drill a small pilot hole at each bolt location. Finish the hole size at 8.5mm
Bolt the pedal set in place using the supplied bolts and washers in the bolt pack. Fasten the slot bolts first and adjust the pedal
position incrementally until you are satisfied with its final position. Finally screw the heel riser on to the front mounts.
Please make sure they are secured tightly to ensure that the pedal set doesn’t flex under the pressure. The mounting surface
needs to be strong enough to withstand the 120kgs+ of pressure that can be exerted on the brake pedal.
F1/GT Pedals Base Plate Dimensions
FITTING
Fitting The Heel Riser
The heel riser is bolted on to front of the Pedal Base using the supplied cap screws, fasten the front of the riser
down via the two slots. Bolts are supplied in the kit.
USB In
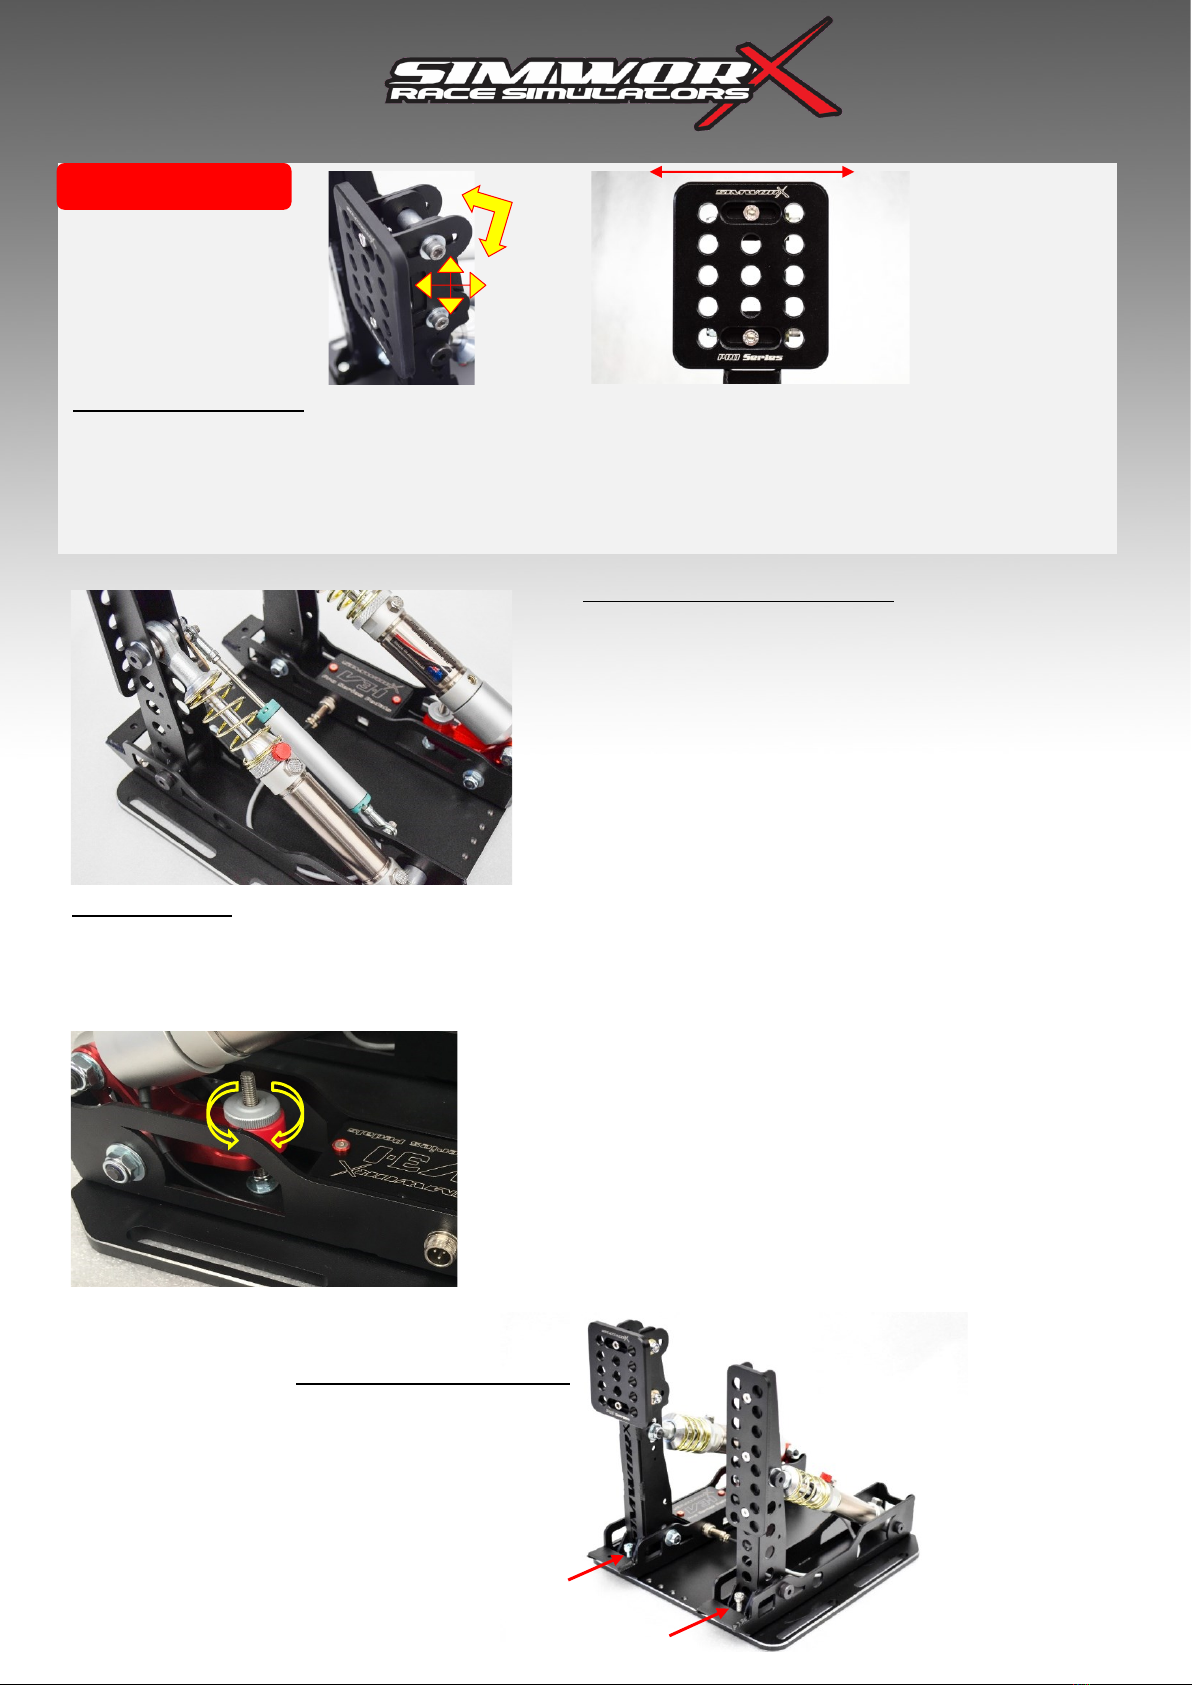
Brake Pedal Face Angle
The pedal face on the brake pedal is fitted with angle and height adjustments. To adjust, using a 5mm allen key and 10mm spanner, loosen off the two nuts
(pointed out by the red arrows) a few turns to loosen the pad assembly. Once loose, you will be able to adjust the pad upwards & down, as well as tilt the
pedal face backward and forwards until you’re comfortable with the position.
The Brake Pedal Pad can also be moved side to side to you desired position using the supplied Hex Allen Key
Once you’re satisfied with the position, tighten up the bolts firmly to ensure that the pad does not move under load
ADJUSTMENTS
Brake and Throttle Tensioner Ring
The brake cylinder is fitted with a dedicated spring tensioner (A) for
adjusting the initial preload to the brake pedal to mimic the initial pad
travel to the brake rotor.
This is useful for fine tuning that initial pedal travel.
If required, to adjust, hold the brake cylinder and spin the tensioner ring at
the base of the brake spring. Once the tensioner ring starts to feel tight to
turn, you have reached the maximum tension point. Do not try and force
the tensioner ring further .
The Throttle Cylinder has an adjuster to adjust tension and/or throw of
that pedal. Unscrew the thumbscrew (B) rotate the adjuster (C) to the
desired position and replace the thumb screw to lock.
Brake Pedal Feel
The pedals come with urethane dampers which have different durometers and heights that act on the Load Cell Cylinder Rocker Arm. The Red is the “soft”
damper and the Black is the “Hard” damper. The thumbwheel enables the pedal feel to be infinitely adjustable. As standard, the soft grade damper (RED) is
fitted. The red damper will give you a slightly softer pedal feel, the black dampers will give you a much harder pedal end feel. To change the dampers, if
needed, is a very simple process as outlined below..
The brake assembly can be adjusted for brake stroke / tension. With Soft
and Hard Settings using the supplied Red and Black dampers.. Each
setting changes the amount of braking force & travel of the pedal. You
will be supplied with Red and Black Urethane dampers. Our default
damper is the soft (RED) which is fitted as standard and the Black hard
damper is supplied with your pedals. The softest damper set provides the
most travel and softest feel, whereas the hard damper setting provides a
short travel with a very firm pedal. You can also adjust the feel with the
thumb wheel by screwing it in and out. To fit the alternative damper,
unscrew the thumb wheel and replace the damper. Replace the
thumbwheel and screw down to required feel.
Thumbwheel
Loosen Tighten
A
B
C
Pedal Rebound Adjustment
Pedal set points are adjusted via the screw stops at the
base of the pedals using a 4mm Allen Key and an 8mm
spanner.
Please Note:
You will need to re-calibrate your pedals once set
points adjustments have been made
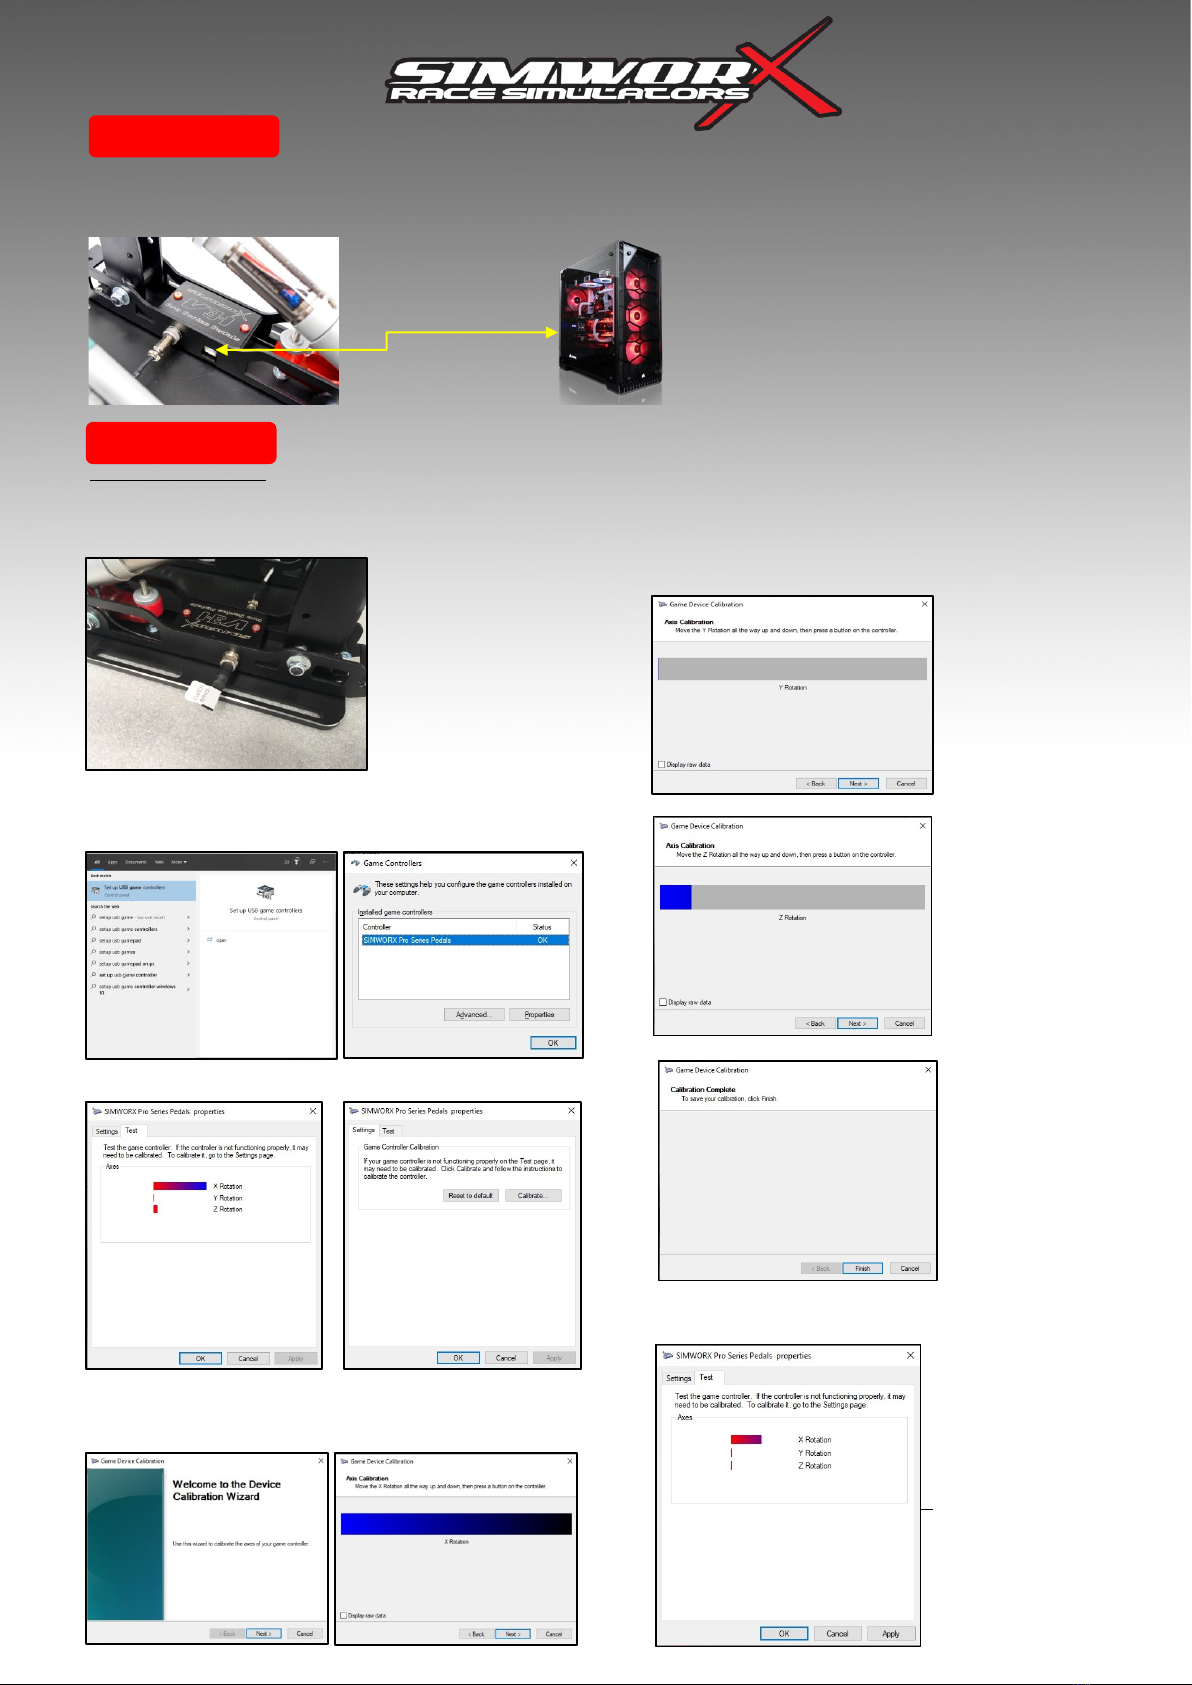
Plug in the supplied USB A to B cable into the pedal set at point A, and then into a spare USB port on your computer. The pedal set should be automatically be
detected by Windows and self-install. You can confirm this by going to the ‘devices and printers” and confirming that “Simworx Pro Series Pedals”is listed
there. If it’s not listed, try another USB port on the computer end.
1
CONNECTION
CALIBRATION
A
Simworx V3.1 F1 Pedal Set
Due to the USB controller in the pedals being used for Pro GT V3.1 pedal set and F1 V3.1 pedal set, we will need to use the Clutch Bypass Plug to
carry out the calibration process. The Bypass Plug will deactivate the clutch axis, therefore only needing to calibrate the throttle and brake.
Calibration Instructions:
2.Type in the windows Search bar ’Setup USB game Controllers’ open
windows game controllers.
3. You will see Simworx Pro Series Pedals, highlight this and click
‘Properties’ below.
4. At the top of the page click on ‘Settings’.
5. Then ‘Reset to Default’ and then followed by ‘Calibrate’.
6. You are now in the pedal calibration page, follow the prompts by
clicking ‘Next’ to calibrate the pedals.
7. You will notice one Axis is at it’s maximum and won’t change, this
is bypassed by the ‘Clutch Bypass Plug’ click ‘Next’
8. Next will be the brake pedal calibration. Press the brake as firm as you
want it to feel for maximum braking, and not try to get the slider to go all
the way up to 100%. You are calibrating it’s working range, click ‘Next’.
9. Press the throttle all the way down and release the pedal, click ‘Next’.
10. Calibration is complete, click ‘Finish’.
11. Once you have completed the calibration process in the game
Controllers window, you will see one of the axis will flicker, remove the Clutch By
Pass plug from its socket and this will stop
23
4 5
67
9
11
Step 1
Plug in the ‘Clutch Bypass
Plug’ in to the 3 pin socket on
the brake module, then plug
USB plug into the pedal set.
1
8
10
12. Click on ‘Apply’ at the
bottom of the page, you
are now ready to assign
the pedals in game.
Other SimworX Video Gaming Accessories manuals


