Singer 1030 User manual

CONTENTS
Page
1. Getting to Know Your Machine ............................................................................................................................ 1
Principal Parts and What The Do.................................................................................................................... 1
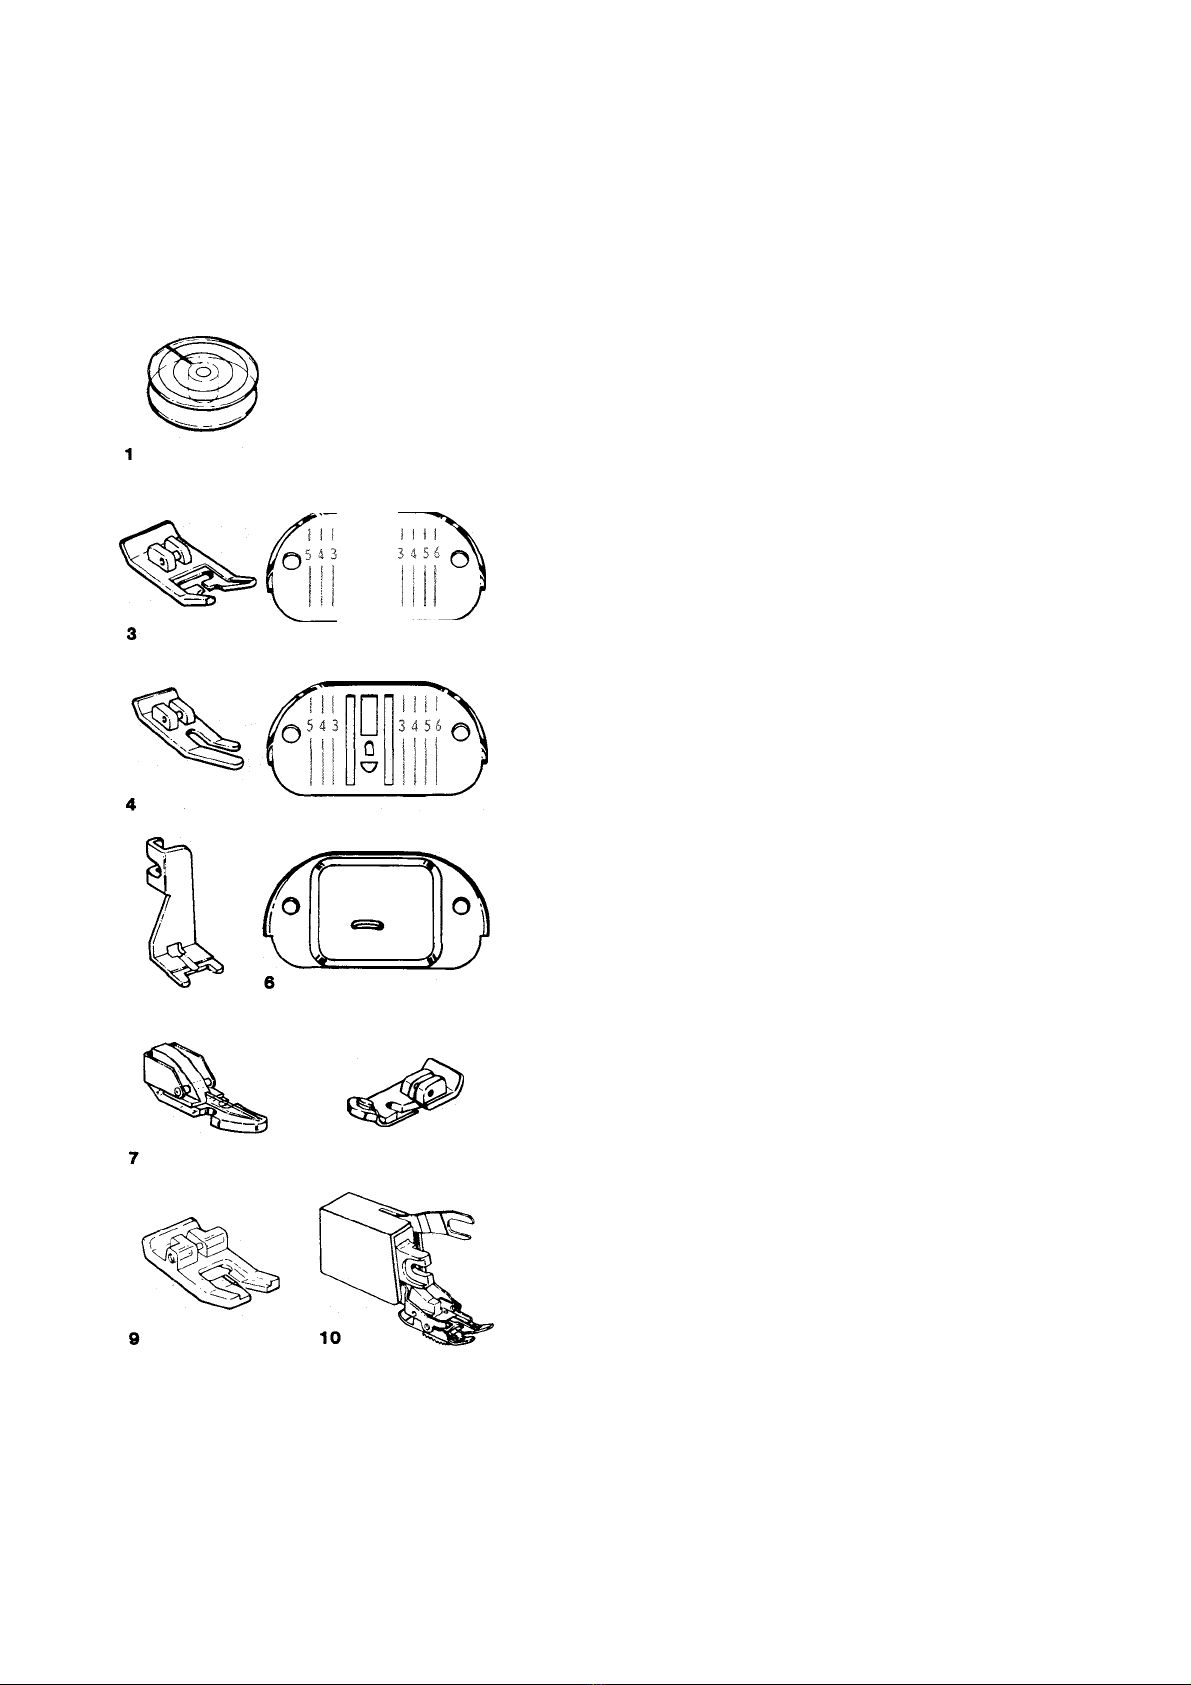
Accessories............................................................................................................................................................ 2
2. Getting Read to Sew............................................................................................................................................... 6
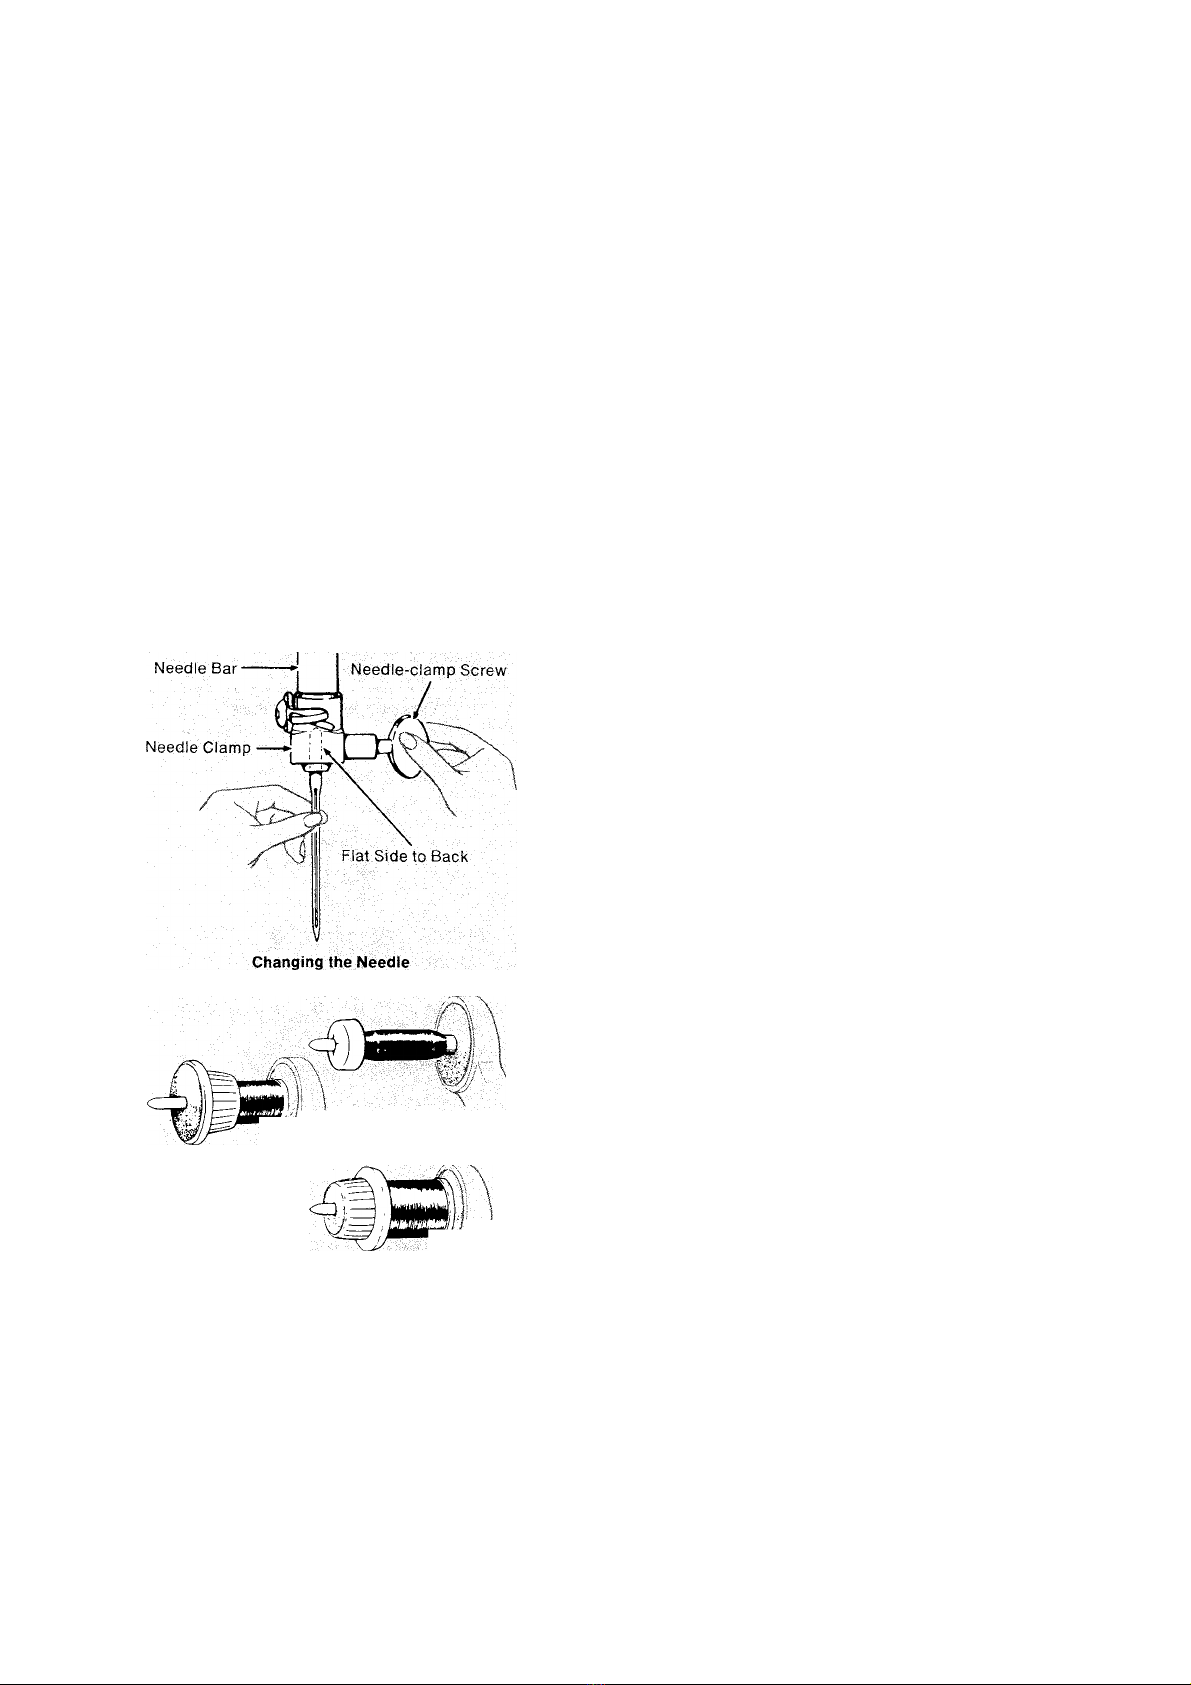
Needles .................................................................................................................................................................. 6
Operating Machine ............................................................................................................................................... 7
Choosing Needle and Thread............................................................................................................................... 8
Threading the Machine......................................................................................................................................... 9
Threading the Needle • Winding the Bobbin
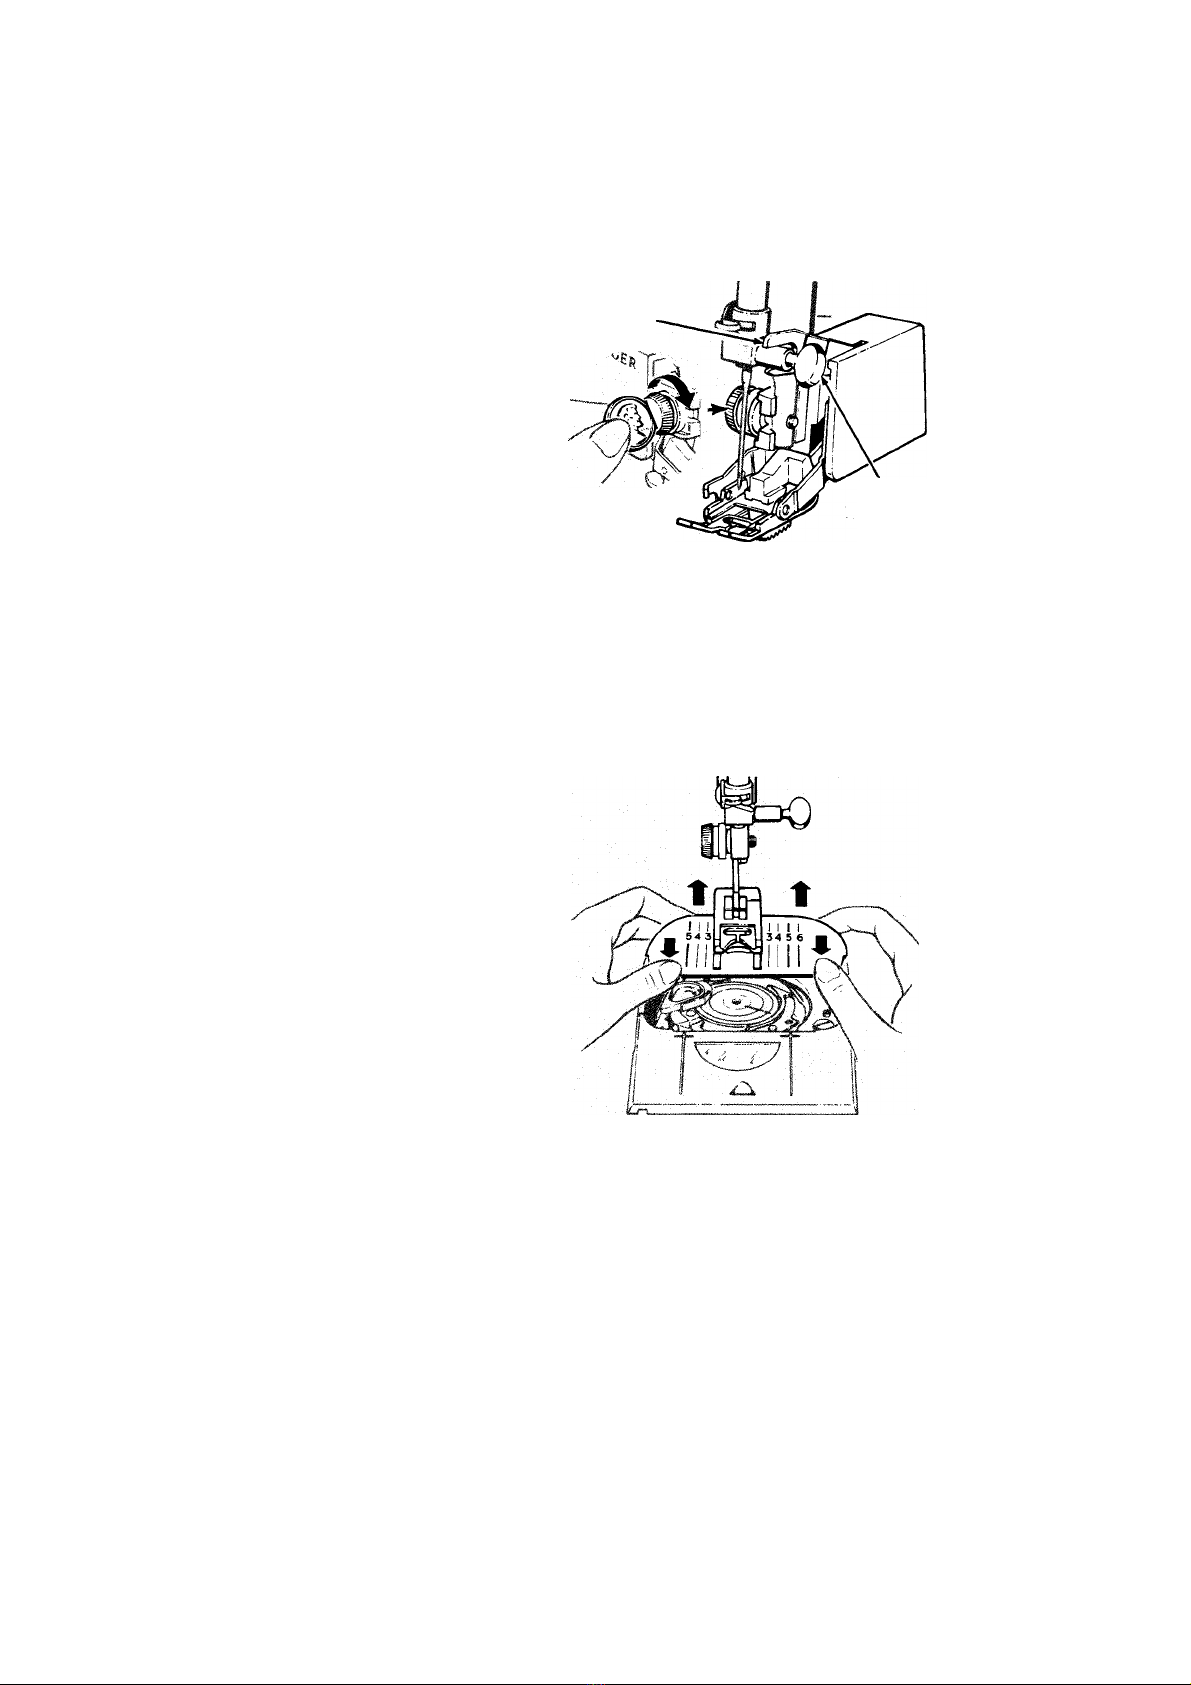
Changing the Bobbin.......................................................................................................................................... 12
3. Tips on Straight Stitching ..................................................................................................................................... 14
Adjusting Machine to Your Fabric .................................................................................................................... 14
Setting Controls • Regulating Pressure • Regulating Needle-thread Tension • Setting
Stitch Length
Sewing a Seam.................................................................................................................................................... 16
4. All About Zig-Zag Stitching................................................................................................................................... 20
How Stitches Are Produced .............................................................................................................................. 20
Setting Pattern Selector • Adjusting Stitch Placement • Adjusting Stitch Width • Adjusting
Needle-thread Tension • Adjusting Stitch Length
Finding the Beginning of a Pattern Unit .......................................................................................................... 23
Adjusting Stitch Balance When Using Flexi-Stitch Patterns
...........................................................................
23
Interchangeable Fash/on and F/ex/-Sf/fc/7 Discs .......................................................................................... 24
5. Twin-Needle Stitching............................................................................................................................................ 26
6. Temporar Stitching............................................................................................................................................... 28
7. Buttons and Buttonholes ..................................................................................................................................... 34
Buttons ................................................................................................................................................................ 34
Buttonholes .................................................................................................................................................... 35
8. Sewing the Professional Wa ............................................................................................................................... 41
Construction Details ......................................................................................................................................... 41
Zippers • Corded Seams • Blindstitch Hems • Darts
Sewing Knit and Stretch Fabric......................................................................................................................... 44
Stretch Stitch Chart • Starting to Sew Using a Flexi-Stitch Pattern • Guiding and Supporting
Fabric • Adjusting Pressure • Plain Stretch Seams • Maxi-Topstitching • Overedged
Seams • Mock Overedging • Finishes for Hems and Facings
Handling Special Fabrics................................................................................................................................... 50
Fabric-Handling Table • The Even Feed foot
Decorative Touches
..............
............................................................................................................................ 54
Satin Stitching • Applique • Free-Motion Embroider • Hesitation Embroider •
Topstitching
Keeping Up Appearances ................................................................................................................................. 58
Darning • Mending • Replacing Lingerie Elastic • Stitch Centering
9. Free-Arm Sewing .................................................................................................................................................. 61
Your Personal Measurements .......................................................................................................................... 65
10. Caring for Your Sewing Machine.......................................................................................................................... 66
11. Sewing Aids ........................................................................................................................................................... 69
Index................................................................................................................................................................................ 70
Instrukcje obsługi maszyn do szycia firm Polskich jak i zagranicznych np. Singer Toyota Pfaff Gritzner Łucznik rka
maszynykrawieckie.shophurt.pl

#$%#& !&
1. Console Cover protects against dust, Is
hinged for eas access to controls.
2. Stitch-balance Dial adjusts balance of
Flexi-Stitch patterns and buttonholes.
3. Disc Hoider holds an one of the in
terchangeable stitch-pattern discs.
4. Interchangeable Stitch-pattern Discs
enlarge the scope of decorative as well
as practical applications.
5. Pattern-selector Release Lever unlocks
the pattern selector.
6. Pattern Selector controls pointer on
stitch panel.
7. Stitch-width Dial controls zig-zag stitch
width.
8. Needle-position Ring places needle in
e i t h e r J * ( l e f t ) , ( c e n t e r ) ,
or J, (right) stitching position.
9. Stitch Pattern Panel pictures stitches
and allows for quick selection.
10. Take-up Lever controls flow of needle
thread.
11. Pressure Dial regulates presser-foot
pressure on fabric.
12. Rear Thread Guide holds needle thread
firml in place while sewing.
13. Snap-in Thread Guidepost eliminates
possible tangling of thread.
14. Presser-foot Lifter, at back of machine,
allows ou to raise and lower the presser
foot.
15. Thread Cutter is built into presser bar for
safet and convenience.
16. Buttonhole Lever sets the machine for
buttonholing.
17. Thread Guides
18. Zig-zag Foot holds fabric against feed.
19. F//p & Sew* Panel converts machine for
free-arm sewing.
20. Zig-zag Piate secured b magnets.
Guidelines on right and left sides help
ou keep seams straight.
21. Soft-touch Feed moves fabric under
presser foot. Soft surface does not injure
fabric, even the most delicate.
22. Bobbin Latch allows ou to switch from
sewing to bobbin winding without remov
ing bobbin.
23. Transparent Bobbin shows thread suppl .
24. Slide Plate has a window to show bobbin
thread suppl at a glance.
25. Needle Clamp holds single and twin nee
dles. It is designed to eliminate the
possibilit of Inserting needle back
wards.
26. Tension Dial lets ou select just the right
tension for our stitch, thread and fabric.
27. Built-in Sewing Light illuminates sewing
area.
28. Stitch-length Dial allows for a variet of
stitch lengths. To reverse stitching,
press dial all the wa down and hold in
place.
29. Electrical Connections and Speed Con
troller
30. Power and Light Switch turns on the
m a c h i n e a n d t h e s e w i n g l i g h t
simultaneousl .
31. Hand Wheel controls movement of take-
up lever and needle.
32. Friction-free Spool Holder, with horizon
tal pin holds spools of various sizes.
Instrukcje obsługi maszyn do szycia firm Polskich jak i zagranicznych np. Singer Toyota Pfaff Gritzner Łucznik rka
maszynykrawieckie.shophurt.pl

$$%%%
The accessories that come with our sewing
machine are designed to heip ou do man
kinds of sewing easii and perfecti .
1. Transparent Bobbins (No. 181551)
2. Needles ...
• St le 2020 for all-purpose sewing.
• St le 2045 for sewing knits, stretch
fabrics and elastic.
• St le 2025t for twin-needle decorative
stitching.
3. Zig-Zag Foot and Zig-Zag Plate, on our
machine when delivered. Use them for
alternating between straight and zig-zag
stitching as well as utilit zig-zag sewing.
The can also be used for straight-stitch
ing firm fabrics. Numbers on plate indi
cate distance from needle in eighths of
an inch from center needle position.
4. Straight-stitch Foot and Straight-stitch
Plate. Use these when our fabric or
sewing procedure requires close control.
Numbers on plate indicate distance from
needle in eighths of an inch.
The straight-stitch plate is also used for
chainstitching.
5. Button Foot holds most flat buttons
securel for fastening.
6. Feed Cover Plate for button sewing and
free-motion work.
7. Zipper Foot for inserting zippers and
stitching corded seams.
8. Overedge Foot used with overedge
stretch stitch for seams in stretch fabrics
at stitch width 5 onl .
9. Special-purpose Foot. Use this for all
kinds of decorative stitching.
10. Even Feed Foot for sewing hard-to-feed
pile, stretch, and bonded fabrics. Also
excellent for matching plaids and stripes
and for topstitching.
tCAUTION:
Use this needle with the zig-zag needle plate and zig-zag or special purpose foot only.
Do not use any other accessories with this needle as needle breakage will occur.
Instrukcje obsługi maszyn do szycia firm Polskich jak i zagranicznych np. Singer Toyota Pfaff Gritzner Łucznik rka
maszynykrawieckie.shophurt.pl

11. One-step Buttonhole Foot allows ou to
stitch complete buttonhole up to 1-1/2
inches in a single step. It determines the
correct buttonhole length, either b plac
ing button in foot or b using gauge on
foot.
12. Spool Holders
a. Small Spool Holder for use with small
diameter tubes of thread.
b. Large Spool Holder on our machine
when delivered. For use with medium
and large spools of thread.
13. Detachable Spool Pin for decorative
twin-needle stitching and two-thread
topstitching.
14. Seam Guide helps ou keep seam
allowances even.
15. Blindstitch Hem Guide. Use this with the
zig-zag foot to position and guide the
hem.
12
16. Stitch-pattern Discs
• One reversible Flexi-Stitch disc on
holder in machine when delivered.
• Five discs in accessor box: three
reversible Flexi-Stitch* discs and two
reversible Fash/on* Stitch discs.
• Each reversible disc produces two pat
terns.
17. Seam Ripper to pick and cut threads
quickl and neatl .
18. Lint Brush for cleaning our sewing
machine.
Instrukcje obsługi maszyn do szycia firm Polskich jak i zagranicznych np. Singer Toyota Pfaff Gritzner Łucznik rka
maszynykrawieckie.shophurt.pl

CHANGING PRESSER FEET
Snap-on Presser Feet
Most of the presser feet furnished with our
machine snap on and off a common shank.
1. Raise take-up lever to its highest position
b turning the hand wheel toward you.
2. Raise presser foot.
3. Press toe of presser foot upward (as far as
it will go) and then snap down to remove.
4. Center the new presser foot under the
shank and lower the presser-foot lifter so
that the shank fits over the presser-foot pin.
5. Press presser-foot screw down until foot
snaps into place.
To remove and replace the shank of snap-on
presser feet, follow instructions below for one-
piece presser feet.
One-piece Presser Feet
1. Raise take-up lever to its highest position
b turning the hand wheel toward you.
2. Raise presser foot.
3. Loosen presser foot screw and remove the
foot guiding it to the right.
The Button Foot
• Hook button foot around the presser bar and
tighten presser-foot screw.
Instrukcje obsługi maszyn do szycia firm Polskich jak i zagranicznych np. Singer Toyota Pfaff Gritzner Łucznik rka
maszynykrawieckie.shophurt.pl

The Even Feed Foot
• Guide Even Feed foot into position from back
of machine, making sure the movabie arm
straddies the needie ciamp. Tighten
presser-foot screw securei with a coin. To
remove, ioosen screw and guide foot to the
right and awa from ou.
Movable
Arm
Needle
Clamp
Changing Even Feed Foot
CHANGING PLATES
(Note; Remove bobbin if it contains thread in
order to prevent thread being caught when
piate is repiaced.)
1. Raise take-up iever to its highest position
b turning the hand wheel toward you.
2. Raise presser foot.
3. Open slide plate. Press down on front edge
of plate and lift up and out.
4. Position new plate over pins and release.
Plate is drawn into position b magnets.
See special instructions on page 30 for
attaching straight-stitch plate for
chainstitching.
5. Close slide piate.
Removing Needle Piate
Instrukcje obsługi maszyn do szycia firm Polskich jak i zagranicznych np. Singer Toyota Pfaff Gritzner Łucznik rka
maszynykrawieckie.shophurt.pl

#&%
st le 2020 St le 2025
Regular Needle 5t |g 2045 Twin-Needle
Ball Point
Yellow Band
Needie
To Hold Small Spools
\ To Hold Small Tubes
To Hold Large Spools
The needle ou use should be straight and not
bent to ensure perfect stitch formation and
needle penetration through the fabric. The
needle should also be fine enough to prevent
the fabric from being marred with large
punctures, et heav enough to pierce the
fabric without being bent or deflected.
Remember, too, that the e e of the needle
must be large enough for the thread to pass
through freel ; too fine a needle will cause the
thread to fra .
IMPORTANT: Your SINGER sewing machine
has been designed to obtain best results with
SINGER* needles. You should follow the
recommendations in this instruction book and
on the needle package for correct st le and
size of needle for different t pes and weights
of fabric.
• St le 2020 (15x1) needles, for all-purpose
sewing.
• St le 2045 bail-point Yellow Band* need\es,
for sewing s nthetic knits and stretch
fabrics.
• St le 2025 needle, for twin-needle decora
tive stitching.
CHANGING THE NEEDLE
1. Raise needle to its highest point b turning
the hand wheel toward you. Loosen needle-
clamp screw, and remove the needle.
2. Insert new needle in clamp, with the flat
side of the needle to the back; push it up as
far as it will go.
3. Tighten needle-clamp screw.
SPOOL HOLDER
Place spool or tube of thread on horizontal
spool pin. If spool has a retaining slit, the slit
should be placed against the spool cushion to
the right. Select correct spool holder accord
ing to the t pe and diameter of spool being
used. The diameter of the end of the spool
holder should alwa s be larger than that of the
spool itself. Press holder firml against spool
to prevent it from turning.
Instrukcje obsługi maszyn do szycia firm Polskich jak i zagranicznych np. Singer Toyota Pfaff Gritzner Łucznik rka
maszynykrawieckie.shophurt.pl

#'($ #
CONNECTING MACHINE
Before plugging in our machine, be sure that
the voitage and number of amperes indicated
at the right end of the machine, conform to
our electricai power suppi .
• Push the machine plug into the machine
socket.
• Connect the power-line plug to our electri
cal outlet.
To turn on the machine and set speed range,
push the power and light switch to desired
speed. This will also turn on the sewing light.
• The MIN. setting A (switch pressed in half
wa ) allows for maximum control. Use this
setting for special jobs where intricate con
struction details require close control. The
speed range this setting provides is ap
propriate for almost all of our sewing
needs.
• The MAX, setting B (switch pressed in all
the wa ) allows for full speed capacit of the
machine. It is best for long, straight seams,
and eas -to-handle fabrics.
To run the machine, press the foot or knee
speed controller, The harder ou press, the
faster the machine will sew within the
selected speed range. The lighter ou press,
the slower the machine will sew within the
selected speed range.
CAUTION: Switch off the power and light
switch when changing needles, feet or needle
plates or when leaving the machine unattended.
This eliminates the possibility of starting the
machine by accidentally pressing the speed
controller.
Connecting and Operating Machine
Power and Light Switch
Instrukcje obsługi maszyn do szycia firm Polskich jak i zagranicznych np. Singer Toyota Pfaff Gritzner Łucznik rka
maszynykrawieckie.shophurt.pl

$ %#'#&#& &
The needle and thread ou choose will depend
upon the fabric being stitched. The table be
low is a practical guide to needle and thread
selection. Refer to It before starting a sewing
project. Be sure to use the same size and t pe
of thread in both needle and bobbin.
FABRIC, THREAD AND NEEDLE TABLE t
DELICATE— tulle, .chiffo , :,fi é lace, or
ga za, chiffo yèjvèt
LIGHTWEIGHT — batiste, orga dy, voile,
taffeta, crepe, chiffo velvet, ptastic film,
sati , surah, peau de soie, sha tu g,
brocade
MEDIUM WEIGHT — gi gham, seersucker,
madras, percatei pigUei li e , ehi iz. f^
fi e cordurby:, velvetee , suiti gs, vi yl,,
terry cloth, challis. twill
MEDIUM HEAVY — gabardi e, tweed, sail-
cloth, duck, de im, coati gs, drapery
fabrics, vi yl, deep-pile fabrics, corduroy,'
bo ded fabric
HEAVY — overcoati gs, upholstery fabrics,
ca vas
KNITS, WOVEN STRETCH , AND ELASTIC -
double k its, bo ded, k its, spa déx, y
lo tricot, ciré: tricot, jersey, pa e velvet,
stretch terry
LEATHER — sUede, kidskih, calf, capeskih,
buckski , cabretta, pate t, cobra, li ed
leathers, simulated leathers
VINYLS , (KNIT BACK)- suede, Imitatib
reptile, cri kle pate t, pate t, embossed
a d pri ted vi yls
WOVEN FABRICS (ALL WEIGHTS) - dec
orative straight-stitch topstitchi g
LIGHT AND MEDIUM WEIGHTS (WOVEN) -,
decorative twi - eedle stitchi g
THREAD ’
Fi e polyester, ylo ,
or cotto thread
Cotto -wrapped
polyester (FINE)
, 100% polyester
50 mercerized cotto ,
‘‘ÀY, y:lp :,; i,;,,'
“A.” silk
Cotto -wrapped polyester
100% polyester
50 mercerized cotto
' ' 60 cotto
"A"
silk
Cotto -wrapped polyester
100% polyester
Heavy-duty
mercerized cotto
40 to 60 cotto
Cotto -wrapped polyester
Heavy-duty
mercerized cotto
40 cotto
Cotto -wrapped polyester
100% polyester
"A"
ylo
50 mercerized cotto
, “A" silk
Cotto -wrapped polyester
100% polyester
50 mercerized cotto
■‘A" ylo
"A” silk
Cotto -wrapped polyester
100% polyester
50 mercerized cotto
“A” ylo
‘ A" silk
"D-silk’M ' L
(Butto hole twist)
Cotto -wrapped polyester
100% polyester
50 mercerized cotto
Style 2020
(15x1)
Style 2020
(15x1)
Style 2020
(15x1)
Style 2020
(15x1),:
style 2020
(15x1)
Stylo 2045
Ball Poi t
Yellow Band
Style 2032
style 2045
Ball Poi t
Yellow Band
Style 2020
(15x1)
Style 2025
(twi )
9tt
11:
14
16
18
.14
11
14
16
14
16
18
14
tDoes ot apply to chai stitchi g.
ttSize 9 eedle recomme ded for sewi g o ly. For bobbi wi di g, use iarger size eedle.
tttUse with mercerized cotto , “A” silk, or polyester thread i bobbi .
8
Instrukcje obsługi maszyn do szycia firm Polskich jak i zagranicznych np. Singer Toyota Pfaff Gritzner Łucznik rka
maszynykrawieckie.shophurt.pl

&#' ($ #
THREADING
• Raise take-up lever to its highest position b
turning hand wheel toward ou. Raise
presser foot to release the tension discs.
1. Lead thread from spool holder and snap it
down into thread guidepost A.
2. Raise console cover and thread the rear thread
guide b holding thread in left hand and guiding
it over wing B and into channel C.
3. Draw thread firmiy between tension discs,
down right-hand channel, and up left-hand
channel.
4. Thread take-up lever D b guiding thread
down over top of lever and then up Into
e elet.
5. Lead thread from take-up lever down into
ieft channel and then Into lower thread
guides E and F.
• Thread the needie using the needle
threader. Refer to page 10 for instruc
tions on using the needle threader.
Instrukcje obsługi maszyn do szycia firm Polskich jak i zagranicznych np. Singer Toyota Pfaff Gritzner Łucznik rka
maszynykrawieckie.shophurt.pl

USING THE NEEDLE THREADER
The needle threader ma be purchased sepa
ratel at our local Singer Sewing Center.
Thread the machine in the usual wa up to the
needle, then follow the instructions below.
Turn hand wheel toward ou to raise needle
to its highest position.
Lower the presser foot.
. Holding the needle threader b its tab with
the right hand, position U-shaped part of
threader under bar of needle clamp. Snap
threader up onto bar.
Slide threader over to left, as far as it will go.
I. Swing threader back just far enough to
clear the needle. Align metal hook of
threader with the e e of the needle.
Swing threader forward so that hook passes
through e e of needle.
3. Holding approximatel 3 inches (7.6cm) of
thread between our hands, loop thread
under metal hook. Leave slack in thread on
each side of hook. Release thread.
4. Holding threader b its tab with right hand,
draw metal hook and thread back through
e e of needle. •
• Slide threader to the right off bar of needle
clamp. Carefull unhook thread from needle
threader.
10
Instrukcje obsługi maszyn do szycia firm Polskich jak i zagranicznych np. Singer Toyota Pfaff Gritzner Łucznik rka
maszynykrawieckie.shophurt.pl

WINDING THE BOBBIN
You will find a bobbin in place under the slide
plate of our machine. (To open slide plate,
simpl draw it gentl toward ou.) If the bobbin
runs out of thread during sewing, ou can re
wind it without removing it from the machine.
The window in the slide plate lets ou see
bobbin-thread suppl at a glance, to help
avoid running out of thread in the middle of
a seam.
Preparation Steps
1. Raise the take-up lever to its highest posi
tion b pressing lightl on the speed con
troller or b turning the hand wheel toward
ou.
2. Raise the presser foot to release tension
discs.
3. Open slide plate and make sure bobbin is
empt . For removal of bobbin and thread,
see page 12.
4. Set pattern-selector release lever b turn
ing it clockwise, see page 14, and set stitch
control dials for straight stitching; stitch
pattern I , needle position/^(center)
and stitch w i d t h .
If pattern-selector release lever fails to lock
into place, turn the hand wheel slightl toward
ou and then reset lever.
Winding Steps
1. Move bobbin latch to right (wind position).
2. Draw needle thread back between toes of
presser foot, under left side of presser foot,
then up, into and around thread retainer, as
shown. Do not hold thread end. Start the
machine, running it at a moderate speed.
3. Pull thread end awa after it has separated
from bobbin.
• Keep our e e on the bobbin as it fills.
Do not allow thread to wind be ond the
outside FULL ring.
4. Close slide plate to release bobbin latch to
sewing position.
To start sewing, pull thread back under
presser foot and cut. Place threads diagonall
under foot to right or left side, position needle
in fabric where desired, lower presser foot,
and start machine.
Winding Steps
Step 4
11
Instrukcje obsługi maszyn do szycia firm Polskich jak i zagranicznych np. Singer Toyota Pfaff Gritzner Łucznik rka
maszynykrawieckie.shophurt.pl

Removing Bobbin
Open Slide Plate and Move Bobbin Latch to Left
$ #'#' )))#
REMOVING THE BOBBIN
aise take-up lever to its highest position.
1. Open slide plate; move bobbin latch to left.
2. Remove bobbin b inserting fingernail un
der rim of bobbin.
Replacing Empt Bobbin
REPLACING AN EMPTY BOBBIN
1. Slip bobbin (slot on top) into bobbin case.
2. Move bobbin latch to right (wind position).
3. Leave slide plate open until ou have fin
ished winding the bobbin.
REMOVING THREAD FROM BOBBIN
You can leave the bobbin in place while re
moving thread. With slide plate closed, pull
thread end through the plate with a stead
motion. Do not pull the thread across the feed
as this ma damage it.
12
Instrukcje obsługi maszyn do szycia firm Polskich jak i zagranicznych np. Singer Toyota Pfaff Gritzner Łucznik rka
maszynykrawieckie.shophurt.pl

Replacing a Wound Bobbin
REPLACING A WOUND BOBBIN
aise take-up lever to its highest position.
1. Open slide plate; move bobbin latch all the
wa to the left.
2. Draw about an inch of thread from bobbin
and place bobbin in case.
3. Pull thread into bobbin-case slot (point 1),
draw it under flat spring and around to (or
slightl past) point 2, leaving two or three
inches of free thread. (Leave slide plate
open.)
RAISING THE BOBBIN THREAD
Set stitch width dial at .
1. Move bobbin latch to right (sewing posi
tion). Hold needle thread lightl with left
hand and turn hand wheel slowl toward
ou so the needle enters plate.
2. Continue turning hand wheel and holding
needle thread until needle rises. Tighten
our hold on the needle thread and bring
up bobbin thread in a loop.
3. Open the loop with our fingers, draw nee
dle and bobbin threads under the presser
foot and place them diagonall to right or
left. Then close the slide plate.
I sert Bobbi
Flat Spri g
Draw Thread
U der Flat Spri g
Arou d to Poi t 2
Raising the Bobbin Thread
Step 2 Step 3
13
Instrukcje obsługi maszyn do szycia firm Polskich jak i zagranicznych np. Singer Toyota Pfaff Gritzner Łucznik rka
maszynykrawieckie.shophurt.pl

&*"%#'($ #!"+)$
Straight-Stitch Settings
Stitch-
Width
Dial
Needle-
Positio
Ri g
SETTING CONTROLS
1. Set pattern-selector release lever b turn
ing it clockwise until it locks in place. If
lever fails to lock, turn hand wheel slightl
and reset lever.
NOTE: Do not attempt to turn pattern-
seiector release lever after it is locked in
place. It repositions itself when you start
the machine or turn the hand wheel.
2. Turn pattern-selector dial until stitch-panel
pointer is above | setting.
3. Turn stitch width dial to and turn needle
position ring to (center).
4. Attach straight-stitch foot and straight-
stitch plate (see pages 4 and 5).
NOTE: When alternating between straight and
zig-zag stitching use the zig-zag foot and zig
zag plate, and set pattern selector on zig-zag
setting I .
1 1
1 ri
-------
■■
1
N1i
1 i ■
H i jR
1 1
1|_H_|
j i J j
Pressure Dial
REGULATING PRESSURE
The pressure dial regulates the pressure that
the presser foot exerts on the fabric. The NORM
(normal) setting can be used for sewing a wide
variet of fabrics of different weight and texture.
Intermediate settings, above and below NORM,
are also provided. Generall lighter than normal
pressure is best for thick, soft fabrics. See
page 45 for adjusting pressure when sewing
knits.
Lower the presser foot before setting pressure.
• To increase pressure, turn dial from NORM
toward MAX.
• To decrease pressure, turn dial from NORM
toward DARN. •
• For darning, set dial on DARN.
14
Instrukcje obsługi maszyn do szycia firm Polskich jak i zagranicznych np. Singer Toyota Pfaff Gritzner Łucznik rka
maszynykrawieckie.shophurt.pl

Regulating Needle-thread Tension
REGULATING NEEDLE-THREAD
TENSION
The tension dial reguiates the degree of ten
sion on our needie thread and iets ou select
just the right setting for our stitch, thread,
and fabric. The numbers on the dial eliminate
guesswork in duplicating settings.
Correct tension is important because too much
or too little will weaken our seams. To find
the correct tension setting, make a test on a
sample of our fabric. If the fabric puckers or
the bobbin thread is pulied to the fabric sur
face, decrease tension. If the surface or under
side stitches look loose, increase tension.
• To increase tension, turn dial to a higher
number.
• To decrease tension turn dial to a lower
number.
NOTEr The tension dial controls needle-thread
tension only. Bobbin-thread tension has been
correctly set at the factory, and you do not
need to adjust it.
SETTING STITCH LENGTH
The stitch-length dial regulates the length of
both straight and zig-zag stitches. The num
bers 6 to 20 represent the number of straight
stitches per inch: the higher the number, the
shorter the stitch. Generail , shorter stitches
are best for lightweight fabric; longer ones for
heav fabric. Curved seams, bias-cut seams,
and scallops require short straight stitches
(15 to 20) for elasticit and smooth contours.
Bound buttonhoies should be sewn with a
short stitch for durabilit and strength.
• To set stitch iength, turn dial to setting
desired. •
• For reverse stitching, press diai ali the wa
down and hoid in piace.
15
Instrukcje obsługi maszyn do szycia firm Polskich jak i zagranicznych np. Singer Toyota Pfaff Gritzner Łucznik rka
maszynykrawieckie.shophurt.pl

Pin Placement
When Seam Guide is Used
%#'%(
PIN BASTING
Pin basting is a time saver and can be used
when ou sew eas -to-handle fabric. Use fine
pins and place them so that;
• The are at right angles to the presser foot
and just nip into the fabric at the stitching
line.
• The do not extend under both sides of the
presser foot. Never place pins on the under
side of the fabric In contact with the feed.
• Sew, pulling pins out of fabric as ou stitch.
We do not recommend sewing over pins.
For information on speed basting b maohlne,
turn to page 28.
PLACING FABRIC
Most fabric can be placed under the presser
foot b raising the presser-foot lifter to its up
position. When placing bulk fabrics, such as
coating, knit or terr cloth, or several fabric
la ers, raise the presser-foot lifter to its high
position and make sure needle is at its highest
point. Hold lifter in position (since it does not
lock) while placing fabric under the presser
foot. Make sure the lifter is all the wa down
before starting to sew.
Presser-foot Lifter Settings
16
Instrukcje obsługi maszyn do szycia firm Polskich jak i zagranicznych np. Singer Toyota Pfaff Gritzner Łucznik rka
maszynykrawieckie.shophurt.pl
Table of contents
Other Singer Sewing Machine manuals

Singer
Singer 107-1 User manual

Singer
Singer 734E User manual

Singer
Singer Advance 7422 User manual

Singer
Singer 14K1 User manual

Singer
Singer 5400 Series User manual

Singer
Singer XL-580 User manual

Singer
Singer DSX User manual

Singer
Singer Graduate 6705 User manual

Singer
Singer 237M23 User manual

Singer
Singer FUTURA CE-200 User manual

Singer
Singer 96-18 User manual

Singer
Singer 114-21 Installation and operation manual

Singer
Singer 2282 User manual

Singer
Singer 105-20 User manual

Singer
Singer 6-2 User manual

Singer
Singer Patchwork Plus C5950 User manual

Singer
Singer 269W Guide

Singer
Singer 58-12 Quick start guide

Singer
Singer F687C User manual

Singer
Singer 14 U44B/244B Manual