Singer M1150 User manual

M1150
INSTRUCTION MANUAL

IMPORTANT SAFETY INSTRUCTIONS
Read all instructions before using this household sewing machine.
When using an electrical appliance, basic safety precautions should always be followed, including the following:
Keep the instructions at a suitable place close to the machine. Make sure to hand them over if the machine is
given to a third party.
This appliance is intended for use by adults. The appliance can be used with adult supervision by (i) children
aged from 8 to 12 years and (ii) persons with reduced physical, sensory or mental capabilities or lack of
experience and knowledge if they have been given instruction concerning use of the appliance in a safe way
and understand the hazards involved. Cleaning and user maintenance shall not be made by children without
supervision. It is not allowed for anyone to play with the machine. Children up to 8 years are not allowed to use
the machine.
WARNING –TO REDUCE THE RISK OF BURNS, FIRE, ELECTRIC SHOCK, OR
INJURY TO PERSON:
• A sewing machine should never be left unattended when plugged in. The electrical socket, to which the
machine is plugged in should be easily accessible. Always unplug this sewing machine from the electric outlet
immediately after using and before cleaning, removing covers, lubricating or when making any other user
servicing adjustments mentioned in the instruction manual.
• Do not allow to be used as a toy. Close attention is necessary when this sewing machine is used by or near
children.
• Use this sewing machine only for its intended use as described in this manual. Use only attachments
recommended by the manufacturer as contained in this manual.
• Never operate this sewing machine if it has a damaged cord or plug, if it is not working properly, if it has been
dropped or damaged, or dropped into water. Return the sewing machine to the nearest authorized dealer or
service center for examination, repair, electrical or mechanical adjustment.
• Never operate the sewing machine with any air openings blocked. Keep ventilation openings of the sewing
machine and foot control free from the accumulation of lint, dust, and loose cloth.
• Keep ngers away from all moving parts. Special care is required around the sewing machine needle.
• Always use the proper needle plate. The wrong plate can cause the needle to break.
• Do not use bent needles.
• Do not pull or push fabric while stitching. It may deect the needle causing it to break.
• Wear safety glasses.
• Switch the sewing machine o (“0”) when making any adjustment in the needle area, such as threading
needle, changing needle, threading bobbin, or changing presser foot, etc.
• Never drop or insert any object into any opening.
• Do not use outdoors.
• Do not operate where aerosol (spray) products are being used or where oxygen is being administrated.
• To disconnect, turn all controls to the o (“0”) position, then remove plug from outlet.
• Do not unplug by pulling on cord. To unplug, grasp the plug, not the cord.
• The foot control is used to operate the machine. Never place other objects on the foot control.
• Do not use the machine if it is wet.
• If the LED lamp is damaged or broken, it must be replaced by the manufacturer or its service agent or a
similarly qualied person, in order to avoid a hazard.

• If the cord connected with the foot control is damaged, it must be replaced by the manufacturer or its service
agent or a similarly qualied person, in order to avoid a hazard.
For Overlock Machines only:
• Never operate without a cutter cover or a securely installed coverstitch table.
SAVE THESE INSTRUCTIONS
TABLE OF CONTENTS
INTRODUCTION............................................. 4
Intended Use .................................................................. 4
Machine Overview.......................................................... 4
Top of Machine .................................................................... 4
Needle Area.......................................................................... 5
Accessories .................................................................... 5
Included Accessories (Not Pictured).................................... 5
Presser Feet................................................................... 6
Stitch Overview............................................................... 6
PREPARATIONS............................................ 7
Unpack the Machine....................................................... 7
Connect to the Power Supply......................................... 7
Pack Away after Sewing ................................................. 7
Free Arm/Removable Accessory Tray ............................ 8
Presser Foot Lifter.......................................................... 8
Thread Knife................................................................... 8
Change the Presser Foot ............................................... 8
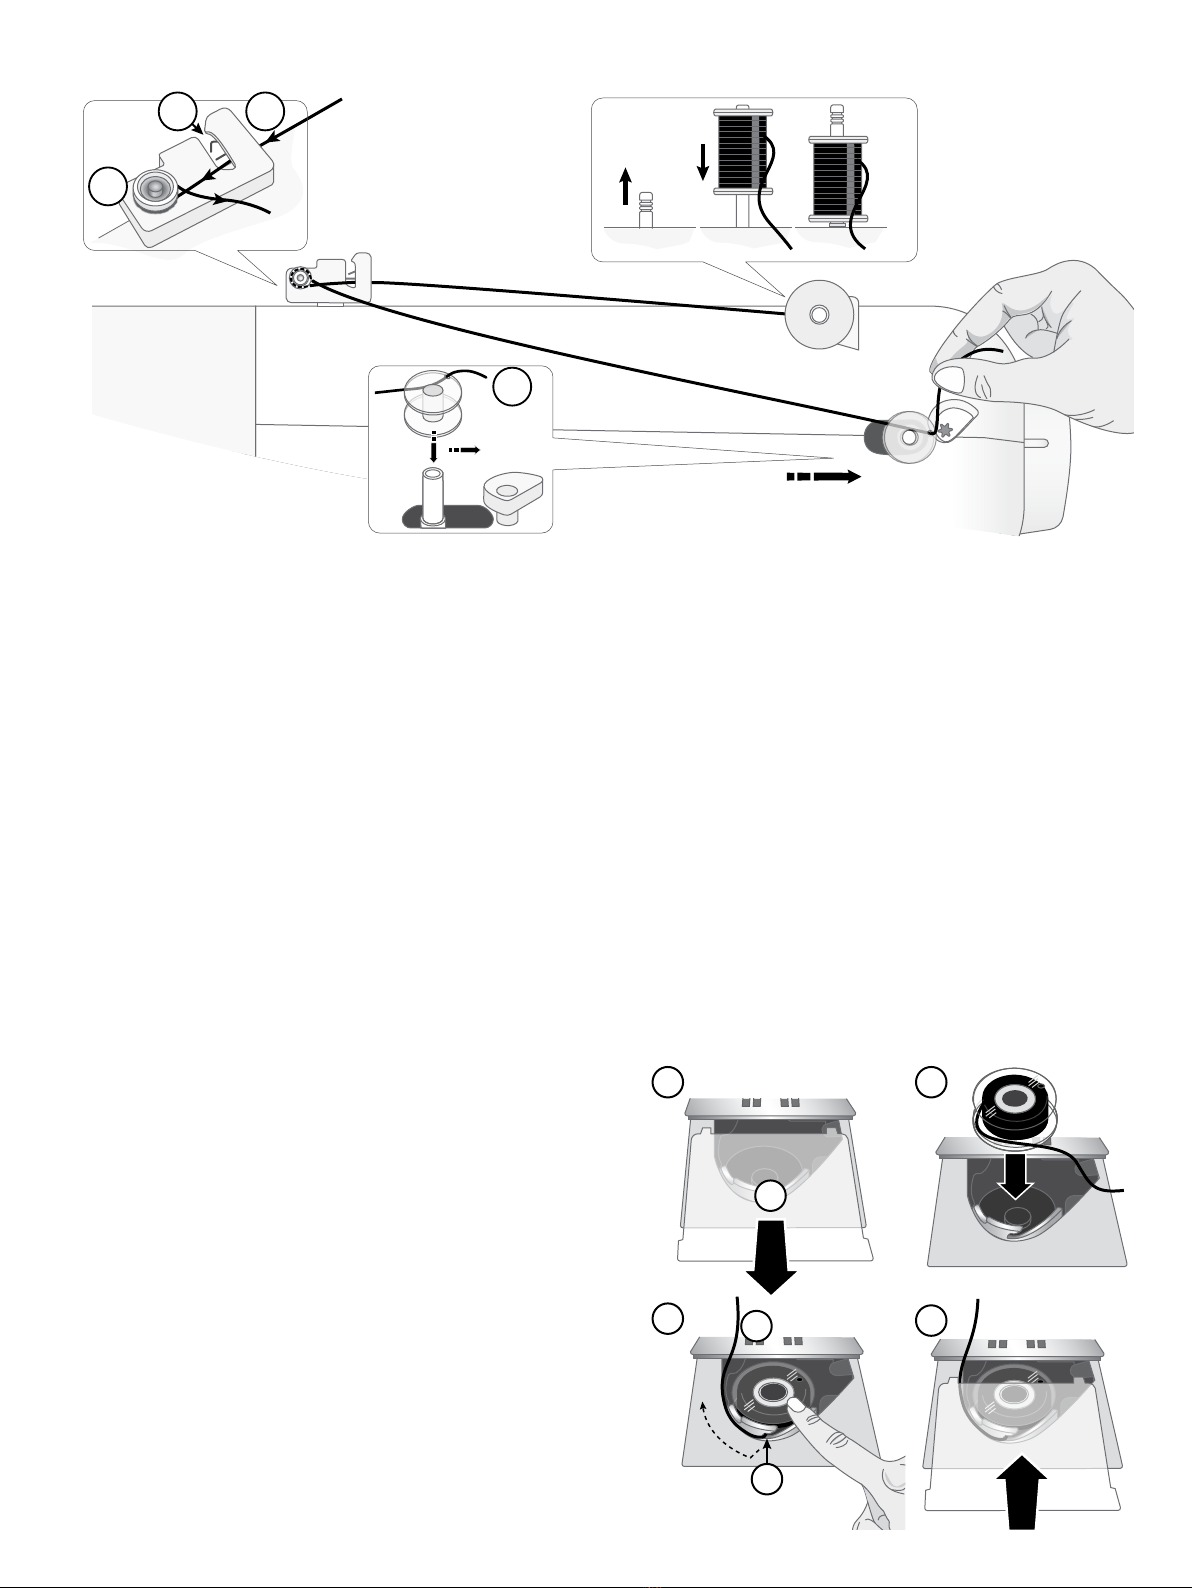
Wind the Bobbin ............................................................. 9
Insert the Bobbin ............................................................ 9
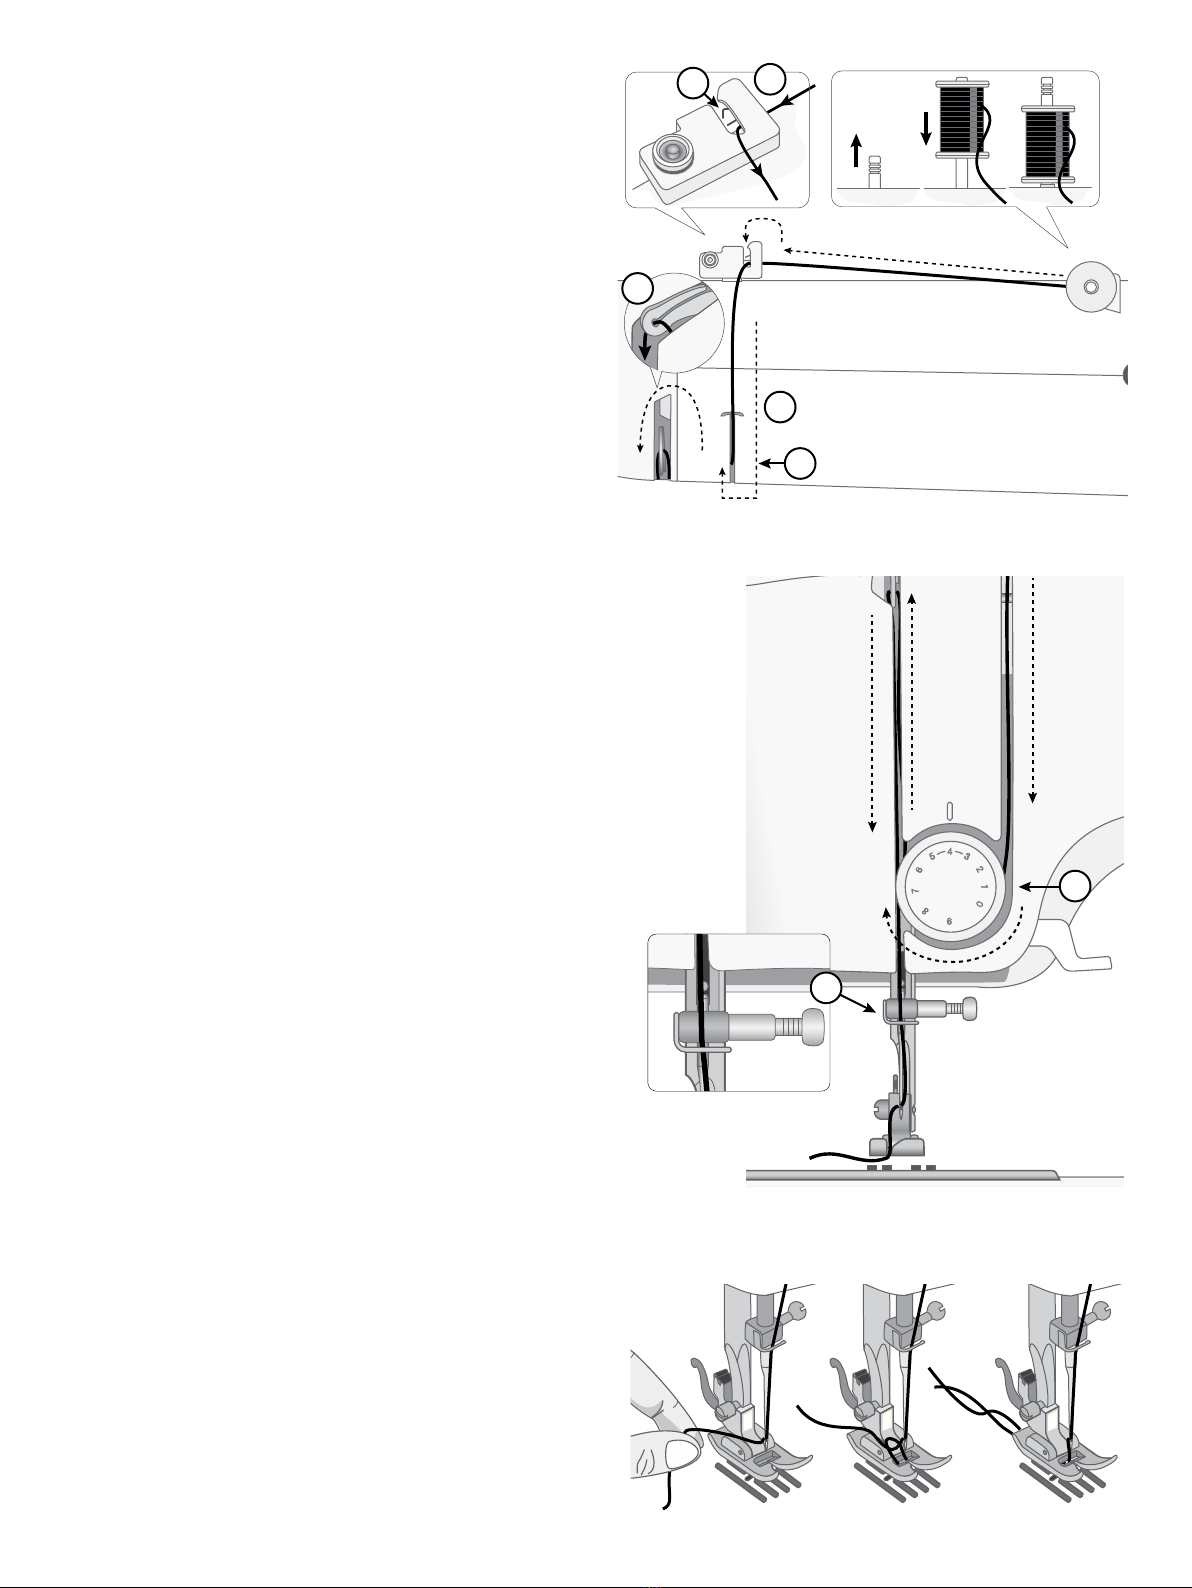
Thread the Machine...................................................... 10
Bring Up the Bobbin Thread......................................... 10
Needles .........................................................................11
Important Needle Information ............................................11
Selection Guide — Needle Size, Fabric, Thread ................11
Change the Needle........................................................11
Thread Tension............................................................. 12
Select a Stitch............................................................... 12
Reverse Sewing ........................................................... 12
SEWING........................................................ 13
Start to Sew – Straight Stitch........................................ 13
Change Sewing Direction............................................. 13
Finish Sewing ............................................................... 13
Multi-Step Zigzag Stitch................................................ 14
Blind Hems ................................................................... 14
Darning and Mending ................................................... 15
Repair Large Holes ............................................................ 15
Repair Tears ....................................................................... 15
Four-Step Buttonhole ................................................... 16
Buttonhole Balance............................................................ 16
Sew Zippers.................................................................. 17
MAINTENANCE............................................ 18
Cleaning the Machine................................................... 18
Cleaning the Bobbin Area............................................. 18
Cleaning under the Bobbin Area................................... 18
Troubleshooting............................................................ 19
Technical Specication ...................................................... 23
Intellectual property ........................................................... 23

4
1
2
6
10
7
11
5
3
8
9
12
234 5
6
1
7
INTRODUCTION
Optimal use and maintenance are described in these instructions. This product is not intended for industrial or commercial use.
Additional assistance, by region, may be found online at www.singer.com.
1. Accessory Tray / Free Arm — provides a at surface when
sewing and allows storage for your accessories. Remove the
accessory tray to use the free arm which makes it easier to
sew, e.g., trouser hems and sleeves.
2. Presser Foot Lifter
3. Thread Knife — for trimming thread ends at the end of
sewing.
4. Thread Tension Disks — positioned behind the thread
tension dial.
5. Thread Tension Dial — adjustable for setting the desired
tension for your stitch, thread and fabric.
Intended Use
Top of Machine
1. Thread take-up lever
2. Bobbin winding tension disc
3. Thread guides
4. Handle
5. Spool pin
6. Bobbin winding stopper
7. Bobbin winding spindle
6. Threading Slots — thread paths with tension discs and take up
lever.
7. Hand Wheel — used to manually control the movement of the
needle and the thread take-up lever.
8. Stitch Selector Dial — is used to select stitch patterns and
buttonhole settings (see page 12).
9. Buttonhole Balance
10. Reverse Sewing Lever — press and hold to sew in reverse, e.g.,
when securing the beginning or ending of a seam.
11. Power and foot control socket
12. On/O switch
Machine Overview

8
2
7
3
1
4
5
69
10
1
3
2
English
5
Needle Area
1. Needle Plate — provides a at area around presser foot for
sewing. Guidelines indicate various seam allowances used
to guide fabric while sewing.
2. Feed Teeth — feed the fabric under the presser foot when
sewing.
3. Presser Foot — holds fabric against feed teeth which draw
fabric under the presser foot as you sew.
4. Presser Foot Holder Screw — loosen the screw to
remove the presser foot holder.
5. Presser Foot Holder — holds the presser foot.
6. Presser Foot Release Lever — press this lever to release the
presser foot from the holder.
7. Presser Foot Bar — accommodates the presser foot holder.
8. Needle Clamp Screw — secures the needle.
9. Needle Thread Guide — helps maintain thread ow
when sewing.
10. Bobbin Cover — protects the bobbin while sewing.
Accessories
Included Accessories (Not Pictured)
• Needles
• Foot control
• Power cord
1. Bobbin x3 — Only use the type of transparent bobbins de-
livered with your machine (SINGER® Class 15 transparent
bobbins). One of the bobbins is inserted in the machine upon
delivery.
2. Brush and Seam Ripper — Used to remove stitches/brush o
lint.
3. Screwdriver — Used to remove the needle plate, presser foot
holder or needle screw.

English
6
Application
Straight Stitch
Center Position
The basic stitch used for sewing. The most common use for a straight stitch is to
sew two pieces of fabric together.
Use stitch with longer stitch length when sewing in heavy fabric.
Straight Stitch
Left Position
Use for top stitching.
Zigzag Stitch A very versatile stitch for decorative sewing, applique, attaching trims, and
more.
Satin Stitch Use for decorative sewing and appliqués.
Multi-Step
Zigzag Stitch
Finish seam allowances to prevent the fabric from unravelling. When seam
nishing, the smaller step of the stitches will help keep fabric more at than a
regular zigzag. It can also be used for mending tears and sewing elastic.
Blind Hem
Stitch
Sew hems that are practically invisible from the right side of the fabric. It is
used for skirts, dresses, trousers, curtains, etc, made with non-stretch fabrics.
Stretch Blind
Hem Stitch
Sew hems that are practically invisible from the right side of the fabric. It is
used for garments and other projects made with stretch knit fabrics.
Buttonhole Sew buttonholes on home decór, garments, crafts and more.
Stitch Overview
The stitches described in the below chart are utility stitches, used mainly for utility sewing. When sewing, use a thread tension be-
tween 3–5. Always test sew on a piece of scrap fabric, and adjust the tension if necessary.
All-purpose Foot (T) (attached to the machine upon delivery)
This foot is used for general sewing on most types of fabric. The bottom of the
foot is at, so that the fabric is held down rmly against the feed teeth while
sewing. It also has a wide slot so that the needle can move from left to right,
depending on which stitch you sew.
Zipper Foot (I)
This foot is used for inserting zippers. Attach the foot to the presser foot holder
on either side of the foot, depending on which side of the zipper is being sewn.
The Zipper Foot can also be used to create and insert piping.
Four–Step Buttonhole Foot (D)
This foot is used for making a 4–step buttonhole. This foot holds the fabric
securely as you sew the top, bottom, left side and right side of your buttonhole.
Presser Feet

A
B
English
7
PREPARATIONS
1. Place the box on a steady, at surface. Lift the machine out of the box, and remove the packaging.
2. Remove all outer packing material and the plastic bag.
3. Wipe o the machine with a dry cloth to remove any lint and/or excess oil around the needle area.
Note: Your sewing machine is adjusted to provide the best stitch result at normal room temperature. Extreme hot and cold temperatures
can aect the sewn result.
1. Switch the main switch o. After switching o, residual power may still remain in the machine. This may cause the light to stay
on for a few seconds while the power is consumed. This is normal behavior for an energy ecient appliance.
2. Unplug the cord from the wall socket and then from the machine.
3. Wind the cord around the foot control for easy storage.
4. Place all accessories in the accessory tray. Slide the tray on to the machine around the free arm.
5. Place the foot control and cord in the space above the free arm.
6. Place the soft cover on the machine to help protect it from dust and lint.
Among the accessories you will nd the power cord and the
foot control.
For this sewing machine, foot control model HKT7
(110-120V,50/60HZ,2.0A) / HKT72C (GS AX200-240V,
50HZ,0.5A) manufactured by Zhejiang Huaxing Electric Motor
Co.,Ltd (China) must be used.
Note: Consult a qualied electrician if in doubt as how to con-
nect the machine to the power source. Unplug the power cord
when the machine is not in use.
On the bottom right side of the sewing machine, you nd the
connecting sockets and the ON/OFF button.
1. Connect the power cord to the socket on the bottom right
side of the machine (A). Plug the cord into the wall socket.
2. Press the ON/OFF switch (B) to "I" to turn on power and
light.
Sewing speed is regulated by pressing the foot control.
Note: After turning o the machine, residual power may remain
in the machine. This could cause the light to stay on for a few
seconds while the power is consumed. This is normal for an en-
ergy ecient appliance.
Unpack the Machine
Pack Away after Sewing
Connect to the Power Supply
For the USA and Canada
This sewing machine has a polarized plug (one blade wider
than the other). To reduce the risk of electric shock, this
plug is intended to t in a polarized outlet only one way. If
the plug does not t fully in the outlet, reverse the plug. If it
still does not t, contact a qualied electrician to install the
proper outlet. Do not modify the plug in any way.

1
2
English
8
Free Arm/Removable Accessory Tray
Presser Foot Lifter
Thread Knife
Store presser feet, bobbins, needles and other accessories in the
accessory tray so that they are easily accessible.
Keep the accessory tray on the machine to provide a larger, at
work surface.
Use the free arm to facilitate sewing trouser legs and sleeve
hems. To use the free arm, slide o the accessory tray. When
attached, a hook keeps the accessory tray securely attached to
the machine. Remove the tray by sliding it to the left.
The presser foot lever is located at the side of the sewing
machine head. The lever is used to raise and lower the presser
foot. Raise the lever up for machine threading, lower it for
sewing.
When the foot is in the raised position, press the lever further
upward for more room under the presser foot. This is good for
sewing thick projects.
To use the thread knife, pull the thread from back to front as
illustrated. Doing this will leave the thread ends long enough
so that the needle doesn't become unthreaded when you start to
sew again.
1. Make sure that the needle is in the highest position and the
presser foot is lifted. The presser foot release lever extends
out the back of the presser foot holder. Press this lever to
release the presser foot.
2. To attach a presser foot to the holder, place the desired
presser foot with its pin directly under the slot in the presser
foot holder. Lower the presser foot lifter and the presser
foot will snap into place.
Note: If you nd it dicult to place the presser foot in the
correct position, keep the release lever pressed while lower-
ing the presser foot. Use your thumb to carefully guide the
presser foot into the correct position and it will snap into
place.
Change the Presser Foot

AB
C
D
B
A
C
1 2
4
3
English
9
1. Pull up the spool pin to its full extent.
2. Place a thread spool on the spool pin.
3. Place the thread into the thread guide (A) from back to the
front. Make sure the threads slips into the spring (B). Bring
the thread clockwise around the bobbin winding tension
disc (C).
4. Thread through the hole in the bobbin (D) from the inside
to the outside.
5. Place the bobbin on the bobbin winding spindle. Make sure
the bobbin is pushed down rmly.
6. Push the bobbin winding spindle to the right. Hold the
thread end, and press the foot control to start winding.
After a few turns, take your foot o the foot control to
stop winding. Cut the excess thread tail above the bobbin,
making sure to trim it close to the bobbin. Step on the foot
control to resume winding. When the bobbin is full, the
bobbin winding will slow down.
7. Remove your foot from the foot control to stop winding.
8. Push the bobbin winding spindle to the left. Remove the
bobbin and cut the thread.
Insert the Bobbin
Note: Make sure that the needle is fully raised and the machine
is turned o before inserting or removing the bobbin.
1. Remove the bobbin cover (A) by sliding it towards you.
2. Insert the bobbin in the bobbin case with the thread running
in a counterclockwise direction.
3. Pull the thread through the slit (B). Pull out about 15cm
(6 inches) of thread and place it to the back over the stitch
plate (C).
4. Attach the bobbin cover plate.
Note: When the bobbin winding spindle is pushed to the right, the machine will not sew. Make sure to push the bobbin spindle back to
the sewing position (left) before sewing.
Machine from above
Wind the Bobbin

BA
F
C
D
E
G
English
10
Important! Make sure that the presser foot is raised and the
needle is in its highest position by turning the handwheel
toward you. This is very important to help ensure that the
machine is correctly threaded. Not doing so can result in poor
stitch quality when you start to sew.
1. Pull up the spool pin to its full extent.
2. Place a thread spool on the spool pin.
3. Place the thread into the thread guide (A) from back to the
front. Make sure the threads slips into the spring (B).
4. Pull the thread over the thread guide (C) and down in the
threading slot (D).
5. Continue bringing the thread down through the right thread-
ing slot, around the the tension dial (E) (make sure the
thread slips into the tension discs). Then bring the thread
back upwards through the left threading slot.
6. Bring the thread from the right into the take-up lever (F)
and down in the left-hand threading slot, and into the needle
thread guide (G).
7. Thread the needle from front to back.
Thread the Machine
Machine from above
Machine from front
Bring Up the Bobbin Thread
1. Hold the upper thread with the left hand. Turn the hand
wheel towards you lowering, then raising needle.
2. If it is dicult to raise the bobbin thread, check to make
sure the thread is not trapped in the bobbin cover.
3. Gently pull on the upper thread to bring the bobbin thread
up through the needle plate hole.
4. Lay both threads to the back under the presser foot. Pull out
about 6–8” (15–20cm) of thread behind the needle.

A
B
C
43
1 2
English
11
Needles
The sewing machine needle plays an important role in successful sewing. Use only quality needles. We recommend needles of system
130/705H. The needle package included with your machine contains needles of the most frequently used sizes.
Be sure to match the needle to the thread you are using. Heavier threads require a needle with a larger needle eye. If the
needle eye is too small for the thread the needle threader may not work properly.
Note: To avoid the needle break, use only medium/low speed and recommended needle on thick fabrics works.
Change the needle often. As a general rule, needles
should be changed every 6-8 hours of actual stitch-
ing time.
Important Needle Information
Always use a straight needle with a sharp point and make sure
the point is not bent or damaged (A).
A damaged needle (B) can cause skipped stitches, breakage or
snapping of the thread. It can also damage the needle plate.
Do not use asymmetrical twin needles (C), they can damage
your sewing machine.
Note: Before you begin changing the needle, it can be helpful
to place a small piece of paper or fabric underneath the needle
area, over the hole in the needle plate, so that the needle doesn't
accidentally fall down into the machine.
1. Loosen the needle clamp screw. If it feels tight, use the
screwdriver from your accessories to aid with loosening the
screw.
2. Remove the needle.
3. Push the new needle upwards into the needle clamp with
the at side of the needle away from you.
4. When the needle will go up no further, tighten the screw
securely.
Change the Needle
Selection Guide — Needle Size, Fabric, Thread
Needle Size Fabric
70 (9)
80 (12)
Lightweight fabrics: Fine cotton, voile, silk, muslin,
interlock, tricot, jersey, crepe, polyester, chion, organza,
organdy
Light duty all-purpose thread
80 (12)
90 (14)
Medium weight fabrics: Quilting cotton, satin, double
knit, lightweight wool, rayon, polyester, lightweight linen
Use polyester threads on synthetic fabrics and
all-purpose or cotton thread on natural fabrics for
best results.
90 (14) Medium weight fabrics: Firm woven, medium weight lin-
en, cotton/polyester blend, terrycloth, chambray, double
knit
100 (16) Heavy weight fabrics: Canvas, wool, denim, home decor,
eece, heavy knit
Polyester or all-purpose thread.
110 (18) Heavy weight fabrics: Coat weight wool, upholstery
fabrics
Heavy duty thread for needle, with all-purpose
thread for the bobbin.

A
A
B
C
English
12
Thread Tension
To set the thread tension, turn the dial on the front of the
machine. Depending on the fabric, thread, etc, the tension may
need to be adjusted. For the best stitch appearance and durabili-
ty, make sure the needle thread tension is correctly adjusted.
When sewing, use a thread tension between 3–5
For general sewing, the threads evenly meet between the two
layers of fabric (A).
If the bobbin thread is visible on the top side of the fabric, the
needle thread tension is too tight (B). Reduce the needle thread
tension.
If top thread is visible on the underside of the fabric, the needle
thread tension is too loose (C). Increase the needle thread
tension.
For decorative stitches and buttonholes, the top thread should
be visible on the underside of the fabric.
Make a few tests on a scrap piece of the fabric you are going to
sew and check the tension.
Select a Stitch
Turn the stitch selector dial to the left or right until the stitch you want
to sew is lined up with the dot marking above the dial.
Reverse Sewing
To secure the beginning and the end of a seam, press down the
reverse lever. Sew a few reverse stitches. Release the lever and
the machine will sew forward again.
Thread tension dial

A B
3-5
3-5
A B C
English
13
SEWING
Start to Sew – Straight Stitch
Next to each stitch or sewing technique described in this section of the
manual is a chart showing the recommended settings and presser foot.
See sample of the chart to the right.
The recommended settings are also shown on the display, but might
need adjustment to t a special technique.
Note: Some fabrics have a lot of excess dye which can cause discolor-
ation on other fabric but also on your sewing machine. This discolor-
ing may be very dicult or impossible to remove. Fleece and denim
fabric in especially red and blue often contain a lot of excess dye. If you
suspect that your fabric/ready-to-wear garment contains a lot of excess
dye, always pre-wash it before sewing to avoid the discoloring.
Note: For best sewing result, use the same thread on top and bobbin. If
sewing with specialty/decorative threads, use regular sewing thread in
the bobbin.
Note: When sewing in light weigt fabrics, always use stabilizer under
the fabric. This is to make sure the fabric feed correctly and that the
stitches are formed correctly.
Set your machine for straight stitch (see chart to the right).
Raise the presser foot and position the fabric under it, next to a
seam allowance guide line on the needle plate or bobbin cover.
Place the top thread underneath the presser foot.
Lower the needle to the point where you want to start. Bring
the threads toward the back and lower the presser foot. Press
the foot control. Gently guide the fabric along the seam guide
letting the machine feed the fabric (A).
Note: Do not forget to bring up the bobbin thread before start-
ing to sew (see page 10.)
To secure the beginning of a seam, press and hold the reverse
lever. Sew a few reverse stitches. Release the reverse lever and
the machine will sew forward again (B).
A. Stitch
B. Presser foot
C. Thread tension
Set up for straight stitch
To change sewing direction, stop the machine and turn the
handwheel toward you to bring the needle down into the fabric.
Raise the presser foot.
Pivot the fabric around the needle to change sewing direction
as desired. Lower the presser foot and continue sewing in the
new direction.
Change Sewing Direction
Press and hold the Reverse lever and sew a few stitches in reverse when you reach the end of the seam. Release the button and sew
forward again to the end of the seam. This will secure the seam so the stitches don't unravel.
Turn the handwheel toward you to raise the needle to its highest position. Raise the presser foot and remove the fabric, pulling the
threads to the back.
Pull the threads up and into the thread knife so that the threads are cut the proper length and your needle won't come unthreaded when
you start the next seam.
Finish Sewing

A
3-5
(1) (2) 3-5
English
14
Multi-Step Zigzag Stitch
Multi-step zigzag stitch is used to overcast raw edges. Make
sure the needle pierces the fabric on the left side and overcasts
the edge on the right side.
The stitch can also be used as an elastic stitch to allow seams to
stretch when sewing knit fabrics. Set up for multi-step zigzag stitch
The blind hem stitch is used to make invisible hems on skirts,
trousers and home décor projects. There are two types of blind
hem; one is recommended for medium to heavy woven fabric
(1), the other for medium to heavy stretch fabric (2).
• Finish the raw edge of the hem if sewing on a woven
fabric. There is no need to nish the raw edge rst on most
knits.
• Fold and press the hem allowance to the wrong side.
• Fold the hem back on itself so approximately 3/8" (1 cm)
of the nished edge extends beyond the fold. The wrong
side of your project should now be facing up.
• Place the fabric under the presser foot so that the fold runs
along the presser foot as illustrated (A).
• When the needle swings into the fold it should catch a
small amount of fabric.
Blind Hems
Set up for blind hem
Right side of fabric
Woven fabric Stretch fabric

3-5
3-5
English
15
Darning and Mending
Repair Large Holes
Repair Tears
To cover large holes it is necessary to sew a new piece of fabric
onto the damaged area.
Baste the new piece of fabric onto the damaged area on the
right side of the fabric.
Sew over the fabric edges with the zigzag or the multi-step
zigzag stitch.
Trim the damaged area close to the seam from the wrong side
of the fabric.
On tears, frayed edges or small holes it is useful to lay a piece
of fabric on the wrong side of the fabric. The underlayed fabric
reinforces the damaged area.
Lay a piece of fabric underneath the damaged fabric. It must be
a little larger than the damaged area.
Sew over the damaged area using the zigzag or multi-step
zigzag stitch.
Trim the piece of fabric used as reinforcement.
Set up for zigzag
Set up for multi-step zigzag

A B
C D
AB
C
D
E
F
G
IH
3-5
English
16
Set up for buttonhole
Sew buttonholes perfectly sized for your button. The fabric
should be interfaced and/or stabilized where buttonholes are to
be sewn.
1. Measure the button to use for your project. Add 5/8 inch
(3mm). Use a fabric marking pencil to mark the starting
position and length of the buttonhole on the fabric (A).
2. Attach the buttonhole foot and slide the foot backwards as
far as it will go (B).
3. Place the fabric underneath the foot, aligning the marks on
the foot with lines marked on the fabric (C).
4. Select buttonhole stitch “ac”. Lower the foot and sew 5-6
stitches, to create the rst bartack of the buttonhole (D).
Stop when the needle is at the left side of the bartack.
5. Raise the needle to its highest position and select but-
tonhole stitch “b”. Sew the left column backwards to the
desired length of the buttonhole (E). Stop when the needle
is at the left side of the column.
6. Raise the needle to its highest position and select button-
hole stitch “ac”. Sew the second bartack (F). Stop when the
needle is at the rigt side of the bartack.
7. Raise the needle to its highest position and select button-
hole stitch “d”. Sew the right side of the buttonhole to the
same length as the rst column (G).
8. To secure the bartack, thread the end of the top thread into
a hand sewing needle, pull to the wrong side and tie the end
before cutting excess thread ((H).
9. Use a seam ripper and cut the buttonhole open from both
ends towards the middle (I).
Note: Always sew a test buttonhole on a piece of scrap fabric.
Four-Step Buttonhole
Buttonhole Balance
If the density of the buttonhole columns dier, you can adjust the
stitch density of the buttonhole. The buttonhole balance dial (A)
is found on the right side of the stitch selection dial. Only the left
column of the buttonhole will be adjusted. Balance it to match the
right buttonhole column.
Normally, the dial should be placed in a neutral position (B).
If the stitches of the left buttonhole column are too dense, turn the
dial to the left (C).
If the stitches of the left buttonhole column are too sparse, turn the
dial to the right (D).

BA
CD
E F
3-5
2
2
3-5
English
17
Set up for sewing zippers
Set up for basting
Sew Zippers
Centered Zipper
The Zipper Foot can be attached on either the right or the left
of the needle, making it easy to sew both sides of the zipper.
To sew the right side of the zipper, attach the foot in the left
presser foot position (A).
To sew the left side of zipper, attach the foot in the right presser
foot position (B).
• Place the fabric pieces right sides together and pin. Mark
the zipper length on your fabric.
• Baste the zipper seam using the specied seam allowance
(use straight stitch with the longest stitch length, thread
tension 2). Baste to the end of zipper marking (C).
• Set up the machine for straight stitch (see table above),
backstitch a few stitches and sew the rest of the seam using
the specied seam allowance (C).
• Press the seam allowances open. Place the right side of the
zipper to the wrong side of the seam, tape in place (D).
• Flip your project, making sure that the right side is facing
up. Snap on the Zipper Foot, to the left side of the needle
(A).
• Sew along the right side of the zipper to the end of your
zipper, remember to backstitch in the beginning. Stop with
the needle down in the fabric, lift the presser foot and turn
your project to sew across the bottom of the zipper (E).
• Attach the Zipper Foot to the right side of the needle (B).
Sew the remaining zipper side as you did with the rst side
(F).
• Flip your project to remove the tape on the back side.
• Flip your project to the right side again and remove the
basting stitches.

A
B
D
C
E
English
18
MAINTENANCE
Cleaning the Machine
Cleaning the Bobbin Area
Raise the needle and turn o the machine.
Cleaning under the Bobbin Area
To keep your sewing machine operating well, clean it often. No lubrication (oiling) is needed. Wipe the exterior surface of your ma-
chine with a soft cloth to remove any dust or lint built up.
Remove the presser foot. Slide o the bobbin cover and re-
move the bobbin.
Clean the feed teeth and the bobbin area with the brush found
among the accessories.
Attach the presser foot, insert the bobbin and replace the bob-
bin cover.
Clean the area under the bobbin case after sewing several
projects or any time you notice an accumulation of lint in the
bobbin case area.
Remove the presser foot. Remove the screws in the needle
plate by using the screwdriver. Lift up and remove the needle
plate.
Remove the bobbin case by lifting it up.
Clean the area with the brush or with a dry cloth.
Note: Do not blow air into the bobbin case area. The dust and
lint will be blown into your machine.
Guide the “forked” end of the bobbin case (A) under the feed
teeth from left to right. The bobbin case should be placed uder
the feed teeth and under the spring (B). The mark (C) on the
bobbin case should be aligned with the mark (D) on the the
hook race for easy placement. Move the bobbin case slightly
until it slips correctly into the hook race (E). To make sure the
bobbin case is properly replaced, turn the handwheel towards
you. The hook race should rotate freely in a counter-clockwise
direction.
Place the needle plate over the feed teeth, replace and tighten
the screws.
Attach the presser foot and replace the bobbin.

English
19
Troubleshooting
Thread Loops on Underside of Fabric
Possible cause: Thread looping on the underside of the fabric is always an indication that the upper thread is not correctly
threaded. This happens when the upper thread is not correctly placed in the thread tension mechanism and has
not been threaded through the take up lever.
Solution: Rethread the machine, making sure to rst raise the presser foot lifter before starting to thread, so thread can
be properly seated in the tension mechanism and take up lever. To know if you have rethreaded the machine
correctly, try this test:
• Raise the presser foot lifter and thread the top of the machine.
• Thread the needle, but don't put the thread under the presser foot yet. As you pull the upper thread to the
left, it should pull freely.
• Put the presser foot lifter down. As you pull the upper thread to the left, you should feel resistance. This
means you are threaded correctly.
• Put the thread under the presser foot, and then draw up the bobbin thread. Slip both thread tails under the
presser foot towards the back. Lower the presser foot and begin sewing.
If you put the presser foot lifter down, but the thread still pulls freely (you feel no dierence whether the presser
foot is up or down), this means that you have threaded incorrectly. Remove the upper thread and rethread the
machine.
Bobbin Thread Breaking
Possible cause: Bobbin threaded incorrectly.
Solution: Check that bobbin is placed correctly in the bobbin holder.
Possible cause: Bobbin wound too full or unevenly.
Solution: Bobbin thread may not have been correctly placed into bobbin winding tension disc during the bobbin winding
process.
Possible cause: Dirt or lint in bobbin holder.
Solution: Clean bobbin holder.
Possible cause: Wrong bobbins being used.
Solution: Use bobbins that are the same style as those that come with the machine (SINGER® Class 15 transparent
bobbins) – don’t substitute.
Bobbin Thread Showing on Top of Fabric
Possible cause: Top thread too tight.
Solution: Reduce upper thread tension.
Possible cause: Thread path is obstructed, putting extra tension on top thread.
Solution: Check that the top thread path is not obstructed and thread is moving freely through the thread path.
Possible cause: Bobbin thread not in bobbin case tension.
Solution: Rethread bobbin.
Bobbin Winding Diculties
Possible cause: Bobbin thread loosely wound on bobbin.
Solution: Rewind bobbin, making sure that the thread is placed snuggly in the bobbin winding tension disc.
Possible cause: Bobbin winding spindle not fully engaged, therefore bobbin not winding.
Solution: Check that the bobbin winding spindle has been fully engaged before starting to wind.
Possible cause: Bobbin is winding sloppily because thread end not held at beginning of winding process.
Solution: Before starting to wind, hold the thread tail (coming out of the bobbin) securely, allow the bobbin to partially
ll, then stop to trim the thread tail close to the bobbin.

English
20
Fabric Puckers
Possible cause: Top thread is too tight.
Solution: Reduce top thread tension.
Possible cause: Wrong style needle for fabric type.
Solution: Use correct needle style and size for your fabric.
Fabric Is Tunneling Under Stitches
Possible cause: Fabric is not properly stabilized for the density of the stitches (for example, satin stitch applique).
Solution: Add a fabric stabilizer underneath the fabric to help keep the stitches from tunneling in together, forming a
puckered ridge in fabric.
Loud Noise When Sewing
Possible cause: Thread not in take-up lever.
Solution: Rethread the machine, making sure the take up lever is in its highest position so thread goes in the eye of the take
up lever — turn machine hand wheel toward you to raise the take up lever to its highest position for threading.
Possible cause: Thread path is obstructed.
Solution: Check that thread is not caught on the thread spool or behind the spool cap.
Machine is Not Feeding Fabric
Possible cause: Presser foot lifter has not been lowered onto fabric after threading.
Solution: Lower the presser foot lifter before starting to sew. Don´t “push” or “pull” the fabric as you sew.
Machine Will Not Run
Possible cause: Bobbin winding spindle is engaged when you try to sew.
Solution: Disengage bobbin winding spindle by pushing it to the left.
Possible cause: Power cord and/or foot control not plugged in correctly.
Solution: Make sure power cord/foot control are correctly seated in machine and power supply.
Possible cause: Wrong bobbins being used.
Solution: Use bobbins that are the same style as those that come with the machine (SINGER® Class 15 transparent
bobbins)– don’t substitute.
Needles Breaking
Possible cause: Bent, dull or damaged needle.
Solution: Discard needle, insert new needle.
Possible cause: Wrong size needle for fabric.
Solution: Insert appropriate needle for fabric type.
Possible cause: Machine not threaded correctly.
Solution: Rethread the machine completely.
Possible cause: “Pushing” or “pulling” fabric.
Solution: Don’t manually push/pull fabric in order to sew, but allow the machine’s feed teeth to draw fabric under the
presser foot as you guide it.
Table of contents
Other Singer Sewing Machine manuals

Singer
Singer 460/21 User manual

Singer
Singer 3400 User manual

Singer
Singer Sewing Machine User manual

Singer
Singer 251 User manual

Singer
Singer 248-2 User manual

Singer
Singer 107W11 Installation and operation manual

Singer
Singer 451K21 User manual

Singer
Singer 20-2 User manual

Singer
Singer Patchwork Plus C5950 User manual

Singer
Singer 14SH754 - User manual