SINJI SMART OUTDOOR CAMERA User manual

1
F F
SMARTSMART
OUTDOOROUTDOOR
CAMERACAMERA
Manual


3
F F
English 4
Nederlands 14
Français 24
Deutsch 34
Español 44
Italiano 54
Portuguese 64
INDEX
4
F F
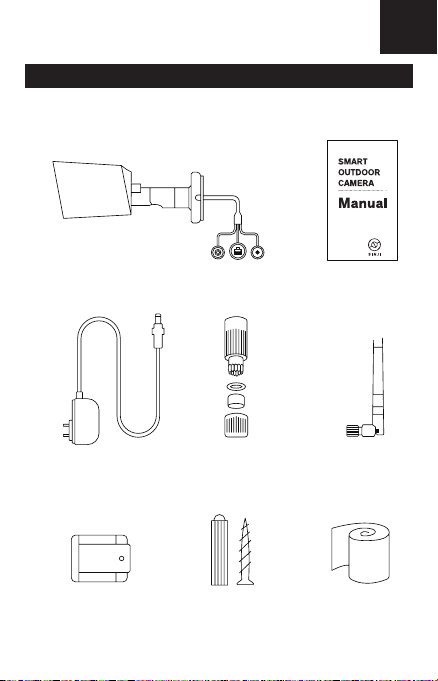
1. PACKAGE CONTENTS
Please check if the camera is intact and all accessories are
included.
EN
Camera x1 User manual x1
Power adapter x1 Sealed hose kit x1 Antenna x1
Line buckle x4 Screw x4 Waterproof tape x2

5
F F
2. APPEARANCE
EN
95mm
180mm
Note:
Please note that adjusting the angle multiple times may cause wear of the
screws (the latch will wear out the joints).
Please adjust the installation
angle and tighten the three
screws as shown in the image.
To readjust the angle, please
loosen the screws before
adjusting them.
Indicator light Micro SD slot
Microphone
Infrared light
Photosensor

6
F F
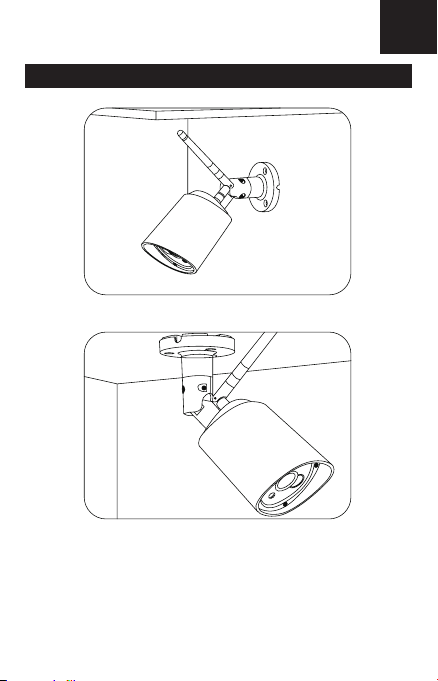
3. INSTALLATION INSTRUCTIONS
EN
Wall mounted
Ceiling mounted
Note:
1. Please pay attention to the waterproofing measures for outdoor
installation. See following images for a detailed instruction.
2. Please pay attention to outdoor lightning protection.

7
F F
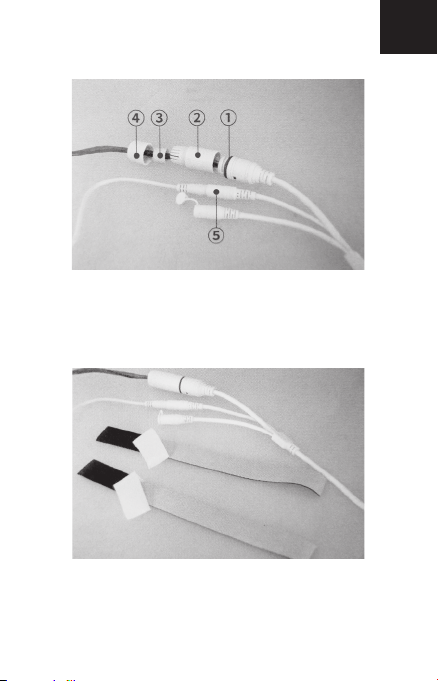
EN
• Fit the red O ring in the net port seat .
• Tighten the ,,, and parts.
• Connect the power cord to the power port.
• Remove the paper at the back ofthe
waterproof tape.

8
F F
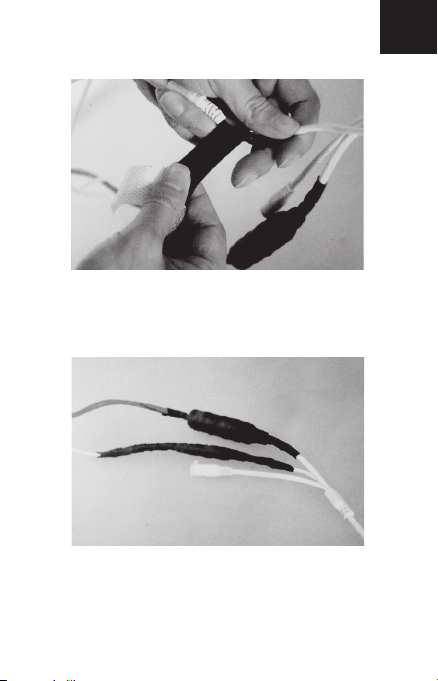
EN
• When applying the waterproof tape, keep
tension on the tape by stretching it during
assembly. This way the waterproof tape
works best.
• The result after wrapping waterproof tape.

9
F F
4. INSTRUCTIONS FOR USE
EN
1. Connecting the Smart Outdoor Camera
Connect the Smart Outdoor Camera to a power source using
the included power adapter.
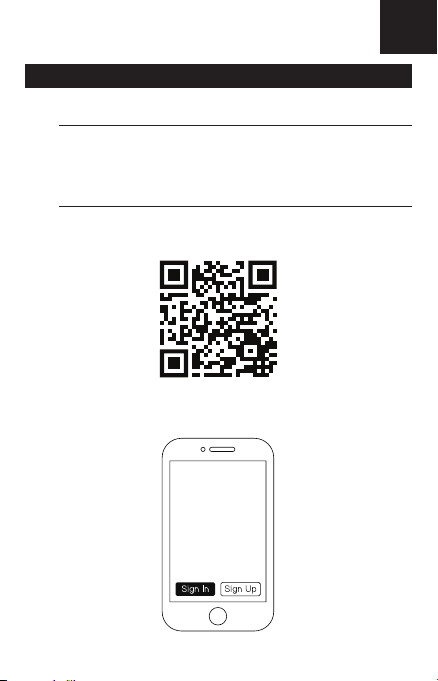
2. App installation
Go to the App Store on your mobile device to download the
app “Doby”.
Sign up with your email address and choose a password. If
you already have an account, please tap “Sign in”.
10
F F
EN
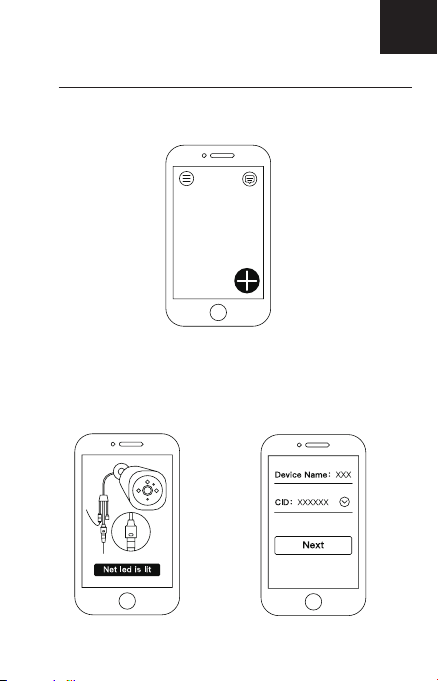
3. Add device
Open “Doby” [Home], tap “+” to search devices.
Choose “Camera (OutdoorVersion)”.
Wired connection
Please check if the camera and app are connected to the
same network and the net led indicator is lit. Select the
device CID, and tap “Next”.
11
F F
EN
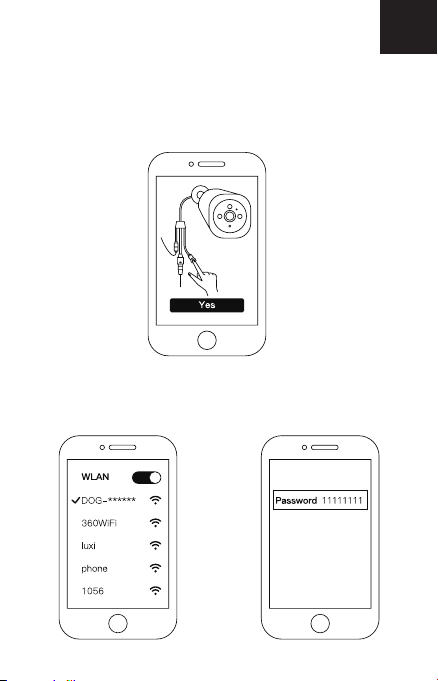
WiFi connection
• Please make sure the WiFi indicator on the Outdoor Camera
is flashing blue. If not, please press and hold the WiFi button
for a few seconds until the WiFi indicator blinks.
• Via [Settings]>[Wi-Fi] on your mobile device, connect to
DOG00***, enter the code “11111111”. Return to the Doby
app and tap “Next”.
12
F F
EN
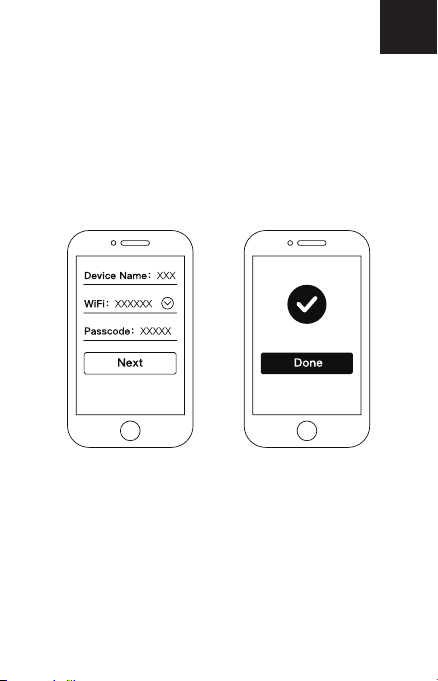
• Choose a device name, for example “Garden”. Choose a
network and enterthe password. Tap “Next”. The Smart
Outdoor Camera will start connecting to the network and the
WiFi indicator will flash red. It maytake a few minutes until
the connection is established. When the WiFi indicator turns
blue, the camera has connected successfully. Tap “Done”
on your mobile device. You are now readyto use the Smart
Outdoor Camera.

13
F F
5. PROBLEMS AND SOLUTIONS
1. How far is the monitoring range?
In daylight the camera has a visual distance of 50 meters.
With infrared night vision the visual distance is about 15
meters.
2. The Smart Outdoor Camera gives the status “offline”
after connecting.
• Ensure the WiFi password for your home network is entered
correctly in the settings menu ofthe “Doby” application.
• Ensure your mobile device is connected to the same WiFi
network as your camera to make the initial connection.
3. The SD Card cannot be detected.
Please ensure the SD card is formatted as FAT32.
6. TECHNICAL SPECIFICATIONS
Lens: Wide-angle lens
Angle: Diag. 105°, horiz. 90°, vert. 60°
Video compression: H.264
Resolution: 1280 960 @15fps
Audio: Single microphone
WiFi Protocol Support: IEEE802.11 b/g/n (2.4GHz)
Encryption: WPA2 / WPA / WEP / OPEN
Network: Wi-Fi/Cable RJ45
Power: 12V/1A
Operating Conditions: Temperature -30~60°C,
Humidity <90%
Size: 67 105 145mm
EN

14
F F
1. INHOUD VAN DE VERPAKKING
Controleer of de camera intact is en alle accessoires in de
doos zitten.
NL
Camera x1 Handleiding x1
Voedingsadapter x1 Kabel behuizing x1 Antenne x1
Lijngesp x4 Schroef x4 Waterdichte tape x2

15
F F
2. UITERLIJK
NL
95mm
180mm
Let op:
Houd er rekening mee dat het meerdere keren aanpassen van de hoek
kan leiden tot slijtage van de schroeven (de vergrendeling zal de naden
verslijten).
Pas de installatiehoek aan en
draai de drie schroeven vast
zoals wordt weergegeven in
de afbeelding. Om de hoek
opnieuw aan te passen, draait
u de schroeven los voordat u
ze afstelt.
Indicatielicht Micro SD slot
Microfoon
Infraroodlicht
Fotosensor
16
F F
3. INSTRUCTIES VOOR INSTALLATIE
NL
Muurmontage
Plafondmontage
Let op:
1. Let op water-dichtende maatregelen voor installatie buitenshuis.
Zie de volgende afbeeldingen voor een gedetailleerde instructie.
2. Let op bliksembeveiliging.
17
F F
NL
• Plaats de rode O-ring in de netpoortzitting .
• Draai de onderdelen ,,, en vast.
• Sluit het netsnoer aan op de voedingspoort .
• Verwijder het papier aan de achterkant van de
waterdichte tape.
18
F F
NL
• Houd bij het aanbrengen van de waterdichte
tape spanning op de tape door deze tijdens
de montage uit te rekken. Op deze manier
werkt de waterdichte tape het best.
• Het resultaat na het wikkelen van
waterdichte tape.
19
F F
4. INSTRUCTIES VOOR GEBRUIK
NL
1. Verbind de Smart Outdoor Camera
Verbind de Smart Outdoor Camera aan een voedingsbron
door middel van de meegeleverde kabel.
2. Installatie van de app
Ga naar de App Store op uw mobiele apparaat om de “Doby”
app te downloaden.
Registreer met uw e-mail en kies een wachtwoord. Als u al
een account heeft, tik op “Sign in”.

20
F F
NL
3. Voeg de Smart Outdoor Camera toe aan uw mobiele
apparaat
Open “Doby” [Home], tik “+” om naar apparaten te zoeken.
Kies “Camera (OutdoorVersion)”.
Bedrade verbinding
Controleer of de camera en de app op hetzelfde netwerk zijn
aangesloten en of de led-indicator voor het netwerk brandt.
Selecteer de apparaat-CID en tik op "Next".
Table of contents
Languages:


