sinmag LBC SE Series User manual


© COPYRIGHT 2019 LBC BAKERY EQUIPMENT, INC. 2 REV J 8/2021
Table of Contents
Page 3 Cautions
Page 4 Installation
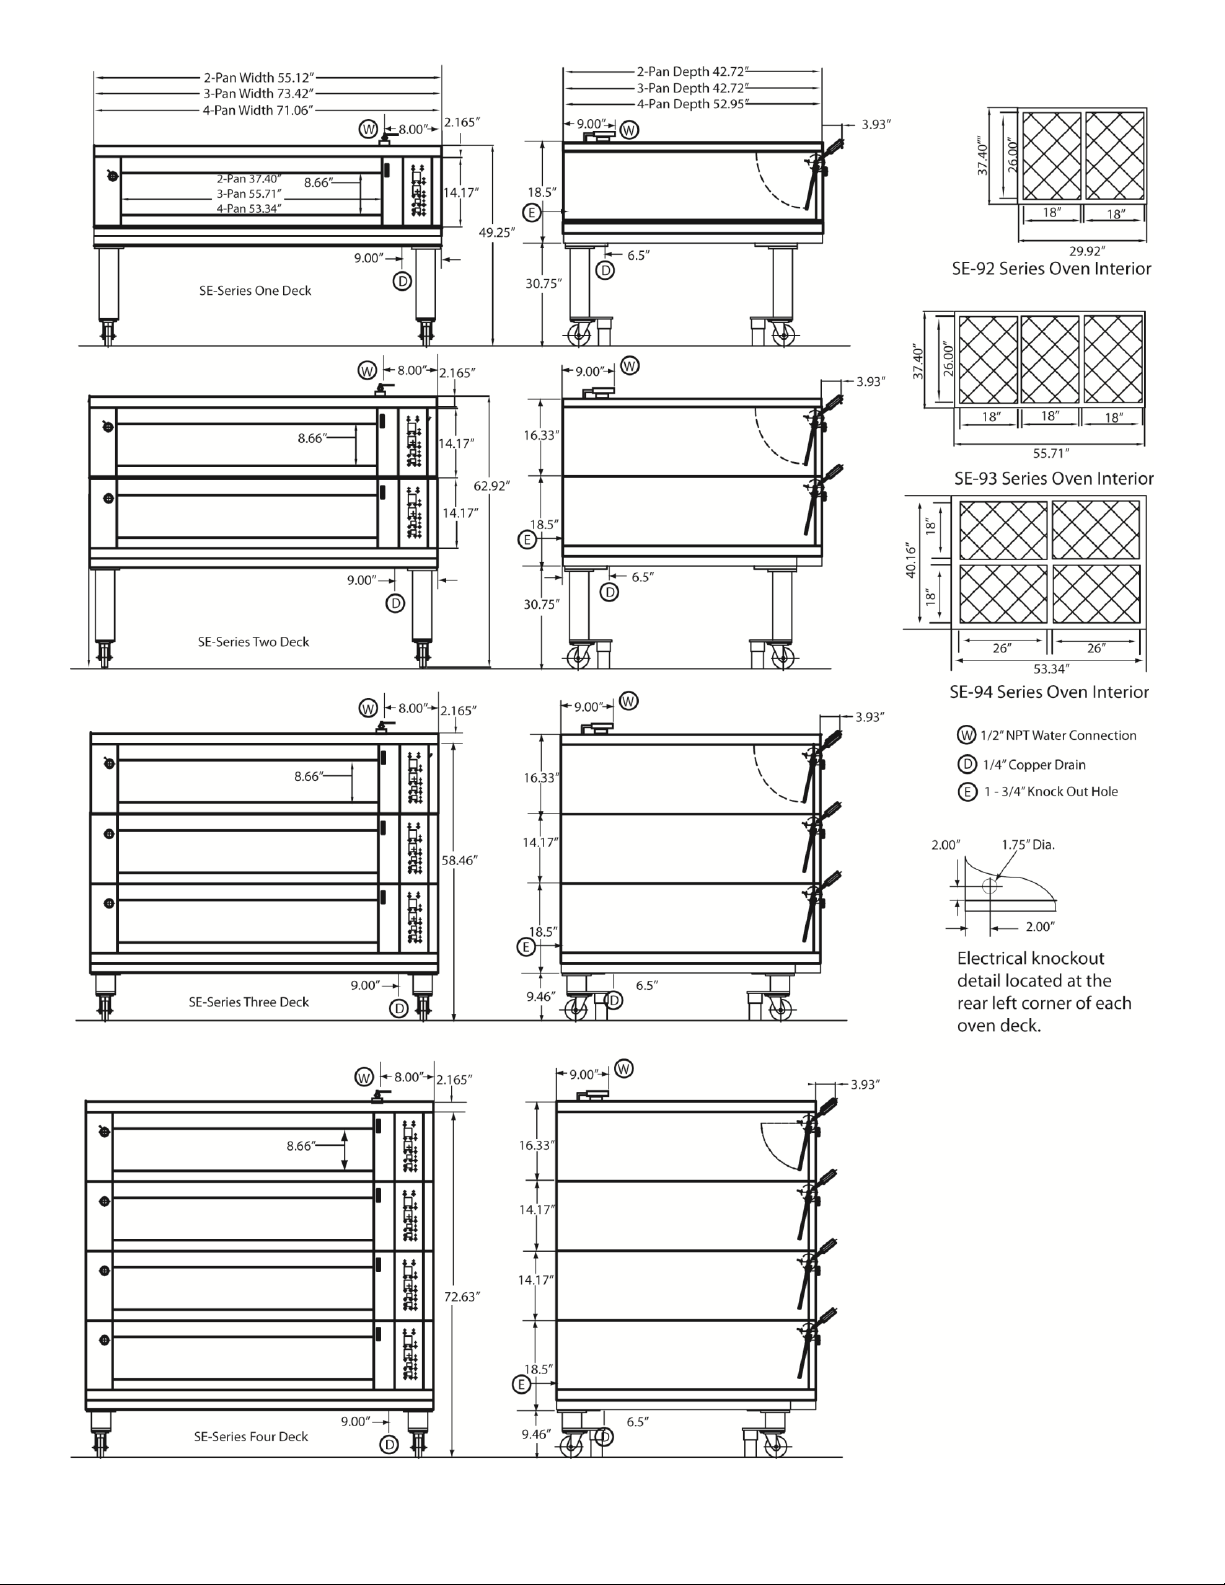
Page 5 Dimensions
Page 6 Connections
Page 9 Start-Up
Page 10 Trouble-shooting
Page 11 Operation
Page 11 Oven Control
Page 12 Loading the oven
Page 12 Starting a Bake
Page 13 Cleaning and Maintenance
Page 15 Parts Illustrations and Lists
Page 20 Notes
Page 22 Limited Warranty Information

© COPYRIGHT 2019 LBC BAKERY EQUIPMENT, INC. 3 REV J 8/2021
DISCONNECT FROM POWER SOURCE WHEN CLEANING AND/OR SERVICING
THIS MACHINE
NEVER ATTEMPT TO CLEAN THIS MACHINE WHILE IT IS HOT OR HEATING AS
RISK OF SERIOUS INJURY COULD RESULT
NEVER OPERATE THIS MACHINE WITH SAFETY COVERS OR INSPECTION
PLATES REMOVED OR WITH SAFETY SWITCHES INOPERATIVE
The SE Deck oven has been packaged to withstand rough handling; however, it
is important that you inspect the shipment for damages, concealed or otherwise
and that you sign the bill of lading to note any such damages. These damages
are the responsibility of the consignee and must be reported to the carrier within
10 days in order to file for a claim.
LBC Bakery Equipment, Inc. will not warrant any equipment that is not installed
by a trained installation contractor or that has not been connected to utilities by
a licensed electrician and plumber. Please consult our warranty at the end of
this document.
CAUTION!
DO NOT OPERATE, CLEAN OR SERVICE THIS MACHINE BEFORE
READING THIS MANUAL AND UNDERSTANDING COMPLETELY THE
SAFETY INSTRUCTIONS FOUND IN THIS MANUAL AND ON THE
MACHINE’S LABELS
IMORTANT!
ALL OPERATORS OF THIS OVEN MUST BE OF LEGAL AGE TO
OPERATE SUCH EQUIPMENT AND MUST BE FAMILIAR WITH AND
UNDERSTAND ALL CAUTION LABELS.
IMORTANT!
THIS OVEN IS DESIGNED FOR DIRECT HEARTH BAKING OF BREAD
PRODUCTS AND PIZZA ONLY. ALL OTHER PRODUCTS MUST BE
BAKED IN A PAN OR ON OTHER MEDIA.

© COPYRIGHT 2019 LBC BAKERY EQUIPMENT, INC. 4 REV J 8/2021
I:
Installation Section
A: Installation
The SE deck oven requires some assembly by an authorized LBC trained service
technician.
In the US the SE deck oven must be installed in accordance with:
1. State and local codes
2. National Electrical Code (ANSI/NFPA no. 70, latest edition) available from
the National Fire Protection Association, Batterymarch Park, Quincy MA
02269
In Canada, the SE deck oven must be installed in accordance with:
1. Local codes.
2. Canadian Electrical Code (CSA C22.2 No. 3 latest edition) available from
the Canadian Standards Association, 5060 Spectrum Way, Mississauga,
Ontario L4W 5N6
Check with your local building department to determine if the oven will need to
be placed under a hood. Information on the construction and installation of
ventilating hoods may be obtained from Vapor Removal from Cooking
Equipment, NFPA Standard no. 96 (latest edition)
The installation location should be free and clear of all obstruction.
The floor should be smooth and level and must be capable of supporting the
weight of the appliance.
Allow adequate clearance at the sides of the oven for serviceability. Allow 42” at
the front of the oven so that it can be pulled forward for servicing.
The SE deck oven is equipped with four (4)
leveling feet located under the equipment
stand, two at the front and two at the rear.
Once the oven is installed in its operating
position, lower the feet by turning them
clockwise to level and secure the appliance
from movement.
© COPYRIGHT 2019 LBC BAKERY EQUIPMENT, INC. 5 REV J 8/2021

© COPYRIGHT 2019 LBC BAKERY EQUIPMENT, INC. 6 REV J 8/2021
Deck ovens are shipped individually and will need to be stacked. It is very important to
use the proper material handling equipment.
1. Place the stand in an area that is level and can support the weight of the oven.
2. Lower the feet on the stand so that it will not move during the assembly process.
3. Place the first deck on the stand and secure it in place using the supplied XXX
fasteners.
4. Stack other decks on top of each other and secure them in place using the
stacking kits clips and fasteners.
5. Use a suitable 1.75” strain reliever to connect the power supply to the oven.
6. Wire the decks together using copper wire suitable for 90 degrees C and suitable
for the amperage of the branch circuit protector supplying the ovens.
B: Electrical Connections
Electrical connection must comply with all applicable State and local codes and in
accordance with the NEC and NFPA.
Electrical connections MUST be made by a licensed electrician.
A separate service disconnect should be installed so that main power can be
disconnected during service.
Use only Copper Wire Rated at 90 Degrees Centigrade
The oven must be installed with the provided lanyard securely attached to the
stand and to the wall. Verify that all connections are long enough so that the
oven can be pulled forward to the extent of the lanyard without straining any
connection.
Electrical and grounding connections must comply with the applicable portions of
the National Electrical Code and or other local codes.

© COPYRIGHT 2019 LBC BAKERY EQUIPMENT, INC. 7 REV J 8/2021
Disconnect the electrical power to the unit and follow lockout / tag out
procedures.
C: Water Requirements
As with all steam related products, water filtration and regular filter
replacements, coupled with routine deliming are required.
Proper water quality can improve the taste of the food prepared in the oven,
reduce liming and extend equipment life. Local water conditions vary from one
location to the other. The recommended water hardness is 2.0 to 6.0 grains of
hardness per gallon with pH from 7.0 to 8.0. Chlorides must not exceed 30 parts
per million. Water hardness above 6.0 grains per gallon should be treated by a
water conditioner (water softener or in-line water treatment). Water hardness
below 4.0 grains per gallon may also require a water treatment system to reduce
potential corrosion.
© COPYRIGHT 2019 LBC BAKERY EQUIPMENT, INC. 8 REV J 8/2021
D: Plumbing Connections
:
Water and waste piping and connections shall comply with the international
Plumbing Code 2003, International Code Council (ICC), or to the Uniform
Plumbing Code 2003, International Plumbing and Mechanical Officials (IAPMO)
Plumbing connections must comply with applicable sanitary, safety and plumbing
codes and provide adequate backflow protection to comply with applicable
federal, state and local codes. A 100 mesh strainer must be installed
immediately upstream of a check valve-type back-flow preventer.
Each oven deck is equipped with a “Steam Pod” located behind the access panel
rear of the oven(s); drains are required for these steam pods. Note: this
appliance has atmospheric steam generation and does not create any positive
pressure in the oven chamber or in the steam generator pods.
Water to this appliance should be treated to prevent build-up of minerals and
rust in the steam pods and water system.
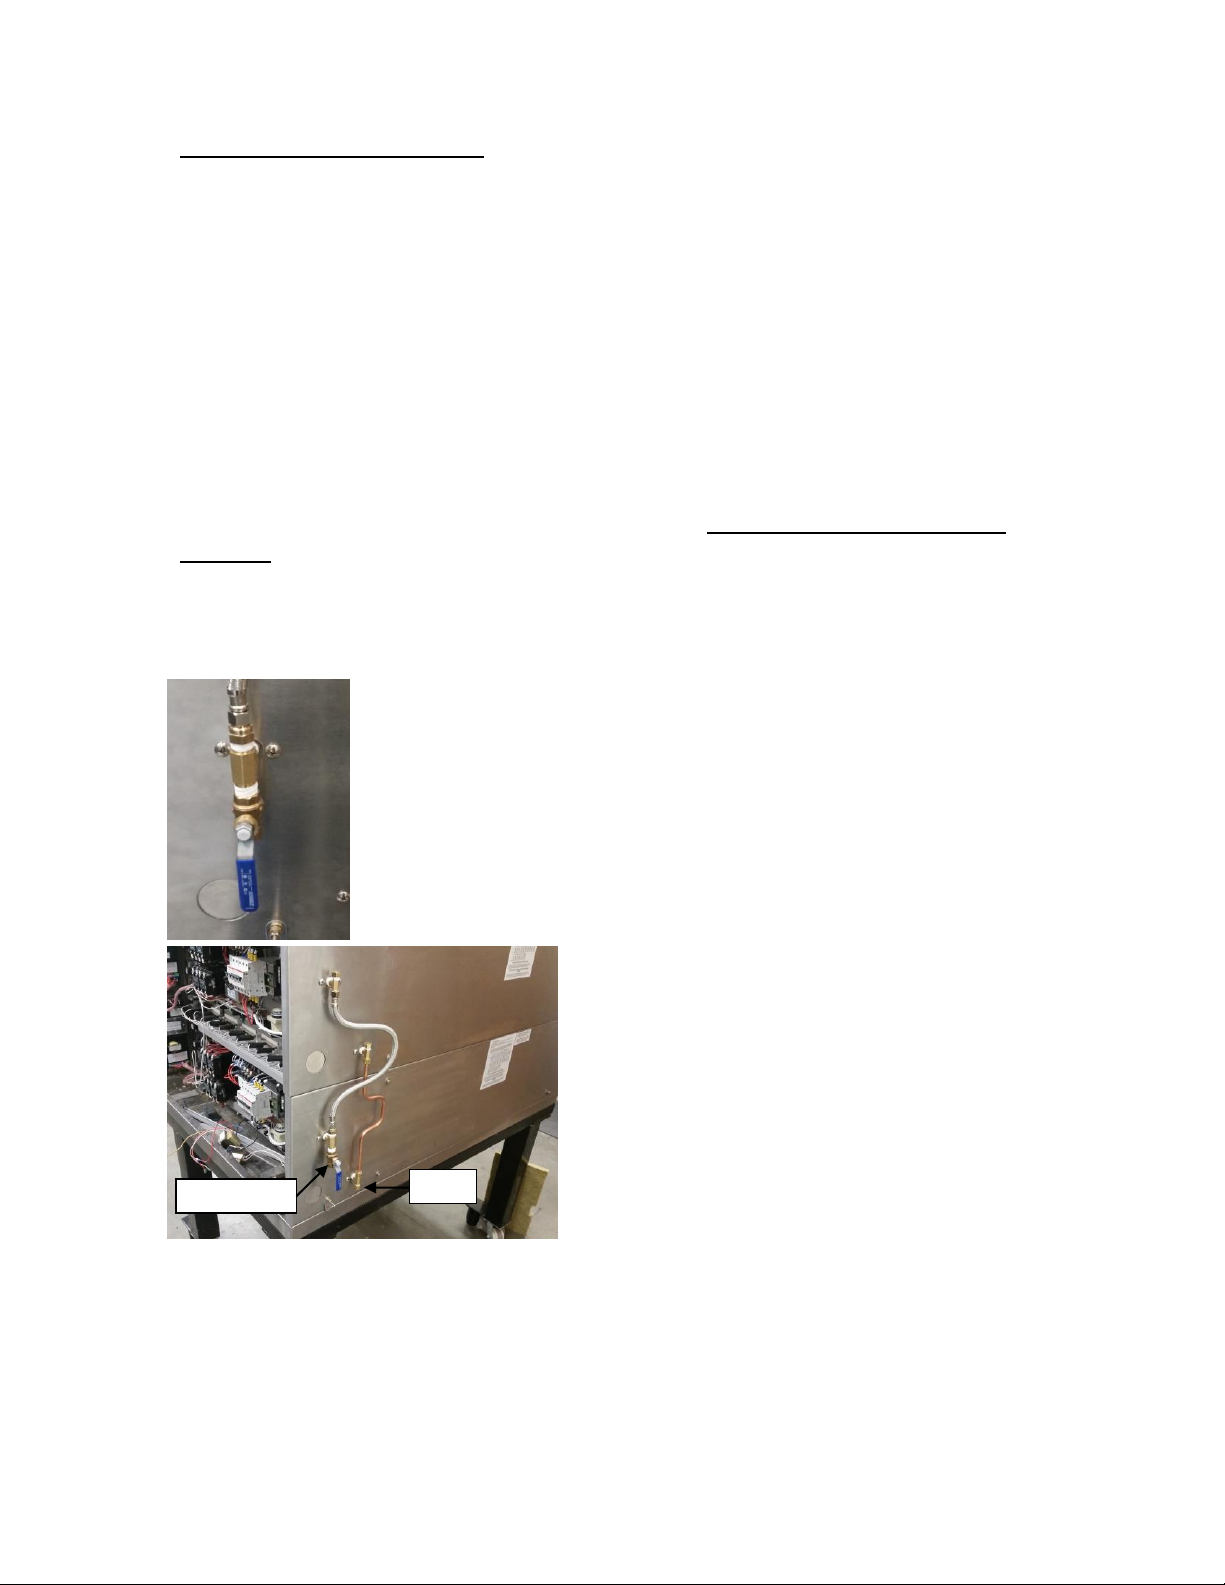
The bottom deck oven is supplied from the factory with a ½”
NPT ball valve and “Y” strainer. The water supply connection is
made at the ½” ball valve. The supply connection should be
made with a suitable flexible line to allow the oven to be
moved in and out of position.
Subsequent decks will need to have the
water lines linked together using the
supplied braided hoses, 10mm copper
tubing, and compression fittings.
Inspect final connections for leaks.
Water Supply
Drain

© COPYRIGHT 2019 LBC BAKERY EQUIPMENT, INC. 9 REV J 8/2021
E: Start-Up
Before using the oven for the first time, when new stone deck is installed, or if
the stone deck has been cleaned with water, the baking stone need to be slowly
“baked in” prior to start-up. Use the following chart as a guide for the first
start-up to properly season the baking stone.
Parameter
Step 1
Step 2
Step 3
Step 4
Step 5
Top Heat
150 F
250 F
350 F
450 F
550 F
Bottom Heat
150 F
250 F
350 F
450 F
550 F
Bake Time
30 Min.
30 Min.
30 Min.
30 Min.
30 Min.
Steam
None
None
None
None
None
Steam Vent
Open
Open
Open
Open
Open

© COPYRIGHT 2019 LBC BAKERY EQUIPMENT, INC. 10 REV J
8/2021
F: Trouble Shooting
Oven does not heat Check main power is on
Check internal circuit breakers
Check that over-temp limit has not tripped (This is
a thermal device, allow to cool and re test)
Check voltage at elements
Check that contactors have not tripped; reset if
necessary.
Oven Slow to Heat Check supply voltage matches rating on data plate
Electrical phase is out
Check that all elements are operational
Check internal circuit breakers
Temp display reading backwards Thermocouple wire backwards
Oven looses temp. Excessive steam time
Circuit breaker tripped out
Element out
Contactor tripped
Uneven baking Oven not loaded correctly (see page 10)
Element out
Circuit breaker tripped
Contactor tripped
No Steam Water supply is not on
Ball valve closed
Blockage in “Y” Trap
Solenoid defective
For the installation company:
I/we certify that the SE-9 model
electric deck oven serial number(s)
has been installed and tested and is in excellent operating
condition.
Signed by: Date
Please sign and return this to LBC Bakery Equipment, Inc5901 23rd Drive West, Suite 105, Everett
WA 98203

© COPYRIGHT 2019 LBC BAKERY EQUIPMENT, INC. 11 REV J
8/2021
II: Operation Section
Please take a few minute to have all operators read and understand these instructions
CAUTION: Always wear protective gloves or use a wooden oven peel when loading or
unloading the deck oven as there is risk of serious injury from hot surfaces.

© COPYRIGHT 2019 LBC BAKERY EQUIPMENT, INC. 12 REV J
8/2021
A: Controls Operations
1. Press the main On/Off key
2. Using the temperature adjustment keys set the desired top and bottom
temperatures.
a.
Very Important
: The temperature difference between the top and
bottom heat should NEVER be more than 50 degrees.
3. Allow the oven to heat to the desire temperature; at initial start-up allow
30
minutes
for the oven stones to saturate.
a. The steam system will begin heating as soon as the oven is turned on.
4. Set the desired bake time by using the up or down timer keys
5. Set the desired steam time by using the up or down steam timer arrows
a.
Very Important
: It is not recommended that you exceed more than 6
Seconds of steam as this will cause a severe drop in temperature and
poor baking results.
b.
EXTREMELY IMPORTANT
:NEVER STEAM THE OVEN WITH THE
LOADING DOORS OPEN AS RISK OF SERIOUS BURNS WILL RESULT!
c. It will take about 10 minutes between steaming for the system to
recover.
B: Loading the Oven
Depending on your particular model the deck oven will hold either two, three or four
18”x26’ sheet pans wide. If partial loads are going to be used please follow these very
important instructions to ensure you achieve even baking results.
Regardless of the type of pan used it is important to keep them spaced evenly and as
close to centered as possible to avoid uneven baking results.
Product may be placed directly on the oven stones. Use the same centering techniques
as shown above.
CAUTION:
Products such as pizza, artisan bread or other bread products may be
baked directly on the hearth stone. All other products must be cooked in a pan
or on other medium to prevent contact with the deck stone. If food products
spill onto the deck stone, clean by scraping or brushing off the excess material.
DO NOT WASH WITH WATER. See Section
D: Cleaning and Maintenance
for
instructions.
C: Starting a Bake
With the oven loaded and the doors closed press the start stop key.
If steam is desired press the Steam Start Stop key.
To vent the steam pull the vent knob located at the front left of the oven deck.
At the end of the bake, open the oven door slightly to allow and steam to escape the
open the door fully and use a peel to remove the finished product.
© COPYRIGHT 2019 LBC BAKERY EQUIPMENT, INC. 13 REV J
8/2021
D: Cleaning and Maintenance
When the oven is cool:
Inspect the oven interiors and clean any loose debris from the oven stones. A
long handled hearth broom is best.
Remove any baked on product with a brass brush or scraper.
NEVER WASH THE HEARTH STONES WITH WATER OR CHEMICALS AS THEY
MAY BREAK OR SHATTER WHEN HEATED!
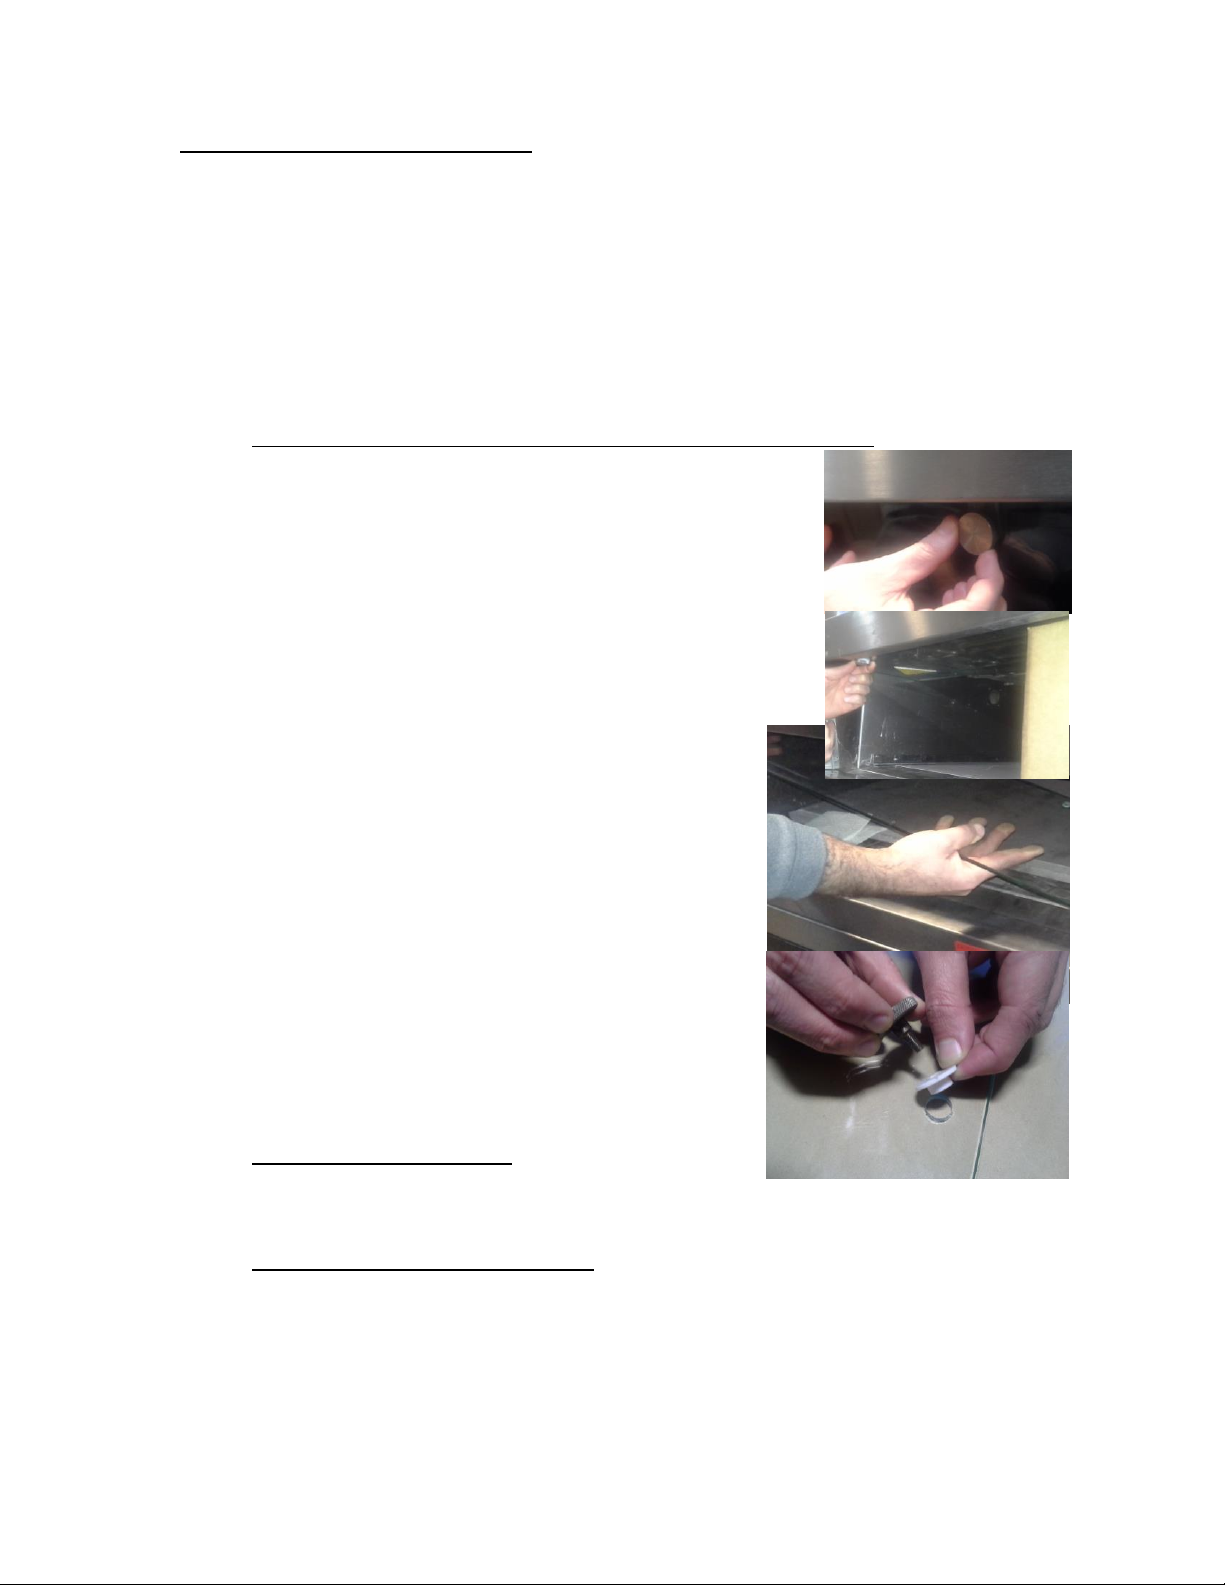
To clean above the door and the back side of the window glass:
1. Allow the oven interior to cool to
room temperature. Remove the
center knurled head screw from the
door glass.
2. Open the door. With assistance,
remove the remaining screws from
the door as shown. If you do not
have assistance, place an 8” box
under the door in the center.
3. Remove the glass from the oven by
tilting one end up as shown. Place
on a clean flat surface. Clean the
glass with paper or cloth and a mild
glass cleaner solution.
4. Use a brush or damp cloth to clean
the space above the door and above
the heating elements. DO NOT
SPRAY WATER INTO THE OVEN.
5. Replace the door in the oven. Use
paper towel to support the glass at
the bottom. Reinstall the knurled
headed screws through the glass
into the hinge. Be sure the Teflon®
washer and hole liners are in place.
Tighten the screws by hand only.
Clean the exterior surfaces with a damp
cloth and polish with a commercial grade
stainless steel polish.
Check and replace any water filters that may have been installed at the incoming
water line.
© COPYRIGHT 2019 LBC BAKERY EQUIPMENT, INC. 14 REV J
8/2021
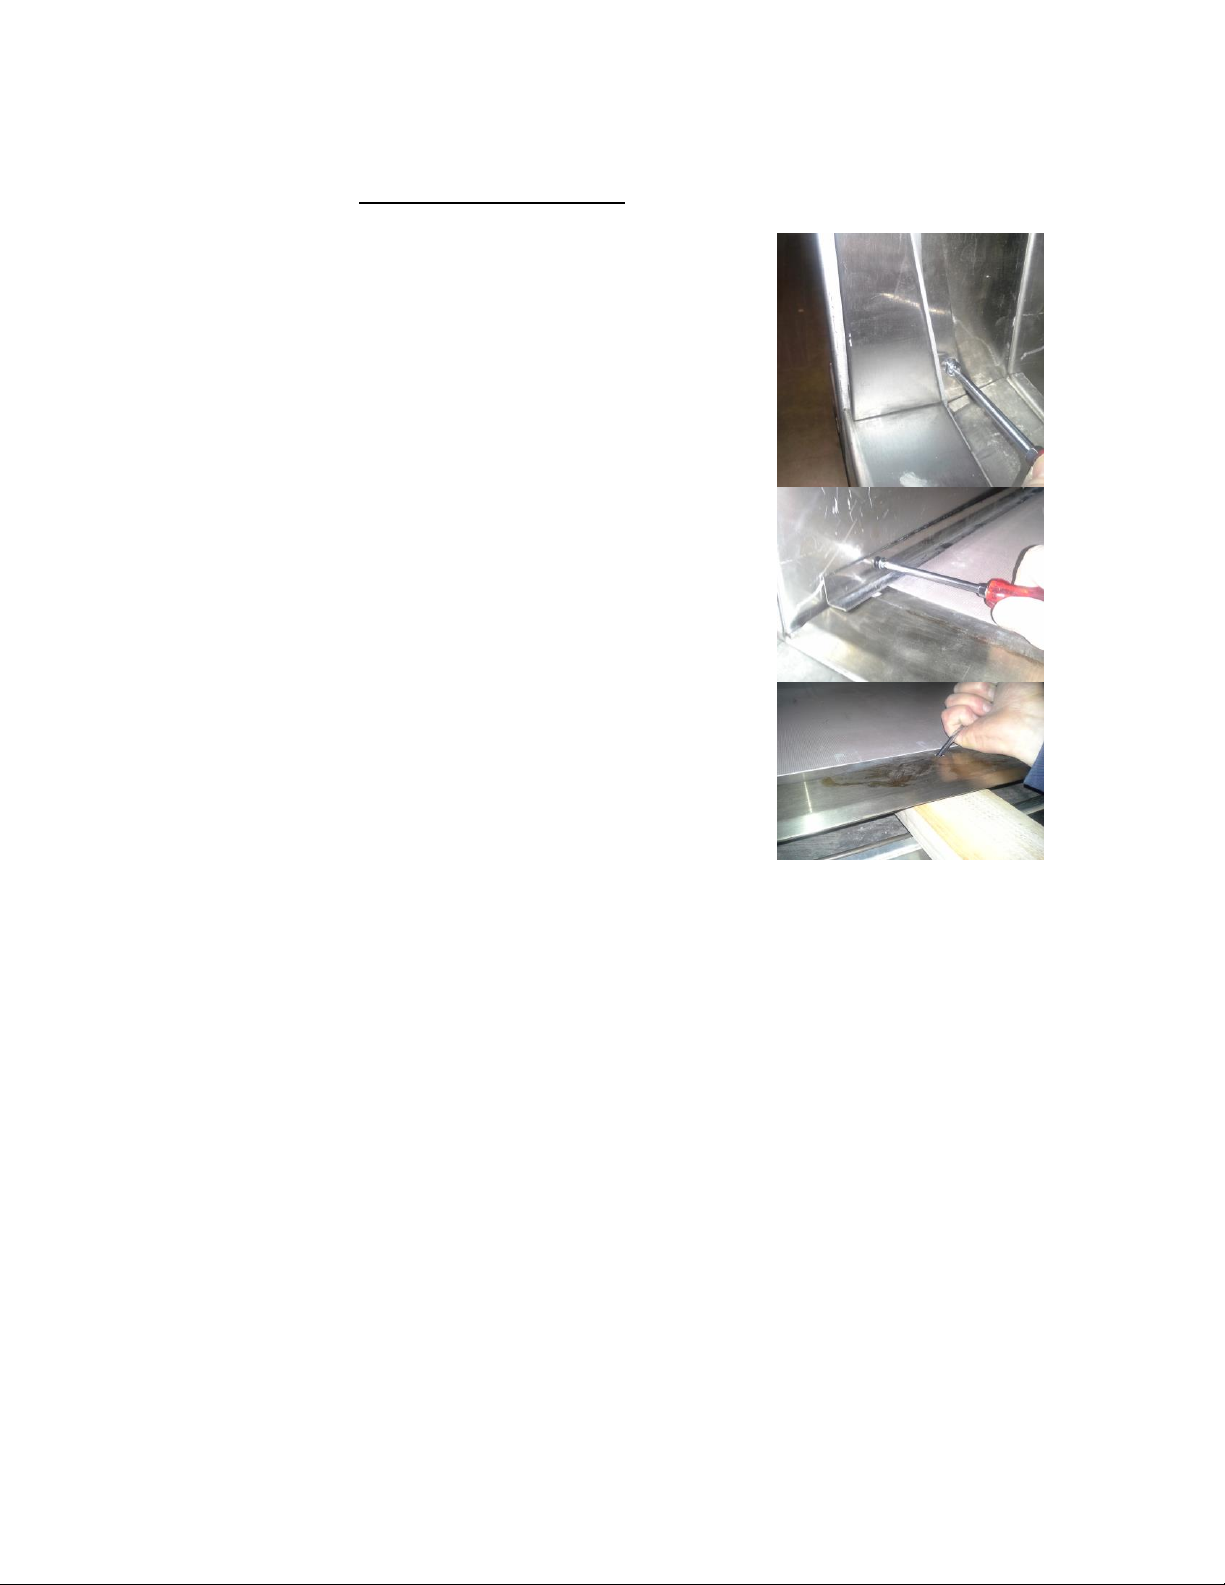
If needed, you may lift the oven stone(s) to thoroughly clean under them. Use
extreme caution when lifting the stones.
1. Open the loading door. Allow the oven
to cool to room temperature.
2. Remove the door stops on the left and
right side of the door.
3. Remove the angles on the sides of the
deck that hold the deck down.
4. Place a screw driver or other tool into
the hole in the front of the forward deck
clamp. Lift the deck and slide a board
under the deck.
5. Use a vacuum cleaner to remove any
debris under the deck.
6. Replace the deck and clamp parts when
completed.
7. Replace the door stops on the left and
right sides.

© COPYRIGHT 2019 LBC BAKERY EQUIPMENT, INC. 15 REV J
8/2021
E: Parts Illustrations and Listing
Item No.
Part No.
Description
1
11090-43
Element SE-92X Deck Oven, 208V 330 Watts
1
11090-44
Element SE-92X Deck Oven, 208V 480 Watts
1
11090-45
Element SE-92X Deck Oven, 208V 330 Watts
1
11090-46
Element SE-92X Deck Oven, 208V 480 Watts
1
11090-47
Element SE-93X Deck Oven, 208V 490 Watts
1
11090-48
Element SE-93X Deck Oven, 208V 720 Watts
1
11090-49
Element SE-93X Deck Oven, 208V 490 Watts
1
11090-50
Element SE-93X Deck Oven, 208V 720 Watts
1
11090-51
Element SE-94X Deck Oven, 208V 660 Watts
1
11090-52
Element SE-94X Deck Oven, 208V 950 Watts
1
11090-53
Element SE-94X Deck Oven, 208V 660 Watts
1
11090-54
Element SE-94X Deck Oven, 208V 950 Watts
2
11090-55
Element SE-92X Steam Pod, 208V 1000 Watts
2
11090-56
Element SE-93X and SE-94X Steam Pod, 208V 2000 Watts
2
11090-57
Element SE-93X and SE-94X Steam Pod, 240V 2000 Watts
3
41100-42
Thermocouple, K type
4
30401-33
High Limit Thermostat
5
30401-33-2
High Limit Thermostat; Steam Pod
6
40102-82
Circuit Board, SE Deck Oven
7
30701-12
Solid State Relays
8
30700-17
Contactor, 3-Pole 50 Amp
9
31400-32
Transformer, LRP, 208-240 Primary 24-12 Secondary 40VA CL2
10
70403-01
Solenoid Valve
11
31800-13-1
Circuit Breakers, 15 Amp
12
31602-23
Lamp, Halogen(Behind Panel)

© COPYRIGHT 2019 LBC BAKERY EQUIPMENT, INC. 16 REV J
8/2021
E: Parts Illustrations and Listing
Item
No.
Part No.
Description
6
40102-82
Circuit Board, SE Deck Oven
13
50800-104
Handle, Deck Oven Door
14
71401-34
Oven Stone, SE-92 Two Pan
14
71401-35
Oven Stone, SE-93 Two Pan
14
71401-36
Oven Stone, SE-94 Two Pan
15
71300-34
Oven Door, Glass, SE-92 Two Pan Oven
15
71300-35
Oven Door, Glass, SE-93 Three Pan Oven
15
71300-36
Oven Door, Glass, SE-94 Four Pan Oven
16
50800-105
Knob, Vent
17
72901-39
Caster, Deck Oven Stand
18
72901-40
Leveler Foot Deck Oven
© COPYRIGHT 2019 LBC BAKERY EQUIPMENT, INC. 17 REV J
8/2021

© COPYRIGHT 2019 LBC BAKERY EQUIPMENT, INC. 18 REV J
8/2021

© COPYRIGHT 2019 LBC BAKERY EQUIPMENT, INC. 19 REV J
8/2021

© COPYRIGHT 2019 LBC BAKERY EQUIPMENT, INC. 20 REV J
8/2021
Notes:
This manual suits for next models
4
Other sinmag Oven manuals


Popular Oven manuals by other brands


AEG
AEG BSK792380B user manual

Siemens
Siemens iQ700 CM656GBS1/B8 User manual and installation instructions

Frigidaire
Frigidaire FRIGIDAIRE FEB24S2A Specifications

Siemens
Siemens CB675GB 1 Series instruction manual

NEFF
NEFF B57VS24.0B User manual and installation instructions

Hisense
Hisense BI5221PX Detailed instructions


