sinmag LBC LCR7 User manual

Models LCR5 and LCR7
5-Spit and 7-Spit Rotisserie Ovens
Operator’s Manual
LBC Bakery Equipment, Inc.
5901 –23rd Drive West, Suite 105
Everett, WA 98203
Phone: 888-RACKOVN (888-722-5686)
Fax: 425-642-8310
Email: service@lbcbakery.com
Website: www.lbcbakery.com REV D 8/2013

2
READ FIRST T
THIS MANUAL MUST BE RETAINED FOR FUTURE REFERENCE. READ, UNDERSTAND AND FOLLOW
THE INSTRUCTIONS AND WARNINGS CONTAINED IN THIS MANUAL. IT IS THE RESPONSIBILITY OF
THE OWNER/OPERATORS OF THIS APPLIANCE TO TRAIN, SUPERVISE AND AUTHORIZE ANY PERSON
DESIGNATED AS AN OPERATOR. ALL OPERATORS MUST READ AND UNDERSTAND THIS MANUAL.
W A R N I N G
DO NOT STORE OR USE GASOLINE
OR OTHER FLAMMABLE VAPORS
AND LIQUIDS IN THE VICINITY OF
THIS OR ANY OTHER APPLIANCE.
D A N G E R
W A R N I N G
IMPROPER INSTALLATION,
ADJUSTMENT, SERVICE OR
MAINTENANCE CAN CAUSE
PROPERTY DAMAGE, INJURY OR
DEATH. READ THE INSTALLATION,
OPERATING AND MAINTENANCE
INSTRUCTIONS THOROUGHLY
BEFORE INSTALLING OR SERVICING
THIS EQUIPMENT.
C A U T I O N ALWAYS KEEP THE AREA NEAR
THE APPLIANCE FREE FROM
COMBUSTIBLE MATERIALS.
Your LBC Rotisserie was manufactured to rigid standards. The appliance has been tested and is listed by Intertek Testing
Services (ETL Semko) and meets applicable safety and sanitation standards.
A) The responsibility of the manufacturer is to supply suitable, comprehensive instructions and recommendations for
proper operation and maintenance.
B) All operations, maintenance and repair of this or any appliance must be performed by properly trained and qualified
personnel, and all such operations, maintenance and repair must be performed in a diligent manner. It is the
responsibility of the owner/operator to ensure proper training and diligence of any person coming into contact with
either the subject units or the output (product, fumes or otherwise) of the subject units. It is the responsibility of
the owner/operator to ensure that the subject units are installed and operated in accordance with OSHA Standard
1910.263.
C) A regular periodic program of cleaning, inspection and maintenance must be established and comprehensive
maintenance records maintained. It is the sole responsibility of the owner/operator to establish, schedule and
enforce the frequency and scope of these programs in keeping with recommended practice and with due
consideration given to actual operating conditions.
D) The appliance must be operated within limits which will not exceed its working limits. It is the responsibility of the
user to operate this appliance in accordance with the rules and limits described in this manual and the published
product specification sheet, and in accordance with the directions and instructions of the owner/operator of the
appliance or employer, and in accordance with applicable federal, state and local laws and ordinances.

3
TABLE OF CONTENTS T
CHAPTER PAGE
Read First . . . . . . . . . . . . . . . . . . . . . .. . . . . . . . . . . . . . . . . . . . . . . . . . . . . . . . . . . . . . . . . . . . . . . 2
Safe Operating Rules . . . . . . . . . . . . . . . . . . . . . . . . . . . . . . . . . . . . . . . . . . . . . . . . . . . . . . . . . . 4
Equipment Description . . . . . . . . . . . . . . . . . . . . . . . . . . . . . . . . . . . . . . . . . . . . . . . . . . . . . . . . . . 6
Configurations . . . . . . . . . . . . . . . . . . . . . . . . . . . . . . . . . . . . . . . . . . . . . . . . . . . . . . . . . . . . . . . . 7
Control Overview . . . . . . . . . . . . . . . . . . . . . . . . . . . . . . . . . . . . . . . . . . . . . . . . . . . . . . . . . . . . . 8
Operation
How to Program and Save a Recipe . . . . . . . . . . . . . . . . . . . . . . . . . . . . . . . . . . . . . . . . . . 11
How to Run a Recipe . . . . . . . . . . . . . . . . . . . . . . . . . . . . . . . . . . . . . . . . . . . . . . . . . . . . . . 13
Maintenance and Cleaning . . . . . . . . . . . . . . . . . . . . . . . . . . . . . . . . . . . . . . . . . . . . . . . . . . . . . . 15
Parts List . . . . . . . . . . . . . . . . . . . . . . . . . . . . . . . . . . . . . . . . . . . . . . . . . . . . . . . . . . . . . . . . . . . . . 16
Warranty . . . . . . . . . . . . . . . . . . . . . . . . . . . . . . . . . . . . . . . . . . . . . . . . . . . . . . . . . . . . . . . . . . . . 18

4
SAFE OPERATING RULES (Part 1 of 2) I
YOU MUST READ AND UNDERSTAND THIS SECTION BEFORE YOU OPERATE THIS APPLIANCE.
Hot Surfaces
The appliance may be hot. Do not contact hot surfaces in the appliance interior without proper protection.
Contact with hot surfaces can cause serious burns, loss of skin and hair and the use of limbs.
The appliance door may not stay open and may close on its own.
Avoid contact with hot surfaces when loading or unloading the oven. Use appliance mitts to handle spits,
forks or baskets. Contact with hot product can cause you to react suddenly and result in spilling or dropping
the product, which can cause physical harm.
Hot Water and Steam
This appliance produces steam in the process of cooking. When opening the loading door, hot air and steam
will be released from the oven interior. Steam is very hot and contact can cause serious burns, loss of skin
and hair, loss of the use of limbs and serious injury to eyes and internal organs. Excessive contact with steam
can even result in loss of life. Open the loading door slowly and keep your face and hands clear of the
opening.
Steam produced by the appliance can cause the floor to become wet. If this happens, wipe or mop up the
water and alert other employees of the hazard.
Steam and/or hot water may be expelled through the appliance drain. The drain line should be connected to
a proper air gap drain during installation to allow excess water to be evacuated from the work area. Steam
and water from the drain may be very hot and contact can cause serious burns, loss of skin and hair, loss of
the use of limbs and serious injury to eyes and internal organs.
Use caution to avoid slipping when operating this appliance or when in the area of the appliance. In the
event that the drain becomes clogged, continued use of the appliance may result in water spilling onto the
floor in the general work area around the appliance. If the drain becomes clogged and water spills on the
floor:
oStop using the appliance to prevent more water spillage.
oMop up and clean up any water on the floor in front of the appliance or in the surrounding work area.
oAlert other personnel, employees, customers or observers of the hazard.
oNotify supervisor, servicer or maintenance persons and have the drain unclogged.
In the normal operation of the appliance, product intended for cooking may spill onto the floor. If this
happens:
oMop up and clean up any product on the floor in front of the appliance or in the surrounding work area.
oAlert other personnel, employees, customers or observers of the hazard.
Sharp Edges and Pinch Hazards
Use caution to avoid contact with sharp edges. Doors, covers, etc. may have edges that can cut or snag skin
and clothes. Use caution when working on, cleaning or servicing the appliance.
Keep hands and fingers out of the path of the loading door when closing to avoid pinching.
Strains, Over-Extension, Over-Exertion and Lifting Hazards
Use caution when loading or unloading heavy product from the appliance. Cooked product may be heavy
and result in sprains, strains or injury to back, arms, hands or legs. Do not lift more than you are safely
capable of lifting.
Other Precautions
Never stand on top of the appliance for any reason.
Do not store anything on top of the appliance.
The oven is not a self-cleaning appliance –do not attempt to burn off surface contamination.

5
SAFE OPERATING RULES (Part 2 of 2) I
YOU MUST READ AND UNDERSTAND THIS SECTION BEFORE YOU OPERATE THIS APPLIANCE.
Smoke or Fire Hazard
If you see flames or smoke in or around the appliance:
oTurn the appliance off and contact your supervisor or an authorized service provider.
oCall 911 or contact fire safety personnel in accordance with your employer’s emergency plan.
oDo not open the loading door as this will allow oxygen to reach any flames and may cause injury to
persons, property damage and may cause loss of life.
Do not operate the appliance or any other appliance if you hear bangs, pops or other abnormal noises. Turn
off the appliance and contact your supervisor or authorized service provider.
Do not allow any flammable materials to be put into the appliance. The following materials are flammable:
oGasoline and petroleum products, including wax and tar.
oWood chips, wood and paper.
oFlour dust and fine corn meal that can become airborne.
oCharred baked products or any other burned material.
oAnimal and vegetable fats that vaporize or become overheated.
Do not operate the appliance if an attached fire suppression system or fire alarm system is dysfunctional or
has been discharged. Contact your supervisor or contact the fire safety system servicer.
If a fire suppression system discharges while you are operating the appliance, turn off the appliance and
follow your employer’s emergency plan, or exit the building or work area.
Electrical Hazard
Do not operate the appliance if electrical covers are removed or there are frayed, burned or exposed wires or
if any live electrical terminals are exposed. Turn off the appliance and any circuit breaker or disconnect
device supplying electrical power to the appliance as described in your employer’s emergency plan.
Do not operate the appliance if any circuit breaker or fuse connected to the appliance becomes tripped and
cannot be reset. Contact your supervisor or authorized servicer or electrician to correct the condition before
operating the appliance. Alert other employees and service personnel to the hazard.
Do not operate the appliance if you feel an electrical shock when in contact with the appliance or other
devices attached to the appliance. Contact your supervisor or authorized servicer or electrician to correct the
condition before operating the appliance. Alert other employees and service personnel to the hazard.
Improper Operation
Do not operate the appliance if covers, doors or other components are removed.
Do not operate the appliance if any other person has applied a lock-out on the electrical supply or has tagged
the appliance in a way to suggest that the appliance not be used. Contact your supervisor for further
instructions or refer to your employer’s safety plan.
Health and Safety in Cooked Products
For the safety and health of those who will consume goods produced through the use of the appliance, use
all caution and diligence to prevent the ingestion of any item or material that is unsafe or unfit for human
consumption.
Do not use the appliance if you see any material floating in the air in the appliance or if you see any foreign
matter in the finished food product.
Do not use the appliance if you smell unfamiliar smells or if you smell any odor that you know to be
unhealthy.
Do not under-cook any product that can carry bacteria such as but not limited to e-coli, salmonella or any
other pathogen.
Do not cook, roast or handle any meat or meat product that contains any known diseases or pathogens.
In all cases, follow all food-safe practices as mandated by law and your employer.

6
EQUIPMENT DESCRIPTION I
Exterior Dimensions
Model LCR5: 32.5” [826mm] Height 31.5” [800mm] Width 26.3” [668mm] Depth
Model LCR7: 38.4” [975mm] Height 38.9” [988mm] Width 32.6” [828mm] Depth
NOTE 1: The depths shown are for LCR5-2D and LCR7-2D two-door (pass through) ovens and exclude handles. For
LCR5-1D, add 0.8” [20mm]. There is no change in depth for the LCR7-1D.
NOTE 2: The heights shown do not include the legs, casters or stand. For countertop legs add 4.0” [102mm]. For
floor legs add 6.0” [152mm]. For casters add 4.5” [114mm]. For the stand add 32.1” [815mm].
Construction
The exterior top, front, rear and sides are constructed of stainless steel, as is the oven cook cavity (including the
carousel parts, drip plates, spits, forks and baskets). The exterior underside is constructed of stainless steel and
corrosion-resistant aluminized steel.
The loading doors include double-pane tempered safety glass with a low-energy coating for increased efficiency.
The inner panes are hinged to make cleaning easier.
The oven cook cavity is insulated with high-temp insulation for reduced heat loss and increased energy
efficiency.
High-output halogen lamps are located at the upper front and rear of the oven to thoroughly illuminate the cook
chamber for easy viewing.
Performance
Fast-acting heater elements are utilized for energy-efficient convective cooking.
Top-mounted fans thoroughly circulate convection air for even browning of the food product.
Capacity
LCR5: 15—20 Chicken Capacity
LCR7: 28—35 Chicken Capacity
Controls
Simple, intuitive and easy-to-understand layout.
Large displays for time, temperature and recipe number.
Sear, roast and warm/hold buttons to facilitate recipe setups.
Up to 3-event recipe capability.
Storage for up to 20 recipes.
6 quick-select buttons for your most-frequently-used recipes.
Carousel and interior fans automatically stop when loading door is opened and automatically resume when door is
closed.
Press-and-hold jog button to rotate carousel while door is open for easier loading and unloading.
Buzzer alarm to indicate end of cook cycle.
Set point ranges from 145-480oF [63-250oC].
Temperature scale can be either oF or oC with a single button press.
On shutdown the last recipe settings used is retained in the control memory and reappears on subsequent startup.

7
CONFIGURATIONS S
Rotisserie
Rotisserie
Countertop or
Floor Mount
Stand Mount
Stacked Appliances
6.0” [152mm] Legs or
4.5” [114mm] Swivel Casters
with Brakes
LST5 Stand (for LCR5 Rotisserie) or
LST7 Stand (for LCR7 Rotisserie or
LHC7 Holding Cabinet)
Combinations:
2 ea LCR5 Rotisseries
2 ea LCR7 Rotisseries
1 ea LHC7 Holding Cabinet + 1 ea LCR7 Rotisserie
NOTE: When a Rotisserie is stacked with a
Holding Cabinet, It may be installed on the top
or bottom
Countertop: 4.0” [102mm] Legs
Floor: 6.0” [152mm] Legs or
4.5” [114mm] Swivel Casters
with Brakes

8
CONTROL OVERVIEW (Part 1 of 3) L
See pages 9 and 10 for more thorough descriptions of the features shown below
ACTUAL
TEMP
SET
POINT
TIMER
POWER
SET
PROGRAM SELECT
START
STOP
WARM
ROAST HOLD
SEAR
OPERATE
1 2 3
4 5 6
SAVE
JOG
BACK
+3
E1. Quick-Select Buttons
Easy access to most-frequently-
used recipes
E3d. Recipe Save Button
Save up to 20 recipes
E1. Recipe Arrow
Buttons & Display
Use arrow button to
scroll through recipes;
recipe number will
appear in display
C. Set Point Arrow Buttons
Use to adjust temp set point
B. Change Temperature Scale
Simultaneously press-and-hold
up and down arrows for 3
seconds to change scale from
oF to oC and back
D. Timer Start/Stop
and Reset Button
Press to start/stop timer;
Press-and-hold for 3
seconds to reset timer
G. Jog Button
Press-and-hold this
button to adjust carousel
position when loading
door is open
D. Timer Arrow Buttons
Use to change cook time
C. Set Point Display
E2. Cook Event Buttons
Press to access existing
settings or to program
new settings for sear,
roast and warm/hold
steps
D. Timer Display
C. Actual Temp Display
E1. Recipe Indicator Light
Illuminates to indicate when a
quick-select recipe has been
opened
A. Power Button
F. Back +3 Button
Use this button to back a
running recipe up one event
to change time and/or temp

9
CONTROL OVERVIEW (Part 2 of 3)(Con tinu )
N O T I C E
During the first few hours of operation, you may
notice a small amount of smoke coming from the
rotisserie and/or a faint odor. This is normal in a
new oven and will disappear after a few hours of
use.
A Power Button. Press this button to turn the oven on or off. The Power indicator light will remain on whenever
the appliance is connected to an electrical supply.
B Change Temperature Scale. The oven can display temperatures in either oF or oC. To change from one scale to
the other, simultaneously press-and-hold both Set Point arrows for 3 seconds. Unless selected otherwise, this
scale will remain active for all future startups. Saved recipes will automatically change to the selected scale.
C Set Point and Actual Temperature. Use the set point arrows to enter the desired temperature, which will appear
in the adjacent set point display. The oven will heat or cool to match the set point and the oven temperature will
appear in the actual temp display
DCook Timer. The timer start/stop and reset button can be used in the following ways:
1Start the Timer. Press the start/stop button once to start the timer. When the timer is counting, the timer
colon will flash. If the loading door is opened while the timer is counting, the countdown will automatically
pause. The countdown will resume when the door is closed. A buzzer will sound when the timer has
counted to zero. Press any button on the control to silence the buzzer.
2Stop the Timer. If the timer is counting, press the start/stop button again to stop the countdown. When
the timer is stopped, the entire timer display will also flash.
3Reset the Timer. Press-and-hold the button to reset the timer.
4Jog Feature. If the loading door is open, the cook timer button will function as a jog button. See the Jog
Button description in this section.
E Recipe Features
1 Storage and Quick-Select Buttons. Up to 20 recipes may be stored. Six large, numbered Quick-Select
buttons allow easy access to your most-frequently-used recipes with a single button push. All recipes can
be accessed with the Program Select arrows. The recipe numbers will appear in the adjacent display as you
advance through the recipes.
2 Cook Event Buttons. The sear, roast and warm/hold buttons allow you to create up to 3 cooking events.
(NOTE: The set point and timer values for all 20 recipes have been factory-programmed for your
convenience. These values may be used as is or changed as needed.)

10
CONTROL OVERVIEW (Part 3 of 3) )
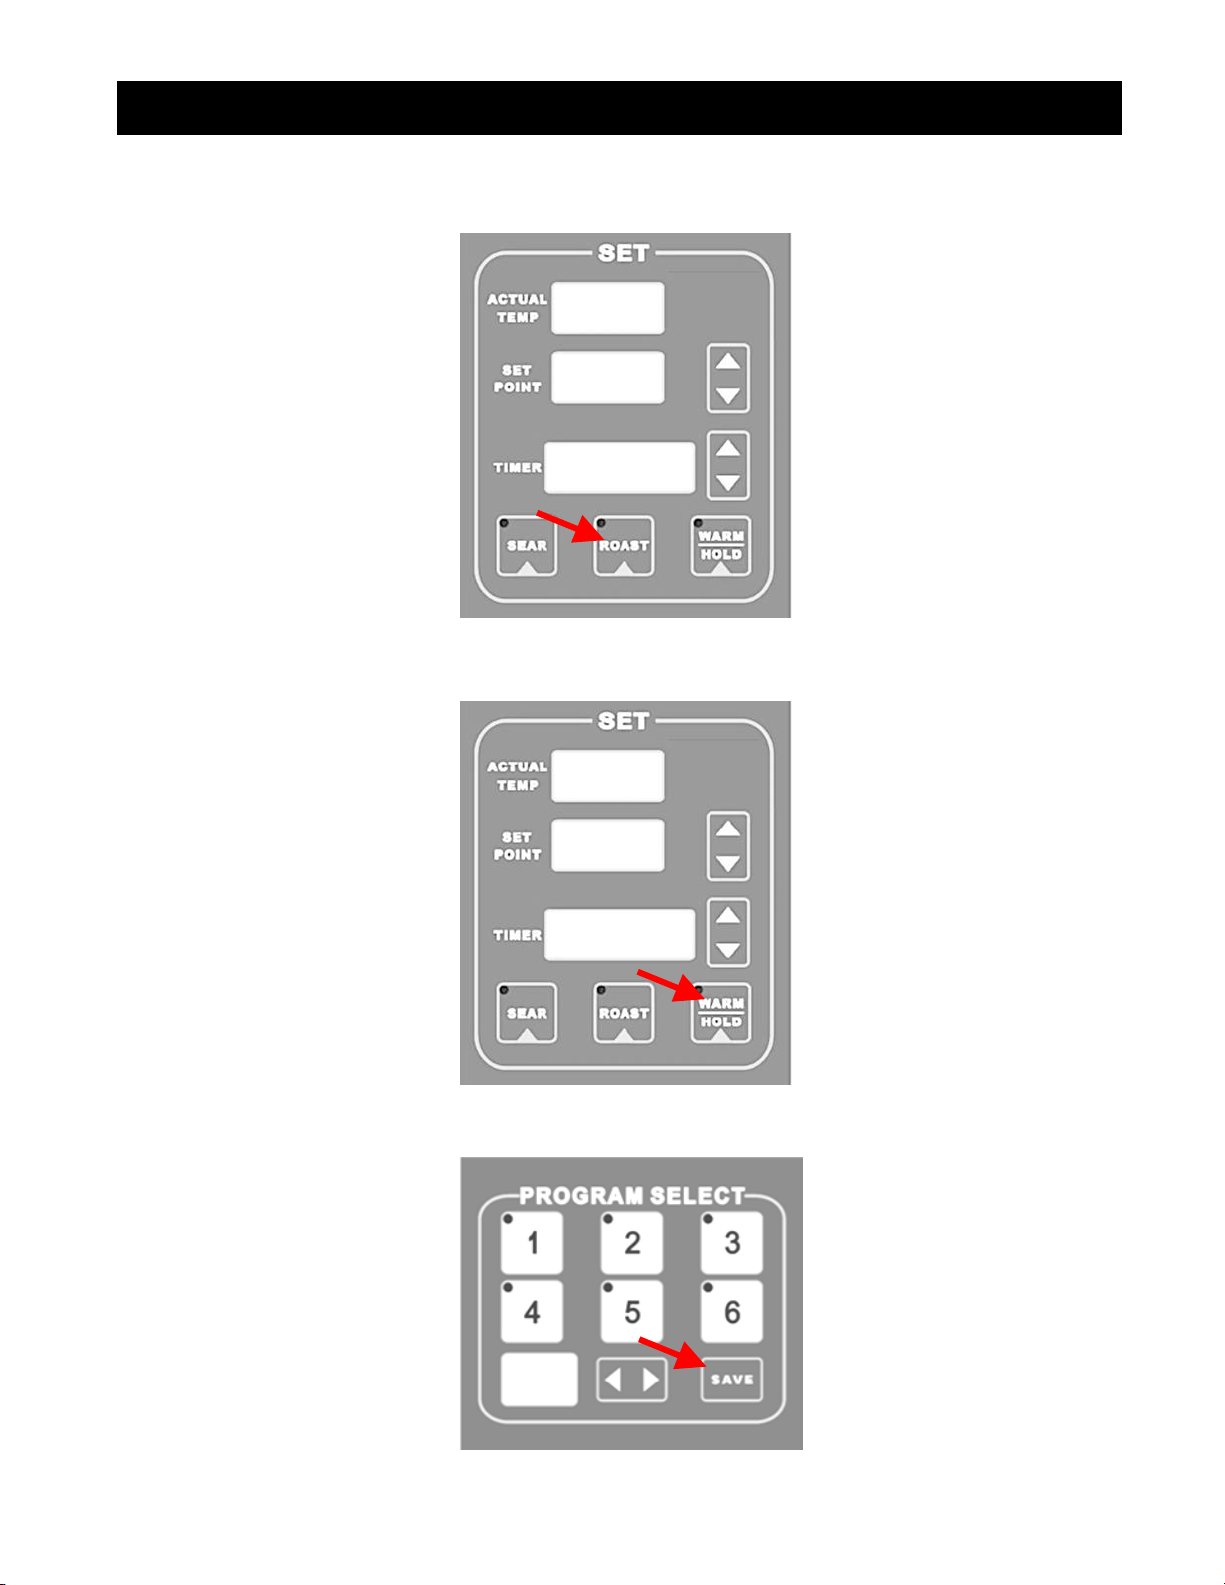
3 Creating and Saving Recipes. To create and save a recipe, do the following:
aSear. Press the sear event button. The sear button light will flash, indicating the sear event is
in programming mode. The temperature and timer values will appear in the adjacent
displays. Use the set point and timer arrows to enter the desired temp and time. (NOTE: If
you wish to skip the sear event for your recipe, change the timer value to “00:00”.)
bRoast. Press the roast event button. The roast button light will flash, indicating the roast
event is in programming mode. The temperature and timer values will appear in the adjacent
displays. Use the set point and timer arrows to enter the desired temp and time. (NOTE: If
you wish to skip this event for your recipe, change the timer value to “00:00”.)
cWarm/Hold. Press the warm/hold event button. The warm/hold button light will illuminate,
indicating the warm/hold event is in programming mode. The temperature will appear in the
adjacent display. (NOTE: The timer display will be blank while in warm/hold mode.)
dSave the Recipe. Press the save button twice to save the recipe.
F Back +3 Button. This button allows you to back up one event to change temperature and/or time in a
running recipe. A single press backs the program up one event and adds 3 minutes to that event.
G Jog Button. Press-and-hold this button to rotate the carousel while the loading door is open. You can also
rotate the carousel by closing the door.

11
OPERATION (Part 1 of 4) )
How to Program and Save a Recipe
Press the power button to turn the oven on.
Select a recipe number. Up to 20 recipes may be saved. Buttons 1 through 6 are Quick-Select buttons
intended for your most-used recipes. Recipes 7 through 20 can be accessed with the program select arrows.
The recipe number selected will appear in the adjacent display.
Setup or deactivate the sear step. To setup, press the sear button and enter a set point and time. If you
prefer to deactivate the sear step, enter a sear time of “00:00.”
12
OPERATION (Part 2 of 4) )
Setup or deactivate the roast step. To setup, press the roast button and enter a set point and time. If you
prefer to deactivate the roast step, enter a roast time of “00:00.”
Setup the warm/hold step. To setup, press the warm/hold button and enter a set point. (NOTE: The warm/hold
step has no time parameter and the timer display will be blank.)
Press save button twice to save your recipe. The oven will automatically adjust to the set temp of the first step
with an active timer value.

13
OPERATION (Part 3 of 4) )
How to Run a Recipe
Press the power button to turn the oven on. (NOTE: The oven will automatically heat to the set temp of the first
recipe step with an active timer value.
Select your recipe. Buttons 1 through 6 are Quick-Select buttons intended for your most-popular recipes.
Recipes 7 through 20 may be accessed with the program select arrows. The recipe number selected will appear in
the adjacent display. The oven will automatically heat to the temperature shown in the set point display.
After the oven has reached temperature, load your product for cooking. (NOTE: When the loading door is open,
the timer start/stop button converts to a carousel jog button. Press the jog button to rotate the carousel wheel
and release the button to stop the wheel.)

14
OPERATION (Part 4 of 4) )
Close the loading door and press the timer start button. The timer light and the timer colon will change to from
steady on to flashing to indicate the timer is active and counting down. (NOTE 1: To stop the timer, press the
timer start button a second time. Press the timer start button a third time to resume the countdown. NOTE 2:
To reset the timer, press and hold the timer start button for 3 seconds. NOTE 3: The timer countdown will pause
whenever the loading door is opened and resume when the loading door is closed again.)
A brief buzzer alert will sound when one step finishes and another begins. Press any button to silence the alert.
If needed, both the temperature and/or time can be modified for the step showing in the control displays. (NOTE
1: Only the currently-displayed step can be changed. NOTE 2: To save the modifications, press the save button
twice. Otherwise, the modifications will not be saved into memory.)
When the buzzer alert sounds to indicate the cook cycle has elapsed, open the door and check the internal
temperature of the cooked product with a temperature probe.
Either remove the cooked product or leave it in the oven during the warm/hold step.

15
MAINTENANCE and CLEANING W
C A U T I O N
MOST CLEANERS ARE HARMFUL TO THE SKIN,
EYES, MUCOUS MEMBRANES AND CLOTHING.
PRECAUTIONS SHOULD BE TAKEN WHEN USING
THEM. WEAR RUBBER GLOVES, GOGGLES OR
FACE SHIELD AND PROTECTIVE CLOTHING.
CAREFULLY READ THE WARNING AND FOLLOW
THE DIRECTIONS ON THE LABEL OF THE
CLEANER TO BE USED.
DISABLE ELECTRICAL POWER AT SERVICE
BREAKER BEFORE CLEANING OVEN.
W A R N I N G
KEEP WATER AND SOLUTIONS OUT OF
CONTROLS. NEVER SPRAY OR HOSE
CONTROL CONSOLE.
W A R N I N G
C A U T I O N ALWAYS KEEP THE AREA NEAR THE APPLIANCE
FREE FROM COMBUSTIBLE MATERIALS.
C A U T I O N
KEEP THE FLOOR IN FRONT OF THE APPLIANCE
CLEAN AND DRY. IF SPILLS OCCUR, CLEAN
THEM IMMEDIATELY TO AVOILD THE DANGER
OF SLIPS OR FALLS.
N O T I C E Never use chlorine-based cleansers on this
appliance. Chlorine corrodes stainless steel.
N O T I C E
To maintain optimum safety and performance,
it is recommended that a program of regular
maintenance be implemented. It is the sole
responsibility of the user to establish, schedule
and enforce such a program. Although the actual
service schedule will vary depending on the
environment in which the equipment is
operating, it is recommended that the above be
done by an LBC-authorized service
representative every six months.
After Each Use
Remove all skewers or baskets from the carousel. Wash them with warm water and soap and rinse with water.
Daily
Remove the drip plates and skewers or baskets. Sink-wash these parts with warm water and soap.
Clean the oven interior and exterior with warm water, soap and a soft cloth. Clean the rotor wheel and shaft, walls and ceiling
parts. Clean the control with a damp cloth only. Do not allow water to run down the face of the control.
With the loading door open, hinge the inner glass frame outward for cleaning. Do not use abrasive cleaners or
wash pads as abrasives will damage the low-energy coating.
NOTE: Oven models LCR5 and LCR7 are not designed to be self-cleaning. Do not attempt to burn off surface
contamination.

16
PARTS LIST W
N O T I C E
Service on this or any other LBC appliance must
be performed by qualified personnel. For an
approved service representative in your area,
visit our website at www.lbcbakery.com or call
our factory toll free at 1-888-722-5686.
C A U T I O N
USE OF ANY REPLACEMENT PARTS OTHER THAN
THOSE SUPPLIED BY LBC OR THEIR AUTHORIZED
DISTRIBUTORS CAN CAUSE BODILY INJURY TO
THE OPERATOR AND/OR DAMAGE TO THE
APPLIANCE AND WILL VOID ALL WARRANTIES.
BOTH HIGH AND LOW VOLTAGES ARE
PRESENT INSIDE OF THIS APPLIANCE WHEN
THE UNIT IS PLUGGED/WIRED INTO A LIVE
RECEPTACLE. BEFORE REPLACING ANY PARTS,
DISCONNECT THE UNIT FROM THE ELECTRIC
POWER SUPPLY.
W A R N I N G
To order any of the parts or accessories listed below, visit our website at www.lbcbakery.com. You may also call our
factory toll free at 1-888-722-5686, or fax us at 1-425-642-8310, or email us at service@lbcbakery.com.
Item No.
Part Description
Quantity
Per Oven
Part No.
Usage
1
1000W Interior Light
2
31602-08
5-Spit Only
500W Interior Light
2
31603-87
7-Spit Only
2
Stand with Casters
1
LST7
7-Spit Only
3
4" Adjustable Leg
4
180-733-4
Countertops Only
4
6" Adjustable Leg
4
180-733
Floor Installations
5
Carousel Assembly, Stainless Steel
1
180-768-1
5-Spit Only
Carousel Assembly, Stainless Steel
1
180-768-2
7-Spit Only
Carousel Assembly, Non-Stick Coating
1
180-768-1C
5-Spit Only
Carousel Assembly, Non-Stick Coating
1
180-768-2C
7-Spit Only
6
Angle Spit, Stainless Steel
5
LCR5-SV
5-Spit Only
Angle Spit, Stainless Steel
7
LCR7-SV
7-Spit Only
Angle Spit, Non-Stick Coating
5
LCR5-SV-C
5-Spit Only
Angle Spit, Non-Stick Coating
7
LCR7-SV-C
7-Spit Only
7
Fork Spit, Stainless Steel
5
LCR5-SF
5-Spit Only
Fork Spit, Stainless Steel
7
LCR7-SF
7-Spit Only
Fork Spit, Non-Stick Coating
5
LCR5-SF-C
5-Spit Only
Fork Spit, Non-Stick Coating
7
LCR7-SF-C
7-Spit Only
8
Basket, Stainless Steel
5
LCR5-SB
5-Spit Only
Basket, Stainless Steel
7
LCR7-SB
7-Spit Only
Basket, Non-Stick Coating
5
LCR5-SB-C
5-Spit Only
Basket, Non-Stick Coating
7
LCR5-SB-C
7-Spit Only
9
Loading Door Handle Assembly
1 or 2
180-781-1
5-Spit Only
Loading Door Handle Assembly
1 or 2
180-781-2
7-Spit Only
10
Hand Held Probe Kit
1
Kit, Rotisserie 5
All
31603-87
180-733
180-768-1
180-768-1C
LCR5-SF
LCR7-SF
LCR5-SB
LCR7-SB

17
NOTES T

18
This manual suits for next models
1
Table of contents
Other sinmag Oven manuals


