Sinn7 Kontrolux.61 User manual
Bedienungsanleitung
ACHTUNG!
Lesen Sie sich vor der ersten Inbetriebnahme zur eigenen Sicherheit diese Bedienungsan-
leitung sorgfältig durch! Alle Personen, die mit der Aufstellung, Inbetriebnahme, Bedienung,
Wartung und Instandhaltung dieses Gerätes zu tun haben, müssen entsprechend qualifi-
ziert sein und diese Betriebsanleitung genau beachten. Dieses Produkt erfüllt die Anforde-
rungen der geltenden europäischen und nationalen Richtlinien, die Konformität wurde nach-
gewiesen, die entsprechenden Erklärungen und Unterlagen sind beim Hersteller hinterlegt.
Instruction Manual
CAUTION!
For your own safety, please read this operation manual carefully before initial operation! All
persons involved in the installation, setting-up, operation, maintenance and service of this
device must be appropriately qualified and observe this operation manual in detail. This pro-
duct complies with the requirements of the applicable European and national regulations.
Conformity has been proven. The respective statements and documents are deposited at the
manufacturer.
Um Feuer oder einen elektrischen Schock zu vermeiden, setzen
Sie dieses Gerät nicht Wasser oder Flüssigkeiten aus! Öffnen Sie
niemals das Gehäuse!
To prevent fire or avoid an electric shock do not expose the device
to water or fluids! Never open the housing!
Afin d‘éviter un incendie ou une décharge électrique, veillez à tenir
cet appareil à l‘écart des liquides et de l‘humidité! N´ouvrez jamais
le boîtier!
Für weiteren Gebrauch aufbewahren!
Keep information for further reference!
Gardez ces instructions pour des utilisations ultérieurs!

2
Wir gratulieren Ihnen zum Kauf des Kontrolux.25 / Kont-
rolux.49 / Kontrolux.61 USB/MIDI-Controller Masterkey-
boards. Vielen Dank, dass Sie unserer Technologie Ihr
Vertrauen schenken. Vor Inbetriebnahme bitten wir Sie,
alle Anweisungen sorgfältig zu studieren und zu befolgen.
Nehmen Sie das Kontrolux USB/MIDI-Controller Master-
keyboard aus der Verpackung. Bitte überprüfen Sie vor
der ersten Inbetriebnahme, ob kein offensichtlicher Trans-
portschaden vorliegt. Sollten Sie Schäden am Stromkabel
oder am Gehäuse entdecken, nehmen Sie das Gerät nicht
in Betrieb und setzen Sie sich bitte mit Ihrem Fachhändler
in Verbindung.
Seien Sie besonders vorsichtig beim Umgang mit der
Netzspannung 230 V. Bei dieser Spannung können Sie
einen lebensgefährlichen elektrischen Schlag erhalten!
Bei Schäden, die durch Nichtbeachtung dieser Bedie-
nungsanleitung verursacht werden, erlischt jeder Garan-
tieanspruch. Bei Sach- oder Personenschäden, die durch
unsachgemäße Handhabung oder Nichtbeachtung der
Sicherheitshinweise verursacht werden, übernimmt der
Hersteller keine Haftung.
- Dieses Gerät hat das Werk in einwandfreiem Zustand
verlassen. Um diesen Zustand zu erhalten und einen ge-
fahrlosen Betrieb sicherzustellen, muss der Anwender
unbedingt die Sicherheitshinweise und die Warnvermer-
ke beachten, die in dieser Gebrauchsanleitung enthalten
sind.
- Aus Sicherheits- und Zulassungsgründen (CE) ist das ei-
genmächtige Umbauen und/oder Verändern des Gerä-
tes nicht gestattet. Beachten Sie bitte, dass Schäden,
die durch manuelle Veränderungen an diesem Gerät
verursacht werden, nicht unter den Garantieanspruch
fallen.
- Im Geräteinneren befinden sich keine zu wartenden Tei-
le, ausgenommen die von außen austauschbaren Ver-
schleißteile. Die Wartung darf nur von fachkundigem
Personal durchgeführt werden, ansonsten verfällt die
Garantie!
- Stellen Sie sicher, dass die Stromversorgung erst nach
dem Aufbau des Gerätes erfolgt. Den Netzstecker im-
mer als letztes einstecken. Vergewissern Sie sich, dass
der Netzschalter auf „OFF“ steht, wenn Sie das Gerät
ans Netz anschließen.
- Benutzen Sie nur vorschriftsmäßige Kabel. Achten Sie da-
rauf, dass alle Stecker und Buchsen fest angeschraubt
und richtig angeschlossen sind. Bei Fragen wenden Sie
sich bitte an Ihren Händler.
- Stellen Sie sicher, das beim Aufstellen des Produktes
das Netzkabel nicht gequetscht oder durch scharfe Kan-
ten beschädigt wird.
- Lassen Sie das Netzkabel nicht mit anderen Kabeln in
Kontakt kommen! Seien Sie vorsichtig beim Umgang mit
Netzkabeln und -anschlüssen. Fassen Sie diese Teile nie
mit nassen Händen an!
- Stecken Sie das Stromkabel nur in geeignete Schuko-
steckdosen ein. Als Spannungsquelle darf dabei nur eine
ordnungsgemäße Netzsteckdose des öffentlichen Ver-
sorgungsnetzes verwendet werden.
- Trennen Sie das Gerät bei Nichtbenutzung und vor jeder
Reinigung vom Netz! Fassen Sie dazu den Netzstecker
an der Grifffläche an und ziehen Sie niemals an der Netz-
leitung!
Congratulations on purchasing Kontrolux.25 / Kontro-
lux.49 / Kontrolux.61 USB/MIDI controller masterkey-
boards. Thank you for placing your trust in our disc jockey
technology. Before operating this equipment we ask you
to carefully study and observe all instructions.
Please remove the Kontrolux USB master keyboard from
its packaging. Check before initial operation to make sure
that the device has not been visibly damaged during trans-
port. If you detect any damage to the power cable or the
casing, do not operate the device. Contact your specia-
lised dealer.
Please exercise particular caution when handling 230 V
power voltage. This voltage rating may lead to a critical
electrical shock! Any damage caused by the non-obser-
vance of this operation manual excludes any warranty
claims. The manufacturer is not liable for any damage to
property or for personal injury caused by improper hand-
ling or non-observance of the safety instructions.
- This device left the works in a perfect condition. To main-
tain this condition and to ensure a risk-free operation the
user must observe the safety instructions and warnings
contained in this operation manual.
- For reasons of safety and certification (CE) the unau-
thorised conversion and/or modification of the device
is prohibited. Please note that in the event of dama-
ge caused by the manual modification to this device any
warranty claims are excluded.
- The inside of the device does not contain any parts which
require maintenance, with the exception of wear parts
that can be exchanged from the outside. Qualified staff
must carry out maintenance, otherwise the warranty
does not apply!
- Ensure that the power will only be supplied after the de-
vice has been fully set up. Always plug in the mains plug
last. Ensure that the mains switch is in the „OFF“ position
when connecting the device to power.
- Only use cables that comply with regulations. Observe
that all jacks and bushes are tightened and correctly
hooked up. Refer to your dealer if you have any ques-
tions.
- Ensure that when setting up the product the mains cable
is not squashed or damaged by sharp edges.
- Prevent the mains cable from coming into contact with
other cables! Exercise great care when handling mains
cables and connections. Never touch these parts with
wet hands!
- Connect the power cable exclusively to appropriate
shock-proof outlets. The only supply point to be used is
a supply outlet in accordance with specifications of the
public supply network.
- Disconnect the device from the supply outlet when not in
use and before cleaning! Be sure to hold the mains plug
by the body. Never pull the mains cord!

3
- Position the device on a horizontal and stable low-flame
base. When experiencing feedback, direct the radiation
field of your loudspeakers away from the device.
- Avoid any concussions or violent impact when installing
or operating the device.
- When selecting the location of installation make sure
that the device is not exposed to excessive heat, humi-
dity, and dust. Be sure that no cables lie around openly.
You will endanger your own safety and that of others!
- Do not rest any containers filled with liquid that could
easily spill onto the device or in its immediate vicinity. If,
however, fluids should access the inside of the device,
immediately disconnect the mains plug. Have the device
checked by a qualified service technician before re-use.
Damage caused by fluids inside the device is excluded
from the warranty.
- Do not operate the device under extremely hot (in excess
of 35° C) or extremely cold (below 5° C) conditions. Keep
the device away from direct exposure to the sun and
heat sources such as radiators, ovens, etc. (even during
transport in a closed vehicle). Never cover the cooling
fan or vents. Always ensure sufficient ventilation.
- The device must not be operated after being taken from
a cold environment into a warm environment. The con-
densation caused hereby may destroy your device. Do
not switch on or operate the device until it has reached
ambient temperature!
- Controls and switches should never be treated with
spray-on cleaning agents and lubricants. This device
should only be cleaned with a damp cloth. Never use
solvents or cleaning fluids with a petroleum base for
cleaning.
- When relocating the device should be transported in its
original packaging.
- Devices supplied by voltage should not be left in the
hands of children. Please exercise particular care when
in the presence of children.
- At commercial facilities the regulations for the preventi-
on of accidents as stipulated by the association of pro-
fessional associations must be observed.
- At schools, training facilities, hobby and self-help work-
shops the operation of the device must be monitored
with responsibility by trained staff.
- Keep this operation manual in a safe place for later refe-
rence in the event of questions or problems.
- This device is a professional USB/MIDI controller mas-
terkeyboard which can be used to exchange MIDI-mes-
sages between keyboard and computer.
- This product is authorised for connection to 230 V, 50
Hz AC and is designed exclusively for indoor application.
Alternatively you can operate this device with batteries
or via USB.
- If the device is used for any other purposes than tho-
se described in the operation manual, damage can be
- Stellen Sie das Gerät auf einer horizontalen und stabilen,
schwerentflammbaren Unterlage auf.
- Vermeiden Sie Erschütterungen und jegliche Gewaltan-
wendung bei der Installation oder Inbetriebnahme des
Gerätes.
- Achten Sie bei der Wahl des Installationsortes darauf,
dass das Gerät nicht zu großer Hitze, Feuchtigkeit und
Staub ausgesetzt wird. Vergewissern sie sich, dass kei-
ne Kabel frei herumliegen. Sie gefährden Ihre und die
Sicherheit Dritter!
- Stellen Sie keine Flüssigkeitsbehälter, die leicht umfallen
können, auf dem Gerät oder in dessen Nähe ab. Falls
doch einmal Flüssigkeit in das Geräteinnere gelangen
sollte, sofort den Netzstecker ziehen. Lassen Sie das Ge-
rät von einem qualifizierten Servicetechniker prüfen, be-
vor es erneut genutzt wird. Beschädigungen, die durch
Flüssigkeiten im Gerät hervorgerufen wurden, sind von
der Garantie ausgeschlossen.
- Betreiben Sie das Gerät nicht in extrem heißen (über
35° C) oder extrem kalten (unter 5° C) Umgebungen.
Halten Sie das Gerät von direktem Sonnenlicht und von
Wärmequellen wie Heizkörpern, Öfen, usw. (auch beim
Transport in geschlossenen Wagen) fern. Sorgen Sie
immer für eine ausreichende Ventilation.
- Das Gerät darf nicht in Betrieb genommen werden,
wenn es von einem kalten Raum in einen warmen Raum
gebracht wurde. Das dabei entstehende Kondenswas-
ser kann unter Umständen Ihr Gerät zerstören. Lassen
Sie das Gerät solange uneingeschaltet, bis es Zimmer-
temperatur erreicht hat!
- Regler und Schalter sollten niemals mit Sprühreinigungs-
mitteln und Schmiermitteln behandelt werden. Dieses
Gerät sollte nur mit einem feuchten Tuch gereinigt wer-
den, verwenden Sie niemals Lösungsmittel oder Wasch-
benzin zum Reinigen.
- Bei Umzügen sollte das Gerät im ursprünglichen Ver-
sandkarton transportiert werden.
- Geräte, die an Netzspannung betrieben werden, gehö-
ren nicht in Kinderhände. Lassen Sie deshalb in Anwe-
senheit von Kindern besondere Vorsicht walten.
- In gewerblichen Einrichtungen sind die Unfallverhütungs-
vorschriften des Verbandes der gewerblichen Berufsge-
nossenschaft zu beachten.
- In Schulen, Ausbildungseinrichtungen, Hobby- oder Selbst-
hilfewerkstätten ist das Betreiben des Gerätes durch ge-
schultes Personal verantwortlich zu überwachen.
- Heben Sie diese Bedienungsanleitung für spätere Fragen
und Probleme gut auf.
- Bei diesem Gerät handelt es sich um ein professionelles
USB/MIDI-Controller Masterkeyboard mit dem sie MIDI-
Befehle zwischen Keyboard und Computer austauschen
können.
- Dieses Produkt ist für den Anschluss an 230 V, 50 Hz
Wechselspannung zugelassen und wurde ausschließlich
zur Verwendung in Innenräumen konzipiert. Alternativ
können Sie das Gerät auch mit Batterien oder über USB
betreiben.
- Wird das Gerät anders verwendet als in dieser Bedie-
nungsanleitung beschrieben, kann dies zu Schäden am
Produkt führen und der Garantieanspruch erlischt. Au-
ßerdem ist jede andere Verwendung mit Gefahren wie
z.B. Kurzschluss, Brand, elektrischem Schlag, etc. ver-
bunden.
- Die vom Hersteller festgelegte Seriennummer darf nie-
mals entfernt werden, da ansonsten der Garantiean-
spruch erlischt.
- Überprüfen Sie regelmäßig die technische Sicherheit des
Gerätes auf Beschädigungen des Netzkabels oder des
Gehäuses, sowie auf die Abnutzung von Verschleißteilen
wie Dreh- und Schiebereglern.
- Wenn anzunehmen ist, dass ein gefahrloser Betrieb
nicht mehr möglich ist, so ist das Gerät außer Betrieb zu
setzten und gegen unbeabsichtigten Betrieb zu sichern.
Netzstecker aus der Steckdose ziehen!
- Es ist anzunehmen, dass ein gefahrloser Betrieb nicht
mehr möglich ist, wenn das Gerät sichtbare Beschä-
digungen aufweist, das Gerät nicht mehr funktioniert,
nach längerer Lagerung unter ungünstigen Verhältnis-
sen oder nach schweren Transportbeanspruchungen.
4
caused to the product, leading to exclusion of warranty
rights. Moreover, any other application that does not
comply with the specified purpose harbours risks such
as short circuit, fire, electric shock, etc.
- The serial number determined by the manufacturer
must never be removed to uphold the warranty rights.
- Check the technical safety of the device regularly for da-
mage to the mains line or the casing, as well as for wear
of wear parts such as rotary and sliding switches.
- If it is to be assumed that the safe operation is no longer
feasible then the device must be disconnected and se-
cured against accidental use. Always disconnect mains
plug from the outlet!
- It must be assumed that a safe operation is no longer
feasible if the device bears visible defects, if the device
no longer functions, following longer storage under un-
favourable conditions or after major transport stress.
5
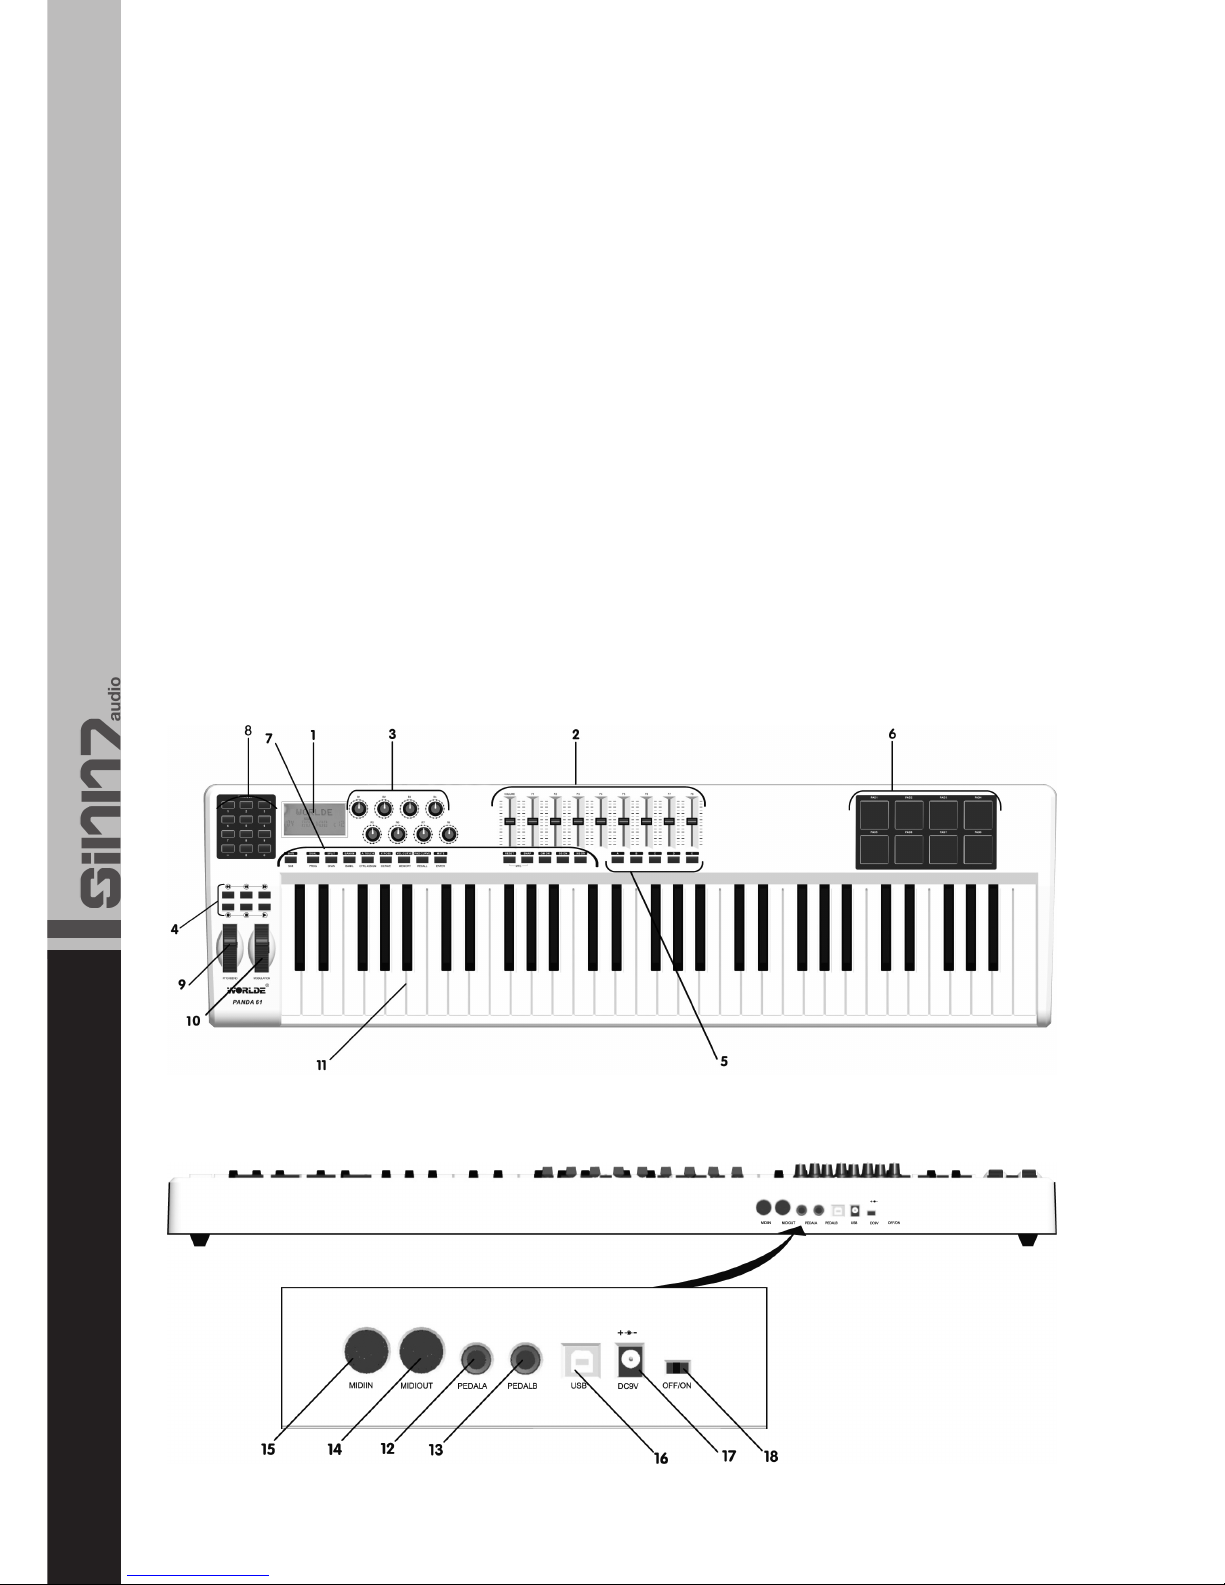
1. LCD Display
2. Schieberegler (nur Kontrolux.49 & Kontrolux.61)
3. MIDI-Encoder
4. Transport-Tasten
5. Frei zuweisbare Funktionstasten
(nur Kontrolux.49 & Kontrolux.61)
6. Trigger Pads
7. Funktionstasten
8. Numerisches Keypad
9. Pitch-Rad
10. Modulationsrad
11. Keyboard-Tastatur
12. Eingang Expression-Pedal
13. Eingang Sustain-Pedal
14. MIDI-Out
15. MIDI-In
16. USB 2.0 Port
17. Anschluss für externes Netzteil
18. EIN/AUS-Schalter
Falls Sie Ihr Kontrolux Masterkeyboard in Verbindung mit
einem Computer verwenden wollen, beachten Sie bitte die
folgenden mindesten Systemanforderungen:
Mindeste Systemanforderungen PC:
- Windows XP (SP2) oder höher (Windows 98, Me, NT,
2000 werden nicht unterstützt)
- Pentium 3, 800 MHz oder höher (CPU Anforderungen
für Laptops können eventuell höher sein)
- 256 MB RAM
- DirectX 9.0b oder höher
Mindeste Systemanforderungen Mac:
- Macintosh G3 800 / G4 733 MHz oder höher (G3/
G4 Accelerator Cards werden nicht unterstützt), (CPU
Anforderungen für Laptops können eventuell höher sein)
- OS X 10.3.9 mit 256 MB RAM
- OS X 10.4.2. oder besser, mit 512 MB RAM
Bitte beachten Sie, dass die mindesten Systemansprüche
Ihrer Musik-Software höher liegen können.
USB-Hubs werden nicht unterstützt. Es wird empfohlen,
das Kontrolux Masterkeyboard direkt an einen USB-Port
Ihres Computers anzuschließen.
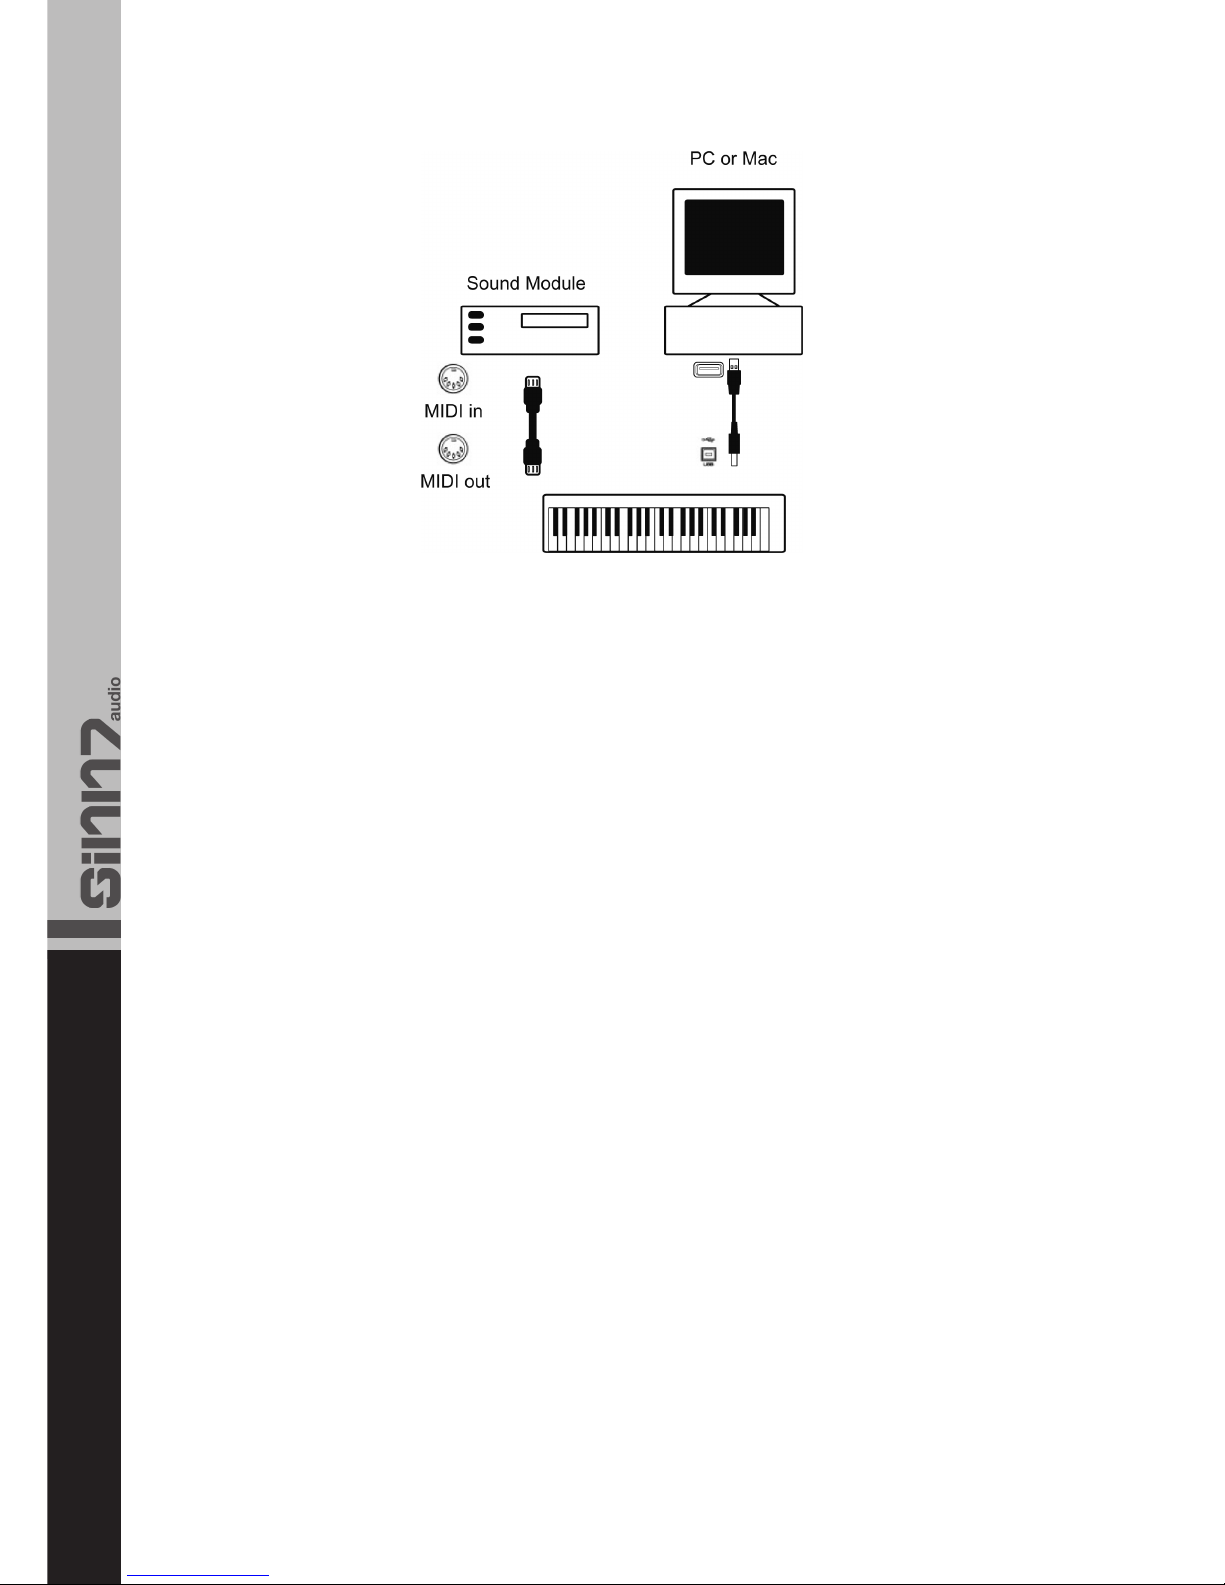
Falls Sie Ihr Kontrolux Masterkeyboard in Verbindung
mit einem Computer verwenden möchten, so beachten
Sie bitte zunächst die Kapitel 1.2 und 1.3. Möchten Sie
Ihr Kontrolux Masterkeyboard in Verbindung mit einem
Sound-Modul oder Synthesizer über den MIDI Out- Aus-
gang verwenden, so springen Sie bitte zu Kapitel 1.4.
Nach der Installation erscheint Ihr Kontrolux als einfaches
MIDI-Gerät mit zwei Eingangs-Ports und einem Ausgangs-
Port. Der erste Kontrolux Eingang sollte als MIDI-Ein-
gangsgerät in Ihrer Software gewählt werden.
Falls Sie ein externes MIDI-Gerät (z.B. Drum Computer
oder ein anderes Keyboard) an den Eingang Ihres Kon-
trolux angeschlossen haben, so kann dieses Gerät zum
Computer geschleift werden, indem man den zweiten Ein-
gang des Kontrolux Keyboards auswählt. Somit wird Ihr
Kontrolux zu einem MIDI zu USB-Interface.
Es ist ebenfalls möglich, Daten von Ihrem Computer zu
1. LCD Display
2. Slider (Kontrolux.49 & Kontrolux.61 only)
3. Encoders
4. Transport Buttons
5. Assignable Buttons
(Kontrolux.49 & Kontrolux.61 only)
6. Trigger Pads
7. Function Buttons
8. Numeric Keypad
9. Pitch Bend Wheel
10. Modulation Wheel
11. Keyboard
12. Expression Pedal Input
13. Sustain Pedal Input
14. MIDI Out Port
15. MIDI In Port
16. USB 2.0 Post
17. Connection Mains Adapter
18. ON/OFF Switch
If you intend to connect your Kontrolux Keyboard to a
computer please refer to the following minimum system
requirements:
Minimum System Requirements PC:
- Windows XP (SP2) or higher (Windows 98, Me, NT,
2000 not supported)
- Pentium 3, 800 MHz or higher (CPU requirements for
laptop computers may be higher)
- 256 MB RAM
- DirectX 9.0b or higher
Minimum System Requirements Mac:
- Macintosh G3 800 / G4 733 MHz or higher (G3/G4
Accelerator Cards are not supported), (CPU require-
ments for laptop computers may be higher)
- OS X 10.3.9 with 256 MB RAM
- OS X 10.4.2. or better, with 512 MB RAM
Please note that the minimum system requirements of
your music software may be higher.
USB hubs are not supported. It is recommended that you
connect the Kontrolux master keyboard directly to your
computer via the USB port.
If you inted to use your Kontrolux keyboard with a compu-
ter please read the sections 1.2 and 1.3 first. If you just
intend to use your Kontrolux to control a sound module or
synthesizer via the MIDI Out Port please refer to chapter
1.4.
When installed, the Kontrolux Keyboard appears as a sim-
ple MIDI device with two input ports and one output port.
You should select the first listed Kontrolux input port as
the MIDI input device in your software.
If you have connected external MIDI gear like a drum ma-
chine or another keyboard to your Kontrolux‘ MIDI In Port,
this gear can be interfaced to the computer by selecting
the second listed Kontrolux input port.
This way the Kontrolux keyboard is acting as a MIDI to
USB interface.
It is also possible to stream data from your computer
6
an MIDI-Geräte zu übermitteln, die an Ihrem Keyboard-
Ausgang angeschlossen sind. Somit fungiert Ihr Kontrolux
als USB zu MIDI-Interface. Dazu sollten Sie den Kontrolux
Ausgang in Ihrer Software auswählen.
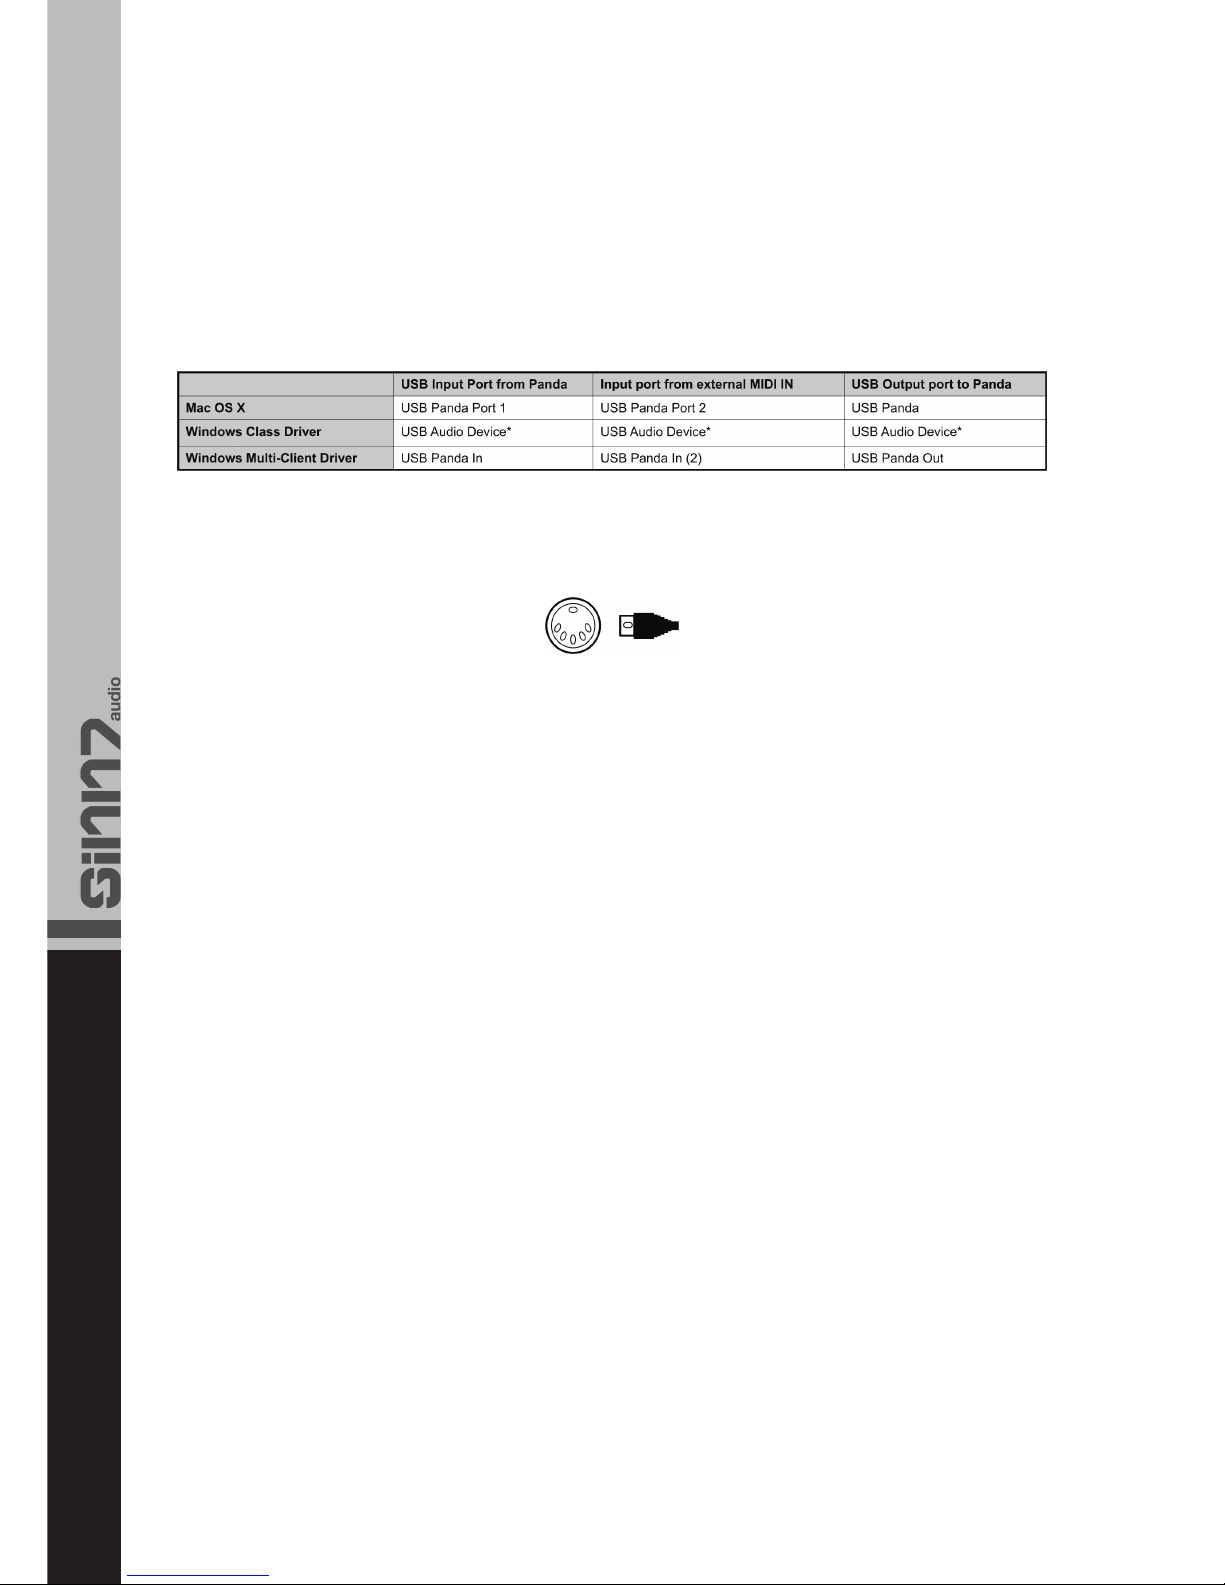
Die Bezeichnungen der Anschlüsse können aus der unten
stehenden Tabelle entnommen werden. Bitte beachten
Sie, dass je nach verwendetem Computer (Mac oder PC),
die MIDI-Anschlüsse mit verschiedenen Bezeichnungen
erscheinen.
Die MIDI-Ausgangsbuchse Ihres Kontrolux Keyboards ist
für standard MIDI-Kabel konzipiert (DIN, 5-Pin).
Der MIDI-Ausgang kann verwendet werden, um das Kont-
rolux Keyboard mit einem Hardware Sequencer, externen
Synthesizer oder Sound-Modul zu verbinden.
In Verwendung mit einem Computer benötigt Ihr Kontro-
lux Keyboard kein externes Netzteil. Das Keyboard wird
über den USB-Anschluss mit Strom versorgt.
Soll das Kontrolux Keyboard jedoch im Stand-Alone Modus
betrieben werden, so muss ein externes Netzteil (optional
erhältlich) verwendet werden. Das Netzteil muss folgende
Eigenschaften besitzen:
- 9V DC
- 250 mA – 300 mA
- Mitte positiv
Ihr Kontrolux Keyboard ist ein Master-Keyboard, was be-
deutet, dass es nur in Verbindung mit einem Computer
oder einem anderen, externen MIDI-Gerät in der Lage ist,
Töne zu erzeugen. Das Kontrolux Keyboard sendet bei
Verwendung der Keyboard-Tastatur MIDI-Daten und es
erzeugt somit keine eigenen Töne. Es wird also verwen-
det, um ein virtuelles Instrument über den Computer oder
ein MIDI-Sound-Modul zu kontrollieren und somit Töne zu
erzeugen.
Das Programmieren von MIDI-Daten kann sich als kom-
pliziert herausstellen, daher wurde das Kontrolux so
hergestellt, dass die Programmierung möglichst einfach
ausfällt. In diesem Kapitel werden Ihnen die gängigsten
MIDI-Befehle und deren Programmierung erklärt.
Die Funktionalität der Kontrolux.49 und Kontrolux.61
Keyboards unterscheidet sich lediglich in der Größe der
Keyboard-Tastatur. Das Kontrolux.25 Keyboard unter-
scheidet sich in seiner Funktionalität in einigen Punkten.
Folglich werden die Funktionen, wo es nötig ist, des Kont-
rolux.25 separat erklärt.
to external MIDI gear connected to the MIDI Out Port of
your Kontrolux, effectively a USB to MIDI interface. To do
this you should select the Kontrolux output device in your
software.
The port names can be found in the table below. Please
note that the MIDI ports will appear with different names
depending on whether you are using a Mac or PC.
The MIDI Out Port accepts a standard 5-pin DIN-type MIDI
plug.
The MIDI Out Port can be used to connect the Kontrolux
to a hardware sequencer, external synthesizer or sound
module.
If you are using your Kontrolux Keyboard with a computer
there is no need for an external power supply. Your Kont-
rolux will draw its power via the USB connection.
However, if you are using your Kontrolux in stand-alone
mode it is necessary to use an external mains adapter
(sold separately). The adapter has to meet the following
requirements:
- 9V DC
- 250 mA – 300 mA
- Center positive
Your Kontrolux is a master keyboard which means that it
can only emit sounds when connected to a computer or
other external MIDI device. The Kontrolux sends MIDI data
when being played and it does not produce sounds on its
own. It is used to control a virtual instrument on your
computer or a MIDI sound module to generate sounds.
Programming MIDI data can be complicated at times,
that is why the Kontrolux sereis has been designed in
order to make programming as easy as possible. In this
chapter you can find the most common MIDI messages
and how to program them.
The functionality of the Kontrolux.49 and Kontrolux.61
only differs due to the different keyboard size. The Kontro-
lux.25 functionality differs in some points. Accordingly the
Kontrolux.25 functions are indicated separately, where
necessary, in this manual.
7
Numerisches Keypad:
Verwenden Sie dieses Keypad, um während der Program-
mierung die gewünschten Werte festzulegen. Auf dem
LCD Display werden diese Werte entsprechend ange-
zeigt.
Wenn Sie das Keyboard spielen, werden MIDI-Befehle ge-
sendet. Diese Befehle werden vom Computer oder dem
externen MIDI-Gerät gelesen und dazu verwendet ent-
sprechend Sounds zu erzeugen.
Jedes mal, wenn eine Taste der Klaviatur gespielt wird, wird
eine MIDI-Note mit einem Anschlagswert zwischen 0 und
127 gesendet. Dieser Wert stellt dar, wie stark die Klavia-
turtaste gedrückt wurde. Ein Anschlagswert von 0 bedeutet,
dass die Taste losgelassen wurde. Da jeder die Klaviatur
verschieden stark spielt, bietet ihr Kontrolux verschiedene,
voreingestellte Velocity Curves. Um herauszufinden, welche
dieser Kurven Ihrem Stil zu spielen entspricht, sollten Sie mit
den verschiedenen Einstellungen etwas experimentieren.
Numeric Keypad:
Use the numeric key pad to enter values during program-
ming. The LCD display will show these values as you enter
them.
When you play the keyboard, MIDI note messages are
sent. These messages are read by your computer soft-
ware or external MIDI gear and are used to generate
sounds.
Each time you press a key, a MIDI note message is sent
with a velocity curve value between 0 and 127. This value
specifies how hard you pressed a key. A velocity value of
0 specifies that the key has been released. Since different
people have different playing styles, your Kontrolux offers
a number of different velocity curves. You should experi-
ment with the different velocity curves to find the curve
that best suits your playing style.

8
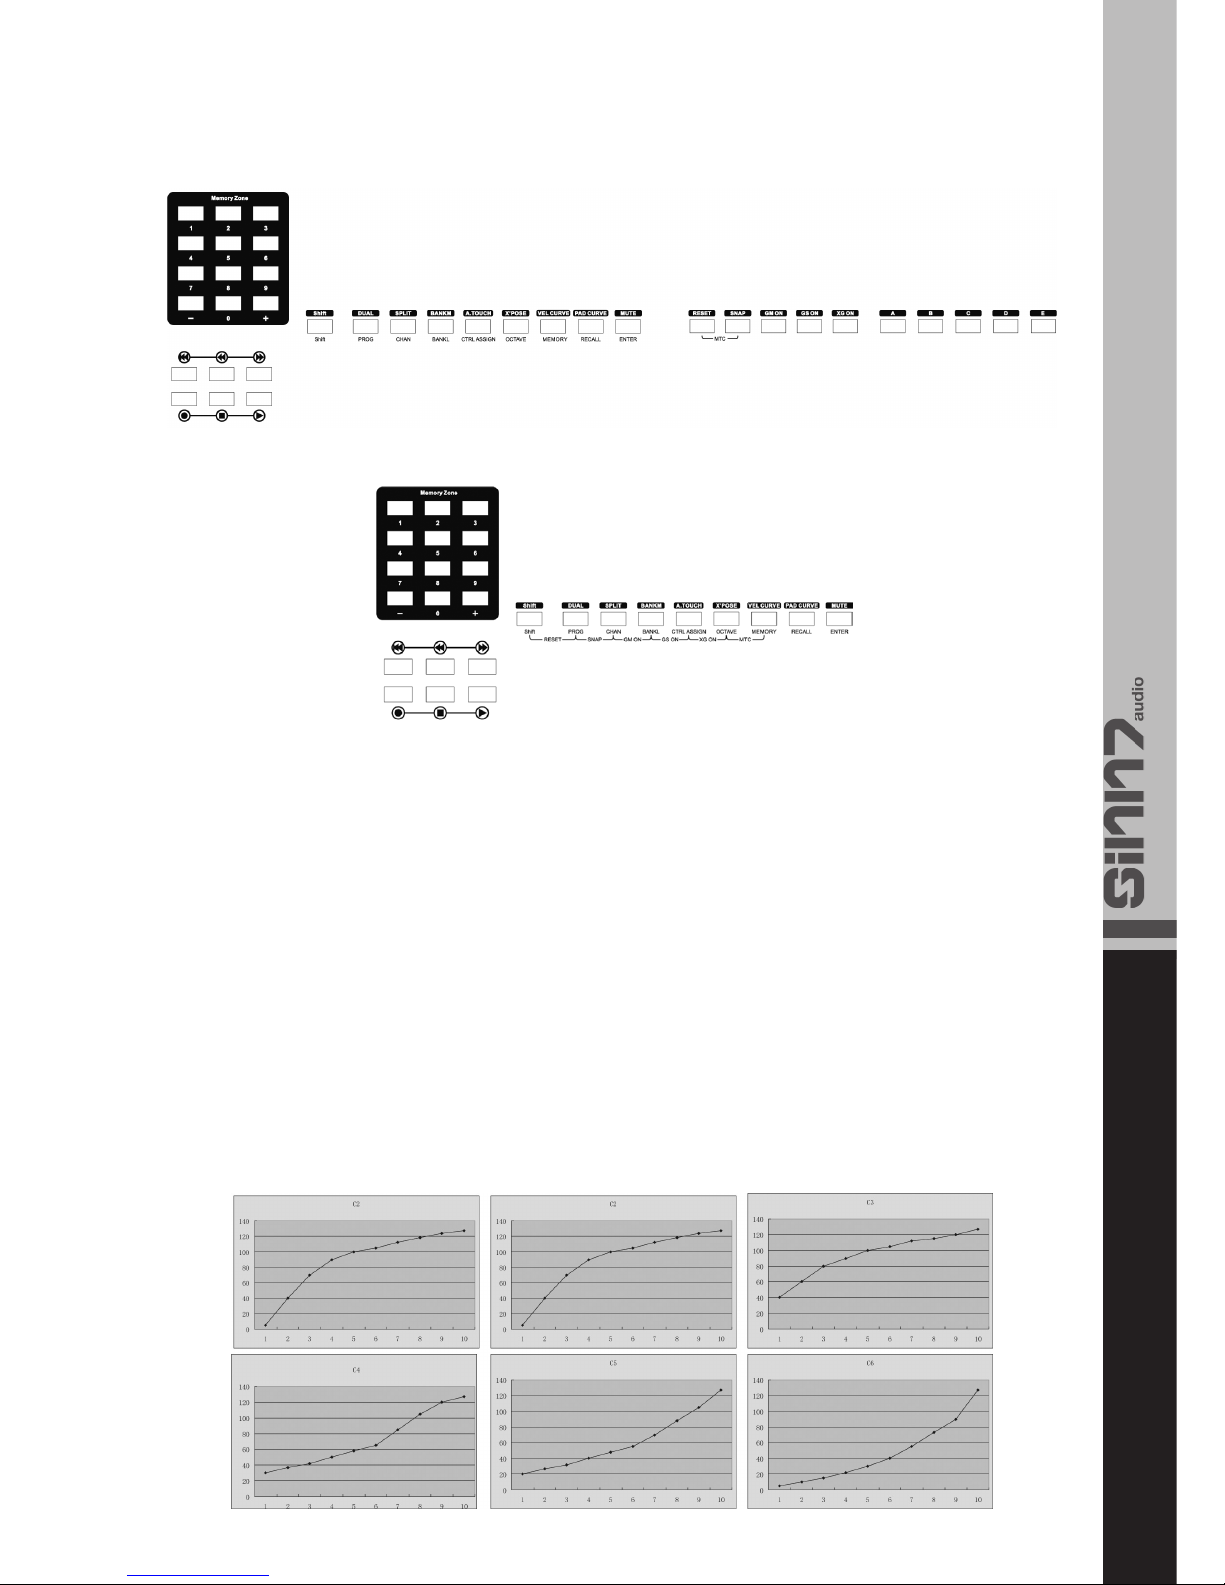
Um die Velocity Curve zu verändern, gehen sie wie folgt
vor. Drücken Sie zunächst die Velocity Curve-Funktionstas-
te. Auf dem Display erscheint „VelCurve“ und die Nummer
der aktuell eingestellten Velocity Curve. Durch Drücken
der +/- Tasten kann die gewünschte Velocity Curve aus-
gewählt werden. Es stehen Ihnen 6 verschiedene Curves
zur Auswahl (1 – 6).
Diese Funktion erlaubt es, den aktiven Oktavenbereich Ih-
res Keyboards um 3 Oktaven nach unten oder 5 Oktaven
nach oben zu verschieben. Drücken Sie zunächst die Oc-
tave- Funktionstaste. Auf dem Display erscheint „Octave“
und der aktuell eingestellte Oktaven-Wert. Durch Drücken
der +/- Tasten können Sie die Oktave verändern.
Mit dieser Funktion ist es möglich, den Pitch-Wert Ihres
Keyboards in Halbtonschritten nach oben und unten zu
verändern. Drücken Sie zunächst die Transpose-Funkti-
onstaste. Auf dem Display erscheint „X‘ pose“ und der
aktuell eingestellte Wert. Durch Drücken der +/- Tasten
kann dieser Wert verändert werden. Der Anfangswert
liegt bei 00 und kann von -12 bis +12 eingestellt werden.
Mit dieser Funktion lässt sich der gewünschte MIDI-Kanal
auswählen. Drücken Sie zunächst die Channel-Funktions-
taste. Auf dem Display erscheint „Channel“. Der Kanal
kann durch Drücken der +/- Tasten auf einer Skala von 1
bis 16 eingestellt werden. Der Anfangswert ist dabei 1.
In order to change the velocity curve please proceed as
follows. First press the Velocity Curve function button. The
display will show “VelCurve” and the number of the cur-
rently selected velocity curve. By using the +/- buttons
the desired velocity curve can be selected. There are 6
velocity curves at your disposal (1-6).
This function allows to change the active pitch of your
keyboard by 3 octaves up or 5 octaves down. To do so
first press the Octave function button. “Octave” and the
currently selected octave value will appear on the display.
By pressing the +/- buttons it is possible to change the
octave.
Via this function it is possible to change the pitch of your
keyboard up and down by halftone steps. Press the Trans-
pose function button. “X‘pose” and the currently selected
value will appear on the display. By pressing the +/- but-
tons it is possible to change the value. The initial setting is
00 and the adjusting scale is -12 - +12.
Via this function it is possible to select the desired MIDI
channel. Press the Channel function button. “Channel” will
appear on the display. The channel can be selected via
the +/- buttons. The initial setting is 1 and the adjusting
scale is 1 – 16.
9
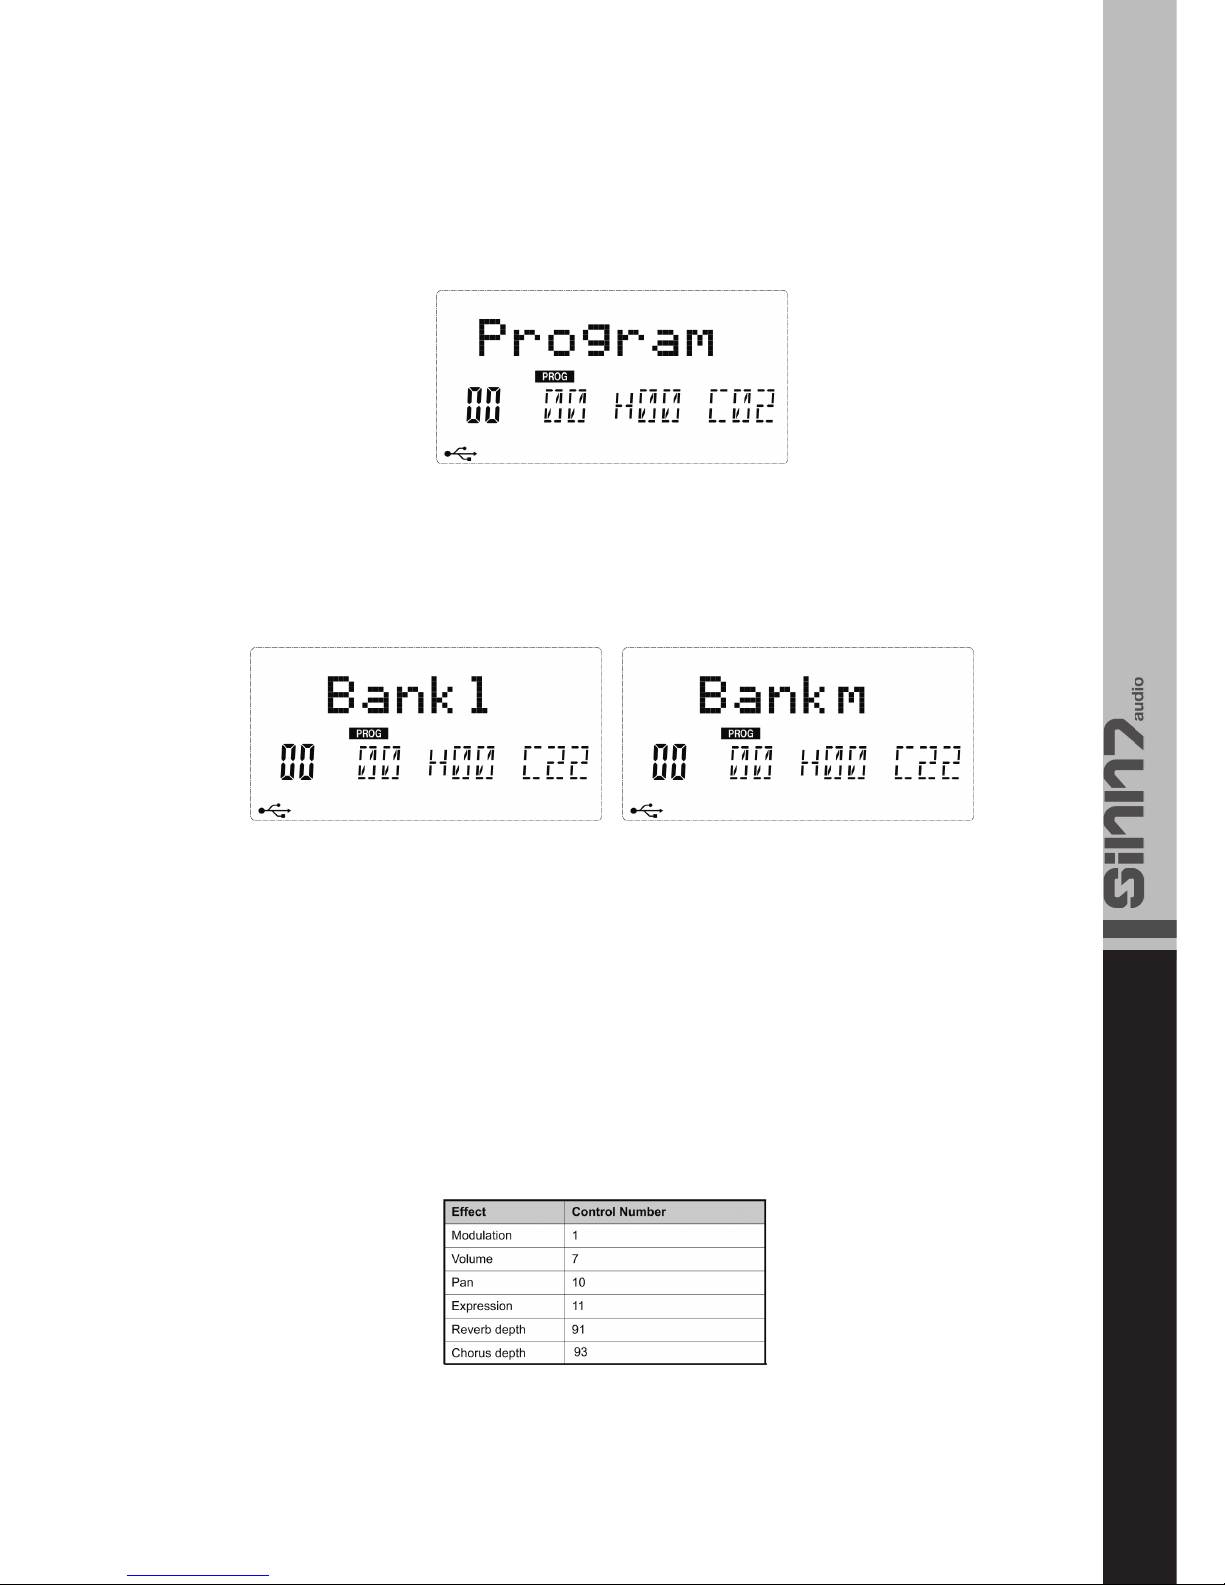
Um den Voice-Wert zu verändern, drücken Sie zunächst
die Program-Funktionstaste. Auf dem Display erscheint
„Program“ und die aktuelle Voice-Nummer. Durch das nu-
merische Keypad oder die +/- Tasten kann dieser Wert in
einem Bereich von 0 – 127 verändert werden.
Um die Voice Bank des aktuellen Kanals zu verändern,
drücken Sie zunächst die Bank LSB bzw. Bank MSB Funti-
onstaste. Auf dem Display erscheint „Bank L“ bzw. „Bank
M“. Durch das numerische Keypad oder die +/- Tasten
kann dieser Wert in einem Bereich von 0 – 127 verän-
dert werden.
Es gibt 128 MIDI-Befehle, die verwendet werden können,
um gewisse MIDI-Parameter Ihrer Software oder externer
MIDI-Geräte zu verändern. Beispiele für diese veränder-
baren Parameter sind unter anderem Lautstärke, Pan,
Expression, Reverb, Chorus oder Portamento.
Jedes Kontrollelement Ihres Kontrolux Keyboards ist in
der Lage, jeden der 128 Standard MIDI-Befehle zu sen-
den, um genannte Parameter zu kontrollieren.
Beispiel:
Sie möchten das Modulations-Rad verwenden, um die Re-
verb-Funktion zu steuern. Dazu muss die Kontrollnummer
91 dem Modulations-Rad zugewiesen werden (A10 für
Kontrolux.25, A19 für Kontrolux.49 und Kontrolux.61).
Eine vollständige Liste dieser Befehle finden Sie im Anhang
C dieser Bedienungsanleitung.
Bitte beachten Sie auch die Anleitung Ihrer Software oder
Ihres MIDI-Gerätes zu diesem Thema.
In order to change the voice value press the Program
function button. “Program” and the current voice number
will appear on the display. By using the numeric keypad or
the +/- buttons it is possible to to adjust the value on a
scale from 0 – 127.
Press the Bank LSB and Bank MSB buttons respectively
in order to change the voice bank of the current channel.
“Bank L” and “Bank M” respectively, appear on the dis-
play. By using the numeric keypad or the +/- buttons it is
possible to adjust the voice bank number on a scale from
0 – 127.
There are 128 MIDI controller messages that can be
used for controlling the MIDI adjustable parameters in
your software or on your external MIDI gear. Examples of
these parameters are volume, pan, expression, reverb,
chorus or portamento.
Each of the controls of the Kontrolux keyboard is able to
send any of the 128 standard MIDI controller messages
in order to control these parameters.
Example:
You would like to use the modulation wheel in order to con-
trol the reverb function. To do so the controller number
91 has to be assigned to the modulation wheel (A10 for
Kontrolux.25, A19 for Klontrolux.49 and Kontrolux.61).
A complete list of these messages can be found in Appen-
dix C of this instruction manual. Please also refer to the
instruction manual of your software or MIDI device.
10
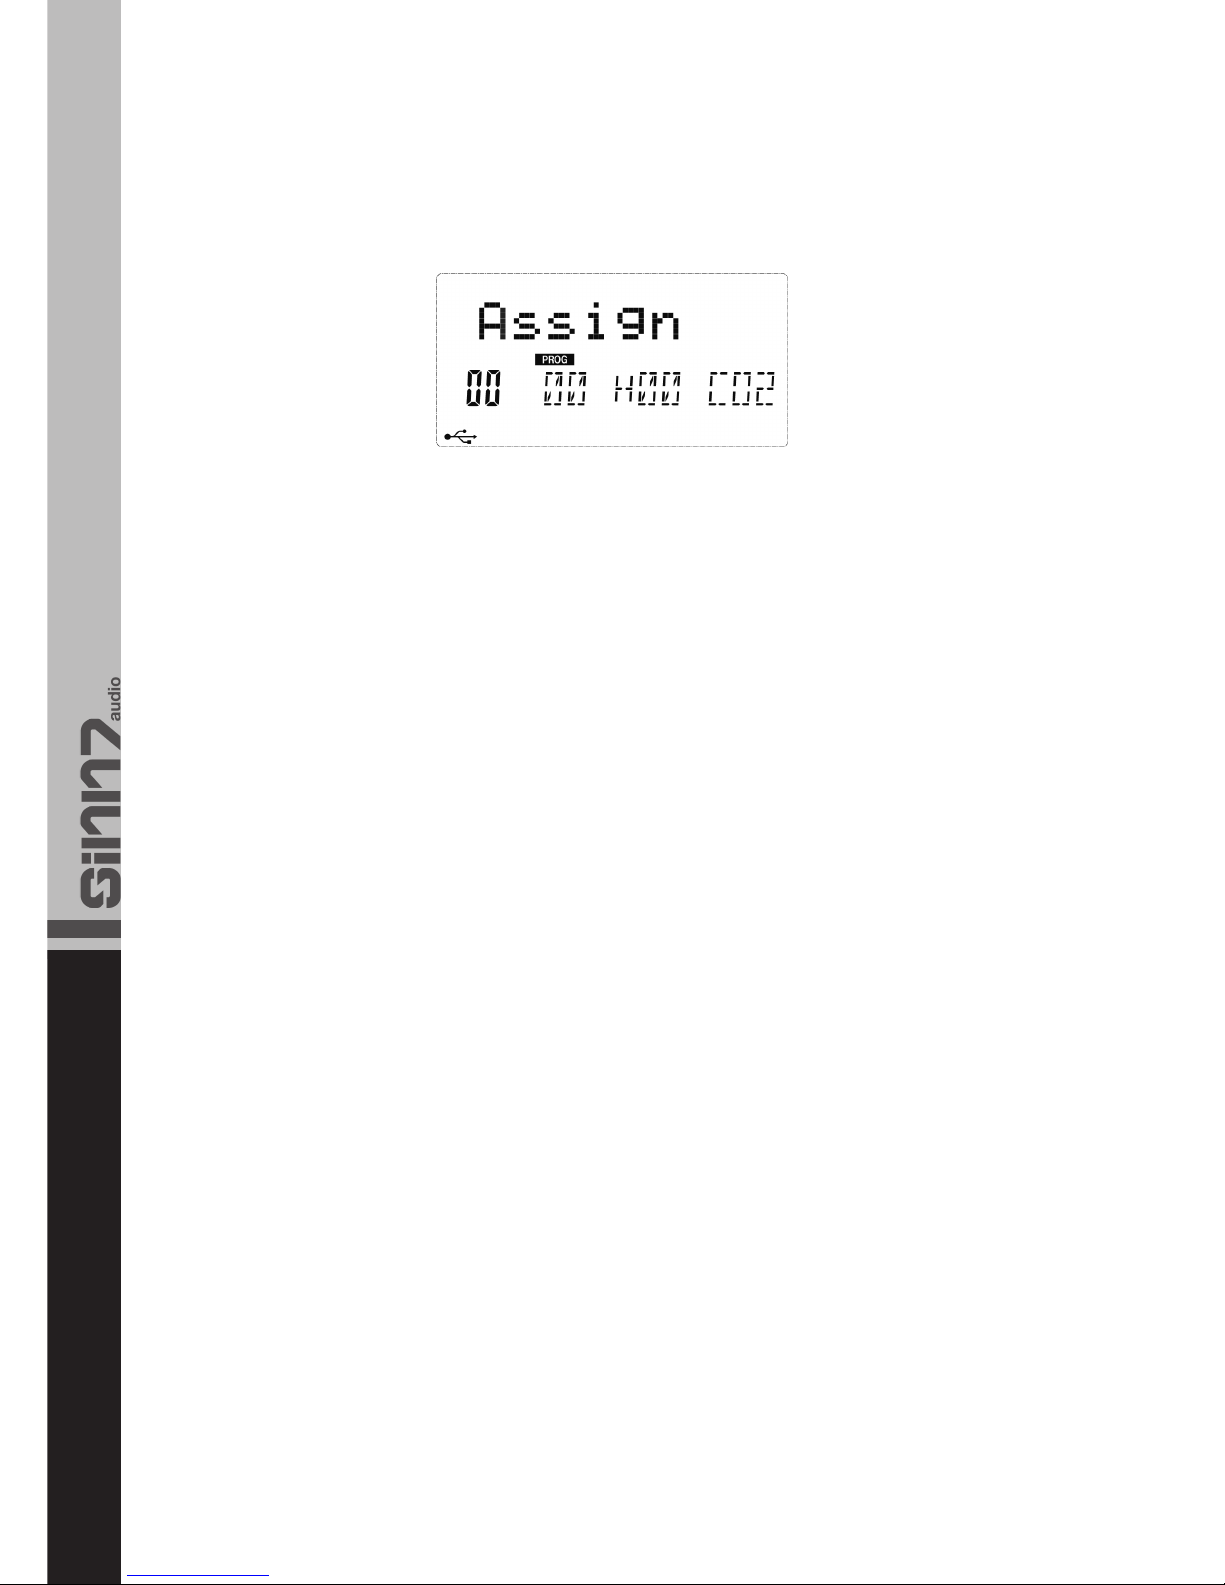
Wenn Sie ein Kontrollelement Ihres Kontrolux program-
mieren möchten, so wird beim Start des Programmier-
vorgangs das zuletzt verwendete Kontrollelement ange-
zeigt. Um ein anderes Element zu wählen, bewegen Sie
den Controller, den Sie programmieren möchten und drü-
cken Sie dann die Assign-Taste.
Es stehen Ihnen 8 Drehregler zur Verfügung, die individu-
ell programmiert werden können. Zunächst drücken Sie
die Assign-Taste. Bewegen Sie dann den Drehregler, der
programmiert werden soll. Auf dem Display erscheint nun
die Nummer des Drehreglers und dessen Wert. Mittels
des numerischen Keypads bzw. der +/- Tasten kann nun
der gewünschte Wert eingestellt werden. Bestätigen Sie
die Eingabe mit der Enter-Taste.
Es stehen ihnen 9 Schieberegler zur Verfügung, die indivi-
duell programmiert werden können. Zunächst drücken Sie
die Assign-Taste. Bewegen Sie dann den Schieberegler,
der programmiert werden soll. Auf dem Display erscheint
nun die Nummer des Schiebereglers und dessen Wert.
Mittels des numerischen Keypads bzw. der +/- Tasten
kann nun der gewünschte Wert eingestellt werden. Be-
stätigen Sie die Eingabe mit der Enter-Taste.
Die Werkseinstellungen der Funktionsräder sind die Mo-
dulations- und Pitch Bend-Funktionen. Diese Räder kön-
nen jedoch ebenfalls programmiert werden. Zunächst
drücken Sie die Assign-Taste. Bewegen Sie dann das Rad,
das programmiert werden soll. Auf dem Display erscheint
nun die Nummer des Rades und dessen Wert. Mittels
des numerischen Keypads bzw. der +/- Tasten kann nun
der gewünschte Wert eingestellt werden. Bestätigen Sie
die Eingabe mit der Enter-Taste.
Es ist möglich, 2 optional erhältliche Pedale an Ihr Kontro-
lux Keyboard anzuschließen. Diese sind ebenfalls zuweis-
bar. Drücken Sie zunächst die Assign-Taste. Betätigen Sie
danach das gewünschte Pedal. Auf dem Display erscheint
nun die Nummer des Rades und dessen Wert. Mittels
des numerischen Keypads bzw. der +/- Tasten kann nun
der gewünschte Wert eingestellt werden. Bestätigen Sie
die Eingabe mit der Enter-Taste.
Dieser Schieberegler sendet die GM Lautstärkebefehle
(F0 7F 7F 04 01 00 xx F7).
Betätigen Sie das zuzuweisende Pad einmal. Nun können Sie mit-
tels der Assign Taste den Editor öffnen. Mit dem numerischen
Keypad kann dem Pad nun ein neuer Wert zugewiesen werden.
Um die Änderungen zu speichern, drücken Sie die Enter-Taste.
If you wish to program a controller of your Kontrolux the
last used controller will be displayed when starting to pro-
gram. In order to select another controller simply move
the one you would like to program; afterwards press the
Assign button.
There are 8 dials at your disposal that can be program-
med individually. First press the Assign button. Then move
the dial you would like to program. The display will now
show the dial‘s number and its value. Via the numeric key-
pad or the +/- buttons it is possible to adjust the desired
value. Confirm by pressing the Enter button.
There are 9 sliders at your disposal that can be program-
med individually. First press the Assign button. Then move
the slider you would like to program. The display will now
show the slider‘s number and its value. Via the numeric
keypad or the +/- buttons it is possible to adjust the desi-
red value. Confirm by pressing the Enter button.
The default settings for the wheels are the modulation
and pitch-bend functions. These wheels can also be pro-
grammed. First press the Assign button. Then move the
wheel you wish to program. The display now shows the
wheel‘s number and value. Via the numeric keypad or the
+/- buttons the desired value can be adjusted. Confirm by
pressing the Enter button.
It is possible to connect 2 separately available pedals
to your Kontrolux keyboard. These are also assignable.
Press the Assign function button. Afterwards operate the
desired pedal. The display will show the pedal number and
its value. Via the numeric keypad and the +/- buttons res-
pectively it is possible to adjust the desired value. Confirm
by pressing the Enter button.
This slider sends the GM Master Volume messages (F0
7F 7F 04 01 00 xx F7).
The pad you wish to assign has to be operated once. Now
the editor can be opened via the Assign button. By using the
numeric keypad it is possible to assign a new value to the pad.
In order to save the adjustments press the Enter button.
11
Mit der Recall Taste hat man die Möglichkeit, den Grup-
penmodus auszuwählen. Nun stehen auf den Tasten 1 - 6
die Gruppen A bis F zur Verfügung. Um die Gruppenaus-
wahl zu bestätigen, betätigen Sie bitte die Enter-Taste.
Mit den Gruppen ist es möglich, bis zu sechs vordefinierte
Presets zu erstellen. Hat man innerhalb einer Gruppe alle
Elemente nach seinen Wünschen definiert, können diese
mit der Save Taste im Keyboard gespeichert werden.
Zur Bestätigung des Speichervorgangs betätigen Sie bitte
die Enter-Taste.
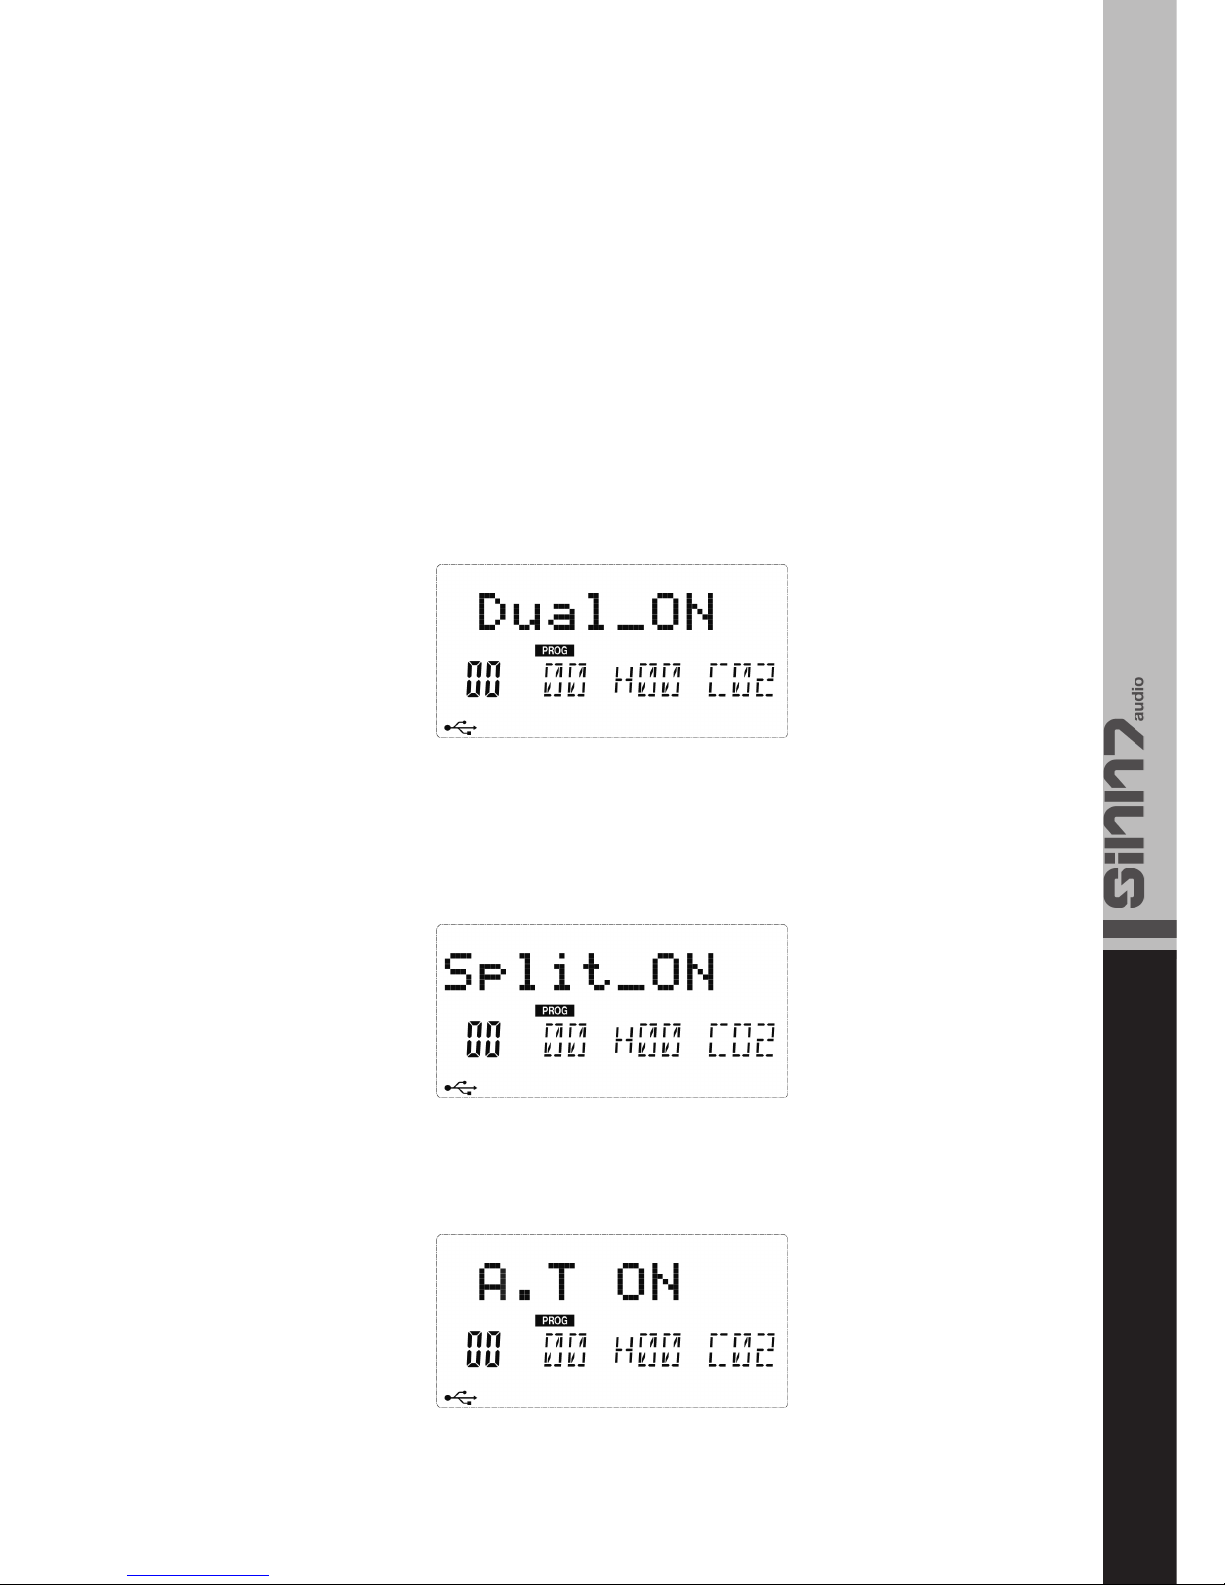
Dual Funktionstaste
Ist diese Funktion aktiviert, so erscheint auf dem Display
„Dual_On“. Nun sendet die Klaviatur bei einem Noten-
anschlag gleichzeitig zwei Signale auf unterschiedlichen
Kanälen. Der zweite Kanal kann im Dual-Modus mit der
Channel Taste von 1 bis 16 gewählt werden.
Split Funktionstaste
Ist diese Funktion aktiviert wird das Keyboard in zwei Be-
reiche geteilt. Nun sendet das Keyboard auf unterschied-
lichen Kanälen. Ist die Split-Funktion aktiviert, kann für den
rechten Bereich sowohl die Oktave als auch der MIDI-
Kanal mittels der Channel- oder Octave-Tasten und den
+/- Tasten ausgewählt werden.
Ist diese Funktion aktiviert, so erscheint auf dem Display
„A.T On“. In diesem Fall sendet das Keyboard dem Veloci-
ty-Wert entsprechend After-Touch-Daten bei Verwendung
der Klaviaturtasten.
Via the Recall button it is possible to select the group
mode. Now the buttons 1 – 6 dispose of the the groups
A – F. In order to confirm the selected group press the
Enter button. Via the groups it is possible to create up
to six presets. When all elements within one group have
been defined according to one‘s requirements these can
be saved by using the Save button. In order to confirm
please press the Enter button.
Dual function button
If this function is activated the display will show “Dual_On”.
Now the keyboard sends two signals at the same time
on two channels when being played. In Dual mode the
second channel can be selected via the Channel button
from 1 – 16.
Split function button
If this function is active the keyboard is splitted in two
parts. Now the keyboard sends data on different chan-
nels. If the Split function is active it is possible to select
the octave as well as the MIDI channel via the channel,
octave, and +/- buttons.
If this function is activated the display will show “A.T On”.
In this case the keyboard sends the channel aftertouch
information according to the velocity curve, when playing
the keyboard.

12
Ist die MIDI Time Code-Funktion aktiviert, so erscheint auf
dem Display „MTC ON“. Das Keyboard sendet die MTC-
Daten (F8).
Ist diese Funktion aktiviert, so erscheint „Mute_On“ auf
dem Display. In diesem Fall sendet das Kontrolux Key-
board keine MIDI-Daten.
Ist diese Funktion aktiviert, so erscheint auf dem Display
„Assign“. Auf dem Display erscheint die Nummer des ak-
tuellen Controllers. Bewegen Sie dann das Element, wel-
ches zugewiesen werden soll.
Drücken Sie die Channel und Bank L Tasten gleichzeitig
(Kontrolux .25) bzw. die GM On Taste (Kontrolux.49 &
Kontrolux.61), um den GM On Befehl zu senden (F0 7E
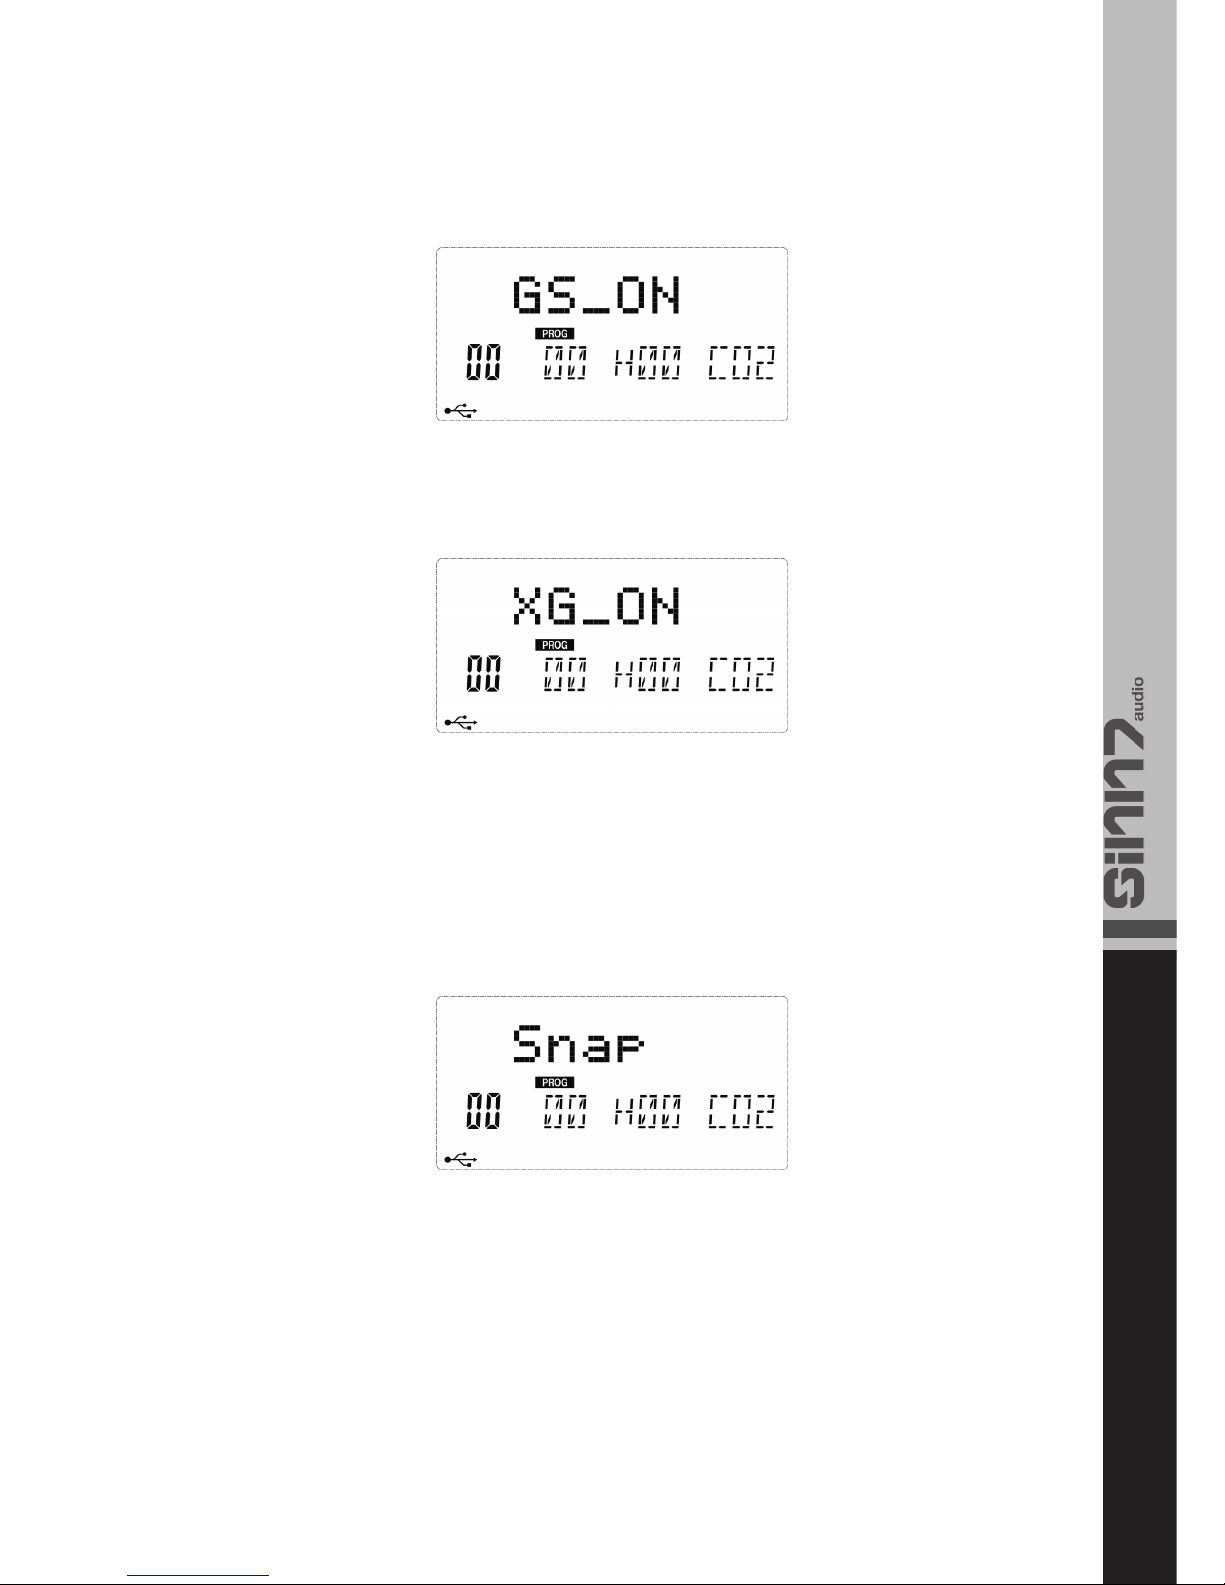
7F 09 01 F7). Auf dem Display erscheint „GM On“.
If this function is activated the display will show “MTC On”.
The keyboard then sends MTC information (F8).
If this function is activated the display will show “Mute_On”.
In this case the Kontrolux keyboard does not send any
MIDI data.
If this function is activated, the display will show “Assign”.
The number of the current controller will also appear on
the display. Then move the controller that you wish to
assign.
Press the Channel and Bank L buttons simultaneously
(Kontrolux.25) or the GM On button (Kontrolux.49 & Kon-
trolux.61) in order to send the GM On message (F0 7E 7F
09 01 F7). “GM On” will appear on the display.
13
Drücken Sie die Control Assign und Bank L Tasten gleich-
zeitig (Kontrolux.25) bzw. die GS On Taste (Kontrolux.49
& Kontrolux.61), um den GS On Befehl zu senden (F0 41
10 42 12 40 00 7F 0041 F7).
Drücken Sie die Control Assign und Octave Taste gleich-
zeitig (Kontrolux.25) bzw. die XG On Taste (Kontrolux.49
& Kontrolux.61), um den XG On befehl zu senden (F0 43
10 4C 00 00 7E 00 F7).
Drücken Sie die Program und Shift Tasten gleichzeitig
(Kontrolux.25) bzw. die Reset Taste (Kontrolux.49 & Kon-
trolux.61), um die Werkseinstellungen des Keyboards
wieder einzustellen.
Mittels der Snap-Taste (nur Kontrolux.49 & 61) oder der
Tastenkombination Program & Channel (Kontrolux.25)
wird der aktuelle Status der vorgenommenen MIDI-Ein-
stellungen an das Sequencer-Programm weiter gegeben.
Ist keine Gruppe ausgewählt kann man man mit der Save-
Taste die aktuelle Belegung global speichern. Bei einem
Neustart des Gerätes kann diese wieder über die Recall-
Taste geladen werden. Betätigt man die Recall-Taste und
eine der Tasten 1 – 6 gleichzeitig, so wird die entspre-
chende Bank ausgewählt. Mittels der Save- und Enter-Tas-
ten können hier bis zu 6 Presets abgespeichert werden.
Press the Control Assign and Bank L button simultane-
ously (Kontrolux.25) or the GS On button (Kontrolux.49 &
Kontrolux.61) in order to send the GS On message (F0 7E
7F 09 01 F7). “GS On” will appear on the display.
Press the Control Assign and Octave buttons simultane-
ously (Kontrolux.25) or the XG button (Kontrolux.49 & Kon-
trolux.61) in order to send the XG On message (F0 43 10
4C 00 00 7E 00 F7). “XG On” will appear on the display.
Press the Program and Shift buttons simultaneously (Kon-
trolux.25) or the Reset button (Kontrolux.49 & Kontro-
lux.61) in order to restore the keyboard‘s default settings.
Via the Snap button (only Kontrolux.49 & 61) or the but-
ton combination Program & Channel (Kontrolux.25) the
current status of the MIDI settings can be sent to the
sequencer program.
If no group has been selected it is possible to save the
current assignment via the Save button. When the device
is being restarted it can be reloaded via the Recall button.
If the Recall button and one of the buttons from 1 – 6
are used simultaneously the corresponding bank can be
selected. Via the Save and Enter buttons it is possible to
save up to 6 presets.

14
Verwenden Sie die Shift-Taste und die gewünschte Funk-
tions-Taste, um die Doppelbelegung zu aktivieren. Die
Funktionen, die mit der Shift-Taste aufgerufen werden kön-
nen, stehen über den entsprechenden Funktions-Tasten.
Verwenden Sie die Enter-Taste, um Befehle zu bestätigen.
Das Kontrolux verfügt über 6 Pad Curves, die die Velocity
steuern. Um zwischen den Curves zu wechseln betätigt
man zunächst die Pad Curve-Taste. Mit den +/- Tas-
ten kann man zwischen den verfügbaren Curves hin- und
herschalten. Bestätigen Sie die Eingabe mittels der Enter-
Taste.
Um einem Pad eine andere Note zuzuweisen, betätigen
Sie das Pad und anschließend die Ctrl Assign-Taste. Da-
nach öffnen Sie den Pad-Note Editor mit zwei Klicks auf die
Shift-Taste. Nun kann dem Pad mittels der Nummerntas-
ten ein neuer Wert zugewiesen werden. Durch Betätigen
der Enter-Taste wird der Vorgang abgeschlossen.
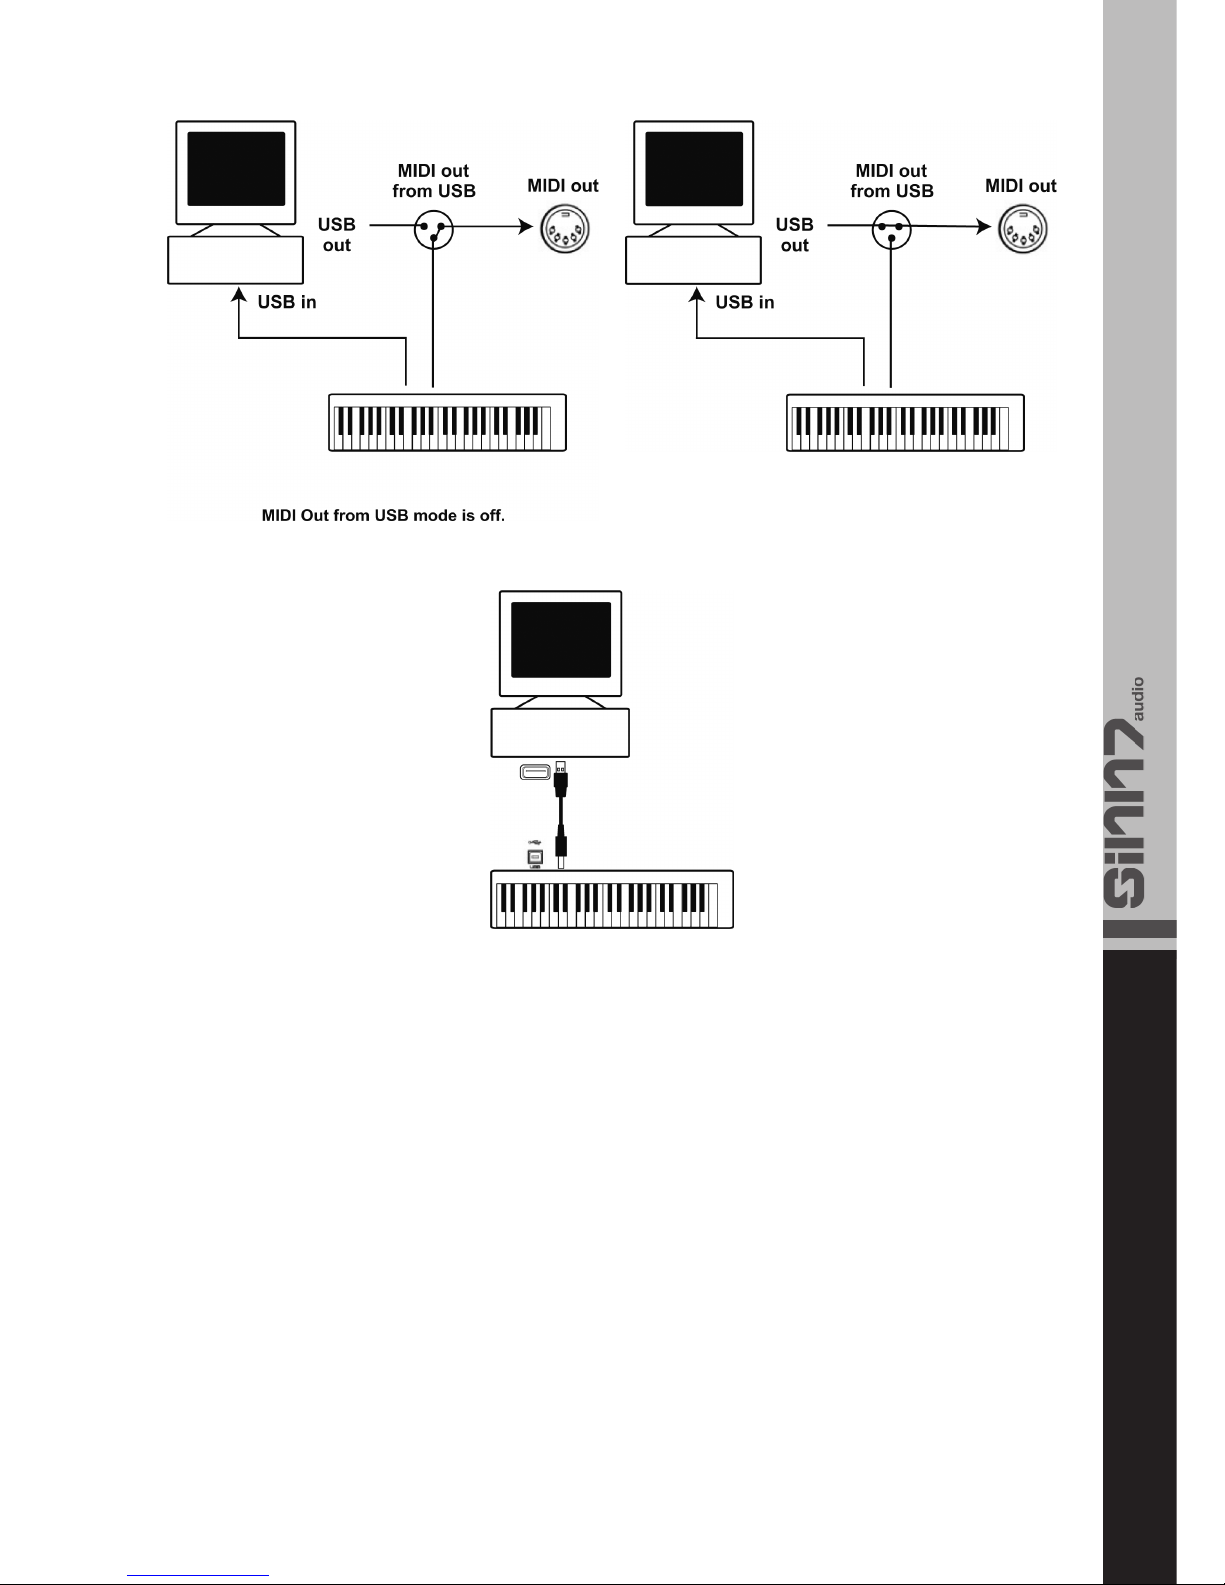
Die MIDI Out from USB Funktion kann verwendet werden,
um die MIDI-Datenquelle am MIDI-Out Port Ihres Kontrolux
Keyboards zu wechseln.
Beim erstmaligen Einschalten des Kontrolux Keyboards
ist diese Funktion ausgeschaltet. Dies bedeutet, dass
beim Spielen des Keyboards MIDI-Daten zum MIDI Out
Port gesendet werden.
Wird diese Funktion aktiviert, so werden beim Spielen
des Kontrolux keine MIDI-Daten zum MIDI-Out Port gesen-
det. Stattdessen werden die Daten vom Computer aus
gestreamt. Solange Sie also das Kontrolux Keyboard als
aktiven Ausgang am Sequencer ihres Computers gewählt
haben, sind dies die Daten, die zum MIDI-Out Port gesen-
det werden.
Beispiel:
Sollten Sie ein Soundmodul mit Ihrem Kontrolux steuern
wollen, so muss die MIDI Out from USB Funktion deakti-
viert sein.
Use the Shift button and the desired function button in
order to access the second button function. The functions
that can be accessed via the shift button are displayed
above the corresponding function buttons.
Use the Enter button in order to confirm adjustments.
The Kontrolux disposes of 6 Pad Curves that control the
velocity. In order to change the curve it is necessary to
first press the Pad Curve button. Via the +/- buttons it
is possible to switch between the curves. Confirm via the
Enter button.
In order to assign a different note to a pad, first press the
desired pad and then the Ctrl. Assign button. Afterwards
open the Pad Note Editor by pressing the shift button 2
times. Via the numeric keypad it is now possible to assign
a new value to the pad. Confirm by pressing the Enter
button.
The MIDI Out from USB function can be used in order to
change the MIDI data source at the MIDI Out port of your
Kontrolux keyboard.
When turning on the Kontrolux for the first time this func-
tion is turned off. This means that while playing the key-
board MIDI data is sent to the MIDI Out port.
If this function is activated no MIDI data will be sent while
playing the Kontrolux. Instead data from the computer
will be streamed. So as long as the Kontrolux keyboard is
selected as active output at the sequencer on your com-
puter, this is the data that is sent to the MIDI Out port.
Example:
If you wish to control a sound module with your Kontrolux
the MIDI Out from USB function has to be deactivated.
15
Ein MIDI-Sequencer erlaubt es Ihnen MIDI-Daten auzuneh-
men, abzuspielen und zu speichern. Obwohl Hardware Se-
quencer als Stand-Alone Geräte existieren, konzentriert
sich diese Anleitung auf die weiter verbreiteten Software-
Sequencer.
Um Ihr Kontrolux Keyboard in Verbindung mit einem Se-
quencer zu nutzen, muss die Sequencer-Software so ein-
gestellt sein, dass Ihr Kontrolux als MIDI-Eingabegerät des
Sequencers erkannt wird.
Es muss ein MIDI-Ausgabegerät verwendet werden, was
in der Lage ist, Sounds zu erzeugen, wenn es Daten emp-
fängt. Dies kann eine Soundkarte am Computer, ein VST
Instrument oder ein Soundmodul sein, dass an ein MI-
DI-Port angeschlossen ist, welches wiederum mit Ihrem
Computer verbunden sein muss. Für weitere Informatio-
nen beachten Sie bitte auch die Bedienungsanleitung Ih-
res Sequencers.
Wenn das Kontrolux Keyboard mit dem Sequencer „kom-
muniziert“ werden Daten zum Sequencer gesendet und
werden dann innerhalb der Sequencer Software zu einem
virtuellen Synthesizer geroutet oder die Daten werden
über einen MIDI-Ausgangs-Port an ein externes Soundmo-
dul gesendet. Der virtuelle Synthesizer oder das externe
Soundmodul wandeln die Daten in hörbare Sounds. Somit
kann man die eingehenden MIDI-Daten aufnehmen und
mit dem Sequencer bearbeiten.
A MIDI sequencer allows the recording, playing and sto-
ring of MIDI data. Even though there are sequencers as
stand-alone devices this manual puts its emphasis on the
more popular software sequencers.
In order to use your Kontrolux keyboard with a sequencer,
the sequencer software has to be adjusted in a way for
the Kontrolux to be recognised as MIDI input device by
the sequencer.
The MIDI output device has to be able to produce sounds
when receiving data. This can be a sound card on your
computer, a VST instrument or a sound module that is
connected to a MIDI port which in turn has to be connec-
ted to your computer. For further information please also
refer to the instruction manual of your sequencer.
When the Kontrolux keyboard communicates with a se-
quencer, data is sent to the sequencer. Within the se-
quencer software this data is routed to a virtual synthesi-
zer or the data is sent to an external sound module via a
MIDI output port. The virtual synthesizer or external sound
module converts the data into audible sounds. This way
the incoming MIDI data can be recorded and edited via
the sequencer.
16
Bei aktivierter „MIDI Out from USB-Funktion“ (siehe Kapi-
tel 4.1) werden die Daten, die vom Computer zum Kon-
trolux Keyboard gesendet werden, direkt aus dem MIDI-
Ausgangs-Port gesendet; somit werden die Sounds des
externen Soundmoduls getriggert. Dies bedeutet, dass
Ihr Kontrolux als „USB zum MIDI-Interface“ handelt. Um
MIDI-Daten des Computers zum MIDI-Ausgangs-Port zu
schleifen, sollte das Kontrolux Keyboard an Ihrem Compu-
ter als MIDI-Ausgangsgerät gewählt sein.
Alternativ können die Kontrolux MIDI-Daten mit den Daten
Ihres Computers gemischt werden. Dies würde Ihnen er-
möglichen, mit einem Sequencer aufzunehmen und Ihre
Performance über ein Soundmodul abzuspielen, dass am
MIDI-Ausgangs-Port Ihres Kontrolux angeschlossen ist.
Um dies zu erreichen, gehen Sie wie folgt vor:
- aktivieren Sie die „MIDI Out from USB“ Funktion (siehe
Kapitel 4.1)
- wählen Sie auf Ihrem Sequencer das Kontrolux Keyboard
als MIDI-Eingabegerät
- wählen Sie auf Ihrem Sequencer das Kontrolux Keyboard
als MIDI-Asugabegerät
Die ursprünglichen GM MIDI-Spezifikationen wurden ent-
wickelt, um lediglich auf 128 verschiedene Sounds, unter
Verwendung der Program Change Befehle (0 – 127), zu-
greifen zu können.
Da MIDI-Geräte im Laufe der Zeit immer komplexer wur-
den und mehr Sounds beinhalten, wurden Bank Change
Befehle implementiert, um auf mehr als 128 Sounds Zu-
griff zu haben. Innerhalb jeder Bank befinden sich 128
verschiedene Sounds, die unter Verwendung der stan-
dard Program Change Befehle, ausgewählt werden kön-
nen. Verwendet man den erweiterten 14-Bit Bank Change
Befehl, so ergibt das 16.384 Bänke mit je 128 Sounds.
Die ersten 7 Bits der 14-Bit Bank Change Befehle wer-
den in einem Byte gesendet, auch bekannt als Bank LSB.
Die zweite Hälfte der Bits sind als Bank LSB bekannt. Die
Bank LSB wird im Allgemeinen meistens verwendet. Dies
erlaubt 128 Bank Changes und oftmals ist es unnötig die
Bank MSB zu senden.
Fast alle MIDI-Geräte reagieren auf Program Change
Befehle und viele sind den GM Listen entsprechend sor-
tiert. In allen gängigen MIDI-Geräten sind die verschiede-
nen Sounds auf die gleiche Art und Weise angeordnet;
dies bedeutet, dass beispielsweise Piano-Sounds immer
ihren eigenen, gleichen Platz haben, Streicher sind im-
When the “MIDI Out from USB” function is activated (see
chapter 4.1) the data that is sent from the computer to
the Kontrolux is sent directly from the MIDI output port;
this way the external sound module‘s sounds are trigge-
red. This means that your Kontrolux acts as “USB to MIDI
Interface”. In order to route the computer‘s MIDI data to
the MIDI output port the Kontrolux keyboard should be
selected as MIDI output device on your computer.
Alternatively the Kontrolux MIDI data can be mixed with
the computer‘s data. This would allow recording with a
sequencer and playback of your performance via a sound
module which is connected to the Kontrolux‘s MIDI output
port. In order to do so follow these steps:
- activate the “MIDI Out from USB” function (see chapter 4.1)
- select the Kontrolux keyboard as MIDI input device on
your sequencer
- select the Kontrolux keyboard as MIDI output device on
your sequencer
The original GM MIDI specification was designed to ac-
cess only 128 different sounds using Program Change
messages (0-127).
As MIDI devices grew to be more sophisticated and con-
tain more sounds, Bank change messages were included
in the specification to allow more than 128 sounds to be
accessed. Within each bank there are a posible 128 diffe-
rent sound patches that can be accessed using the stan-
dard Program Change command. Using the expanded
14 bit Bank Change command, there are now 16.384
banks available – each with 128 sound patches. Techni-
cally speaking, the first 7 bits of the 14 bit Bank Change
messages are sent in a single byte known as Bank LSB.
The Bank LSB is the most commonly used. This allows for
128 bank changes and often there is no need to send a
Bank MSB.
Almost all MIDI devices respond to Program Change
commands and many are organized according to the GM
listing. In all General MIDI devices, the different sounds
are always organized in the same way from device to de-
vice, so the piano sounds are in their particular place, the
string sounds are in their place, the drum sounds are in
their place, etc. All GM devices (both hardware and soft-
ware sound modules) are clearly labeled as such, so it is

17
mer am eigenen, gleichen Platz, usw. Alle GM Geräte
(sowohl Hardware als auch Software Sound Module) sind
als solche klar gekennzeichnet. Wenn also ein GM Gerät
MIDI- Program Change Befehle erhält, so werden Sounds
aufgerufen, die man auf Grund des GM Geräte Sound-
Set erwarten würde. Alle nicht-GM Geräte rufen Sounds
durch ihren Speicher auf nachdem MIDI-Program Change
Befehle empfangen wurden. Da in nicht-GM Geräten die
Sounds nicht in einer bestimmten Art geordnet sind, ist
es nötig das Gerät zu prüfen, um zu erkennen, welcher
Sound gewünscht wird und an welcher Stelle dieser ge-
speichert ist.
Bank Change Befehle sind sinnvoll, wenn man Sounds aus
einer großen Library aufruft, die möglicherweise in einem
bestimmten Soundmodul oder Software Synthesizer exis-
tiert.
Die Kontrolux Keyboards wurden entwickelt, um Ihnen
die best mögliche MIDI-Kontrolle zu bieten. Dennoch gibt
es praktisch unendlich viele Anwendermöglichkeiten; jede
dieser Möglichkeiten könnte die Performance Ihres Sys-
tems beeinflussen. Obwohl dieser Abschnitt nicht alle
möglichen Situationen wiederspiegeln kann, finden Sie fol-
gend einige Vorschläge zur Problembehebung.
Wenn Sie Ihr Kontrolux Keyboard mit einem Computer
verbinden, wird empfohlen, nicht allzu viele Geräte gleich-
zeitig an Ihren Rechner anzuschließen. Je mehr Geräte
angeschlossen werden, desto größer ist die Belastung
des CPU. Obwohl es theoretisch möglich ist, mehrere
USB-Geräte gleichzeitig anzuschließen, könnte dies die
Performance Ihres Computers nachteilig beeinflussen.
Problem:
Mein Kontrolux hat nach der Installation mit einem Com-
puter problemlos funktioniert und auf einmal ist es ohne
Funktion.
Mögliche Lösung:
Schalten Sie das Keyboard und Ihren Computer aus und
schalten Sie beides erst nach ca. 10 Sekunden wieder
ein. Starten Sie den Rechner erneut und schalten Sie Ihr
Kontrolux Keyboard ein. Falls das Problem weiterhin auf-
taucht, müssen eventuell die Treiber neu installiert wer-
den.
Problem:
Es wurde ein Sustain Pedal an das Keyboard angeschlos-
sen, aber es fuktioniert nur in entgegengestzter Richtung.
Mögliche Lösung:
Die Polarität des Sustain Pedals wird vom Kontrolux Key-
board berechnet, sobald Sie es einschalten. Beim Ein-
schalten wird davon ausgegangen, dass sich Ihr Pedal
in der Off-Position befindet. Möchten Sie also, dass das
Pedal aus ist, wenn es nicht gedrückt wurde, stellen Sie
sicher, dass das Pedal beim Einschalten nicht gedrückt
wird. Um die Polarität umzukehren, drücken Sie das Pedal
und halten Sie es gedrückt, während Sie das Keyboard
einschalten.
Dies muss bei jedem erneuten Einschalten vorgenommen
werden.
Problem:
Das Kontrolux Keyboard ist mit dem Computer verbun-
den. Wenn ich eine Keyboard- Taste drücke gibt es eine
Verzögerung, bevor man etwas hören kann.
Mögliche Lösung:
Diese Verzögerung ist auch unter dem Begriff Latenz be-
kannt. Latenz bei MIDI-Signalen entstehen am Computer
und nicht an Ihrem Kontrolux Keyboard. Dies kann an
clear that their sounds are organized in the General MIDI
structure. So when a GM device receives a MIDI Program
Change, it calls up a type of sound that one would expect
from the GM sound set. All non-GM devices call up unique
sounds from their memory upon receiving MIDI Program
Changes. Since the sounds in a non-GM device are not
arranged in a particular order, one needs to take a look
at the device itself to see which sound is desired and at
which location in the memory it resides.
Bank change messages are useful when calling up sounds
from a large library that may exist in a particular sound
module or software synth.
The Kontrolux series has been designed to offer high per-
formance MIDI control. However, there are virtually limit-
less numbers of operating scenarios, any of which could
affect your system‘s performance. Although this section
cannot cover all possible situations you may encounter,
we would like to offer some suggestions for dealing with
common problems.
If you are connecting to a computer, we recommend that
you avoid connecting too many devices to your computer
at the same time. The more devices you have connected
to the computer, the greater the load on the computer‘s
CPU. Although it is possible in theory to connect multiple
USB devies at the same time, doing so may degrade your
system‘s performance.
Problem:
My Kontrolux suddenly stopped working after having per-
formed well since the installation on a computer.
Possible remedy:
Switch off the unit and leave it off for 10 seconds. Then
restart your computer, power up your Kontrolux and try
again. If the problem persists, you may have to reinstall
the drivers for the unit.
Problem:
I have plugged in a sustain pedal to my Kontrolux, but it
works backwards.
Possible remedy:
The polarity of the sustain pedal is calculated by the Kon-
trolux when it is powered up. On power up, the sustain
pedal is assumed to be in the off position. So, if you want
the sustain pedal to be off when it is not depressed, make
sure not to press the pedal when you power up. To rever-
se the pedal polarity, just press and hold the pedal while
powering up.
This will have to be done each time you power up the
Kontrolux.
Problem:
I have connected the Kontrolux to my computer. When I
press a key, there is a delay before I hear any sound.
Possible remedy:
This delay is known as latency. Latency with MIDI signals
is caused at the computer and is not coming from the
Kontrolux. This may be due to the CPU load of the soft-
der CPU Beanspruchung durch den verwendeten Soft-
ware Synthesizer liegen. MIDI-Daten sind lediglich Kont-
rolldaten. MIDI-Daten werden vom Software Synthesizer
gelesen; der Synthesizer muss dann eine hohe Anzahl
komplexer Berechnungen durchführen, um die Sounds
wiederzugeben, und dieser Prozess nimmt eine gewisse
Zeit in Anspruch. Falls Sie die enstsprechenden Para-
meter Ihrer Soundkarte bzgl. der Latenz eingestellt ha-
ben, sollen Sie versuchen die aktuellsten Treiber für Ihre
Soundkarte neu zu installieren oder die Buffer-Größen der
Soundkarte zu reduzieren. Falls Sie eine Host-Anwendug
verwenden, überprüfen Sie die Buffer-Einstellungen, da
bei den meisten Anwendungen Einstellungen zur Zeitbe-
rechnung möglich sind.
Dieser Hinweis betrifft nur PC-User. Falls Ihre Soundkar-
te ASIO oder WDM unterstützt, sollten Sie diese Treiber
benutzen. Es wird empfohlen, besser nicht den MME Trei-
ber zu verwenden, da dieser weniger effizient ist und eine
weitaus höhere Latenz mit sich bringen.
ware synth you are using. MIDI data is simply control data
and is read by the software synth. The software synth
then completes a large number of compley calculations
in order to produce the sound you hear, and all of this
processing activity takes time. If you already have adjus-
ted the appropriate parameters relating to latency on
your sound card, try re-installing the latest drivers for the
sound card, or try reducing the buffer sizes of the sound
card. If you are using a host application, check its buffer
size settings as most applications allow for user adjust-
ment to improve timing.
This note only affects PC users. If your sound card sup-
ports ASIO or WDM, then please use these drivers. It is
suggested not to use the MME driver which is less effici-
ent in design and will cause a much higher latency.
18

Global Distribution GmbH, Schuckertstr. 28, 48153 Münster, Germany, Fax +49.251.60 99 368
This manual suits for next models
2
Table of contents


