Sionyx Nightwave Series User manual

SERIES CAMERAS
TM
USER MANUAL

SIONYX, LLC
NIGHTWAVE
Made in Taiwan
SIONYX.com/patents
NEED HELP?
ONLINE CHAT
SUBMIT A TICKET
24/7 SUPPORT
CALL
www.sionyx.com
www.sionyx.com/contact
www.support.sionyx.com
(866) 827-8237
Register your device and
stay up to date by visiting
the URL or scanning the
QR code below.
SIONYX, LLC
Cummings Center
Beverly, MA 01915
U.S.A.
(978) 922-0684
FOLLOW US
Share your SIONYX content and be sure to tag us!

01TABLE OF CONTENTS
WELCOME TO NIGHTWAVE
GETTING STARTED
INSTALLATION
GETTING CONNECTED
CAMERA SETUP
SAFETY
MAINTENANCE
ADDITIONAL RESOURCES
02
03
05
14
17
18
27
28
TABLE OF CONTENTS

02 SIONYX NIGHTWAVE USER MANUAL
WELCOME TO NIGHTWAVE
NIGHTWAVE CAMERA
ANALOG VIDEO CAMERA
USB CABLE
ALLEN WRENCH
IN-LINE FUSE
USB CABLE
BOX INCLUDES:
THIS IS SIONYX. We believe that human endeavor should not be
limited by daylight. In the darkness of night, greatness is possible. Adventure
enabled. And a full sense of all sight achievable, no matter the light.
SMA TO BNC ADAPTER
BNC TO RCA ADAPTER
BASE GASKET
MOUNTING SCREWS
TEMPLATE

03GETTING STARTED
To get started, please review the legends on the following pages.
GETTING STARTED
GETTING STARTED

04 SIONYX NIGHTWAVE USER MANUAL

05INSTALLATION
INSTALLATION
When planning the installation location, consider the following points:
• The camera is waterproof, and appropriate for above decks mounting.
• When mounting the camera in a ball-down position, ensure that the camera
is installed with adequate drainage so that standing water does not collect
in the base.
• Ensure the camera is installed in a location that will allow it to be accessed
for regular periodic cleaning (fresh-water rinse), inspection of mounting
point integrity and mechanical soundness, and preventative maintenance.
• The underside (inside) of the compartment or deck on to which the camera
is mounted must be weather-tight. You must ensure protection from water
ingress to cables and connections.
• The mounting surface must be horizontal.
• Fixings are supplied for a mounting surface up to X mm (X in) thick. A
thicker surface will require the installer to provide alternative fixings.
• The camera should be mounted as high as practical, but without interfering
with any radar, navigational or communications electronics.
• Choose a location that will provide the most unobstructed view in all
directions.
• Select a location for the camera that is at least X m (X in.) from any magnetic
compass.
• Select a location that is at least X m (X ft) from devices that may cause
interference, such as motors, generators and radio transmitters / receivers.
CAMERA MOUNTING: LOCATION

06 SIONYX NIGHTWAVE USER MANUAL
Plan your system.
Obtain all required equipment and tools.
Site all equipment.
Route all cables.
Drill cable and mounting holes.
Make all connections into equipment.
Secure all equipment in place.
Power on and test the system.
Installation includes the following activities:
INSTALLATION CHECKLIST
INSTALLATION
07INSTALLATION
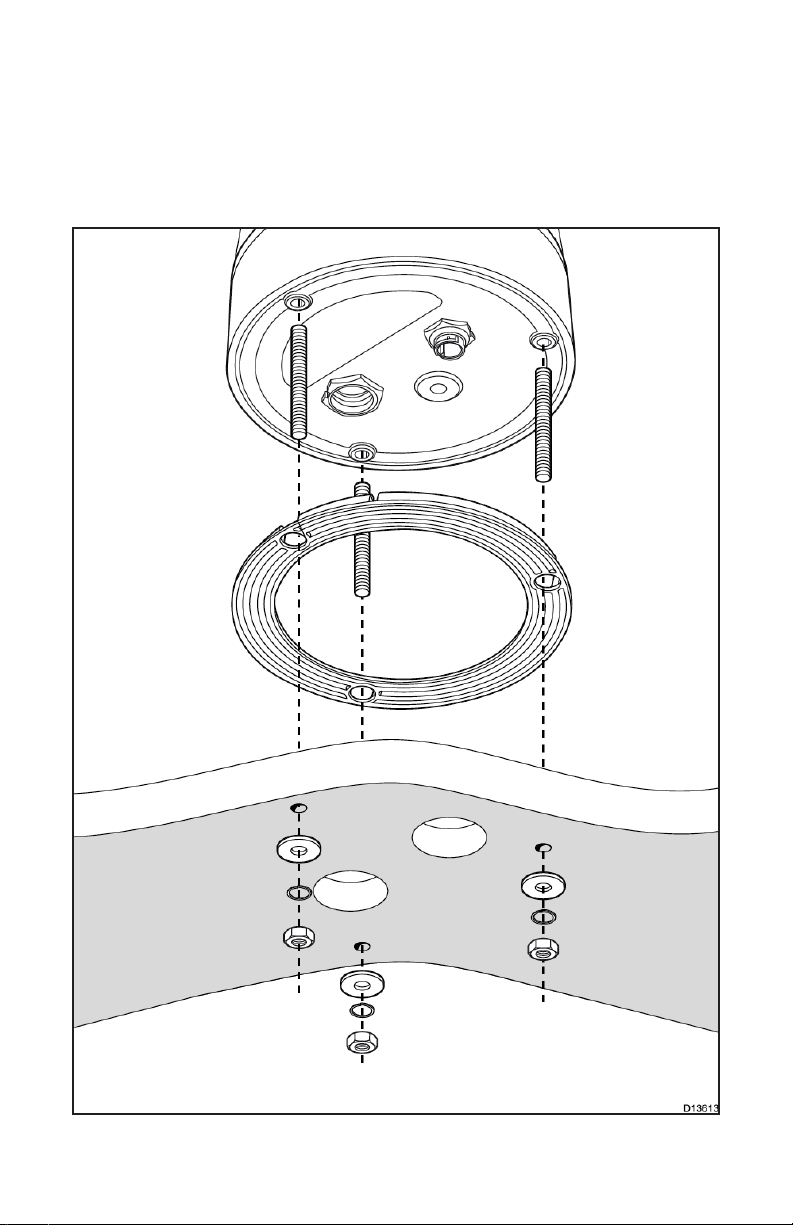
MOUNTING THE CAMERA
Use these instructions to mount the camera unit in position.
Using the template supplied, mark and drill the holes for mounting the camera.
Mounting the Camera: Bottom Up
PLACEHOLDER:
BOTTOM UP
08 SIONYX NIGHTWAVE USER MANUAL
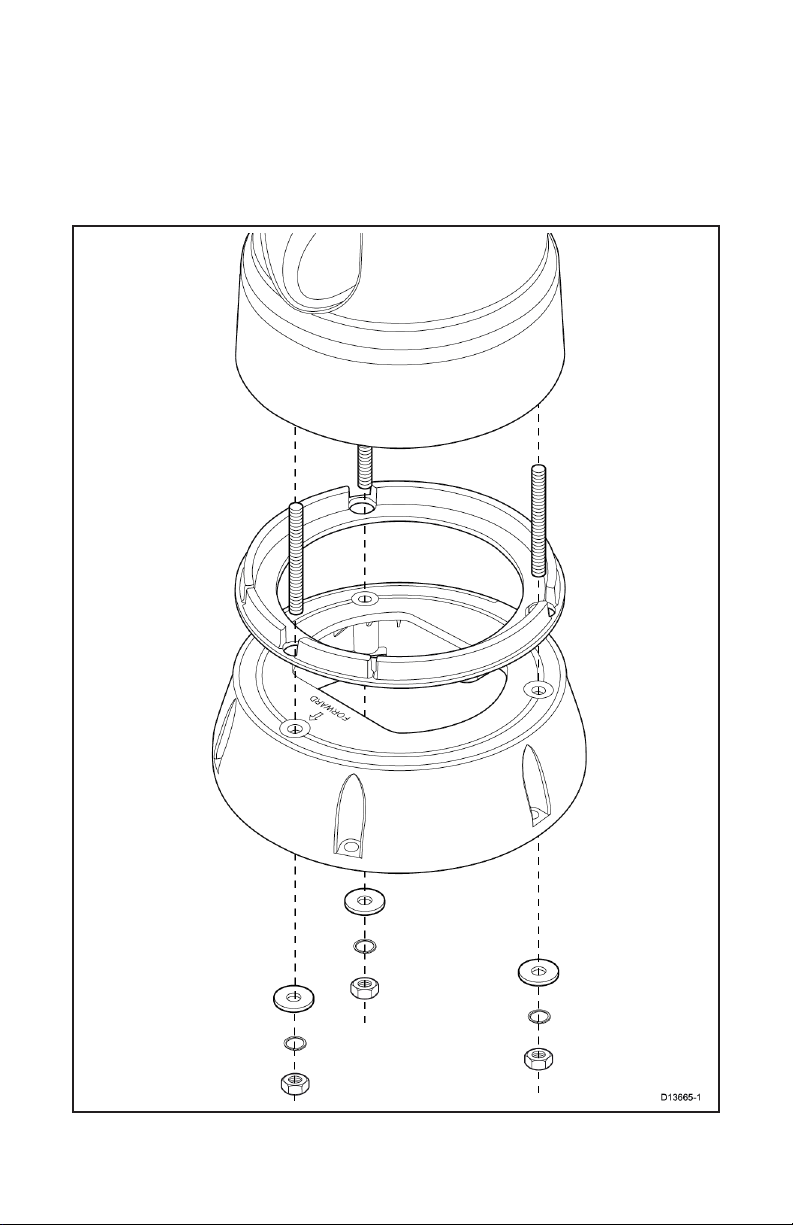
Mounting the Camera: Top Down
PLACEHOLDER:
TOP DOWN

09INSTALLATION
PLACEHOLDER:
TRIPOD

10 SIONYX NIGHTWAVE USER MANUAL
CAMERA ORIENTATION
The camera can be mounted in 2 orientations known as
“Ball up” and “Ball down.”
The default video image orientation is for the ball-up configuration;
if the camera is to be mounted in the ball-down configuration then
the video image must be rotated.
BALL-UP: The camera is mounted
on top of the mounting surface.
BALL-DOWN: The camera is
suspended upside down, below
the mounting surface.
11INSTALLATION
GENERAL CABLING GUIDANCE
Cable Types and Length
• It is important to use cables of the appropriate type and length.
• Unless otherwise stated, only use cables supplied by SIONYX.
• Ensure that any non-SIONYX cables are of the correct quality and gauge.
For example, longer power cable runs may require larger wire gauges to
minimize voltage drop along the run.
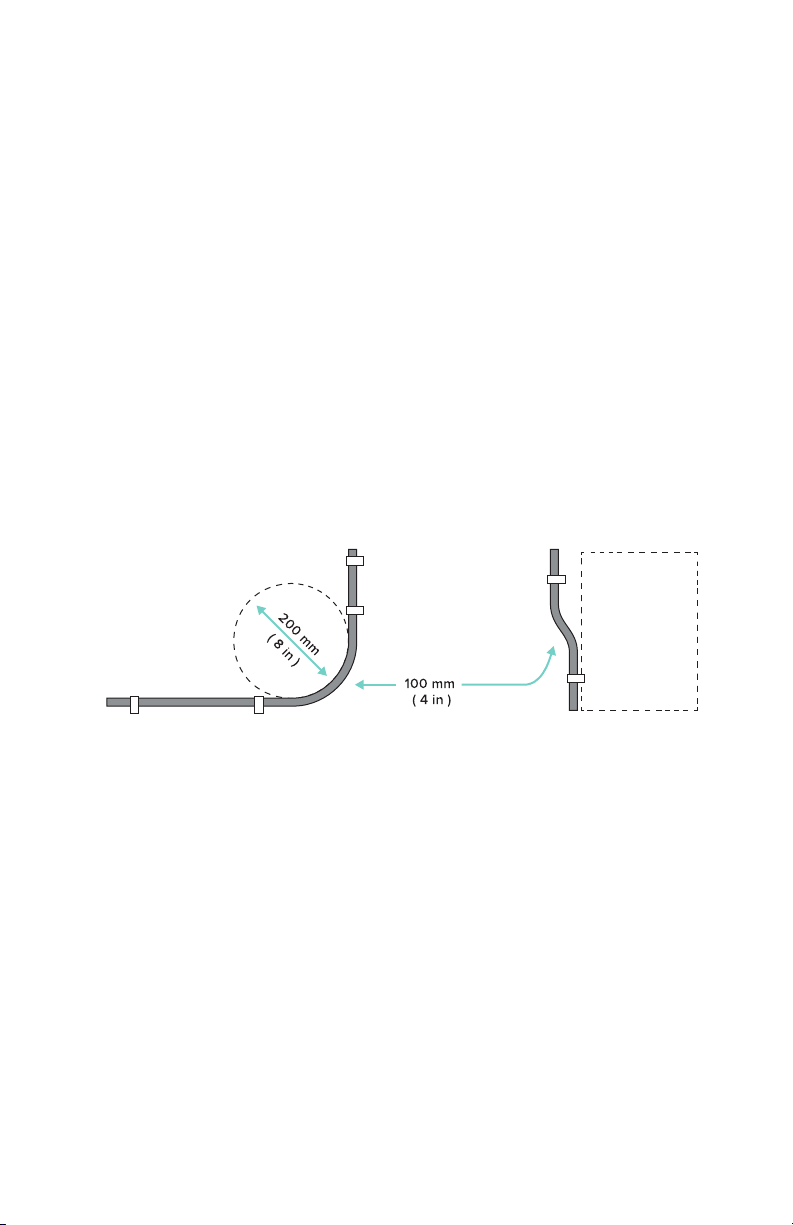
Routing Cables
Cables must be routed correctly, to maximize performance and prolong cable
life.
• Do NOT bend cables excessively. Wherever possible, ensure a minimum
bend diameter of 200 mm (8 in) / minimum bend radius of 100 mm (4 in).
• Protect all cables from physical damage and exposure to heat. Use trunking
or conduit where possible. Do NOT run cables through bilges or doorways,
or close to moving or hot objects.
• Secure cables in place using tie-wraps or lacing twine. Coil any extra cable
and tie it out of the way.
• Where a cable passes through an exposed bulkhead or deckhead, use a
suitable watertight feed- through.
• Do NOT run cables near engines or fluorescent lights.
• Always route data cables as far away as possible from other equipment and
cables, high current carrying AC and DC power lines, and antennas.

12 SIONYX NIGHTWAVE USER MANUAL
Strain Relief
Ensure adequate strain relief is provided. Protect connectors from strain and
ensure they will not pull out under extreme sea conditions.
Circuit Isolation
Appropriate circuit isolation is required for installations using both AC and DC
current:
• Always use isolating transformers or a separate power-inverter to run PC’s,
processors,displays and other sensitive electronic instruments or devices.
• Always use an isolating transformer with Weather FAX audio cables.
• Always use an isolated power supply when using a 3rd party audio amplifier.
• Always use an RS232/NMEA converter with optical isolation on the signal
lines.
• Always make sure that PC’s or other sensitive electronic devices have a
dedicated power circuit.

13INSTALLATION
VERSATILE MOUNTING INSTALLATION
LOCATION REQUIREMENTS
When planning the installation location, consider the following points:
• The camera is water-resistant, and appropriate for above decks mounting.
• When mounting the camera in a ball-down position, ensure that the camera
is installed with adequate drainage so that standing water does not collect
in the base.
• Ensure the camera is installed in a location that will allow it to be accessed
for regular periodic cleaning (fresh-water rinse), inspection of mounting
point integrity and mechanical soundness, and preventative maintenance.
• The underside (inside) of the compartment or deck on to which the camera
is mounted must be weather-tight. You must ensure protection from water
ingress to cables and connections.
• The mounting surface must be horizontal.
• The camera should be mounted as high as practical, but without interfering
with any radar, navigational or communications electronics.
• Choose a location that will provide the most unobstructed view in all
directions.
• Choose a location as close to the vessel’s center line as possible. This
provides a symmetrical view when looking forward or aft.
• Select a location for the camera that is at least 1 m (39.4 in.) from any
magnetic compass.
• Select a location that is at least 1 m (3 ft) from devices that may cause
interference, such as motors, generators and radio transmitters / receivers.
• If installing an optional JCU, select a location for the JCU that is at least 1 m
(39.4 in.) from any magnetic compass.
14 SIONYX NIGHTWAVE USER MANUAL
GETTING CONNECTED
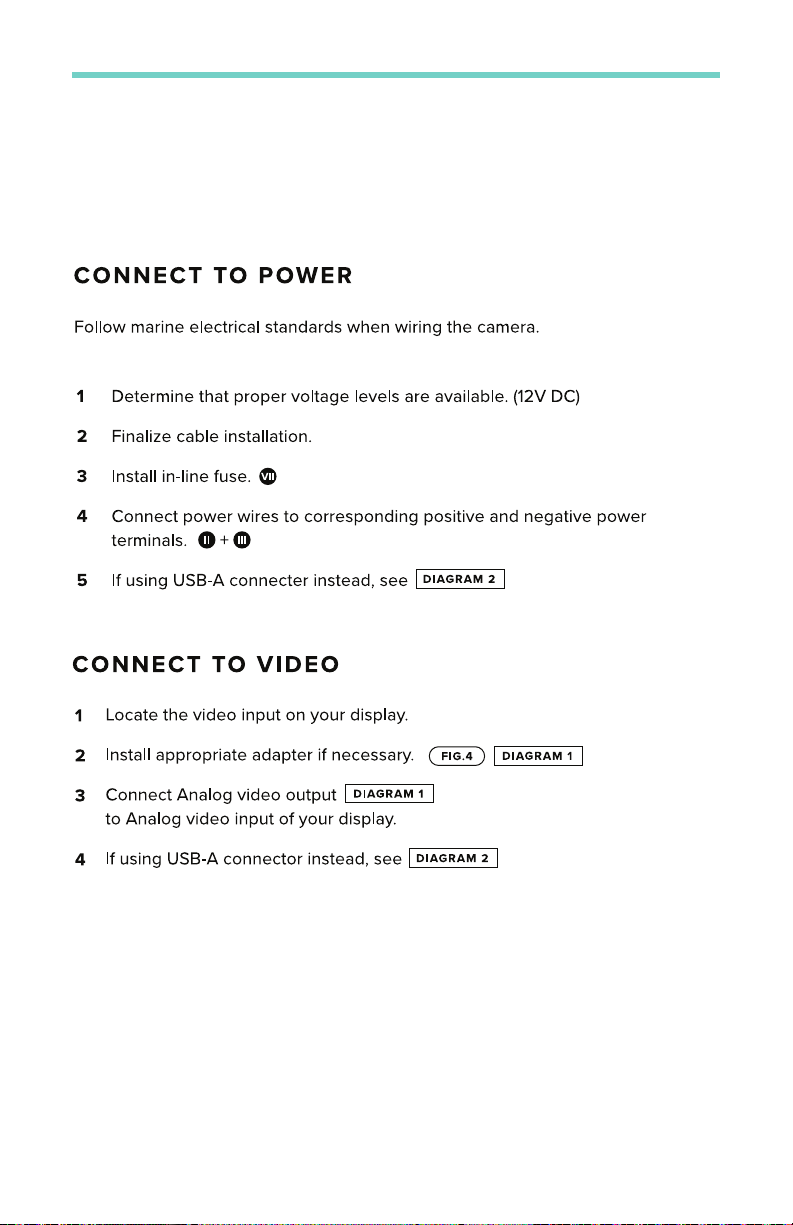
Must apply power output with < 100W DC power equipment.

15GETTING CONNECTED
I
II III
VI V
VII
IV
FIG. 4
VIII

16 SIONYX NIGHTWAVE USER MANUAL
Prior to installing Nightwave, please consider the following:
• Select an installation location as high as practical with minimum
obstructions.
• Select an installation location that is greater than 1m from any magnetic
compass.
• Select an installation location that is greater than 1m from any source of EMI
(electromagnetic interference; radio, generators, motors, radar).
• The mounting surface must be horizontal and level.
• Ensure the camera installation hardware does not weaken the boat’s
structure.
• Choose a drill size appropriate for the installation surface material and types
of fasteners.
• Ensure there are no hidden structures, wires or conduits beneath the install
area that may be damaged by the installation hardware.
• Ensure cable length and routing is adequate for installation location
interference. (Radio, generators, motors, radar)

17CAMERA SETUP
CAMERA SETUP
FIG. 5

18 SIONYX NIGHTWAVE USER MANUAL
SAFETY
IMPORTANT PRODUCT AND SAFETY INSTRUCTIONS
By using this product, you acknowledge that you have read and agree with this
‘Product and Safety Instructions’ document and Privacy Policy (www.sionyx.com/
privacy-policy.html). For more detailed information about camera features and
settings, download the user manual online at www.sionyx.com.
Read this guide for important safety and health information for the product that
you purchased.
WARNING
Failure to properly set up, use, and care for this product can increase the risk
of serious injury, death, property damage, or damage to the product or related
accessories. Exercise caution when using SIONYX products as part of your
active lifestyle. Always be aware of your surroundings to avoid injury to yourself
and others.
1. Read, keep, and follow these instructions.
2. Heed all warnings.
3. Protect the power cord from being walked on or pinched particularly at
plugs, convenience receptacles, and the point where they exit from the
apparatus.
4. Only use attachments and accessories specified by SIONYX.
5. Unplug this apparatus during lightning storms or when unused for long
periods of time.
6. Refer all servicing to qualified services personnel. Servicing is required
when the apparatus has been damaged in any way, such as when the
plug is damaged, liquid has been spilled or objects have fallen into the
apparatus, or the apparatus does not operate normally or has been
dropped.
Other manuals for Nightwave Series
1
Table of contents
Other Sionyx Digital Camera manuals

Popular Digital Camera manuals by other brands

Minox
Minox DC 5011 Operator's manual

Omron Microscan
Omron Microscan HAWK MV-4000 Series quick start guide

Panasonic
Panasonic DMCGF1 - DIGITAL STILL CAMERA Instrucciones de funcionamiento

Sony
Sony DSC-TX9 Cyber-shot® Service manual

Samsung
Samsung QUARTZ DATE AF ZOOM 777i manual

Toshiba
Toshiba PDR-M3 owner's manual


