Siser Romeo User manual

OPERATION MANUAL
MANUALE D’USO
HANDBUCH
MANUAL DEL USUARIO
MANUEL D'UTILISATION


READ SAFETY INSTRUCTIONS PRIOR TO SETUP OR USE
LEGGERE LE ISTRUZIONI DI SICUREZZA PRIMA DI CONFIGURARE
O UTILIZZARE IL PRODOTTO
BITTE LESEN SIE DIE SICHERHEITSANWEISUNGEN VOR DER
INSTALLATION ODER DEM ERSTEN GEBRAUCH
LEA ATENTAMENTE LA INFORMACIÓN DE SEGURIDAD ANTES
DE SU CONFIGURACIÓN YO USO.
LIRE LES INFORMATIONS DE SÉCURITÉ AVANT LA MISE
EN PLACE OU L'UTILISATION

UE DECLARATION OF CONFORMITY
The manufacturer: SISER S.R.L.
VIALE DELLA TECNICA, 18 – 36100 VICENZA (ITALY)
Declare under its own responsibility that the product:
Product: PLOTTER
Model: SISER ROMEO
Is compliant to the following harmonized standard:
• 60204-1:2018
Safety of machinery
Electrical equipment of machines
Part 1: General requirements
And respect the following UE Council Directive:
• Machinery Directive 2006/42/UE
• Low Voltage 2014/35/UE
• Electromagnetic Compatibility 2014/30/UE
Vicenza, lì 21/12/2022
Signed for SISER S.R.L.:
DR. CIRO VISONE, CEO

TABLE OF CONTENTS
GENERAL WARNINGS
OVERVIEW
SETUP
ROLL HOLDER SET UP
TOUCH SCREEN
SAFETY INFORMATION
FCC STATEMENT
12
34
57
8
913
1415
16
TABLE DES MATIÈRES
AVERTISSEMENTS GÉNÉRAUX
VUE D'ENSEMBLE
MISE EN PLACE
PORTEROULEAU
ÉCRAN TACTILE
INFORMATIONS SUR LA SÉCURITÉ
DÉCLARATION DE LA FCC
6566
6768
6971
72
7377
7879
80
ÍNDICE DE CONTENIDOS
ADVERTENCIAS GENERALES
PIEZAS DE LA MÁQUINA
CONFIGURACIÓN
CONFIGURACIÓN DEL PORTARROLLOS
PANTALLA TÁCTIL
INFORMACIÓN DE SEGURIDAD
DECLARACIÓN DE LA FCC
4950
5152
5355
56
5761
6263
64
INDICE
AVVERTENZE GENERALI
PANORAMICA
CONFIGURAZIONE
CONFIGURAZIONE DEL PORTAROTOLO
TOUCH SCREEN
INFORMAZIONI DI SICUREZZA
DICHIARAZIONE DI CONFORMITÀ FCC
1718
1920
2123
24
2529
3031
32
INHALTSVERZEICHNIS
ALLGEMEINE WARNUNGEN
ÜBERBLICK
EINRICHTEN
ROLLENHALTER KONFIGURATION
TOUCHSCREEN
SICHERHEITSINFORMATIONEN
KONFORMITÄTSERKLÄRUNG
3334
3536
3739
40
4145
4647
48
EN
FR
ES
IT
DE

ROMEO™ GENERAL WARNINGS
Siser S.r.l.
Viale della Tecnica, 18 - 36100 Vicenza - Italy
phone +39 0444 287960
fax +39 0444 287959
Thank you for buying one of our Siser ROMEOTM High-Definition Cutting
Machines. We are sure you will capitalize on this excellent unit for years if you
take the time to read these instructions carefully.
Introduction
Please study these instructions carefully before transporting, mounting, using
or maintaining the cutting machine, as they will give you important directions
for a safe handling. Moreover you will find information about how to order
spare parts in this manual.
Please retain these instructions for later reference in a safe, easily accessible
place.
Please make sure that all operators of the cutting machine have understood all
instructions and graphic symbols labelled on the press. Accidents can also be
avoided by strictly following the safety regulations according to the machine
directive 2006/42/CE, LVD 2014/30/CE and EMC 2014/30/CE.
It is specifically prohibited to remove or manipulate shrouds or legally
compulsory labels or plates.
The cutting machine has been designed in compliance with the principles of
the Machinery Directive. Already at the design stage, solutions have been
adopted that eliminate risks for the operator in all phases of use: transport,
regulation and maintenance. The materials used for the construction and the
components used are not dangerous and make the cutting machine
compliant with current regulations.
Siser is not liable for faults, accidents, damages, losses etc. resulting from not
following the instructions in this manual.
Note: It is strictly forbidden to operate or mount this cutting machine contrary
to the directions made in this manual.
Before operating the transfer press, the operator must have fully understood
the handling and function of the electric components of this cutting machine
and must have read and grasped all information provided in this manual.

Siser SRL is not liable for damages, losses, injuries or consequential damages
resulting from acts, changes or other use of the transfer press not authorised
by a prior written consent from Siser SRL.
All mounting, maintenance and repair work must be performed only by skilled
and specially trained electricians.
It is strictly prohibited to remove or manipulate any kind of safety appliances.
The working area must be clean, tidy and free of any obstacles for manoeu-
vring the cutting machine.
All general instructions for operation and all safety instructions must be strictly
followed to avoid any injuries that might result from the use of this cutting
machine and to ensure a successful utilisation.
The electrical connections must comply with local regulations.
Before mounting the cutting machine prepare a suitable mounting location.
Handle the package containing the cutting machine with care and with the
aid of suitable tools. For the mounting location you need a stable table with a
height of approximately 70 cm.
2
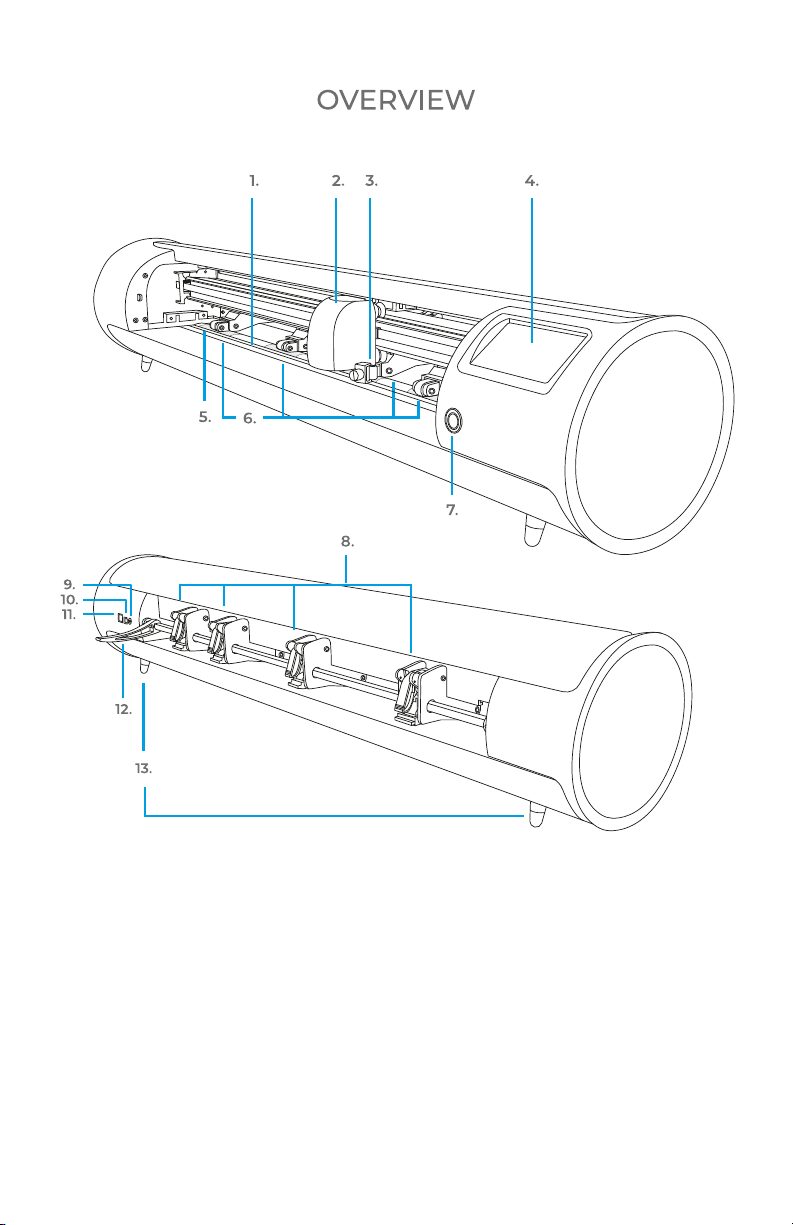
1.
Cutting Strip
2.
Machine Head
3.
Tool Holder
Holds cutting blade housing or
marker adapter
4.
Touch Screen
5. Grit Marks
6.
Adjustable Pinch Rollers
Feeds material in and out of the
cutter
7.
Power Button
8.
Pinch Roller Levers
Adjusts the tension of the pinch
rollers
9.
DC Power Port
10.
USB-B Port
Used for connecting cutter to a
computer
11.
USB-A Port
Used for connecting flash drives
to cutter
12. Roller Bar Lever
Locks down or releases material
under roller bar and allows pinch
rollers to be adjusted
13.
Raised Feet
3

4
POWER CORD AND
POWER SUPPLY
USB CORD
12”X12” 30X30CM CUTTING MAT
BLADE HOUSINGMARKER ADAPTER
12
11
10
9
8
7
6
5
4
3
2
1
0 1 2 3 4 5 6 7 8 9 10 11 12
12
11
10
9
8
7
6
5
4
3
2
1
0 1 2 3 4 5 6 7 8 9 10 11 12
Items shown are not to scale
TWO SHEETS OF 6”X12” 15X30CM
SISER®HEAT TRANSFER VINYL
ROLL HOLDER
ONE COVER SHEET
ALSO INCLUDED IN PACKAGING:
45º BLADE
2X
60º BLADE

ROMEO™ SETUP
Set up your cutter online at
setup.siser.com
OR SETUP MANUALLY USING THE
FOLLOWING INSTRUCTIONS
1Remove all protective packaging from cutter and
accessories, including plastic wrap.
2Plug the round end of the power cord into the DC
power port on the rear of the machine, then plug the
opposite end into a standard electrical outlet.
Press the power button to turn the cutter on.
5
Get the Leonardo Design StudioTM basic
monthly subscription for free with your
cutter purchase
3
Carefully remove 45° blade from
packaging and insert into socket
on blade housing with the
pointed side facing outwards.
4Twist the upper screw of the blade
housing clockwise to expose less of
the blade, or counterclockwise to
expose more of the blade. The
ideal length of exposed blade is
about a credit card’s width. Once
the blade is properly adjusted,
twist the inner screw to lock in the
blade position.
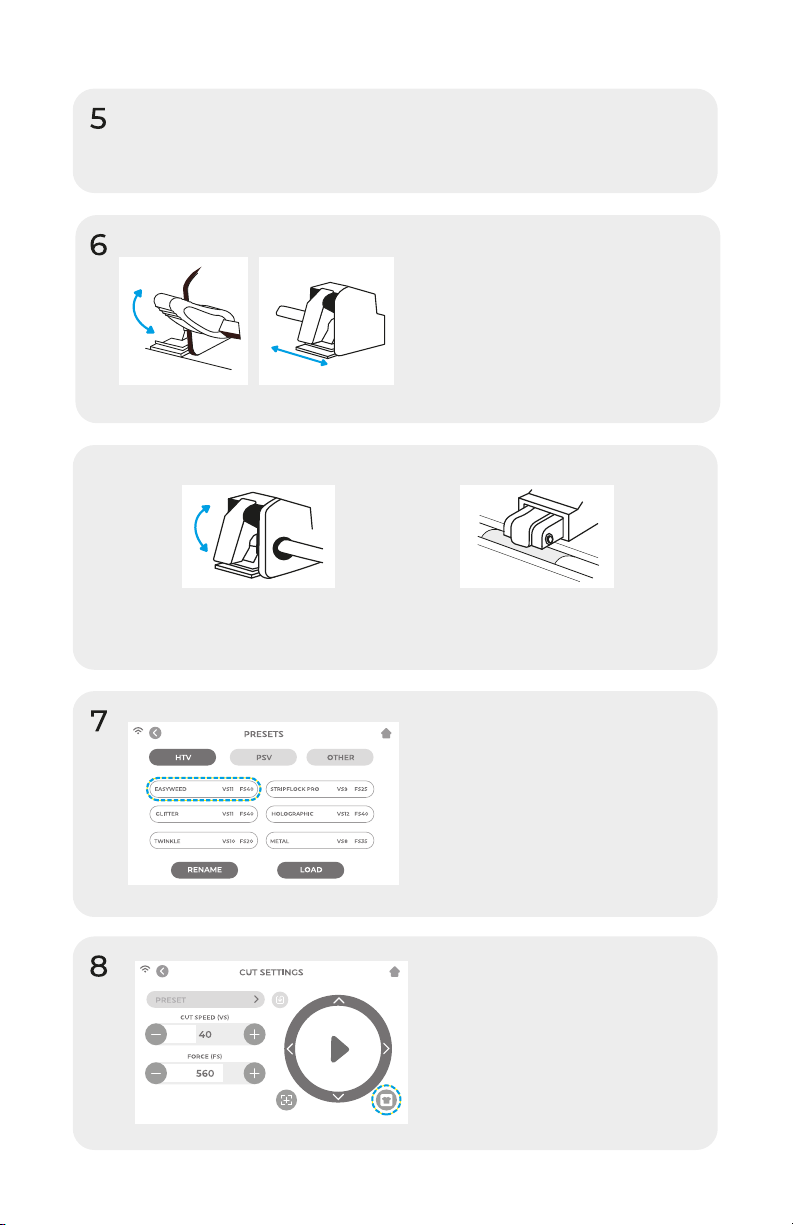
Lower the roller bar lever to
adjust the pinch rollers and
position as desired. Take
material or cutting mat and
align under the rollers. Raise
the roller bar lever to secure
the material or mat in place.
Insert blade housing into tool holder on the machine
head with the blade facing down. Turn the knob on
the tool holder clockwise to tighten.
Pinch Rollers
The pinch roller levers can be flipped
'up' to increase the tension of the
roller or 'down' to ease the tension.
Position pinch rollers over
the grit marks for optimal
traction.
Tap ‘Cut Settings’ on the
touch screen then tap the
current preset to view the
entire menu. Select the
preset that matches your
material to automatically
adjust the cut force and
speed.
Tap ‘Test Cut’ to cut a
small shape out of your
material to ensure the cut
settings are correct. After
testing, select the ‘Home’
icon to return to the
home screen.
6
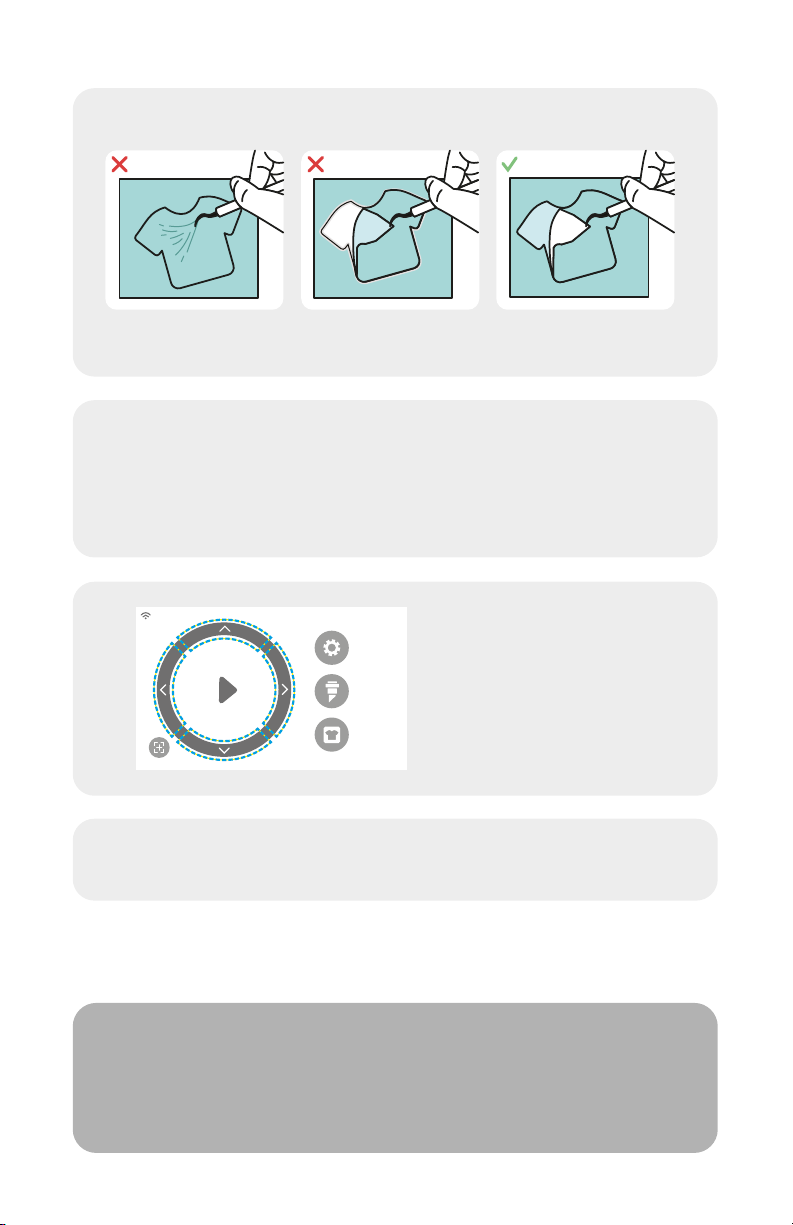
Identifying a Good Test Cut
9Once you’re ready to cut, plug in the USB flash drive
via the USB-A port on the rear of the cutter. Tap the
‘Settings’ button, then ‘USB’. Select your cut file*
from the drop down.
*Visit siser.com for info on accepted file types
7
10 Move the position of the
blade by using the
on-screen arrow buttons.
Once the blade is in
position, tap the play
button to begin cutting.
Congratulations! You’ve cut your first design! To learn
how to apply your design, visit www.siser.com
Ready to use your cutter to its full potential?
Access advanced designer tools, inspirational projects,
tutorials, and more by downloading
Leonardo Design StudioTM.
SETTINGS
CUT SETTINGS
TEST CUT
Cut not deep enough
and can’t be weeded
Material and carrier
cut through
Material cut and
carrier not cut through

ROLL HOLDER SET UP
1Position the Material Roll Holder behind Romeo™.
Place a material roll onto the rollers.
2Load the material through the back of the cutter,
giving the material some slack.
8
3Align the material with the guide strip and place
evenly under the pinch rollers for optimal tracking.
TOUCH SCREEN
SETTINGS
CUT SETTINGS
TEST CUT
HOME SCREEN
SETTINGS
CUT SETTINGS
TEST CUT
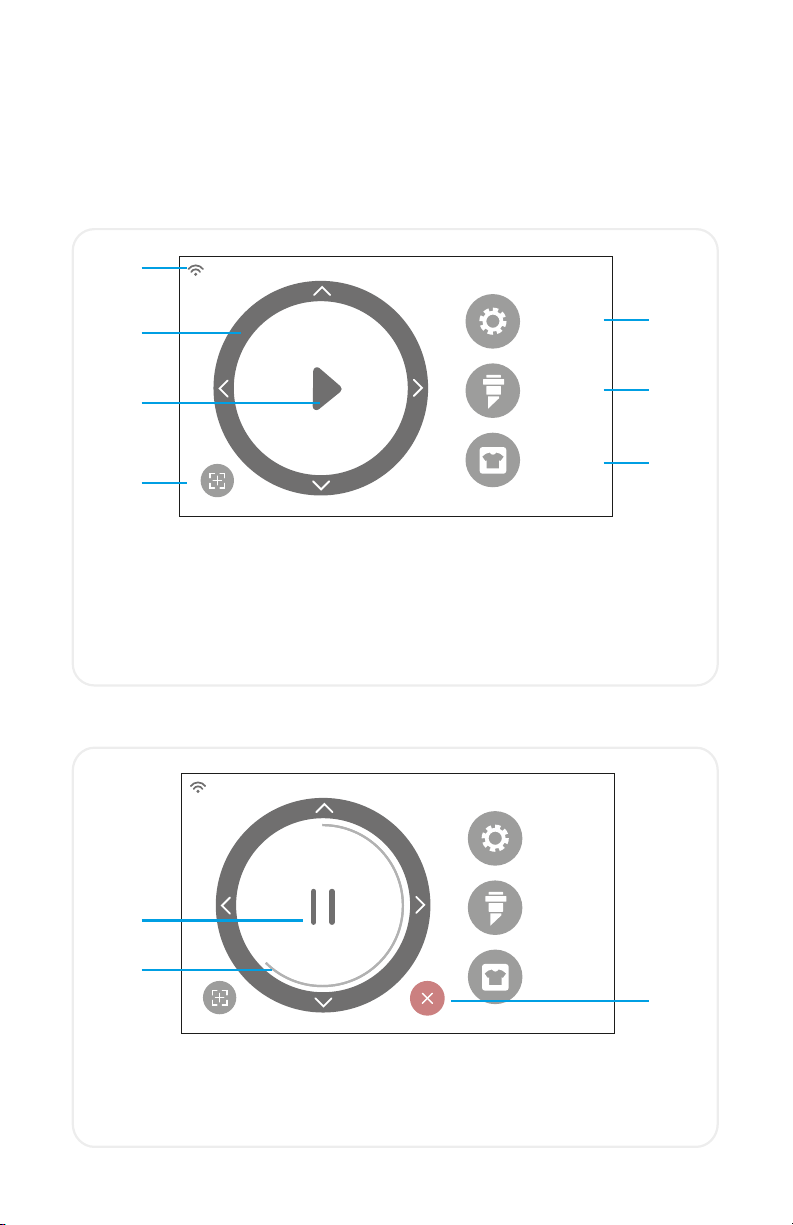
Navigate by tapping the touch screen to select an option or slide along a
bar to adjust values.
1.
2.
3.
4.
5.
6.
7.
1. WiFi Indicator - Displays WiFi connection status
2.
Directional Arrows - Moves material and machine head
3.
Play Button - Resumes cut or recuts the last known design
4. Tool Reorientation - Moves tool holder back to starting position
5. Settings - Opens cutter settings menu
6. Cut Settings - Opens presets menu with adjustable cut settings
7. Test Cut - Performs a test cut at the tool holder’s current position
HOME SCREEN JOB IN PROGRESS
1.
1.
Pause Button - Pauses job at current position
2.
Job Progress Bar - Displays progress of current job based on how
far the circle is completed
3. Cancel Button - Cancels current job
2.
3.
9

PRESET
CUT SPEED VS
FORCE FS
40
560
CUT SETTINGS
SETTINGS
GENERAL
SETTINGS
WIFI CAMERA USB SYSTEM
INFO
CUT SETTINGS
1. 2.
3.
4.
5.
SETTINGS
Access the various settings and functions of the cutter
1. General Settings - Opens general cutter settings menu
2. WiFi - Opens WiFi settings menu
3. Camera - Opens camera settings menu
4. USB - Opens USB menu for opening files from a USB flash drive
5. System Info - Displays system information
Adjust the cut settings of the cutter
1. Back Button - Returns to previous screen
2. Home Button - Returns to the Home Screen
3. Cutting Presets - Opens preset cutting menu
4. Cut Speed - Adjusts how fast the machine head moves
5. Force - Adjusts how much pressure the machine head exerts
6. Update Preset - Overwrites preset with the current settings
1. 2. 3. 4. 5.
6.
10

WIFI
NETWORK NAME SCAN
PASSWORD
NETWORK NAME
PASSWORD123
IP ADDRESS xxx.xxx.xxx.200
APPLY
DEFAULT
CONNECTED: SISER 111.222.3.444
GENERAL SETTINGS
LED ALERT SLEEP UNIT LANGUAGE
GENERAL SETTINGS
1. 2. 3. 4. 5.
Make general adjustments to your cutter
1. LED - Turn the LED ON/OFF and adjust the brightness
2. Alert - Turn the chime and/or LED ON/OFF that indicates a
completed job
3. Sleep - Set how much time of inactivity will put the cutter to sleep
4. Unit - Choose between metric and imperial measurements
5.
Language - Select desired language
WIFI
Set up the cutter’s wireless connection
1.
Scan - Searches for available WiFi networks that the cutter can
connect to
2. Eye Button - Shows or hides the password entered
3. IP Address - Manually enter an IP Address
4. Apply - Uses the manually entered IP Address to connect
5. Default - Switch WiFi to Hotspot mode
1.
2.
3.
4.
5.
11
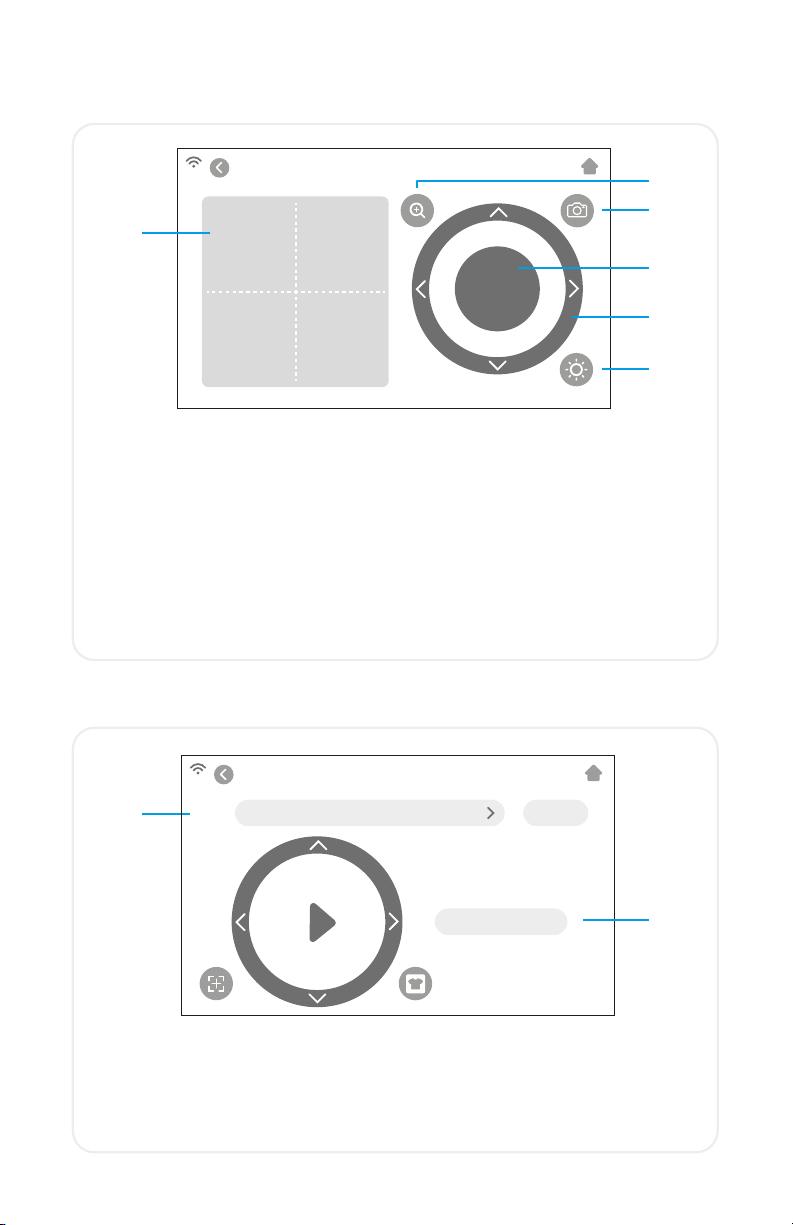
CAMERA
OK
CAMERA
1.
2.
Use the camera for accurate tool registration
1. Registration Snapshot - Crosshair overlay offers a visual preview
of the tool orientation
2. Zoom - Zooms in or out on the current snapshot
3. Camera Snapshot - Takes a snapshot at the tool’s current
position
4. OK - Sets tool position
5. Directional Arrows - Moves the machine head and material for
a different camera view
6. Camera Light - Changes the brightness of the camera light
3.
6.
4.
5.
USB DRIVE
1.
Access cut files from a connected USB drive
1. File selection - Displays folders and files on connected USB flash
drive so the desired cut file can be opened
2. Start cut - Starts job using current settings
USB DRIVE
FILE FOLDER NAME OPEN
START CUT 2.
12

SYSTEM INFORMATION
MODE: 024
HVER: V7.1201
SVER: V20.0811
MPID: 087C872646440768
BAUD: 67800L
DEFAULT ALL SETTINGS
SYSTEM INFORMATION
1.
Displays cutter system information
1. Default All Settings - Resets all cutter settings to factory settings,
including cutting presets.
*Touch screen in actual product may differ from shown images
13

SAFETY INFORMATION
Please read all safety information before product use.
Warning: Risk of Injury, Fire, and Electric Shock
Use of the product in a manner not outlined in this document or
other official material provided by Siser®, may result in damage to
the product, property damage, injuries or fatal injury.
For Indoor Use Only
The product is to be used and stored in dry indoor locations only,
that are kept between 5°C and 35°C. Do not operate product in or
near liquids.
This product is not a toy and is intended to be operated by an adult. Not
intended for use by children 12 years or under. Children must be supervised
around the product.
Do not operate the product if damaged or malfunctioning.
Use this product on a level and stable surface, allowing for enough space in
front of and behind the product for proper operation.
Use only the power cord and power supply provided with this product or other-
wise provided by Siser®for the specific purpose of replacing the provided
power cord and power supply. Do not use the power cord or power supply if
damaged.
The power cord and power supply must be fully inserted into the outlet and
cutter. The product should not be placed on the power cord, and the power
cord and power supply should be positioned to avoid a tripping hazard or
impeding the cutting process.
Disconnect the product from electrical power by unplugging the power cord
from the electrical outlet; always grasping the plug and never the cord.
Always turn the product off before unplugging from the electrical outlet.
Disconnect the product from electrical power when the product is not in use,
before cleaning or servicing the product, and when replacing the cutting
blade.
To avoid injury, use caution when handling the cutting blades and do not
touch the sharp edge. Cutting blades should be stored and kept out of reach of
children.
14

Do not use a broken blade. Remove the broken blade from the blade housing
with tweezers.
Do not load unintended materials onto the cutting mat or into the cutter.
Keep objects, hair, loose jewelry, clothing, and fingers away from the product
when it is operating, as injuries may result from the rapid movements.
Do not touch the cutting mat or materials when the product is operating until
the cutting mat or materials are unloaded from the product.
Do not place fingers or other objects inside the product, or near any moving
parts, while powered on, connected to electrical power, or while operating.
Do not use solvents, such as thinner, alcohol, or nail polish remover to clean the
product as it may damage the product’s finish or touch screen. Clean the
product with a soft, dry cloth.
Any plastic bags used in packaging of this product should be kept out of reach
of children or properly disposed of.
Do not disassemble, modify or otherwise alter the product.
If product malfunctions or becomes damaged, do not attempt to repair.
Please contact Siser by calling +39
0444 287960
or visit
www.siser.com
for
more information.
15
Table of contents
Languages:
Other Siser Cutter manuals


