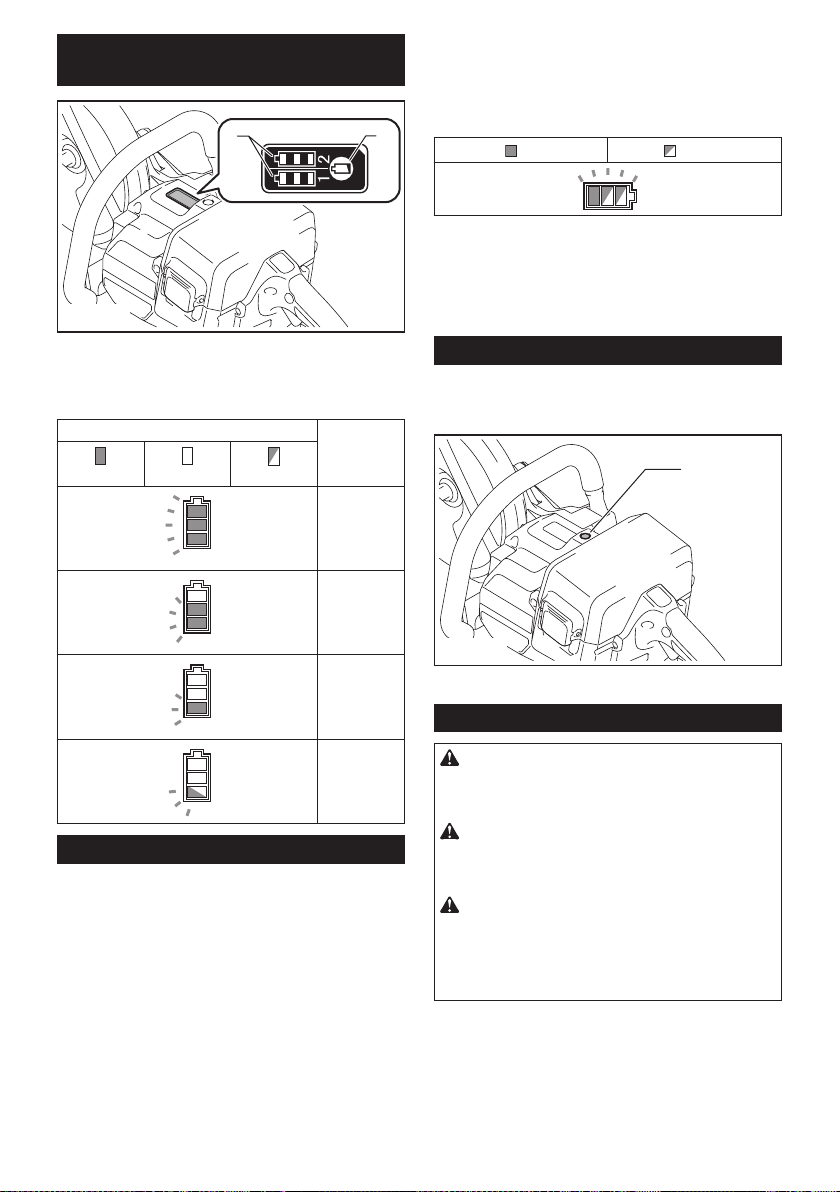
Makita DCE090 User manual

INSTRUCTION MANUAL
Cordless Power Cutter
DCE090
ENGLISH: Original instructions
Read before use.

2ENGLISH
SPECIFICATIONS
Model: DCE090
Wheel diameter 230 mm
Max. wheel thickness 3.0 mm
Max.cutting depth 88 mm
Rated speed 6,600 min-1
Rated voltage D.C. 36 V
Max. permitted pressure of feed-water 5.0 bars
Overall length 554 mm
Net weight 5.6 - 6.3 kg
• Duetoourcontinuingprogramofresearchanddevelopment,thespecicationshereinaresubjecttochange
without notice.
• Specicationsmaydierfromcountrytocountry.
• Theweightmaydierdependingontheattachment(s),includingthebatterycartridge.Thelightestandheavi-
est combination, according to EPTA-Procedure 01/2014, are shown in the table.
Applicable battery cartridge and charger
Batterycartridge BL1815N / BL1820 / BL1820B / BL1830 / BL1830B / BL1840 /
BL1840B / BL1850 / BL1850B / BL1860B
Charger DC18RC / DC18RD / DC18RE / DC18SD / DC18SE / DC18SF /
DC18SH
• Someofthebatterycartridgesandchargerslistedabovemaynotbeavailabledependingonyourregionof
residence.
WARNING: Only use the battery cartridges and chargers listed above.Useofanyotherbatterycartridges
andchargersmaycauseinjuryand/orre.
Symbols
Thefollowingsshowthesymbolswhichmaybeused
fortheequipment.Besurethatyouunderstandtheir
meaning before use.
Read instruction manual.
Wearsafetyglasses.
Ni-MH
Li-ion OnlyforEUcountries
Do not dispose of electric equipment or
batterypacktogetherwithhouseholdwaste
material!
In observance of the European Directives,
on Waste Electric and Electronic
Equipment and Batteries andAccumulators
and Waste Batteries andAccumulators
and their implementation in accordance
with national laws, electric equipment and
batteriesandbatterypack(s)thathave
reached the end of their life must be col-
lectedseparatelyandreturnedtoanenvi-
ronmentallycompatiblerecyclingfacility.
Intended use
The tool is intended for cutting in metal materials with a
abrasivecut-owheelandalsomasonrymaterialswith
a diamond wheel.
SAFETY WARNINGS
General power tool safety warnings
WARNING: Read all safety warnings, instruc-
tions, illustrations and specications provided
with this power tool. Failure to follow all instructions
listedbelowmayresultinelectricshock,reand/or
seriousinjury.
Save all warnings and instruc-
tions for future reference.
Theterm"powertool"inthewarningsreferstoyour
mains-operated(corded)powertoolorbattery-operated
(cordless)powertool.

3ENGLISH
Work area safety
1. Keep work area clean and well lit. Cluttered or
dark areas invite accidents.
2. Do not operate power tools in explosive atmo-
spheres, such as in the presence of ammable
liquids, gases or dust. Power tools create sparks
whichmayignitethedustorfumes.
3. Keep children and bystanders away while
operating a power tool. Distractions can cause
youtolosecontrol.
Electrical safety
1. Power tool plugs must match the outlet. Never
modify the plug in any way. Do not use any
adapter plugs with earthed (grounded) power
tools. Unmodiedplugsandmatchingoutletswill
reduce risk of electric shock.
2. Avoid body contact with earthed or grounded
surfaces, such as pipes, radiators, ranges and
refrigerators. There is an increased risk of elec-
tricshockifyourbodyisearthedorgrounded.
3. Do not expose power tools to rain or wet con-
ditions. Water entering a power tool will increase
the risk of electric shock.
4. Do not abuse the cord. Never use the cord for
carrying, pulling or unplugging the power tool.
Keep cord away from heat, oil, sharp edges
or moving parts. Damaged or entangled cords
increase the risk of electric shock.
5.
When operating a power tool outdoors, use an
extension cord suitable for outdoor use. Use of a cord
suitable for outdoor use reduces the risk of electric shock.
6. If operating a power tool in a damp location
is unavoidable, use a residual current device
(RCD) protected supply. Use of an RCD reduces
the risk of electric shock.
7.
Power tools can produce electromagnetic elds
(EMF) that are not harmful to the user. However,
users of pacemakers and other similar medical
devices should contact the maker of their device and/
or doctor for advice before operating this power tool.
Personal safety
1. Stay alert, watch what you are doing and use
common sense when operating a power tool.
Do not use a power tool while you are tired or
under the inuence of drugs, alcohol or med-
ication. Amoment of inattention while operating
powertoolsmayresultinseriouspersonalinjury.
2. Use personal protective equipment. Always
wear eye protection. Protective equipment such
asadustmask,non-skidsafetyshoes,hardhator
hearing protection used for appropriate conditions
willreducepersonalinjuries.
3. Prevent unintentional starting. Ensure the
switch is in the o-position before connecting
to power source and/or battery pack, picking
up or carrying the tool.Carryingpowertoolswith
yourngerontheswitchorenergisingpowertools
that have the switch on invites accidents.
4.
Remove any adjusting key or wrench before turning
the power tool on.Awrenchorakeyleftattachedtoa
rotatingpartofthepowertoolmayresultinpersonalinjury.
5. Do not overreach. Keep proper footing and
balance at all times. This enables better control
of the power tool in unexpected situations.
6. Dress properly. Do not wear loose clothing or
jewellery. Keep your hair and clothing away
from moving parts.Looseclothes,jewelleryor
long hair can be caught in moving parts.
7. If devices are provided for the connection of
dust extraction and collection facilities, ensure
these are connected and properly used. Use of
dust collection can reduce dust-related hazards.
8.
Do not let familiarity gained from frequent use
of tools allow you to become complacent and
ignore tool safety principles.A careless action can
causesevereinjurywithinafractionofasecond.
9. Always wear protective goggles to protect
your eyes from injury when using power tools.
The goggles must comply with ANSI Z87.1 in
the USA, EN 166 in Europe, or AS/NZS 1336
in Australia/New Zealand. In Australia/New
Zealand, it is legally required to wear a face
shield to protect your face, too.
It is an employer's responsibility to enforce
the use of appropriate safety protective equip-
ments by the tool operators and by other per-
sons in the immediate working area.
Power tool use and care
1. Do not force the power tool. Use the correct
power tool for your application. The correct
powertoolwilldothejobbetterandsaferatthe
rate for which it was designed.
2. Do not use the power tool if the switch does
not turn it on and o.Anypowertoolthatcannot
be controlled with the switch is dangerous and
must be repaired.
3. Disconnect the plug from the power source
and/or remove the battery pack, if detachable,
from the power tool before making any adjust-
ments, changing accessories, or storing power
tools.Suchpreventivesafetymeasuresreduce
theriskofstartingthepowertoolaccidentally.
4.
Store idle power tools out of the reach of children and
do not allow persons unfamiliar with the power tool
or these instructions to operate the power tool. Power
tools are dangerous in the hands of untrained users.
5. Maintain power tools and accessories. Check
for misalignment or binding of moving parts,
breakage of parts and any other condition that
may aect the power tool’s operation. If dam-
aged, have the power tool repaired before use.
Manyaccidentsarecausedbypoorlymaintained
power tools.

4ENGLISH
6. Keep cutting tools sharp and clean.Properly
maintained cutting tools with sharp cutting edges
arelesslikelytobindandareeasiertocontrol.
7. Use the power tool, accessories and tool bits
etc. in accordance with these instructions, tak-
ing into account the working conditions and
the work to be performed. Use of the power tool
foroperationsdierentfromthoseintendedcould
result in a hazardous situation.
8. Keep handles and grasping surfaces dry,
clean and free from oil and grease.Slippery
handles and grasping surfaces do not allow for
safe handling and control of the tool in unexpected
situations.
9. When using the tool, do not wear cloth work
gloves which may be entangled. The entangle-
mentofclothworkglovesinthemovingpartsmay
resultinpersonalinjury.
Battery tool use and care
1. Recharge only with the charger specied by
the manufacturer. Acharger that is suitable for
onetypeofbatterypackmaycreateariskofre
whenusedwithanotherbatterypack.
2. Use power tools only with specically desig-
nated battery packs.Useofanyotherbattery
packsmaycreateariskofinjuryandre.
3. When battery pack is not in use, keep it away
from other metal objects, like paper clips,
coins, keys, nails, screws or other small metal
objects, that can make a connection from one
terminal to another.Shortingthebatterytermi-
nalstogethermaycauseburnsorare.
4. Under abusive conditions, liquid may be
ejected from the battery; avoid contact. If con-
tact accidentally occurs, ush with water. If
liquid contacts eyes, additionally seek medical
help.Liquidejectedfromthebatterymaycause
irritation or burns.
5. Do not use a battery pack or tool that is dam-
aged or modied.Damagedormodiedbatteries
mayexhibitunpredictablebehaviourresultingin
re,explosionorriskofinjury.
6. Do not expose a battery pack or tool to re or
excessive temperature.Exposuretoreortem-
peratureabove130°Cmaycauseexplosion.
7. Follow all charging instructions and do not
charge the battery pack or tool outside the
temperature range specied in the instruc-
tions.Chargingimproperlyorattemperatures
outsidethespeciedrangemaydamagethe
batteryandincreasetheriskofre.
Service
1. Have your power tool serviced by a qualied
repair person using only identical replacement
parts.Thiswillensurethatthesafetyofthepower
tool is maintained.
2. Never service damaged battery packs. Service
ofbatterypacksshouldonlybeperformedbythe
manufacturer or authorized service providers.
3. Follow instruction for lubricating and chang-
ing accessories.
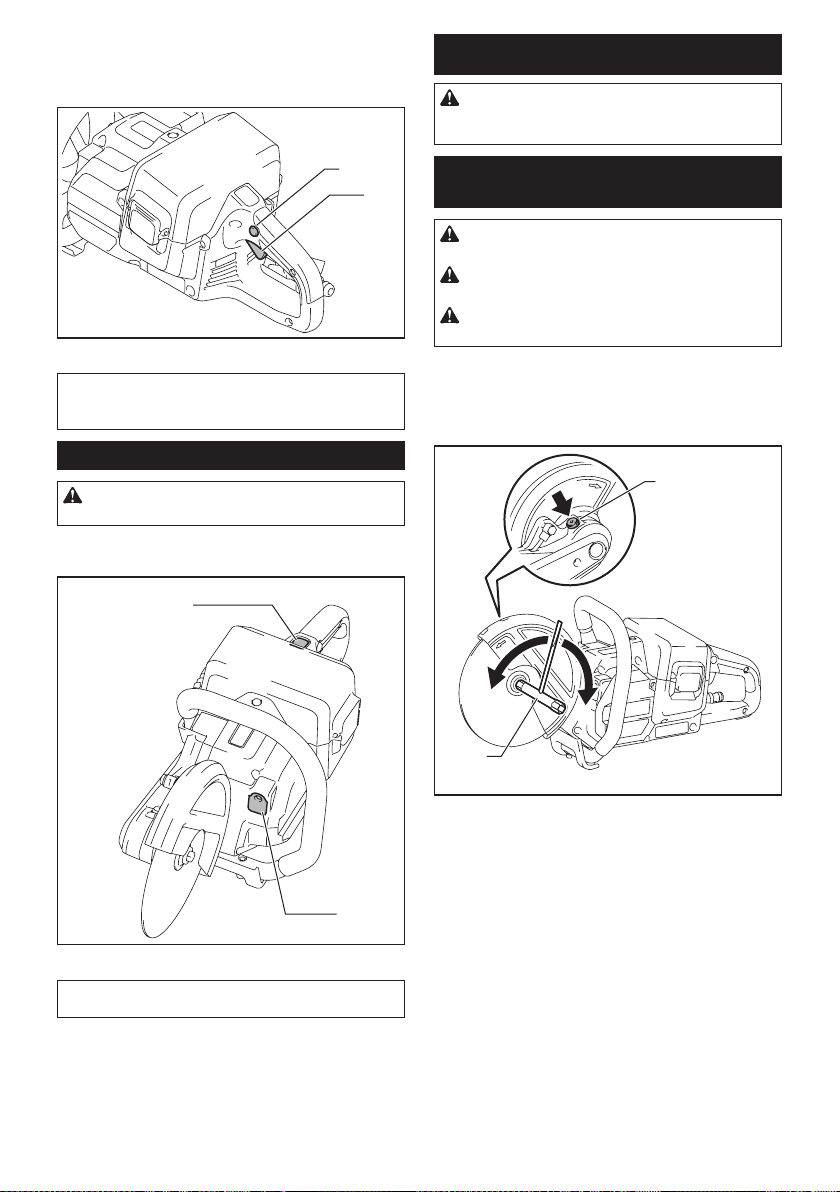
Cordless cutter safety warnings
1. The guard provided with the tool must be
securely attached to the power tool and
positioned for maximum safety, so the least
amount of wheel is exposed towards the oper-
ator. Position yourself and bystanders away
from the plane of the rotating wheel. The guard
helps to protect operator from broken wheel frag-
ments and accidental contact with wheel.
2. Use only bonded reinforced or diamond cut-o
wheels for your power tool. Just because an
accessorycanbeattachedtoyourpowertool,it
does not assure safe operation.
3. The rated speed of the accessory must be at
least equal to the maximum speed marked on
the power tool. Accessories running faster than
theirratedspeedcanbreakandyapart.
4. Wheels must be used only for recommended
applications. For example: do not grind with
the side of cut-o wheel.Abrasivecut-owheels
are intended for peripheral grinding, side forces
appliedtothesewheelsmaycausethemto
shatter.
5. Always use undamaged wheel anges that are
of correct diameter for your selected wheel.
Properwheelangessupportthewheelthus
reducingthepossibilityofwheelbreakage.
6. Do not use worn down reinforced wheels from
larger power tools. Wheels intended for a larger
power tool are not suitable for the higher speed of
asmallertoolandmayburst.
7. The outside diameter and the thickness of your
accessory must be within the capacity rating
of your power tool.Incorrectlysizedaccessories
cannotbeadequatelyguardedorcontrolled.
8. The arbour size of wheels and anges must
properly t the spindle of the power tool.
Wheelsandangeswitharbourholesthatdonot
match the mounting hardware of the power tool
willrunoutofbalance,vibrateexcessivelyand
maycauselossofcontrol.
9. Do not use damaged wheels. Before each
use, inspect the wheels for chips and cracks.
If power tool or wheel is dropped, inspect for
damage or install an undamaged wheel. After
inspecting and installing the wheel, position
yourself and bystanders away from the plane
of the rotating wheel and run the power tool
at maximum no load speed for one minute.
Damagedwheelswillnormallybreakapartduring
this test time.
10. Wear personal protective equipment.
Depending on application, use face shield,
safety goggles or safety glasses. As appro-
priate, wear dust mask, hearing protectors,
gloves and shop apron capable of stopping
small abrasive or workpiece fragments. The
eyeprotectionmustbecapableofstoppingying
debrisgeneratedbyvariousoperations.Thedust
maskorrespiratormustbecapableofltrating
particlesgeneratedbyyouroperation.Prolonged
exposuretohighintensitynoisemaycausehear-
ing loss.

5ENGLISH
11. Keep bystanders a safe distance away from
work area. Anyone entering the work area
must wear personal protective equipment.
Fragmentsofworkpieceorofabrokenwheelmay
yawayandcauseinjurybeyondimmediatearea
of operation.
12. Hold the power tool by insulated gripping
surfaces only, when performing an operation
where the cutting accessory may contact hid-
den wiring.Cuttingaccessorycontactinga“live”
wiremaymakeexposedmetalpartsofthepower
tool“live”andcouldgivetheoperatoranelectric
shock.
13. Never lay the power tool down until the acces-
sory has come to a complete stop. The spinning
wheelmaygrabthesurfaceandpullthepower
tooloutofyourcontrol.
14. Do not run the power tool while carrying it at
your side.Accidental contact with the spinning
accessorycouldsnagyourclothing,pullingthe
accessoryintoyourbody.
15. Regularly clean the power tool’s air vents. The
motor’s fan will draw the dust inside the housing
and excessive accumulation of powdered metal
maycauseelectricalhazards.
16. Do not operate the power tool near ammable
materials. Sparks could ignite these materials.
Kickback and related warnings
Kickback is a sudden reaction to a pinched or snagged
rotating wheel. Pinching or snagging causes rapid
stalling of the rotating wheel which in turn causes the
uncontrolled power tool to be forced in the direction
opposite of the wheel’s rotation at the point of the
binding.
For example, if an abrasive wheel is snagged or
pinchedbytheworkpiece,theedgeofthewheelthatis
entering into the pinch point can dig into the surface of
the material causing the wheel to climb out or kick out.
Thewheelmayeitherjumptowardorawayfromthe
operator, depending on direction of the wheel’s move-
mentatthepointofpinching.Abrasivewheelsmayalso
break under these conditions.
Kickback is the result of power tool misuse and/or
incorrect operating procedures or conditions and can be
avoidedbytakingproperprecautionsasgivenbelow.
1. Maintain a rm grip on the power tool and
position your body and arm to allow you to
resist kickback forces. Always use auxiliary
handle, if provided, for maximum control over
kickback or torque reaction during start-up.
The operator can control torque reactions or kick-
back forces, if proper precautions are taken.
2. Never place your hand near the rotating acces-
sory.Accessorymaykickbackoveryourhand.
3. Do not position your body in line with the
rotating wheel. Kickback will propel the tool in
direction opposite to the wheel’s movement at the
point of snagging.
4. Use special care when working corners, sharp
edges etc. Avoid bouncing and snagging the
accessory. Corners, sharp edges or bouncing
haveatendencytosnagtherotatingaccessory
and cause loss of control or kickback.
5.
Do not attach a saw chain, woodcarving blade,
segmented diamond wheel with a peripheral gap
greater than 10 mm or toothed saw blade. Such
blades create frequent kickback and loss of control.
6. Do not “jam” the wheel or apply excessive
pressure. Do not attempt to make an excessive
depth of cut. Overstressing the wheel increases
theloadingandsusceptibilitytotwistingorbinding
ofthewheelinthecutandthepossibilityofkick-
back or wheel breakage.
7. When wheel is binding or when interrupting
a cut for any reason, switch o the power
tool and hold the power tool motionless until
the wheel comes to a complete stop. Never
attempt to remove the wheel from the cut while
the wheel is in motion otherwise kickback may
occur. Investigate and take corrective action to
eliminate the cause of wheel binding.
8. Do not restart the cutting operation in the
workpiece. Let the wheel reach full speed and
carefully re-enter the cut.Thewheelmaybind,
walk up or kickback if the power tool is restarted in
the workpiece.
9. Support panels or any oversized workpiece to
minimize the risk of wheel pinching and kick-
back. Large workpieces tend to sag under their
own weight. Supports must be placed under the
workpiece near the line of cut and near the edge
of the workpiece on both sides of the wheel.
10. Use extra caution when making a “pocket cut”
into existing walls or other blind areas. The
protrudingwheelmaycutgasorwaterpipes,elec-
tricalwiringorobjectsthatcancausekickback.
Additional Safety Warnings:
1. Before using a segmented diamond wheel,
make sure that the diamond wheel has the
peripheral gap between segments of 10 mm or
less, only with a negative rake angle.
2. Never attempt to cut with the tool held upside
down in a vise. This can lead to serious acci-
dents, because it is extremely dangerous.
3. Some material contains chemicals which may
be toxic. Take caution to prevent dust inhala-
tion and skin contact. Follow material supplier
safety data.
4. Store wheels as per manufacturer recommen-
dations. Improper storage may damage the
wheels.
5. Always use the wheel suitable for your work
and the material to be cut.
6. Examine the material to be cut before cutting.
Ifthematerialcontainsexplosiveorammable
substances,itmaycauseanexplosionorre.
7. Do not switch on the tool if a foreign object
is jammed between the guard and the wheel.
Inthiscase,uninstallthebatterycartridgeand
removetheforeignobject.
8. Use clamps or similar to support the work-
piece whenever possible.
9. Always wear hearing protection during
operation.
10. Do not cut wood materials with this tool.
SAVE THESE INSTRUCTIONS.

6ENGLISH
WARNING: DO NOT let comfort or familiarity
with product (gained from repeated use) replace
strict adherence to safety rules for the subject
product. MISUSE or failure to follow the safety
rules stated in this instruction manual may cause
serious personal injury.
Important safety instructions for
battery cartridge
1. Before using battery cartridge, read all instruc-
tions and cautionary markings on (1) battery
charger, (2) battery, and (3) product using
battery.
2. Do not disassemble or tamper the battery
cartridge.Itmayresultinare,excessiveheat,
or explosion.
3. If operating time has become excessively
shorter, stop operating immediately. It may
result in a risk of overheating, possible burns
and even an explosion.
4. If electrolyte gets into your eyes, rinse them
out with clear water and seek medical atten-
tion right away. It may result in loss of your
eyesight.
5. Do not short the battery cartridge:
(1) Do not touch the terminals with any con-
ductive material.
(2) Avoid storing battery cartridge in a con-
tainer with other metal objects such as
nails, coins, etc.
(3) Do not expose battery cartridge to water
or rain.
A battery short can cause a large current
ow, overheating, possible burns and even a
breakdown.
6. Do not store and use the tool and battery car-
tridge in locations where the temperature may
reach or exceed 50 °C (122 °F).
7. Do not incinerate the battery cartridge even if
it is severely damaged or is completely worn
out. The battery cartridge can explode in a re.
8. Do not nail, cut, crush, throw, drop the battery
cartridge, or hit against a hard object to the
battery cartridge.Suchconductmayresultina
re,excessiveheat,orexplosion.
9. Do not use a damaged battery.
10. The contained lithium-ion batteries are subject
to the Dangerous Goods Legislation require-
ments.
Forcommercialtransportse.g.bythirdparties,
forwarding agents, special requirement on pack-
aging and labeling must be observed.
For preparation of the item being shipped, consult-
ing an expert for hazardous material is required.
Pleasealsoobservepossiblymoredetailed
national regulations.
Tapeormaskoopencontactsandpackupthe
batteryinsuchamannerthatitcannotmove
around in the packaging.
11. When disposing the battery cartridge, remove
it from the tool and dispose of it in a safe
place. Follow your local regulations relating to
disposal of battery.
12. Use the batteries only with the products
specied by Makita. Installing the batteries to
non-compliantproductsmayresultinare,exces-
siveheat,explosion,orleakofelectrolyte.
13. If the tool is not used for a long period of time,
the battery must be removed from the tool.
14. During and after use, the battery cartridge may
take on heat which can cause burns or low
temperature burns. Pay attention to the han-
dling of hot battery cartridges.
15. Do not touch the terminal of the tool imme-
diately after use as it may get hot enough to
cause burns.
16. Do not allow chips, dust, or soil stuck into the
terminals, holes, and grooves of the battery
cartridge.Itmayresultinpoorperformanceor
breakdownofthetoolorbatterycartridge.
17. Unless the tool supports the use near
high-voltage electrical power lines, do not use
the battery cartridge near high-voltage electri-
cal power lines.Itmayresultinamalfunctionor
breakdownofthetoolorbatterycartridge.
18. Keep the battery away from children.
SAVE THESE INSTRUCTIONS.
CAUTION: Only use genuine Makita batteries.
Use of non-genuine Makita batteries, or batteries that
havebeenaltered,mayresultinthebatterybursting
causingres,personalinjuryanddamage.Itwill
alsovoidtheMakitawarrantyfortheMakitatooland
charger.
Tips for maintaining maximum
battery life
1. Charge the battery cartridge before completely
discharged. Always stop tool operation and
charge the battery cartridge when you notice
less tool power.
2. Never recharge a fully charged battery car-
tridge. Overcharging shortens the battery
service life.
3. Charge the battery cartridge with room tem-
perature at 10 °C - 40 °C (50 °F - 104 °F). Let
a hot battery cartridge cool down before
charging it.
4. When not using the battery cartridge, remove
it from the tool or the charger.
5. Charge the battery cartridge if you do not use
it for a long period (more than six months).

7ENGLISH
PARTS DESCRIPTION
18
1
23 4
98
6
5
7
10
11
12
14 15
17
13
16
19
20
1Abrasivecut-owheel/
diamond wheel 2Wheel guard 3Grip 4Cover(forbattery
compartment)
5Lock-obutton 6Hook 7Lamp 8Check button
9Batteryindicator 10 Overload indicator 11 Lamp button 12 Switch trigger
13 Handle 14 Water inlet 15 Cock 16 Cover(forV-belt)
17 Shaft lock button 18 Coupling sleeve 19 Box wrench 20 Hex wrench

8ENGLISH
FUNCTIONAL
DESCRIPTION
CAUTION: Always be sure that the tool is
switched o and the battery cartridge is removed
before adjusting or checking function on the tool.
Installing or removing battery
cartridge
CAUTION: Always switch o the tool before
installing or removing of the battery cartridge.
CAUTION: Hold the tool and the battery car-
tridge rmly when installing or removing battery
cartridge.Failuretoholdthetoolandthebattery
cartridgermlymaycausethemtoslipoyourhands
andresultindamagetothetoolandbatterycartridge
andapersonalinjury.
Toinstallthebatterycartridge,openthecoverwhile
releasingthehook.Alignthetongueonthebattery
cartridge with the groove in the housing and slip it into
place.Insertitallthewayuntilitlocksinplacewitha
littleclick.Ifyoucanseetheredindicatorontheupper
sideofthebutton,itisnotlockedcompletely.
Afterinstallingorremovingthebatterycartridges,make
surethatthecoverisclosedandlockedbythehook.
1
2
►1. Cover 2. Hook
Toremovethebatterycartridges,liftthebatterycar-
tridge while pushing the button on the front of the
cartridge.
1
23
►1. Red indicator 2. Button 3.Batterycartridge
CAUTION: Always install the battery cartridge
fully until the red indicator cannot be seen. If not,
itmayaccidentallyfalloutofthetool,causinginjuryto
youorsomeonearoundyou.
CAUTION: Do not install the battery cartridge
forcibly.Ifthecartridgedoesnotslideineasily,itis
notbeinginsertedcorrectly.
NOTE:Thetooldoesnotworkwithonlyonebattery
cartridge.
Indicating the remaining battery
capacity
Only for battery cartridges with the indicator
1
2
►1. Indicator lamps 2. Check button
Pressthecheckbuttononthebatterycartridgetoindi-
catetheremainingbatterycapacity.Theindicatorlamps
light up for a few seconds.
Indicator lamps Remaining
capacity
Lighted O Blinking
75% to 100%
50% to 75%
25% to 50%
0% to 25%
Charge the
battery.
Thebattery
mayhave
malfunctioned.
NOTE: Depending on the conditions of use and the
ambienttemperature,theindicationmaydierslightly
fromtheactualcapacity.
NOTE:Therst(farleft)indicatorlampwillblinkwhen
thebatteryprotectionsystemworks.

9ENGLISH
Indicating the remaining battery
capacity
12
►1.Batteryindicator2. Check button
Pressthecheckbuttontoindicatetheremainingbattery
capacities.Thebatteryindicatorscorrespondtoeach
battery.
Battery indicator status Remaining
battery
capacity
On O Blinking
50% to 100%
20% to 50%
0% to 20%
Charge the
battery
Tool / battery protection system
Thetoolisequippedwithatool/batteryprotectionsys-
tem.Thissystemautomaticallycutsopowertothe
motortoextendtoolandbatterylife.Thetoolwillauto-
maticallystopduringoperationifthetoolorbatteryis
placed under one of the following conditions.
Overload protection
Whenthetool/batteryisoperatedinamannerthat
causesittodrawanabnormallyhighcurrent,thetool
automaticallystops.Inthissituation,turnthetoolo
and stop the application that caused the tool to become
overloaded. Then turn the tool on to restart.
Overheat protection
When the tool is overheated, the tool stops automati-
cally,andthebatteryindicatorblinkabout60seconds.
In this situation, let the tool cool down before turning the
tool on again.
On Blinking
Overdischarge protection
Whenthebatterycapacitybecomeslow,thetoolstops
automatically.Iftheproductdoesnotoperateeven
when the switches are operated, remove the batteries
from the tool and charge the batteries.
Overload alert
If the tool is operated with excessive load, the overload
indicator will blink in red. In this situation, reduce the
load on the tool. Then, the indicator stops blinking.
1
►1. Overload indicator
Switch action
WARNING: Before installing the battery car-
tridge into the tool, always check to see that the
switch trigger actuates properly and returns to
the "OFF" position when released.
WARNING: NEVER defeat the lock-o button
by taping down or some other means.A switch with
anegatedlock-obuttonmayresultinunintentional
operationandseriouspersonalinjury.
WARNING: NEVER use the tool if it runs when
you simply pull the switch trigger without press-
ing the lock-o button. Aswitch in need of repair
mayresultinunintentionaloperationandserious
personalinjury.ReturntooltoaMakitaservicecenter
for proper repairs BEFORE further usage.

10 ENGLISH
Topreventtheswitchtriggerfrombeingaccidentally
pulled,alock-obuttonisprovided.To startthetool,
depressthelock-obuttonandpulltheswitchtrigger.
Release the switch trigger to stop.
1
2
►1. Switch trigger 2.Lock-obutton
NOTICE: Do not pull the switch trigger hard
without pressing in the lock-o button. This can
cause switch breakage.
Lighting the lamp
CAUTION: Do not look in the light or see the
source of light directly.
Toturnonthelamp,pressthelampbutton.Toturno,
press the lamp button again.
1
2
►1. Lamp button 2. Lamp
NOTE:Thelampwillautomaticallybeturnedoif
there is no operation with the tool for one minute.
ASSEMBLY
CAUTION: Always be sure that the tool is
switched o and the battery cartridge is removed
before carrying out any work on the tool.
Installing or removing abrasive cut-
o wheel / diamond wheel
CAUTION: Use only the Makita wrench to
install or remove the wheel.
CAUTION: When installing the wheel, be sure
to tighten the bolt securely.
CAUTION: Do not press the shaft lock button
when the wheel is rotating.
To remove the wheel, press the shaft lock button and
rotate the wheel until the wheel cannot revolve. While
theshaftlockisfullylocked,turnthehexboltcounter-
clockwise using the box wrench. Then remove the hex
bolt,outerangeandwheel.
1
2
3
4
►1. Shaft lock button 2. Box wrench 3. Tighten
4. Loosen

11 ENGLISH
123
4
55
►1. Hex bolt 2.Outerange(black)3. Abrasive cut-
owheel/diamondwheel4.Innerange(silver)
5.Arrow(rotationdirectionofthewheel)
To install the wheel, follow the removal procedure in
reverse.
BE SURE TO TIGHTEN THE HEX BOLT SECURELY.
CAUTION: Always install the wheel so that
the arrow on it points in the same direction as
the arrow on the wheel guard. Otherwise the wheel
rotatesinreverse,itmaycausepersonalinjury.
CAUTION: Only use the wheel that are
marked with a speed equal or higher than the
speed marked on the tool.
NOTE:Ifaninnerangeisremovedbychance,
installtheinnerangesothattallerprotrusionfaces
thetoolsideasshowninthegure.
1
23
4
5
►1. Hex bolt 2.Outerange(black)3. Abrasive cut-
owheel/diamondwheel4.Innerange(silver)
5.Protrusion(taller)
Connecting to water supply
1. Prepare a water hose.
2. Remove the nut on the coupling sleeve and pass
the water hose through the nut. Insert the end of the
hose into the coupling sleeve and then tighten the nut.
1
2
3
►1. Water hose 2. Nut of the coupling sleeve
3. Coupling sleeve
3. Connectthewaterhosetothewatersupply.
Whenconnectingtoawaterfaucet,useasuitabletting
suchashosebandorwatertapjoint.
12
3
►1. Hose band 2.Watertapjoint3. Water hose
NOTE:Thettingdependsontheshapeofthefaucet
towhichyouconnect.Prepareasuitablecommercial-
ly-boughttting.
NOTE:
Ifyouuseawatertapjoint,prepareanothercou-
pling sleeve and attach it to the other end of the hose.
NOTE: When using a water pump, follow the instruc-
tionsofyourwaterpumptoconnectthewaterhose.
4. Push the coupling sleeve into the water inlet until it
locks with a click.
1
23
►1. Coupling sleeve 2. Water inlet 3. Cock

12 ENGLISH
NOTICE: Keep the cock closed until you start the
cutting operation with water feeding. For how to
feed water, refer to the section for the operation.
OPERATION
CAUTION: Be sure to lock the cover for bat-
tery compartment before operating.
CAUTION: Be sure to hold the workpiece
rmly down on a stable bench or table during
operation.
CAUTION: Do not twist or force the tool in the
cut, or the motor may be overloaded or the work-
piece may break.
Cutting
CAUTION: During operation, do not bring the
tool higher than your shoulder height.
Holdthetoolrmly.Graspthehandlewithyourrighthand
andthegripwithyourlefthand.Topreventelectricshock
byaccidentalcuttingofanelectriccable,alwaysholdthe
gripbythedesignatedportionasshowninthegure.
1
►1. Part to hold
Move the tool over the workpiece surface, keeping it
atandadvancingsmoothlyuntilthecuttingiscom-
pleted.Keepyourcuttinglinestraightandyourspeedof
advance uniform.
NOTE:Whenthebatterycartridgetemperatureis
low,thetoolmaynotworktoitsfullcapacity.Atthis
time,forexample,usethetoolforalight-dutycutfor
awhileuntilthebatterycartridgewarmsupashigh
as room temperature. Then, the tool can work to its
fullcapacity.
NOTE: If the cutting action of the diamond wheel
begins to diminish, dress the cutting edge of the
wheel using an old discarded coarse grit bench
grinderwheelorconcreteblock.Dressbypressing
lightlyontheouteredgeofthediamondwheel.
When feeding water during cutting
CAUTION: When using a wet-type diamond
wheel, always feed water during cutting.
Connectthetooltothewatersupplyandturnthecock
inthedirectionofthearrowasillustrated.Adjustthe
positionofthecocktoobtainagentleowofwater.
1
►1. Cock
CAUTION: When feeding water, always keep
the tool head lower than the tool body to prevent
water entering into the tool mechanism. Failure to
dosomaycauseelectricshock.

13 ENGLISH
MAINTENANCE
CAUTION: Always be sure that the tool is
switched o and the battery cartridge is removed
before attempting to perform inspection or
maintenance.
NOTICE: Never use gasoline, benzine, thinner,
alcohol or the like. Discoloration, deformation or
cracks may result.
To maintain product SAFETYand RELIABILITY,
repairs,anyothermaintenanceoradjustmentshould
beperformedbyMakitaAuthorizedorFactoryService
Centers,alwaysusingMakitareplacementparts.
Cleaning the tool
Aftereachuse,removethebatterycartridgeandthe
wheel and then clean dust, dirt or metal chips accu-
mulatedinsidethewheelguard.Cleanthetoolbody
bywipingodust,dirtwithadryclothoronedippedin
soapywaterandwrungout.Useadryclothtowipethe
dirtothelensofthelamp.Becarefulnottoscratchthe
lensoflamp,oritmaylowertheillumination.
12
►1. Wheel guard 2. Lens of the lamp
Cleaning the air vent
Regularlycleanthetool'sairventsorwheneverthe
vents start to become obstructed.
1
2
►1. Inhalation vent 2. Exhaust vent

14 ENGLISH
Changing the V-belt
1. Removethebatterycartridgeandthewheel.
2. Loosen the hex socket bolts using the hex wrench
and then remove the cover .
1
2
►1. Hex socket bolt 2. Cover
3. WhilestronglytwistingtheV-beltsothatitsinner
sidefacesupasshowninthegure,turntheboltonthe
pulley(large)clockwiseusingtheboxwrench.
TheV-beltwilldeviatefromthetrackandcomeoas
youturnthebolt.
1
2
3
►1. V-belt 2.Pulley(large)3. Box wrench
NOTICE: Never turn the box wrench counter-
clockwise. Doing so loosen the bolt on the pulley
(large) and result in poor performance.
4. HookthenewV-belttothepulley(small).Putthe
otherendoftheV-beltontothepulley(large)sothat
itispartiallyhookedontheforefrontrailofthepulley.
(Youdon'thavetohooktheV-belttoalloftherailson
thepulleyatthisstage).Afterthat,turntheboltonthe
pulley(large)clockwiseusingtheboxwrench.
TheV-beltwillgetonthetrackasyouturnthebolt.
1
2
3
►1.Pulley(small)2.Pulley(large)3. Box wrench
Make sure that all the guides on the internal circle of the
V-belttintotherailsonthepulleys.Alltherailsonthe
pulleymustsupporttheguidesontheV-belt.Ifthereis
a rail which does not support the guide, the V-belt is not
properlyinstalled.
1
2
1
2
►1.Railonthepulley2. Guide on the V-belt

15 ENGLISH
5. Place the cover onto the tool and tighten the hex
socket bolts using the hex wrench.
1
3
2
►1. Tube 2. Cover 3. Hex socket bolt
NOTICE: Make sure that the tube for water feed
is in the positions as shown in the gure before
attaching the cover.
TROUBLESHOOTING
Beforeaskingforrepairs,conductyourowninspectionrst.Ifyoundaproblemthatisnotexplainedinthemanual,donot
attempttodismantlethetool.Instead,askMakitaAuthorizedServiceCenters,alwaysusingMakitareplacementpartsforrepairs.
State of abnormality Probable cause (malfunction) Remedy
Motor does not run. Batterycartridgesarenotinstalled. Installtwobatterycartridges.Thistooldoesnot
workwithonebatterycartridge.
Batteryproblem(undervoltage) Rechargethebattery.Ifrechargingisnoteective,
replacethebatterycartridge.
Thedrivesystemdoesnotworkcorrectly.
Askyourlocalauthorizedservicecenterforrepair.
Motor stops running after a little use. Battery'schargelevelislow. Rechargethebattery.Ifrechargingisnoteective,
replacethebatterycartridge.
Overheating. Stop using of tool to allow it to cool down.
The wheel rotation does not acceler-
ateproperlyevenafterrunningthe
tool without load for 20 seconds.
Batteryisinstalledimproperly.
Installthebatterycartridgeasdescribedinthismanual.
Batterypowerisdropping. Rechargethebatterycartridge.Ifrechargingisnot
eective,replacethebatterycartridge.
The V-belt is slipping. Replace the V-belt with new one.
Thedrivesystemdoesnotwork
correctly.
Askyourlocalauthorizedservicecenterforrepair.
Wheel does not rotate:
stopthemachineimmediately!
The V-belt is slipping. Replace the V-belt with new one.
Foreignobjectisjammedbetweenthe
guard and the wheel. Uninstallthebatterycartridgeandthenremovethe
foreignobject.
Thedrivesystemdoesnotwork
correctly.
Askyourlocalauthorizedservicecenterforrepair.
Abnormal vibration:
stopthemachineimmediately!
Improper attachment of the wheel. Install the wheel as instructed in this manual.
Tightenthebolttosecurethewheelrmly.
Thedrivesystemdoesnotwork
correctly.
Askyourlocalauthorizedservicecenterforrepair.

State of abnormality Probable cause (malfunction) Remedy
Cutting tool and motor cannot stop:
Removethebatterycartridge
immediately!
Electric or electronic malfunction. Removethebatterycartridgeandaskyourlocal
authorized service center for repair.
Poor cutting performance It is time to replace the wheel. Replace the wheel with new one.
Water leaks from the inlet. Water is leaking from the O-ring part. Askyourlocalauthorizedservicecenterforrepair.
OPTIONALACCESSORIES
CAUTION: These accessories or attachments
are recommended for use with your Makita tool
specied in this manual.Theuseofanyother
accessories or attachments might present a risk of
injurytopersons.Onlyuseaccessoryorattachment
for its stated purpose.
Ifyouneedanyassistanceformoredetailsregard-
ingtheseaccessories,askyourlocalMakitaService
Center.
• Abrasivecut-owheel
• Diamond wheel
• V-belt
• Coupling sleeve
• Flange60set(countryspecic)
• Box wrench
• Hex wrench
• Makitagenuinebatteryandcharger
NOTE:Someitemsinthelistmaybeincludedinthe
toolpackageasstandardaccessories.Theymay
dierfromcountrytocountry.
Makita Corporation
3-11-8, Sumiyoshi-cho,
Anjo, Aichi 446-8502 Japan
www.makita.com
885786A928
EN
20200514
Other manuals for DCE090
5
Table of contents
Other Makita Cutter manuals

Makita
Makita CS002G User manual

Makita
Makita EK7650H Instruction Manual

Makita
Makita M0401 User manual

Makita
Makita EK7650H User guide

Makita
Makita 4190D User manual

Makita
Makita ANGLE CUTTER 4110C User manual

Makita
Makita DCE090 User manual

Makita
Makita BCS550 User manual

Makita
Makita 4105KB User manual

Makita
Makita EK7650H User manual

Makita
Makita 4101RH User manual

Makita
Makita 4112H User manual

Makita
Makita 4112HS User manual

Makita
Makita DCS551RTJ User manual

Makita
Makita 4100NH User manual

Makita
Makita DCS550 User manual

Makita
Makita CC300D User manual

Makita
Makita 180 mm 4157KB User manual

Makita
Makita CE001G User manual

Makita
Makita EK7650H User manual