Skidee Y100 User manual

PRODUCT MANUAL - Y100
OR WATCH OUR VIDEOS ON OUR WEBSITE OR ON www.YouTube.com

Tools you get in the box
2 Small Allen Key
1 Large Allen Key

Thank you for choosing our scooter. You can rest assured that you have acquired a high
quality product. And also we oer you an excellent after-sales service.
Before you convince yourself of the unique driving experience oered by your new scooter,
please read the attached instructions carefully. Please keep these instructions in a safe
place so that you can refer to them in the future.
Have fun with your new scooter!
GENERAL
Dear customer,
Tools you get in the box

IMPORTANT: Before you allow your child to use our scooter, please read the operating safety instructions
carefully, please ensure that the screws are tight, and that the wheels have been correctly secured, and
show no signs of wear.
IMPORTANT: Undoing the axle screws several times will reduce the eect of the screw securing product.This
means that the screws may come loose by themselves. You should therefore always check the screws regu-
larly and use the scooter after tightening the screws.
WARNING: The toy needs to be used with caution, since skill is required to avoid falls or collisions causing
injury to the user or third parties.
WARNING: The wearing of helmets, protective equipment for elbows, knees, wrists and palms as well as
shoes with at rubber soles is recommended.
WARNING: Close quick-action lock securely and ensure that it is correctly positioned.
WARNING: Do not ride down slopes.
WARNING: Child must be supervised.
WARNING: Brake can become hot.
WARNING: Maximum permissible weight: 130 Lb (60 kg).
Important Instructions and Warnings

Operating Safety Instructions
Child should practice rst to gain control of the scooter. We recommend that you practice your scooter on a
trac-free car park or on open asphalt play areas.
Ensure that your child always wears a helmet, and wrist, elbow and knee pads, as well as shoes with rubber
soles.
Ensure that your child does not attempt any experiments or risky maneuvers with it. Riding style should always
be adjusted to the personal skill of the rider.
Ensure that your child does not travel at speeds exceeding 10 mph (5 km/h).
Ensure that your child does not ride on roads, paths or other places with motor vehicle trac.
Ensure that your child does not make any modications or alterations to your scooter which would put your
safety at risk.If you do, the guarantee is expired.
Ensure that your child does not ride the scooter in the dark or at night. Only one child may ride on the scooter
at any one time.
Ensure that your child does not ride down any steep hills. The brake is not designed to decelerate from high
downhill speeds. Always look ahead while you ride so that you can quickly come to a stop at any time.The brake
can get hot with prolonged use. Avoid skin contact.
The brake pad becomes hot when it is used. Make especially sure that your child does not keep the brake on for
a long period of time. Explain to your child that direct skin contact may cause burns.
The scooter must not be used on wet, oil, sandy, icy, rough or uneven surfaces. Never use the scooter in wet
conditions.

Kerbstones and cobblestone pavements aect your balance. It is better to get o. Even lowered kerbstones can
knock you o balance.
Watch out for longitudinal and transverse grooves in the asphalt! The narrow wheels may get stuck in tram
rails and manhole covers for example, and lock up.
Some metal parts may corrode after a certain time, especially when used near the sea of left outdoors to often.
The scooter may not be used on public roads. When Riding on pedestrian walking areas, keep to the correct
side according to the rules of the road as much as possible. Watch out for Pedestrians, Wheelchair users,
Cyclists, Rollerblade and Animals. Always observe trac rules and regulations.
Load capacity is up to 130 Lb (60 kg) body weight for the scooter.
Scooter (Model No: Y100) for 2+ year
Always take care not to risk injuring ngers when folding and unfolding scooter.
Explain to your child the risks of using the scooter as how to use it. Supervise your child while they are using
the scooter.
HAVE FUN WITH YOUR NEW SCOOTER!

Hold on to the ends of the T-Bar or Ring Bar with your hand. You steer the board through the slightest of weight
displacements. To Start moving, stand with one leg (the foot approx.at 45 ° angle to the direction of travel) on the
board and push yourself o using the other leg. If you stand with your right leg on the board, you can use left leg
to accelerate. If you stand with your left leg on the board, you can use right leg to accelerate. After gaining
momentum you stand with your legs apart on the board, so that both feet are approx.at 45 ° angle to the direction
of travel. Enjoy your scooter!
Play Instructions
The brake is a friction brake and only designed for reduction of speed
on at surfaces-avoid going downhill. Brake at low speed by gently
pushing your foot, resting far back on the board, against the back
wheel plate.You need to push harder if you are traveling faster. Be
careful however:if you push the brake too hard and slow down too
abruptly, you risk falling.It is best to practise braking at walking speed.
Brake
Attention:The brake and protection plate can get very hot.
If your brake Wears out please contact us to get a replacment

Model No: Y100
Age: 2+year
Music and Flash Light
Folds and unfolds scooter
Reinforced GFK30
Stronger/Loading up to 130 Lb (60kgs)
Chassis
Lean to steer Mechanism
More stable, More exible
Front PU Wheel
Non-Marking/Flash
Red Push Button
T-Bar Adjust Ball
Handlebar\Steering Rod
27.5 inches to 32 inches
Adjustable T-Bar
Durable/Eco-friendly TPR
Handle Grip
Wider/More comfortable
Non-Slip Deck
Colorful Brake With Stainless Steel
Rear Brake

Front Wheel Bearing
Rear Wheel Bearing
Threaded lock sleeve
Thicken ALU Tube
Bar
Seat Folding Button
Button for Horizontal Rotation of Seat
Disco Light
10.5 inches to 12 inches
Stronger/Loading up to 110 Lb (50kgs)
Adjustable Seat
Non-Marking/Flash
Rear PU Wheel
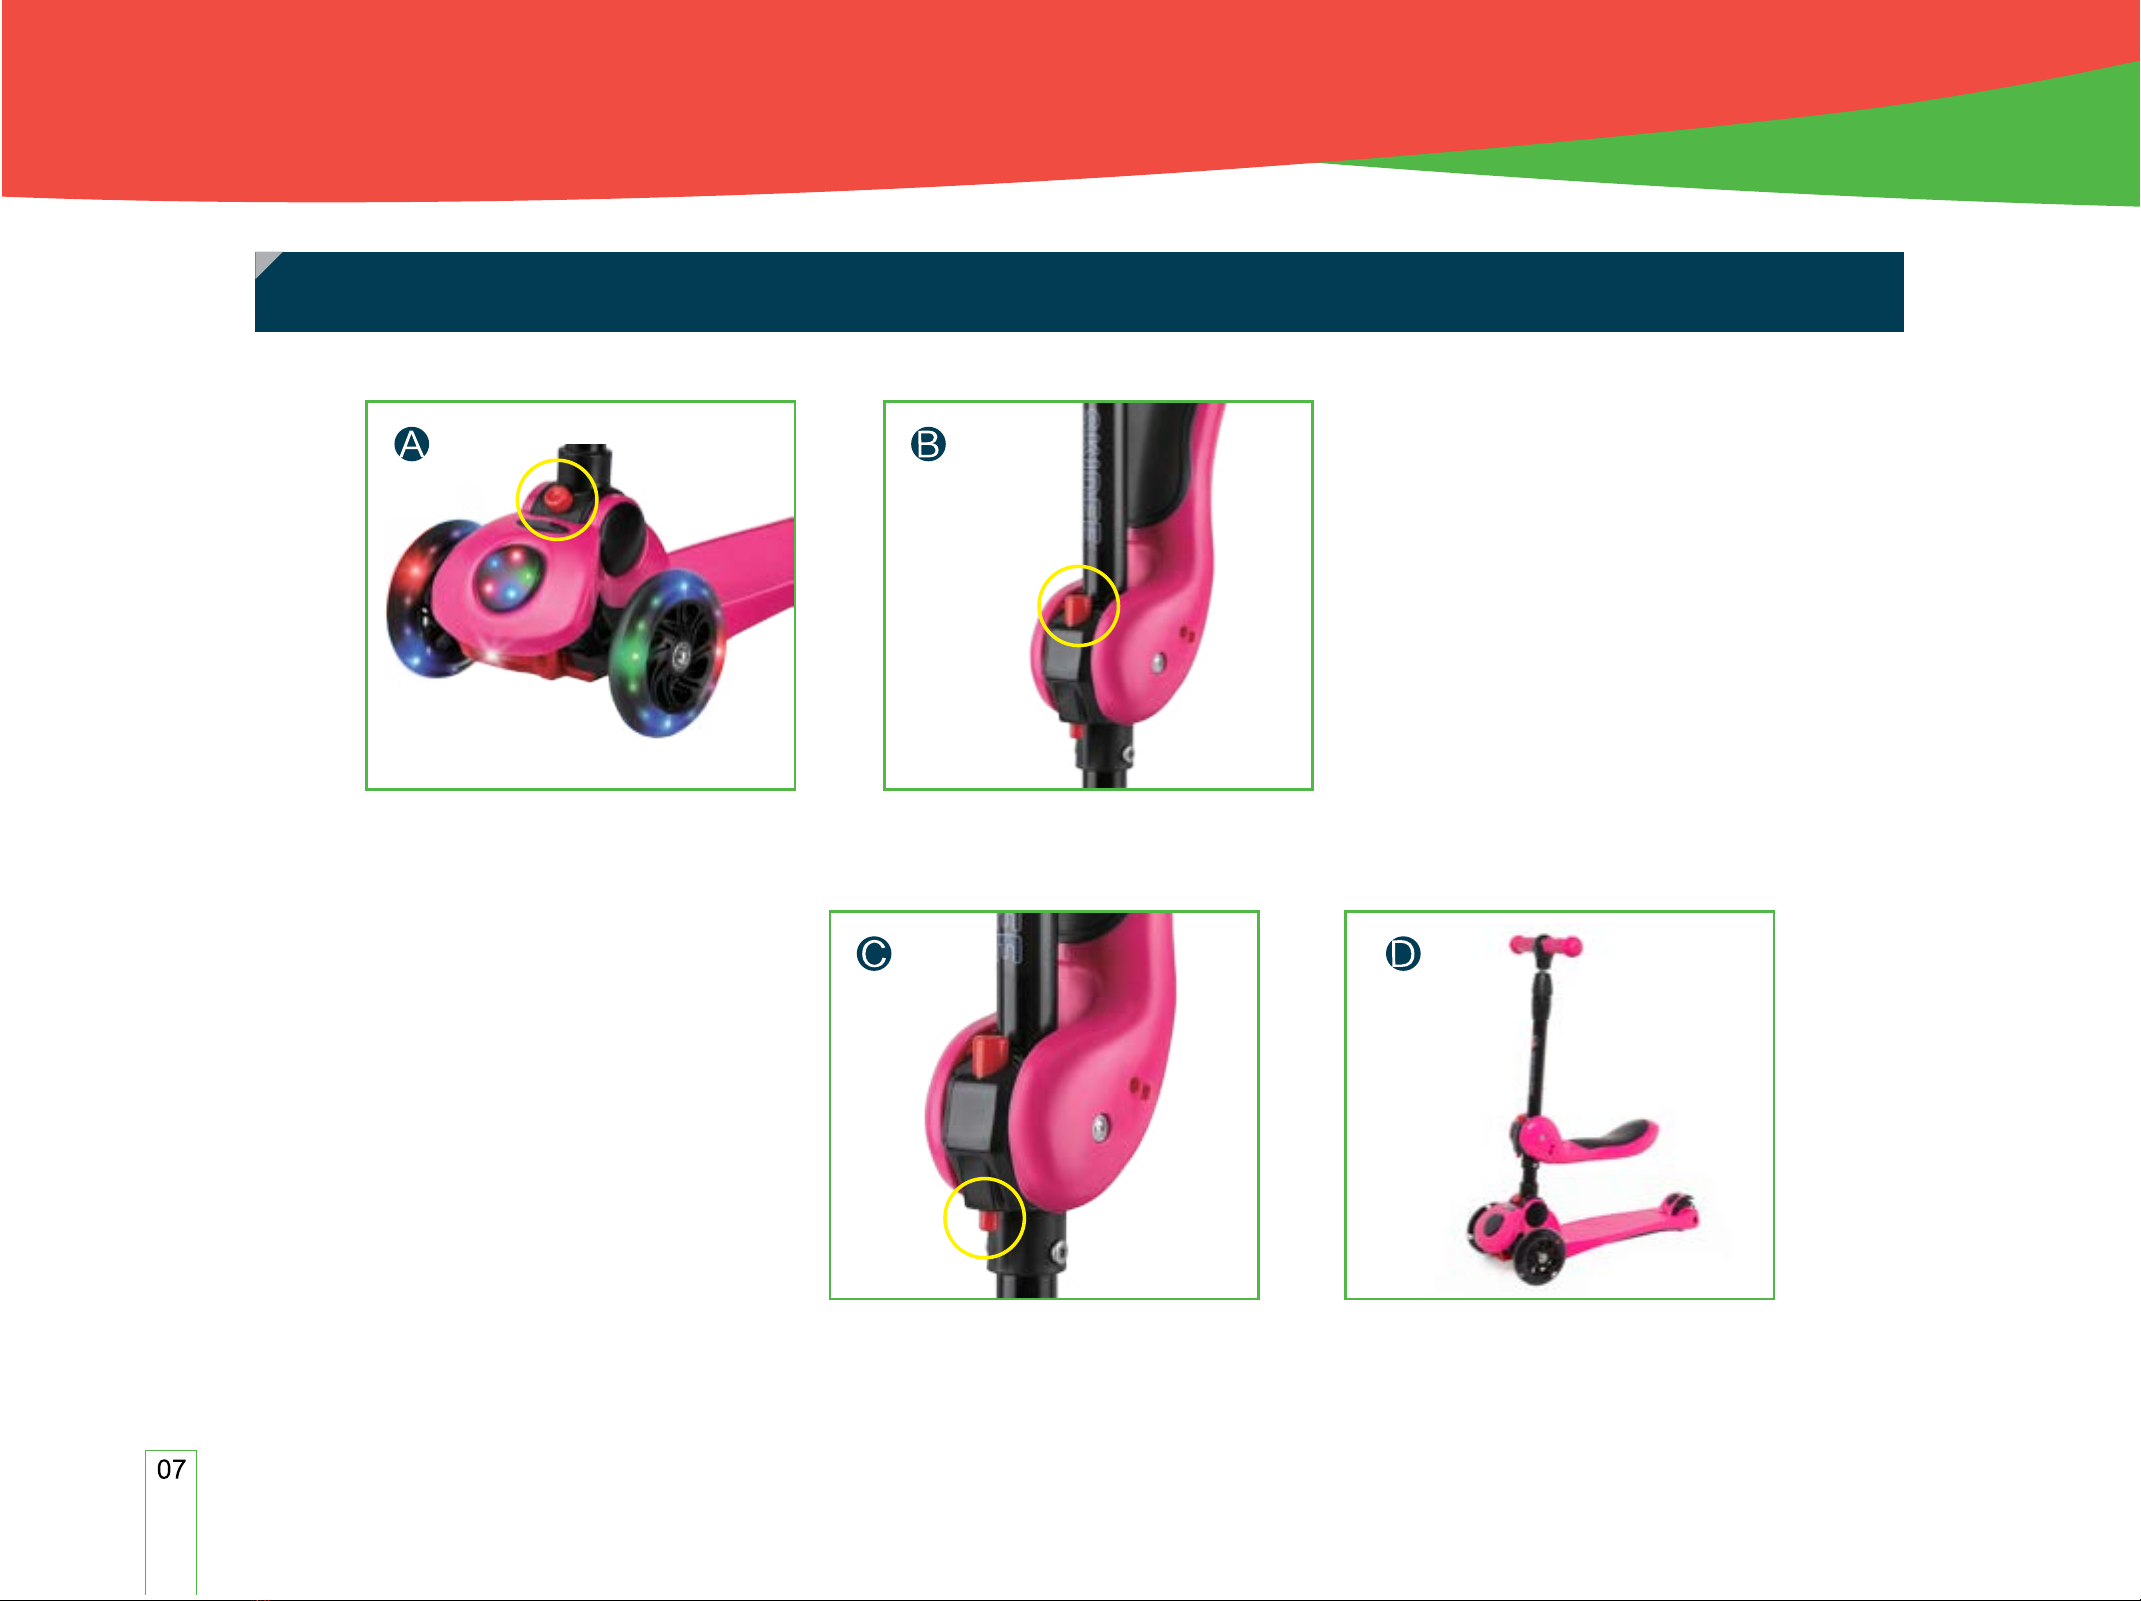
Scooter Fold and Unfold
Ready to Scoot.Red Push Button, To Rotate Seat.
Red Push Button, Fold and Unfold
Scooter.
Red Push Button, Fold and Unfold
Seat.

Scooter Music and Flash Light
Maintenance
Put in 3 AAA Batteries.Open the Screw to Release
Cover.
O (1)
Flash light (2)
Music and Disco light (3).
A B C
Unscrew the 3 Screws as shown.Music Box. Slightly Take Out the Music Box. Carfully Place in the New
Replacement and Screw Back
the 3 Screws.
A B C D
1
2 3

Loosen the screws. Push the Popping Ball and Lower
the Handlebar All the Way down.
(Height: 24.5 inches)
Carefully Separate the 2 Sides From
Each Other, and Put Parts Away for
Future use.
Turn the Threaded Lock Sleeve
Counter Clockwise to Unlock.
Tighten the Threaded Lock Sleeve
Clockwise to secure T-Bar after
adjustment.
Use the popping ball to adjust the
T-Bar according to kids height.
Lowest: 27.5 inches, Second: 30
inches, Highest: 32.5 inches.
If You Still Want the Handlebar Lower Then:
Tighten the Threaded lock sleeve to secure T-Bar after Adjustments.

Seat Height Adjustment (until gure B) Seat Removal
Unscrew the Screw That is
Under the Seat Connected to
the Handlebar Using the 2
Small Allen Keys.
Adjust Seat According to Your
Height Preference.
Bottom Position: 10.5 inches
Top Position: 12 inches
Enter the Screw and Tighten.
Turn the Threaded Lock Sleeve
Counter Clockwise to Unlock.
Push the Popping Ball Through
All Stages Including the Top One
Until You Don't See it.
A B C D
Pull the Seat All the Way Up,
Using Some Force to Pass
Through the Threaded Lock
Base.
When the Seat Will Come Out,
the Handlebar Would Come
Along with it.
Put Back the Threaded Lock
Base Together with the
Handelbar and Make Sure it's
Fully in.
Put the Screw Back on the Seat
and Store away for Future Use.
E F G H
Tighten the Threaded lock sleeve to secure T-Bar after Adjustments.

Left Wheel: Turn the Allen Key
clockwise to loosen the screw.
Take Out the
Screw With
the Bearing
Together with
the Led
Magnet from
the Old
Wheel.
Right Wheel: turn the Allen Key
clockwise to loosen the screw.
Put the
Bearing and
then the Led
Magnet on the
Screw
Enter it Into
New Wheel and
Add the other
Bearing to The
Other Side of
the Wheel and
Tighten Screw
Back in Place.
Maintenance Instructions
The scooter is a new fun piece of product which is safe when used carefully and correctly. However,as with any sporting product, a
small risk cannot be excluded and we recommend that you protect hand joints, elbows and knees from bumps and grazes. A helmet
will also contribute to your safety. To ensure you do not slip it is best if you wear shoes with a rough sole. You should always adjust
your speed according to your ability and the conditions, and when in doubt, dismount if there is a risk of unseen trac.
Some more safety tips

One year warranty covering defects in material and workmanship is provided for the scooter starting from the
date of purchase. During the warranty period, we will inspect and decide if the problem has been caused by a
defect in material, or workmanship, your scooter will either be repaired or replaced with an identical or
equivalent scooter. If you need any help with your scooter, please directly contact us at support@skidee.net
1. Improper attempts at repair or modications the scooter.
2. External inuences(eg.impact against curb stones, rails, obstacles on road, etc.)
3. Improper usage, usage for purposes other than those intended, negligent handling or normal wear and tear.
Warranty Items
No person, seller, distributor, shall be allowed to modify or to supplement the terms and
conditions of this limited warranty.
TO EXTEND YOUR WARRANTY TO 5 YEARS
SIGN UP TO OUR VIP MEMBERSHIP AT WWW.SKIDEE.NET/VIP
The warranty shall not include damage caused by:

Table of contents
Other Skidee Scooter manuals


 user manual")
