SKY Engines Boxer 220s User manual

BOXER 220s
INSTRUCTION MANUAL

CONTENT
1.0
INTRODUCTION
•1.1 General warnings
•1.2 Recommendations for accident prevention
2.0
INSTRUCTIONS FOR USE
•2.1 Fuel
•2.2 Running in
•2.3 Starting the engine
3.0
ENGINE TECHNICAL DATA
•3.1 Engine illustration
•3.2 Technical characteristics
•3.3 Assembly of the secondary components
•3.3.1 Special warnings on assembly
•3.3.2 Radiator
•3.3.3 Silent-block brackets
•3.3.4 Clutch
•3.3.5 Overall ignition unit
•3.3.6 Exhaust
•3.3.7 Silencer
•3.3.8 Reed valve
•3.3.9 Carburettor
•3.3.10 Reduction
4.0
MAINTENANCE AND CLEANING
•Essential cleaning
•Liquid top-up
•Adjustments
•Deadlines and measures
5.0 SPARE PARTS
6.0
WARRANTY
•Requirements
•Certificate

1.0 INTRODUCTION
Thank you for choosing our BOXER220s engine, designed and manufactured
by SKY ENGINES. WE INVITE YOU TO READ THIS MANUAL CAREFULLY
AND FOLLOW ALL THE MAINTENANCE OPERATIONS ILLLUSTRATED
BELOW, BEFORE USING THE PRODUCT, TO AVOID SERIOUS DAMAGE
TO THE ENGINE.
For further information or clarifications, or to purchase spare parts, please
contact us at the telephone number or email address indicated on the cover
page. Thank you for your attention and we wish you lots of fun, in the hope
you are happy with your choice. Best regards,
Sky Engines s.r.l.
1.1 GENERAL WARNINGS:
• SKY ENGINES shall not be directly or indirectly liable for the use of its engine,
especially if it has been modified or tampered with by third parties.
• MAINTENANCE IS FUNDAMENTAL to avoid serious damage to the engine,
please read chapter 4.0 of this manual carefully and strictly follow all the points.
For spare parts to replace damaged parts, consult paragraph 3.3 where all the
assembly procedures are illustrated of the secondary parts which deteriorate over
time.
• SKY ENGINES shall not be liable for damages caused by lack of maintenance
or assembling errors, excluding the replacement of parts covered by warranty.
• The engine can carry a maximum of 150 Kg; a weight over 160 Kg may cause
problems to the engine and during flight.
• We recommend carrying out all checks required to ensure the safety of the
engine functionalities before taking off.

• Technical modifications may be made by the buyer, who assumes full liability
for any damage; spare parts for the purpose of making changes are not
covered by warranty.
• Any modifications made by the buyer to the engine or the removal of original
parts can make use of the engine dangerous!
• SKY ENGINES reserves the right to make changes to the model on sale
and/or in the catalogue, without prior warning, at any time, without any
obligation; all relevant information can be found on the website
www.skyengines.com.
• The aircraft powered by this engine should fly in open spaces, in areas
reserved for flying! The pilot must acknowledge all the risks of using this
aircraft and the fact that this engine may stall.
• See chapter 6.0 of this manual for the warranty conditions.
1.2 RECOMMENDATIONS FOR ACCIDENT PREVENTION
Use of this engine is high risk, therefore you have to pay utmost attention during,
before and after flight, to avoid very serious accidents.
You are therefore invited to follow the general measures illustrated here to avoid
damage or accidents.
• The engine cannot resolve all flight problems, therefore you have to avoid
unsafe situations; one of the most common errors is to fly very low over zones
where you cannot land. You must always consider the eventuality of a fault and
landing in an emergency.
• you must always consider the lack of engine power created during turbulence on
flight stability:
-pay attention to swinging caused by flight changes which cause a fall of 4-5 metres
-The engine can be switched off at any time and you should pay attention to
emergency landing in a safe area.
• STRICTLY avoid flying over water both for your safety and to avoid damage to the
engine.
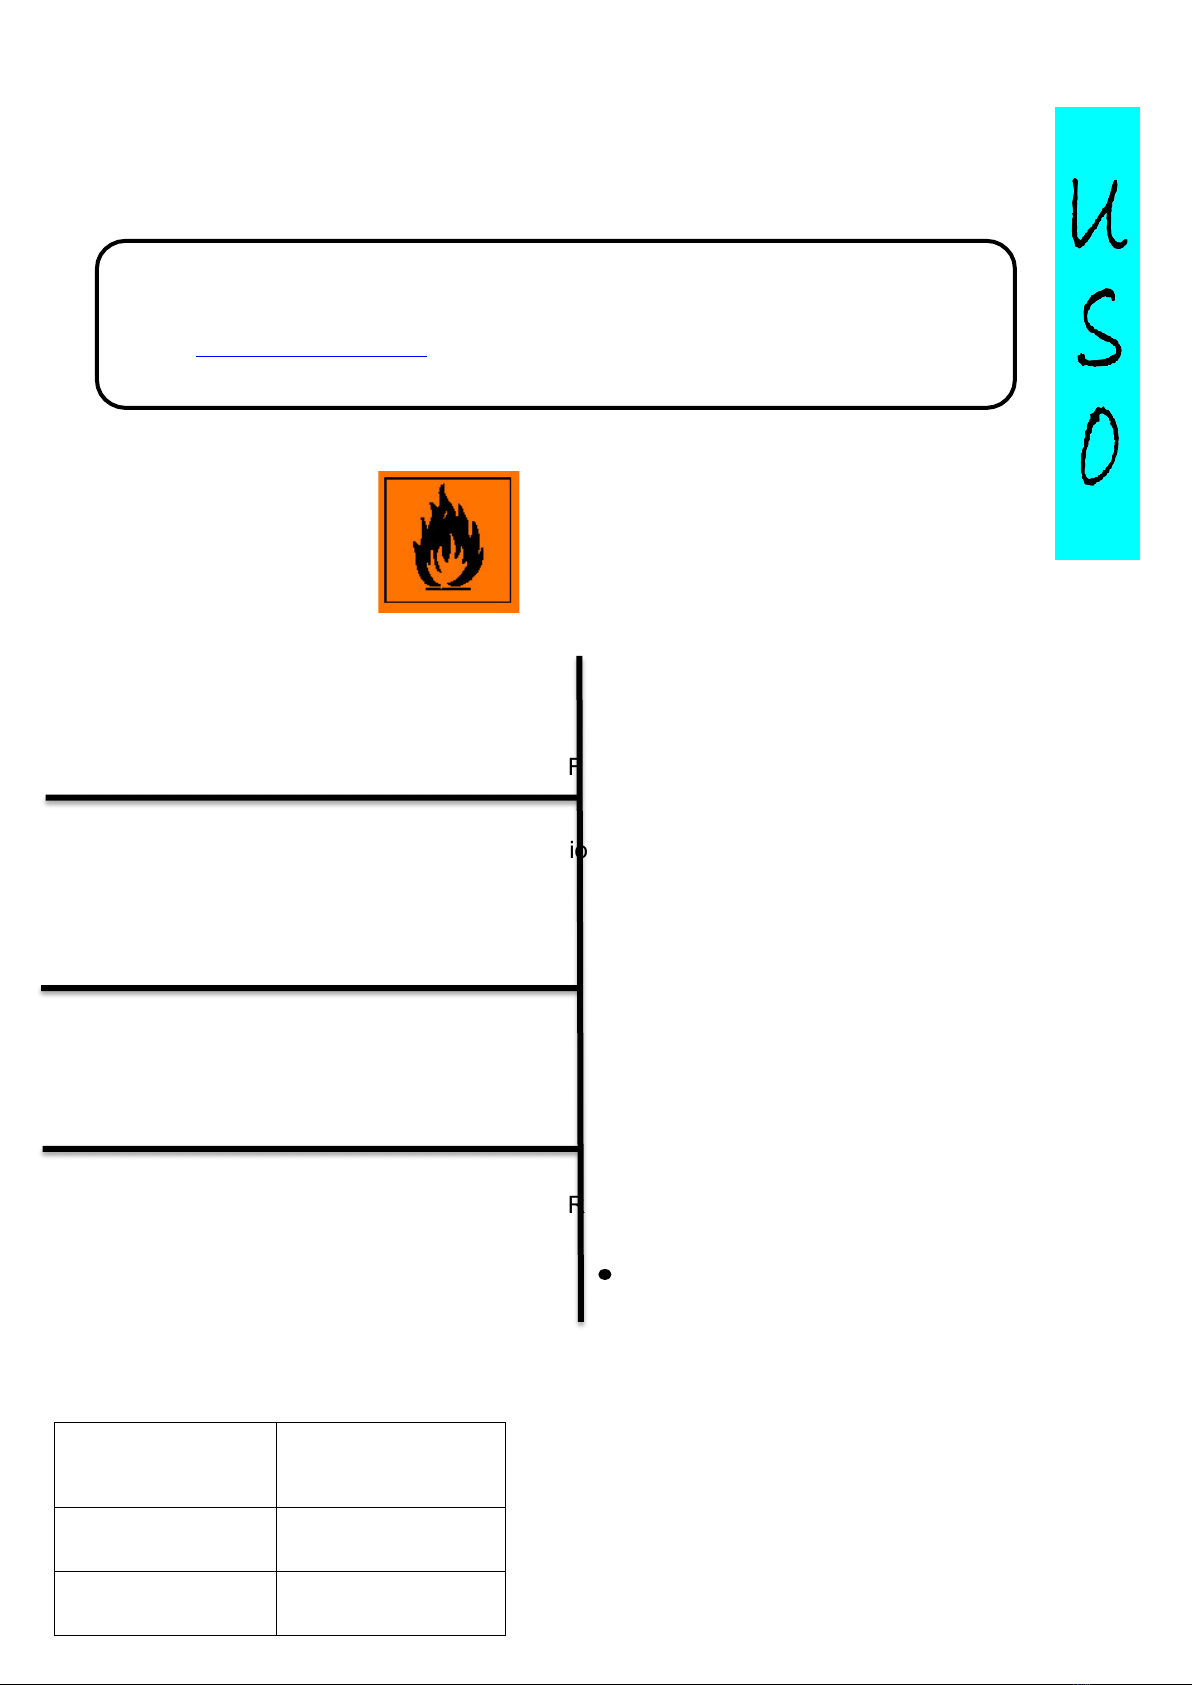
CAUTION!!
This is not a certified engine!
Its use is for experimental and non-certified aircraft.
2.0 INSTRUCTIONS FOR USE
2.1 FUEL
BOXER 220s is a 2-stroke engine which CAUTION!!!
needs a fuel mix of PETROL IS AN EXTREMELY
petrol-oil. FLAMMABLE AND
EXPLOSIVE SUBSTANCE.
Remember in 2-stroke engines CARRY OUT THESE OPERATIONS
it is extremely important to have correct carburation, OUTDOORS, IN A WELL
VENTILATED PLACE
and therefore the correct mix of fuel WITH THE ENGINE OFF.
to avoid piston seizure, not covered DO NOT SMOKE, DO NOT CAUSE
by warranty. SPARKS OR OPEN FLAMES IN THE AREA
WHERE FUEL IS
ATTENTION!! STORED; KEEP OUT OF CHILDREN’S
MIX PETROL AND OIL IN REACH.
A RATIO OF 3% USING TOP QUALITY
SYNTHETIC OIL FOR 2-STROKE
ENGINES.
Pay attention to the excess quantity of oil, CAUTION!!!
and lack of it IN BOTH CASES NEVER MIX DIFFERENT OILS
IT COULD DAMAGE THE ENGINE. TOGETHER.
You are advised to use 100% synthetic oil
BARDAL KITS, already tested by our mechanics.
PERIOD
PERCENTAGE
OF OIL
RUNNING IN
3%
SUBSEQUENT
2.5%
The instructions for use in this manual refer to the production model at time of print;
each type of change will not be directly notified to the buyer, but anyone looking for
explanations on product development can check out the information you want on the
website www.skyengines.com

2.2 RUNNING IN
Good running in of the product ensures a long lasting engine and better
performance of the components:
For the first 3 hours of flight, use the engine with caution.
do not use the engine at maximum power for a long time.
do not keep the accelerator in the same position for more than a few
seconds; it is preferred to open and close the accelerator without climbing
higher to avoid forcing the engine.
Use the engine for 10 minutes at a time, letting it cool. Repeat
these operations each time the engine is serviced.
AFTER 10 HOURS OF FLIGHT OR 30 LITRES OF PETROL APPROX.,
THE ENGINE IS RAN IN!
2.3 STARTING THE ENGINE
The BOXER220S engine starts via the pull “EASY START” with self-winding
cord, which must be strongly pulled to avoid the engine flooding. Thanks to
this type of ignition, the engine is easily started.
CAUTION!
•Engine exhaust gas contains carbon
monoxide, which is lethal for the body;
DO NOT START THE ENGINE IN
ENCLOSED LOCATIONS, BUT
OUTDOORS AND WELL-VENTILATED
PLACES!!!
•never start the engine if not completely
assembled, missing components could
cause serious damage.
•pay utmost attention to the
propeller, it can reach very high
speeds making it no longer visible,
always maintain a due distance.
With the engine cold, pump a little
petrol in the carburettor and, after
ignition, wait a few minutes to
heat the engine, accelerate at
intervals to avoid damage.

3.1 ENGINE ILLUSTRATION
1: CYLINDERS
SKYBO22005005A
13: LOWER EXHAUST
SKYBO22006004C
2: RADIATOR CAP
SKYBO22004032
14: IGNITION COIL
SKYBO22001014
3: RADIATOR
SKYBO22004014
15: RADIATOR TUBES
SKYBO22004002-3-
4-29
4: REED VALVE
SKYBO22002002
16: EXPANSION
TANK
SKYBO22004027
5: EXHAUST RUBBER
SECTIONS
SKYB022006007
17: RADIATOR
BRACKETS
SKYBO22004005
6: HEADS
SKYBO22005001
18: CASING
SKYBO22007004-5
7: CARBURETTOR
SKYB022002005
19: SPIDER
SKYBO22007003
8: UPPER EXHAUST
MANIFOLD
SKYBO22005016
20: EASY START
IGNITION
SKYBO22001
9: REDUCTION
SKYBO22008
21: SILENT BLOCK
SKYBO22007011
10: SILENCER
SKYBO22006001
22: FILTER CASING
SKYBO22002004
11: UPPER EXHAUST
SKYBO22006004B
23: LOWER HEAD COVER
SKYBO22005004
12: UPPER HEAD
COVER
SKYB022005003
24: LOWER EXHAUST
MANIFOLD
SKYBO22005019B
2
8
10
3
12
15
4
22
7
25
5
19
21
15
23
11
13
14
18
9
15
16
17
6
1
20

3.2 TECHNICAL CHARACTERISTICS
TYPE
2-STROKE BI CYLINDER BOXER WITH LIQUID COOLING
DISPLACEMENT
220 CC
MAX POWER
38 HP @ 11600 RPM
PEAK SPEED MAX
12000 RPM
BORE
53 mm
STROKE
50 mm
REDUCTION
MECHANICAL 1:4 OIL LUBRICATED
THRUST*
108 Kg WITH THREE CARBON BLADES 130 cm AT 11800
RPM
112 Kg WITH THREE CARBON BLADES 140 cm AT 11600
RPM
121 Kg WITH THREE BLADES 150 cm AT 10900 RPM
CARBURETTOR
KEIHIN 38
TOTAL
WEIGHT WITH LIQUIDS 20 Kg
EGT
680 °C
CHT
170°C
COOLANT
95°C
DRY
CENTRIFUGAL CLUTCH
*Tests carried out in optimal conditions at sea level with the engine ran in
CAUTION!!
The recommendations in the technical characteristics are very important to avoid
serious damage to the engine and your safety. PAY UTMOST ATTENTION TO THE
ABOVE AND WE INVITE YOU TO COMPLY WITH THE MAXIMUM LIMITS
STATED. SKY ENGINES CANNOT BE HELD IN ANY WAY LIABLE FOR DAMAGE
CAUSED TO PROPERTY OR PEOPLE DUE TO LACK OF ATTENTION
TOWARDS THE TECHNICAL CHARACTERISTICS STATED ABOVE.
3.3 ASSEMBLY OF THE SECONDARY COMPONENTS
3.3.1 SPECIAL WARNINGS ON ASSEMBLY
Assembly of the BOXER220s engine is more complex than the other types and
requires more assembly experience of the components, especially those inside.
Being an engine with liquid cooling, assembly of the parts that use the coolant
liquid of the radiator requires accurate cleaning which only an expert mechanic
will have the ability to carry out.
Therefore, we ask anyone without the skills and ability to carry out assembly
operations NOT TO TOUCH THE ENGINE, UNLESS FOR UNAVOIDABLE
MAINTENANCE OPERATIONS; IN THIS CASE, WE ASK YOU TO FOLLOW THE
INSTRUCTIONS OUTLINED STEP BY STEP WITHOUT IMPROVISING OR MAKING
CHANGES THAT COULD CREATE SERIOUS DAMAGE FOR THE ENGINE NOT
COVERED BY WARRANTY.
• Modifications to the engine can make it extremely unsafe!!
• Replace the engine components with original SKY ENGINES spare parts to ensure
more reliable operation.
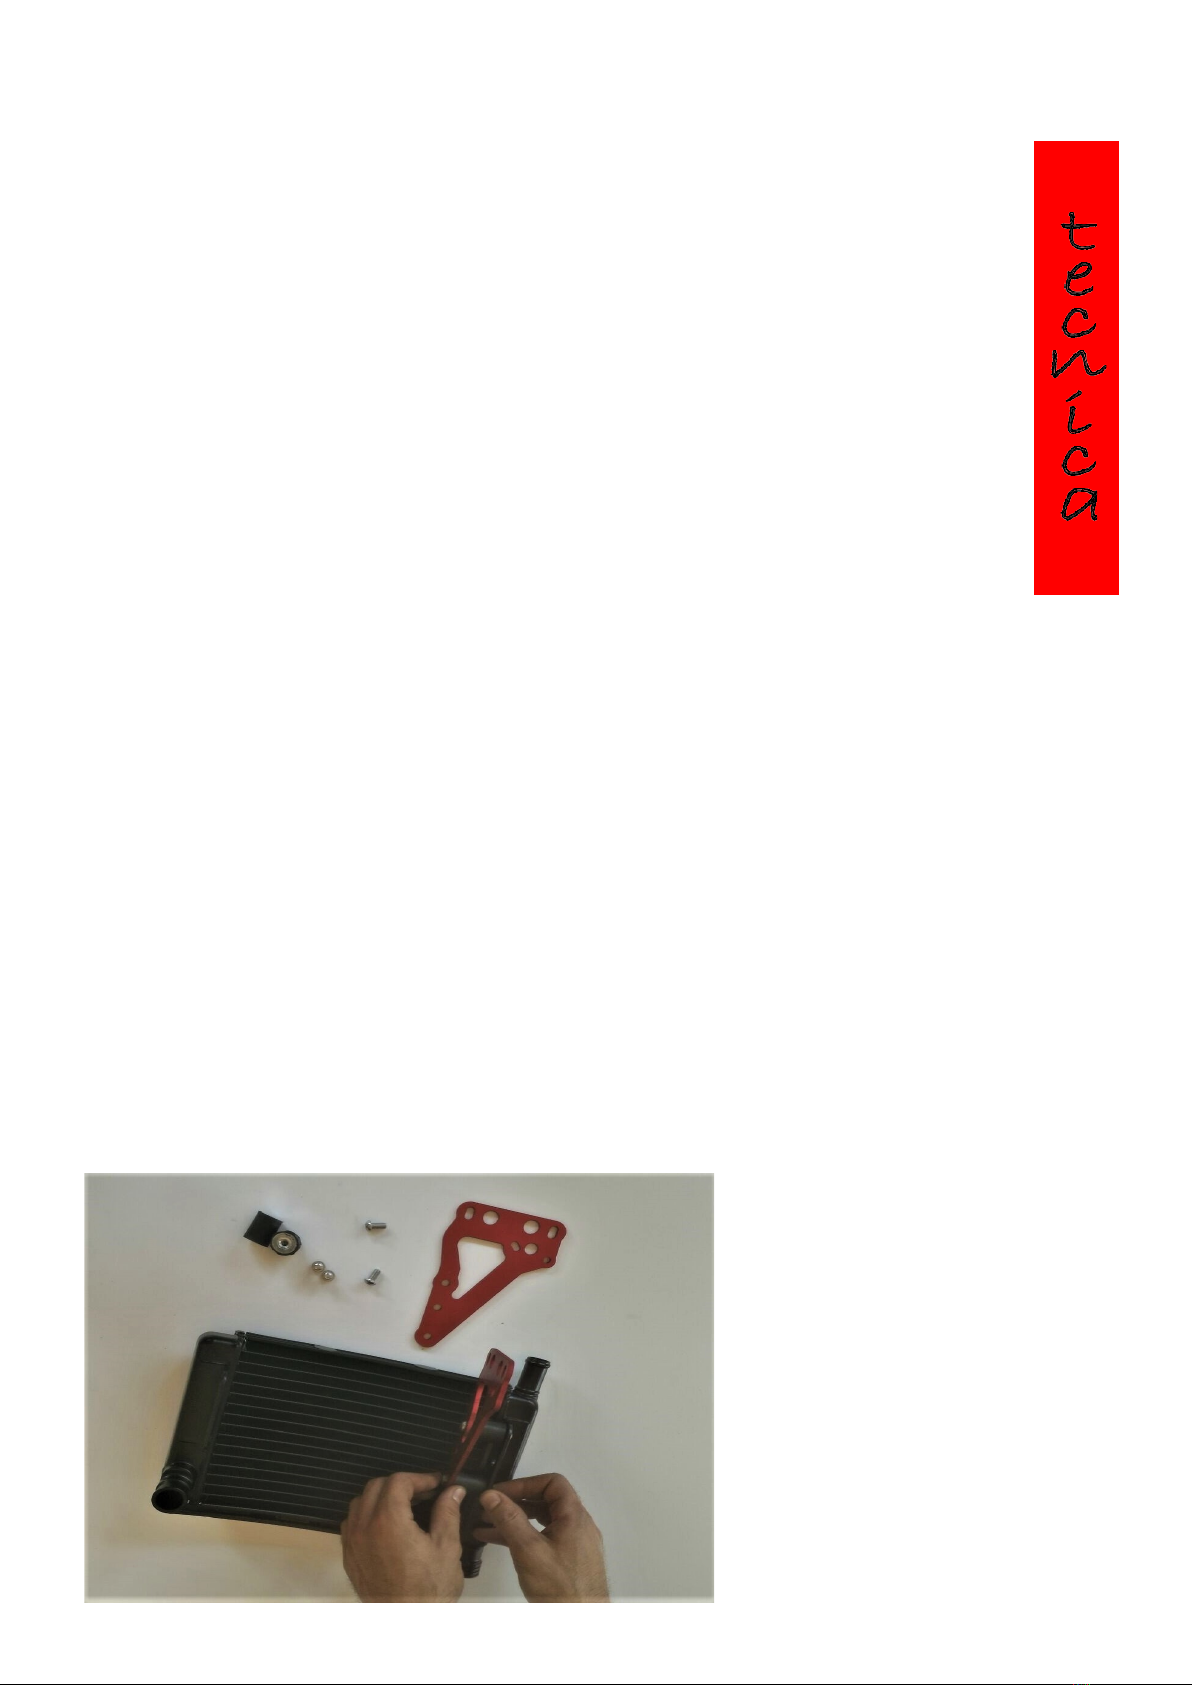
3.3.2 RADIATOR (also see 3.3.3 SILENT BLOCK BRACKETS)
Assemble the specific silent blocks on the radiator and then the brackets on the silent blocks (on
both sides).

Then assemble the tank as in the
figure.
Position the radiator on the upper head cover and insert the tubes in the respective openings as in
the figures below.
Check the positions of the joints and insert the tube tightening clamps as in the photo.
3.3.3 SILENT BLOCK BRACKETS
Assemble the Teflon disc and then
the silent block on the
upper head cover as in the figure to the side.
Then, assemble the head cover dissipator.
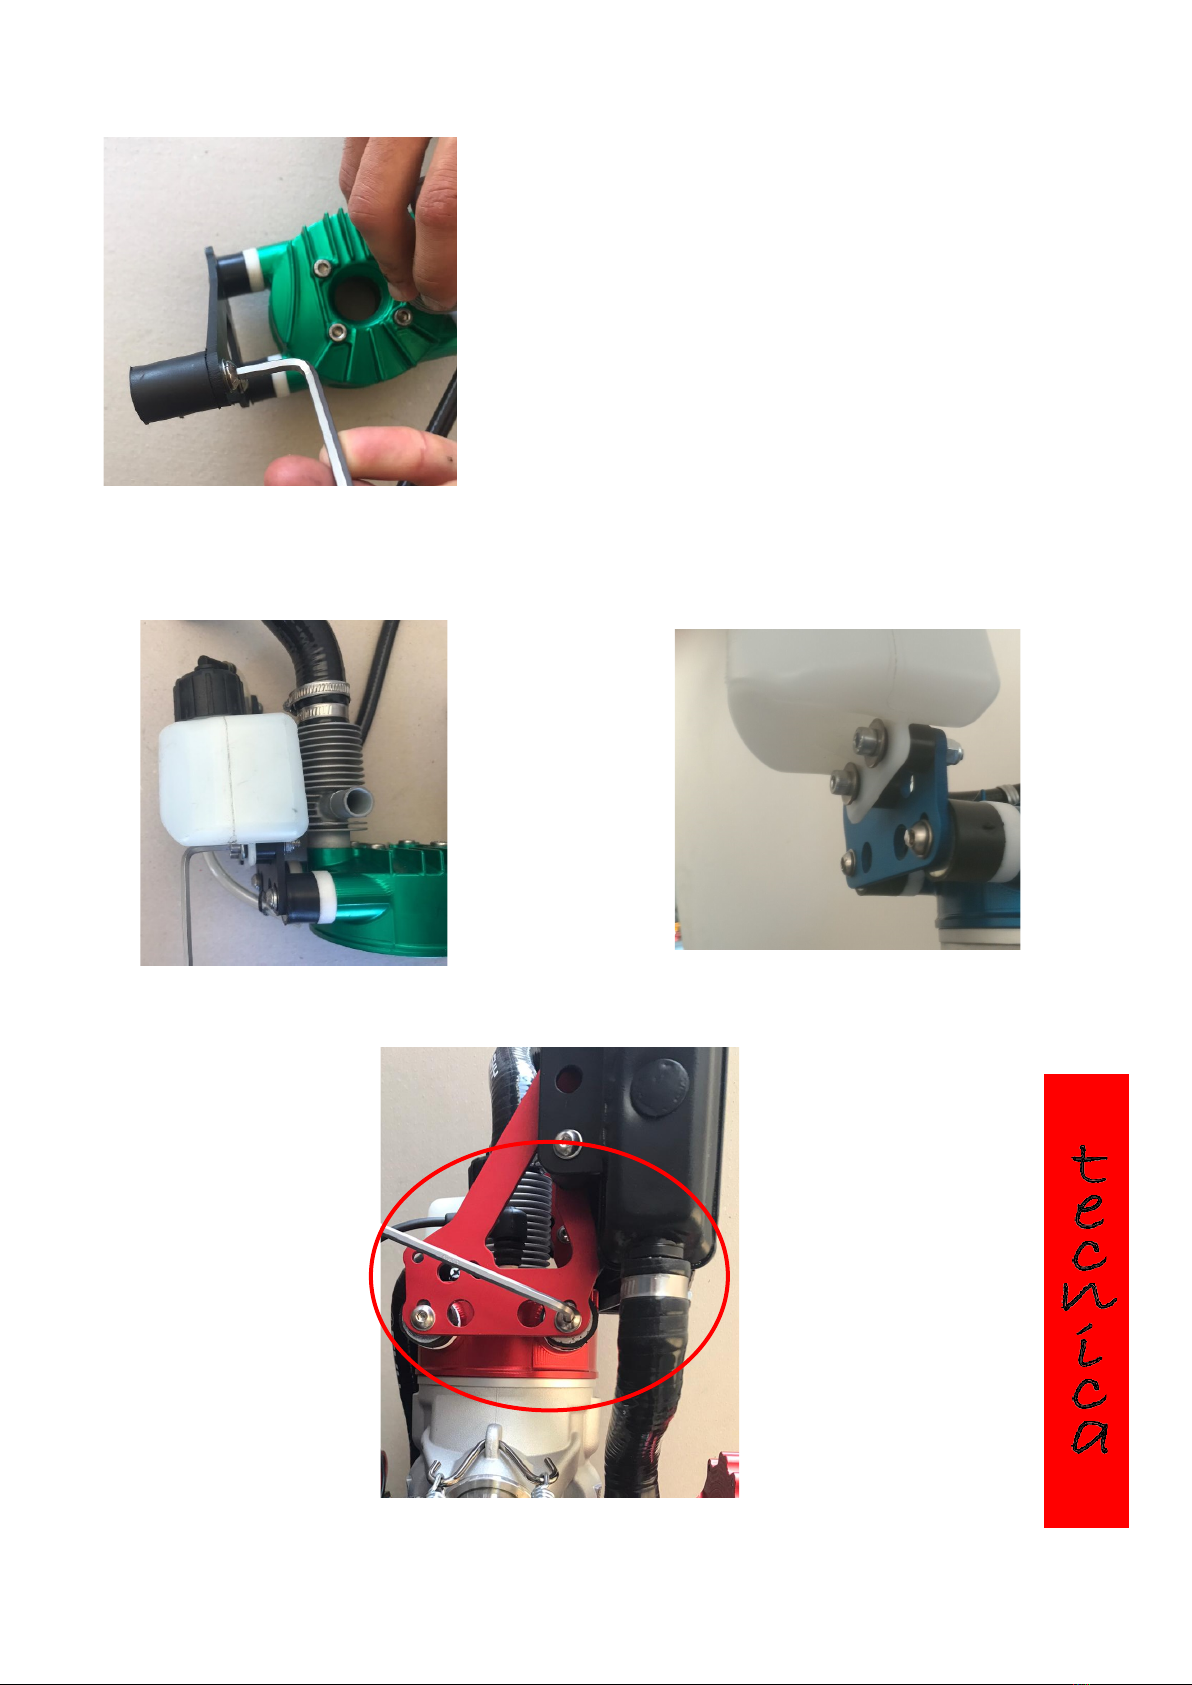
Assemble the brackets on the silent block of the upper head
cover and the silent blocks on the brackets.
Position the tank on the bracket and avoid using the nut without tightening it, to see the tip of the screw
exiting as in the figure to the side.
Lastly, assemble the radiator on the specific silent blocks.

3.3.4 CLUTCH
Before assembling the clutch, ensure you have the following parts.
Position the spring in the specific compartment of the shoe and position the clutch body as
demonstrated in the figures.
Before positioning the shoes and screwing in the screw, affix a drop of Loctite to block the
thread in the specific hole.
This process should also be carried out for the other 3 shoes.

Arrange everything on a vice, aiding fastening with a cylindrical body ensuring the
holes of the shoe and the clutch body match and insert the pin as in the following
figure.
Lastly, assemble the clutch in the engine casing.

3.3.5 OVERALL IGNITION UNIT
Take the flywheel and ensure everything needed is present, i.e. ratchets, screws and springs.
Ensure the parts in question are clean.
Position the spring in the specific hole
and in the flywheel guide as in the
photo to the side.
Rest the ratchet and ensure it fits
with the spring.

Position the threadlocker and the specific screw provided, tighten and ensure the ratchet
remains free to rotate as in the 2 following photos.
Grease the spring carefully.
Couple the serrated pin with the spring, fitting
the latter in the specific slot.
Position the spring-serrated pin unit in the
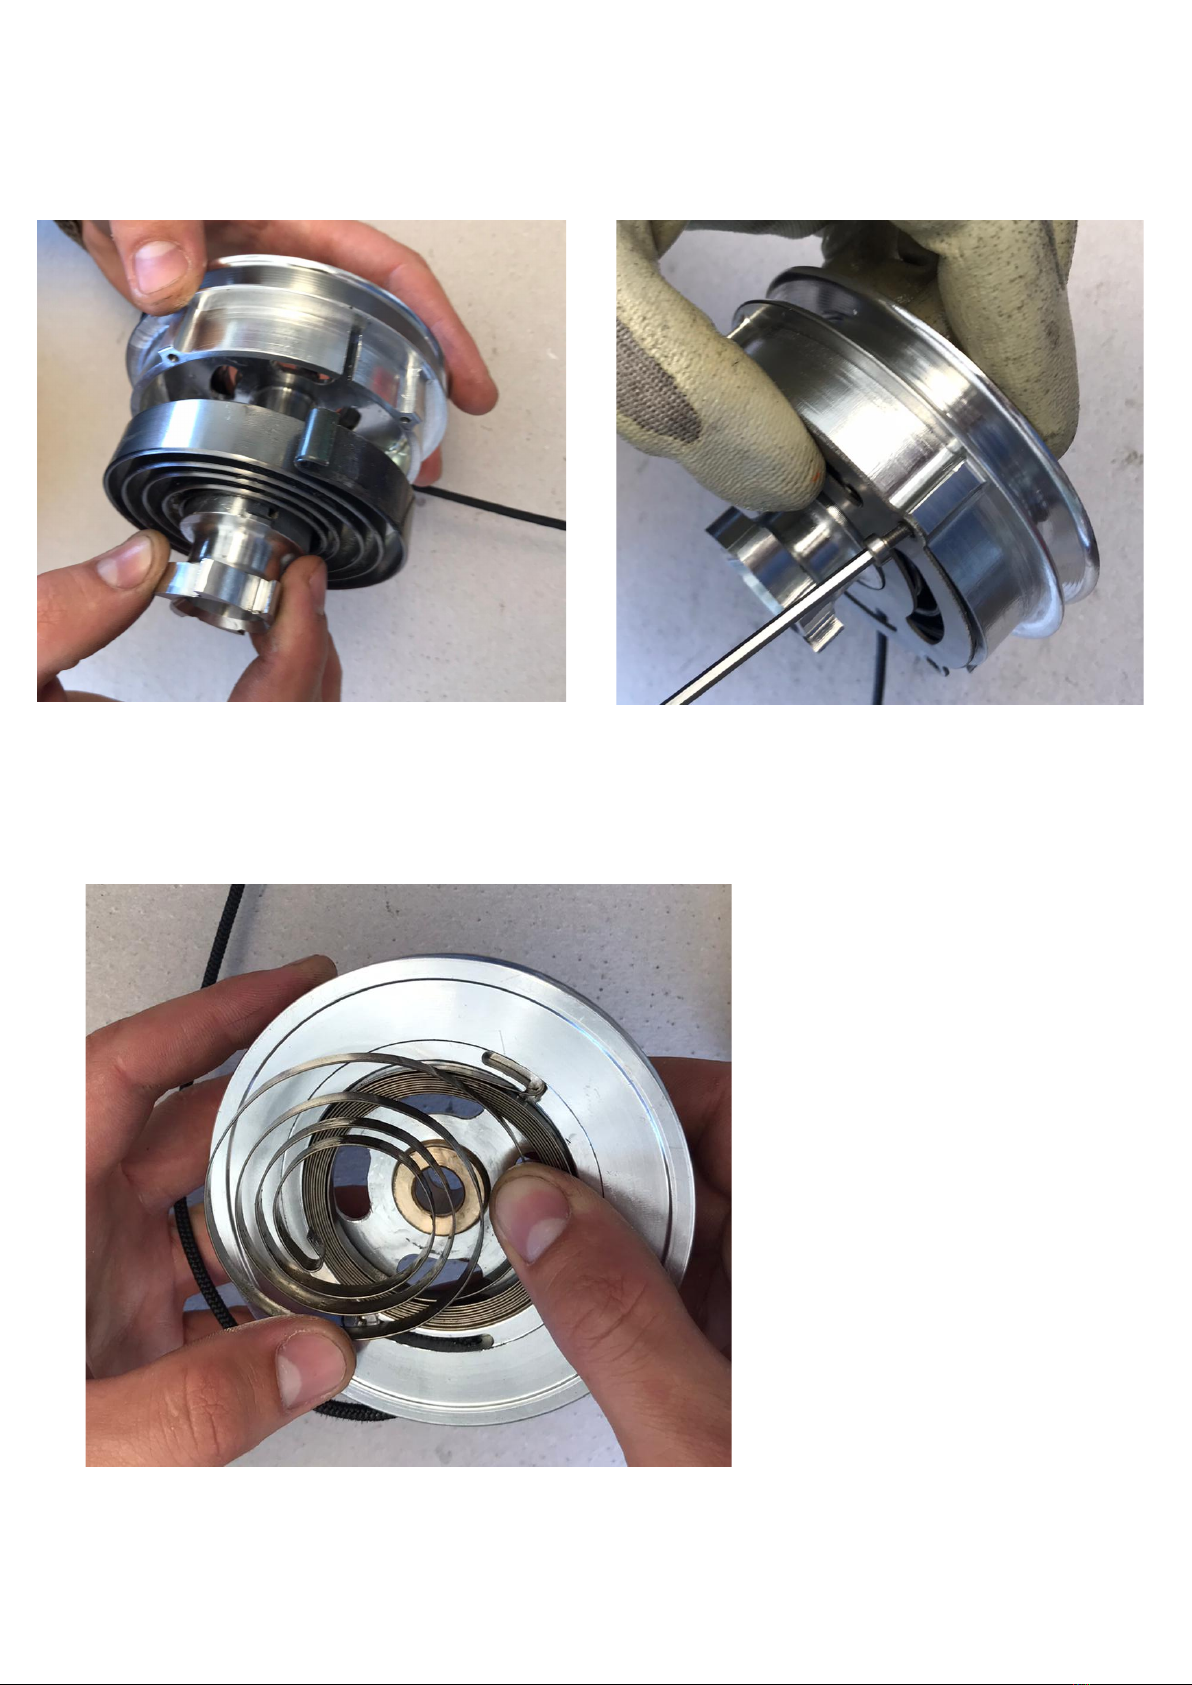
specific compartment of the pulley, also here fitting the spring in the specific slot of the pulley.
Then, screw in the grid as shown in the figures below.
Insert the small spring from the other side of the pulley. As before, fit the spring well in the specific
compartment.

Insert the cord in the hole of the pawl; tighten the grub screw on the cord, then insert it in the hole
of the pulley. Lastly, fit the pawl in the specific hole on the pulley and wind the cord 8 rotations in
the pulley as shown in the figures.
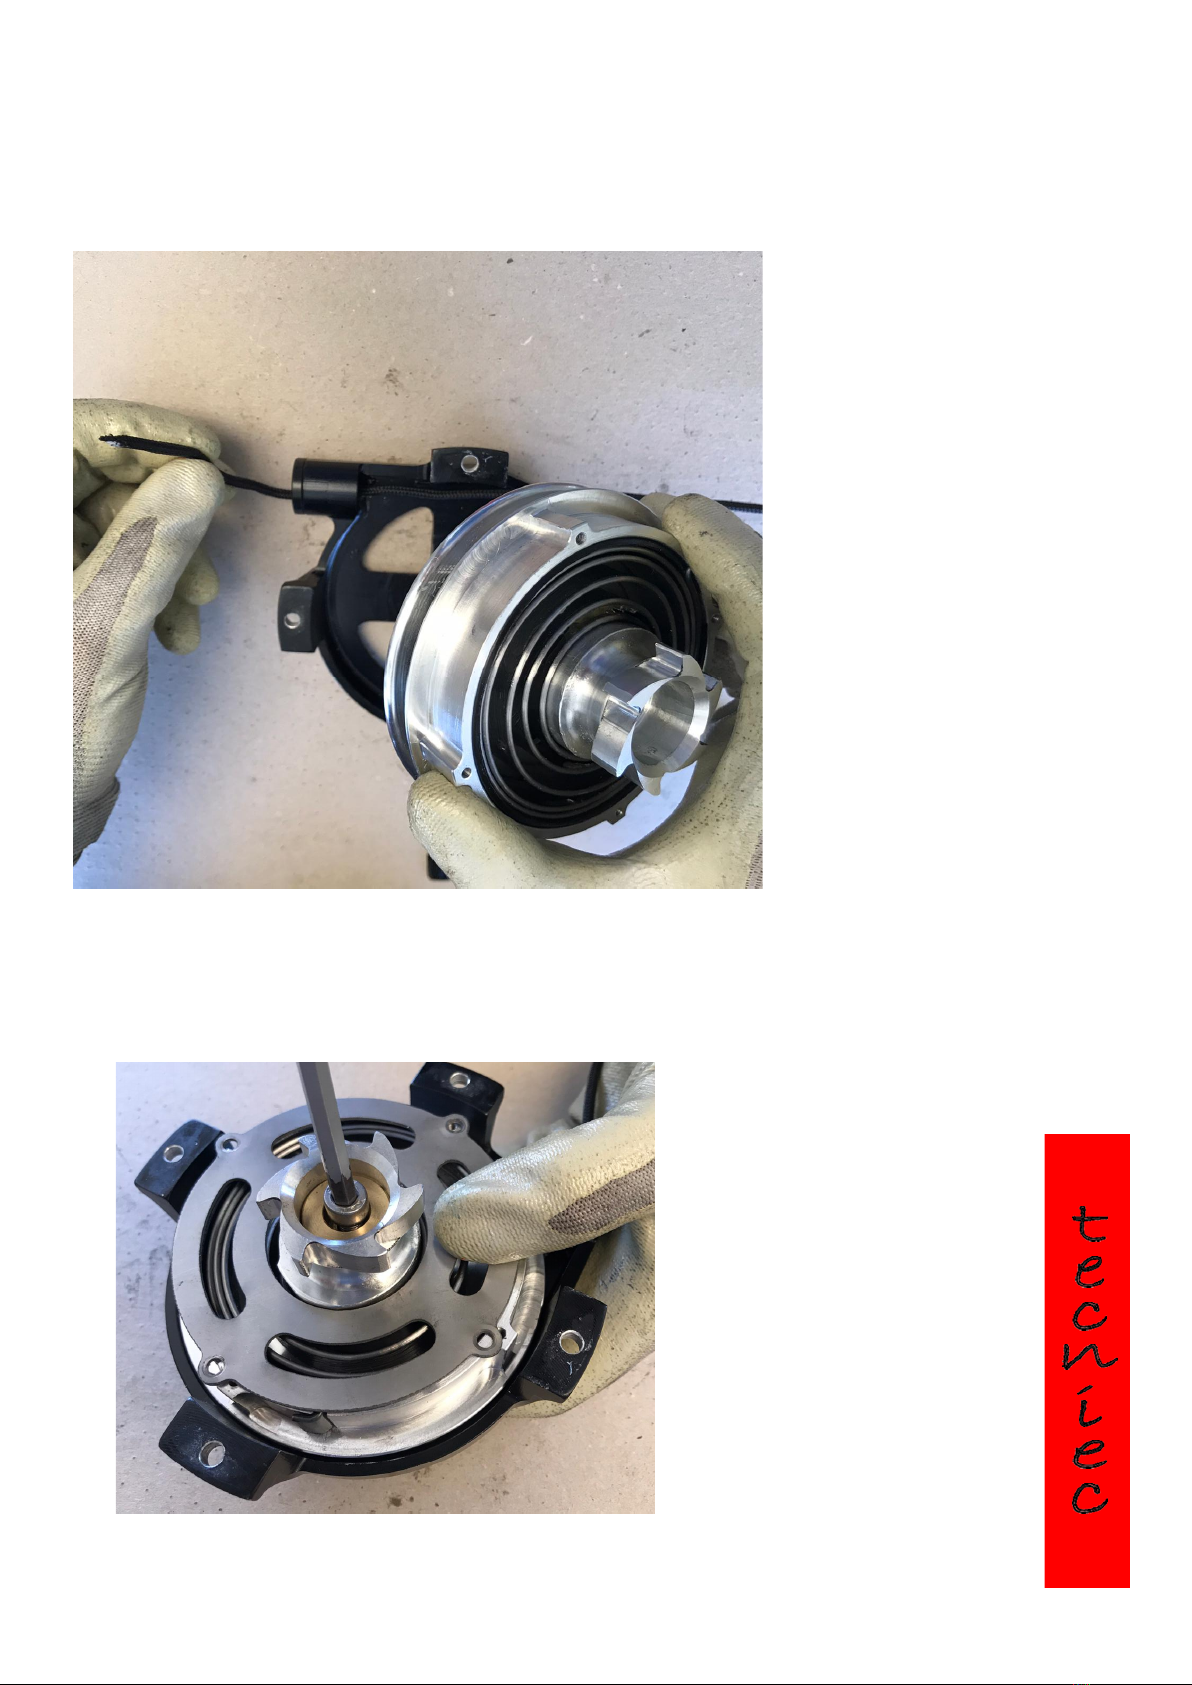
Position the rope in the specific hole of the cup. Insert the ignition unit assembled in the cup and
connect the end of the small spring to the cup.
Insert the bushing as in the figure and tighten it to the serrated pin.
Lastly, check everything is assembled correctly by pulling.
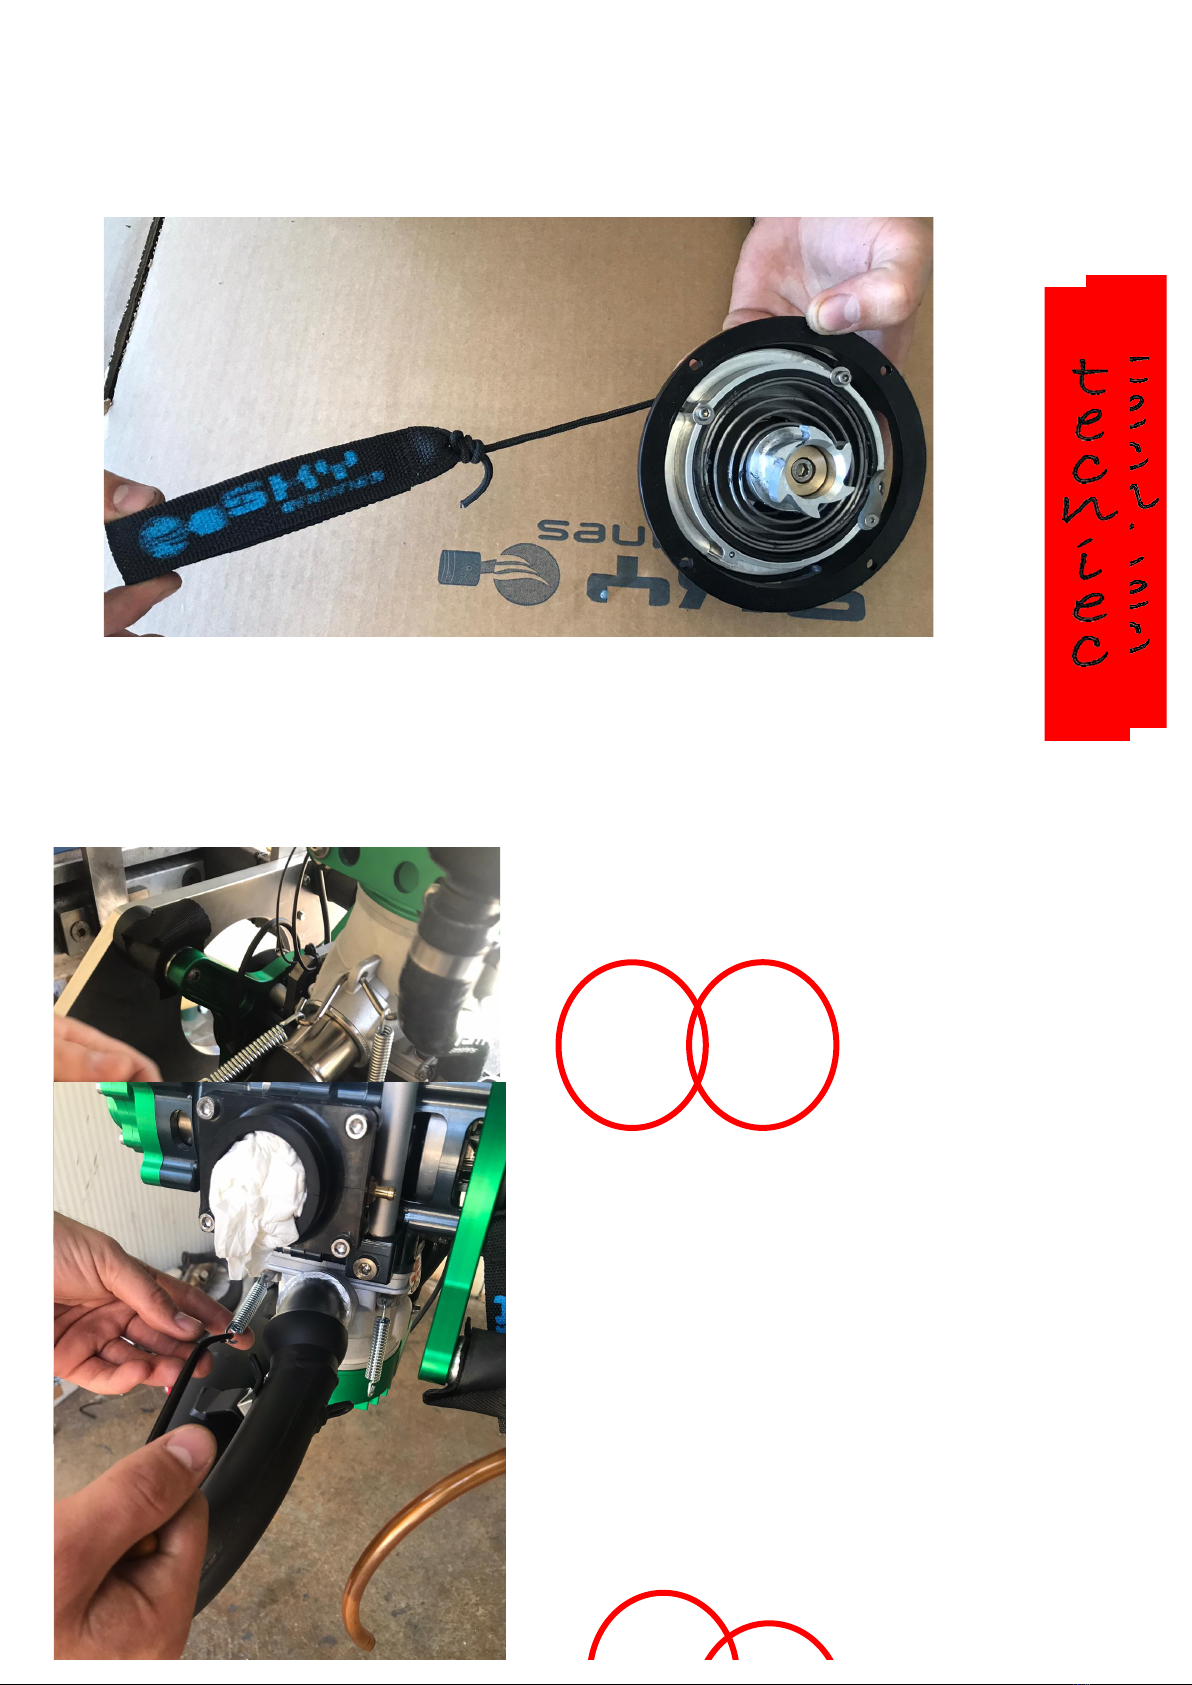
3.3.6 EXHAUST
Insert the manifold of the upper exhaust in the respective
receptacle of the upper cylinder.
Then, assemble the springs with the help of the specific
hook.
Repeat the same operation for the lower exhaust as
shown in the photo.

Fasten the upper exhaust to the two upper silent blocks, as shown in the figure.
Repeat the same procedure for the lower exhaust. Lastly, for the lower exhaust, adjust the correct
inclination by tightening the screw as circled in the image below.
Table of contents
Other SKY Engines Engine manuals


