Skybeam Digital Phone Operation manual

Digital Phone
Installation &
User Guide
Telephone #1 _________________________________
Voicemail PIN _________________________________
Telephone #2 _________________________________
Voicemail PIN _________________________________

skybeam
HIGH SPEED INTERNET • DIGITAL PHONE
We would like you to verify that the 911
address we have for you is correct - you can
do this by dialing 555-555-0911 from your
Skybeam Digital Phone.
If you find that your 911 address is incorrect,
please let us know immediately by calling
us at 1.888.SKYBEAM or emailing us at

Connect the Linksys Phone Adapter to the Internet.
Plug a phone into the adapter (see page 10, step 6)
Configure your phone options such as voicemail and
failover number at http://voice.skybeam.com and
login using your phone number and password shown on the
label below. See pages 15-16
Optional: Keep (port) your existing phone number.
Visit website www.skybeam.com/lnp (LNP Form)
Quick Start Instructions
1
2
3
4
Welcome!
Thank you for ordering the SKYBEAM Digital phone Service. This
service utilizes VoIP (Voice over Internet Protocol) technology
which allows you to use your high-speed SKYBEAM Internet
connection to make and receive phone calls.
This guide will assist you in setting up your phone service and
configuring the options to suit your needs. It also lists the features
that are available with instructions on how to use them.
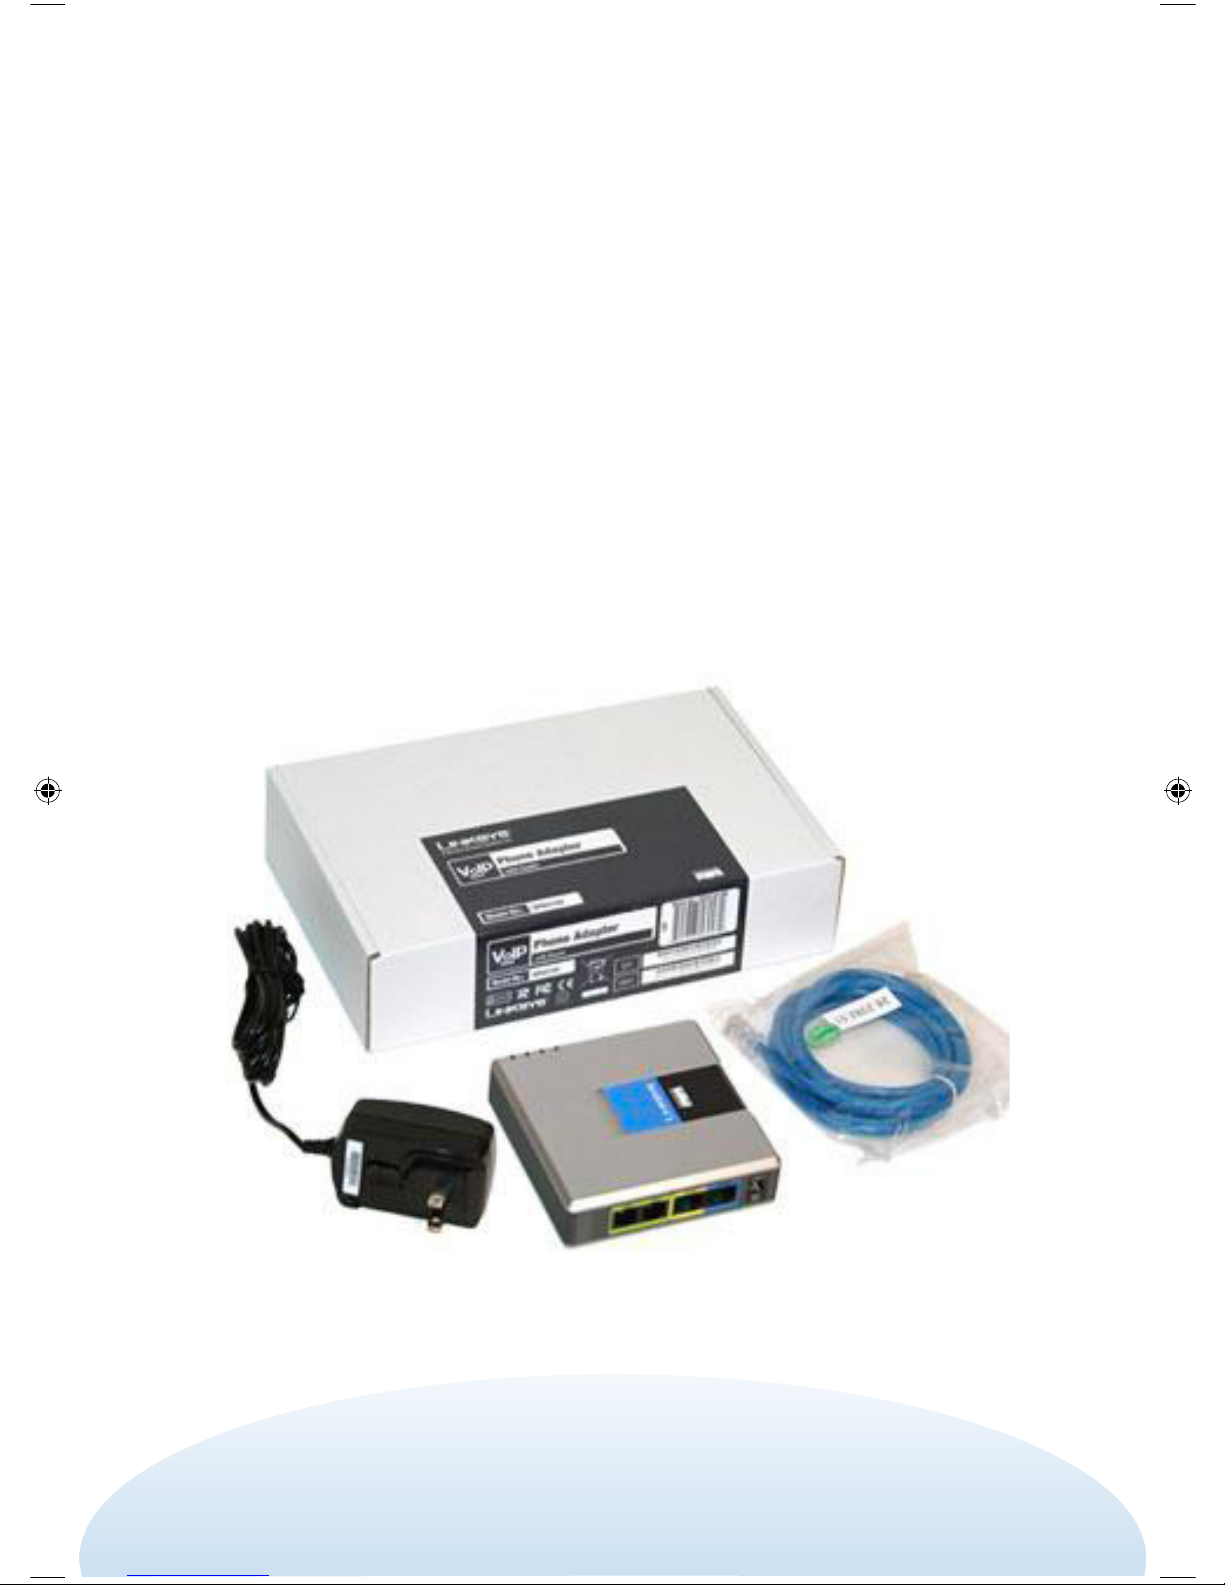
Package Contents
Power Supply
Ethernet
Linksys

5
Table of Contents
SECTION: PAGES:
Phone Number Options 6-7
1. Keeping Your Current Number
2. Phone Setup Options when Porting
3. Important Porting Information
Setting up the Phone Service 8-13
Feature Setup and Use 15-17
1. Online Configuration
2. Phone Configuration
Troubleshooting 18-21
1. Billing
2. Faxing & Alarm Systems
3. Phone Doesn’t Work
4. Caller ID
5. Call Quality
6. Porting
7. Installation
8. Voicemail
9. Lost Password
10. Ringing Problems
11. Calling Problems
12. Cancelling Phone Service

Phone Number Options
Your SKYBEAM Phone Service ships with a new working telephone number
that you can begin using immediately. This number is printed on the your
manual with your voicemail password. If you are NOT going to port your
phone number (bring your number to SKYBEAM), or wish to do it at a
later time, please skip to page 8, “Setting up the Phone Service.”
1. KEEPING YOUR CURRENT NUMBER
If you decide to port (keep) your number, please follow these steps:
A. The number you wish to port must be active with your current
phone company.
B. A “Letter of Authorization” must be entered via the website:
http://www.skybeam.com/lnp (LNP Form)
C. Use a copy of your phone bill to fill out the online form.
D. Once submitted, we will process the port, which takes about 20-
30 calendar days. You will receive an e-mail notification when the
port has been submitted and when it is completed. Please keep your
porting number active with your existing provider until we notify you
that the port has completed.
2. PHONE SETUP OPTIONS WHEN PORTING
Please choose one of the three options listed below if you are porting
your phone number to determine when and how to set up your phone
service:
A. CALL FORWARDING OPTION (recommended)
Call forward your porting number to the Skybeam assigned number
and start using the Skybeam Phone Service to make and receive
all your calls. Once you have forwarded your calls to the Skybeam
assigned number, go to page 8, “Setting up the Phone Service.”
B. TWO PHONE OPTION
Keep your existing phones hooked up to your current phone service,
and set up your Skybeam Phone adapter with a phone plugged into it.
When your existing phones quit ringing and the Skybeam phone starts
to ring, the port has completed. At that time, follow the steps on page
11, beginning with step 10. This will allow you to set up all phones
in your home to use the Skybeam Phone Service. To proceed with
setting up your Skybeam Phone adapter, go to page 6, “Setting up the
Phone Service.”

7
C. WAITING FOR PORT OPTION
You can wait to hook up the Skybeam phone service until you notice
that the port has completed. The downside to this option is that
you may miss calls. Several companies are involved in the porting
process and once the port completes it may take a few days for us
to notify you. However, callers will be able to leave messages on
your Skybeam voicemail. You can configure the voicemail online at
http://voice.skybeam.com to notify you via e-mail or text message
when you receive a message. When you receive the confirmation
e-mail indicating that the port has completed, go to page 8, “Setting
Up the Phone Service.”
3. IMPORTANT PORTING INFORMATION
A. PRE-CONFIGURED ADAPTER
Once we process your porting request, we immediately configure
your phone adapter with your porting number, so calls made from
a phone attached to the adapter will show your porting number
on the outbound caller ID before the port has completed. This is
normal.
B. DON’T CANCEL
After 20-30 calendar days, you may notice that the port has
completed several days before we notify you.
DO NOT CANCEL YOUR EXISTING PHONE SERVICE UNTIL
NOTIFIED VIA E-MAIL OF THE PORT COMPLETION.
C. PORT STATUS
name and phone number, and we’ll respond with the status.
Step 1
Open the box or envelope
delivered to your home.
Inside the package is the
Linksys Phone Adapter,
power supply and one
Ethernet cable. If the power
supply is in two parts, slide
the small black plug portion
onto the large black power
supply
Setting Up Phone Service
WARNING: To use all the phones in your home on the Skybeam telephone service,
it is imperative that you FIRST disconnect the phone wiring from the carrier box on
the outside of your home (See step 9 for details.)
9
Step 2
Locate your Internet
connection by following the
Ethernet line that comes
into your home from the
outside and plugs into the
Motorola Antenna Power
Supply (it may be located
near your computer or in
your basement). Locate the
Ethernet plug on the power
supply and disconnect it from
your computer or router. It’s
usually a flat black cable.
Step 3
Insert the rounded plug
into the power jack on the
adapter, and plug the other
end into an always-on power
source.
Step 4
Take the Ethernet plug you
unplugged in Step 2 that was
attached to your computer
or router, and plug it into the
blue jack labeled “Internet.”

Step 5
Take the Ethernet cable that
was included in the Linksys
Phone Adapter box and plug
it into the yellow jack labeled
“Ethernet.” Plug the other
end of the Ethernet cable
into the same location on
your computer or router from
which you unplugged the
Ethernet cable in step 2
Step 6
Plug a single phone into the
Linksys Phone Adapter jack
labeled “Phone 1” (the outer
jack).
WARNING: Do not plug a
phone cord from a wall jack
into the phone adapter at
this time as it may damage
the adapter. The “Whole
Home Installation” will be
explained beginning with
Step 9.
Step 7
Turn the Phone Adapter so
that you can see the lights.
The first three lights should
come on in sequence.
Light 1 is the power light and
should become solid green.
Light 2 will flash as Internet
traffic passes through the
device.
Light 3 indicates dial tone is
available from the “Phone 1”
jack and should become solid
green within 30-60 seconds.
It will flash when a phone is
in use (off-hook).

11
Step 9
Whole Home Installation:
If you wish to use all the
phones in your home on the
Skybeam Phone Service,
it is imperative that you
disconnect the landline of
your existing phone carrier
from your home wiring.
If you have ported your
number, wait until you are
notified via email that your
port has completed before
proceeding. Otherwise
continue with the following
steps.
Step 10
To disconnect your home
from your landline phone
provider, locate the telephone
network interface unit on the
outside of your house. This
is usually located near the
cable and power boxes. Most
units will look like this box,
but may vary depending on
the age of the home. Using a
screwdriver, open the box.
Step 8
Test your connection by picking up the phone. You should now hear a dial tone. If you
will be using a single phone plugged into the Skybeam Phone Adapter, you can now
skip to page 15, “Feature Setup and Use.” However, if you have phones throughout
your home that you would like to connect to the Skybeam Phone Service, please
proceed to Step 9 which covers “Whole Home Installation.”
Step 11
Interface Type 1: Locate all
the RJ-11 telephone plugs
in the box. These are the
clear plugs that look like a
standard telephone plug in
your home.
Step 11
Interface Type 2: Newer
homes will often have
a different style phone
interface. Locate the
latch(es) that that are
labeled “cover release.”
Step 12
Interface Type 1: Unplug all
the RJ-11 telephone plugs in
the box. This will disconnect
the phone company’s lines
from your home. Close and
secure the cover door.
Or...
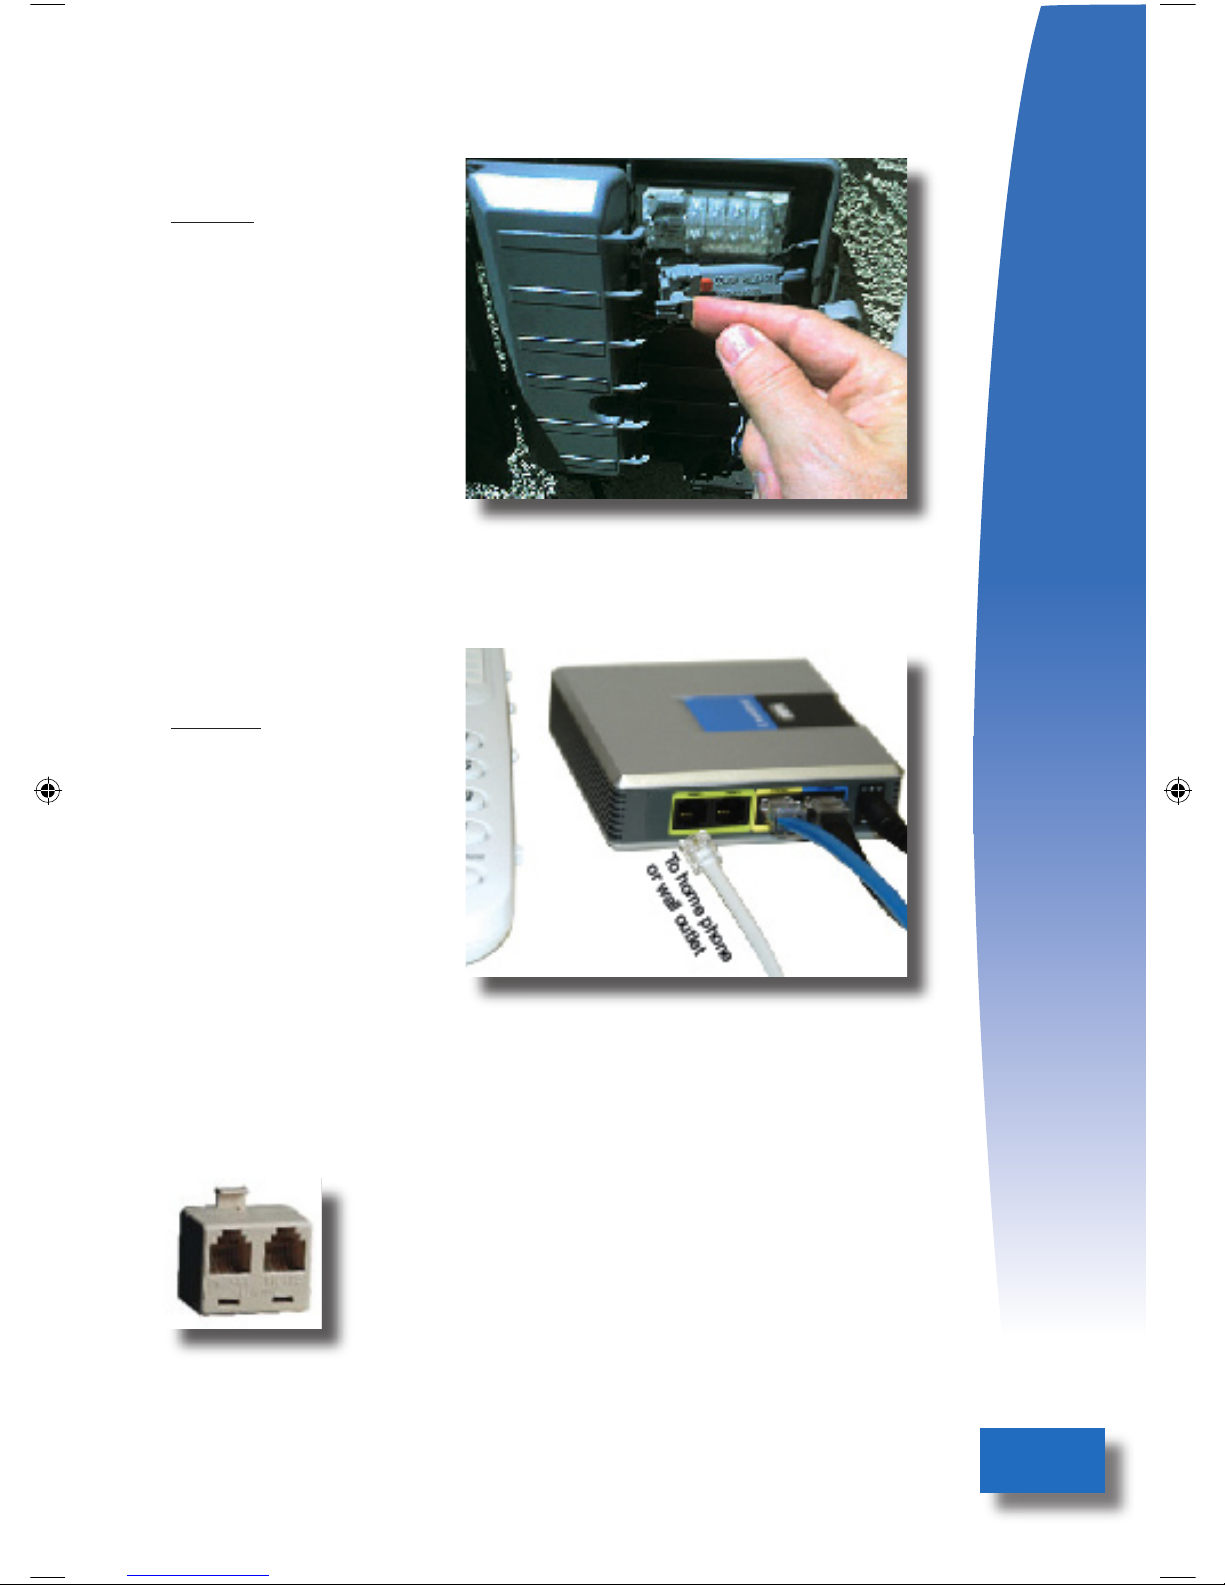
13
Step 12
Interface Type 2: Pull the
latch(es) forward to open the
cover release mechanism.
This disconnects the jack
from your outside phone
line(s). Close and secure
the cover door making
sure the latch(es) remain
disconnected.
Step 13
Now you can plug into your
home phone network. Take
a standard phone wire and
plug one end into the “Phone
1” jack; plug the other end
into a previously active home
phone wall jack.
To use a phone in the same wall
jack, use a duplex adapter that splits
one jack into two, as shown.
Or...

Included Features
• Unlimited Calling to U.S., U.S.
Territories and Canada
• Voicemail
• Call Waiting
• Caller ID
• 3-way calling
• Call Transfer
• Last Call Return
• Auto Redial
• Web Configuration Tools
• E911
• Keep Your Existing Telephone Number
• Find Me/Follow Me Call Forwarding
• PLUS Low International and 411 Rates

15
Feature Setup and Use
Once your phone is set up and you have a dial tone, you should
configure the features of your phone. Some of the features are
configured online and some are configured directly from your phone.
1. ONLINE CONFIGURATION
To set up your online-based phone features, go to the website: (http://
voice.skybeam.com.) Your login is your 10-digit phone number, and your
password is the four digits printed on the front of this book or on the
label of your phone adapter. If you are in the process of porting your
phone number, use your porting number. The password was e-mailed
to you if you ported after receiving the adapter or you can obtain it by
calling Skybeam Customer Care. To configure your phone click the “One
Number Access” tab. This tab allows you to do the following:
A. Set up a Failover Number.
This is a phone number where calls will be transferred if there is a
power outage or if the Internet service is down. Typically it would be
a cell phone. It is not required, but can be useful in the event of an
outage.
B. Configure Voicemail or Answering Machine.
The Skybeam Phone Service comes with voicemail turned on—it will
answer after 20 seconds (about four rings). The Skybeam voicemail will
store 50 messages. If you wish to use your own answering machine,
uncheck the “Voicemail On” button. If you wish to have your voicemails
emailed as an audio attachment and/or texted to you, enter an e-mail/
text address. Deleting an emailed copy of the voicemail message will
not delete the message from your voicemail box. You will need to dial
into your voicemail and delete it there also.
C. Set up Ring Pattern.
The ring pattern determines how incoming calls will be handled. It is set
for “Ring Main Phone Only.” It can be set to ring the main phone, then
forward to an alternate number, ring an alternate number only (“Call
Forwarding”) or to forward all calls to voicemail. The options will change
with each choice and are self explanatory. Be sure to click on the “save”
button once you make any changes to the One Number Access page.
2. PHONE CONFIGURATION
After you have configured the basic settings of your phone through
the website, there are additional settings that are configured using the
phone itself.

A. Access Voicemail - Record Voicemail Greeting - Change
Password.
If someone has left you a voicemail message, when you pick up
the phone you will hear a “stutter” dial tone. To access the Skybeam
voicemail system, simply dial your phone number. (If you are in the
process of porting your number, dial the temporary number until the
port has completed). If you are calling from your own number, you will
be prompted for your password. If you are calling from another number
(such as a cell phone), press the “*” (star) key when the greeting starts
playing, and you’ll be prompted for your password. You can now listen to
your messages. To customize your greeting, press “0” for mailbox options.
Press 1 to record your “Unavailable Message” (the message callers hear
if you don’t answer the phone). Press 2 to record your “Busy Message”
(message callers will hear if you’re on the phone). Press 3 to record
your name. Press 4 to record a temporary greeting (if you record this,
you’ll need to delete it before your regular greetings will play). Press 5 to
change your password, if desired.
B. Caller ID
Inbound and Outbound caller ID are provided with the Skybeam Phone
Service. Inbound caller ID will display the caller’s name and phone
number for all calls when available. It requires a telephone with Caller ID
display capability. Outbound Caller ID for a new number that we assign
will show your phone number, but may display “Anonymous, Restricted,
Private, Not Allowed” or an incorrect name for up to a month until your
name information is updated in the national Caller-ID Database. Please
make sure that you have enabled outbound caller ID by dialing *68 on
your phone.
C. Block Caller ID
*67 blocks outbound caller ID; *68 enables outbound caller ID. You will
usually want this enabled.
D. Call Waiting
A call waiting tone alerts you to an incoming caller during an active call.
Press Flash (or hook switch) to place the current call on hold and answer
an incoming call. Press Flash (or hook switch) to switch between calls. Dial
*56 to enable Call Waiting; dial *57 to disable this feature.
E. 3-Way Calling - Call Transfer
During a call press Flash (or hook switch) momentarily; the party will be
placed on hold. You will hear dial tone and can then dial a third party.
Once the third party starts ringing you can either press the Flash (or
hook switch) to join all three parties in a single 3-way call, or hang up to
connect the remaining two callers. You can perform a blind transfer by
hanging up before the third party answers, or an attended transfer by
hanging up after the third party has answered.

17
F. Last Call Return
Dial *69 to call the phone number of the last caller if Caller ID
information was available.
G. Auto Redial
*66 will redial the last number you called. If the number is busy the
user will hear a special announcement and the feature will monitor the
called number for up to 30 minutes. When both lines are idle, the phone
will give a special ring. Pick up the handset and you will be connected
to the number. During the monitoring process you can continue to
originate and receive calls without affecting the Auto Redial request.
Request can be canceled by dialing *86.
H. Call Dialing
All numbers within your home area code can be dialed using 7 digits
(the area code is not required). For all calls outside of your area code
dial 1 plus the 10-digit number. For international calls, start by dialing
011, then the country code, then any remaining digits. Calls to all
locations in the U.S., U.S. Territories and Canada are included in the
monthly service price. Calls to other countries have a low per-minute
charge based on the country. (To avoid delays after dialing a number,
press the “#” (pound) key and the call will connect immediately.)
I. International Calls
To view the rate for an international call, go to the website (http://
voice.skybeam.com,) log in, and click on “International Rates.” Type in
the name of the country to see current pricing. International and 411
calls are billed at the beginning of each month to your account. To see
itemized toll calls that you have made for up to six months, click on the
“Billing” tab in the website.
J. 911 and 411 Calls
911 calls are included with the service. You should be prepared to give
your address immediately on a 911 call if asked, although in many cases
the 911 operator may already have it available. If you have moved since
setting up service, please contact Skybeam Customer Care to update
your address in the 911 address database. 411 calls are available at
$.89/call and billed with the International calls at the beginning of each
month.
K. Please note
Our service does not support any thirdparty billed calls such as collect,
credit card, 900 and certain 800 pay-per-call services. Rotary or pulse
dial phones will not work. Your phone must be set to “tone” dialing.

Troubleshooting
The following topics cover the most typical problem situations that you
may encounter, along with an explanation and action to take.
1. BILLING
We bill for Skybeam Phone Service every month in advance. Because we
activate the phone service after your Internet service has been installed
and after you’ve received your initial invoice from your installer, we prorate
the phone service for the balance of the current billing cycle. Your next
invoice will include the prorated amount, plus the next month’s charge for
phone service.
2. FAXING & ALARM SYSTEMS
The Skybeam Phone Service uses digital technology, while faxing and
DVR-type connections to the phone use analog technology. We cannot
guarantee that these services will work successfully on the Skybeam
Phone Service. However, faxing is more likely to function properly if the
fax baud rate (speed) is set to a slower speed, (we recommend 9600
baud rate on your fax speed setting.) Alarm systems will not work with our
service.
3. PHONE DOESN’T WORK
The Skybeam Phone Service uses your Skybeam Internet connection.
Please check to see if your Internet connection is working by opening
a web browser on your computer to view your home page. If it’s not
working, contact Skybeam Customer Care; otherwise do the following:
A. Check Power
Please make sure that the green lights are active on the Linksys Phone
Adapter. Power-cycle the adapter (unplug the power, then plug it back in)
and wait for 1-2 minutes for it to reset. This may fix the problem.
B. Check Wiring
Verify the wiring to make sure the Ethernet plug on the Motorola Antenna
Power Supply is plugged into the “Internet” (blue) jack—see page 9, step
4. Also check to make sure the phone wire is plugged into the “Phone 1”
jack—see page 10, step 6.
C. Check Lights
The normal light configuration on the adapter should be: 1st light (power)
solid green; 2nd light (Internet traffic), flickering green; 3rd light (Phone
1 jack) solid green when the phone is on hook—flashing when the phone
is off-hook. If the lights ARE NOT in this configuration, contact Customer
Care. If the lights ARE in this configuration and you do not hear a dial
tone, try plugging a single phone directly into the phone adapter “Phone
1” jack, to verify a dial tone. If you still don’t hear a dial tone, try using a

19
different phone and cable to see if the phone is malfunctioning. Contact
Customer Care if you have trouble resolving the problem.
D. Port Completed?
If your phone(s) quit working and you have ported your number, it’s
possible that your port has completed. To verify port completion, see
number 6 below. After receiving a confirmation e-mail indicating that
your port has completed, if you chose option 2B on page 6, “Two Phone
Option,” follow the instructions on page 11 beginning with Step 9,
“Whole Home Installation,” to complete the installation. If you chose
option 2C on page 6, “Wait for Port Option,” go to page 8, “Setting Up
the Phone Service.”
E. Contact Customer Service
If you still cannot get the phone service to work, please contact our
Customer Care department to resolve the problem.
4. CALLER ID
Caller ID is available for both inbound and outbound calls. Inbound
caller ID should work properly when connected to a phone that
supports caller ID. Outbound caller ID is also provided, but it may take
several weeks for your name to properly display on the phones that you
are calling. Be sure to enable outbound caller ID by dialing *68 from
your phone, which unblocks outbound caller ID. If your name does not
display properly after 30 days, please contact Customer Care to resolve
the problem. If inbound caller ID quits working, please dial *65 to
enable it.
5. CALL QUALITY
If you are having call “breakup,” “choppiness,” or “dropout” issues,
(the audio goes out for several seconds) there may be several causes.
One possibility is in-home interference from multiple wireless devices.
Our Skybeam antenna is located on the roof of your home, and the
frequency it uses is very close to some of the frequencies used in
cordless phones and routers. Try using a corded phone for a day to
make calls, and unplug the power from all cordless phones, to see if the
problem is resolved. If it is resolved, then most likely the choppiness
was caused by wireless interference in your home. Try relocating the
cordless phone base as far away as possible from our antenna on the
roof and away from a wireless router to see if that fixes the problem.
There are other things that we can do to attempt to resolve these
issues—contact our Skybeam Customer Care department for options.
6. PORTING
provide a status update or respond to any porting questions. We use
e-mail to notify you of porting problems and port completion. Please

make sure that you have provided Skybeam with a current e-mail address
to receive these notifications. In some situations we may need to have
you fax a copy of a phone bill to us, or remove a line freeze or DSL on
your current phone account to proceed with the port. Most ports take
approximately 20-30 calendar days. If you have not received any e-mail
response from Skybeam regarding your port status after 30 calendar days,
to check the status.
7. INSTALLATION
Please be sure that you have read page 6, “Setting Up the Phone Service.”
There are also installation videos on our website: http://skybeam.
com/phone. If you have followed these instructions, and are still having
difficulty hooking up the phone service, please contact Skybeam Customer
Care.
8. VOICEMAIL
If someone has left a voicemail message, you will hear a “stutter” dial
tone when you pick up the phone. To access your voicemail, please
review the instructions on page 12, number 2A, “Access Voicemail.” If you
dial your number from your own phone and are not prompted for your
password, you may have inadvertently turned off outbound caller ID, so
the voicemail system doesn’t recognize your number. Activate outbound
caller ID by dialing *68 on your phone. You can access Skybeam Voicemail
from any phone by calling your number and hitting the “*” (star) key
during the greeting message. To use your own answering machine and
turn off the Skybeam voicemail, see page 11, number 1B, “Configure
Voicemail or Answering Machine.”
9. LOST PASSWORD
If you cannot access your voicemail or the http://voice.skybeam.com
website because you lost your password, look on the front of this booklet
or on the Skybeam Linksys phone adapter where it is printed. If you
ported your number after receiving the adapter, the password changed
and it was emailed to you. If you still cannot locate the password, please
contact Skybeam Customer Care.
10. RINGING PROBLEMS
If your phone rings in a different, choppy pattern, please contact
Skybeam Customer Care to resolve the problem.
11. CALLING PROBLEMS
If you can receive calls on your Skybeam Phone Service, but cannot make
calls it’s possible that your phone is set to “pulse” mode rather than “tone”
mode (press the “9” key and see if you hear clicks rather than a tone).
Verify that the switch on your phone is set to “tone,” and not “pulse.” The
switch may be labeled “T” or “P.” For problems with international calling
Table of contents


