SkyNanny GPS SkyNanny 1.0 User manual

Copyright (c) 2014 Neit Enterprises Inc. Page 1
SkyNanny 1.0
Quick Start Guide
Version 1.01
Copyright (c) 2014 Neit Enterprises Inc. Page 2
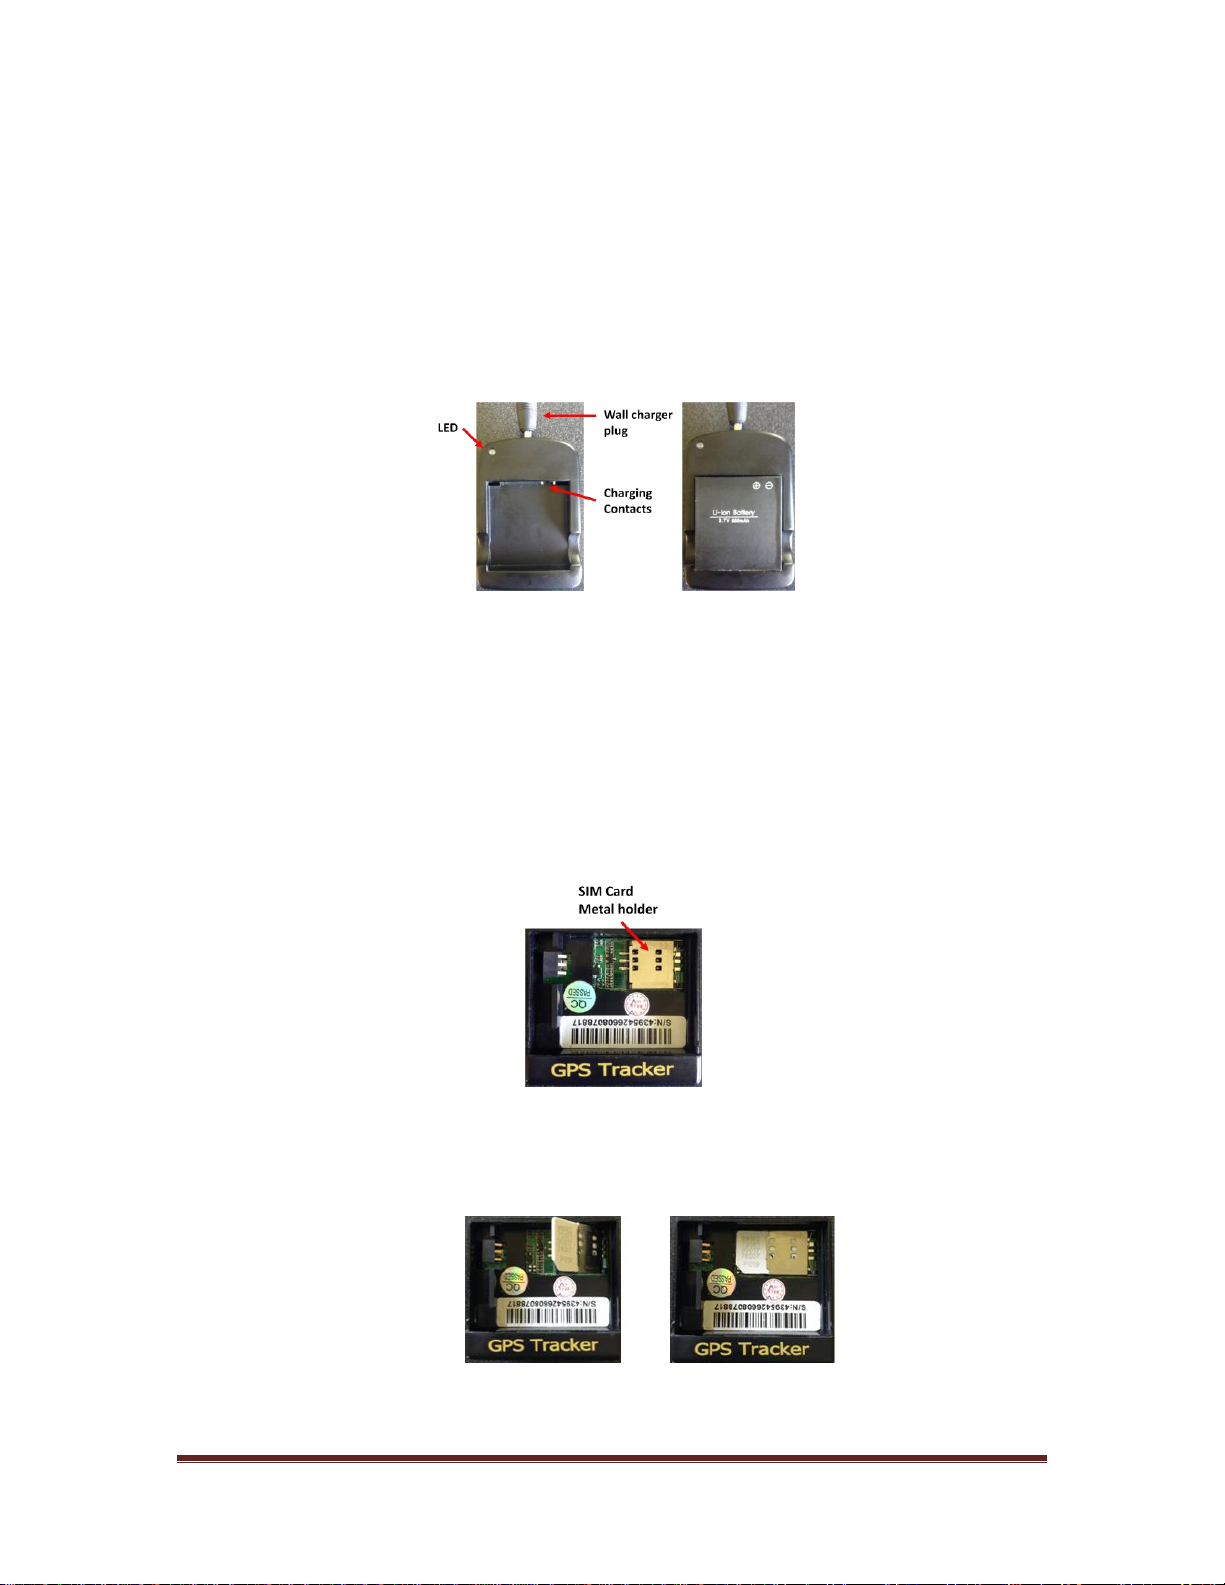
1First Time Use - Charge the battery
Prior to first-time use, please charge the battery 8 to 12 hours in the supplied charging
cradle. Subsequent charging should take between 3 to 5 hours. The charging cradle has an
indicator that glows Red when charging and Green meaning fully charged. The battery
lasts up to 48 hours, dependent upon use. For subsequent charging, we recommend you
leave the battery installed in the device and charge via the USB port (just as you would a
mobile phone).
2Install SIM card and battery
You will need to get and install a standard-sized SIM card from a service provider, with a
text-only plan. We recommend US Mobile, as they have text-plans that start at $4/mo:
https://gousmobile.com/
Step 1: Lift SIM Card Slot metal holder
Step 2: Insert SIM card and press the metal holder down and lock in position

Copyright (c) 2014 Neit Enterprises Inc. Page 3
Step 3: Connect battery to tracker circuit board, replace cover
3Place unit outside, clear from obstructions to satellite signals
After battery insertion, the unit will turn on automatically (if not, press and hold power
on/off button for 3 seconds - LED indicator will flash quickly and then stop). Once the
cellular signal is acquired (in 30 to 60 seconds), the LED will flash every 4 seconds. The LED
will remain continuously on if there is no cellular signal.
4Download App from Google Play Store
The SkyNanny Android app provides the control and monitoring interface to manage your
tracker device. Get the SkyNanny GPS app for your Android-based smart phone:
https://play.google.com/store/apps/details?id=com.skynannygps.app
4.1 Tracker Registration
When the app is started for the first time, you will see a screen showing the number of
registered trackers as zero. This is the screen where you can add the trackers to be
managed. Press the Add Tracker button to enter the name and phone number of a tracker
to be managed. This phone number is the one associated with the SIM card installed in
the tracker, NOT the number of your mobile phone. Once entered, it will appear on the
list of registered trackers.

Copyright (c) 2014 Neit Enterprises Inc. Page 4
4.2 Tracker Configuration
Select an item from the Registered Trackers list to pull up the configuration screen for the
tracker. From this screen, you can choose whether you want the device to send you updates
periodically or on-demand. "On-demand" mode is the default and usual method of
operation.
4.3 Starting a Tracking Session
Press the Activate button, the app will attempt to initiate the tracker (process takes about a
minute). Once confirmation from the tracker is received, its status will change to Active.
Pressing STOP will change the status of the tracker back to Inactive. Press the "Done"
button to exit the Configuration screen.
4.4 Mapping the Trackers
After activating a tracker, your phone should receive another text message (in the
background) from the tracker containing GPS coordinates. It can take up to 2 minutes for
these initial coordinates to arrive, so please be patient. When this is received, you can
see its location on a map. From the Active Trackers screen, pressing the Map button at the
bottom will plot all of the Active trackers in Google Maps.
The label is GREEN if the data is fresh (GPS coordinates less than 5 minutes old). The label
turns RED if the receipt time of the update is older than 5 minutes (Fig. 3.2). However, we
understand that there are situations where GPS signals may be obstructed (e.g., inside
buildings), leading to suspect coordinates. If the received update is fresh, but the GPS
coordinates are older than 5 minutes, the label will be AMBER (Fig. 3.3)
In summary:
GREEN = coordinates you can trust
RED = stale coordinates
AMBER = suspect coordinates
For trackers in "on-demand" mode, the label will turn RED after 5 minutes. If you would
like to get the current position of that tracker, tap on the RED label and a pop-up will
appear asking if you want to update the position. If you select yes, an updated coordinate
will be requested from the tracker and plotted on the map when received
Pressing the cross-hair icon at the top right corner will center the map on the position of
the user's phone, represented by either a blue dot or arrow (arrow is drawn when the

Copyright (c) 2014 Neit Enterprises Inc. Page 5
phone's GPS chip is used). You can therefore see your position relative to the children you
are tracking.
Figure 3.2: Map Screen - Red label example
Figure 3.3: Map Screen - Amber label example

Copyright (c) 2014 Neit Enterprises Inc. Page 6
5Disclaimer
The SkyNanny GPS Quickstart Guide (the "Guide") is proprietary to Neit Enterprises Inc. No
ownership rights are hereby transferred. No part of the Guide shall be used, reproduced,
translated, converted, adapted, stored in a retrieval system, communicated or transmitted
by any means, for any commercial purpose, including without limitation, sale, resale,
license, rental or lease, without the prior express written consent of Neit Enterprises Inc.
Neit Enterprises Inc. does not make any representations, warranties or guarantees, express
or implied, as to the accuracy or completeness of the Guide. Users must be aware that
updates and amendments will be made from time to time to the Guide. It is the user's
responsibility to determine whether there have been any such updates or amendments.
Neither Neit Enterprises Inc. nor any of its directors, officers, employees or agents shall be
liable in contract, tort or in any other manner whatsoever to any person for any loss,
damage, injury, liability, cost or expense of any nature, including without limitation
incidental, special, direct or consequential damages arising out of or in connection with the
use of the Guide or the products described herein.
Table of contents


