Slate RAVEN MTX User manual

RAVEN&MTX&DIGITAL&PERFORMER&USER&MANUAL&&&&&&
1!
MTX
DIGITAL PERFORMER USER GUIDE & BATCH COMMAND SYSTEM MANUAL
RAVEN Version 3.0.0
Updated 10/24/2015

RAVEN&MTX&DIGITAL&PERFORMER&USER&MANUAL&&&&&&
2!
Updated 10/24/2015
Contents
IMPORTANT SAFETY NOTES BEFORE YOU START&................................................................&3!
WARRANTY INFORMATION&....................................................................................................&6!
MAINTENANCE AND CARE&.....................................................................................................&8!
Cleaning the RAVEN MTX!....................................................................................................................................................................!8!
Revitalizing the RAVEN MTX Glass!.................................................................................................................................................!9!
GETTING STARTED&..............................................................................................................&12!
System Requirements!.........................................................................................................................................................................!12!
RAVEN MTX Dimensions!.....................................................................................................................................................................!13!
Software Installation & Touch Calibration!.............................................................................................................................!14!
Connecting RAVEN MTX to Digital Performer!....................................................................................................................!22!
Launching RAVEN MTX Software!...................................................................................................................................................!24!
INSTALLING RAVEN MTX FOR DIGITAL PERFORMER&..........................................................&24!
Setting Up & Aligning Digital Performer with RAVEN!...................................................................................................!24!
RAVEN MTX DIGITAL PERFORMER SOFTWARE FEATURES&..................................................&25!
The RAVEN Mixer!...................................................................................................................................................................................!25!
RAVEN Channel Strip!...........................................................................................................................................................................!26!
Icons!.............................................................................................................................................................................................................!27!
RAVEN Toolbar!........................................................................................................................................................................................!30!
RAVEN Settings!.......................................................................................................................................................................................!42!
Saving a Digital Performer Session!..............................................................................................................................................!47!
Saving a RAVEN Session!.....................................................................................................................................................................!47!
Restoring to Factory Default!..........................................................................................................................................................!49!
Edit Window!.............................................................................................................................................................................................!50!
WORKING WITH PLUGINS&..................................................................................................&50!
Loading Plugins:!.....................................................................................................................................................................................!50!
Controlling Plugins:!.............................................................................................................................................................................!52!
BATCH&COMMAND&SYSTEM&FOR&DIGITAL&PERFORMER&.........................................................&53!
RAVEN&MTX&DIGITAL&PERFORMER&USER&MANUAL&&&&&&
3!
Important Safety Notes Before You Start
This symbol indicates that dangerous voltage constituting a risk of electric shock is
present within your RAVEN MTX.
This symbol indicates there are important operating and maintenance instructions
in the literature accompanying your RAVEN MTX.
1. Read these instructions.
2. Keep these instructions.
3. Regard all warnings.
4. Follow all instructions.
5. Do not use this apparatus near water.
6. Do not block any ventilation openings. Install in accordance to the
manufacturer’s instructions.
7. Do not install near any heat sources such as radiators, heat registers,
stoves, or other apparatus (including amplifiers) that produce heat.
8. Protect the power cord from being walked on or pinched particularly at
plugs, convenience receptacles, and the point where they exit from the
device.

RAVEN&MTX&DIGITAL&PERFORMER&USER&MANUAL&&&&&&
4!
9. Only use attachments/ accessories specified by the manufacturer.
10. Unplug this apparatus during lightning storms or when unused for long
periods of time.
11. Do not press strongly on the panel with a hand or sharp object such as a
pencil, pen, or nail.
12. Do not stick metal objects or conductive material in the device, power
chord, or power inlet.
13. Make sure you connect the earth ground wire to prevent electric shock. A
cable with a three-pronged grounded AC Plug must be connected to a three-
pronged AC outlet.
Power Source
Operate your RAVEN MTX only from the power source included.
Moving
Make sure the product is turned off, unplugged, and all cables have been removed. It
will take a minimum of two people to move your RAVEN MTX, although three are
recommended.
Servicing
Servicing of the RAVEN MTX is to be done by qualified service personnel only. To
reduce the risk of electric shock, do not perform any servicing other than that
contained in the operating instructions unless you are qualified to do so.
Damage Requiring Service
Unplug the device from the power outlet and refer servicing to qualified service
personnel under the following conditions:
•When power supply is damaged
•If liquid has been spilled or objects have fallen into the RAVEN MTX.
•If your RAVEN MTX has been exposed to rain or water.
•If your RAVEN MTX has been dropped or damaged in any way.
•When your RAVEN MTX exhibits a distinct change in performance.

RAVEN&MTX&DIGITAL&PERFORMER&USER&MANUAL&&&&&&
5!
Important Note About DVI Cables & Display
As in many studios, your computer may be located in a room far away from your
console. For DVI cable lengths over 15ft, a DVI signal booster is required. This will
ensure the video signal reaches the display with no signal degradation.
Additionally, when switching sources between DVI and HDMI for the display, you must
press the center button of the remote, or the source button on the OSD board behind
the meter access panel.
You must wait a full 6 seconds before the source will change.
Also there is no RGB input for the MTX. Although it will show as a source, it should be
ignored. It will take around 14 seconds to switch to the RGB source, just be patient
and move on to DVI when the RGB source is selected.

RAVEN&MTX&DIGITAL&PERFORMER&USER&MANUAL&&&&&&
6!
Warranty Information
Hardware Limited Warranty
A. Limited Warranty
Slate Media Technology (SMT) warrants that its hardware will be free from defects in
materials and workmanship, for one (1) year after it has been acquired by the first
user when given normal, proper and intended usage. SMT will repair or replace
nonconforming product (or a component thereof) that is returned to SMT within the
warranty term at no charge.
This warranty applies to products purchased anywhere in the world. You may have
additional consumer rights under local laws. SMT will provide the minimum warranty
term required by applicable law.
B. Warranty Recipient
The limited warranty applies only to genuine SMT products when sold by an SMT
reseller, distributor or dealer.
C. Exclusions from Warranty
This warranty does not cover problems caused by your acts, the acts of others, or
events beyond SMT’s reasonable control.
SMT does not warrant that use of SMT products will be uninterrupted or error-free.
This limited warranty does not apply to expendable components and is void if the
product serial numbers have been removed. SMT has no obligation under this
warranty to repair or replace products damaged as a result of 1) normal wear and
tear, 2) improper or unauthorized use or repair, 3) customer fault or negligence, 4)
natural or manmade disaster, or 5) causes external to the products including, but not

RAVEN&MTX&DIGITAL&PERFORMER&USER&MANUAL&&&&&&
7!
limited to, exposure to moisture, extreme temperatures, power outages, or other
customer site conditions.
D. Limitation On and Exclusion of Damages for Breach of Warranty
You may recover from SMT and its suppliers only direct damages up to the amount you
paid for the product.
You cannot recover for loss of present or prospective profits, data loss, business
damage, or any other consequential, special, indirect or incidental damages.
E. Warranty Procedures
For information regarding your warranty, please contact Slate Media Technology or
your local authorized reseller, distributor, or dealer. Product registration at
www.slatemt.com is required in order to process a warranty claim. You will be
required to provide proof-of-purchase to validate your claim.
Hardware may require return-to-factory, and customer is responsible for properly
packing and labeling and insuring any warranty returns for shipment to Slate Media
Technology. Customer is responsible for any damage or loss incurred due to improper
packaging or labeling. Customer is required to pay shipping/handling one way for
warranty product returns and applicable custom duties, V.A.T. and other associated
taxes and charges for international service.

RAVEN&MTX&DIGITAL&PERFORMER&USER&MANUAL&&&&&&
8
Maintenance And Care
Cleaning the RAVEN MTX
The RAVEN MTX ships with a Revitalizer spray that used a NanoGlide™ coating, which
protects the screen from oil, water, and dirt. The coating also strengthens the surface
of the glass making it scratch resistant and smooth to the touch.
IMPORTANT
Do not use regular cleaning solutions on the RAVEN MTX.
Household sprays and cleaners will affect the touch glass coating, which can impact
performance. We recommend a simple microfiber cloth to clean the surface of the
glass.
If more intensive cleaning is required, use a lightly damp cloth. Make sure that the
cloth is not too wet; the coating will make the water bead and drip. As a precaution,
keep a dry cloth at the bottom of the screen to catch any runoff.
Do not allow moisture from liquids to accumulate on the screen when cleaning.
Accumulation of liquids can damage internal electrical devices. If a damp cloth
must be used, make sure to remove any excess water immediately after cleaning.
To clean RAVEN MTX’s exterior metal parts use a simple microfiber cloth. If deeper
cleaning is required, a non-abrasive cleaning solution can be used on the metal parts
only. Be sure to not spray cleaner on the RAVEN MTX directly, rather spray the
cleaner on to a cleaning cloth away from the RAVEN MTX, then use the dampened
cloth on the RAVEN MTX’s metal parts.
The high gloss lacquer finish on RAVEN MTX’s side panels can be damaged by some
cleaners. Use a gentle cleaning solution. Test in an inconspicuous area first.

RAVEN&MTX&DIGITAL&PERFORMER&USER&MANUAL&&&&&&
9
Revitalizing the RAVEN MTX Glass
The RAVEN MTX comes out of the box with a NanoGlide™ coating that repels oil,
water, and leaves the surface incredibly smooth to the touch.
After some use, it may be necessary to revitalize to bring the glass back to its original
slickness. We recommend using the revitalizing solution when you feel the glass has
substantially more friction than when you first started using your RAVEN MTX.
The coating process is very easy and can be done following the steps below. All you
need is a microfiber cloth and the supplied 4oz bottle of Revitalizer/Protector
solution.
IMPORTANT
Apply the revitalizer solution in a well-ventilated area.
NOTE:
The Revitalizer Solution is not a product of Slate Media Technology. Please read the
Revitalizer label for more information, precautions, and first aid instructions.
RAVEN&MTX&DIGITAL&PERFORMER&USER&MANUAL&&&&&&
10
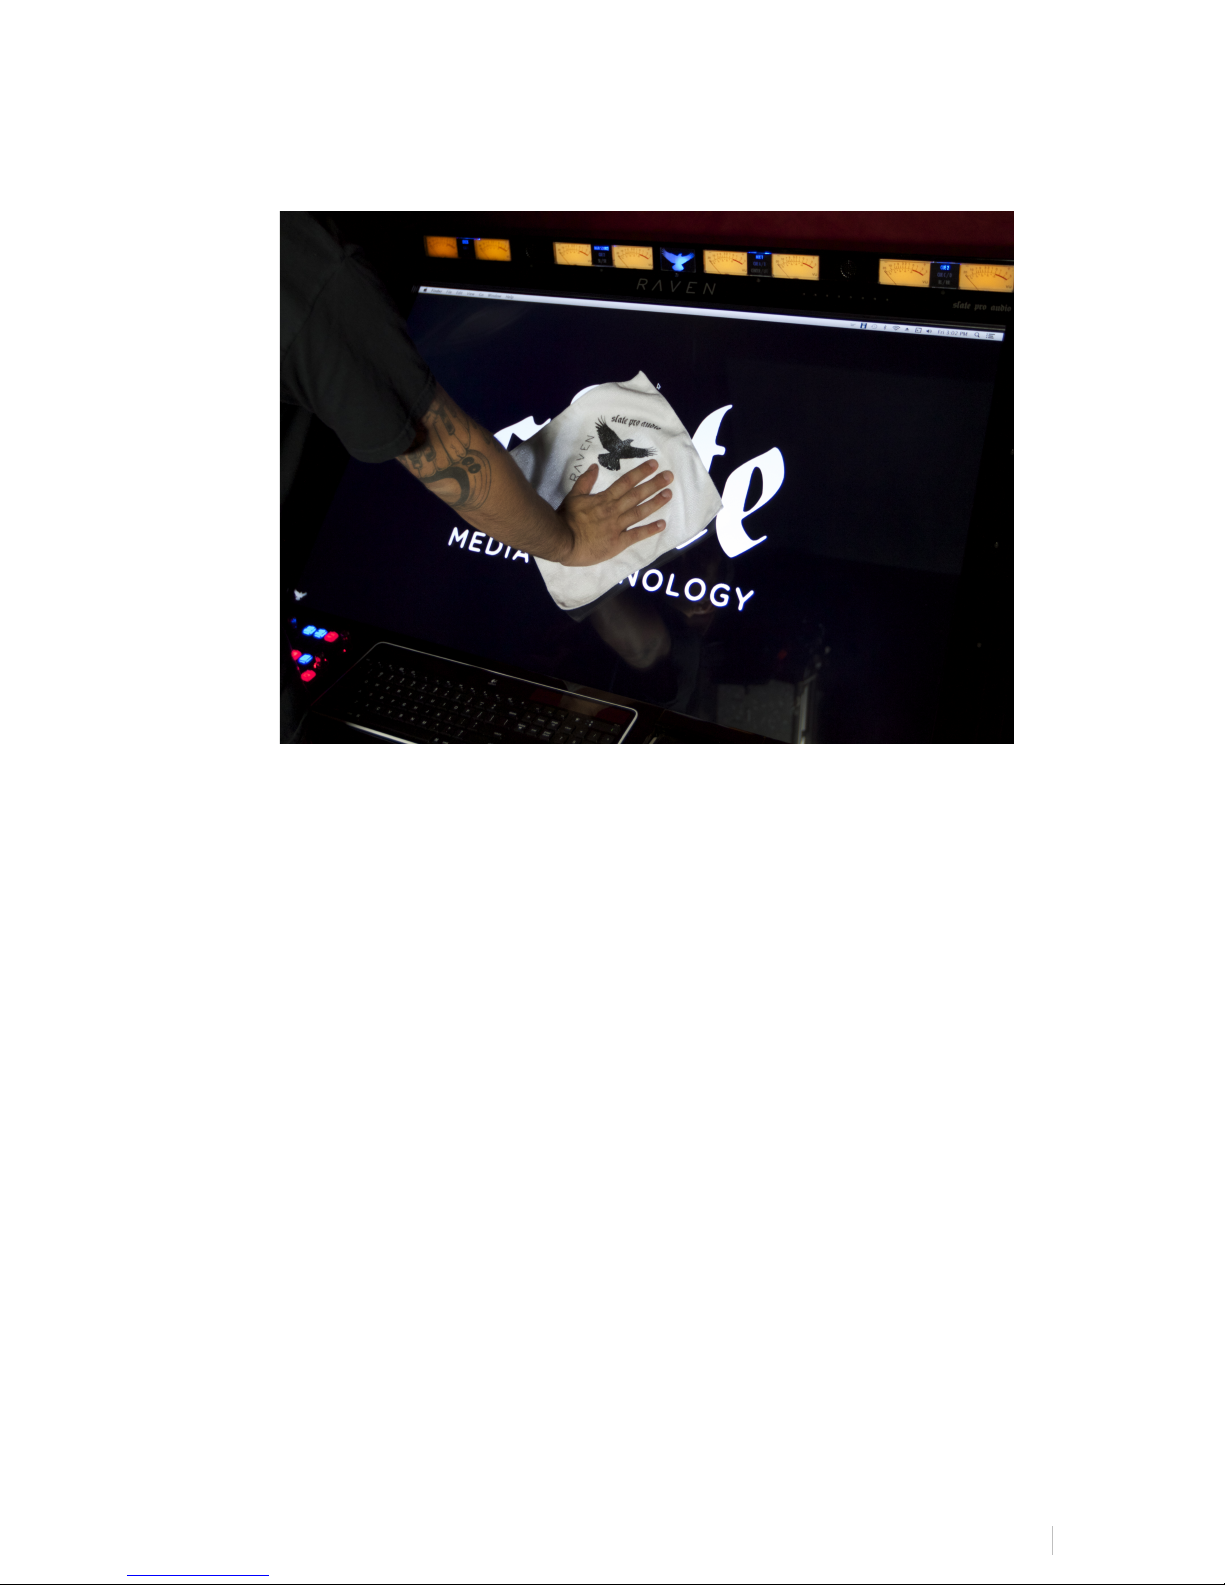
1. Using a microfiber cloth, clean the RAVEN MTX screen to remove dust and
fingerprints.
2. Spray the revitalizer solution directly onto the RAVEN MTX glass. It should take
approximately six sprays to cover the glass completely.
IMPORTANT
Do not spray so much that the solution drips down the screen. Excess
moisture could damage the display and touch system. If you are unsure,
place a cloth at the bottom of the screen to catch any runoff.

RAVEN&MTX&DIGITAL&PERFORMER&USER&MANUAL&&&&&&
11
3. Using a microfiber cloth LIGHTLY spread the solution around to cover the entire
screen.
IMPORTANT
DO NOT WIPE/BUFF AWAY ALL OF THE REVITALIZER SOLUTION FROM THE
SCREEN.
The coating on the glass leaves a very thin residual layer of Revitalizer, which
significantly adds to the slickness and oil repellency. Removing all of the
product will leave the glass less smooth than desired.

RAVEN&MTX&DIGITAL&PERFORMER&USER&MANUAL&&&&&&
12
NOTE:
There will be a residual oil layer on the glass after revitalizing. When the
screen is turned OFF, the glass may appear cloudy. This is OK. You should not
be able to notice this layer when the screen is turned ON. If you do, wipe
gently until you cannot see the oil layer.
Your RAVEN MTX is now back to its original slickness.
Getting Started
System Requirements
The RAVEN MTX will run on any Mac computer, however we recommend these
specifications for optimal performance.
•OSX 10.7 (Lion,) OSX 10.8 (Mountain Lion,) OSX 10.9 (Mavericks.)
•OSX 10.10 (Yosemite) will function with the RAVEN software, however it’s
important to note multiple simultaneous touches can cause graphics to flicker
when using more than three simultaneous touches. This will not affect the
quality of the control surface, graphic changes only.
•OSX 10.11 (El Capitan) is not yet supported.

RAVEN&MTX&DIGITAL&PERFORMER&USER&MANUAL&&&&&&
13
•Intel i7 or Xeon processor with a clock speed of at least 2.4 GHz.
•Minimum 4GB RAM (We recommend 8GB for strong performance.)
•Graphics card with minimum 512MB memory, though 1GB graphics memory is
recommended.
•Any Mac Pro produced after 2010 should meet all the requirements, though Mac
Mini’s and iMac’s meeting the requirements should be fine. Graphic response
speed will vary depending on the capabilities of the computer’s graphics card.
NOTE:
MacBook Pro’s are not recommended with the RAVEN MTX.
RAVEN MTX Dimensions
NOTE:
If you are creating custom furniture for your RAVEN MTX, CAD drawings with precise
dimensional information may be available on request.

RAVEN&MTX&DIGITAL&PERFORMER&USER&MANUAL&&&&&&
14!
You will now need to install Multi-Touch Driver in order to get touch response
from your RAVEN MTX.
Software Installation & Touch Calibration
Installing the RAVEN MTX software and calibrating the touchscreen is a quick process.
IMPORTANT
Calibration is the most important process for accurate use of the screen. Failure
to calibrate properly will result in poor touch performance.
DO NOT RUN ANY APPLICATIONS UNTIL CALIBRATION IS COMPLETED.
1. Run the RAVEN MTX installer and download the drivers onto your hard drive.
NOTE: Make sure to use the included UNINSTALL MULTI-TOUCH PLATFORM
application, available in your Slate User Account if any pre-existing Multi-Touch
software has been installed, as existing Multi Touch software will complicate
the install process. In this case, the uninstallation package should be run
primary to the included Multi-Touch Platform Driver package.
2. Restart your computer for changes to take effect.
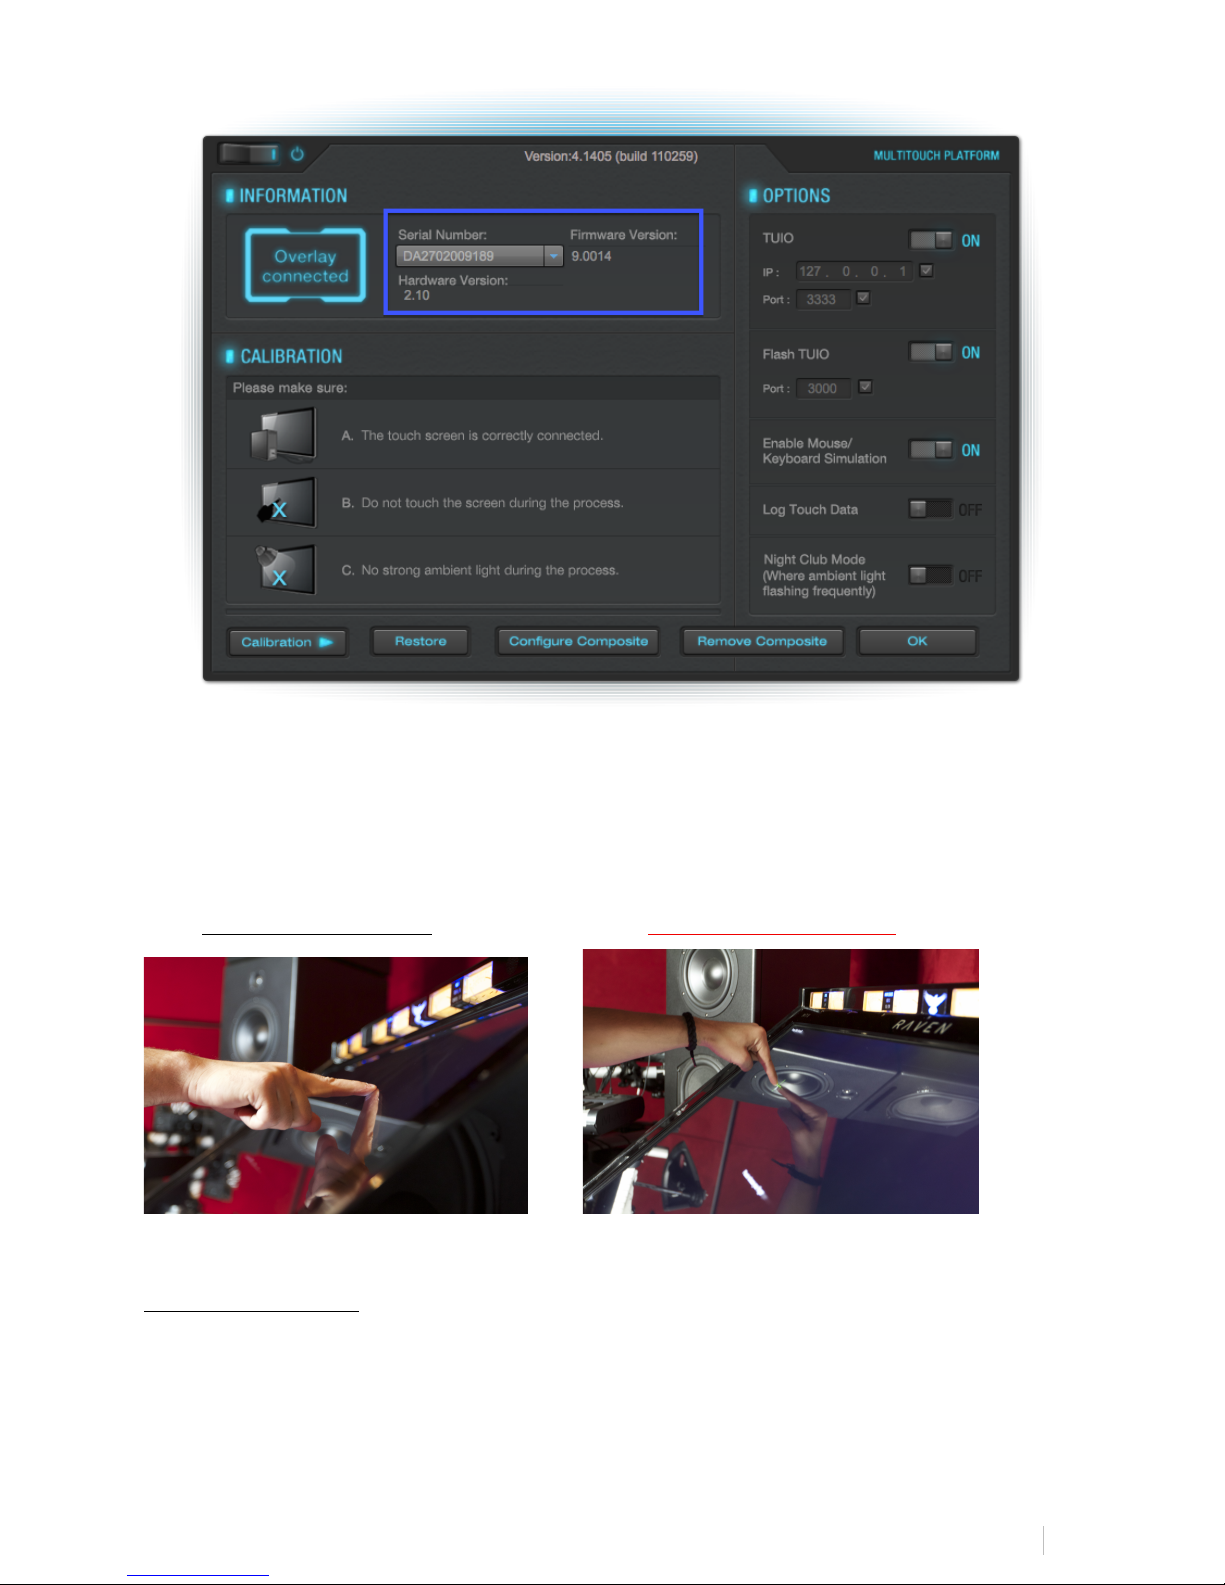
To calibrate RAVEN MTX use the following procedure:
1. Launch MultiTouchPlatform. This can be found in your application folder. (We
recommend moving this to your dock.)
2. Press the Calibration button on the main window.
3. Follow the prompts on the screen and touch the center of each “+” as it
appears.
4. Repeat steps 2-3 until an accurate calibration is achieved.
NOTE: Confirm calibration by checking on ensure the mouse cursor is
completely covered by one’s finger on each of the four corners of the desktop.
RAVEN&MTX&DIGITAL&PERFORMER&USER&MANUAL&&&&&&
15!
IMPORTANT NOTES ABOUT SCREEN CALIBRATION
●Calibration should be done sitting in the center position of the console.
Failure to do so will result in an inaccurate calibration point.
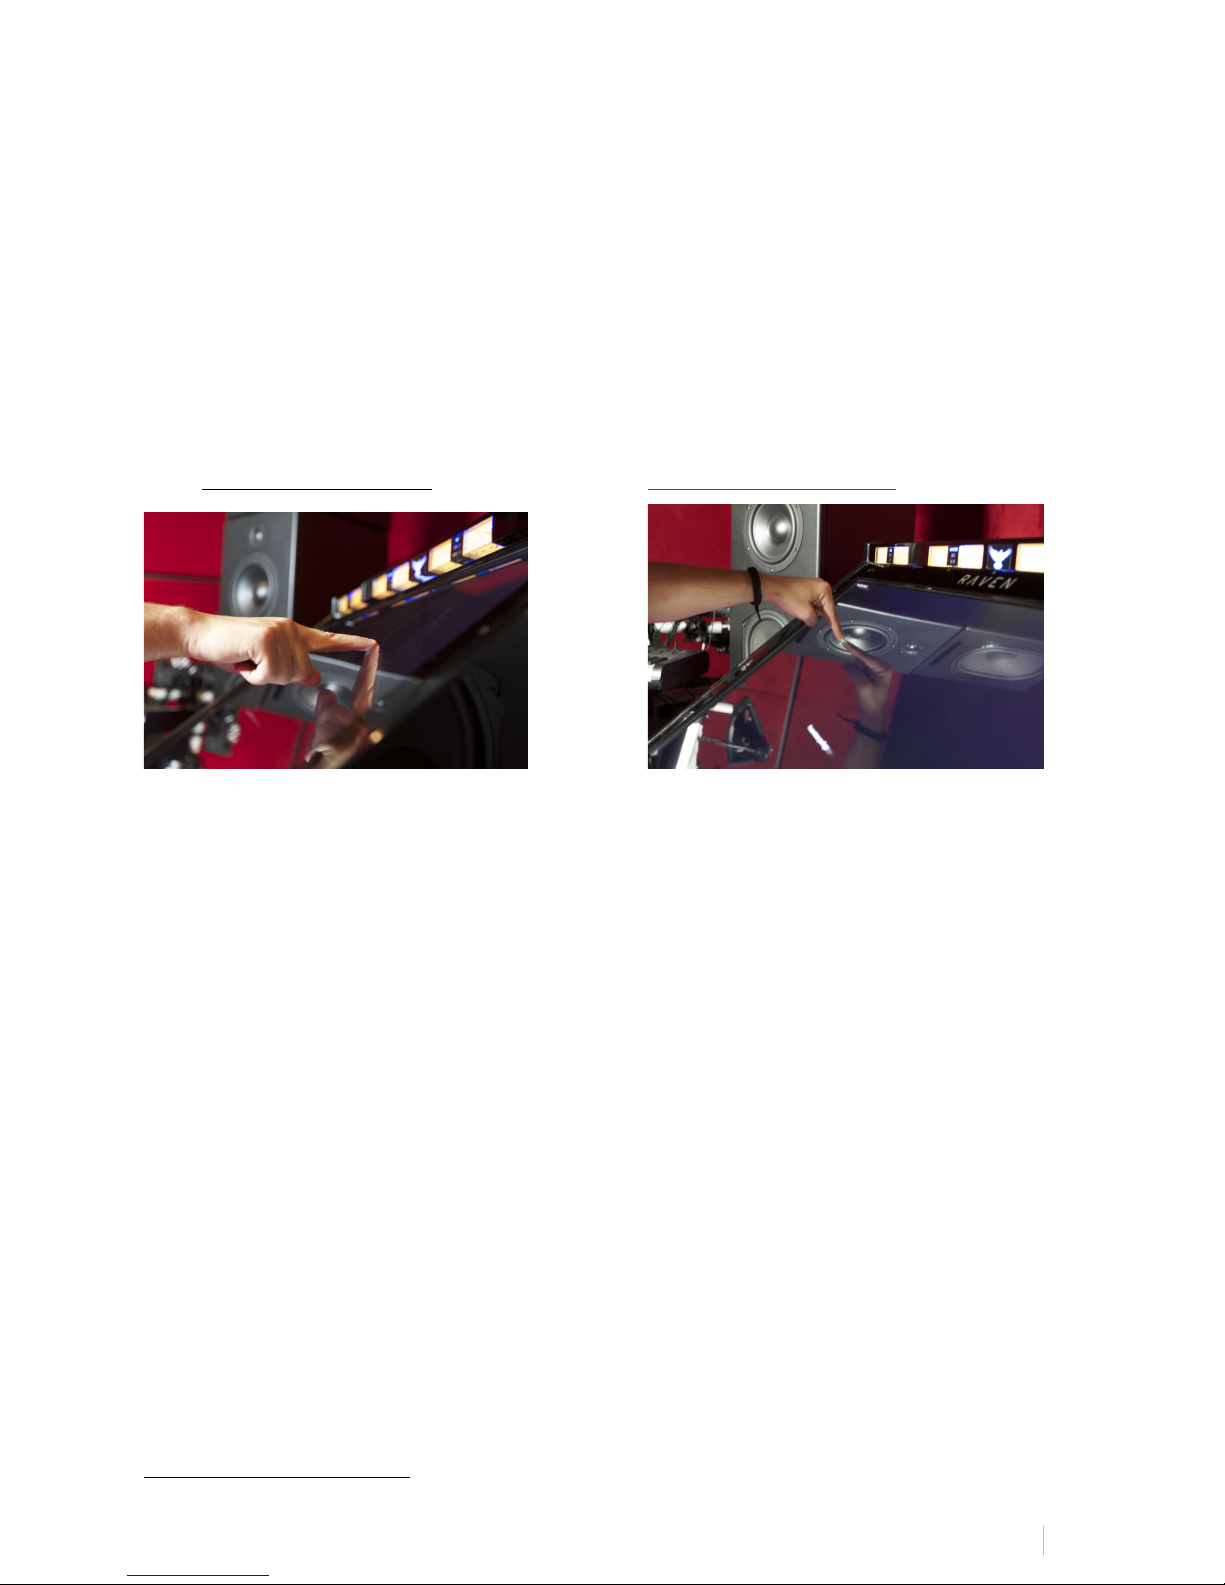
●Calibration must be done using a direct and natural touch angle. DO NOT
CALIBRATE WITH A BEND IN YOUR WRIST OR FROM AN EXTREME ANGLE.
Failure to do so will result in an inaccurate calibration.
Correct Touch Angle Incorrect Touch Angle
●Do not use a stylus or other object to calibrate the screen.
●After calibration is achieved, test on desktop applications and software. The
user should be able to open and close windows with ease.
●RAVEN MTX should not be used without confirmation of proper calibration.
To confirm proper calibration, simply go to the Finder and touch random points on
the desktop evaluating the mouse cursor and confirm that the cursor is hidden
undernieth your finger and no black from the cursor is visible. If you can see the
cursor, you should recalibrate.
NOTE:
We have also included a Calibrate button within your RAVEN Settings for easy
access to the MultiTouchPlatform application. At any time, quickly recalibrate.
This is important to do if multiple users are sharing the RAVEN MTX.
DUAL RAVEN SOFTWARE:

RAVEN&MTX&DIGITAL&PERFORMER&USER&MANUAL&&&&&&
16!
If using two RAVEN’s, users now have access to the “DUAL” button on the RAVEN
opening menu is will activate the RAVEN Software for DUAL functionality. This again,
only is to be used with two RAVEN’s. If using multiple displays that are not RAVEN’s,
you should still use the regular version of the RAVEN software.
DUAL CALIBRATION:
To calibrate for DUAL RAVEN’s, set your main display to the left display as displayed
below.
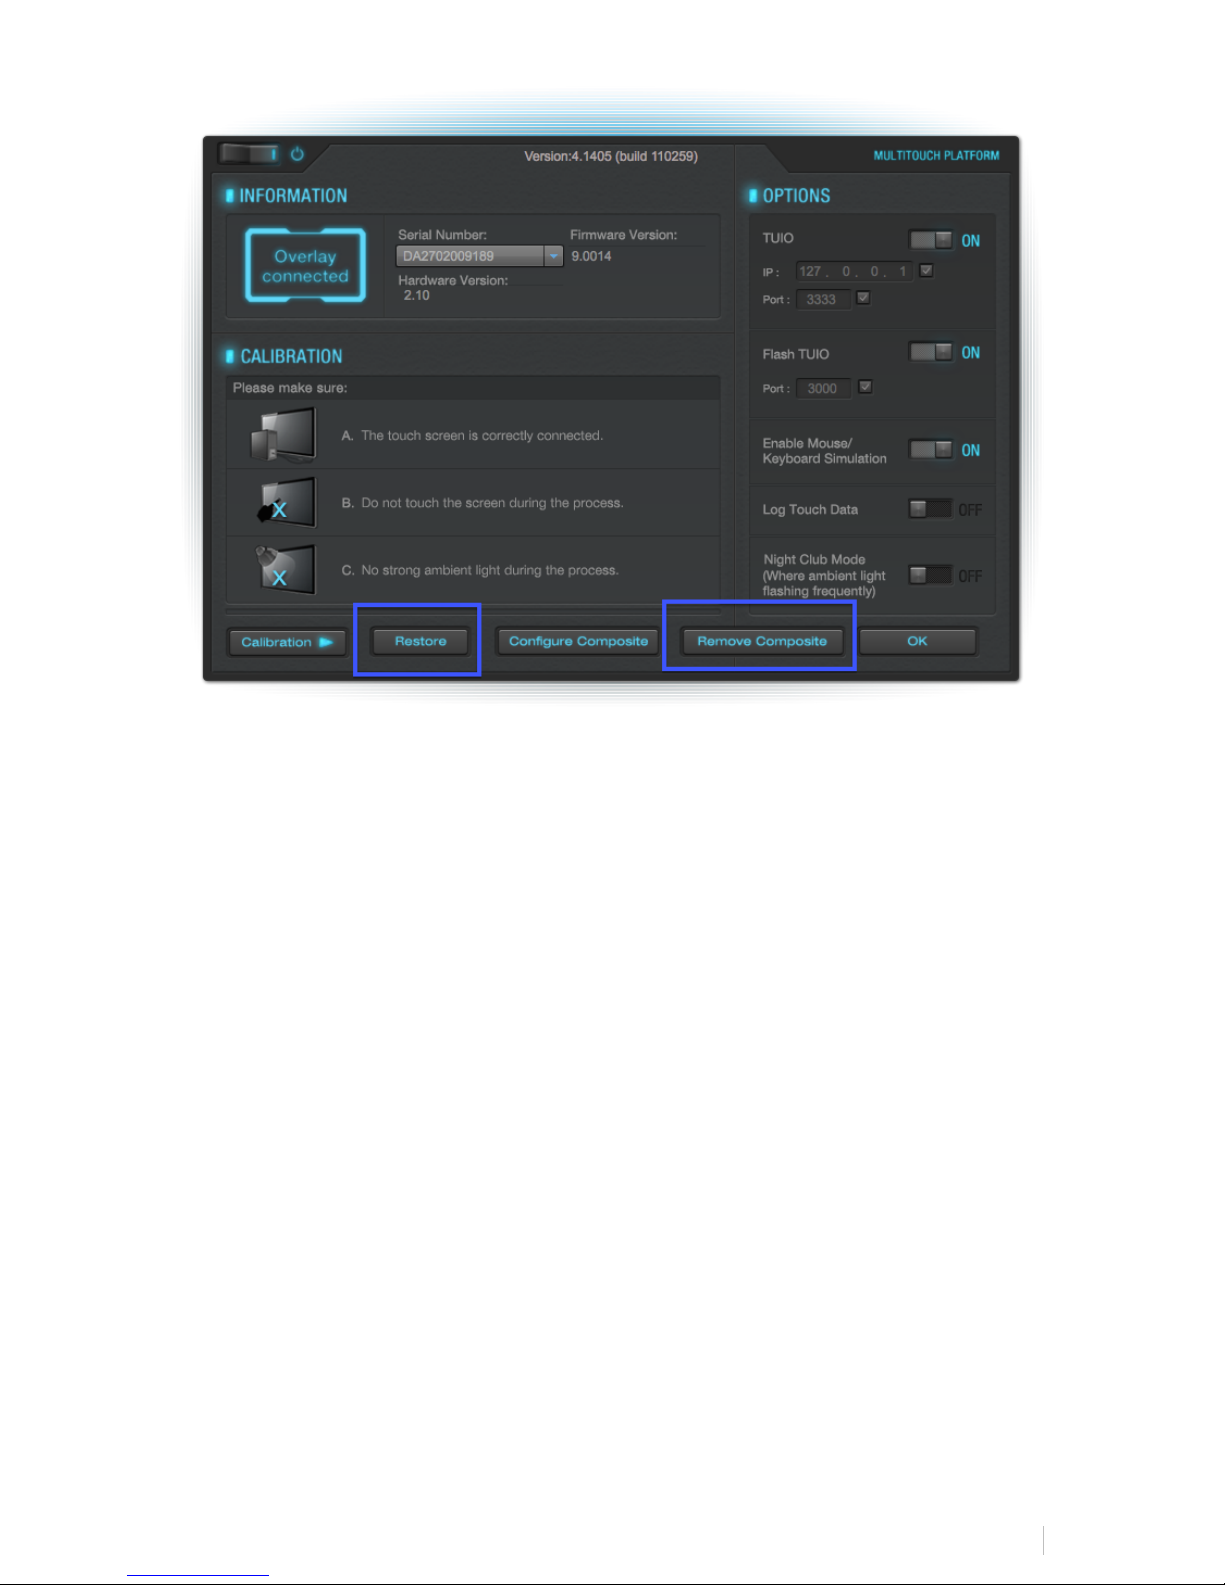
Then, launch the MultiTouchPlatform application and hit “Restore” and “Remove
Composite” as displayed below.
Note: If you ever notice an inconsistent screen calibration, simply open the
MultiTouchPlatform application and click, “Remove Composite" and “Restore” and
then repeat the Dual Calibration process described below.
RAVEN&MTX&DIGITAL&PERFORMER&USER&MANUAL&&&&&&
17!
Now, you will need to configure Multi-Touch for two RAVEN’s. Hit, “Configure
Composite.” Follow the instructions on the white screens being:
Press and hold the left display and then release. Then repeat the press, hold and
release for the right display.
Now calibrate each screen. Use the drop-down menu as displayed below on the
MultiTouchPlatform application to select each display and hit “Calibration.”
RAVEN&MTX&DIGITAL&PERFORMER&USER&MANUAL&&&&&&
18!
From a center, seated position, press and hold the center of the red addition symbol
like you are giving a fingerprint to the top of your finger until it turns green, using
your left hand for the left side of the screen and your right hand for the right side of
the screen. There will be four corners to calibrate. Once completed, hit “Ok.”
Correct Touch Angle Incorrect Touch Angle
USING RAVEN DUAL:
Set the Left Display as your Mixer and Right Display as your Edit Window. To flip the
displays, simply hit the “1-2/2-1” display button by default on the Floating Toolbar.

RAVEN&MTX&DIGITAL&PERFORMER&USER&MANUAL&&&&&&
19!
NOTE: TRIPLE RAVEN IS NOT YET SUPPORTED, BUT WILL BE AVAILABLE SOON.
SYSTEM PREFERENCES CONFIGURATION:
IMPORTANT: Be sure to hide the OS X Dock when using RAVEN.
1. Navigate to “System Preferences” by going to the Apple drop-down menu on
the top left of the Finder and select, System Preferences.
2. Now, select the “Sharing” folder option and confirm your computer is named. If
not, make sure and name your computer as displayed in the image below.

RAVEN&MTX&DIGITAL&PERFORMER&USER&MANUAL&&&&&&
20!
3. Next, hit “Show All” on the top left of the window and hit “Security & Privacy.”
4. On the “General” tab, be sure the option for Allow apps downloaded from:
“ANYWHERE” is selected as shown in the picture below.
5. Now, for users on OS X 10.9 and higher only, select the “Privacy” tab on the
top right still on the “Security & Privacy” area and select “Accessibility” from the
left menu as imaged below. Once selected, navigate to your “Applications” folder
in a separate Finder window and add the following applications to the area on the
right for allowing apps to control your computer:
- Automator
- Digital Performer 8 or 9
- RAVEN MTX
- Terminal
Note: Terminal is located within your “Utilities” folder within the “Applications”
folder.
Other manuals for RAVEN MTX
1
Table of contents
Other Slate Music Mixer manuals


Popular Music Mixer manuals by other brands


Conrad Electronic
Conrad Electronic ML 6 operating instructions

AUSTRALIAN MONITOR
AUSTRALIAN MONITOR TX8201 - MANUEL 2 operating manual

SoundCraft
SoundCraft Spirit Live 3-2 user guide

Elmuz
Elmuz PMF600 user manual

Thermionic Culture
Thermionic Culture The Fat Bustard 2 operating manual

Behringer
Behringer XENYX QX1832USB quick start guide


