Slime 20480 User manual

COMPACT & PORTABLE
EASY CARRY HANDLE
ATTENTION! READ ALL INSTRUCTIONS CAREFULLY
BEFORE OPERATING THIS TOOL. FAILURE TO DO SO MAY RESULT IN PERSONAL
INJURY AND/OR PROPERTY DAMAGE AND WILL VOID WARRANTY.
PART# 20480 INSTRUCTIONS | REV051419ART
5 GALLON AIR TANK
INDUSTRIAL CONSTRUCTION
• Air hose with integrated
air chuck
PRESSURE GAUGE
• Displays PSI and BAR
REGULATOR
CONTROL
• ON/OFF air
adjustment knob
FILL STEM
• Attaches to air source
SAFETY AIR RELEASE
• Pressure bypass valve

5 Gallon (18.92 Liters)
85 to 125 PSI / 5.86 to 8.618 BAR)
36" (91.44 cm)
Dial Gauge 0-150 PSI
CAUTION: PLEASE READ, UNDERSTAND AND FOLLOW ALL INSTRUCTIONS AND
WARNINGS BEFORE OPERATING THIS TOOL. FAILURE TO DO SO MAY RESULT IN
PERSONAL INJURY AND/OR PROPERTY DAMAGE AND WILL VOID WARRANTY.
1. DO NOT OVERFILL TANK! Air tank MAXIMUM fill rating is 125 PSI. Use tank within
its rated operating capacity. Overfilling tank can cause permanent tank damage,
personal injury or property damaged and will void warranty.
2. DO NOT fill from any source charged with more than 150 PSI and DO NOT fill from
any compressed gas cylinder.
3. Check to ensure all fittings, hose, pressure gauge and valve assembly are tight and
free from damage or wear before each use.
4. Ensure that tank is under no pressure before removing or adjusting any fittings.
5. Keep air hose free from obstruction, binding, and twisting.
6. Do not drag or carry tank by the air hose, gauge or valve.
7. Discard tank immediately if any leaks develop. DO NOT attempt to repair or weld any
tank designed to contain pressure.
8. Discard tank if it becomes dented or damaged.
9. Discard or destroy tank by date stamped on canister.
10. Always wear eye protection when operating this tool. If raising dust/debris, wear a
suitable mask. 11. Always use tank in a safe manner, protecting yourself and others in
the work area from possible injury.
11. Always use tank in a safe manner, protecting yourself and others in the work area
from possible injury.
TECH SPECS
CAPACITY
OPERATING PRESSURE
AIR HOSE LENGTH
PRESSURE GAUGE
AIR TANK OPERATION INSTRUCTIONS:
Filling Air Tank:
DO NOT OVERFILL! Fill tank from clean, dry air source to between 85 and 125 PSI
1. Turn the red ON/OFF air adjustment knob clockwise to the OFF position.
2. Press the chuck from air source onto the tank fill stem.
3. Watch the reading on the tank pressure gauge. DO NOT EXCEED MAXIMUM
air pressure of 125 PSI.
4. When the tank has filled to the desired pressure, remove the air chuck from
the tank fill stem.
5. The 5 gallon air tank is now filled and ready to use.

AIR TANK OPERATION INSTRUCTIONS: (cont.)
Inflating Tires:
Note: Air tank MAXIMUM fill rating is 125 PSI. DO NOT EXCEED MAXIMUM TANK
PRESSURE. Ensure that the max pressure of the tire being inflated is within this
pressure rating. Tank pressure must be higher than desired inflation pressure of
item being filled, otherwise air will not transfer.
1. Turn the red ON/OFF air adjustment knob counter-clockwise to the ON
position. This allows air to flow from the tank into the hose.
2. Press the hose air chuck onto the valve stem of tire until air begins to flow into
the tire.
3. Periodically remove air chuck from tire and check tire pressure using a tire
pressure gauge.
4. When tire is filled to desired pressure, remove air chuck from valve stem.
Note: Tank pressure must exceed the desired pressure of the tire being filled.
5. Repeat steps 2 through 4 on all tires that need to be filled.
6. When finished using air tank, turn the red ON/OFF air adjustment knob
clockwise to the OFF position.
7. If the air tank will be left unused for an extended period of time, drain all air
from tank and hose.
8. Store empty tank in a clean, dry place.
Tank Maintenance:
Drain water from tank and hose after each use. Water in the tank and hose
can cause poor performance and damage to the tank and tire to be filled.
Condensation from the air can accumulate inside the tank. Eventually this will
lead to rusting which will weaken the tank. Water in the air tank or hose can
cause gumming and power loss.
To Drain Water from Tank:
1. Fill tank with air to 10 to 20 PSI.
2. Turn tank upside down.
3. Depress valve core on fill stem using a screwdriver or other small object.
4. Allow water to be expelled from tank.
Take note of the destroy date stamped on the tank and destroy or discard the
tank before the destroy date.

WARRANTY: For the period of one year from date of purchase, manufacturer guarantees that
this Product will meet the specifications when used as directed. Manufacturer’s sole liability
and Customer’s sole remedy under any warranty claim is limited to Manufacturer’s coupon
upon return of proof of purchase.
QUESTIONS OR COMMENTS:
Call (888)457-5463 or visit www.slime.com
ITW Global Tire Repair • 125 Venture Drive, Suite 210, San Luis Obispo, CA 93401 USA
Slime® is a trademark of Illinois Tool Works, Inc., registered in the U.S. and other countries.
TROUBLESHOOTING
Tank Leaking Air:
1. Check tank for worn or dirty components (clean or replace as necessary).
2. Apply PTFE tape to fittings, hoses, and gauge.
Loss of air pressure:
1. Possible leak. Apply soapy water to fittings and connection points and note
any air bubbles that form to find leak.
Tank fills Slowly or not at all:
1. Check fill stem for dirt, debris or other obstructions
2. Clean or replace fill stem valve core if necessary.
3. Check air source for obstructions.
Tank doesn’t hold enough air:
1. Gauge may be faulty. Use tire pressure gauge on fill stem, compare reading
to tank gauge.
Safety pressure bypass valve leaks air:
1. Pull ring several times to properly seat with tank.
Gauge does not register correctly:
1. Check to make sure gauge needle is able to move freely and check gauge for
damage.
2. Use tire pressure gauge on fill stem, compare reading to tank gauge.
3. Replace gauge if necessary.
Air Chuck Pin floating/crooked/off center/leaking air:
1. Turn red air Adjustment knob to the ON position.
2. If pin is stuck in off center position, tap back of air chuck on a hard surface
to dislodge.

COMPACTO Y PORTATIL
MANIJA DE FACIL
TRANSPORTACIÓN
¡ATENCION! LEA EL MANUAL DE INSTRUCCIONES CON CUIDADO
ANTES DE OPERAR ESTA HERRAMIENTA. CUALQUIER ERROR PUEDE CAUSAR DAÑO
AL USUARIO Y/O DAÑOS EN EL AERA DE TRABAJO Y ESTO ELIMINA LA GARANTIA.
COMPRESOR DE AIRE 5 GALONES
USO INDUSTRIAL
• Cabeza de Mangera para
válvula llantas
CALIBRADOR DE PRESIÓN
• Display indicador PSI y BAR
REGULADOR DE
CONTROL
• Encendido/Apagado
de aire con llave de
ajuste
VÁSTAGO DE LLENAD
• Llenado de aire
DESAHOGO DE AIRE
• Válvula Bypass de
presión

PRECAUCION: FAVOR DE LEER, ENTENDER Y SEGUIR LAS INSTRUCCIONES Y ALERTAS
PREVIO A UTILIZAR ESTA HERRAMIENTA. CUALQUIER ERROR PUEDE CAUSAR DAÑO AL
USUARIO Y/O DAÑOS EN EL ÁREA DE TRABAJO Y ESTO ELIMINA LA GARANTIA.
1. ¡NO SOBRECARGUE EL COMPRESOR! El llenado de Aire es MÁXIMO 125 PSI. Opere el
compresor dentro de los parámetros de capacidad. Sobrecargar puede generar daños
permanentes al compresor, al usuario y/o daños en el aera de trabajo; esto elimina la
garantia.
2. Para llenar el compresor NO utilice ningún equipo que contenga mas de 150 PSI ni
utilice cilindros de gas comprimido.
3. Asegúrece de revisar que los accesorios como manguera, medidor de presión y válvula
embonen y esten sin daño alguno y sin desgaste antes de utilizarlos.
4. Asegurese que el compresor no se encuentre bajo presión antes de moverlo o ajustar
sus accesorios.
5. Mantenga la manguera y el cabezal sin obstrucciones, amarrada o doblada.
6. No transporte o arrastre el compresor jalando la manguera, válvula o el medidor de
presión.
7. Deseche el compresor si presenta fugas. No lo intente reparar o soldar ya que estan
diseñados para contener presión.
8. Deseche el compresor si se encuentra dañado o abollado
9. Deseche y/o destruya el compresor posterior a la caducidad indicada.
10. Siempre utilice protección en los ojos al operar esta herramienta. Si existe polvo o
desechos utilize una máscara adecuada.
11. Siempre utilice el compresor de manera segura, protegiéndose usted y a otras
personas de posibles daños.
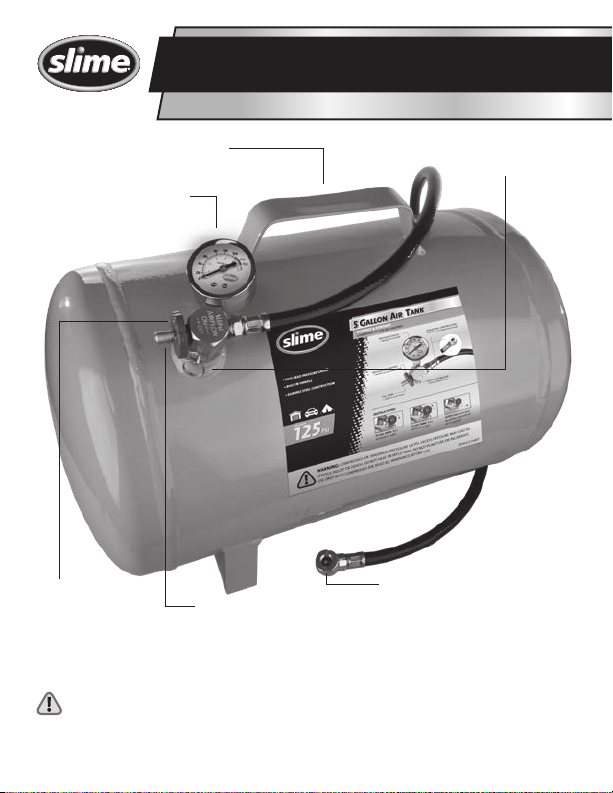
ESPECIFICACIONES TÉCNICAS
CAPACIDAD
PRESIÓN EN OPERACION
LONGITUD DE LA MANGUERA
PRESION DEL MEDIDOR DE PRESIÓN
5 Galones (18.92 litros)
85 a 125 PSI / 5.86 a 8.618 BAR
36" (91.44 cm )
Indicador de presion 0-150 PSI
INSTRUCCIONES DE OPERACIÓN DEL COMPRESOR:
Llenado de aire al compresor:
¡NO SOBRE LLENE! Inserte desde un dispositivo de aire limpio y seco entre 85 y 125 PSI.
1. Utilize el botón rojo de encendido/apagado en direccion de las manecillas del
reloj a la posición apagado.
2. Presione el cabezal del aire en la válvula/vastago de aire del compresor.
3. Verifique la lectura del medidor de presion del compresor. NO EXCEDA EL
MAXIMO de presion de aire 125 PSI.
4. Cuando se llene el compresor a la presion requerida, retire el cabezal del aire en
la válvula/vastago de aire del compresor.
5. El compresor de 5 galones esta ahora listo para su uso.

INSTRUCCIONES DE OPERACIÓN DEL COMPRESOR: (cont.)
Inflado de neumáticos:
Nota: El llenado del Compresor de Aire MÁXIMO es 125 PSI. NO EXEDA EL LÍMITE
MAXIMO DE PRESION DE AIRE. Asegúrese que la presión de aire de inflado de
su neumático se encuentre dentro de los parámetros de presión. La presión del
Compresor deberá ser mayor al objeto que vaya a llenar, de otra manera no pasará
el aire.
1. Utilize el botón rojo de encendido/apagado en dirección de las manecillas
del reloj a la posición apagado. Esto permitirá fluir al aire del compresor a la
manguera.
2. Presione el cabezal del aire en la válvula/vástago del neumático permitiendo el
llenado del mismo.
3. Periodicamente retire el cabezal de la valvular (vástago) para medir la presión del
neumático.
4. Cuando el neumático este lleno a la presión elegida, retire el cabezal de la
válvula/vástago.
Nota: La presión del compresor deberá ser mayor a la presión del neumático
requerido.
5. Repita los pasos 2 a 4 con todos los neumáticos que deseé llenar.
6. Al finalizer el uso del compresor, apague el mismo con el botón rojo de apagado/
encendido en contra de las manecillas del reloj a la posición APAGADO.
7. Si el compresor no es utilizado por largos periodos de tiempo, drenar todo el aire
del compresor y de la manguera.
8. Almacene el compresor vacio y seco en un lugar limpio.
Mantenimiento del Compresor:
Drene toda el agua del compresor y manguera despues de cada uso. El agua en el
compresor puede causar bajo rendimiento y daño al compresor y neumaticos en
los que se utilice. Condensacion de agua puede acumularse dentro del compresor.
Eventualmente esto puede causar oxidacion o daño en el compresor. Agua en el
compresor o manguera, puede causar congestion y Perdida de potencia.
Para el Drenado de Agua del Compresor:
1. Llene el tanke con aire de 10 a 20 PSI.
2. Coloque el compresor de cabeza.
3. Presione el centro de la valvula/vastago utilizando un desarmador o algun otro
objeto pequeño.
4. Permita la salida del agua del compresor.
Tome nota de la fecha de destrucción del compresor estampada en el mismo y
deseche/destruya el mismo antes de la fecha límite.

GARANTIA: Aplica por un año iniciando en la fecha de la compra. El fabricante garantiza
que este product cumple con las especificaciones indicadas. Responsabilidad exclusiva del
fabricante y el único recurso del Cliente bajo cualquier reclamo de garantía se limita al cupón
del fabricante a la devolución contra prueba de compra.
PREGUNTAS O COMENTARIOS:
Llamar (888)457-5463 o visiten www.slime.com
ITW Global Tire Repair • 125 Venture Drive, Suite 210, San Luis Obispo, CA 93401 USA
Slime® es una marca commercial de Illinois Tool Works, Inc., registrada en U.S. y otros paises.
SOLUCIÓN DE PROBLEMAS
El Compresor fuga aire:
1. Revise el compresor de componentes desgastados o sucios (limpie o reemplace
el accesorio).
2. Utilice Cinta Teflón en las uniones de manguera y medidor de presión.
Pérdida de presión de aire:
1. Posible fuga, aplique espuma de jabón y agua en puntos de unión y verifique si
existen burbujas para hallar fugas.
El compresor bombea lentamente o no llena completamente:
1. Cheque el vástago/valvula, que este libre de suciedad, mugre o alguna otra
obstrucción.
2. Limpie o reemplace la Valvula/Vástago en caso de ser necesario.
3. Revise la cabeza de aire que se encuentre libre de obstrucciones.
El compresor no retiene suficiente aire:
1. El medidor puede estar fallando. Utilice un medidor de presión en la valvular de
entrada/llenado.
La valvular de seguridad (Bypass) fuga aire:
1. Tire del anillo varias veces para asentar correctamente con el compresor.
El medidor de presion no marca correctamente:
1. Asegurece de que la Ahuja del medidor pueda moverse libremente y descarte
daños.
2. Use el indicador de presión de neumáticos en el vástago de llenado, compare la
lectura con el indicador del compresor.
3. Reemplace el medidor si es necesario.
Centro o vastago de la valvula / torcido / fuera del centro / con fugas de aire:
1. Gire la perilla roja de ajuste de aire a la posición ON.
2. Si el pasador está atascado fuera de su posición, golpee la parte posterior de la
valvular o centro sobre una superficie dura para desalojar.
Table of contents
Languages: