JohnDow Industries JDI-FST15 User manual

™
15-GALLON FUEL STATION
USER’S MANUAL
UN/DOT APPROVED
Part No. JDI-FST15
151 Snyder Ave.
Barberton, OH 44203
Rev 6/2021
FST-MAN-ENG
READ AND SAVE THIS MANUAL
FOR SERVICE ASSISTANCE, CALL 800-433-0708 OR VISIT JOHNDOW.COM
FOR WARRANTY INFORMATION, PLEASE CALL 800-433-0708
DATE OF PURCHASE:

2FOR SERVICE ASSISTANCE, CALL 800-433-0708 OR VISIT JOHNDOW.COM
DANGER
WARNING
CAUTION
NOTICE
DANGER
WARNING
CAUTION
NOTICE
DANGER
WARNING
CAUTION
NOTICE
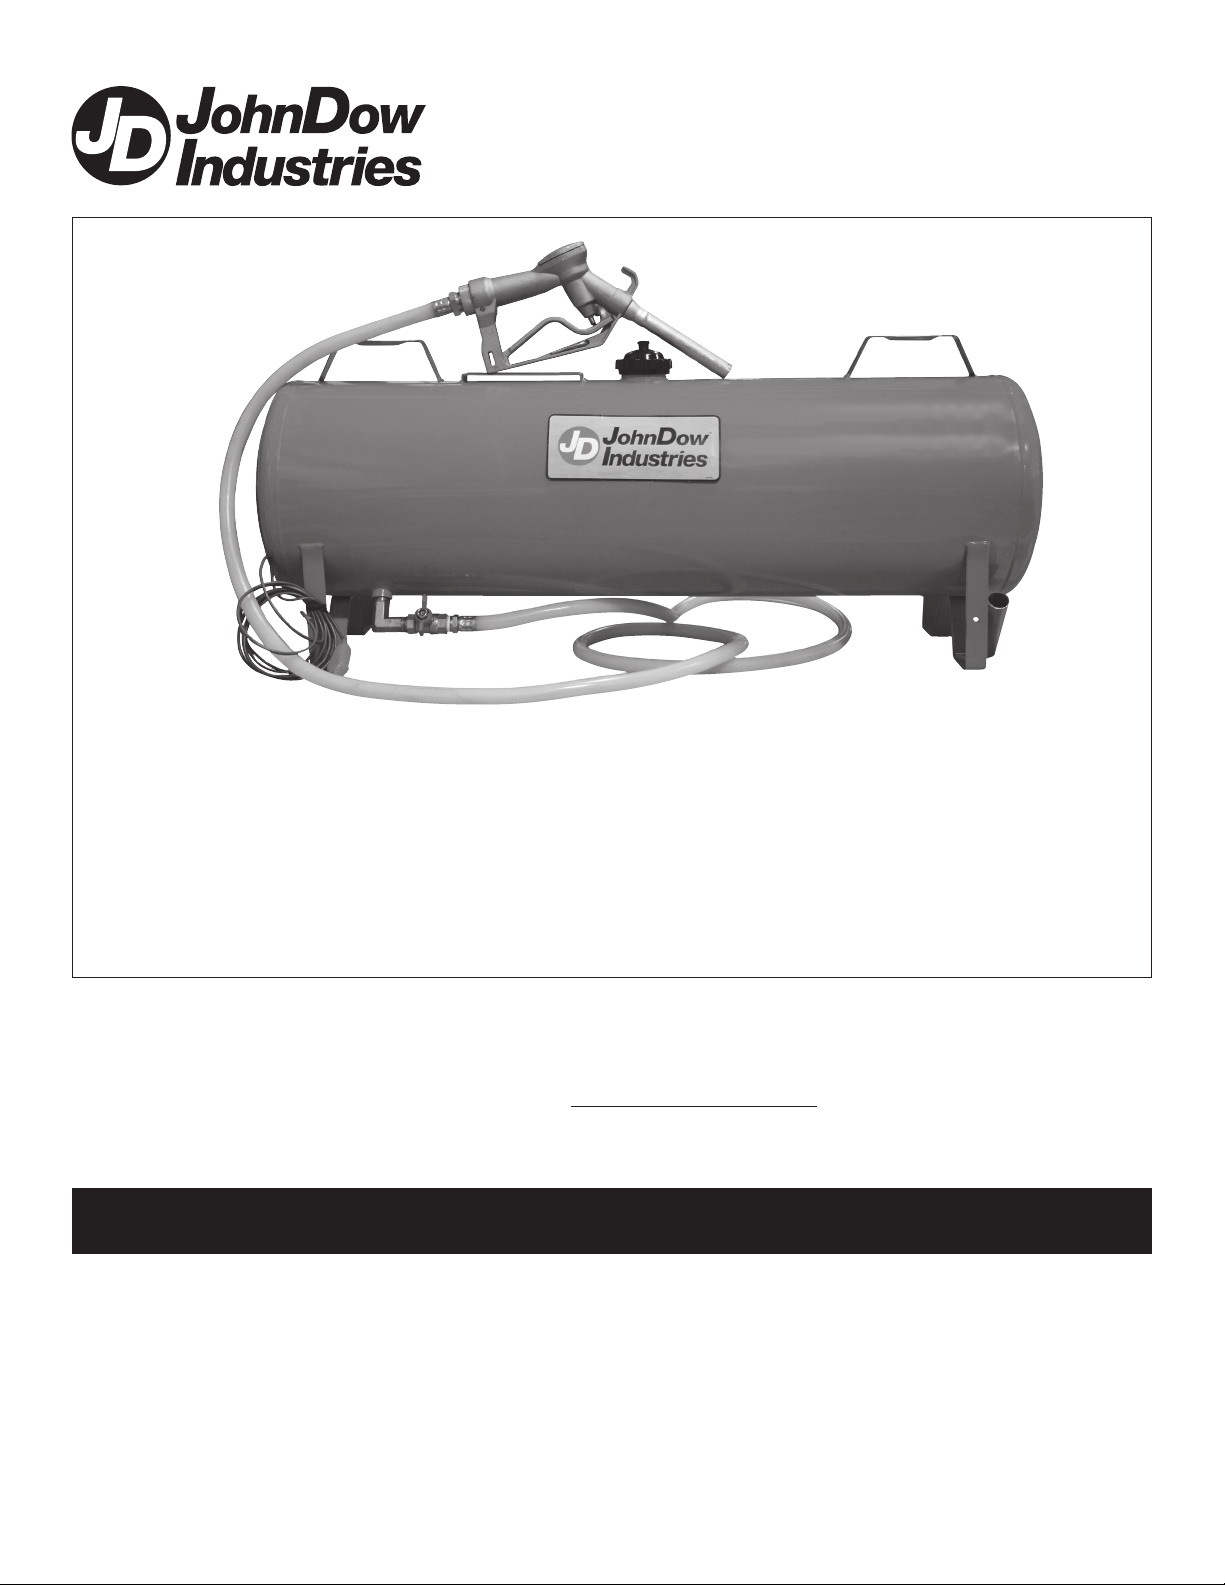
Important Safety Information
Read user's manual and this safety information before using this fuel station.
DANGER indicates a hazardous situation which, if not avoided,
will result in death or serious injury.
WARNING indicates a hazardous situation which, if not avoided,
could result in death or serious injury.
WARNING indicates a hazardous situation which, if not avoided,
could result in death or serious injury.
The use of this product includes the
handling of gasoline.
DANGER GASOLINE
EXTREMELY FLAMMABLE
VAPORS CAN EXPLODE
HARMFUL OR FATAL IF SWALLOWED
• Keep container closed.
Static charge and container lling warnings.
• Place container in horizontal position on the ground when
lling.
• Dissipate any static electricity from your body by
touching a metal surface away from the service station
nozzle and prior to removing service station nozzle from
dispensing pump.
• Keep service station nozzle in contact with tank while lling.
• Monitor ow to prevent spills and overlling.
• Fill slowly to prevent buildup of static charge.
Use, transportation, and storage warnings.
• Conrm all users are trained on safe working practices
and comply with any and all regulations for using,
transporting, and storing gasoline.
• Conrm all ttings and connections are tight and leak-free.
• Do not modify this fuel station or its components.
• Perform the entire closure procedure after lling and
before transporting.
• Do not place inside a vehicle trunk or inside passenger
cabin.
• Secure or strap fuel station to a trailer or truck bed.
• If swallowed, do not induce vomiting. Call physician
immediately.
• Do not siphon by mouth.
• Avoid prolonged breathing of vapors.
• Keep out of reach of children.
• Do not store in vehicle or living space.
• Store and use in well-ventilated area.
• Vapors can ignite by a spark or ame source many feet away.
• Keep away from ame, pilot lights, stoves, heaters, electric
motors, and other sources of ignition.
• Do not smoke near or while using this product.
• Do not re-enter vehicle while lling. Re-entry can
cause static buildup on person and create spark.
• Do not use electronics or mobile phones while
using this fuel station.
• Do not use funnels to ll or dispense fuel with this
fuel station.
• If re starts, do not remove service station nozzle.
Back away immediately.
• Use ground wire to equalize static charge potential
between receiving equipment and this tank.
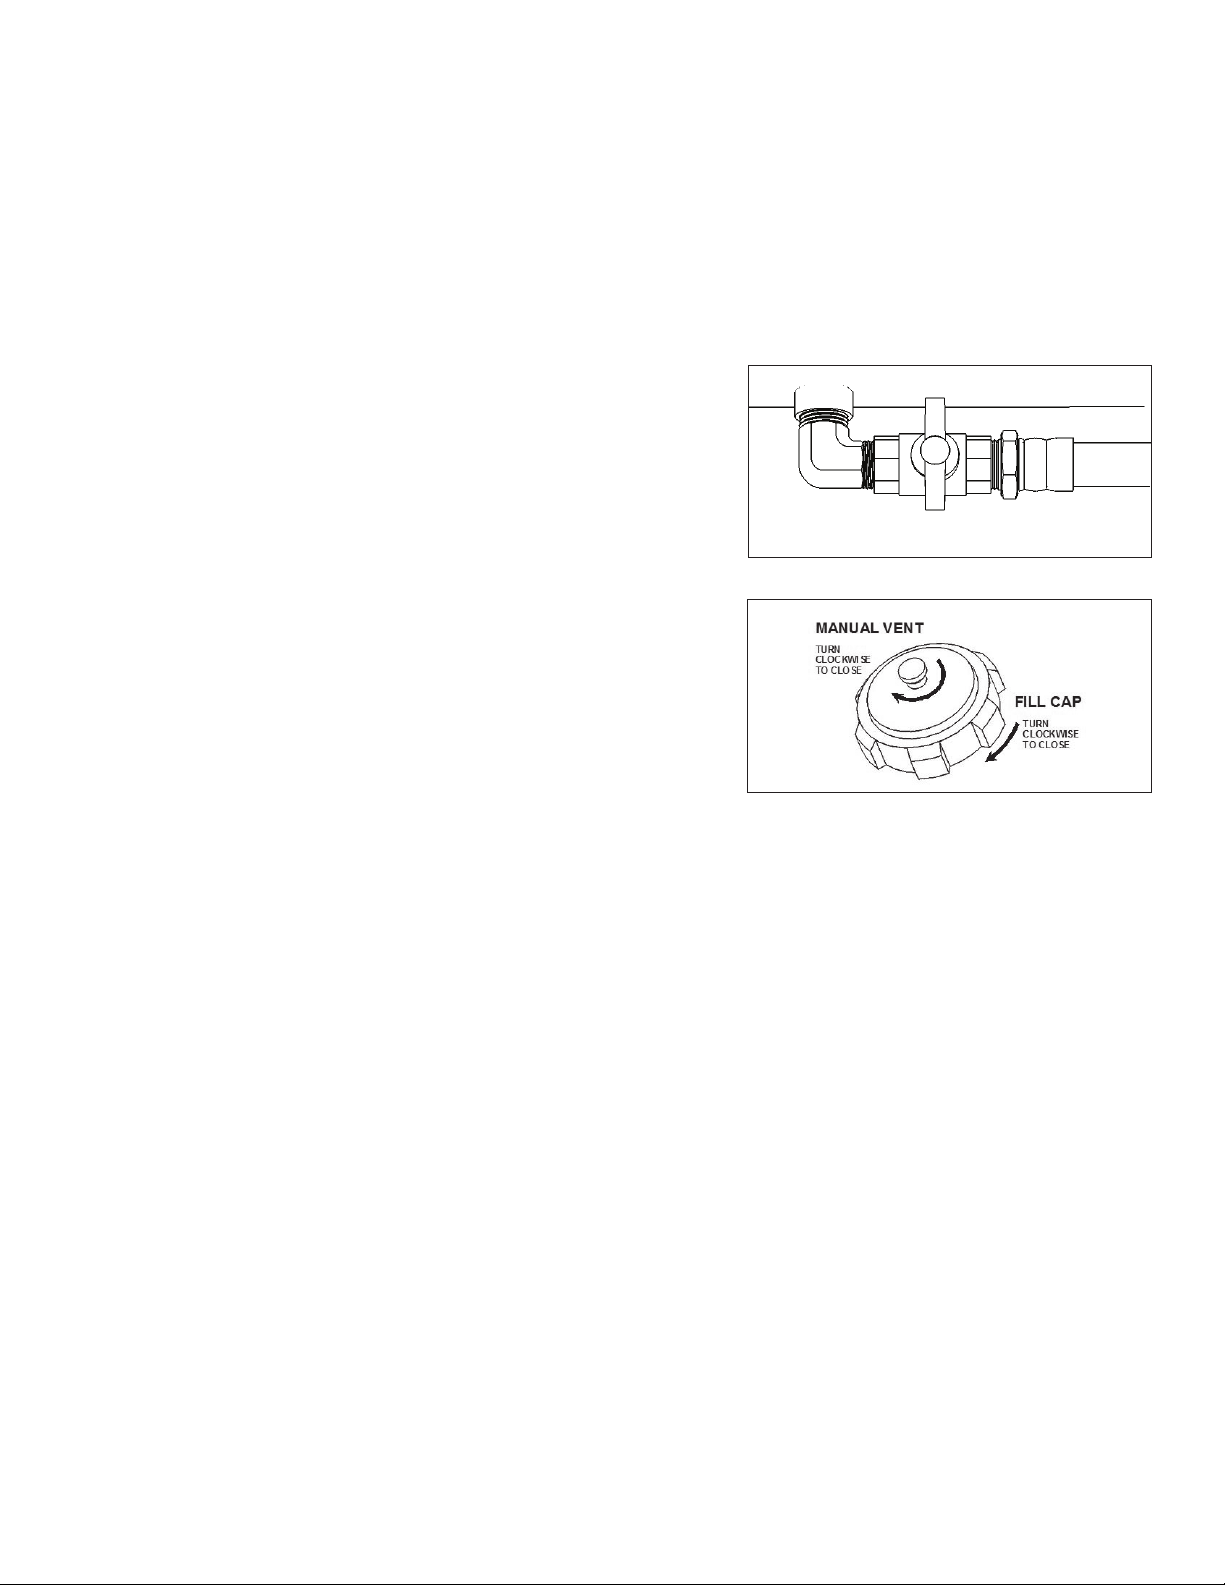
• Open ll cap manual vent screw slowly to release
internal pressure prior to opening valve and nozzle.
• Use care when lifting to prevent loss of control or
injury. Seek assistance to avoid strain or injury.
• State and local regulations vary for the transportation
of gasoline. It is the vehicle operator's responsibility
to review and comply with all federal, state, and local
regulations regarding gasoline transportation.
• Do not store in direct sunlight.
• Do not store in an attached garage connected to a
residence or dwelling.

3
FOR SERVICE ASSISTANCE, CALL 800-433-0708 OR VISIT JOHNDOW.COM
REGULATIONS FOR USE
GETTING STARTED
The persons or functions using this product may be subject to additional regulations including
PHMSA, DOT 49 CFR Subchapter C – Hazardous Materials Regulations (HMR) as well as
requirements of other federal agencies, and requirements of state and local government agencies.
It is the persons responsibility to determine the applicability of these regulations and for compliance
to these regulations.
Resources for additional information:
https://www.phmsa.dot.gov/regulations-and-compliance
https://www.phmsa.dot.gov/about-phmsa/phmsa-faqs
Before assembly, ensure you have all parts according to the contents list below. If any parts are
missing or damaged, contact JohnDow Industries for replacement.
CONTENTS
Item No. Description Qty.
1 Tank 1
2 1/2” x 10' Hose w/1/2” NPT & 3/4” NPT Fittings 1
3 Dispensing Nozzle 1
4 Ground Wire 1
5 10-32 x 3/8” Self-Tapping Ground Screw (assembled onto tank) 1
6 2-1/4” Fill Cap w/Rubber Gasket 1
7 5/16” x 1-1/2” Hex Head Cap Screw, Grade 8.8 4
8 5/16” Flat Washer 8
9 5/16” Hex Nut 4
10 UN1203 Gasoline Label (not pictured) 1
1
5
4
2
3
6
79
8
TOOLS REQUIRED
Flat Head Screwdriver or 5/16” (or 8mm) Nut Driver Adjustable Wrench
7/8” and 1-1/16” Wrench PTFE Tape (included)

TO DISPENSE FROM FUEL STATION
Before use, read and follow all safety instructions on page 2 of this user's manual.
1. Ensure fuel station is at a higher elevation than the receiving tank. Fuel is gravity dispensed
through the dispensing nozzle.
2. Attach the ground wire clip end to frame of the equipment receiving the fuel to create a bond.
Bonding will place both the fuel station and receiving equipment at the same static charge
potential.
3. Slowly open the ll cap's manual vent screw to release any internal pressure. After releasing
pressure, open ball valve by turning the handle clockwise. The ball valve handle should be in-line
with the valve body.
4. Place the dispensing nozzle into the receiving fuel tank. The dispensing nozzle must remain inside
the receiving tank during the entire ll process.
5. Remove the locking clip from the dispensing nozzle. Squeeze dispensing nozzle handle to begin
ow, release to stop. Monitor ow and liquid levels to prevent spills and overlling.
4FOR SERVICE ASSISTANCE, CALL 800-433-0708 OR VISIT JOHNDOW.COM
ASSEMBLY INSTRUCTIONS
TO FILL FUEL STATION
Before use, read and follow all safety instructions on page 2 of this user's manual.
1. Remove ground screw [5] from tank [1] leg using screwdriver or nut driver. Assemble green
ground wire [4] to tank by placing screw through the connector and reattaching to tank leg.
Tighten securely using screwdriver or nut driver.
2. Assemble ll cap [6] onto ll neck. Make sure cap is secure by turning completely to stop position,
described in To Close for Transportation or Storage.
3. Wrap ½” tting on hose [2] with PTFE tape. Thread into ball valve. Tighten with wrenches.
4. Wrap ¾” ttings on hose [2] with PTFE tape. Thread nozzle [3] onto hose end. Tighten with
wrenches.
5. Afx the included GASOLINE UN 1203 [10] label to the fuel station, on a side visible during
transportation.
Before lling, read and follow all safety instructions on page 2 of this user's manual.
1. Alwayslayfuelstationonthegroundawayfromvehiclebeforellingtodissipateanystatic
charge.
2. Dissipate any static electricity from your body by touching a metal surface away from the service
station nozzle and prior to removing service station nozzle from dispensing pump.
3. Ensure the ball valve is closed. The ball valve handle should be in a 90° position to the valve
body, as described in To Close and Secure for Transportation and Storage.
4. Removellcapfromfuelstationandinsertservicestationnozzleintothellerneckopening.
5. Whilelling:
a. Do not remove service station nozzle from fuel station. Keep the service station nozzle in
contact with the rim of the fuel station at all times until fueling is complete.
b. Do not use service station nozzle lock-open device. Fill slowly to prevent the buildup of static
charge.Stopimmediatelyifyousensethebuildupofstaticcharge.Donotresumellinguntil
static charge dissipates.
c. Closelymonitorowtopreventspillsandoverlling.Donotllabovethebottomoftheller
neck.
6. Replacellcapandtightenassecurelyaspossiblebyhand,asdescribedinTo Close and
Secure for Transportation and Storage.
7. Wipe any gasoline residue from surface of fuel station or allow to evaporate. If fuel spills on
clothing, change clothing immediately.

TO DRAIN FUEL FROM HOSE BACK INTO FUEL STATION
Before use, read and follow all safety instructions on page 2 of this user's manual.
1. Elevate dispensing the nozzle above the hose and slope the hose back to the valve providing a
clear path for uid to drain.
2. Squeeze the handle of the nozzle to allow the hose to vent and fuel to drain back into the tank.
3. Close the ball valve per the procedure below.
4. Replace locking clip onto the dispensing nozzle.
5
FOR SERVICE ASSISTANCE, CALL 800-433-0708 OR VISIT JOHNDOW.COM
TO CLOSE FOR TRANSPORTATION OR STORAGE
Before transporting and storing, read and follow all safety
instructions on page 2 of this user's manual.
1. Close ball valve by turning the handle counter-clockwise
until it stops in 90° position, as shown in Figure 1.
2. Replacellcapandtightenintheclockwisedirectionas
securely as possible by hand, as shown in Figure 2.
3. Tightenllcap'smanualventscrewintheclockwise
direction as securely as possible by hand, as shown in
Figure 2.
CLOSED POSITION
Figure 1
Figure 2
SECURE BEFORE TRANSPORTATION
Before transporting, read and follow all safety instructions on page 2 of this user's manual.
1. Secure the fuel station onto a trailer or truck bed, in the horizontal position only. Do not place
inside a vehicle trunk or inside the passenger cabin.
2. To secure the fuel station, use ratchet-style polyester cargo tie down straps having a 300 lb.
minimum working load (WL). Do not use friction or cam lock style straps.
3. Secure by routing the cargo straps over the tank through the top brackets. Do not attach cargo tie
down straps to the ball valve or route the straps directly against the ll cap.
STORAGE
Before storing, read and follow all safety instructions on page 2 of this user's manual.
Upon use, all statements below apply, whether the fuel station is empty, full, or partially full.
Storethefuelstationinaccordancetothefollowing:
1. Itistheuser'sresponsibilitytoreviewandcomplywithalllocalandstatebuildingandrecodes
regarding proper storage of gasoline and the approved storage locations.
2. Storeinwell-ventilatedareaawayfromdirectsunlight,ame,pilotlights,stoves,heaters,
electronic motors and other sources of ignition.
3. Do not store inside a vehicle passenger cabin or trunk, residence, living space or basement, or an
attached garage connected to residence or dwelling.

6FOR SERVICE ASSISTANCE, CALL 800-433-0708 OR VISIT JOHNDOW.COM
HOW TO COMPLY WITH §178.604 AND §173.28
PRODUCTION TESTING AND REUSE
The fuel station user or third party should complete the inspection and leak-proof test prior to reuse.
Inspection for evidence of a reduction in structural integrity. This is determined by the person
doing the inspection. It is suggested the person inspect for ruptures, creases, cracks, corrosion, bent
llerneck,damagedcap,and/orbrokencapvalve.Fillcapsandcomponentsmaybereplaced.Do
not recondition or use if the tank has a reduction in structural integrity after inspection.
Leakproofness testing. Perform on an empty JDI-FST15 tank only. Apply a 3.0 psi air pressure and
using a test method per Appendix to Part 178 – Alternate Leakproofness Test Methods. Acceptable
methodsinclude:
1) Pressuredifferentialtestbyholdingforsufcienttimetodetermineifthereisachangein
pressure.
2) Solution over seams test by coating all seams and welds with a soapy water solution and
holdingforasufcientperiodoftimetodetermineifairisleaking.
Apackagepassestheleakprooftestifthereisnoleakageofairaftersufcienttimeafterestablishing
3.0psiinsidethetank.Typically,30-60secondsisasufcientamountoftime.
Marking to indicate successfully-passed inspection and leakproofness test. Mark the packaging
with the letter “L”, the name and address or symbol of the person conducting the test, and the last
two digits of the year the test was conducted. Symbols, if used, must be registered with the Associate
Administrator.
Equipment. A Leakproofness Test Kit, JDI-FST15-TK2, for model JDI-FST15 is available from
JohnDow Industries. The kit includes the necessary test equipment, instructions, and blank marking
labelstowriteonandafxtothetank.
Model JDI-FST15 is a DOT approved packaging for the transport of UN 1203, Gasoline, Packing
Group II. The marking plate on the product designates the packaging was tested including leakproof-
nesstestingper49CFR§178.604duringproductionbeforebeingrstusedintransportation.
However, in order to assure the integrity and performance of the packaging, 49 CFR §178.604 also
requires production testing prior to reuse per 49 CFR §173.28. §173.38 requires inspection for a re-
duction in integrity, leakproofness testing, and marking.
REPLACEMENT PARTS
Item No. Part No. Description
1 FST15-BV 1/2” F x F Ball Valve
2 201594 2-1/4” Fill Cap w/Rubber Gasket
3 FST15-EB 1/2” NPT M x M 90° Elbow
4 30GC-49-OM Ground Wire Assembly
5 FST15-HOSE 10' Hose, 1/2” NPT, 3/4” NPT
6 FST15-NOZZLE Dispensing Nozzle
Table of contents
Other JohnDow Industries Tank Equipment manuals