SMaBiT AV2011/38 User manual
Z-Wave Heizkörperthermostat
AV2011/38
Lieferumfang
1 Z-Wave Heizkörperthermostat
2 Bedienungsanleitung (Deutsch, Englisch)
3 Adapter (Danfoss RA, Danfoss RAV, Danfoss RAVL)
Bestimmungsgemäßer Gebrauch
Mit Z-Wave Heizkörperthermostat haben Sie einen program-
mierbaren Heizkörperregler zur Temperaturregelung in ge-
schlossenen Räumen verwendet werden kann und so zur Re-
duzierung der Heizenergie beitragen kann. Den Stellantrieb
können Sie manuell über das Drehrad oder mit der App Ihres
Smart Home Systems steuern.
Sicherheitshinweise
Batterien niemals wieder aufladen, nicht kurzschließen, nicht
auseinandernehmen –Explosionsgefahr! Erschöpfte Batte-
rien umgehend aus dem Gerät entfernen. Batterien vor star-
ker Erwärmung schützen –erhöhte Auslaufgefahr! Keine ge-
brauchten und neuen Batterien zusammen verwenden. Bat-
terie und Gerätekontakte vor dem Einlegen bei Bedarf reini-
gen. Batterien von Kindern fernhalten. Kontakt mit Haut, Au-
gen und Schleimhäuten vermeiden. Bei Kontakt mit Batterie-
säure die betroffenen Stellen sofort mit reichlich klarem Was-
ser spülen und umgehend einen Arzt aufsuchen.
Einrichtung
Die Montage des Z-Wave Heizkörperthermostats ist
problemlos auf allen bekannten Ventilunterteilen
möglich; ohne Schmutz und Wasserflecken, da der
Heizwasserkreis nicht unterbrochen wird.
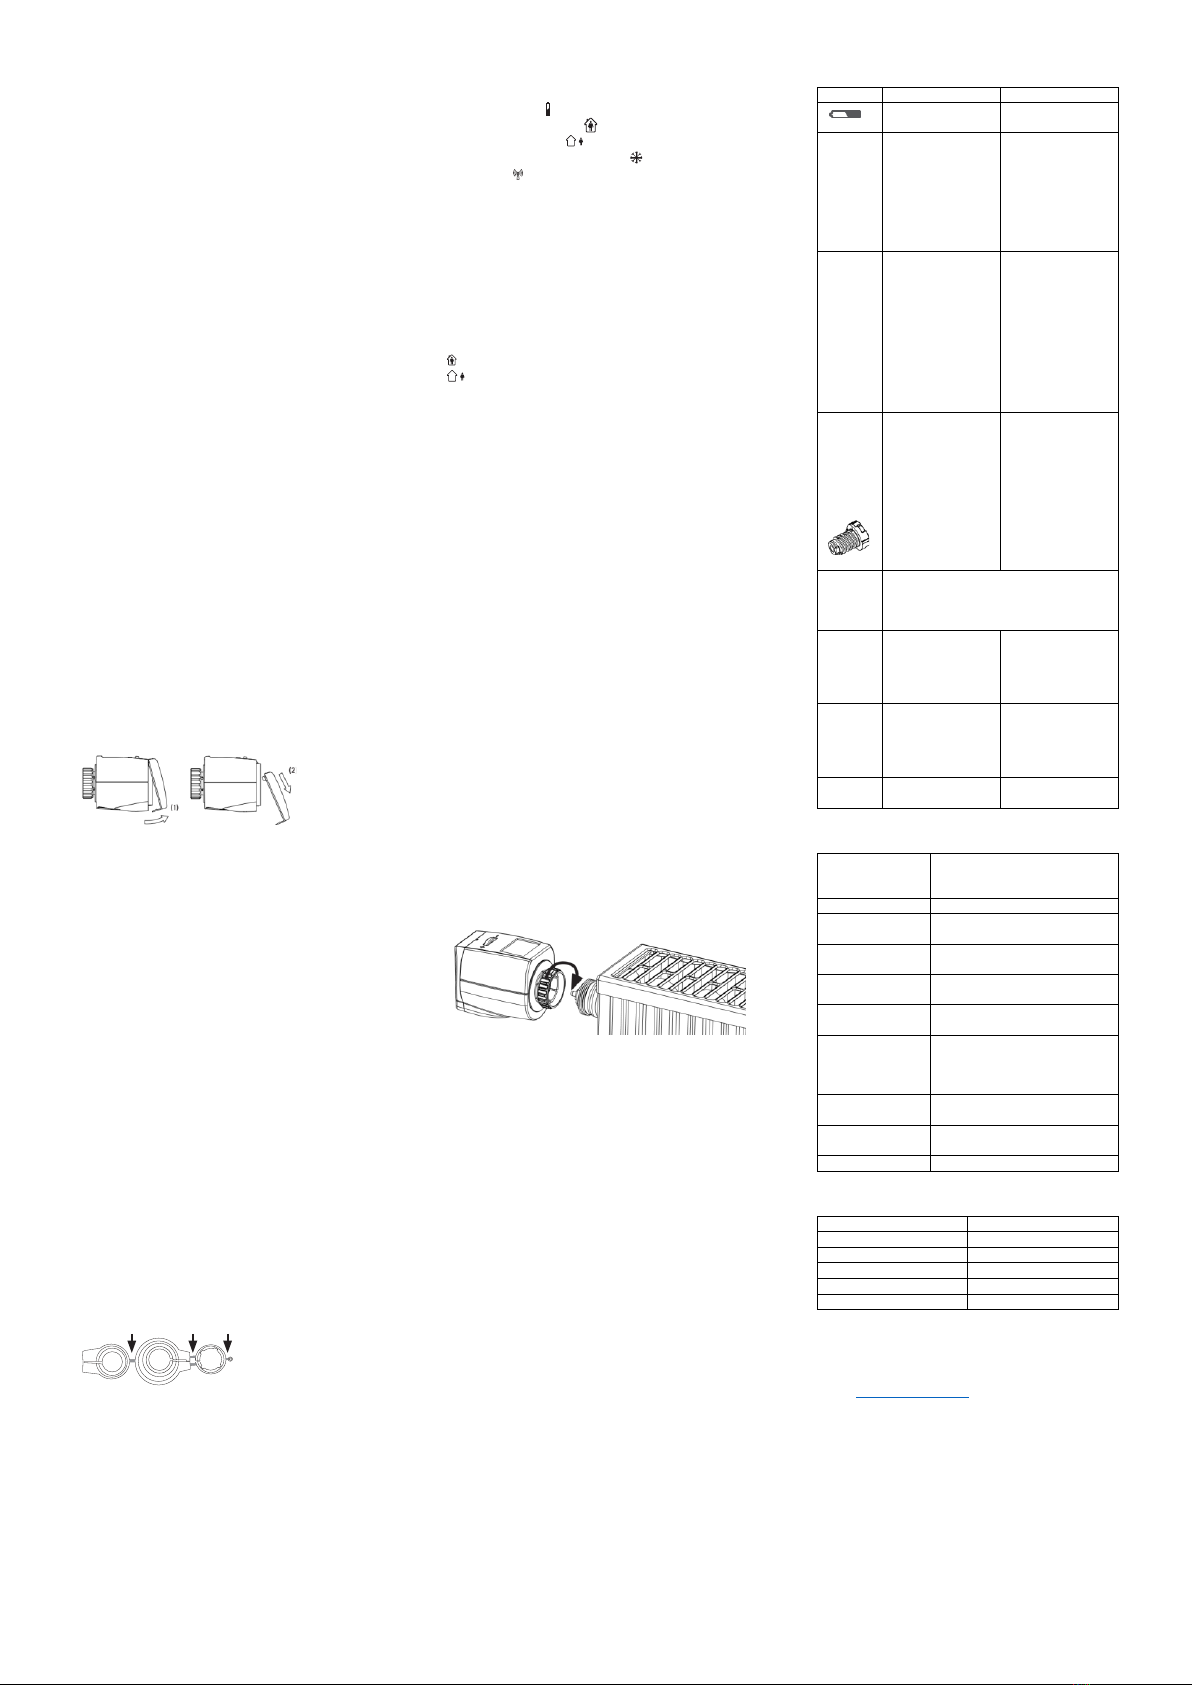
1. Alten Thermostatkopf ganz aufdrehen, Befestigung
lösen und vom Ventil abziehen.
2. Entfernen Sie den Batteriedeckel, indem Sie diesen an
der markierten Stelle nach oben drücken (1) und ihn
dann aushängen (2).
3. Setzen Sie dann die Batterien wie abgebildet ein. Ver-
wenden Sie keine Akkus und achten Sie auf die rich-
tige Polarität.
4. Im Display erscheint PREP. Der Motor fährt nun voll-
ständig auf, um die Montage zu erleichtern. Sobald
der Regler montagebereit ist, erscheint INST im Dis-
play. Das blinkende Funksymbol signalisiert Anlernbe-
reitschaft. Starten Sie bei den Anlernvorgang (Inclu-
sion) Ihres Z-Wave Smart Home Systems, um das Ge-
rät in das Netzwerk aufzunehmen.
5. Drehen Sie die Überwurfmutter (Ring am Produkt) auf
das Ventil. Passt die Überwurfmutter nicht auf Ihr
Ventil, benötigen Sie eventuell einen Adapter. Gän-
gige Adapter finden Sie bereits im Lieferumfang.
6. Den Taster im Batteriefach betätigen. Das Heizkör-
perthermostat zeigt ADAP im Display und führt eine
Initialisierungsfahrt aus. Nach der Initialisierung zeigt
das Heizkörperthermostat den Hauptbildschirm an.
Im Fehlerfall wird ein Fehlercode angezeigt. Eine
Übersicht der Fehlercodes finden Sie in der Tabelle
„Hilfe“.
Verwendung der Adapter
Bitte entfernen Sie die Verbindungsstücke der Kunststoff
Adapter restlos, bevor Sie einen der beiliegenden Adapter
verwenden!
Die grau markierten Verbindungsstäbe bitte vor der Montage
der Adapter komplett entfernen.
Hinzufügen bzw. Entfernen aus dem Netzwerk
Um das Gerät manuell an- bzw. abzulernen starten sie den An-
/Ablernvorgang ihres Smart Home Systems. Halten Sie den
Taster im Batteriefach des Z-Wave Heizkörperthermostat für
5 Sekunden gedrückt. Das Gerät fährt in Montageposition um
eine Montage/ Demontage zu ermöglichen.
Bedien- und Anzeigenelemente im Display
1. Batterie schwach
2. Komforttemperatur aktiv
3. Spartemperatur aktiv
4. Fenster-/Frostschutzfunktion aktiv
5. Funk aktiv
6. AUTO- oder MANU-Modus aktiv
7. Stellrad + und –
8. Taster im Batteriefach
Grundlegende Betriebsarten
AUTO-Modus
Der Z-Wave Heizkörperthermostat regelt wie in der Werksein-
stellung vorgegeben oder wie per Funkeinstellung vorgege-
ben.
Werkseinstellung
Komforttemperatur (Werkseinstellung 22°C)
Spartemperatur (Werkseinstellung 18°C)
MANU-Modus
Z-Wave Heizkörperthermostat wechselt in den MANU-Mo-
dus, wenn Sie per Hand am Stellrad die Temperatur verändert
haben. Die Einstellung überschreibt die Funkeinstellung für 2
Stunden. Danach wechselt die Einstellung automatisch in die
vorher programmierte Einstellung. Möchten Sie die Einstel-
lungen vorher ändern können Sie dies per Funk durchführen.
Standby
30 Sekunden nach der letzten Eingabe am Gerät schaltet das
Display ab um Strom zu sparen. Durch drehen des Stellrads in
eine beliebige Richtung wird das Display wieder eingeschal-
tet. Die Frostschutz, Fenster-Offen Erkennung- und
Kalkschutzfunktion sind automatisch aktiv:
Frostschutzfunktion
Sinkt die Temperatur auf unter 6°C, öffnet das Heizkör-
perthermostat das Ventil solange, bis die Temperatur
wieder auf über 8°C steigt. Somit wird ein Einfrieren der
Heizkörper verhindert.
Kalkschutzfunktion
Um ein Verkalken der Heizkörperventile zu verhindern, führt
der Energiespar-Regler 1x wöchentlich eine Kalkschutzfahrt
durch.
Fenster-Offen Erkennung
Fällt die Temperatur abrupt ab wird die Fenster-Offen
Erkennung aktiviert und das Fenster-Offen-Aktiv Sym-
bol angezeigt. Das Ventil wird hierbei für 15 Minuten ge-
schlossen.
Demontage
Um das Heizkörperthermostat zu entfernen, halten Sie den
Taster für 3 Sekunden lang gedrückt. Das Gerät fährt in Mon-
tageposition. Ist die Montageposition erreicht (Display zeigt
INST) können Sie die Batterien entnehmen und den Energie-
spar-Regler vom Ventil abschrauben.
Reinigung
Verwenden Sie zur Reinigung des Z-Wave Heizkörperthermos-
tats nur ein trockenes bis leicht feuchtes Tuch. Vermeiden Sie
chemische Lösemittel, Sie beschädigen damit eventuell das
Gerät.
Entsorgungshinweise
Werfen Sie elektronische Altgeräte bitte nicht in den Haus-
müll. Halten Sie bei der Entsorgung bitte die Normen und Ge-
setze ein. Dieses Gerät enthält elektronische Komponenten,
die als Elektronikschrott entsorgt werden müssen.
Gewährleistung
Innerhalb der gesetzlichen Garantiezeit beseitigen wir unent-
geltlich Mängel des Gerätes, die auf Material- oder Herstel-
lungsfehler beruhen, durch Reparatur oder Umtausch. Die Ga-
rantie erlischt bei Fremdeingriff.
Konformität
Das Produkt darf im Gebiet der EU verkauft und vertrieben
werden. Hiermit erklärt SMaBiT GmbH, dass sich dieses Pro-
dukt in Übereinstimmung mit den Anforderungen der EG-
Richtlinie 1995/5/EG und den anderen relevanten Vorschrif-
ten der auf das Produkt anwendbaren Richtlinien befindet. Die
Konformitätserklärung ist im Internet unter www.coqon.de zu
finden.
Probleme und Lösungen
Problem
Ursache
Lösung
Batteriestand nied-
rig
Batterien wechseln
Heizkör-
per wird
nicht
warm.
Kesselwassertem-
peratur in Ord-
nung? Ventil öffnet
nicht: nach der
Sommerheizpause
verkalkt?
Kesselwassertem-
peratur erhöhen.
Den Stellantrieb
abnehmen und.
Ventilstößel mehr-
mals per
Hand/Werkzeug
bewegen.
Heizkör-
per wird
nicht
kalt.
Ventil schließt
nicht vollständig.
Evtl. hat sich der
Schließpunkt
der Ventildichtung
verschoben.
Erneut adaptieren
Ventilstößel mehr-
mals von Hand be-
wegen –
evtl. ist eine Adap-
tion nicht möglich,
da Ihr Ventil viel-
leicht verkalkt ist
oder die Dichtung
Ihre Funktion nicht
mehr erfüllt.
Druck-
stück
fällt her-
aus
(kann zu
E1 füh-
ren).
Durch ein Endlos-
gewinde kann das
auf der Unterseite
sitzende Druck-
stück herausfallen,
wenn der Regler
nicht auf dem Ven-
til angebracht
wurde.
Druckstück einsetz-
ten. Den Taster 3
Sekunden gedrückt
halten. Das Endlos-
gewinde dreht sich
nun und zieht das
Druckstück wieder
fest. Am Heizkör-
per anbringen und
erneut adaptieren.
E1-E3
Den Taster 3 Sekunden gedrückt halten
löscht die Fehleranzeige im Display und
fährt in Montageposition (Display zeigt
PREP und anschließend INST).
E1
Keine Adaption
möglich.
Der Stellantrieb ist
nicht am Heizkör-
per montiert.
Gerät korrekt am
Heizkörper mon-
tiert? Den Stellan-
trieb montieren.
E2
Ventilhub zu kurz
oder Batterieleis-
tung zu schwach.
Ventilstößel per
Hand mehrmals
öffnen und schlie-
ßen oder neue Bat-
terien einsetzen.
E3
Keine Ventilbewe-
gung möglich.
Ventilstößel frei
beweglich?
Z-Wave Befehlsklassen
BASIC (r/w)
Ermöglicht die Ansteuerung
grundlegender Funktionen
(AN/AUS)
BATTERY (r)
Batteriestand in Prozent
MANUFACTU-
RER_SPECIFIC (r)
Herstellerinformation und Pro-
duktkennung
NODE_
NAMING (r/w)
Benennen von Gerät und Installa-
tionsort
SENSOR_
MULTILEVEL (r)
Gemessene Temperatur
SWITCH_
MULTILEVEL (r/w)
Öffnungsgrad des Ventils in Pro-
zent
THERMOSTAT
_MODE (r/w)
Betriebsmodus:
OFF/HEAT/ENERGY SAVE
HEAT/MANUFACTURER_SPE-
CIFIC/SWITCH_MULTILEVEL
THERMOSTAT_
SETPOINT (r/w)
Solltemperatur
VERSION (r)
Produkt- und Befehlsklassenver-
sion
WAKEUP (r/w)
Aufwachintervall
Technische Daten
Schutzklasse
IP20
Betriebstemperatur
0°C –50°C
Betriebsspannung
3V (2x 1,5V AA)
Kommunikation
Z-Wave bidirektional
Funkfrequenz
868,4 MHz
Abmessungen
88x55x65 mm
Kundendienst
Sollten trotz sachgerechter Handhabung Störungen auftreten
oder wurde das Gerät beschädigt, wenden Sie sich bitte per E-
Hersteller
SMaBiT GmbH
Friedrichstraße 95
10117 Berlin –Deutschland

Z-Wave Radiator Thermostat
AV2011/38
Scope of delivery
1 Z-Wave radiator thermostat
2 User manual (German, English)
3 Adapters (Danfoss RA, Danfoss RAV, Danfoss RAVL)
Intended use
With Z-Wave Radiator Thermostat you have a programmable
radiator controller that can be used for temperature control
in enclosed spaces and thus contribute to the reduction of
heating energy. You can control the actuator manually via the
rotary wheel or with the app of your smart home system.
Safety
Never recharge batteries, do not short-circuit, do not take
them apart –risk of explosion! Remove exhausted batteries
from the device immediately. Protect batteries from strong
heating –increased risk of leakage! Do not use used and new
batteries together. Clean the battery and device contacts be-
fore insertion if necessary. Keep batteries away from children.
Avoid contact with skin, eyes and mucous membranes. In case
of contact with battery acid, rinse the affected areas immedi-
ately with plenty of clear water and immediately consult a
doctor.
Furnishings
The installation of the Z-Wave radiator thermostat is
easily possible on all known valve bases; without dirt
and water stains, as the heating water circuit is not in-
terrupted.
1. Turn up the old thermostatic head completely, loo-
sen the attachment and pull it off the valve.
2. Remove the battery cover by pressing it up in the
highlighted place (1) and then unhooking it (2).
3. Then insert the batteries as shown. Do not use batter-
ies and pay attention to the correct polarity.
4. PREP appears on the display. The engine now moves
up completely to facilitate assembly. As soon as the
controller is ready for installation, INST appears on
the display. The flashing radio symbol signals willing-
ness to learn. Start the inclusion process of your Z-
Wave Smart Home System to add the device to the
network.
5. Turn the coupling nut (ring on the product) onto the
valve. If the coupling nut does not fit on your valve,
you may need an adapter. Common adapters are al-
ready included in the scope of delivery.
6. Press the button in the battery compartment. The ra-
diator thermostat shows ADAP in the display and per-
forms an initialization drive. After initialization, thera-
diator thermostat displays the main screen. In the
event of an error, an error code is displayed. For an
overview of error codes, see the Help table.
Using the adapters
Please remove the connectors of the plastic adapters com-
pletely before using one of the enclosed adapters!
Please remove the grey marked connecting rods completely
before mounting the adapters.
Add or remove from the network
To manually teach or learn the device, they start the learning
process of your smart home system. Press and hold the but-
ton in the battery compartment of the Z-Wave radiator ther-
mostat for 5 seconds. The device moves to the mounting po-
sition to enable assembly/disassembly.
Controls and display elements in the display
1. Battery low
2. Comfort temperature active
3. Saving temperature active
4. Window/frost protection function active
5. Connected to smart home system
6. AUTO or MANU mode active
7. Wheel + and –
8. Button in the battery compartment
Basic operating modes
AUTO Mode
The Z-Wave radiator thermostat regulates as specified in the
factory setting or as specified by radio setting.
Default setting
Comfort temperature (factory setting 22°C)
Saving temperature (factory setting 18°C)
MANU mode
Z-Wave radiator thermostat switches to MANU mode when
you have manually changed the temperature on the control
wheel. The setting overrides the wireless setting for 2 hours.
After that, the setting automatically changes to the previously
programmed setting. If you want to change the settings be-
forehand, you can do this by radio.
Standby
30 seconds after the last input on the device, the display
switches off to save power. By turning the control wheel in
any direction, the display is switched on again. The frost pro-
tection, window-open detection and limescale protection
function are automatically active:
Antifreeze function
If the temperature drops below 6°C, the radiator thermo-
stat opens the valve until the temperature rises again to
over 8°C. This prevents the radiators from freezing.
Lime protection function
In order to prevent calcification of the radiator valves, the en-
ergy-saving controller carries out a limescale protection trip
1x a week.
Window-Open Detection
If the temperature drops abruptly, the Window Open
Detection is activated and the Window Open-Active
icon is displayed. The valve is closed for 15 minutes.
Dismantling
To remove the radiator thermostat, press and hold the button
for 3 seconds. The device moves to the mounting position.
Once the mounting position has been reached (display shows
INST), you can remove the batteries and unscrew the energy-
saving controller from the valve.
Cleaning
Use only a dry to slightly damp cloth to clean the Z-Wave ra-
diator thermostat. Avoid chemical solvents, you may damage
the device.
Disposal instructions
Please do not throw waste electronic equipment into your
household waste. Please comply with the standards and laws
when disposing of it. This device contains electronic compo-
nents that must be disposed of as electronic waste.
Warranty
Within the statutory warranty period, we remedy defects in
the device that are based on material or manufacturing de-
fects free of charge by repair or exchange. The warranty ex-
pires in the event of external intervention.
Conformance
The product may be sold and distributed in the territory of the
EU. SMaBiT GmbH hereby declares that this product is in com-
pliance with the requirements of EC Directive 1995/5/EC and
the other relevant provisions of the directives applicable to the
product. The declaration of conformity can be found on the
Internet at www.coqon.de.
Problems and solutions
Problem
Cause
Solution
Battery level low
Changing batteries
Radiator
does not
get
warm.
Boiler water tem-
perature OK? Valve
does not open: cal-
cified after the
summer heating
break?
Increase boiler wa-
ter temperature.
Remove the actua-
tor and. Move the
valve tappets sev-
eral times by
hand/tool.
Radiator
does not
get cold.
Valve does not
close completely.
Possibly the
Closing point
of the valve seal.
Re-adapt
Move the valve
tappets several
times by hand –
Adaptation may
not be possible be-
cause your valve
may be calcified or
the seal may no
longer fulfil its
function.
Print
piece
falls out
(can
lead to
E1).
Due to an endless
thread, the pres-
sure piece sitting
on the underside
can fall out if the
regulator has not
been attached to
the valve.
Use the printed
piece. Press and
hold the button for
3 seconds. The
endless thread now
rotates and tight-
ens the pressure
piece again. Attach
to the radiator and
adapt again.
E1-E3
Hold down the button for 3 seconds de-
letes the error indicator in the display and
moves to the mounting position (display
shows PREP and then INST).
E1
No adaptation pos-
sible.
The actuator is not
mounted on the ra-
diator.
Device correctly
mounted on the ra-
diator? Mount the
actuator.
E2
Valve lift too short
or battery power
too weak.
Open and close the
valve tappets sev-
eral times by hand
or insert new bat-
teries.
E3
No valve move-
ment possible.
Valve tappets
freely movable?
Z-Wave Command Classes
BASIC (r/f)
Enables the control of basic func-
tions (ON/OFF)
BATTERY (r)
Battery level in percent
MANUFAC-
TURER_SPECIFIC
(r)
Manufacturer information and
product identification
NODE_
NAMING (r/f)
Naming the device and installa-
tion location
SENSOR_
MULTILEVEL (r)
Measured temperature
SWITCH_
MULTILEVEL (r/f)
Degree of opening of the valve in
percent
THERMOSTAT
_MODE (r/f)
Operating mode: OFF/HEAT/EN-
ERGY SAVE HEAT/MANUFAC-
TURER_SPECIFIC/SWITCH_MULTI-
LEVEL
THERMOSTAT_
SETPOINT (r/f)
Set temperature
VERSION (r)
Product and command class ver-
sion
WAKEUP (r/f)
Wake-up interval
Specifications
Class
IP20
Operating temperature
0°C –50°C
Operating voltage
3V (2x 1.5V AA)
Communication
Z-Wave bidirectional
Radio frequency
868.4 MHz
Dimensions
88x55x65 mm
Customer service
Should malfunctions occur despite proper handling or if the
device has been damaged, please contact support-en@sma-
bit.eu
Manufacturer
SMaBiT GmbH
Friedrichstrasse 95
10117 Berlin - Germany
Table of contents
Languages:


