SMAI AIR ROWER User manual

AIR ROWER
OWNER’S MANUAL

2
Table of Contents
Important Safety Information PAGE 3-4
Machine Maintenance Guide PAGE 5-12
Overview Of The Performance Monitor PAGE 13-14
Safety Using Instruction PAGE 15-18
Before You Start PAGE 19
Accessory List PAGE 20
Assembly Instruction PAGE 21-29
Exploded View PAGE 30
Part List PAGE 31-34

3
Important Safety Information
Thank you for purchasing this AIR ROWER!
. To ensure your safety and health, please use this equipment correctly. It is important to
read this entire manual before assembling and using the equipment. Safe and effective
use can only be achieved if the equipment is assembled, maintained and used properly. It
is your responsibility to ensure that all users of the equipment are informed of all
warnings and precautions.
1. Before starting any exercise program, you should consult your physician to determine if
you have any medical or physical conditions that could put your health and safety at risk
or prevent you from using the equipment properly. Your physician’s advice is essential if
you are taking medication that affects your heart rate, blood pressure or cholesterol level.
2. Be aware of your body’s signals. Incorrect or excessive exercise can damage your
health. Stop exercising if you experience any of the following symptoms: pain, tightness
in your chest, irregular heartbeat, shortness of breath, lightheadedness, dizziness or
feelings of nausea. If you do experience any of these conditions, you should consult your
physician before continuing with your exercise program.
3. Keep children and pets away from the equipment. The equipment is designed for adult
use only.
4. Use the equipment on a solid, flat level surface with a protective cover for your floor or
carpet. To ensure safety, the equipment should have at least 2 feet (60 CM) of free space
all around it.
5. Ensure that all nuts and bolts are securely tightened before using the equipment. The
safety of the equipment can only be maintained if it is regularly examined for damage
and/or wear and tear.
6. Always use the equipment as indicated. If you find any defective components while
assembling or checking the equipment, or if you hear any unusual noises coming from
the equipment during exercise, discontinue use of the equipment immediately and do
not use until the problem has been rectified.
7. Wear suitable clothing while using the equipment. Avoid wearing loose clothing that
may become entangled in the equipment.
8. Do not place fingers or objects into the moving parts of the equipment.
9. The maximum weight capacity of this unit is 320 pounds (145 KGS).
10. The equipment is not suitable for therapeutic use.
11. To avoid bodily injury and/or damage to the product or property, proper lifting and
moving are required.

4
12. Your product is intended for use in cool and dry conditions. You should avoid storage
in extreme cold, hot or damp areas as this may lead to corrosion and other related
problems.
13. This equipment is designed for indoor only.
WARNING: BEFORE BEGINNING ANY EXERCISE PROGRAM
CONSULT YOUR PHYSICIAN. THIS IS ESPECIALLY IMPORTANT FOR
INDIVIDUALS OVER THE AGE OF 35 OR PERSONS WITH PRE-EXISTING
HEALTH PROBLEMS. READ ALL INSTRUCTIONS BEFORE USING ANY
FITNESS EQUIPMENT. WE ASSUME NO RESPONSIBILITY FOR
PEROSNAL INJURY OR PROPERTY DAMAGE SUSTAINS BY OR
THROUGH THE USE OF THIS PRODUCT.
5
Machine Maintenance Guide
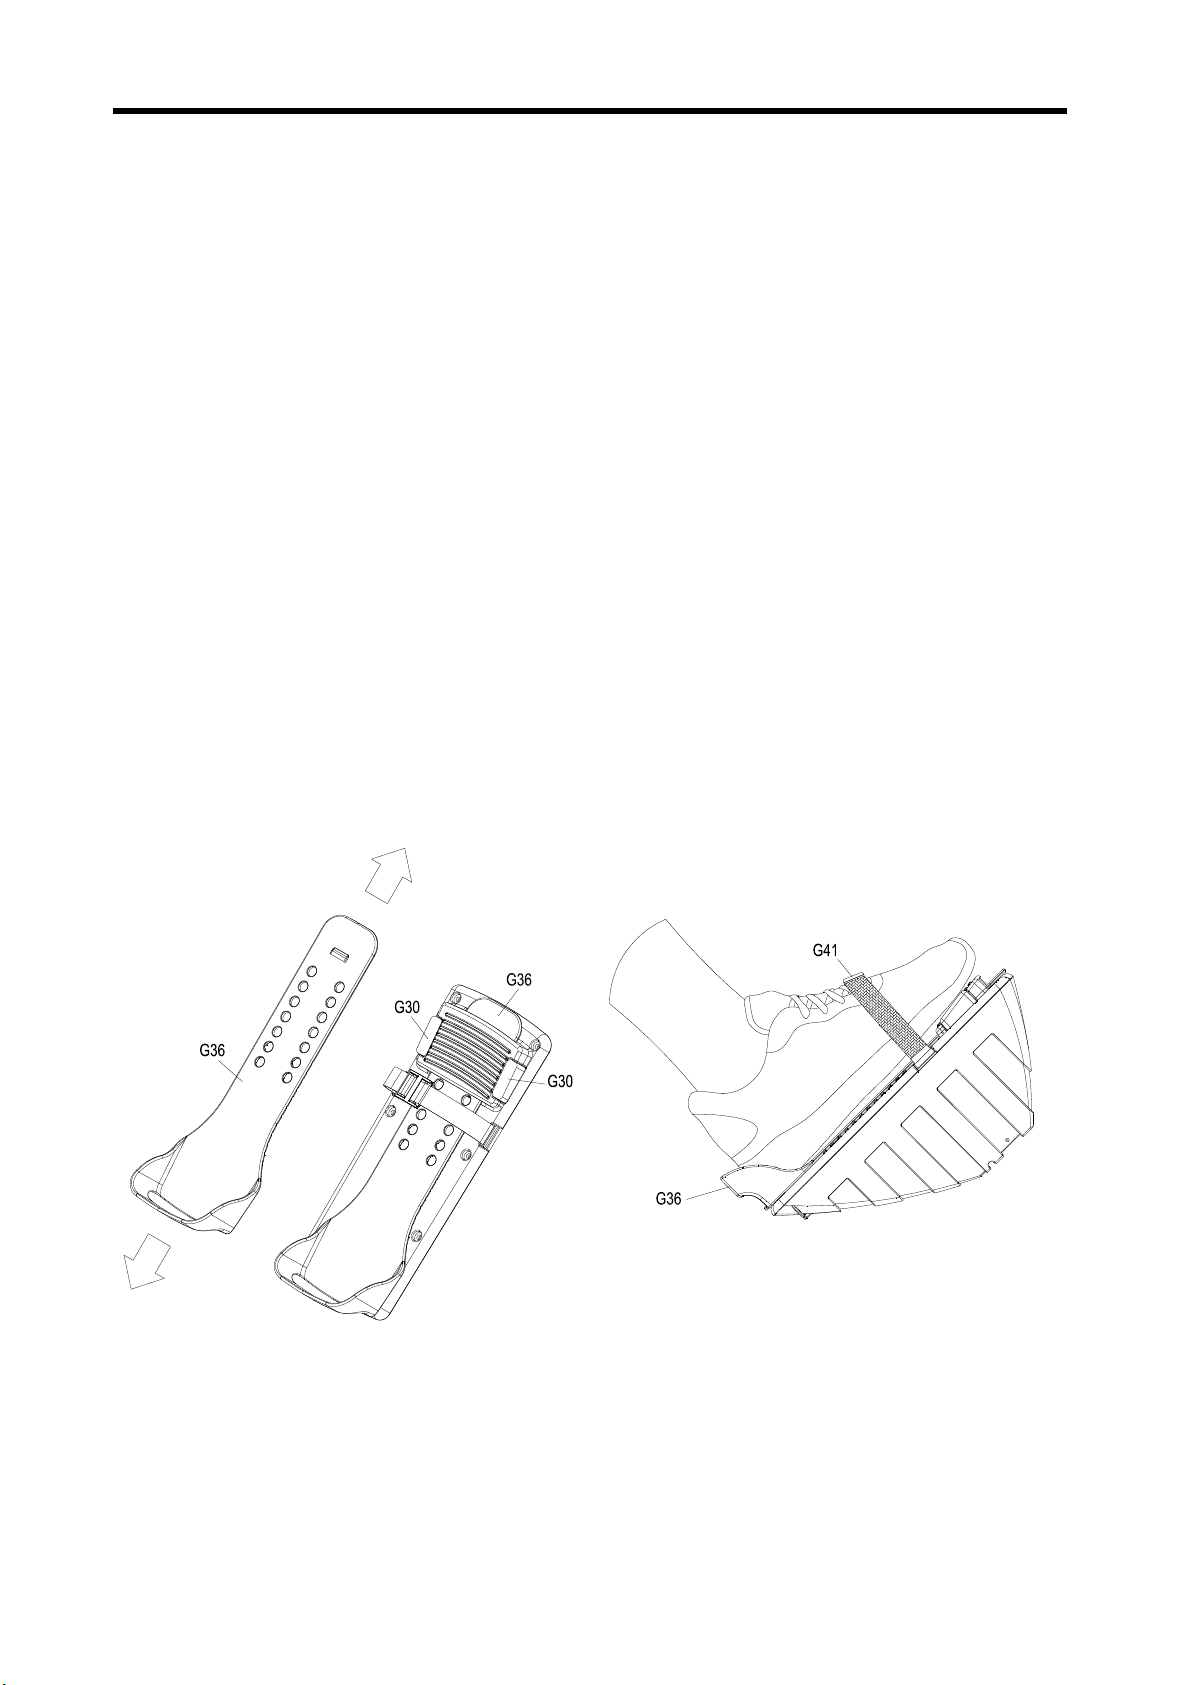
(1) Flex Foot (G36) adjustment
The pedal strap is adjustable and can be personalized to fit
the user’s foot size per the below steps:
Step 1: Push and hold the Flex Foot Adjuster (G30) on two
sides, then adjust the Flex Foot (G36) forward or backward
to your desired foot size.
Step 2: With your feet tightly secured by the FOOT STRAP
W/BUCKLE (G41).
NOTE:
Pls make sure the protruding pricks inside the Flex Foot
Adjuster (G30) has been stuck on the circular pits on Flex
Foot (G36) base on your desired foot size position tightly.

6
Machine Maintenance Guide
(2) Bungee Cord (G40) Replacement
-Pls follow the instructions which are shown from PAGE 6 ~ PAGE10
Step 1: Pls turn upside down the machine and remove Screws (B17X6) from
Lower Decoration Plate (A04).

7
Machine Maintenance Guide
(2) Bungee Cord (G40) Replacement
Step 2: Release Bungee Cord (G40) from Cord Adjustment Hook Plates
(A14).
Step 3: Remove Cord Adjustment Hook Plates (A14) to be separated from the
Bungee Cord (G40).

8
Machine Maintenance Guide
(2) Bungee Cord (G40) Replacement
Step 4: Pull out Bungee Cord (G40) from Cord Pulley Mounting Plate (A13).
9
Machine Maintenance Guide
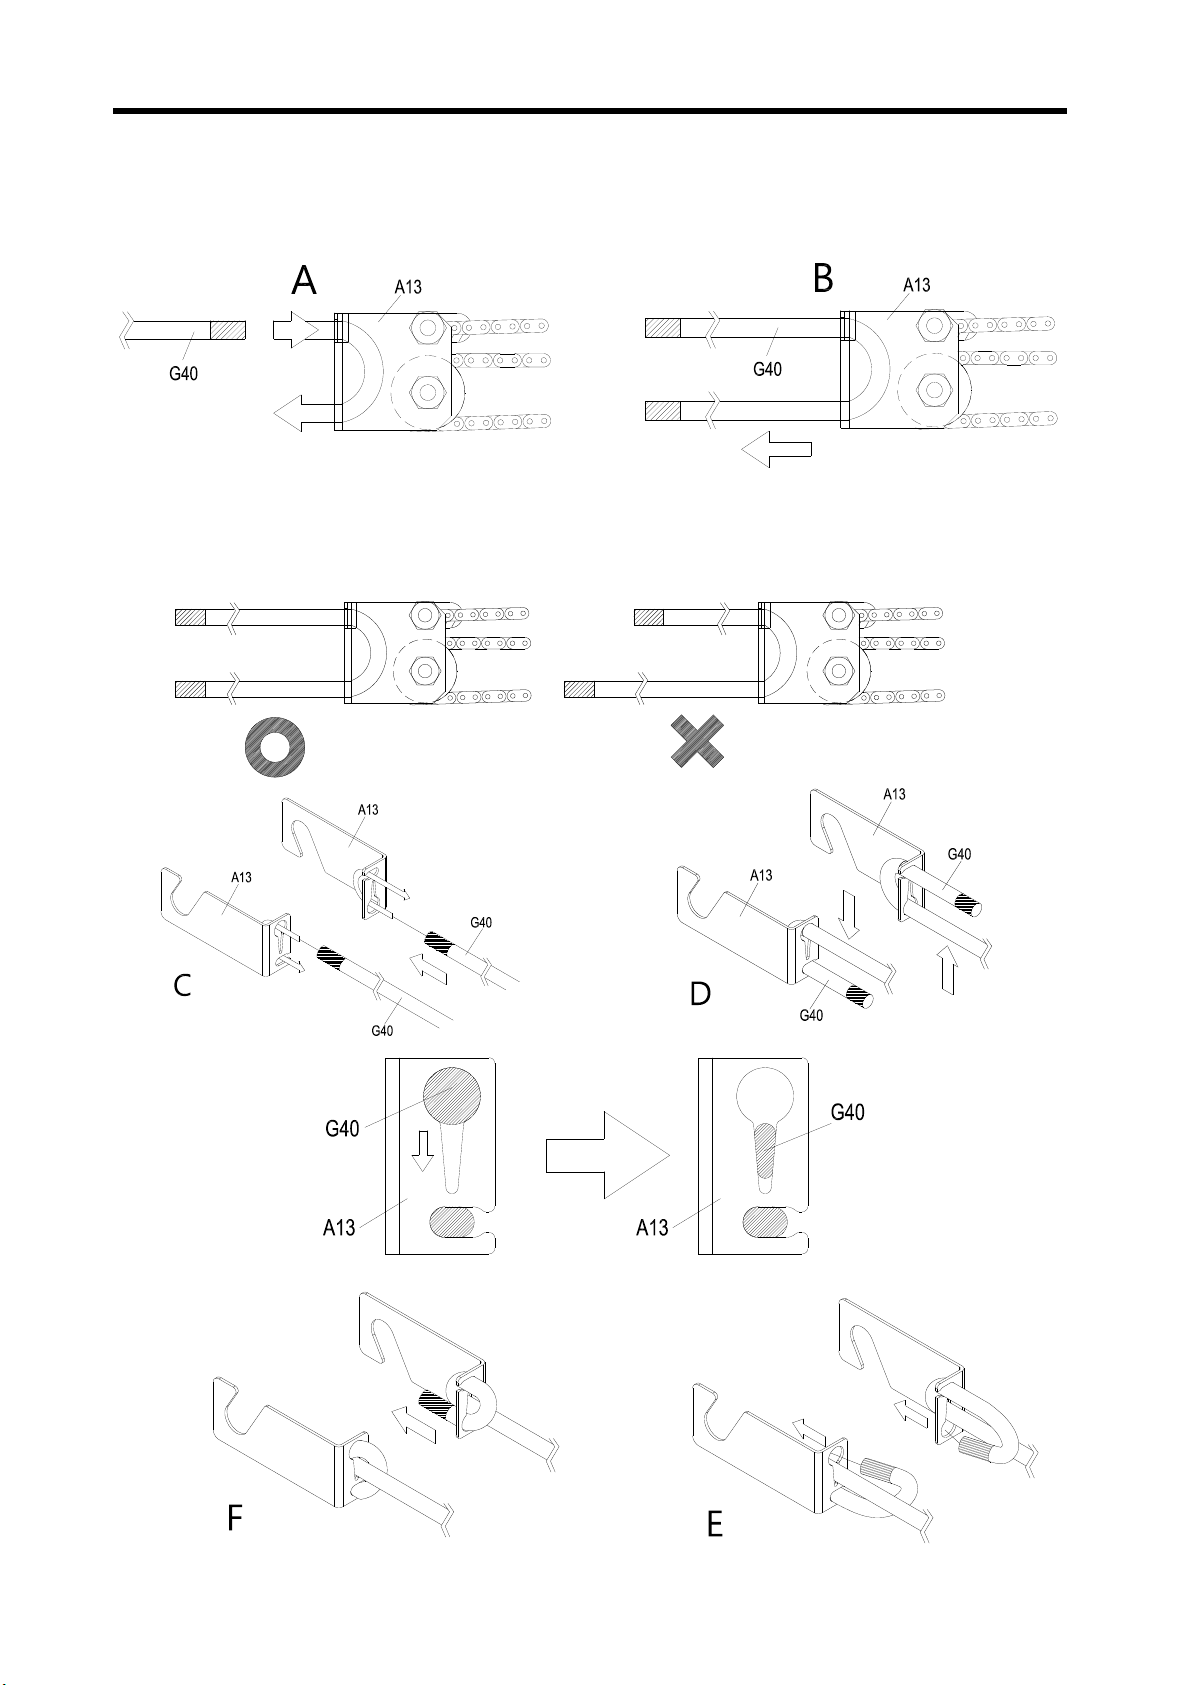
(2) Bungee Cord (G40) Replacement
Step 5: Push equal amounts of cord (G40) through both Cord Adjustment
Hook Plates (A14) as shown on diagrams (A) ~(F).
Note: Length on two sides of Bungee Cord should be equal (as
shown below)
10
Machine Maintenance Guide
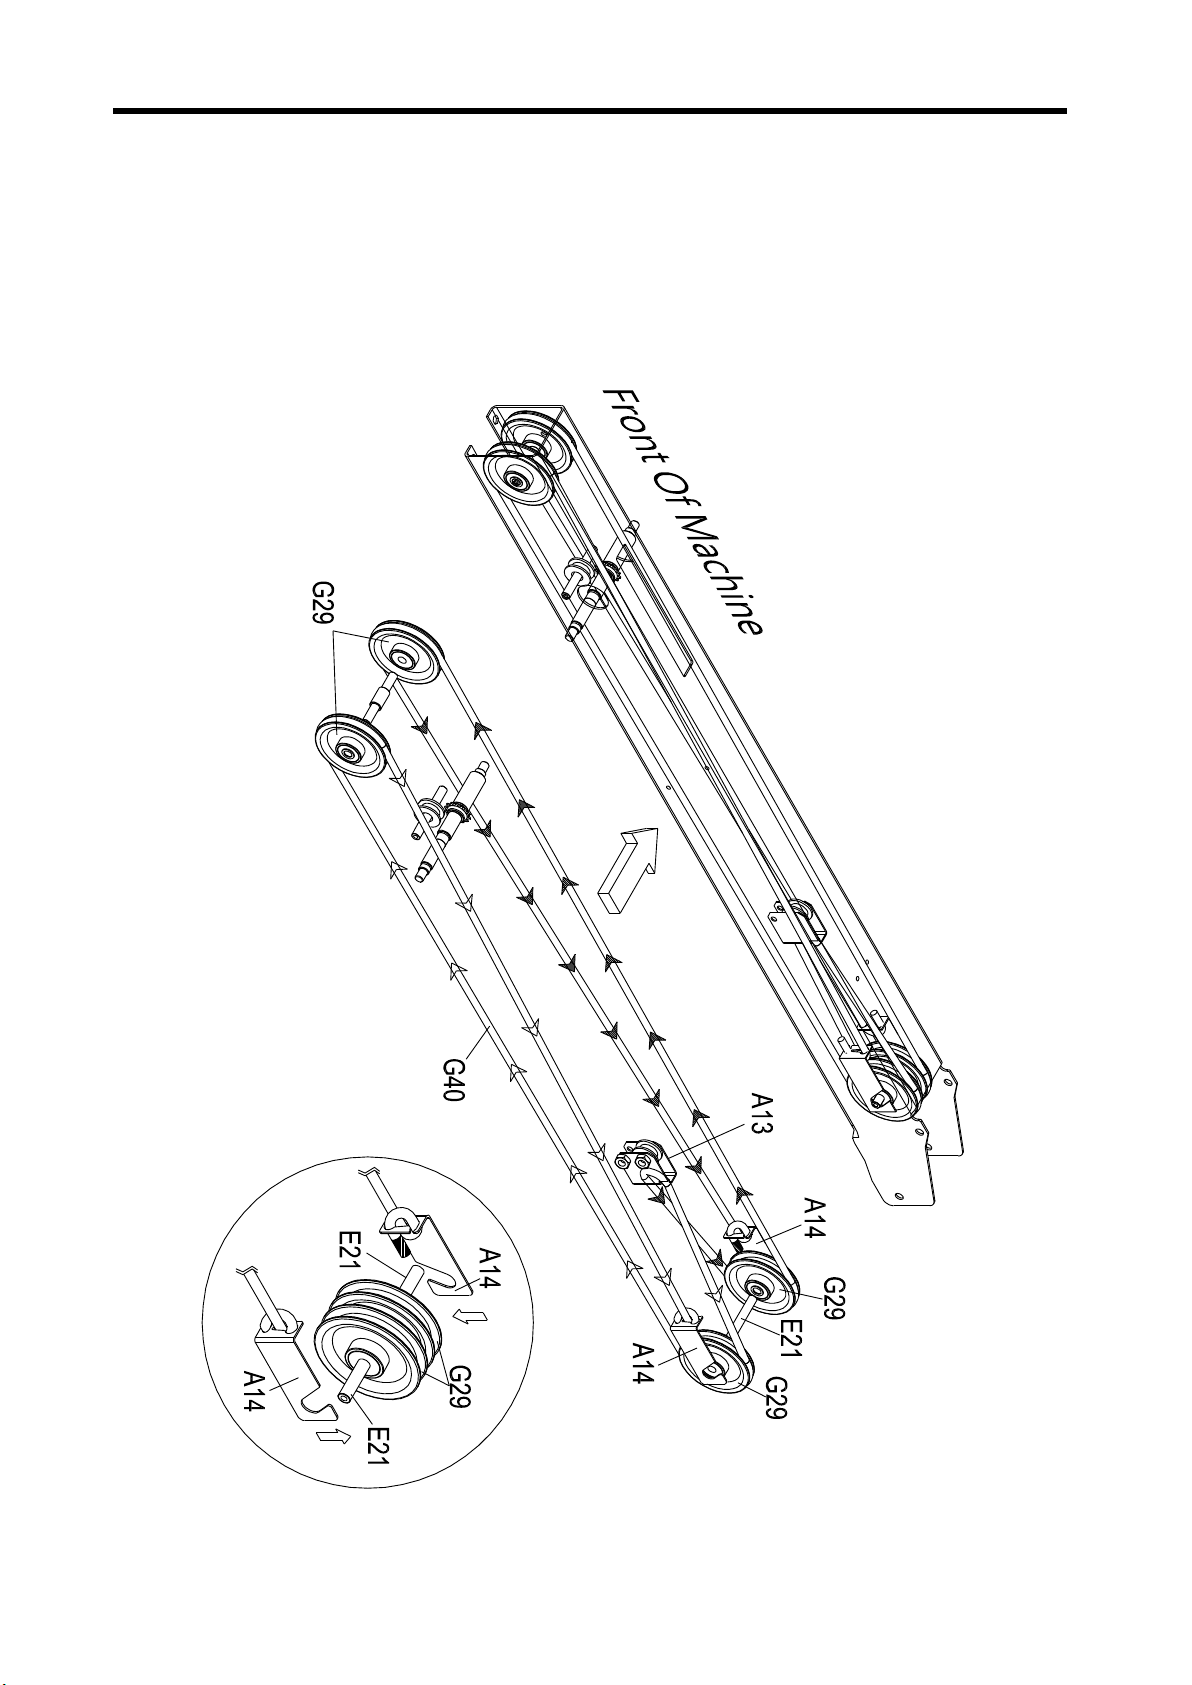
(2) Bungee Cord (G40) Replacement
Step 6: Wrap the replaced Bungee Cord (G40) around the Cord Pulley (G29).
Step 7: Re-hook both Cord Adjustment Hook Plates (A14) to the Cord Pulley
Axle (E21) on two sides.
11
Machine Maintenance Guide
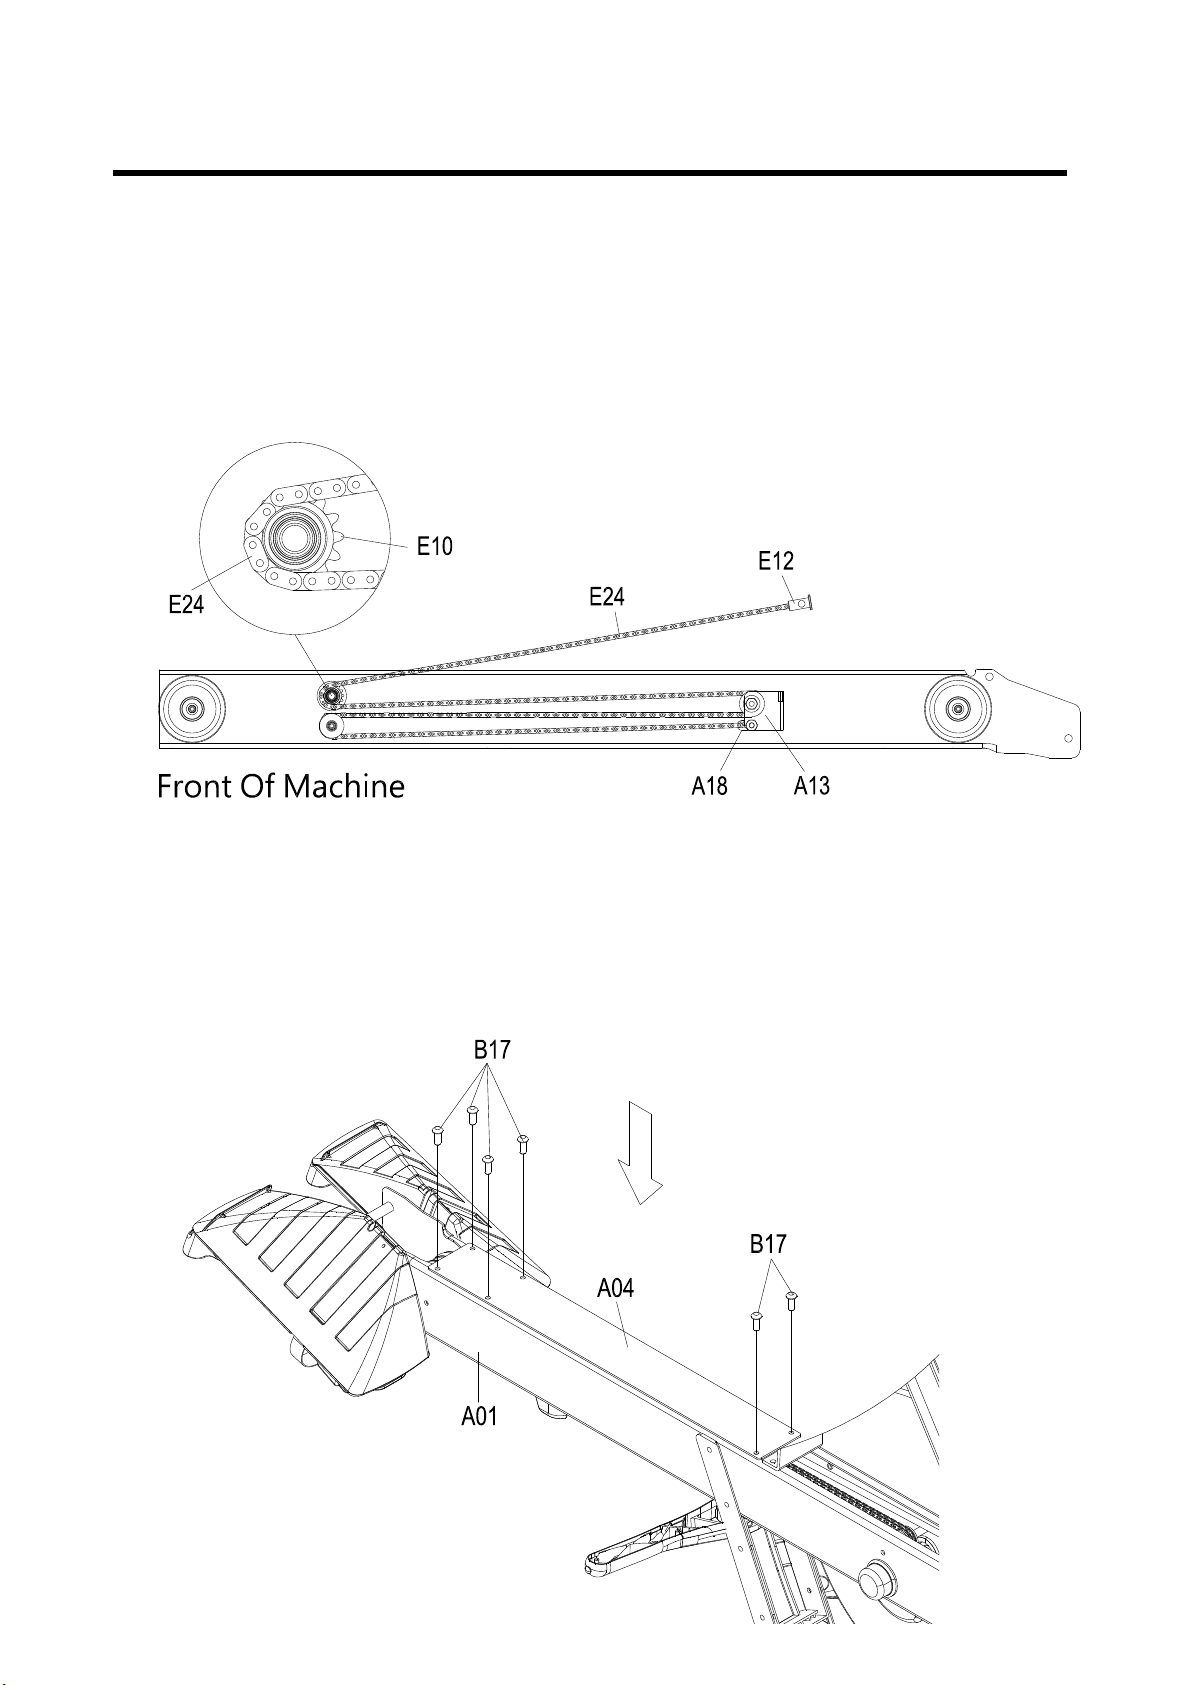
(3) Chain Routing checking
The correct Chain Routing should be as below image, (the Bungee Cords
(G40) & Flywheel are omitted for clarity.) (Front end is shown upside down).
Note 1: The Chain (E24) has to be installed to the Axle Sprocket(E10)
correctly and smoothly as the diagram.
Note 2: Pls recheck the Chain Routing before re-attaching the Lower
Decoration Plate (A04) back to the Main Frame (A01)
Next re-attach the Lower Decoration Plate (A04) to the Main Frame by using
the Screws (B17 X 6) as shown.
12
Machine Maintenance Guide
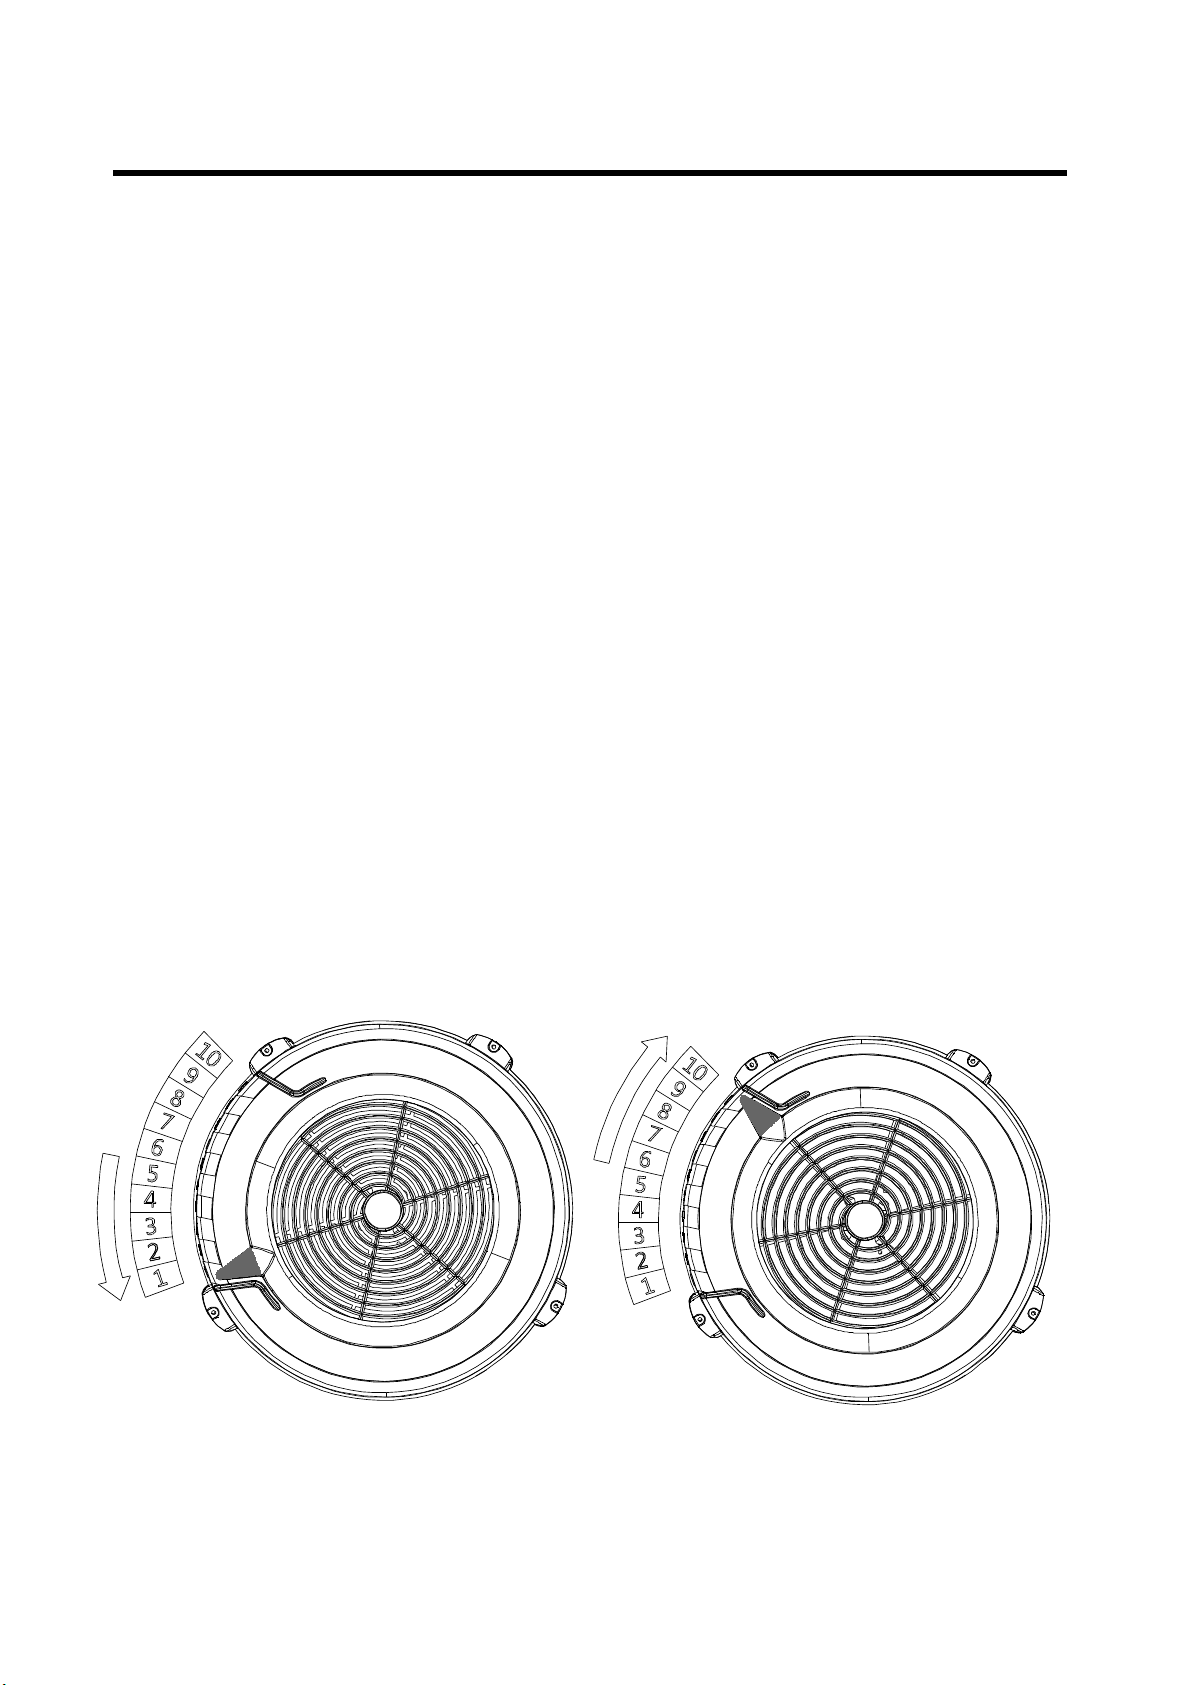
(4) WORKOUT INTENSITY ADJUSTMENT
•This Air Rower uses wind resistance, which is generated by the spinning flywheel. The
harder you pull, the more resistance you will feel. The faster you get the wheel spinning, the
more resistance there will be.
•You can row as hard or as easy as you wish. This Air Rower will not force you to row
at any set intensity level. It is up to you. As you put more effort into your rowing, you
will go faster, produce more watts, and burn more calories. All of these outputs will be
measured and displayed by the Monitor.
DAMPER SETTINGS ON THE FLYWHEEL
•The damper setting is like bicycle gearing. It affects the feel of the rowing but does not
directly affect the resistance. With a little experimentation, you will find the damper
setting that gives you the best workout and results. We recommend a damper setting of
3-5 for the best aerobic workout. This is the setting that feels most like a sleek, fast boat
on the water. Higher settings feel more like a bigger, slower boat. Rowing with the damper
setting too high can be detrimental to your training program because it may refine your
output and increase your risk of injury.
Adjust Down for Faster Adjust Up for Slower
13
OVERVIEW OF THE PERFORMANCE MONITOR (V2)
For Dynamic Indoor Air Rower, and the Air Skier.
Getting Started:
General Operation
• The V2 will automatically displays your workout data as you start your workout on the machine , or press
the MENU button/Any buttons to power up the V2 monitor .
• Press MENU button to go back to the previous display .
• Use the MENU button to access all features.
Just Row
Select Workout
NewWorkout
BluetoothSet
MoreOption
Main Menu
Units Display Menu
Row or ski without a pre-set distance or time. The PM 5 will begin
recording your workout data when you take your first stroke. Your results
will be saved if you row/ski longer than one minute and press MENU.
Set your own time, distance or interval, or choose from a selection of pre-
programmed standard or custom workouts.
There different workouts you can try, enter it to have more fun workouts
in it.
Use this menu to set and pairing Blutooth,you can use it to
connect to Kinomap HR monitor and smartphone.
Access additional functions and information.
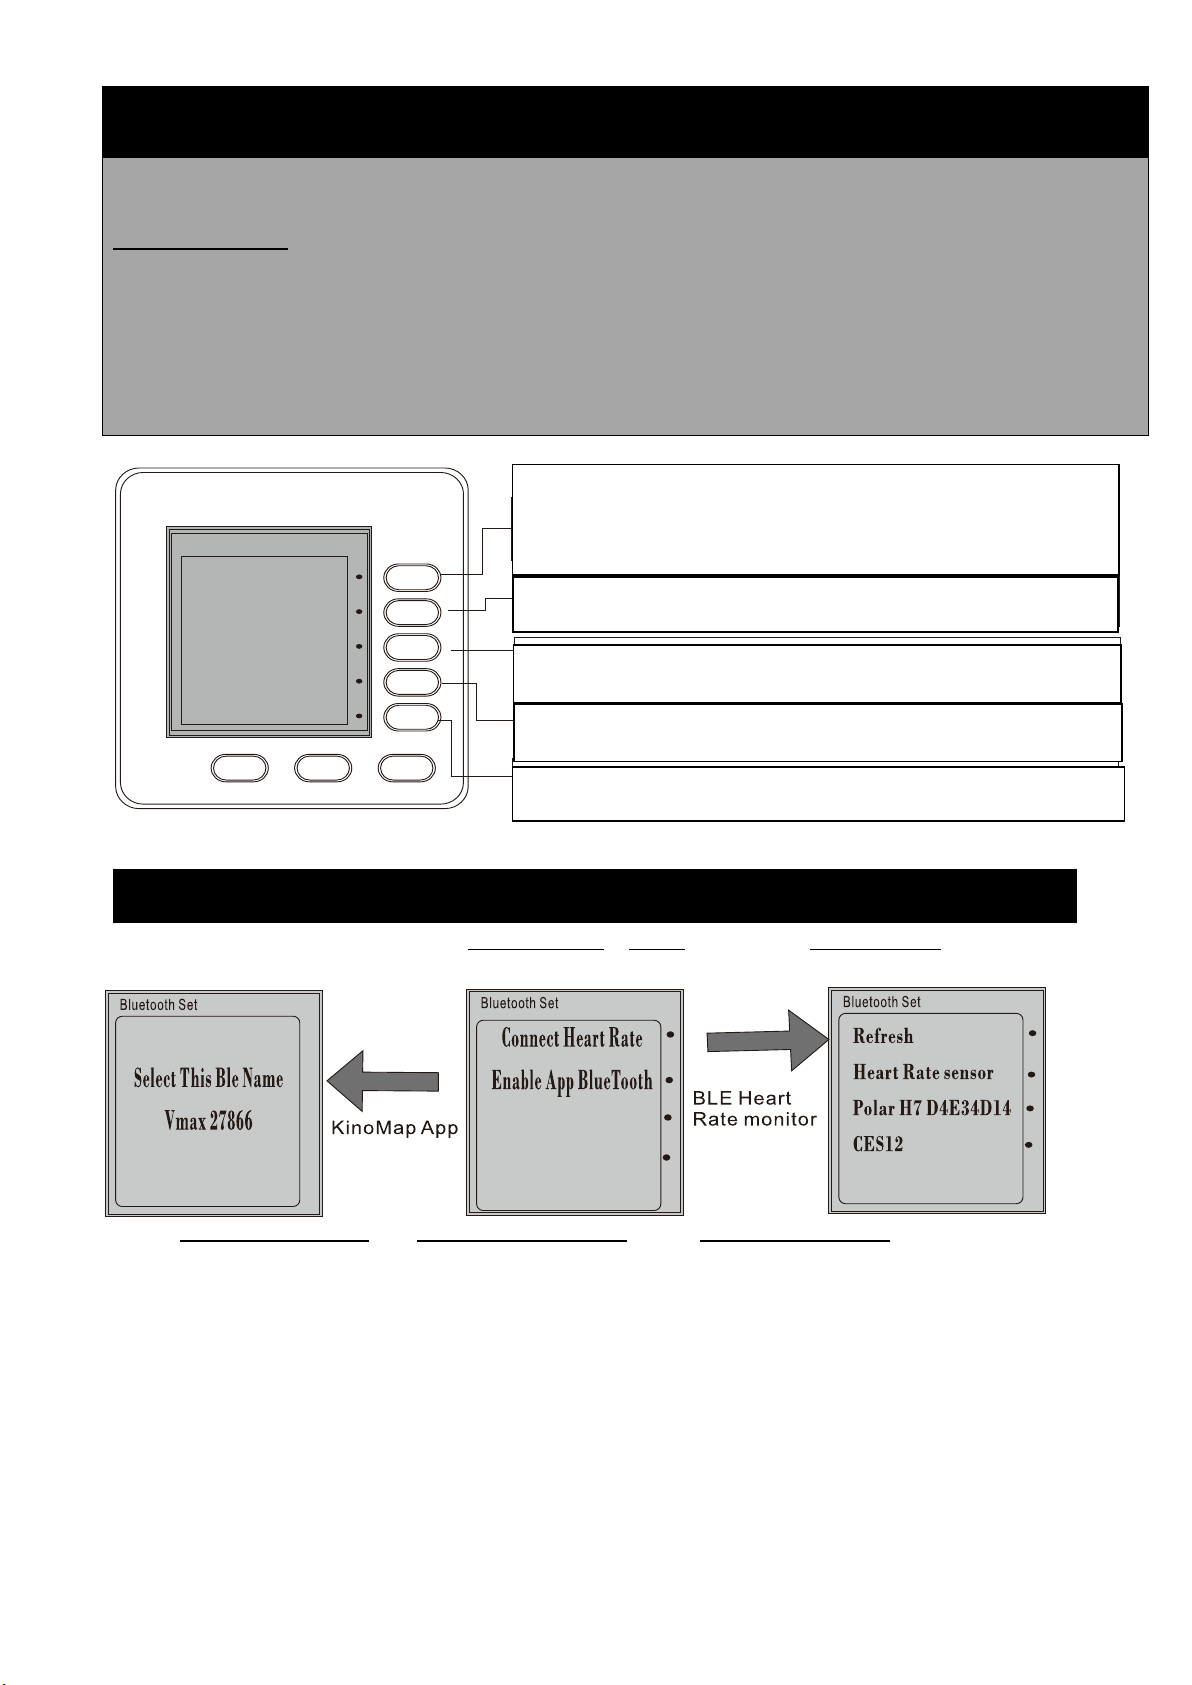
Bluetooth Device Pairing & Select.
BLE Heart Monitor Connection: use Bluetooth Set at Menu, Once enter Bluetooth Set display will
shows Connect Heart Rate and Enable App Bluetooth, select Connect Heart Rate, V2 will find all the
BLE heart rate monitor and showing on the display, please select device you have. Then it will
connect each together, if you can not find your device, please use Refresh to re-find all BLE device.
KinoMap APP connection: Turn your Bluetooth of smart phone, the use system setting to finding
Vmax XXXXX(BLE SERIAL NUMBER), Once VmaxXXXXX (BLE SERIAL NUMBER) Is found on smart
phone, please connect it, then you can work it on your phone.
Memory Workout: from Kinomap all of your workout can be saved in your workout database. You
can review it any time.
Choose from a selection of pre-programmed standard
Row or ski without a pre-set distance or time. The V2 will begin
recording your workout data when you take your first stroke.
Your results will be saved if you row/ski longer than one minute
and press MENU.
Set your own time, distance or calories ---etc different
workouts .you can try to have more fun workouts.
Access additional functions and information
Use this button to open and set Bluetooth, you can use it to connect to
Kinomap APP, or Bluetooth Heart Rate monitor device

14
Firmware :Firmware is the internal software that runs your Performance Monitor(V2). Your
V2 comes pre-installed with the latest firmware, however, new and improved
versions are offered regularly. The free V2 software makes posted regularly. The free
V2 Utility Software makes it easy to update your software with the latest firmware version at
any time. When V2 detect flash drive (USB) with newest version software, it will automatic
update software,
Caution: don’t unplug flash drive (USB )until update finished.
V2 Menu Map
Units Display Menu
:17 23
45 120
2: 33.8
43
5708
m
avg
/500m
split
meters
projects
/m 30:00
2:23s/m
Total elapsed time
Total meters row or skied
.
.
Strokes pre minutes (s/m)
Average paces pre 500m.
This is the average for your
entire workout
Pace(in time) pre 500m(caculated each stroke
Your Pace in the account of time. It takes to row
or ski 500m. A smaller time is faster.
Split meters. the number of
rowed or skied in given
distance or time. In Just Row
Splits are five minutes long MENU.
push to power up PM. display the previous
menu or saved workout results.
(optional. Require additional chest belt.
Heart Rate
Projected meters in 30 minutes. if the current
pace is maintained.
push any between Meters(m), Pace(time/500m),
Watts and Calories(Cal)
Units: Push to change display between all data. Force Curve.
Paceboot/Pace. Bar Chart, and Large Print.
DISPLAY
Battery cover
USB flash drive
Reset bottom(Fire ware update)
sensor cable
to flywheel
Change battery
please open battery cover
and only use18650
Li-on battery
Units: Push at any time to change units between
Meters(m), Pace (time/500m), Watts and Calories
(Cal).
Average pace (in time) per
500m.This is the average for
your entire workout
Split meters. The number of
meters rowed or skied in a given
distance or time. In Just Row / Ski
splits are five minutes long.
Strokes per minute (s/m).
Display
Push to change display between All Data, Force Curve,
Paceboat /Pace Skier, Bar Chart, and Large Print.
Pace (in time) per 500m (calculated each stroke).
Your pace is the amount of time it takes to row
or ski 500m. A smaller
time is faster.
Heart rate
(Optional. Requires additional chest belt.)
Projected meters in 30 minutes if the
current
Split meters. The number average pace is
maintained.
MENU
Push to power up the PM, display the
previous menu
or save workout results.
Total elapsed time.
Total meters rowed or skied

15
3
5
Safety Using Instruction
Stretching should be included in both your warm up and cool down, and should be performed
after 3-5 minutes of low intensity aerobic activity or callisthenic type exercise. Movements should
be performed slowly and smoothly, with no bouncing or jerking. Move into the stretch until slight
tension, not pain, is felt in the muscle and hold for 20-30 seconds. Breathing should be slow,
rhythmical and under control, making sure never to hold your breath.
1
Head rolls
Rotate your head to the right for
one count, feeling the stretch up
the left side of your neck. Next
rotate your head back for one
count, stretching your chin to the
ceiling and letting your mouth
open. Rotate your head to the left
for one count, and finally, drop
your head to your chest for one
count.
2
Toe touches
Slowly bend forward from
your waist, letting your back
and shoulder relax as you
stretch toward your toes.
Reach down as far as you
can and hold for 15
seconds.
3
Shoulder lifts
Lift your right shoulder up
toward your ear for one
count. Then lift your left
shoulder up for one count
as you lower your right
shoulder.
4
Quadriceps stretch
With one hand against a wall
for balance, reach behind you
and pull your right foot up.
Bring your heel as close to
your buttocks as possible.
Hold for 15 counts and repeat
with left foot up.
5
Side stretches
Open your arms to the side
and continue lifting them until
they are over your head.
Reach your right arm as far
upward toward the ceiling as
you can for one count. Feel
the stretch up your right side.
Repeat this action
with your left arm.
6
Hamstring stretches
Sit with your right leg straight in
front of you. Straighten your leg
out while trying to hold on to your
outstretched leg with your hand.
Starting up with your back
straight. Slowly exhale and try to
bring your chest to the knee of
your outstretched leg. Hold, then
repeat on the other side for 15
seconds.

16
7
Inner thigh stretch
Sit with the soles of your
feet together with your
knees pointing outward.
Pull your feet as close into
your groin as possible.
Gently push your knees
toward the floor. Hold for
15 counts.
8
Calf/ Achilles stretch
Lean against a wall with your
left leg in front of the right and
your arms forward. Keep your
right leg straight and the left
foot on the floor; then bend the
left leg and lean forward by
moving your hips toward the
wall. Hold, then repeat on the
other side for 15 seconds.

17
Safety Using Instruction
PROPER ROWING TECHNIQUE INSTRUCTION
The rowing stroke can be divided into two parts: the drive and the recovery.
The drive is in the work portion of the strokes; the recovery is the rest portion
that prepares you for the next drive. The body movements of the recovery
are essentially the reverse of the drive. Blend these movements into a smooth
continuum to create the rowing stroke.
The followings are the proper rowing technique demonstration
(1) The Catch
•Arms are straight; head is neutral;
shoulders are level and not hunched.
•Upper body is leaning forward from the hips
with the shoulders in front of the hips.
•Shins are vertical, or as close to vertical
as comfortable for you. Shins should not
move beyond perpendicular.
•Heels may lift as needed.
(2) The Drive
•Start the drive by pressing with your legs,
and then swing the back through the
vertical position before finally adding the arm pull.
•Hands move in a straight line to and from the flywheel.
•Shoulders remain low and relaxed.
(3) The Finish
•Upper body is leaning back slightly, using
good support from the core muscles.
•Legs are extended and handle is held lightly
below your ribs.
•Shoulders should be low with wrists an
(4) The Recovery
•Extend your arms until they straighten
before leaning from the hips towards the
flywheel.
•Once your hands have cleared your knees,
allow your knees to bend and gradually
slide the seat forward on the monorail.
•For your next stroke, return to the catch position with shoulders relaxed and shins vertical.
18
Safety Using Instruction
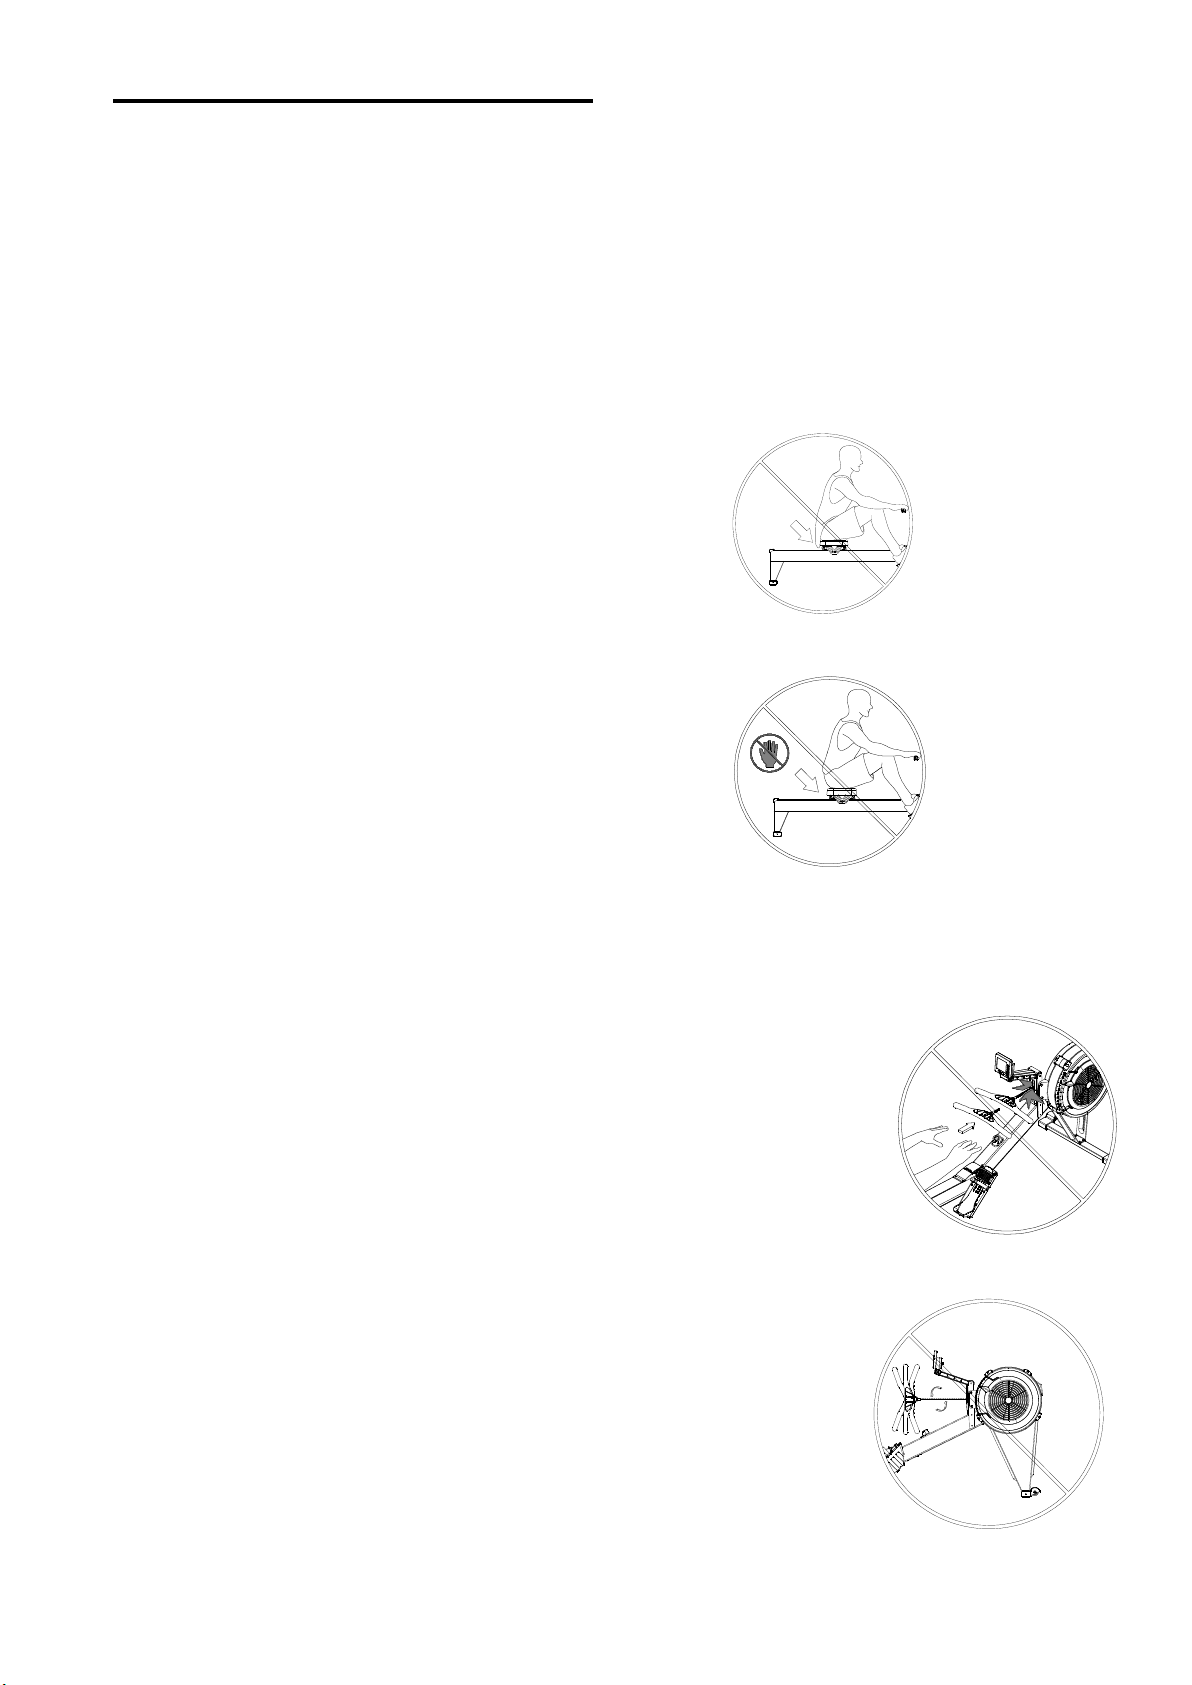
IMPORTANT USE AND SAFETY NOTE
Use of this machine with a worn or weakened part, such as the chain, sprockets,
chain/swivel connector, handle U-bolt or cord, may result in injury to the user. When
in doubt about the condition of any parts, we strongly advise that it should be
repaired or replaced immediately.
Pls use the machine and follow below notes correctly to avoid any injury.
Note 1: Keep clothing free of seat rollers. Diagram 1
(See Diagram1)
Note 2: Keep children, pets and fingers away
from seat rollers. Seat rollers can cause injury. Diagram 2
(See Diagram2)
Note 3:
*Place handle against chain guide or in handle hooks before letting go.
Diagram 3
*Do not let handle fly into chain guide.
(See Diagram3)
Note 4:
*Pull straight back with both hands. Do not row with one
hand only. Abuse of the chain can result in injury.
*Handle should be used horizontally, do not flip. Diagram 4
(See Diagram4)
*If there are abnormal sounds or the parts are loose,
please stop using immediately and contact the technician.

19
Before You Start
Thank you for choosing this Air Rower. We take great pride in producing
this
quality product and hope it will provide many hours of quality
exercise to make you feel better,
look better, and enjoy life to its fullest.
It's a proven fact that a regular exercise program can
improve your
physical and mental health. Too often, our busy lifestyles limit our time
and
opportunity to exercise. The Indoor Rower provides a convenient
and simple method to begin your assault on getting your body in
shape and achieving a happier and healthier lifestyle.
**Before you start to assemble the machine, please review the following
drawing to familiarize yourself with the listed parts. Also, pls
be sure to read the below instructions first and follow each assembly
steps.

20
Accessory List
1
ALUMINUM MAIN FRAME ASSY (#A01) X 1PC
2
ALUMINUM MONORAIL ASSY(A02) x1 SET
3
FRONT FOOT LEG(LONG)(ALUMINUM)(A06) X1PC
4
FRONT FOOT LEG(SHORT)(ALUMINUM)(A07) X1PC
5
FRONT STABILIZER(A08) X1PC
6
M6*P1.0*15L HEX SCREW(LICOTTED)(STAINLESS)(B17) X4PCS
7
M6*P1.0*20L HEX SCREW(LICOTTED)(STAINLESS)(B19) X4PCS
8
TOOL (WRENCH) X1 PCS
Table of contents
Other SMAI Home Gym manuals


