smart & green SPIDER SYSTEM User manual

1
www.smartandgreen.eu
Lire avant emploi
Read before use

2 3
DESCRIPTION DU SYSTEME ....................................................................
MODES D’UTILISATION ............................................................................
INFORMATIONS TECHNIQUES ...............................................................
SYSTEM DESCRIPTION...............................................................................
USER GUIDELINES ......................................................................................
TECHNICALS INFORMATIONS ................................................................
Bonjour, et merci d’avoir acheté un produit Smart & Green équipé du SYSTEM SPIDER
Hello, and thank you for purchasing a product equipped with the Smart & Green SPIDER SYSTEM
4
Français
English
4
8
10
11
15
17
Spider System • S&G • 24 /12/2013

45
Français
DESCRIPTION DU SYSTÈME
REVUE DU SYSTÈME ET DE SES COMPOSANTS
AMPOULES
PWR1
PWR1 (1 sortie)
Pour recharge de la batterie
ou alimentation d’ampoules faible
ou MOYENNE PUISSANCE
PWR2
PWR2 (2 sorties)
Pour recharge de la batterie
ou alimentation d’ampoules
FORTE PUISSANCE
(exemple SMARTBAR
BOÎTIER DE CONTRÔLE
AMPOULES
À LEDS
BATTERIE
PIEUVRE
CONNECTIQUE
ALIMENTATION
BATTERIE
Pour alimentation batterie
des ampoules
BAR CONVERTIBLE LUMINAIRE KIT D’ECLAIRAGE PARASOL
SMARTBAR SHADELITEFRENCH CONNECTION
Les ampoules forment un réseau qui part d’une « pieuvre » connectique et assure l’illumination d’un meuble
luminaire ou l’éclairage sous un parasol. Voir la représentation symbolique des 3 types de réseau ci-dessous.
BLOC D’ALIMENTATION
(aussi appelé chargeur)
Technologie Pebble
Télécommande radio
de luminaires
PEBBLE
TELECOMMANDE EN OPTION
La télécommande permet de commander des luminaires à distance (par radio).
MODES D’OPERATION DU SYSTEME
Le système SPIDER est destiné à 2 types d’application :
• Illuminer des formes ou meubles pour en faire des luminaires.
• Assurer une fonction d’éclairage sous abri, par exemple sous un parasol.
Technologie Kameleon
Télécommande radio
d’un groupe de luminaires,
Fonctions avancées,
Modèles 4 et 8 boutons
KEY
SMARTBAR FRENCH CONNECTION SHADELITE
2 types de boîtier de contrôle qui utilisent 2 technologies diérentes :
- La technologie Kameleon autorise la formation et la gestion d’un groupe de luminaires à partir de la
télécommande (en option).
- La technologie Pebble permet le contrôle local et à distance (en option) des luminaires.
CHOIX MODE
COULEUR AMBIANCE
CHOIX
COULEUR
REGLAGE
INTENSITE
VEILLE
CHOIX
COULEUR
REGLAGE
INTENSITE
BOÎTIER DE CONTRÔLE
K-SPI-CON
PEBBLE
KEY 4B KEY 8B
P-SPI-CON
BAR CONVERTIBLE LUMINAIRE KIT D’ECLAIRAGE PARASOL
SPI-PWR1
SPI-BAT
SPI-PWR2
SYSTEME
SPIDER

6 7
ACCES AU SYSTEME A TRAVERS UNE TRAPPE
ACCES AU SYSTEME DANS UN MEUBLE DE TYPE SMARTBAR
PRÉCAUTIONS D’UTILISATION
Utilisez le produit conformément aux instructions données dans cette notice du système d’éclairage et dans celle du
produit luminaire - faute de quoi aucune garantie ne pourra être appliquée.
Bloc d’alimentation et batterie
. Pour la recharge, placez le bloc d’alimentation et la batterie dans un endroit sec à l’abri de la pluie.
. Ne pas les utiliser près d’une source de chaleur et ou du feu.
. Les tenir hors de portée des enfants.
. Ne pas tenter de l’ouvrir sous peine de danger et d’annulation automatique de cette garantie.
. Vérier que le bloc d’alimentation est hors tension avant de connecter ou déconnecter la batterie.
. Attention, ne jamais charger plus de deux batteries sur le même bloc d’alimentation.
. Ne pas toucher les contacts du bloc d’alimentation sous tension ou de la batterie en charge.
. Nettoyer les contacts à l’eau claire et les sécher avec un chion doux et sec.
. Ne pas connecter la batterie à tout autre dispositif que le bloc d’alimentation.
. Attention, recharger régulièrement la batterie. La batterie se dégrade après plusieurs mois sans recharge.
Produit luminaire et tout composant
. Manipuler avec soin le luminaire, le diuseur peut se rayer.
. Ne pas tirer sur le boîtier de contrôle (risque d’arracher les câbles).
. Ne pas exposer le luminaire au jet d’eau, ni le laver à grande eau.
. Nettoyer le luminaire avec un chion humide ou une éponge.
. Ne pas poser le luminaire dans une aque d’eau – ne pas l’y laisser après la pluie.
. Ne pas poser sur le luminaire un plat ou un récipient chaud sous peine de risquer de l’abimer.
. Ne pas tenter de démonter les ampoules et les câbles.
3
1 2 3 4
4
Le tiroir de commande donnant accès au système se trouve à l’intérieur du meuble.
Un couvercle ferme l’accès au système Spider. Tournez le couvercle manuellement pour le retirer.
Le boîtier de contrôle est connecté à la batterie ou bien au bloc d’alimentation (type PWR2).
Une cale maintient l’équipement en place. Une seconde batterie peut être ajoutée dans le tiroir an de doubler
l’autonomie en fonctionnement.
Ôtez la cale pour libérer l’équipement. Suivant le cas de gure, vous pouvez alors :
• Mettre en place cet équipement à l’intérieur du luminaire lors de l’installation (voir Modes d’opération),
• Retirer la batterie pour la recharger (à l’extérieur du luminaire),
Attention : Ne pas tirer sur le boîtier de contrôle (risque d’arracher les câbles)
• Modier le réglage de la lumière (voir chapitre Modes d’utilisation).
1
2
3
4
1 2
MODE SANS-FIL (AVEC BATTERIE)
Utilisation Utilisation
MODE FILAIRE (SANS BATTERIE)
La batterie alimente
directement les ampoules
Recharge
La batterie doit être rechargée avec le bloc
d’alimentation à l’extérieur du luminaire
Dans cette conguration, le bloc
d’alimentation branché sur le réseau
électrique alimente les ampoules
PWR1 PWR2
PWR1 PWR2
2 Modes d’opérations sont possibles :
La trappe est xée au luminaire par deux vis en partie supérieure.
Une gorge périphérique permet sa fermeture rapide par l’utilisateur et assure une bonne étanchéité.
Attrapez et tirez un coin inférieur de la trappe avec une main.
Suivant le cas de gure, avec l’autre main, vous pouvez alors :
• Mettre en place le système à l’intérieur du luminaire, lors de l’installation (voir Modes d’opération),
NB : Dans le cas d’un mode d’opération laire, passez le l d’alimentation à travers le fond.
• Retirer la batterie pour la recharger (voir Recharge de la batterie).
Attention : Ne pas tirer sur le boîtier de contrôle (risque d’arracher les câbles)
• Modier le réglage de la lumière (voir chapitre Modes d’utilisation) .
Une fois l’opération terminée, refermez la trappe. Commencez par mettre en place le bas de la trappe puis ses
deux côtés et appuyez en suivant le pourtour pour vérier que la gorge est bien en place sur le diuseur (an de
conserver une bonne étanchéité).
1
2
3
4

8 9
RECHARGE DE LA BATTERIE
UTILISATION EN KAMELEON
Rechargez la batterie avant sa première utilisation.
Attention, ne rechargez pas plus de 2 batteries à la fois sur un
même bloc d’alimentation.
•Ôtez la batterie du luminaire.
• Appuyez sur le bouton (voir ci-contre) pour vérier l’état
de charge de la batterie (4 barres bleues indiquent une
pleine charge).
• Placez-vous à couvert dans un endroit sec, posez la batterie
sur le bloc d’alimentation puis branchez-le sur une prise secteur.
Le témoin de charge s’allume en bleu (voir ci-contre) ;
quand il s’éteindra, la batterie sera complètement chargée
(comptez 8 heures pour une recharge complète).
• Débranchez le bloc d’alimentation une fois la batterie
chargée avant de la retirer.
Un appui sur ce bouton
change la couleur.
A noter que la réduction de l’intensité lumineuse
augmente proportionnellement l’autonomie
de fonctionnement.
Allumer la lumière Éteindre la lumière
Choisir une couleur
Un appui court sur ce bouton augmente
ou diminue l’intensité lumineuse par pallier.
Un appui long augmente ou diminue
progressivement l’intensité jusqu’au
maximum ou minimum.
Régler l’intensité lumineuse
EXTINCTION : Un appui simultané sur les 2 boutons éteint
le luminaire et met le produit en veille.
Un appui sur l’un des
2 boutons allume le
luminaire et restaure
la couleur ou le mode
couleur actif avant
extinction.
+
ARRET : 3 appuis simultanés consécutifs sur ces 2 boutons (luminaire
éteint) désactivent la fonction radio et mettent le produit en mode
Arrêt. L’ampoule clignote 3 fois en bleu. Leur consommation se trouve
réduite et la charge préservée sur une longue période (veillez à bien
recharger la batterie avant cette mise à l’Arrêt). Un appui ultérieur sur
un des boutons remet le produit en marche et allume le luminaire.
CYCLE
DE 9
COULEURS
Maintenir le boîtier de contrôle en position sur la batterie ou le bloc d’alimentation
MODES D’UTILISATION
Le système d’éclairage est commandé à partir :
• Du boîtier de contrôle connecté aux ampoules. Voir la description du mode d’utilisation ci-après.
• De la télécommande radio (en option). Reportez-vous à la notice de votre télécommande
(Pebble ou Kameleon suivant le la technologie de votre système) pour ce mode d’utilisation.
Un appui appui long (env. 10s jusqu’à
clignotement rouge) sur ce bouton
dégroupe le luminaire et restaure son
paramétrage d’origine.
COULEUR TÉMOIN DU MODE SÉLECTIONNÉ
La couleur de tête clignote une fois au départ du mode.
UTILISATION EN PEBBLE
Dégrouper un luminaire*
et restaurer le paramétrage d’origine Verrouiller les boutons
Régler l’intensité lumineuse
Choisir un mode couleur (ambiance)
Un appui court sur ce bouton
change le mode couleur
(ambiance).
Allumer et éteindre la lumière
Un appui simultané long (env. 3s) sur ces 2 boutons
verrouille (ou déverrouille) le luminaire éteint.
Le luminaire clignote 3 fois en blanc.
Un appui sur ce bouton
allume le luminaire en blanc
(à pleine intensité) ou bien l’éteint.
Un appui sur ce bouton
allume le luminaire en violet
(à pleine intensité).
Un appui court sur ce bouton
réduit ou augmente l’intensité
lumineuse suivant un cycle
(3 réglages d’intensité possibles).
10S +3S
*SOUND + COLOUR
Le témoin s’allume en blanc.
Un appui court sur ce bouton
dans ce mode sélectionne une
nouvelle couleur.
* groupé avec une télécommande
warm
Rotation de couleurs
Eet bougie - scintillement des LEDs
CYCLE DE
8 MODES
Eet bougie - scintillement des LEDs
*
Rotation de couleurs chaudes
Rotation de couleurs froides
Délement de toutes les couleurs
rainbow
Rotation de couleurs
claires
Candle
rythme
Cold
Candle bleu
Sound + Color
Sweet
Mise en rythme d’une couleur
Choisir une couleur et un mode (ambiance)
Un appui long sur ce bouton lance
un délement rapide des couleurs
qui s’arrête dès l’appui terminé.
Pour trouver le blanc, éteindre puis
rallumer la lumière.
Eet bougie - scintillement des LEDs
Délement de toutes les couleurs
Eet bougie - scintillement des LEDs
Candle
Candle bleu
rainbow
CYCLE DE
7 COULEURS
ET 3 MODES
*
RAINBOW*
Un appui court sur ce bouton dans
ce mode xe la couleur choisie, un
second appui relance le délement
du mode, ....

10 11
INFORMATIONS TECHNIQUES
CARACTERISTIQUES DU SYSTEME
Ampoules Leds blanches et RGB, innité de couleurs disponibles
Puissance lumineuse 8-28W 1.5-5W 1.5-6W
Autonomie avec 1 batterie 3-4h environ Plus de 10h Plus de 10h
Alimentation en entrée du bloc 100-240Vac, 50-60Hz
Alimentation en sortie du bloc PWR1 19.5Vdc (1 sortie), 39W
Alimentation en sortie du bloc PWR2 15.5Vdc / 19.5Vdc (2 sorties), 39W
Batterie Lithium-ion, 14.8V, 4400mAh
Recharge de la batterie 6-8h (recharge à C/7)
Technologie et fréquence radio Kameleon, 315, 433, 868 ou 905MHz Pebble, 433MHz
Portée radio 100m max (en portée directe) 20m max
Protection du système IP56
Température d’utilisation conseillée 0 à 40°C
Garantie 1 an (sous conditions normales d’utilisation)
SMARTBAR
BAR CONVERTIBLE
SHADELITE
KIT PARASOL
FRENCH
CONNECTION
LUMINAIRE
QUE FAIRE EN CAS DE PROBLEME ?
LA LUMIERE NE S’ALLUME PAS
Vériez que le boîtier de contrôle est bien connecté, soit à une batterie (voire 2), soit à une alimentation branchée
sur le réseau électrique.
Si une batterie alimente le boîtier, vériez qu’elle est bien chargée.
Allumez la lumière depuis le boîtier de contrôle.
Si la lumière ne s’allume pas, déconnectez puis reconnectez le boîtier de contrôle puis restaurez sa conguration
d’origine (en Kameleon uniquement).
LA LUMIERE S’EST ETEINTE
Vériez la charge de la batterie, mettez-la à recharger si nécessaire. Le mieux est de disposer d’une batterie de
rechange prête à l’emploi.
Vous pouvez dans certains cas (en SmartBar par exemple) alimenter les ampoules avec 2 batteries de façon à dou-
bler l’autonomie.
Vous avez également la possibilité d’alimenter directement les ampoules avec un bloc d’alimentation (PWR1 sauf
pour SmartBar qui utilise PWR2).
Dans l’union Européenne (conformément à la directive DEEE 2002/96/CE), voire aussi d’autres régions, vous avez l’obligation,
en n de vie, de retourner ce produit à un point de collecte pour recyclage. En eet, ce produit n’est pas un déchet ménager
ordinaire, gérer ainsi sa n de vie nous permet de préserver notre environnement et limiter l’utilisation de nos ressources
naturelles. Pour toute information complémentaire, contactez Smart & Green.
IPW Europe déclare le présent produit conforme aux directives européennes suivantes : RTTE (1999/5/CE),
LVD (2006/95/CE), ROHS (2011/65/EU), EMC (2004/108/CE) and Battery (2006/66/EC).
La déclaration de conformité correspondante est disponible sur notre site internet (www.smartandgreen.eu).
CONFORMITE A LA REGLEMENTATION
> Dans le cas où ces notices ne répondent pas à vos questions, contactez votre point de vente.
English
SYSTEM DESCRIPTION
OVERVIEW OF THE SYSTEM AND ITS COMPONENTS
BULBS
PWR1
PWR1 (1 output)
To recharge the battery or supply
low or MEDIUM WATTAGE lights
PWR2
PWR2 (2 outputs)
To recharge the battery or supply HIGH
WAT TAGE lights (e.g. SMARTBAR)
CONTROL BOX
LED BULB
BATTERY
OCTOPUS
CONNECTORS
POWER SUPPLY
BATTERY
To supply the bulb battery pack
The bulbs form a network stemming from an «octopus» connector and provide illumination in a lighting
xture or shine light in a parasol lamp conguration. See diagram below depicting all 3 types of networks.
POWER SUPPLY
(also called charger)
SPI-PWR1
SPI-BAT
SPI-PWR2
CONVERTIBLE LIGHT BAR LIGHTING FIXTURE PARASOL LIGHTING KIT
SMARTBAR SHADELITEFRENCH CONNECTION
SPIDER
SYSTEM
1 side x4
LEDs (tube)

12 13
Pebble technology
Remote control
of lighting products
PEBBLE
REMOTE CONTROL OPTIONAL
The remote control unit serves to operate lighting xtures remotely (by radio frequency).
SYSTEM OPERATING MODES
The SPIDER system is intended for 2 types of applications:
• Lighting physical shapes or furnishings to create attractive lighting xtures
• Performing an illumination function under a shade structure, e.g. parasol.
Kameleon technology
Remote control of
grouped lighting
Advanced functionalities,
4- and 8-button models
KEY
SMARTBAR FRENCH CONNECTION SHADELITE
2 types of control box set-up using 2 dierents technologies:
- Kameleon technology allows the management of a group of lighting xtures driven by a
remote control (optional)
- Pebble technology oers local and (optional) remote control of lighting xtures.
CHOICE OF COLOR
MODE BACKGROUND
COLOR
CHOICE
BRIGHTNESS
ADJUSTMENT
STANDBY
COLOR
CHOICE
BRIGHTNESS
ADJUSTMENT
CONTROL BOX
K-SPI-CON
PEBBLE
KEY 4B KEY 8B
P-SPI-CON
CONVERTIBLE LIGHT BAR LIGHTING FIXTURE PARASOL LIGHT INSTALLATION
SYSTEM ACCESS VIA A TRAPDOOR
1 2 3 4
WIRELESS MODE (WITH BATTERY)
Lighting diagram Llighting diagram
WIRED MODE (WITHOUT BATTERY)
The battery charges
the lights directly .
Battery recharging
The battery must be recharged using a
power supply outside the lighting xture.
In this conguration, the power
supply connected to the electrical
network lights the bulbs.
PWR1 PWR2
PWR1 PWR2
2 operating modes can be set:
The trapdoor is attached to the xture by two screws located at the top.
A peripheral groove allows the user to close the hatch quickly, ensuring a tight seal.
Grab and pull a lower corner of the trapdoor with one hand.
Depending on the conguration, with the other hand, you can:
• Position the system inside the xture, at the time of installation (see «Operating modes» section).
Note: For a wired mode, run the power supply cord across the bottom.
• Remove the battery to be recharged (see «Battery recharge» section).
Caution: Don’t pull on the control box (to avoid the risk of stripping the cables).
• Change the light setting (see «User guidelines» section).
Once the operation has been completed, close the trapdoor. This step begins by putting the bottom of the
trapdoor back into place and then the two sides; next, press down along the hatch periphery to ensure the
groove is well positioned on the light diuser (in order to maintain a good seal).
1
2
3
4

14 15
SYSTEM ACCESS IN A SMARTBAR TYPE FURNITURE
USE PRECAUTIONS
Be sure to use this product in strict compliance with the instructions included in this guide for the lighting system as
well as with instructions applicable to the xture; otherwise, the warranty will no longer be valid.
Power supply and battery
. For battery recharge, place the power supply and battery in a dry spot protected from rain.
. Avoid use near a heat source or ame.
. Keep them out of the reach of children.
. Never try to open the power supply or battery due to the potential hazard; any attempt will automatically nullify
this warranty.
. Check that the power supply is unplugged before connecting or disconnecting the battery.
. Warning: Never charge more than two batteries on the same power supply.
. Don’t touch the power supply or battery terminals.
. Clean the terminals with distilled water and dry them with a soft dry cloth.
. Avoid connecting the battery to any device other than the power supply.
. Caution: Be sure to regularly recharge the battery. After several months without being recharged, the battery can
lose charging capacity.
Lighting xture and any component
. Handle the lighting xture with great care, the light diuser can be scratched.
. Don’t pull on the control box (due to a risk of stripping the cables).
. Don’t expose the xture to water spray and don’t wash it with large quantities of water.
. Clean the xture using a wet cloth or sponge.
. Don’t place the xture in a puddle or pool of water; be sure not to leave it near water after a rainstorm.
. Don’t place a hot dish or container on the xture to avoid causing damage.
. Refrain from disassembling the bulbs and cables.
34
The control system drawer is located inside the furniture.
A lid prevents access to the Spider system. Turn the lid manually to remove it.
The control box is connected to the battery or power supply (PWR2 type).
A wedge holds the equipment snugly in place. An extra battery may be added in the drawer to double
battery life during operations.
Remove the wedge to release the equipment. Depending on the conguration, you can then:
• Place this equipment inside the lighting xture during installation (see «Operating modes» section)
• Remove the battery to be recharged (outside the xture)
Caution: Don’t pull on the control box (to avoid the risk of stripping the cables)
• Change the light setting (see «User guidelines» section).
1
2
3
4
1 2 BATTERY RECHARGE
USE wITH KAMELEON TECHNOLOGY
Recharge the battery prior to its initial use.
Reminder: Never recharge more than 2 batteries at the
same time on a single power supply.
• Remove the battery from the lighting xture.
• Push the button (see opposite) to check the battery charge
status (a display of 4 blue bars indicates full charge).
• Perform this step in a protected dry spot, place the battery
on the power supply and then hook it up to the mains. The
charge indicator lights up in blue (see opposite); when it turns
o, the battery will be completely charged (allow 8 hours for a
complete recharge).
• Disconnect the power supply once the battery has charged
and before removing it.
Pressing this button
changes the color.
Note that a drop in light intensity extends
battery life by a proportional amount.
Turn the light on Turn the light o
Choose a color
Pressing this button a short time either
increases or decreases light intensity by an
increment. Pressing the button a longer time
gradually increases or decreases the intensity
until reaching its maximum or minimum.
Adjust light intensity
TURNING THE LIGHT OFF: Simultaneously pressing both buttons
turns o the xture and places the device in standby mode.
Pressing either of the two
buttons turns the lighting
xture on and restores the
color or active color scheme
applicable prior to turning
the light o.
+
SHUTDOWN: 3 simultaneous and consecutive pushes of these 2
buttons (with the xture already o) deactivates the radio function
and places the xture in Shutdown mode. The bulb blinks 3 times in
blue. Consumption for this xture decreases and moreover the charge
is preserved over a longer period (be sure to adequately recharge the
battery before this shutdown step). Subsequently pressing one of the
buttons turns the xture back on and lights it.
A 9COLOR
CYCLE
Keep the control box in its place on the battery or power supply.
USER GUIDELINES
The lighting system is controlled from:
• The control box connected to the bulbs. See the operating mode description below.
• The radio remote control (as an option). Refer to the instructions for your remote control unit (either
Pebble or Kameleon depending on your system technology) for this particular operating mode.

16 17
Pressing this button a long time
(approx. 10 sec, until it blinks red)
serves to remove the light from a
group and restore its original settings.
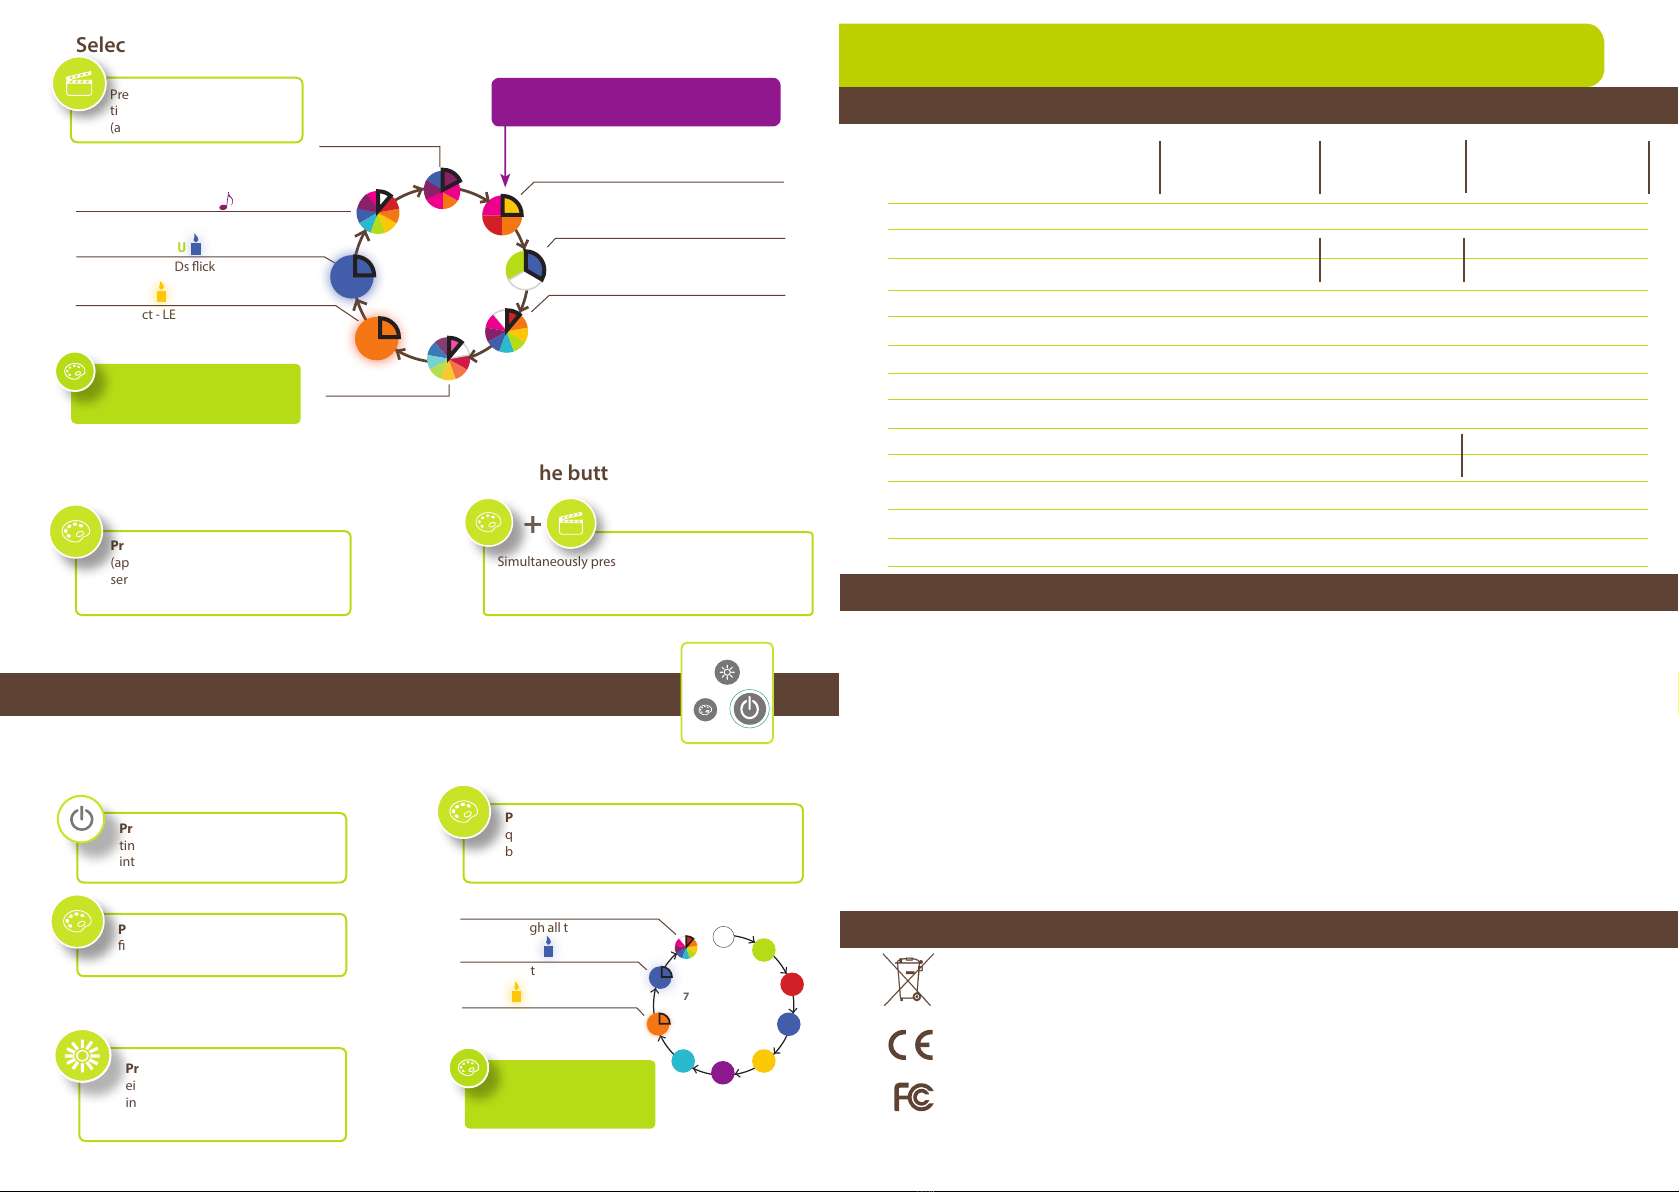
COLOR INDICATES MODE SELECTED
The lead color ashes once before the cycle starts.
USE wITH PEBBLE TECHNOLOGY
Remove a light from a group*
and restore the original settings Lock the buttons
Adjust light intensity
Select a color mode (ambiance)
Pressing this button for a short
time changes the color mode
(ambiance).
Turn the light on and o Choose a color and mode (ambiance)
Simultaneously pressing both these buttons approx.
3 sec locks (or unlocks) the xture already turned o.
A white color will then blink 3 times.
Pressing this button turns the ligh-
ting xture on in white (i.e. at full
intensity) or else turns it o.
Pressing this button lights the
xture in purple (full intensity).
Pressing this button a short time
either lowers or raises the light
intensity according to a cycle
(possibility of 3 intensity settings).
Pressing this button a long time initiates a
quick scrolling of colors that stops once the
button has been released. To nd white, turn the
light o and on.
10S +3S
*SOUND + COLOR
The indicator lights up white.
Briey press this button (in this
mode) to select a new color.
*grouped with the remote control
warm
Rotation of colors
Candle eect - LEDs icker
CYCLE OF
8 MODES
Candle eect - LEDs icker
*
Rotation of hot colors
Rotation of cold colors
Scrolls through all the colors
rainbow
Rotation of pale
colors
Candle
rythme
Cold
Candle bleu
Sound + Color
Sweet
Sound eect on any selected color
TECHNICAL INFORMATION
SYSTEM CHARACTERISTICS
Bulbs White and RGB LED lights, an innite number of colors available
Lighting wattage 8-28W 1.5-5W 1.5-6W
Battery life with 1 battery 3-4hrs approx. Over 10hrs Over 10hrs
Power supply input 100-240Vac, 50-60Hz
Power supply output PWR1 19.5Vdc (1 output), 39W
Power supply output PWR2 15.5Vdc / 19.5Vdc (2 sorties), 39W
Battery Lithium-ion, 14.8V, 4400mAh
Battery recharge 6-8hrs (recharging under C/7)
Technology and radio fréquency Kameleon, 315, 433, 868 ou 905MHz Pebble, 433MHz
Radio range 100m max (open range) 20m max
System protection IP56
Recommended use temperature 0 à 40°C
Warranty 1 year (under normal use conditions)
SMARTBAR
CONVERTIBLE BAR
SHADELITE
PARASOL LIGHTING KIT
FRENCH
CONNECTION
LIGHTING FIXTURE
TROUBLESHOOTING PROBLEMS
THE LIGHT REMAINS OFF
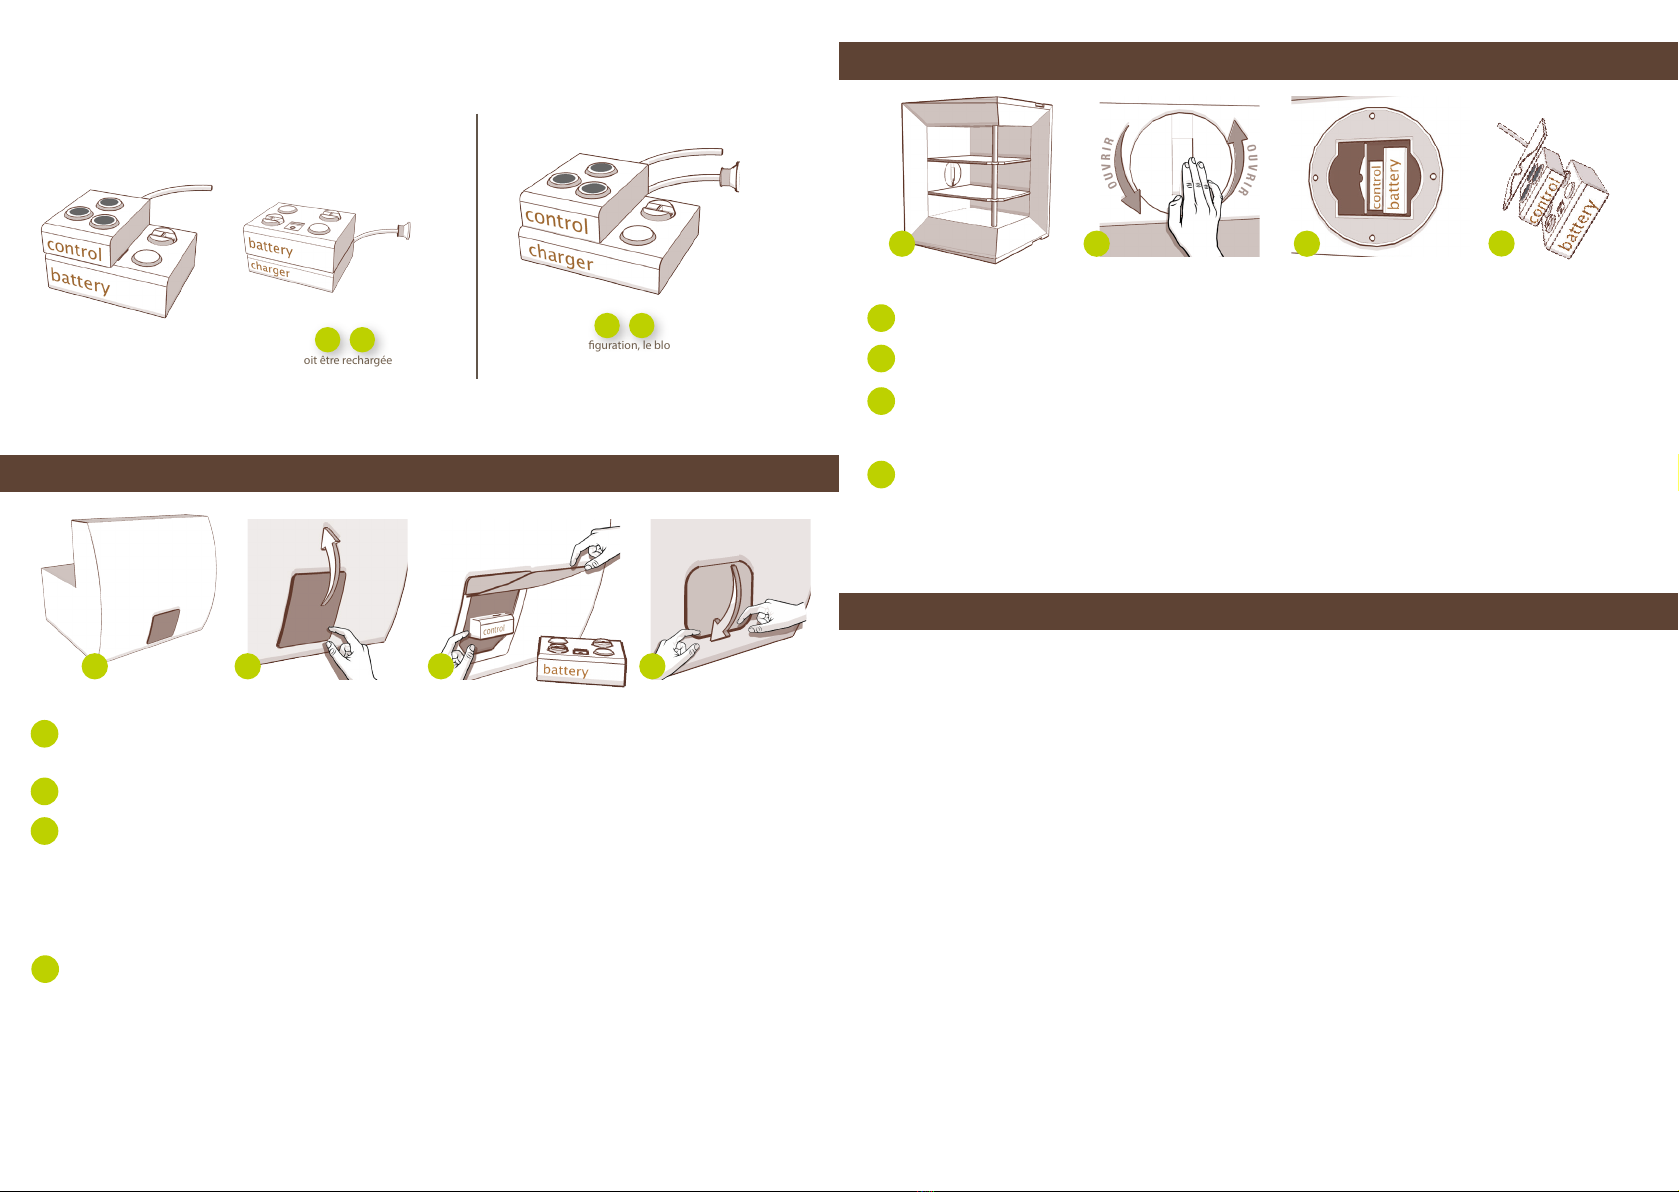
Check that the control box is properly connected, either to the battery or to the power supply hooked up to the
mains.
If the battery is supplying the box, then verify that the battery is indeed charged.
Turn the light on from the control box.
If the light remains o, disconnect then reconnect the control box and continue by restoring the original
conguration (only in Kameleon mode).
LIGHT SHUTS OFF
Check the battery charge and, if necessary, initiate recharging. The best option is to be equipped with a spare
battery ready for use.
In some cases (e.g. SmartBar), you can supply the bulbs with 2 batteries so as to extend autonomy by 100%.
You also have the option to directly supply the bulbs using a power supply (PWR1, except for SmartBar, which
requires PWR2).
> Should these precautions not answer your specic questions, please contact your point of sale.
In the European Union (in accordance with Directive DEEE 2002/96/EC), and also in other regions, you must return this product
to a recycling collection point at the end of its life. As this product is not ordinary household waste, managing its end of life helps
us protect our environment and limit the use of our natural resources. For further information, please contact Smart & Green.
IPW Europe declares that this product complies with the following European directives: R&TTE (1999/5/EC), LVD (2006/95/EC),
RoHS (2011/65/EU), EMC (2004/108/EC) and Battery (2006/66/EC). The corresponding Declaration of Conformity
can be viewed on our website (www.smartandgreen.eu).
This device complies with Part 15 of the FCC Rules. Operation is subject to the following two conditions: (1) this device may not
cause harmful interference, and (2) this device must accept any interference received, including interference that may cause
undesired operation.
REGULATORY COMPLIANCE
A short click on this button
sets the chosen color.
A second click restarts
the color rotation,...
Candle eect - LEDs icker
Scrolls through all the colors
Candle eect - LEDs icker
Candle
Candle blue
rainbow
7COLOR CYCLE
AND
3 MODES
*
RAINBOW*

11, rue de l’Abbé Vincent - Z.I. Les Vouillands - 38600 Fontaine - France
www.smartandgreen.eu
Table of contents
Languages:
Other smart & green Lighting Equipment manuals