Smart Electrician V1888 User manual

Questions, problems, missing parts?
Before returning to your retailer, call our customer service at 1-800-887-6326
Monday – Friday 9:00 a.m. – 5:00 p.m. CST
Page 1 of 4
BB
Chain
X2
Pull Chain
X1
Sku Number: 348-1442
LED BLUETOOTH SPEAKER SHOP LIGHT
Model Number: V1888
PACKAGE CONTENTS
HARDWARE CONTENTS Note: Hardware not shown actual size.
AA
B
A
Page 2 of 5
Installation Steps
Important to know
1. Read all instructions carefully before installation and operation.
2. If you are not familiar with state and local electrical codes, it is recommended that you consult with a qualified
electrician.
3. Do not use in wet locations, use indoors only.
4. Non-replaceable LEDs.
5. Caution: LEDs emit bright light. Avoid looking directly into the light source for prolonged periods to avoid eye
damage.
6. Not to be used with a dimming circuit or any other electronically controlled switch.
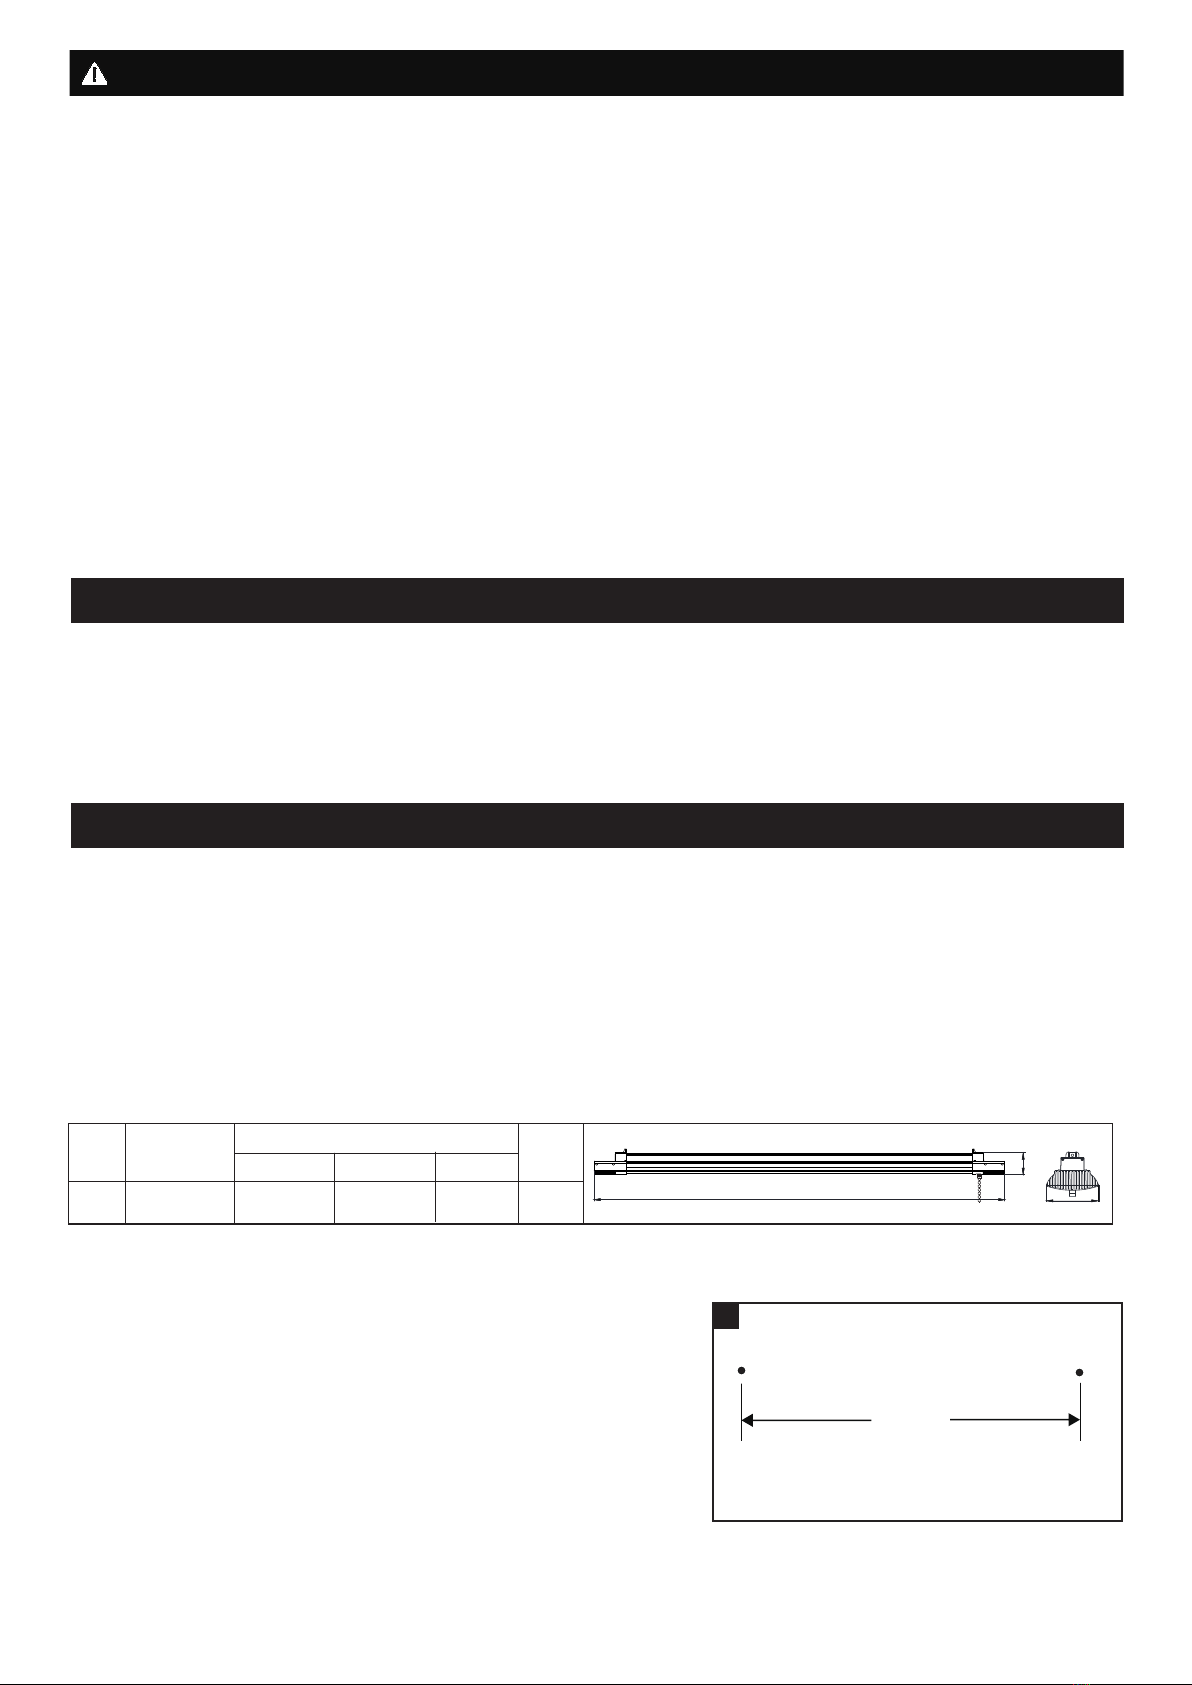
7. Specification:
1
Turn off the power at fuse or circuit box.
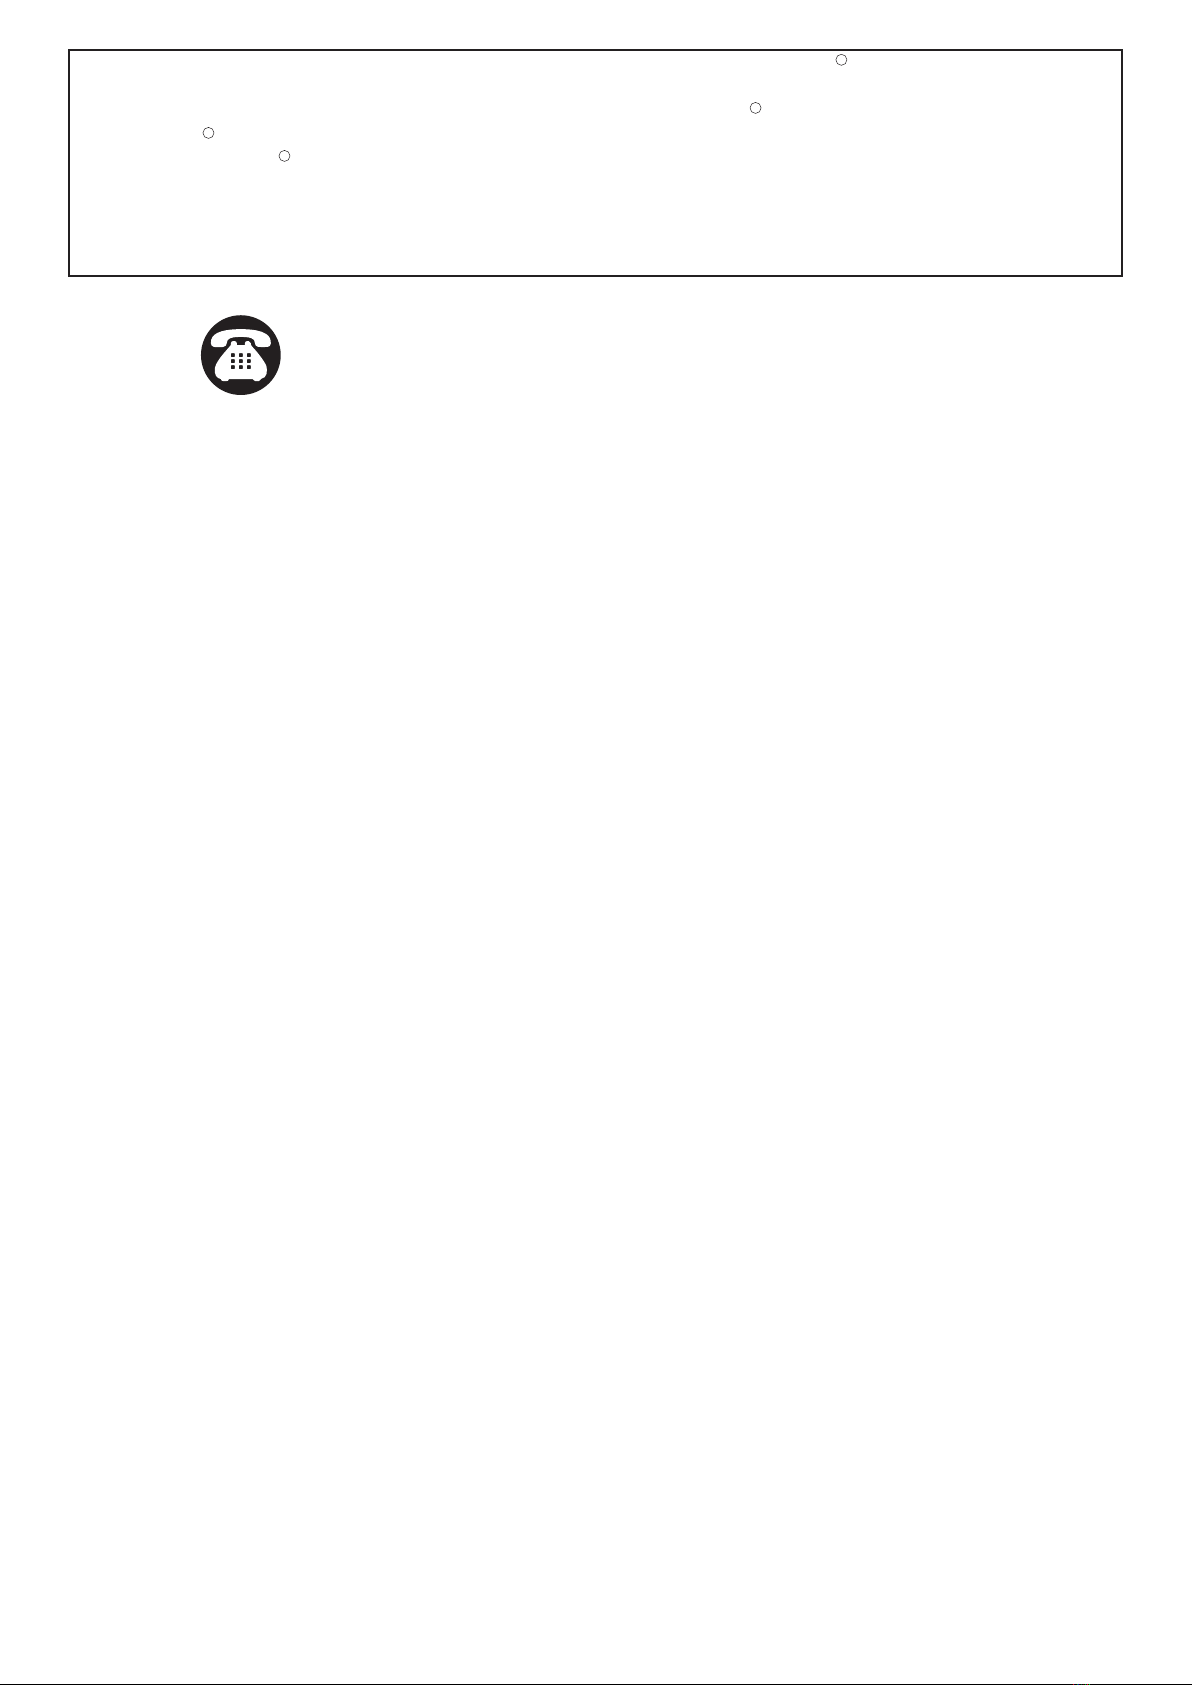
1. Select suitable location that can support the weight of the fixture and
has an outlet on the ceiling to insure that the fixture hangs properly.
Determine method of mounting before drilling. Make two spots on the
ceiling 39 in. apart for the mounting hardware( not included).
NO.
146.25 3.375
Dimension(inch)
Item #.
348-1442
ABC
3.875
Watts
50
39 in
Please read and understand this entire manual before attempting to assemble, operate or install the product.
WARNING
●Turn off electricity at main fuse box (or circuit breaker box) before beginning installation by removing fuse (or
switching off circuit breaker).
●Be careful not to damage or cut the wire insulation (covering) during fixture installation. Do not permit wires to contact
any surface having a sharp edge. To do so may damage or cut the wire insulation, which could cause serious injury
or death from electric shock.
●LED electronics can be damaged by electro static discharge (ESD)shock. Before installation, discharge yourself by
touching a grounded bare metal surface to remove this hazard. To avoid damage, do not touch the LED module.
CAUTION
●All electrical connections must be in agreement with local codes, ordinances or the national electric code (NEC).
Contact your municipal building department to learn about your local codes, permits and/or inspections.
●Risk of fire – most dwellings built before 1985 have supply wire rated for 140°F/60ºC. Consult a qualified electrician
before installation.
Before beginning assembly, installation or operation of product, make sure all parts are present. Compare parts with
package contents list and diagram on previous page. If any part is missing or damaged, do not attempt to assemble,
install or operate the product. Contact customer service for replacement parts.
Tools Required for Assembly (not included): Screwdriver, Phillips Screwdriver, Pliers, Electrical Tape, Wire Cutters,
Safety Glasses, Ladder, Wire Stripper.
SAFETY INFORMATION
ASSEMBLY INSTRUCTIONS
PREPARATION
A
B
C

Page 3 of 5
ASSEMBLY INSTRUCTIONS (continued)
Drywall Wood
2. For Mounting to Drywall:
Drill 1/4 in. holes to the ceiling to clear the closed flaps
of the toggle bolt. Make sure to fasten the toggle bolt
into the butterfly nut before inserting the flaps into the
ceiling with the toggle bolt protruding through the ceiling.
Lock the assembly by screwing the hook into the ceiling.
3. Attach one hang chain (AA) to the fixture using one
hook provided. Repeat with second hang chain and
second hook at other end of fixture (A).
For Mounting to Wood:
Drill 1/16 in. diameter pilot hole in the ceiling.
Make sure to fasten the combo wood-machine
end into the metal hook screwing into ceiling to
lock and tighten.
4. Hang fixture body (A) by placing one chain (AA)
over each hook that has been installed in the
ceiling. You may need to adjust the chains (AA)
slightly on the hooks for fixture (A) to hang level.
Fixture must hang at lease 3 in. from ceiling.
5. Plug power cord (B) into ceiling outlet. Lengthen the pull chain (BB) with provided if necessary.
2.1 2.2
4
5
A
B
BB
3
AA
A
AA
4
A
Ring Hook
Operating the Shop Light and Bluetooth Speakers:
1. Once plug in power supply, the Bluetooth Speakers are now enabled and ready to connect. The speakers can
continue working with the light off.
2. The light will turn on when you pull the fixture chain. Pull the chain again to turn to turn the light off.
3. While standing within 4’ of the Shop Light, pair a Bluetooth enabled device such a you smart phone or tablet to the
speakers by selecting the “shop light 1.”You will hear a confirmation chime once paired. Please find the
operation processes base on Android and iphone.

Page 4 of 5
TROUBLESHOOTING
CARE AND MAINTENANCE
Caution: Before attempting to clean the fixture, disconnect the power to the fixture by turning the breaker off or
removing the fuse from the fuse box.
POSSIBLE CAUSE CORRECTIVE ACTION
The fixture will not light Pull chain is in “OFF” position Pull chain switch so that it is
in the “ON” position
PROBLEM
If unable to fix any of the above issues, please consult a certified electrician.
The following parts are available for re-order if damaged or missing. Call our toll free at 1-800-887-6326.
Spare Parts List:
BB
AA
Chain
3204CP
Pull Chain
3039PU
Operating the Shop Light and BT Speakers:
A: For Android; Pull down the suspernsion window, press the Bluetooth icon will enter the Bluetooth panel. Turn on the
Bluetooth switch and find the name of Bluetooth speaker,"shop light 1," then click it to connect.
B: For iphone; Click the setting icon, enter the settings panel, click the Bluetooth option, and turn on the Bluetooth
switch. Find the name of Bluetooth speaker, "shop light 1," then click it to connect.
4. Enjoy listening to music or other media (books, podcasts, etc.). The paired device must remain within 32’ of the
shop light to stay connected. When not in use, it can be turned off by clicking the Bluetooth switch again.
5. Once you have turned off the speakers, step 3 may be repeated to re-connect.
FCC WARNING:
This device complies with part 15 of the FCC Rules. Operation is subject to the following two conditions: (1) this device
may not cause harmful interference, and (2) this device must accept any interference received, including interference
that may cause undesired operation.
Any changes or modifications not expressly approved by the party responsible for compliance could void the use’s
authority to operate the equipment.
Note: This equipment has been tested and found to comply with the limits for a class B digital device,pursuant to
Part 15 of the FCC Rules.These limits are designed to provide reasonable protection against harmful interference in
a residential installation.
This equipment generates uses and can radiate radio frequence energy and, if not installed and used in accordance with
the instructions,may cause harmful interference to
radio communications.
However,there is no guarantee that
interference will not accor in a particular installation. if this equipmemt does cause harmful interference to radio or
television reception,which can be determined by turning the equipment off and on,the user is encouraged to try to
correct the interference by one or more of the following measures:
• Reorient or relocate the receiving antenna.
• Increase the separation between the equipment and receiver.
• Connect the equipment into an autlet on a circuit different from that to which the receiver is connectec.
• Consult the dealer or an experienced radio / TV technician for help.
This equipment should be installed and operated with a minumum distance of 20 cm between the radiator and your
body.
FIVE-YEAR LIMITED WARRANTY: If, during normal use, this SMART ELECTRICIAN lighting fixture breaks or fails
due to a defect in material workmanship within five (5) years from the date of original purchase, simply bring this
lighting fixture with the original sales receipt back to your nearest MENARDS retail store. At its discretion, SMART
ELECTRICIAN agrees to have the product or any defective part(s) repaired or replaced with the same or similar
SMART ELECTRICIAN product or part free of charge, within the stated warranty period, when returned by the
original purchaser with original sales receipt. This warranty; (1) excludes expendable parts including but not limited to
light bulbs; (2) does not cover damage that has resulted from abuse or misuse; and (3) does not cover any losses,
labor, injuries to persons/property or costs. This warranty does give you specific legal rights and you may have other
rights, which vary from state to state.
R
R
R
R
Questions, problems, missing parts?
Before returning to your retailer, call our customer service at 1-800-887-6326
Monday – Friday 9:00 a.m. – 5:00 p.m. CST
Page 5 of 5
This manual suits for next models
1
Table of contents
Other Smart Electrician Lighting Equipment manuals

Popular Lighting Equipment manuals by other brands


Lightronics
Lightronics WVK manual

Saxby Lighting
Saxby Lighting Surge PIR instruction manual

Sealey
Sealey LED3603 Series instructions

Star Headlight & Lantern
Star Headlight & Lantern Contour S-Link System 9100DLED DUAL-COLOR... manual

Elumen8
Elumen8 TZ 350 LED user manual

TEUCER
TEUCER WP-4RGBWN instructions


