TP-Link Tapo L900 User manual

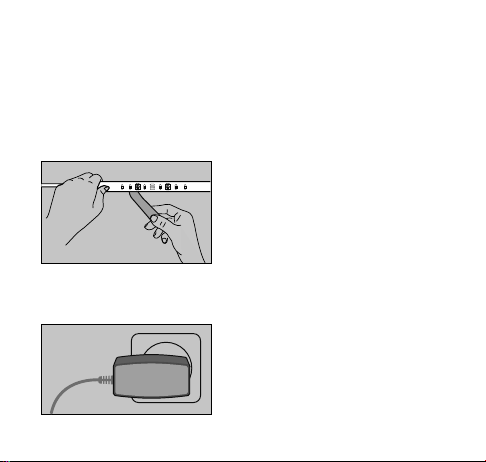
1. Only cut the exceeded length along the cutting lines of the
light strip after unplugging the light strip.
2. Avoid any sharp corners or turns behind the LED beads.
To avoid damaging your light strip, note the following tips.
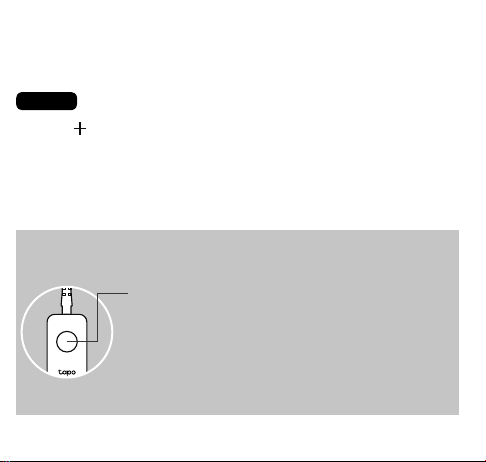
CONNECT HARDWARE
STEP 2
Connect all the parts. When connecting the light strip to the
controller, make sure the arrows point at each other.
SET UP
STEP 3
Tap the button in the app, choose Light Strips, and select
your model. Follow the instructions in the Tapo app to
complete the setup.
©2021 TP-Link 7106509328 REV1.0.0
*Images may dier from actual products.
Get the Tapo app from the App Store or Google Play.
DOWNLOAD APP
STEP 1
OR
Quick Start Guide
Tapo Smart Light Strip,
Multicolor
Set Up Your Light Strip Installation Tips
Button Explanations
Control Button
• Press once to turn on/o your light strip
• Press twice to switch preset lighting eects
• Press and hold for 5s, then release to reset only Wi-Fi settings
• Press and hold for 10s to restore factory settings
≥90° LED

1. Only cut the exceeded length along the cutting lines of the
light strip after unplugging the light strip.
2. Avoid any sharp corners or turns behind the LED beads.
To avoid damaging your light strip, note the following tips.
CONNECT HARDWARE
STEP 2
Connect all the parts. When connecting the light strip to the
controller, make sure the arrows point at each other.
SET UP
STEP 3
Tap the button in the app, choose Light Strips, and select
your model. Follow the instructions in the Tapo app to
complete the setup.
©2021 TP-Link 7106509328 REV1.0.0
*Images may dier from actual products.
Get the Tapo app from the App Store or Google Play.
DOWNLOAD APP
STEP 1
OR
Quick Start Guide
Tapo Smart Light Strip,
Multicolor
Set Up Your Light Strip Installation Tips
Button Explanations
Control Button
• Press once to turn on/o your light strip
• Press twice to switch preset lighting eects
• Press and hold for 5s, then release to reset only Wi-Fi settings
• Press and hold for 10s to restore factory settings
≥90° LED
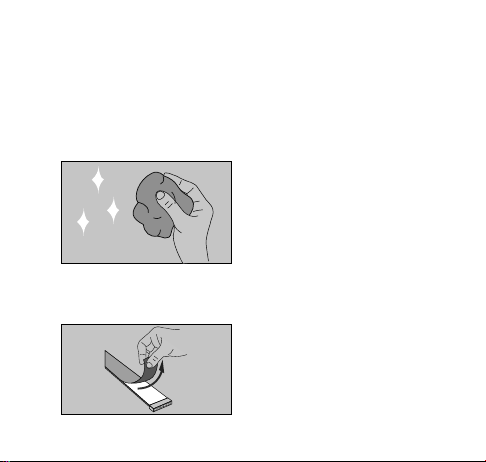
1. Choose a location that avoids static and eases away from
splashing water. Find a clean, dry and smooth surface,
then wipe o the dust.
2. Slowly peel away the 3M adhesive backing and take it out
bit by bit.
3. Stick the light strip and press it down for 10-15 seconds.
Secure the controller with the adhesive pads. Do not move it
to other place after it is attached.
• NOT FOR EMERGENCY LIGHTING
• Not intended for recessed installation in ceilings, or sots.
• Only use the control provided with or specied by these
instructions to control this device.
• To prevent re danger, do not run cord behind walls, ceilings,
sots, or cabinets where it may be inaccessible for examination.
• Use only insulated staples or plastic ties to secure cords.
• The maximum distance to the receptacle is determined by the
length of adapter cord.
• Keep the device away from water, re, humidity or hot
environments.
• Do not attempt to disassemble, repair, or modify the device. If you
need service, please contact us.
• Do not use the device where wireless devices are not allowed.
• Do not use damaged charger or USB cable to charge the device.
• Do not use any other chargers than those recommended.
• Adapter shall be installed near the equipment and shall be easily
accessible.
4. Plug in the power adapter to power on your light strip.
Safety Notice
• Route and secure cords so that they will not be pinched or
damaged when the cabinet is pushed to the wall;
• Position the portable cabinet light with respect to the cabinet
so the lamp replacement markings are able to be read during
replacing;
• The National Electrical Code (NEC) does not permit cords to be
concealed where damage to insulation may go unnoticed. To
prevent re danger, do not run cord behind walls, ceilings,
sots, or cabinets where it may be inaccessible for
examination. Cords should be visually examined periodically
and immediately replaced when any damage is noted.
Support
For technical support, the user guide and other information,
please visit https://www.tapo.com/support/.
Install Your Light Strip
Other manuals for Tapo L900
1
Table of contents
Other TP-Link Lighting Equipment manuals

TP-Link
TP-Link kasa smart KL400L5 User manual

TP-Link
TP-Link LB1 Series User manual

TP-Link
TP-Link KL420L5 User manual

TP-Link
TP-Link Tapo L930 User manual

TP-Link
TP-Link kasa smart KL400L5 User manual

TP-Link
TP-Link KL420L5 User manual

TP-Link
TP-Link Tapo L900 User manual

TP-Link
TP-Link Tapo L920 User manual


