Smart Life DH-JS01W Guide

Aroma Diffuser
START GUIDE
DH-JS01W
Contents
Download & Register & Important Safeguards
gninaelC&resuffiDgnitratS
tcennoC
secitoN,gnitoohselbuorT,snoitseuQ
Thank you for purchasing Our smart home product.
Get started using your new devices by downloading Smart Life, one
convenient app that manages everything straight from your
phone or tablet. Easily connect to your home Wi-Fi and control
multiple devices from the touch of your fingertips.
2-6
7-10
11-12
13-15
Get Ready
What’s in the Box
• Aroma Diffuser
• Power Adapter
• User Manual
• Know your Wi-Fi network and password
• Make sure your mobile device is running iOS ®8 or higher
or Android™ 4.1× or higher
• Make sure you’re connecting to a 2.4GHz Wi-Fi network
(Smart Life can’t connect to 5GHz networks)
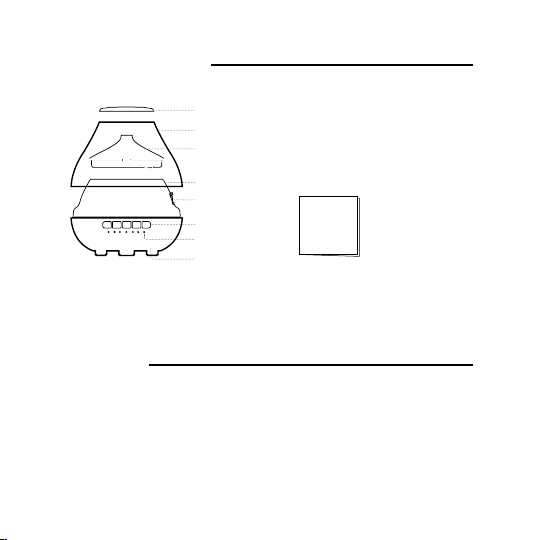
Aroma
Diffuser
START GUIDE
Mist Nozzle
Outer Cover
Water Tank
Cover
Air Outlet
Water Tank
Buttons
Indicator Lights
Base
1

2
1Download the Smart Life app from App Store or Google Play.
3
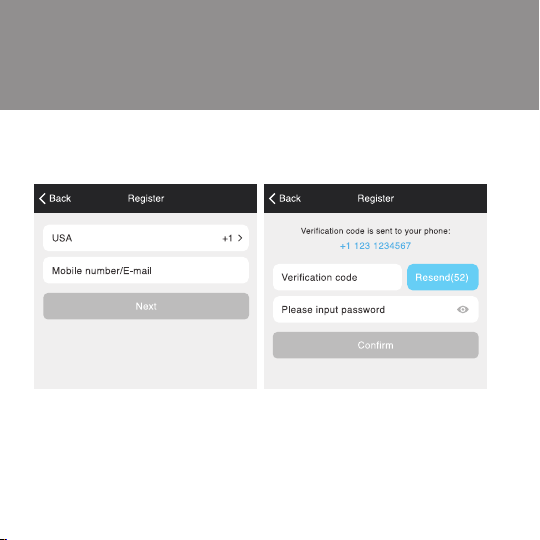
2Register an account on your Smart Life app.
STEP 1.
Enter your mobile phone number
or email address.
STEP 2.
Enter the verification code
and create a password.
4
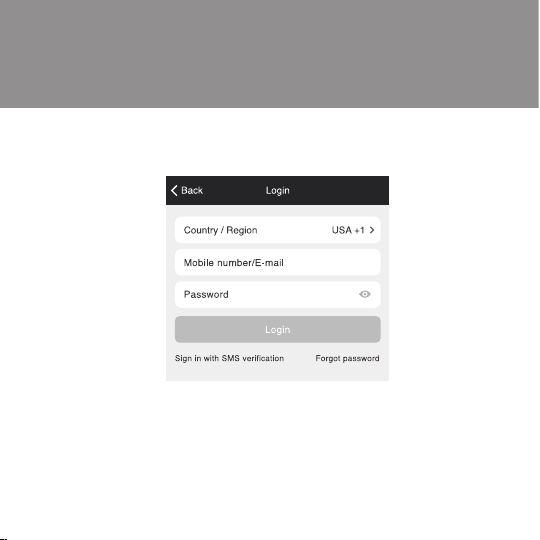
STEP 3.
Login to the App.
2.1 Register an account on your Smart Life app.

5
STEP 3.
Login to the App.
2.2 Register an account on your Geeni app.

6
3Important Safeguards
This product is designed for
household use only - When using
electrical appliances, basic safety
precautions should always be
followed, including the following:
1. READ ALL INSTRUCTIONS.
2. To protect against fire,
electrical shock and personal
injury, do not immerse this
appliance, including cord and
plug, in water or other liquid.
3. Close supervision is necessary
when any appliance is used by
or near children.
4. Unplug from outlet when not
in use, before putting on or
taking off parts, and before
cleaning.
5. Do not operate any appliance
with a damaged cord or
plug or after the appliance
malfunctions or has been
damaged in any manner.
To avoid hazards, return
the appliance to Merkury
Innovations for examination,
repair or adjustment.
6. The use of accessory
attachments not
recommended by the
manufacturer may result in
fire, electric shock or injury to
persons.
7. Do not use outdoors.
8. Do not let cord hang over
edge of table or counter, or
touch hot surfaces.
9. Do not place on or near a hot
gas or electric burner or in a
heated oven.
10. Do not use appliance other
than for its intended use, as
described in this manual.

7
1. Remove
the outer cover 2. Add purified water 3. Drip the essential oil
Water level :
50ml(min)~200mI(max)
4~6 drops
for 200ml water
4Getting ready.
8
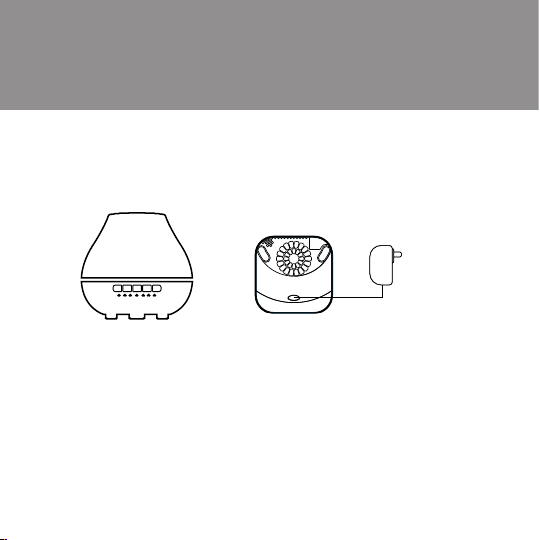
4.1 Starting the diffuser
AC Adapter
Bottom View
4. Cover the water
tank/outer cover
5. Plug the AC Adapter into
power outlet and start it

9
8
4.2 Using the Controls
Connect the diffuser
- Press & hold “ “ for 5 seconds to set until the indicator light flashes
quickly to put the diffuser in pairing mode. You can now pair the diffuser
with the Geeni App.
Operate the diffuser
- Press “ “ to turn the diffuser on.
- Press” “ to start diffusing continuously - the LED above “ “ will turn
blue; press this button again, it will mist intermittently - the LED above
“ “ will turn blue; press the button once again, it will stop diffusing.
- Press “ “ to set the mood lights to one color; press this button again
and the mood light will turn off; press it once again and the mood
light will cycle through different colors.
- Press the “ “ button to set the diffuser to timed settings.
The default timer is 1 hour. Press the button again to change the timer
to 3 hours. Press a 3rd time to set to 5 hours. Press once again and
the timer will be turned off.
NOTE : DO NOT open the outer cover or fill with water/oil while misting
1h 3h 5h

10
5Cleaning
For safety, it is suggested to clean the diffuser every 5-6 days, or
after 9-10 times of usage. The cleaning procedures are as follows:
- Disconnect the adapter from the AC power source, or turn off
the power source.
- Place the diffuser on a flat and stable place such as table to avoid
leaking water. Remove the outer cover and the water tank cover.
- When pouring out the water, keep the mist nozzle up. Don’t let any
water flow inside the circuity.
- Clean the ultrasonic vibration plate at the bottom of the water tank with
a cotton swab; clean the outer cover with cloth or cotton swab.
- When there is dirt, such as aroma or oil, in the cover of the diffuser or
the water tank, please clean it with a dried cloth with kitchen soap
and warm water.
- After cleaning, please add purified water into the water tank, then
power on the diffuser for 30 minutes, drain the water out and
dry the water tank. You can store the diffuser after it is dried out.
- When there is dirt on the mist nozzle, please remove the outer cover,
clean it with a neutral detergent. After it is dried, you can use
the diffuser again.
NOTE : Neutral detergent is strongly recommended for cleaning.
Any detergent with chlorine, acid, enzyme left inside the tank
may produce hazardous effects and maybe harmful.
11
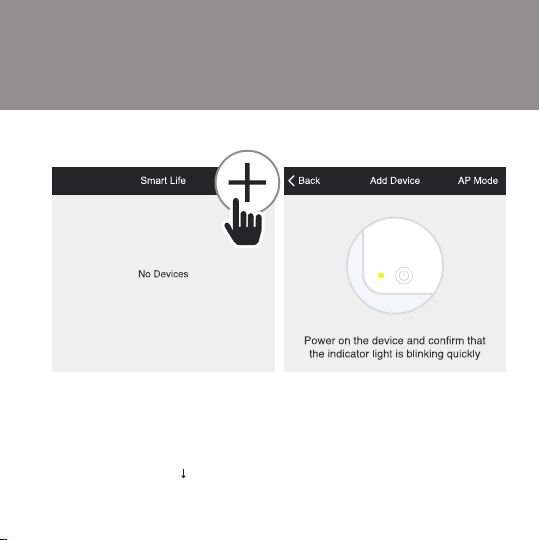
STEP 2.
In the Smart Life app, on the top
corner of the Devices screen,
click (+).
Choose “ Home Appliance”
Humidifier
6Add device.
STEP 3.
Make sure theindicatorlight on the
device is flashing rapidlyblue, indicating
thedevice is ready to connect using Easy
Mode. If not, press and hold the Button
for 3 secondsuntil the indicator light is
flashing rapidly, then press “confirm
indicator rapidly blink”.
12
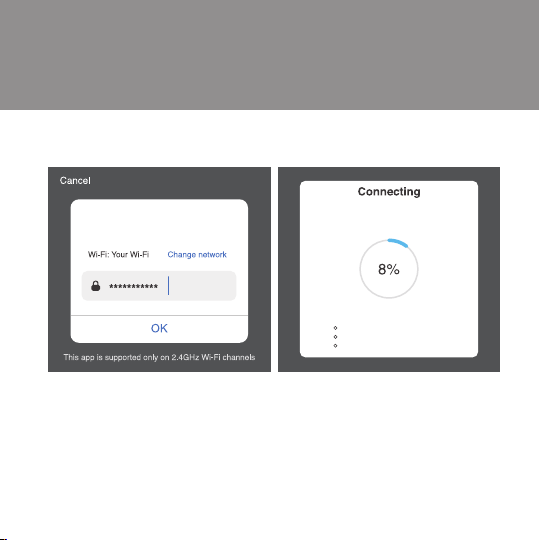
STEP 4.
Enter your Wi-Fi network and
password.
*If the connection fails, try to connect using AP Mode.
STEP 5.
The Smart Life app will try to
connect your device.
NOTE: Smart Life can’t connect to 5GHz networks.
Enter Wi-Fi Password
Only support 2.4GHz Wi-Fi network
Make sure your rounter, mobile,and device
are as close to your router as possible
Device found
Registering device to Smart cloud
Initializing device

13
Frequently Asked Questions
1. Can I share with family and friends?
Yes, you can share your device with family and friends who will have
access to control your bulbs, plugs, cameras, and other devices. In
this app, press the Profile button and click on the “Device Sharing”
button, and you will be able to give or revoke sharing permissions.
In order to share, the other user should already have downloaded the
Smart Life app and registered a new account.
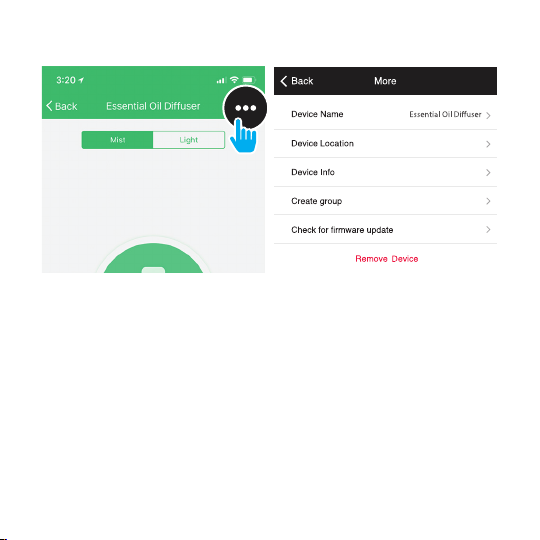
2. Can I group multiple Smart Life devices together?
Yes, you can group multiple devices of the same type together, by room,
location, or however else you want. The same devices can be in multiple
groups. (For example, create a group for “Bedroom” and another group
for “Entire House”, and your Bedroom lights can be included in both
groups). From your main device list, click on one of the devices you want
to group, press the “ ” button on the top right for advanced settings,
and click Create Group. You’ll then be able to choose which devices you’d
like to group together and will be able to rename them.
3. How Many Devices Can I Control?
Smart Life’s app can control an unlimited amount of devices in an unlimited
amount of locations. Your router may have a limit of how many devices
can be connected to one router.
4. My Smart Life device has a funny name. How do I rename it?
From yourmain device list, clickon one of the devices you want to rename,
press the “ ” button on the top right for advanced settings, and click
Modify Device Name (or Modify Group Name, if applicable). You’ll then be
able to choose a more familiar name.
14
5. The device appears offline or unreachable, what should I do?
Check the light switch and make sure that it’s switched ON. The light bulb
requires an “always-on” power supply to operate properly.
Make sure your Wi-Fi router is online and in range.
Make sure you have the latest Geeni functionality by clicking “Check for
firmware update” in your device settings.
6. What’s the Wireless Range?
The range of your home Wi-Fi is heavily dependent on your home router
and the conditions of the room. Check with your router specifications for
exact range data.
7. If my Wi-Fi/Internet goes down, will Smart Life still work?
Smart Life products need to be connected to Wi-Fi in order to use them remotely.

15
Troubleshooting
Reset the device
System Requirements
Technical Specifications
Cannot connect to your Wi-Fi network.
Make sure you entered the correct Wi-Fi password during the Wi-Fi
setup. Check whether there are any Internet connection problems. If the
Wi-Fi signal is too weak, reset your Wi-Fi router and try again.
• Mobile device running iOS ®8 or higher or Android™ 4.1x or higher
• Existing Wi-Fi Network
• Power: 10W
• Capacity: 200ml
• Timer: 1/3/5 hour
Reset once (press & hold reset button) to reach Easy Mode, which is the
primary way the app will try to connect. (When in Easy Mode, you’ll see
the LED flashing quickly, 2x per second)
Reset again (press & hold reset button) to reach AP, which is the Backup
Mode to help connect.

20C
Table of contents


