PANEL PERFORMANCE
.NIM.NIM
MAX.
CONDITION FUNCTIONALITY
SEASONAL FUNCTIONALITY
OPTIMUM LOW
LOW MEDIUM
GOOD MEDIUM
WINTER SPRING
AUTUMNSUMMER
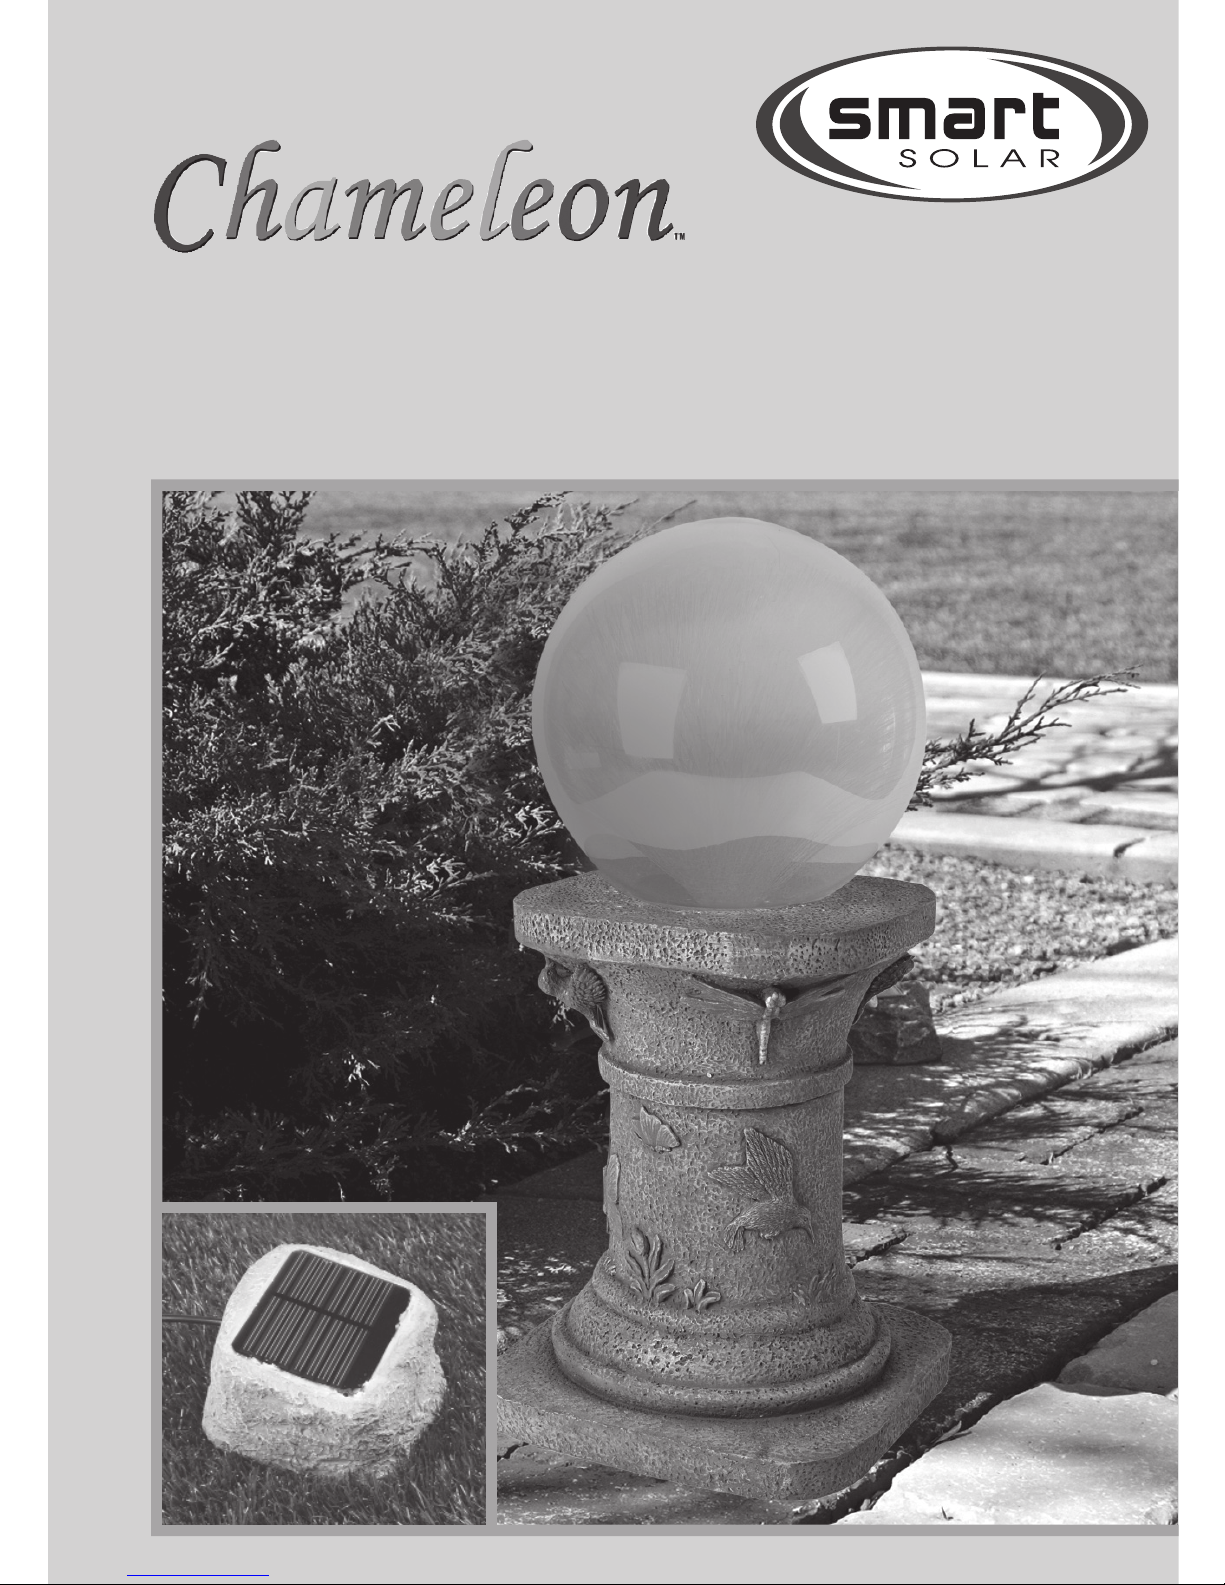
1Solar Gazing Ball Pedestal Stand.
2Glass Gazing Ball.
3Solar Rock power pack with On/Off Switch.
3. OVERVIEW
The Chameleon™ solar gazing ball is a lighted solar garden
accent. The pedestal and solar rock power pack are made
from a fiberglass/resin composite. The gazing globe itself is
made from a special glass with poly fiber optic strands
illuminated by a color changing LED. The solar rock power
panel absorbs sunlight and converts it to usable energy that is
stored in the rechargeable Ni-Mh batteries found on the
underside of the solar rock power pack. The illumination
comes from a specially designed multi-color LED. The unit will
automatically go on in the evening and go off at daylight or
when the battery pack is exhausted.
In order for your unit to operate at maximum efficiency it is
important to place the solar rock power pack in direct sunlight
and keep the solar panel free from debris and clean. The
performance of your unit will depend on the charging of the
batteries by the solar panel and will be affected by location
and the season position of the sun.
5. ASSEMBLING & USING YOUR PRODUCT
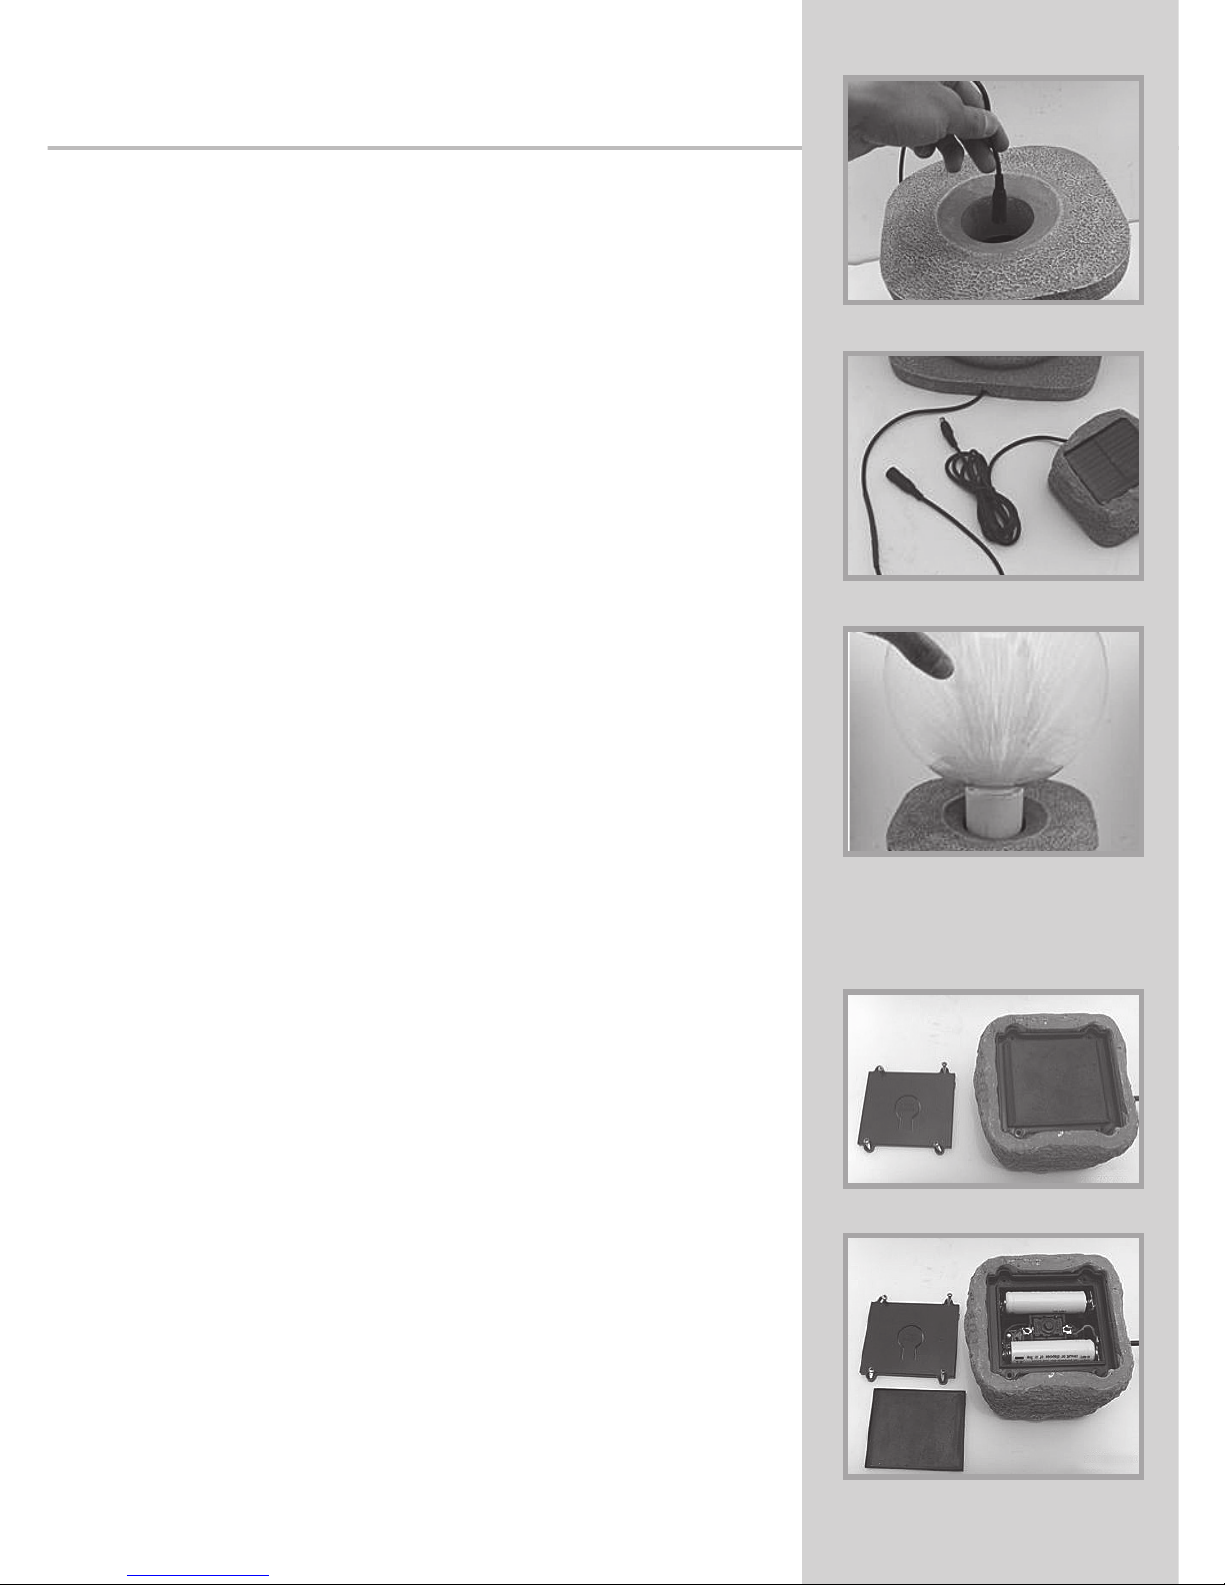
1. Carefully unpack the product from the box paying special
attention not to drop the glass gazing ball on any hard surface
since it will break if dropped.
2. Orient the base in an upside down position. Feed the long
cable from the solar rock power pack through the hole in the
center of the base (feeding the cable from the bottom first and
exiting at the top – See Figure 1)
4. Turn pedestal right side up and place in desired location.
5. Connect cable from the solar rock power pack that exited at
the top of the pedestal into the bottom of the glass gazing ball
(See Figure 2) and place gazing ball on the pedestal into the
opening. (See Figure 3)
6. Position solar rock power pack in the garden in a location that
can receive direct sunlight.
7. For optimal results allow the solar rock power pack to fully
charge for one day and then depress the on/off switch on the
bottom to activate.
Note: To check the position of the switch, cover the solar rock
power pack’s sensor with your hand and depress the on/off
switch on the underside of the solar rock power pack
If the gazing ball illuminates, the switch is in the “ON” position.
In daylight, once you take your hand off the sensor the light will
immediately go off. The solar panel will continue to charge and
the unit will illuminate automatically during darkness.
6. CLEANING AND MAINTENANCE
The solar module and glass gazing ball should be cleaned with a
soft cloth and water or a mild glass cleaning solution.
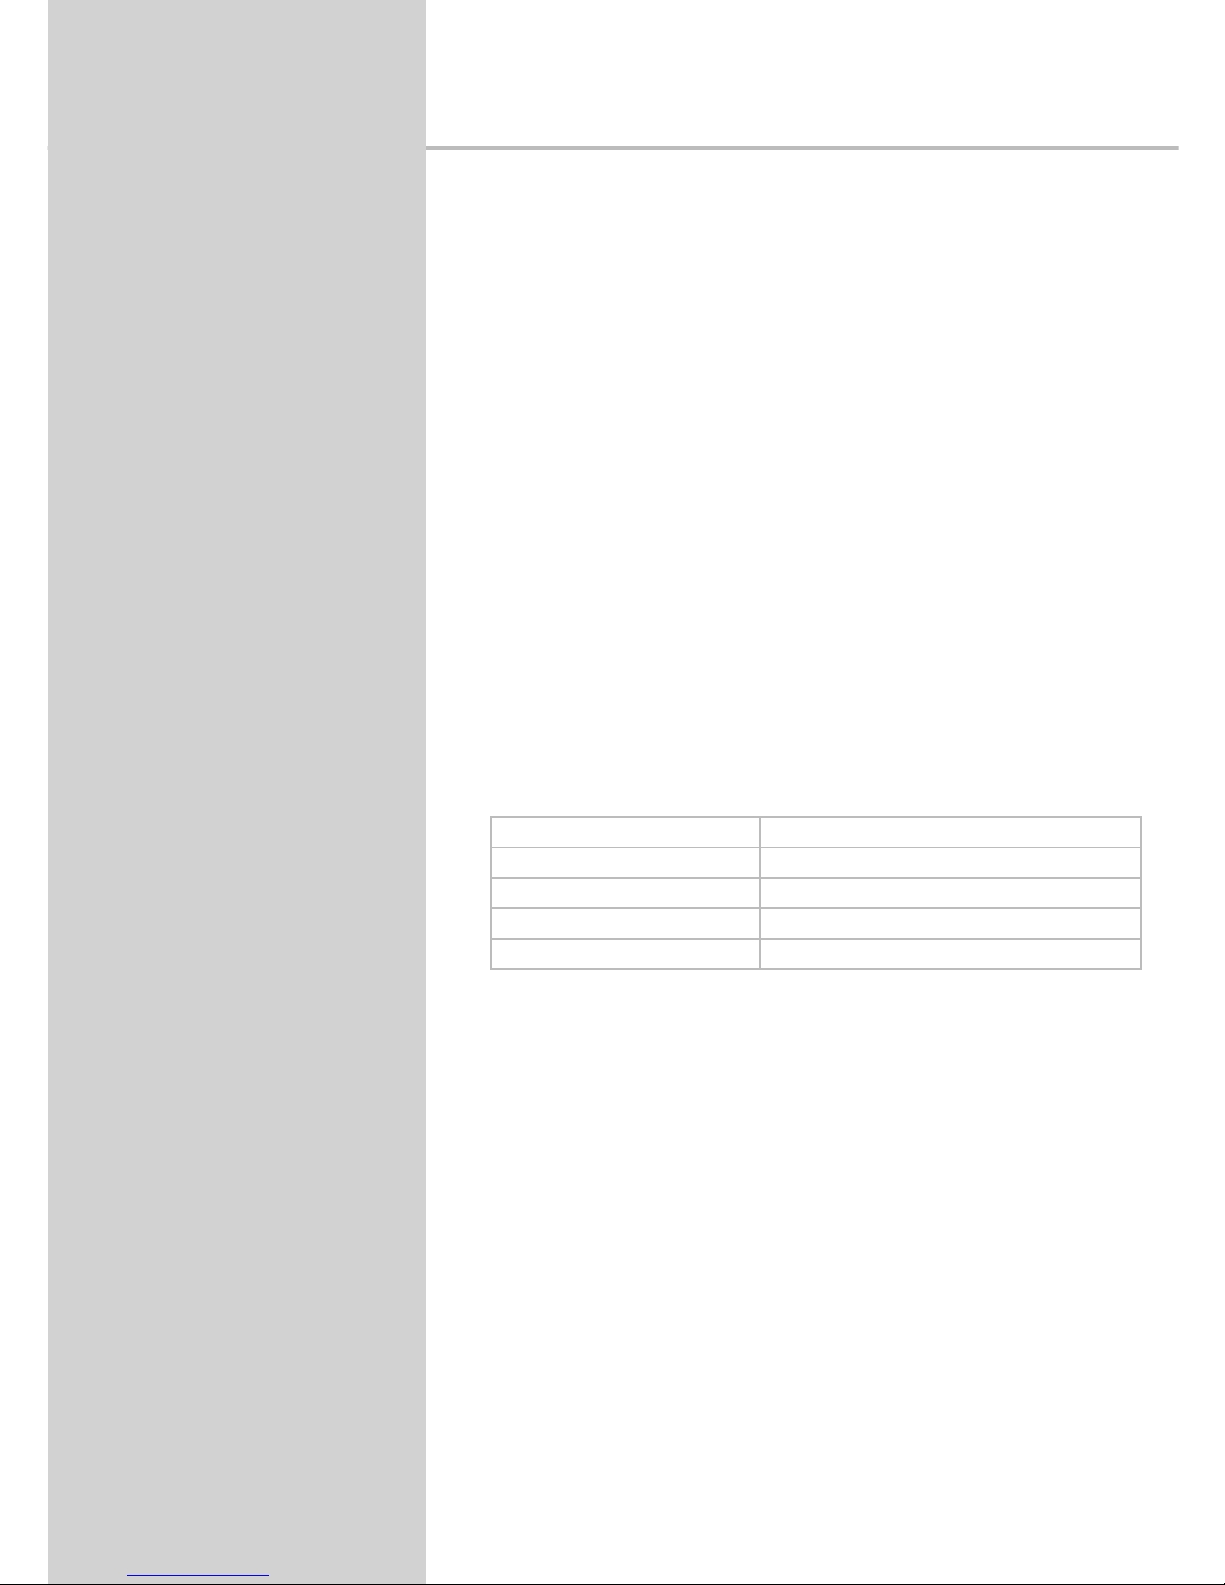
Changing of the batteries:
This product is powered by two AA x 600mAh Ni-Mh
rechargeable batteries. Under normal use, the batteries should
last approximately 2 years. It is time to replace the batteries
when the gazing glove operates for only a few hours or
becomes dim despite a full day of charging in bright sun.
To replace the batteries simply remove the screws from the
underside of the solar rock power pack. (See Figure 4) Carefully
remove the cover and the weatherproof gasket. (See Figure 5)
Remove the old batteries and replace with new Smart Solar model
BP-200 Ni-Mh 600mAh batteries. Pay attention to orient the
batteries with the “+’ and “-“ poles in the correct position. Replace
the weatherproof gasket and secure the top cover by re-fastening
all the screws. Test the batteries by covering sensor.
Please note: Used batteries must be disposed of carefully with
regard to the environment and should not be put into the family
waste. Please follow your local disposal laws accordingly.
FIGURE 1
FIGURE 2
FIGURE 3
FIGURE 4
FIGURE 5
1
2
4. COMPONENTS
ON/OFF SWITCH
3
CHAMELEON SOLAR GAZING BALL
Instruction Manual Model 3560MRM1
CHAMELEON SOLAR GAZING BALL
Instruction Manual Model 3560MRM1