Smartek ST-2000N User manual

Cord Cordless Iron
Model # ST-2000N
Operating Instructions
READ ALL INSTRUCTIONS CAREFULLY BEFORE USING THE IRON

SAFE USE OF THE IRON
When using your iron, basic safety precautions should always be followed:
1. Before using your appliance check and ensure that the voltage of the
power socket is the same as the rating marked on the iron.
2. Remove any stickers or protective foil from the soleplate.
3. Before use, unwind the cord completely.
4. Use the iron for its intended use as stated in the instruction manual.
5. Do not place the iron on any other surface other than an ironing board
during operating or on the stand provided with this model.
6. Never allow the cord to hang over the work surface.
7. When ironing different material, always start with the lowest
temperature first.
8. To protect against the risk of electric shock, do not immerse the
appliance in water or any other liquid.
9. Do not allow cord to touch hot surfaces or to come into contact with the
heated soleplate to avoid cord damage.
10. Do not operate iron if it malfunctions, or if the cord, plug, or the iron
itself has been dropped or damaged.
11. Always disconnect the iron from the outlet when filling or emptying the
water tank.
12. Do not leave the iron unattended (even for a short time) whilst plugged
in or on an ironing board. Disconnect the iron from outlet when not in
use.
13. Close supervision is necessary when any appliance is used near
children. Never allow a child to use this product.

SAFE USE OF THE IRON CONT.
14. Although the power plug has been disconnected, the remaining
temperature can produce steam. After using the appliance, put iron in a
place where children cannot reach. Empty the remaining water from the
water tank and store it only when iron is completely cooled (about half
hour after the iron is unplugged).
15. The iron’s soleplate can become extremely hot and may cause burns if
touched. Be cautious when turning iron upside down; there may be hot
water in the water tank. Burns can occur from contact with hot water or
steam. Keep ejecting steam away from the body.
16. Never yank the power cord to disconnect, instead, grasp plug and pull
to disconnect.
17. Never wrap the cord around the appliance as this can damage the cord.
When storing the iron, fold the cord neatly to avoid placing stress on the
cord.
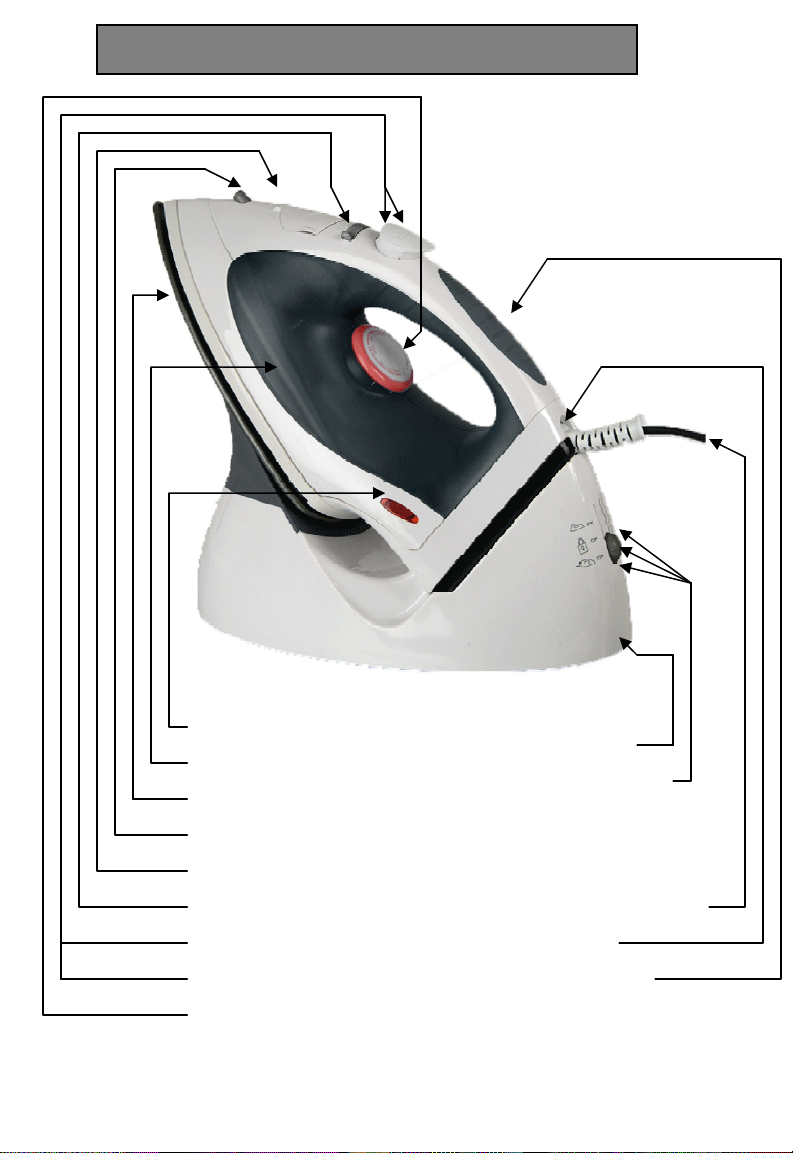
COMPONENTS IDENTIFICATION
Pilot Light
Water Tank
Soleplate
Spray Nozzle
Water Filling Inlet With Cap
Steam Control (variable)
Spray Button
Steam Burst Button
Temperature Control Dial
Locking Stand
3-Position Switch
Cordless Ironing
Locked Position
Corded Ironing
Power Cord Protector
Power Unit
Soft Touch Grip

HOW TO USE YOUR IRON
Note* It is normal for a small amount of smoke to be produced the
first time, this will quickly disappear.
When using the steam function for the first time, do not direct the
steam toward the laundry, as there could be debris from the steam
vents.
•Pull out the bracket from the locking stand and fix it on the ironing
board.
•Set the iron on the stand and plug it into the outlet.
Filling the water tank:
a) Remove the plug from the outlet and set the variable steam
control to the “0” (no steam) position.
b) Set the 3-position switch to (1) and
remove the cordless iron from the stand.
c) Fill measuring cup with water.
If the water is very hard, it is advised
to use distilled water.
d) Open the inlet cap and fill water tank
with prepared water to the maximum capacity. Do not fill over
the indicated max line. After filling, slide the cap back.
e) Pour out the remaining water after use.
SETTING TEMPERATURE:
Follow the ironing instructions on the garment label. If there are no
instructions and you know what kind of fabric your garment is, consult the
following table:

SYNTHETICS SILK WOOL LINEN COTTON
Synthetiques Sole/lanie Toile/cotton
Chemiefasem Seied/wolle Leinen/baumwolle
Note: If the fabric consists of various kinds of fabrics, always select
the temperature required by the most delicate fabric.
CORDED OR CORDLESS USE
CORDED IRONING:
•Set the 3-position switch to position (3).
•Take the iron (with the power unit) from the stand.
•Always replace the iron (with the power unit) on the stand during ironing
intervals.
CORDLESS IRONING:
•Set the 3-position switch to position (1).
•Take the iron (without the power unit) from the stand.
•Always replace the iron on the stand during ironing intervals.
•When the iron is correctly placed on the stand, the pilot light will turn
on.
•If the soleplate needs to heat up to its set
temperature, the pilot light will turn on. As soon as
the soleplate has regained the set temperature, the
light will turn off.
Note: If you intend to steam iron for a long time period, it is
advisable to use the iron in the corded position, since frequent
shots of steam can cause the soleplate to cool down.

DRY IRONING
•Make sure the steam control is set to position “0” (no steam) and
proceed to “Steam Ironing”.
•Any temperature may be used depending on the garment.
•You do not need to put water in the water tank when dry ironing only.
•The spray button may be used while dry ironing if there is water in the
water tank.
STEAM IRONING
•Fill the iron with water as described above (“Filling the water tank”) and
insert the plug into the outlet.
•Set the iron on the stand and allow the iron to heat for 2 minutes.
Note: For the first time use, allow the pilot light to turn on and off 3
consecutive times before ironing.
•The steam output can be varied from low to high by moving the steam
control
•After using for about 40 seconds, turn the steam control to OFF. Put the
iron on the stand until the pilot light (turns off. You can now steam iron
again.
•The steam feature is only possible when setting the iron to high ironing
temperatures.
SPRAYING
Press the spray button and aim the spray nozzle at stubborn creases.
When using the water spray, it may be necessary to push the spray button
a few times to get the spray pump geared to use.

STEAM BURST
•Make sure the steam control is set to position “0” (no steam).
•Press the steam burst button to release an intense shot of steam from
the soleplate to remove stubborn creases in heavy materials.
•After using for about 25 seconds, put the iron on the stand until the pilot
light turns off. You can now steam burst again.
•The steam feature is only possible when setting the iron to high ironing
temperatures.
•Do not use the steam burst feature at a temperature below the steam
range shown on the temperature control dial.
Note* For best steam quality, do not operate the steam burst button
more than 3 times in a row.
ANTI DRIP SYSTEM
This iron is equipped with a drip stop function; the iron will automatically
stop steaming when the temperature is too low to prevent water from
dripping out of the soleplate. With the anti-dripping system, you can iron
even the most delicate fabrics.
CLEANING AND STORAGE
After using, open the water filling inlet cap and hold the iron downwards to
empty the remaining water from the water tank. Put the iron on the power
base and set the temperature control dial to “MAX” for about 1-2 minutes to
evaporate remaining water. Unplug the iron and let it cool down before
storing.
In case of any repairs, replacement of cord or plug, or adjustment, please
consult a qualified technician or take the appliance to an authorized service
facility.

1 Year Limited Warranty
Smartek warrants this product free from defects in material and
workmanship for 1 year from date of purchase.
Within this warranty period, Steam-X will repair or replace, at its option,
defective parts at no charge, provided the product is returned freight
prepaid with proof of purchase. Allow 2-4 weeks for return shipping.
This warranty does not cover improper installation, misuse, abuse or
neglect on part of the owner. Warranty is also invalid in any case that
the product is taken apart or serviced by an unauthorized service
station.
Distributed By
Smartek USA Inc.,
Brooklyn, NY 11206
www.smartekusa.com
Table of contents
Other Smartek Iron manuals


