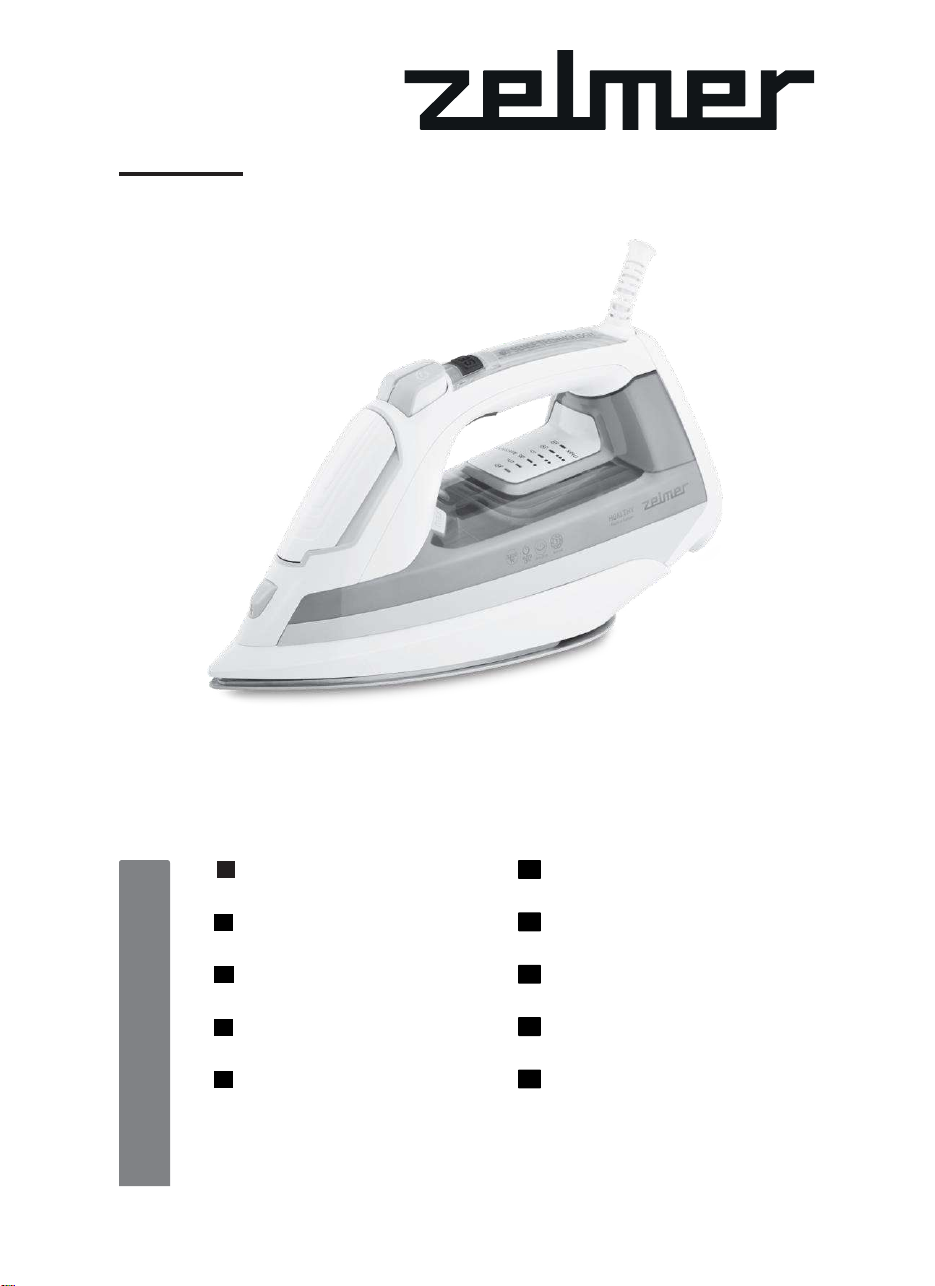
Zelmer ZIR3200 Healthy User manual

ZIR3200 Healthy
ŻELAZKO PAROWE
ПАРОВОЙ УТЮЖОК
/ Steam iron
PL
EN
DE
CZ
SK
INSTRUKCJE UŻYTKOWANIA
Żelazkoparowe
USER MANUAL
Steam iron
BENUTZERHANDBUCH
Dampfbügeleisen
NÁVOD K POUŽITÍ
Napařovací žehlička
NAVODILA ZA UPORABO
Parná žehlička
HASZNÁLATI UTASÍTÁS
Gőzölős vasaló
INSTRUCȚIUNI DE UTILIZARE
Fier cu Aburi
ИНСТРУКЦИЯ ПО ПРИМЕНЕНИЮ
Паровой утюжок
ИНСТРУКЦИИ ЗА УПОТРЕБА
Парна ютия
ІНСТРУКЦІЯ ПО ЗАСТОСУВАННЮ
Парова праска
HU
RO
RU
UA
BG
ZIR3200 Healthy

14
15
13
8 1
9
10 12 16
11
6 5
7 4
3
2

DZIĘKUJEMY ZA WYBÓR MARKI ZELMER. ŻYCZYMY SATYSFAKCJI Z UŻYTKOWANIA
URZĄDZENIA.
OSTRZEŻENIE
Przed użyciem produktu należy uważnie przeczytać instrukcję użytkowania. Przechowuj ją w
bezpiecznym miejscu do wykorzystania w przyszłości.
OPIS
1. Lampki kontrolne programu prasowania
2. Lampka kontrolna „Sense Technology”
3. Przycisk „SET”
4. Lampka kontrolna „calc”
5. Przycisk spryskiwacza
6. Przycisk wyrzutu pary
7. Lampka kontrolna „auto”
8. Zaślepka wlewu wody
9. Wylot pary wodnej
10. Oznaczenie maksymalnego poziomu napełnienia
11. Przycisk samoczynnego czyszczenia
12. Stopa żelazka
13. Podstawa
14. Kabel zasilający
15. Wyzwalacz pary wtryskowej
16. Lampki kontrolne pary wtryskowej
INSTRUKCJE DOTYCZĄCE BEZPIECZEŃSTWA
Urządzenie może być obsługiwane przez dzieci w
wieku od 8. roku życia oraz przez osoby o ograniczonej
sprawności fizycznej, sensorycznej lub psychicznej i
osoby nieposiadające wystarczającego doświadczenia
oraz wiedzy pod warunkiem, że będą one nadzorowane
lub zostaną poinstruowane w zakresie bezpiecznej
obsługi urządzenia i będą rozumiały zagrożenia
związane z taką obsługą. Nie należy dopuszczać,
aby dzieci bawiły się urządzeniem. Dzieci nie mogą
przeprowadzać czynności czyszczenia ani konserwacji
urządzenia bez nadzoru.
Jeżeli przewód zasilania jest uszkodzony, dla
bezpieczeństwa musi zostać wymieniony przez
producenta, autoryzowany serwis lub odpowiednio
wykwalifikowaną osobę.
3
PL

Żelazka nie można zostawiać bez nadzoru, jeżeli jest
podłączone do zasilania.
Wtyczkę należy wyjąć z gniazda przed napełnieniem
zbiornika wodą.
Żelazko musi być używane i przechowywane na
stabilnej i płaskiej powierzchni.
Podczas umieszczania żelazka na podstawie
należy dopilnować, aby powierzchnia, na której znajduje
się podstawa, była stabilna.
Żelazko nie może być używane, jeżeli zostało
upuszczone, przecieka lub nosi widoczne ślady
uszkodzeń.
Trzymaj żelazko i przewód poza zasięgiem dzieci
poniżej 8 roku życia.
Instrukcje bezpiecznego napełniania zbiornika wody
znajdują się w sekcji dotyczącej napełniania zbiornika
wody.
UWAGA. Gorące powierzchnie. Powierzchnie mogą być
gorące podczas używania żelazka.
WAŻNE OSTRZEŻENIA
Urządzenie przeznaczone jest wyłącznie do użytku domowego i w żadnym wypadku nie
może być używane do zastosowań komercyjnych lub przemysłowych. Nieprawidłowe używanie lub
niewłaściwa obsługa produktu powoduje unieważnienie gwarancji.
Przed podłączeniem urządzenia do sieci należy sprawdzić, czy napięcie zasilania jest takie samo, jak
wskazane na tabliczce znamionowej urządzenia.
Urządzenie należy podłączać do gniazda z uziemieniem. W przypadku używania adaptera upewnij się,
że może osiągnąć natężenie 16 A i ma wtyczkę z uziemieniem.
W trakcie korzystania z urządzenia przewód zasilający nie może być zaplątany ani owinięty
wokół urządzenia.
Nie używaj, nie podłączaj ani nie odłączaj urządzenia od sieci, mając mokre dłonie lub stopy.
Nie ciągnij za przewód zasilający w celu odłączenia urządzenia. Nie używaj przewodu do
wieszania urządzenia.
Nie kieruj strumienia pary bezpośrednio w stronę ludzi ani zwierząt.
Nie podstawiaj urządzenia pod kran w celu napełnienia zbiornika. Nie zanurzaj urządzenia w wodzie
ani innych płynach.
4
PL

W przypadku jakiejkolwiek awarii lub uszkodzenia natychmiast odłącz urządzenie od sieci i skontaktuj
się z autoryzowanym serwisem. Aby zapobiec niebezpieczeństwu, nie należy otwierać obudowy
urządzenia.
Naprawy lub procedury dotyczące urządzenia może wykonywać tylko wykwalifikowany personel z
oficjalnego działu wsparcia technicznego marki.
Nie wolno wystawiać urządzenia na działanie wody ani warunków atmosferycznych.
Urządzenie osiąga wysokie temperatury i wytwarza parę podczas działania, co w razie
nieprawidłowego użytkowania grozi poparzeniami.
Nie wolno dopuszczać do zetknięcia się kabla zasilającego z gorącą stopą żelazka.
Urządzenie należy czyścić według wskazówek znajdujących się w sekcji dotyczącej konserwacji i
czyszczenia.
EUROGAMA SP. Z O. O. nie ponosi odpowiedzialności za szkody poniesione przez ludzi, zwierzęta
lub przedmioty z powodu niestosowania się do ostrzeżeń.
Przed pierwszym użyciem
Przed użyciem generatora pary przeczytaj instrukcję obsługi i upewnij się, że budowa urządzenia i
jego funkcje są zrozumiałe. Przed użyciem urządzenia po raz pierwszy usuń wszelkie materiały
opakowaniowe i etykiety.
Przy pierwszym użyciu nie należy używać generatora bezpośrednio na ubraniach, ponieważ na stopie
mogą znajdować się zabrudzenia. Z urządzenia mogą też uwalniać się zapachy lub opary.
SPOSÓB UŻYCIA
Nagrzewanie
Sprawdź, czy prasowany wyrób zawiera metkę z instrukcjami dotyczącymi prasowania. We wszystkich
przypadkach należy stosować się do tych instrukcji.
Naciśnij przycisk „SET”, aby ustawić odpowiednią temperaturę podaną w instrukcjach prasowania lub
na metce.
Program
Rodzaj tkaniny
AntiShine •
Ciemne i delikatne tkaniny. Zmniejsza ryzyko
powstawania wyświeceń.
••
Jedwab i wełna
•••
Bawełna
Max
Tkaniny lniane
SmartCare
Wszystkie rodzaje tkanin
Higiena
Program SmartCare
Wybranie tego programu spowoduje ustawienie kombinacji temperatury i pary odpowiedniej dla
wszystkich tkanin nadających się do prasowania (symbole ).
Program SmartCare zapobiega uszkadzaniu odzieży wskutek wybrania niewłaściwej temperatury.
Program SmartCare nie jest odpowiedni dla tkanin, które nie są przeznaczone do prasowania (symbol
). Zapoznaj się z informacjami podanymi na metce lub spróbuj uprasować fragment tkaniny, który
jest niewidoczny.
5
PL

Program Higiena
Odpowiedni dla wszystkich rodzajów tkanin i wyjątkowo wydajny zarówno w przypadku materiału
grubego, jak i delikatnego. Wyjątkowe połączenie temperatury oraz pracy przerywanej zapewnia
ziałanie odkażające bez potrzeby stosowania dodatków chemicznych.
1. Przyłóż żelazko do odzieży lub tkaniny, którą chcesz odkazić.
2. Naciskaj przycisk uwalniania pary (15), żeby emitować silne strumienie odkażającej pary. Powoli
uprasuj całą powierzchnię, żeby osiągnąć najlepszy efekt.
Uwaga: ustawienie energooszczędne Eco nie zadziała w trakcie korzystania z programu Higiena.
Uwaga: program Higiena automatycznie przełączy się na program SmartCare po upływie 20 minut.
Zmiana zostanie zasygnalizowana 3 sygnałami dźwiękowymi oraz pięciokrotnym zaświeceniem się
lampek. Jeśli chcesz kontynuować korzystanie z programu Higiena, wybierz inny program za pomocą
pokrętła (1), a następnie ponownie ustaw program Higiena.
Włóż wtyczkę do gniazda ściennego. Żelazko wyda jeden sygnał dźwiękowy. Żelazko automatycznie
przełączy się na program temperatury „SmartCare”. Aby wybrać inny program, należy nacisnąć przycisk
SET.
Po osiągnięciu wybranej temperatury lampka wskaźnika zgaśnie, co oznacza, że można rozpocząć
prasowanie.
Napełnianie zbiornika wody
Przed rozpoczęciem napełniania zbiornika odłączyć żelazko od zasilania.
Woda
Urządzenie należy napełniać wodą z kranu. Jeżeli woda w miejscu używania żelazka jest twarda lub
półtwarda, należy używać mieszanki wody z kranu z wodą destylowaną lub demineralizowaną w proporcji,
odpowiednio, 2:1 i 1:1 (woda destylowana : woda z kranu). Skontaktuj się z dostawcą wody w celu
ustalenia rodzaju wody w miejscu używania żelazka. Nie używaj wody destylowanej lub demineralizowanej,
wody deszczowej, wody zmiękczanej, wody zapachowej, wody z innych urządzeń, np. z chłodziarek,
klimatyzatorów, suszarek lub innych rodzajów wody przygotowanej wdomu.
Ważne: Nie wolno stosować żadnych dodatków!
1. Otwórz zaślepkę wlotu wody.
2. Powoli wlej wodę przez wlot.
3. Nie przekraczaj poziomu wskazanego na zbiorniku wody w celu uniknięcia rozpryskiwania się wody.
4. Zamknij pokrywę do napełniania.
Zbiornik na wodę należy opróżniać po każdym użyciu.
Spryskiwanie
Jeżeli w zbiorniku wody jest wystarczająca jej ilość, można używać przycisku spryskiwacza przy
dowolnym ustawieniu temperatury podczas prasowania parowego lub na sucho.
Prasowanie parowe
1. Ustaw pokrętło regulacji temperatury na wybraną pozycję zgodnie z metką producenta.
2. Dioda LED wybranej temperatury zacznie mrugać do momentu osiągnięcia wybranej temperatury.
Następnie dioda LED zacznie świecić światłem ciągłym, a żelazko wyda sygnał dźwiękowy.
UWAGA: Należy unikać kontaktu z generowaną parą.
Żelazko generuje parę przy użyciu wbudowanego silnika i ma dwa tryby produkowania pary. Tryb można
zmienić poprzez dwukrotne wciśnięcie przycisku aktywacji silnika.
Tryb automatyczny
Wskaźnik „auto” jest włączony.
Żelazko automatycznie ustawi odpowiednią ilość pary, która jest dostosowana do wybranego programu
prasowania. Para generowana jest w sposób ciągły.
6
PL

Tryb manualny
Wskaźnik „auto” jest wyłączony..
Produkcja pary kontrolowana jest manualnie wyłączne podczas prasowania przy użyciu pary.
W celu prasowania przy użyciu pary należy wcisnąć przycisk aktywacji silnika.
W celu prasowania bez użycia pary (prasowanie na sucho) nie należy wciskać przycisku aktywacji
silnika.
Prasowanie na sucho
Żelazka parowego można używać do prasowania na sucho z wodą lub bez wody w zbiorniku. Należy
unikać prasowania na sucho z pełnym zbiornikiem wody.
Ustaw tryb „MANUAL STEAM”. Nie wciskaj przycisku aktywacji silnika.
Za pomocą pokrętła regulacji temperatury wybierz pozycję, która najlepiej nadaje się do prasowanego
materiału.
OSTRZEŻENIE: Jeżeli żelazko parowe było używane przez dłuższy czas, jest ciepłe i nie ma w nim wo.dy,
nie napełniaj żelazka wodą do czasu, aż się ochłodzi.
Wyrzut pary
Funkcja wyrzutu pary zapewnia dodatkową parę do usuwania uporczywych zagnieceń.
Ustaw pokrętło regulacji temperatury co najmniej na pozycję „●●max”.
Przyciśnij przycisk dodatkowej pary w celu uwolnienia strumienia pary.
Uwaga: Aby zapobiec wyciekaniu wody ze stopy, nie naciskaj przycisku dodatkowej pary w sposób
ciągły i odczekaj około 5 sekund między kolejnymi naciśnięciami.
Prasowanie w pionie
Ustaw pokrętło regulacji temperatury na pozycję „MAX”.
Naciskaj przycisk wyrzutu pary w odstępach, można również prasować w pionie (zasłony, ubrania na
wieszakach itp.).
Uwaga: Aby zapobiec wyciekaniu wody ze stopy, nie naciskać przycisku dodatkowej pary w sposób
ciągły i odczekaj około 5 sekund między kolejnymi naciśnięciami.
Po zakończeniu prasowania
1. Odłącz wtyczkę od gniazdka ściennego.
2. Opróżnij zbiornik na wodę
3. Ustaw żelazko na podstawce.
4. Luźno zwiń kabel zasilający wokół podstawy żelazka.
KONSERWACJA I CZYSZCZENIE
Zaleca się, aby przeprowadzać samoczynne czyszczenie co dwa tygodnie, jeżeli woda w miejscu
używania żelazka jest twarda lub półtwarda, a żelazko jest używane często.
Przed czyszczeniem żelazka parowego upewnij się, że jest odłączone od zasilania i całkowicie ostygło.
Nie używaj ściernych środków czyszczących.
Do czyszczenia zewnętrznej powierzchni używaj zwilżonej miękkiej ścierki i wycieraj urządzenie do
sucha. Nie używaj rozpuszczalników, ponieważ uszkodzą powierzchnię urządzenia.
Czyszczenie stopy: nie używać czyścików lub ostrych gąbek do czyszczenia stopy, ponieważ mogą
uszkodzić powierzchnię. W celu usunięcia przypaleń przesuń ciepłym żelazkiem po wilgotnej ściereczce.
W celu wyczyszczenia stopy przetrzyj ją miękką, wilgotną ściereczką i osusz.
7
PL

Samoczynne czyszczenie
Po pewnym czasie użytkowania zaświeci się lampka ostrzegawcza czyszczenia automatycznego „calc”
wskazująca, że należy przeprowadzić proces samoczyszczenia.
1. Napełnij zbiornik wody.
2. Ustaw pokrętło regulacji temperatury na pozycję maksimum.
3. Włóż wtyczkę do gniazdka ściennego.
4. Odczekaj, aż żelazko nagrzeje się, a lampka wskaźnika zgaśnie.
5. Odłącz żelazko parowe od zasilania (bardzo ważne!).
6. Przytrzymaj żelazko nad zlewem. Naciśnij przycisk „clean” i potrząsaj żelazkiem do czasu aż około
jednej trzeciej pojemności zbiornika wyparuje. Wrząca woda i para odprowadzą zanieczyszczenia przez
otwory w stopie.
7. Gdy z żelazka przestanie kapać woda, zwolnij przycisk. Ostrożnie sprawdź, czy zbiornik na wodę
jest pusty (bardzo ważne!).
8. Następnie podłącz żelazko do zasilania i nagrzej je do czasu odparowania pozostałej ilości
wody.
9. Przytrzymaj przycisk „SET” przez trzy sekundy lub do momentu, gdy zgaśnie lampka „calc”.
10. Odłącz żelazko i pozostaw stopę do ostygnięcia.
11. Przesuń żelazkiem po starym kawałku tkaniny. W ten sposób żelazko będzie suche podczas
przechowywania.
Zaleca się, aby przeprowadzać samoczynne czyszczenie co najmniej raz na dwa tygodnie.
System antywapienny
żywiczny jest zamontowany na stałe i nie wymaga wymiany.
Ważne:
nie używać dodatków chemicznych, substancji zapachowych lub odkamieniaczy. Niezastosowanie się
do tego zalecenia prowadzi do utraty gwarancji.
Filtr samoczyszczący
Filtr samoczyszczący chroni silnik przed zablokowaniem.
Technologia czujników
Uchwyt żelazka zawiera czujnik, który po wybraniu pary zmiennej włączy funkcję pary zmiennej, gdy
ręką dotyka się uchwytu od strony górnej. Gdy żelazko nie jest używane, funkcja pary zmiennej zostanie
wyłączona.
Po wstępnym nagrzaniu funkcja technologii czujników wyłącza żelazko, gdy nie jest używane,
zwiększając tym samym bezpieczeństwo i oszczędność energii.
1. Podczas trzymania uchwytu żelazko nagrzewa się.
2. Po puszczeniu uchwytu żelazko przestaje się nagrzewać. Lampka wskaźnika zacznie migać.
Para wtryskowa
Urządzenie jest wyposażone w system pary wtryskowej, który wtryskuje wodę do stopy, aby
zapewnić większe przenikanie pary do tkaniny. Funkcja ta jest sygnalizowana niewielką wibracją, gdy
produkt działa w trybie prasowania parowego.
Automatyczne wyłączanie
Żelazko parowe jest wyposażone w układ automatycznego wyłączania. Układ zatrzymuje nagrzewanie
żelazka. Jeżeli żelazko jest postawione na podstawie i nie jest używane przez około 30 sekund, rozlegnie
się dźwięk ostrzeżenia, a ponadto włączy się lampka sygnalizacyjna automatycznego wyłączania
temperatury / lampka sygnalizacyjna automatycznego wyłączania zacznie migać. Żelazko przestanie
się nagrzewać. Aby wyłączyć automatyczne wyłączanie, podnieś żelazko i delikatnie nim porusz z
boku na bok. Lampka sygnalizacyjna automatycznego wyłączania temperatury / lampka sygnalizacyjna
automatycznego wyłączania zgaśnie, a żelazko ponownie zacznie się nagrzewać.
8
PL

Problem
Potencjalna przyczyna
Rozwiązanie
Żelazko się nie nagrzewa.
Funkcja technologii czujników
została aktywowana. Żelazko jest
w trybie czuwania.
Należy złapać uchwyt żelazka,
aby je ponownie włączyć.
Podczas korzystania z
funkcji wyrzutu pary woda
kapie z podkładki.
Kilkukrotnie naciśnięto przycisk
wyrzutu pary, nie czekając
5 sekund pomiędzy każdym
naciśnięciem.
Poczekać 5 sekund pomiędzy
każdym naciśnięciem przycisku
wyrzutu pary.
Nadmierne kapanie lub
parowanie.
Nieprawidłowo zamknięty przycisk
„clean”.
Skierować żelazko z dala od
miejsca prasowania. Kilkukrotnie
wcisnąć przycisk „clean”.
Stopa jest brudna lub
przypalona i może
plamić ubrania. Ubranie
przywiera do stopy.
Prasujesz ze zbyt wysoką
temperaturą.
Ustaw pokrętło temperatury na
niższą
pozycję.
Silnik nie działa.
Stopa się nagrzewa.
Poczekaj, aż wybrana
temperatura zostanie osiągnięta.
Po włączeniu zasilania
z żelazka wydobywa się
dym.
Przy pierwszym użyciu: na
niektóre części urządzenia jest
fabrycznie nałożony smar, przez
co przy pierwszym nagrzaniu
może powstać niewielka ilość
dymu.
Jest to całkowicie normalne i po
chwili ustaje.
Przez otwory w stopie
wydostają się białe
zacieki.
W produkcie wytworzył się kamień,
ponieważ wkład antywapienny nie
był regularnie zmieniany.
Wykonać cykl czyszczenia.
Przeprowadź proces
samoczynnego czyszczenia.
Urządzenie wydaje dźwięk
pompowania.
Woda jest pompowana do żelazka.
Zbiornik wody jest pusty.
Lampka ostrzegawcza
automatycznego
czyszczenia „calc” miga.
Przypomnienie o
„samoczyszczeniu” zostało
aktywowane.
Wykonać cykl czyszczenia.
Przeprowadź proces
samoczynnego czyszczenia.
Jeżeli żelazko jest postawione na podstawie i nie jest używane przez około 10 sekund, rozlegnie się
dźwięk ostrzeżenia, a ponadto lampka sygnalizacyjna automatycznego wyłączania zacznie migać.
Żelazko przestanie się nagrzewać. Aby wyłączyć automatyczne wyłączanie, podnieś żelazko i delikatnie
nim porusz z boku na bok. Lampka sygnalizacyjna automatycznego wyłączania zgaśnie, a żelazko
ponownie zacznie się nagrzewać.
Rozwiązywanie problemów
9
PL

PORADY DOTYCZĄCE UTYLIZACJI
Nasze produkty są optymalnie pakowane. Oznacza to przede wszystkim stosowanie nieszkodliwych
dla środowiska materiałów, które należy przekazać do lokalnego przedsiębiorstwa gospodarki odpadami
ako surowce wtórne. Informacji na temat utylizowania zużytych urządzeń udziela administracja lokalna.
To urządzenie jest oznaczone zgodnie z Dyrektywą Europejską 2012/19/UE oraz polską
Ustawa z dnia 11 września 2015 r. „O zużytym sprzęcie elektrycznym i elektronicznym”
(Dz.U. z dn. 23.10.2015 poz. 11688) symbolem przekreślonego kontenera na odpady.
Takie oznakowanie informuje, że sprzęt ten, po okresie jego użytkowania nie może być umieszczany
łącznie z innymi odpadami pochodzącymi z gospodarstwa domowego.
Użytkownik jest zobowiązany do oddania go prowadzącym zbieranie zużytego sprzętu
elektrycznego i elektronicznego. Prowadzący zbieranie, w tym lokalne punkty zbiórki, sklepy oraz
gminne jednostki, tworzą odpowiedni system umożliwiający oddanie tego sprzętu.
Właściwe postępowanie ze zużytym sprzętem elektrycznym i elektronicznym przyczynia się do
uniknięcia szkodliwych dla zdrowia ludzi i środowiska naturalnego konsekwencji, wynikających z
obecności składników niebezpiecznych oraz niewłaściwego składowania i przetwarzania takiego
sprzętu.
Mamy nadzieję, że produkt przyniesie Państwu wiele satysfakcji.
10
PL

WE WOULD LIKE TO THANK YOU FOR CHOOSING ZELMER. WE WISH THE PRODUCT
PERFORMS TO YOUR SATISFACTION AND PLEASURE.
WARNING
Please read the instructions for use carefully prior to using the product. Store these in a safe place for
future reference.
DESCRIPTION
1. Ironing programme indicator lamps
2. “Sense Technology” indicator lamp
3. “SET” button
4. “calc” indicator lamp
5. Spray button
6. Shot of steam button
7. “auto” indicator lamp
8. Water inletlid
9. Spray nozzle
10. Level mark for maximum filling
11. Self-cleaning button
12. Soleplate
13. Heel
14. Power cable
15. “Injection Steam” activation trigger
16. “Injection Steam” indicator lamps
SAFETY INSTRUCTIONS
This appliance can be used by children aged from 8
years and above and persons with reduced physical,
sensory or mental capabilities or lack of experience
and knowledge if they have been given supervision or
instruction concerning use of the appliance in a safe
way and understand the hazards involved. Children
shall not play with the appliance. Cleaning and user
maintenance shall not be made by children without
supervision.
If the supply cord is damaged it must be replaced by
the manufacturer, its service agent or similarly qualified
persons in order to avoid a hazard.
The iron must not be left unattended while it is
connected to the supply mains.
11
EN

The plug must be removed from the socket-outlet
before the water reservoir is filled with water.
The iron must be used and rested on a flat, stable
surface
When placing the iron on its stand, ensure that the
surface on which the stand is placed is stable.
The iron is not to be used if it has been dropped, if there
are visible signs of damage or if it is leaking.
Keep the iron and its cord out of reach of children less
than 8 years of age when it is energized or cooling
down.
Instruction for the safe refilling of the water reservoir are
given in filling the water tank section.
CAUTION Hot surfaces. Surfaces are liable to
get hot during use.
IMPORTANT WARNINGS
This appliance is designed for home use and should never be used for commercial or industrial use
under any circumstances. Any incorrect use or improper handling of the product shall render the
warranty null and void.
Prior to plugging in the product, check that your mains voltage is the same as the one indicated on the
product label.
If you use one adaptor, make sure it can reach 16 A and is provided with earth socket
The mains connection cable must not be tangled or wrapped around the product during use.
Do not use the device, or connect and disconnect to t supply mains with the hands and / or feet wet.
Do not pull on the connection cord in order to unplug it or use it as a handle
Do not direct steam at people and animals.
Do not place the appliance under the tap to fill the water tank, or immerse it in water or other liquids.
In order to avoid that, under unfavorable mains conditions, phenomena like transient voltage drops or
lighting fluctuations can happen, it is recommended that the iron is connected to a power supply system
with a maximum impedance of 0.28 Ω. If necessary, the user can ask the public power supply company
for the system impedance at the interface point.
Unplug the product immediately from the mains in the event of any breakdown or damage and contact
an official technical support service. In order to prevent any risk of danger, do not open the device. Only
qualified technical personnel from the brand´s Official technical support service may carry out repairs or
procedures on the device. Only an official technical support service center may carry out repairs on this
product.
12
EN

Programme
Suitable for
AntiShine •
Dark and delicate fabrics. Reduces the risk of shiny
marks
••
Silk-Wool
•••
Cotton
Max
Linen
SmartCare
All fabrics can be ironed
Proceed according to maintenance and cleaning section of this manual for cleaning
EUROGAMA SP. Z O. O. disclaims all liability for damages that may occur to people, animals or
objects, for the non-observance of these warnings.
Before the first use
Before using the steam iron, please ensure you read the user manual and understand all parts and
features of the steam iron. Be sure to remove any packaging material and labels before using for the first
time.
In the first use they can break off odors or fumes that sent quickly. Do not spray for the first time on
clothes and there may be traces of dirt on the soleplate.
HOW TO USE
Heating
Always check whether a label with ironing instructions is attached to an article to be ironed. Follow these
instructions in all cases.
Press the “SET” button to set the appropriate temperature indicated in ironing instructions or in fabric
label.
“SmartCare” programme
If this program is selected, an appropriate combination of temperature and steam is set, which is suitable
for all fabrics that can be ironed (symbols ).
The “SmartCare” program prevents clothes from being damaged due to an unsuitable temperature being
selected.
The “SmartCare” program does not apply to fabrics that cannot be ironed (Symbol ). Please, check
the garment care label for details or try ironing on a part of the cloth not visiblenormally.
“Healthy” programme
Suitable for all kind of fabrics and extremely efficient for both thick and delicate garments. The unique
combination of temperature and interval provides a sanitizing effect requiring no chemical additives.
1. Place the iron on the garment or fabric you want to disinfect.
2. Continuously press the steam release button (15) to release powerful shots of hygienic steam. Slowly
iron the whole garment to enhance the final result.
Note: The energy saving setting “Eco” cannot be activated while the “Healthy” programme is selected.
Note: The “Healthy” programme changes automatically to “SmartCare” after 20 minutes. The change
will be indicated by 3 beeps and the indicator lights will flash 5 times. If you want to continue using the
“Healthy” programme, you would have to change to another programme by turning the programme
selector (1) and then coming back to the “Healthy” programme again.
Insert the main plug into the wall socket. One beep will be heard. The iron will shift automatically to the
13
EN

“SmartCare” temperature programme. If you want to change to another programme, please press the
SET button.
Once the selected temperature is reached, the indicator light will turn off, indicating you may start
ironing.
Water tank filling
Unplug the iron before filling the water tank.
The device is designed for use with tap water. If the water in your area is hard or semi-hard use mix
tap water with distilled or demineralized water purchased in stores, in the ratio 2:1 and 1:1 respectively
(distilled water: tap water). Check with your water supplier to determine the type of water in your area.
Never use 100% distilled or demineralized, rainwater, softened water, scented water, water from other
appliances such as refrigerators, air conditioners, dryers or other types of home water preparation water.
1. Open the cover for filling.
2. Slowly pour water through the water inlet.
3. Do not fill higher than mark on the water tank, in order to avoid spilling out ofwater.
4. Close the cover for filling.
The water tank should be emptied after each use.
Spraying
As long as there is enough water in the water tank, you may use the spray button at any temperature
setting during steam or dry ironing.
Steam ironing
1. Set the temperature control dial to the desired position in accordance with the manufacturer’s label.
2. The LED of the selected temperature will start blinking until the temperature is reached. Then the LED
will become fixed and you will hear an acoustic sound.
CAUTION: Avoid coming in contact with ejected steam.
This iron generates steam by means of a built-in motor, and has two steam production modes. The mode
can be changed by double-clicking the motor activation trigger.
Autosteam mode
The “auto” indicator lamp is on.
The iron will automatically set the appropriate steam amount that is suitable for the selected ironing
programme. The steam will be produced continuously.
Manual steam mode
The “auto” indicator lamp is off.
Steam production can be controlled manually for steam ironing only when necessary.
For ironing with steam, press the motor activation trigger.
For ironing without steam (dry ironing), do not press the motor activation trigger.
Dry ironing
The steam iron can be used on the dry setting with or without water in the water tank, it is best to avoid
having the water tank full while dry ironing.
Set the “MANUAL STEAM” mode. Do not press the motor activation trigger.
Select the setting on the temperature control dial best suited for the fabric to be ironed.
CAUTION: If the steam iron has been used for a long time, it is hot and there is no water. Do not refill it
with water until the steam iron cools down.
Shot of steam
The shot of steam feature provides additional steam for removing stubborn wrinkles.
14
EN

Set the temperature control to at least the “●●max” position.
Press the powerful steam button to release the burst of steam.
NOTE: To prevent water leakage from the soleplate, do not keep the powerful steam button in
continuously and wait almost 5 seconds between pressures.
Vertical ironing
Set the temperature control to “max”.
By pressing the shot-steam button at intervals you can also iron vertically (curtains, hung garments, etc.)
NOTE: To prevent water leakage from the soleplate, do not keep the powerful steam button in
continuously and wait almost 5 seconds between pressures.
When you finished ironing
1. Remove the main plug from the wall socket.
2. Empty the water tank
3. Stand the iron on heel rest.
4. Coil the power cable loosely around the heel of the iron.
MANITENANCE AND CLEANING
It is recommended to do the self-cleaning every two weeks if the water in the area is hard or semi-hard if
frequent use of the device is made
Before cleaning the steam iron ensure it is unplugged from the power supply and has completely cooled
down.
Do not use abrasive cleaners.
To clean exterior surfaces, use a damp soft cloth and wipe dry. Do not use any chemical solvents, as
these will damage the surface.
Cleaning the soleplate; Do not use scouring pads or harsh cleaners on the soleplate as these will
damage the surface. To remove burnt residue, iron over a damp cloth while iron is still hot. To clean the
soleplate, simply wipe with soft damp cloth and wipe dry.
Self-cleaning
After a period of use, the automatic clean warning lamp “calc” flashes, indicating that the self-clean
process must be performed.
1. Fill the water reservoir.
2. Set the temperature control to its maximum position.
3. Insert the main plug into the wall socket.
4. Allow the iron to heat up until the indicator light turns off.
5. Unplug the steam iron (very important!)
6. Hold the iron over a sink. Press the “clean” button and shake the iron until approximately one third of
the water capacity of the tank is evaporated. Boiling water and steam will be ejected from the holes in
soleplate with impurities washed out
7. When the iron stops dripping, release the button. Check carefully that the water tank is empty (very
important!).
8. Then plug the iron in and heat it up again until the remaining water hasevaporated.
9. Press the “SET” button for three seconds or until the “calc” lamp goes off.
10.Unplug the iron and let the soleplate cool down.
11.Move the iron over an old (preferably) piece of cloth. This ensures that the soleplate will be dry during
storage.
It is recommended to do the self-cleaning at least every two weeks.
15
EN

Please note:
Anti-calc system
A special resin filter inside the water reservoir softens the water and prevents scale build-up in the plate.
The resin filter is permanent and does not need replacing.
Please note:
Do not use chemical additives, scented substances or decalcifies. Failure to comply with the above-
mentioned regulation leads to the loss of guarantee.
Self clean filter
The “self-clean” filter prevents motor from blocking.
Sense technology
The iron handle incorporates a sensor that, when the variable steam is selected, will turn on the variable
steam function while the hand touches the handle from the upper part. If the iron is not touched the
variable steam function will be stopped.
After the initial heating, “Sense Technology” function switches off the iron when it is left unattended, thus
increasing security and saving energy.
1. While the handle is gripped, the iron heats up.
2. When the handle is released, the iron stops heating up. The indicator lamp willflash.
Injection steam
The appliance has an injection steam system that injects water to the soleplate in order to facilitate a
greater penetration of steam into the garments. You will notice this function as a small vibration when
product is working under steam ironing function.
Auto shut-off
This steam iron is fitted with an automatic switch-off system. This stops the iron from heating up, if the
iron is resisting on its sole and is not moved for about 30 seconds, there will be a warning beep and the
control lamp for the automatic switch-off temperature / automatic switch-off control lamp flashes. The
iron will stop heating up. To deactivate the automatic switch-off, lift up the iron and move it gently from
side to side. The control lamps for the automatic switch-off temperature / automatic switch-off control
lamp goes out and the iron will head up again.
If the iron is resisting on its base and is not moved for about 10 seconds, there will be a warning beep
and the control lamp for the automatic switch-off lamps will flash. The iron will stop heating up. To
deactivate the automatic switch-off, lift up the iron and move it gently from side to side. The control
lamps for the automatic switch-off goes out and the iron will heat up again.
16
EN

Problem
Possible cause
Solución
The iron does not heat up.
The “Sense Technology” function
has been activated. The iron is set
to stand-by.
Grip the handle of the iron to
re-start it.
The clothes tend to stick.
The temperature of the soleplate
is too high.
Select a lower temperature and
wait until the iron has cooled
down.
Water drips out of the
soleplate when using the
shot of steam function.
You have pressed the shot of
steam button repeatedly without
waiting for 5 seconds between
each press.
Wait 5 seconds between each
press of the shot of steam
button.
Excessive dripping or
steaming.
No proper closing of “clean”
button.
Point the iron away from the
ironing area. Actuate a few
times the “clean” button.
The motor does not work.
1. The iron is not in ahorizontal
position.
2. The soleplate is heating up.
1. Use the iron in a horizontal
position.
2. Wait until theselected
temperature is reached.
Smoke comes out when
connecting the iron for the
first time.
This may be caused by the
lubrication of some of the internal
parts.
This is normal and will stop
after a few minutes.
Deposits come out through
the holes in the soleplate.
Traces of lime scale are coming
out of the steam chamber.
Carry out a cleaning cycle
(see “Self-cleaning function”
section).
The appliance makes a
pumping sound.
Water is being pumped into the
steam chamber.
This is normal.
The automatic clean
warning lamp “calc” flashes.
The “Self-cleaning” reminder has
been activated.
Carry out a cleaning cycle
(see “Self-cleaning function”
section).
Troubleshooting
17
EN

PRODUCT DISPOSAL
This product complies with European Directive 2012/19/EU on electrical and electronic
devices, known as WEEE (Waste Electrical and Electronic Equipment), provides the legal
framework applicable in the European Union for the disposal and reuse of waste electronic
and electrical devices. Do not dispose of this product in the bin, instead going to the electrical
and electronic waste collection centre closest to your home.
We hope that you will be satisfied with this product.
18
EN

WIR MÖCHTEN UNS BEI IHNEN BEDANKEN, DASS SIE SICH FÜR ZELMER ENTSCHIEDEN
HABEN. WIR HOFFEN, DASS DAS PRODUKT ZU IHRER ZUFRIEDENHEIT UND IHREM
VERGNÜGEN FUNKTIONIERT.
ACHTUNG
Bitte lesen Sie die Gebrauchsanweisung vor der Anwendung des Produkts aufmerksam durch.
Bewahren Sie diese zur späteren Einsichtnahme an einem sicheren Ort auf.
BESCHREIBUNG
1. Kontrollleuchten für das Bügelprogramm
2. Anzeigelampe „Sense Technology“
3. “Set-Taste
4. Anzeigelampe „calc“
5. Sprühtaste
6. Betätigung der Dampftaste
7. Kontrollleuchte “Auto”
8. Abdeckung für Einfüllöffnung
9. Ausstoß des Wassersprays
10. Füllstandsmarkierung für maximale Befüllung
11. Selbstreinigungstaste
12. Basisplatte
13. Hacke
14. Netzkabel
15. Aktivierungsauslöser „Injection Steam“
16. Anzeigelampen „Injection Steam“
SICHERHEITSHINWEISE
Dieses Gerät kann von Kindern ab 8 Jahren und
von Personen mit eingeschränkten körperlichen,
sensorischen oder geistigen Fähigkeiten oder
mangelnden Erfahrungen und Kenntnissen benutzt
werden, wenn sie beaufsichtigt werden oder in den
sicheren Gebrauch des Gerätes eingewiesen wurden
und die damit verbundenen Gefahren verstehen. Kinder
dürfen nicht mit dem Gerät spielen. Die Reinigung
und Wartung darf nicht von Kindern ohne Aufsicht
durchgeführt werden.
Bei Beschädigung des Netzkabels muss dieses
vom Hersteller, seinem Servicepartner oder ähnlich
qualifizierten Personen ausgetauscht werden, um eine
Gefährdung zu vermeiden.
19
DE

Das Bügeleisen darf nicht unbeaufsichtigt bleiben,
solange es an das Stromnetz angeschlossen ist.
Der Stecker muss aus der Steckdose gezogen werden,
bevor der Wasserbehälter mit Wasser befüllt wird.
Die Bügeleisen müssen auf einer flachen, stabilen
Oberfläche verwendet und abgestellt werden
Wenn das Bügeleisen auf seinen Ständer gestellt wird,
ist darauf zu achten, dass die Oberfläche, auf der der
Ständer steht, stabil ist.
Das Bügeleisen darf nicht benutzt werden, wenn es
fallen gelassen wurde, wenn es sichtbare Anzeichen
von Schäden aufweist oder wenn es undicht ist.
Bewahren Sie das Bügeleisen und sein Kabel
außerhalb der Reichweite von Kindern unter 8 Jahren
auf, wenn es mit Strom versorgt wird oder es gerade
abkühlt.
Anweisungen zur sicheren Auffüllung des
Wasserbehälters befinden sich im Abschnitt zum
Wassertank.
VORSICHT. Heiße Oberflächen. Die Oberflächen
können bei der Anwendung heiß werden.
WICHTIGE WARNHINWEISE
Dieses Gerät ist für den Haushaltsgebrauch konzipiert und sollte unter keinen Umständen für den
gewerblichen oder industriellen Gebrauch verwendet werden. Jede unsachgemäße Verwendung oder
unsachgemäße Handhabung des Produkts führt zum Erlöschen der Garantie.
Überprüfen Sie vor dem Anschluss des Geräts, ob Ihre Netzspannung mit der auf dem Typenschild
angegebenen übereinstimmt.
Falls Sie einen Adapter verwenden, stellen Sie sicher, dass er imstande ist, 16 A zu erreichen und dass
er mit einer Schutzkontaktsteckdose ausgestattet ist.
Das Netzanschlusskabel darf während der Verwendung nicht verwickelt oder um das Produkt gewickelt
werden.
Benutzen Sie das Gerät nicht, schließen Sie es nicht an und trennen Sie es nicht vom Stromnetz, wenn
Sie nasse Hände und / oder Füße haben.
Ziehen Sie nicht am Netzkabel, um den Stecker zu ziehen, und verwenden Sie es nicht als Griff.
20
DE
Table of contents
Languages:
Other Zelmer Iron manuals

Zelmer
Zelmer 28Z010 User manual

Zelmer
Zelmer 28Z017 User manual

Zelmer
Zelmer 28Z018 User manual

Zelmer
Zelmer ZIR3285 User manual

Zelmer
Zelmer 28Z030 User manual

Zelmer
Zelmer ZIR1505 User manual

Zelmer
Zelmer Smartcare ZIS6450 User manual

Zelmer
Zelmer 28Z015 User manual

Zelmer
Zelmer ZIR06000 User manual

Zelmer
Zelmer ZIS8700 Healthy User manual

Zelmer
Zelmer 28Z024 User manual

Zelmer
Zelmer ZIR2415 User manual

Zelmer
Zelmer ZIR2620 User manual

Zelmer
Zelmer 28z012 User manual

Zelmer
Zelmer GlidePro ZIR2600 User manual

Zelmer
Zelmer ZIS8402 PRO-Compact User manual

Zelmer
Zelmer 28Z019 User manual

Zelmer
Zelmer IR3200 User manual

Zelmer
Zelmer 28Z013 User manual

Zelmer
Zelmer IR4200 User manual