Stiroplus SP1031 User manual

SP1031
ΟΔΗΓΙΕΣ
ΧΡΗΣΗΣ

Πριν χρησιμοποιήσετε την ηλεκτρική συσκευή πρέπει να ακολουθείτε τις βασικές
προφυλάξεις, συμπεριλαμβανομένων των ακολούθων :
1. Διαβάστε όλες τις οδηγίες.
2. Πριν από τη χρήση βεβαιωθείτε ότι η τάση του δικτύου αντιστοιχεί σε αυτήν
που αναγράφεται στην ετικέτα της συσκευής.
3. Για την αποφυγή τραυματισμού, εάν το ηλεκτρικό καλώδιο ή το φις ή το σύνολο
της συσκευής παρουσιάζουν φθορές , ή σε περίπτωση πτώσης ή διαρροής της
συσκευής , απευθυνθείτε στο πλησιέστερο εξουσιοδοτημένο κατάστημα σέρβις
για έλεγχο και επισκευή.
4. Αν το καλώδιο τροφοδοσίας είναι κατεστραμμένο, πρέπει να αντικατασταθεί
από τον κατασκευαστή, από εξουσιοδοτημένο σέρβις ή παρόμοια
εξειδικευμένο προσωπικό για να αποφευχθεί κάθε κίνδυνος.
5. Αποφύγετε με κάθε τρόπο την επαφή της πλάκας του σίδερου με τα ηλεκτρικά
καλώδια όταν είναι ζεστή.
6. Εγκαύματα μπορεί να προκληθούν από την επαφή με τα μεταλλικά, ζεστά μέρη,
το ζεστό νερό και τον ατμό.
7. Μην αφήνετε το καλώδιο να κρέμεται από την άκρη του τραπεζιού ή από άλλη
θερμή επιφάνεια.
8. Για την αποφυγή ηλεκτροπληξίας, μη βυθίζετε ποτέ το σίδερο μέσα σε νερό ή
σε οποιοδήποτε άλλο υγρό. Εάν αυτό συμβεί, δε θα πρέπει να
χρησιμοποιήσετε ξανά αυτή τη συσκευή και να απευθυνθείτε στο
εξουσιοδοτημένο κατάστημα σέρβις της εταιρίας.
9. Μην αφήνετε τη συσκευή ανεπιτήρητη, όταν είναι το φις στη πρίζα ή όταν η
συσκευή βρίσκεται πάνω σε σιδερώστρα.
10. Να τοποθετείτε τη συσκευή σε σταθερή , επίπεδη και οριζόντια επιφάνεια.
11. Η χρήση εξαρτημάτων που δεν προτείνονται από τον κατασκευαστή μπορεί να
προκαλέσει τραυματισμό στο χρήστη και φθορές στη συσκευή.
12. Πριν τοποθετήσετε το σίδερο στην ειδική βάση, βεβαιωθείτε ότι η επιφάνεια
που ακουμπά η βάση είναι σταθερή.
13.
14. Βγάζετε το φις από τη πρίζα όταν δε λειτουργείτε τη συσκευή, πριν το γέμισμα
ή τον καθαρισμό.
15. Μην χρησιμοποιείτε τη συσκευή για άλλη από τη προβλεπόμενη χρήση της.
16. Η χρήση της συσκευής επιτρέπεται σε άτομα ( συμπεριλαμβανομένων παιδιών
από 8 ετών και άνω) με μειωμένη αντίληψη και περιορισμένες σωματικές και
πνευματικές ικανότητες ή με ανεπαρκή εμπειρία, μόνο εάν επιβλέπονται και
εκπαιδεύονται με προσοχή από άτομο υπεύθυνο για τη σωματική ακεραιότητα
τους.
17. Επιβλέπετε τα παιδιά και βεβαιωθείτε ότι δεν παίζουν με τη συσκευή. Ο
καθαρισμός και η συντήρηση της συσκευής δε θα πρέπει να γίνεται από παιδιά
χωρίς επιτήρηση.
18. Μη χρησιμοποιείτε τη συσκευή μετά από πτώση , διαρροή ή αν παρουσιάζει
εμφανή σημάδια βλάβης.
19. Κρατήστε το σίδερο και το καλώδιο του μακριά από παιδιά κάτω από 8 ετών,
όταν είναι αναμμένο ή ακόμα κρυώνει.
20. Μην αγγίζετε ποτέ τη ζεστή πλάκα σιδερώματος, εκτός κι αν το σίδερο έχει
κρυώσει πλήρως και έχει αποσυνδεθεί από την πρίζα
21. Μη χρησιμοποιείτε τη συσκευή σε εξωτερικούς χώρους.
22. Φυλάξτε αυτές τις οδηγίες.

Γεμίστε το δοχείο με νερό από το ειδικό άνοιγμα στη δεξαμενή. Βεβαιωθείτε ότι δεν
υπερβαίνετε την ένδειξη MAX που υπάρχει στη δεξαμενή.
Ρυθμίστε τον διακόπτη στη κατάλληλη θέση ανάλογα με το ρούχο που πρόκειται να
σιδερώσετε.
Όσο το σίδερο θερμαίνεται, η ενδεικτική λυχνία θερμοκρασίας θα παραμένει αναμμένη.
Όταν το σίδερο φτάσει στη επιθυμητή θερμοκρασία τότε η ενδεικτική λυχνία
θερμοκρασίας θα σβήσει. Κατά τη διάρκεια του σιδερώματος η ενδεικτική λυχνία
θερμοκρασίας θα ανάβει και θα σβήνει ανά διαστήματα.
Όταν η θερμοκρασία της πλάκας φτάσει στην επιθυμητή θερμοκρασία και η φωτεινή
ένδειξη παραμείνει μόνιμα αναμμένη, μπορείτε να πατήσετε το διακόπτη ατμού για να
αρχίσει η παροχή. Κρατώντας το διακόπτη πατημένο, έχετε συνεχή παροχή ατμού ενώ
απελευθερώνοντας τον, μπορείτε να σιδερώσετε χωρίς ατμό.
Όταν δεν χρησιμοποιείτε τη συσκευή τυλίξτε τα καλώδια ρεύματος και ατμού γύρω από τη
βάση όπως φαίνεται στις εικόνες που ακολουθούν.
Θέση πρώτη
(70℃<T<120℃)
Θέση δεύτερη
(100℃<T<160℃)
Θέση τρίτη
(140℃<T<210℃)
Μέγιστη θέση
(170℃<T<225℃)

Όταν ακουμπάτε το σίδερο πάνω στη βάση βεβαιωθείτε ότι το τοποθετήσατε σωστά –όπως
φαίνεται παρακάτω:
1.Αφαιρέστε οποιοδήποτε αυτοκόλλητο ή άλλο προστατευτικό από το σίδερο ή από την
πλάκα .
2.Γεμίστε τη δεξαμενή με νερό, επιλέξτε τη μέγιστη θερμοκρασία και σιδερώστε
δοκιμαστικά σε ένα κομμάτι ελαφρώς βρεγμένου υφάσματος για μερικά λεπτά, για να
απομακρύνετε τυχόν υπολείμματα από την πλάκα όπως περιγράφεται στην παράγραφο
«ΣΙΔΕΡΩΜΑ ΜΕ ΑΤΜΟ».
ΣΗΜΕΙΩΣΕΙΣ:
- Κατά την πρώτη χρήση, ενδέχεται να εξέλθει από τη συσκευή μια παράξενη μυρωδιά.
Αυτό είναι απόλυτα φυσιολογικό και θα σταματήσει μετά από λίγο.
- Κατά την πρώτη χρήση, ενδέχεται να εξέλθουν από τη πλάκα, ορισμένα σωματίδια .
Αυτό είναι απόλυτα φυσιολογικό και θα σταματήσει μετά από λίγο. Τα σωματίδια είναι
αβλαβή και σταματούν να βγαίνουν από το σίδερο μετά από ένα σύντομο χρονικό
διάστημα.
Η συσκευή έχει δύο επιλογές σιδερώματος: Σιδέρωμα με ατμό ή σιδέρωμα χωρίς ατμό.
Δείτε λεπτομέρειες παρακάτω.

1. Τοποθετήστε τη συσκευή σε μια επίπεδη, σταθερή επιφάνεια
2. Τοποθετήστε το σίδερο στην ειδική βάση της συσκευής.
3. Βάλτε το φις στην πρίζα και στρέψτε το διακόπτη ρύθμισης θερμοκρασίας σίδερου
στην επιθυμητή θέση, ανάλογα με τον τύπο του υφάσματος. Συμβουλευτείτε την
παράγραφο και τον «ΣΥΜΠΛΗΡΩΜΑΤΙΚΟ ΠΙΝΑΚΑ»
4. Ηφωτεινή ένδειξη λειτουργίας θα ανάψει υποδεικνύοντας ότι το σίδερο
θερμαίνεται.
5. Όταν η λυχνία θερμοκρασίας του σίδερου σβήσει, η επιλεγμένη θερμοκρασία έχει
επιτευχθεί και μπορείτε να αρχίσετε το σιδέρωμα.
ΠΡΟΣΟΧΗ : Μην αγγίζετε την πλάκα πριν κρυώσει!
F)
1. Τοποθετήστε τη βάση σε μια επίπεδη και σταθερή επιφάνεια.
2. Κρατώντας τo δοχείο από την ειδική λαβή, τραβήξτε το προς τα έξω και γεμίστε με
νερό (βλ. εικόνα 4). Επανατοποθετήστε κατάλληλα το δοχείο νερού. Η μέγιστη
χωρητικότητα του δοχείου είναι 1,2L. Η στάθμη του νερού δεν θα πρέπει να
υπερβαίνει την ένδειξη MAX.
3. Τοποθετήστε το σίδερο στην ειδική βάση της συσκευής.
4. Βάλτε το φις στην πρίζα. Στρέψτε το διακόπτη ρύθμισης θερμοκρασίας του σίδερου
στην επιθυμητή θέση ανάλογα με το ύφασμα που πρόκειται να σιδερώσετε.
Συμβουλευτείτε την παράγραφο και τον
5. Ηφωτεινή ένδειξη λειτουργίας θα ανάψει υποδεικνύοντας ότι το σίδερο
θερμαίνεται.
6. Όταν η λυχνία θερμοκρασίας του σίδερου σβήσει, η επιλεγμένη θερμοκρασία έχει
επιτευχθεί και μπορείτε να αρχίσετε το σιδέρωμα.
7. Πιέστε τον διακόπτη ατμού στο σίδερο για να αρχίσει η εκπομπή ατμού από την
πλάκα και να σιδερώσετε με ατμό.
ΣΗΜΕΙΩΣΗ: Aν ρυθμίσετε τη θερμοκρασία κάτω από τη δεύτερη θέση ενδέχεται να
τρέξει νερό από την πλάκα. Αυτό είναι φυσιολογικό.
ΠΡΟΦΥΛΑΞΕΙΣ
1) Μην αγγίζετε την πλάκα πριν κρυώσει!
2) Μην κατευθύνετε τον ατμό σε ανθρώπους!
Εικ. 4

3) Μην πατάτε το διακόπτη ατμού όταν το σίδερο βρίσκεται στη βάση για να
αποφύγετε την πρόκληση βλάβης.
8. Όταν ολοκληρώσετε το σιδέρωμα, βγάλτε το φις από την πρίζα για να σβήσετε τη
συσκευή. Επειδή η πλάκα του σίδερου παραμένει ζεστή , μην την ακουμπάτε ποτέ με
το χέρι. Τοποθετήστε το σίδερο στην ειδική βάση μέχρι να κρυώσει τελείως.
Πριν τον καθαρισμό , αποσυνδέστε τη συσκευή από το ρεύμα και αφήστε την να κρυώσει
εντελώς.
1. Καθαρίστε τυχόν υπολείμματα αλάτων από την πλάκα με ένα υγρό, μαλακό πανί ή με ένα
ήπιο υγρό καθαριστικό.
2.Καθαρίστε το επάνω μέρος του σίδερου, με ένα μαλακό , υγρό πανί. Σκουπίστε με ένα
στεγνό πανί, τυχόν υπολείμματα νερού από το λέβητα και τη βάση του σίδερου
3.Όταν δε χρησιμοποιείτε για μεγάλο χρονικό διάστημα τη συσκευή, συνιστάται να
αδειάζετε το δοχείο νερού και να αποθηκεύετε το σίδερο πάνω στην ειδική βάση του.
Για την αποθήκευση της συσκευής τυλίξτε τα καλώδια παροχής ατμού και ρεύματος στη
βάση, στερεώστε τα με το ειδικό κλιπ και φυλάξτε τη συσκευή μακριά από παιδιά.
-Πριν το σιδέρωμα , να ακολουθείτε τις οδηγίες σιδερώματος που αναγράφονται
στην ετικέτα του υφάσματος.
-Ξεκινήστε το σιδέρωμα των ρούχων που απαιτούν χαμηλότερη θερμοκρασία , όπως
τα συνθετικά.
-Αν το ύφασμα αποτελείται από διάφορα είδη ινών, τότε θα πρέπει να επιλέγετε
πάντα τη χαμηλότερη θερμοκρασία ώστε να σιδερωθεί κατάλληλα η σύνθεση τους.
-Για την αποφυγή γυαλάδων, μεταξωτά και άλλα γυαλιστερά υφάσματα, πρέπει να
σιδερώνονται από την ανάποδη πλευρά.
-Υφάσματα όπως το βελούδο θα πρέπει να σιδερώνονται προς μια κατεύθυνση και
χωρίς ιδιαίτερη πίεση της πλάκας πάνω στο ύφασμα. Η πλάκα δεν πρέπει να
παραμένει παρά ελάχιστα δευτερόλεπτα στη περιοχή σιδερώματος.
-Τα μάλλινα υφάσματα ( 100% μαλλί ) μπορούν να σιδερωθούν με ατμό. Είναι
προτιμότερο να ρυθμίσετε τη θερμοκρασία στη μέγιστη θέση και να
χρησιμοποιήσετε ένα στεγνό ύφασμα για προστασία.
-Για να αποφύγετε τη φθορά της πλάκας , μην την ακουμπάτε πάνω σε φερμουάρ ή
άλλα μεταλλικά στοιχεία των ρούχων. Σιδερώστε γύρω από τα συγκεκριμένα
σημεία.
Θέση 1η
70<T<120
Ελαστάν, πολυαμίδιο, πολυπροπυλένιο
Θέση 2η
100<T<160
Πολυεστέρας, μετάξι
Θέση 3η
140<T<210
Μάλλινα, Βισκόζ
Μέγιστη Θέση
170<T<225
Βαμβακερά, Λινα

Στο τέλος της ωφέλιμης ζωής του, το προϊόν δεν πρέπει να διατίθεται με τα αστικά
απορρίμματα. Μπορεί να διατεθεί σε ειδικά κέντρα διαφοροποιημένης συλλογής που
ορίζουν οι δημοτικές αρχές, ή στις αντιπροσωπείες που παρέχουν αυτήν την υπηρεσία. Η
διαφοροποιημένη διάθεση μίας ηλεκτρικής συσκευής επιτρέπει την αποφυγή πιθανών
αρνητικών συνεπειών για το περιβάλλον και την υγεία από την ακατάλληλη διάθεση καθώς
και την ανακύκλωση υλικών από τα οποία αποτελείται ώστε να επιτυγχάνεται σημαντική
εξοικονόμηση ενέργειας και πόρων. Για την επισήμανση της υποχρεωτικής χωριστής
διάθεσης, το προϊόν φέρει το σήμα του διαγραμμένου τροχοφόρου κάδου απορριμμάτων.

ENGLISH
Read this manual thoroughly before using and save it for future reference the following:
1. Read all instructions.
2. Before using check that the voltage of wall outlet corresponds to the one shown on the
rating plate.
3. Do not use the appliance if the main cord, plug, light or the appliance itself shows
visible damage, or the appliance has been dropped or is leaking. Take it to the nearest
authorized service facility or a qualified serviceman for examination and repair in order
to avoid a hazard.
4. If the supply cord is damaged, it must be replaced by the manufacturer, its service
agent or similarly qualified persons in order to avoid a hazard.
5. Do not allow the cord to come into contact with the soleplate when it is hot.
6. Burns may occur from touching hot metal parts, hot water, or steam.
7. Do not let cord hang over edge of table or hot surface.
8. To protect against a risk of electric shock, never immerse the iron in water or other
liquids. If this has happened, do not use this appliance any more; dispose of the
appliance.
9. Do not leave iron unattended while connected into power supply or on an ironing
board.
10. Always place or use the appliance on a stable, level and horizontal surface.
11. The use of accessory not recommended by manufacturer may cause injury to persons
or damage to appliance.
12. When placing the iron on its stand, ensure that the surface on which the stand is placed
is stable.
13. Never fill the water tank with hot water, scent, vinegar, starch, descaler, fabric softener
or other chemical reagent.
14. Unplug from outlet when not in use, before filling water or cleaning.
15. Do not use the appliance for other than its intended use.
16. This appliance can be used by children aged from 8 years and above and persons with
reduced physical, sensory or mental capabilities or lack of experience and knowledge if
they have been given supervision or instruction concerning use of the appliance in a
way and understand the hazards involved.
17. Children shall not play with the appliance. Cleaning and user maintenance shall not be
made by children without supervision.
18. The iron is not to be used if it has been dropped, if there are visible signs of damage or
if it is leaking.
19. Keep the iron and its cord out of reach of children less than 8 years of age when it is
energized or cooling down.
20. Never touch the hot soleplate unless the iron is cooled down completely and
unplugged.
21. Do not use outdoors.
22. Save these instructions.
HOUSEHOLD USE ONLY

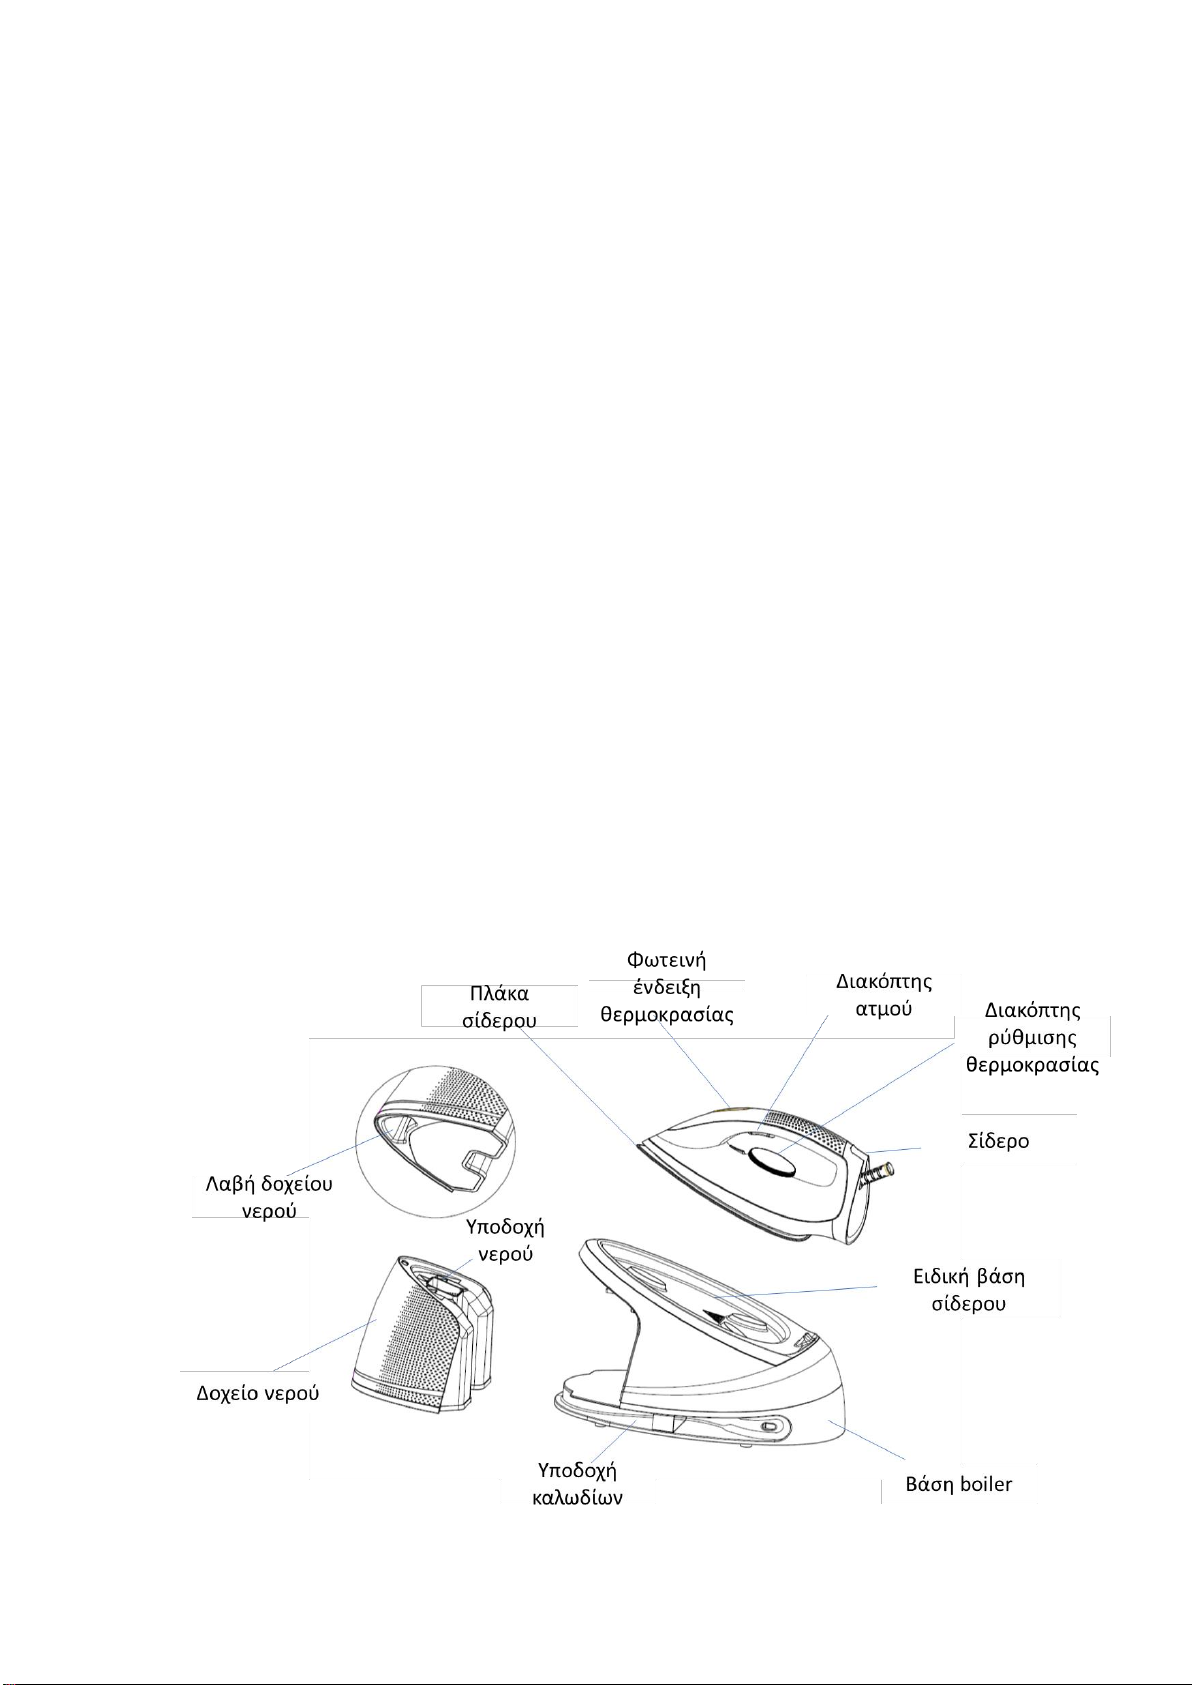
KNOW YOUR STEAM STATION
Iron
Temperatureindicator
Temperaturedial
Steamtrigger
Aluminumsoleplate
Thermalinsulationstand
Cordclip Unitbase
Watertank
Fillingaperture
Watertankhandle
TEMPERATURE DIAL
The first setting
(70℃<T<120℃)
The second setting
(100℃<T<160℃)
The third setting
(140℃<T<210℃)
Maximum setting
(170℃<T<225℃)

Filling aperture
Fill the water tank with water through the filling aperture. Make sure the water shall not
exceed the maximum level of water tank.
Temperature dial
Turn the temperature dial to set the ironing temperature basing on the garment needs to be
ironed.
Temperature indicator
When the iron is heating up, the temperature indicator will light up. Once the iron has
reached the selected temperature, it will extinguish. The temperature indicator will
illuminate solidly during heating.
Steam trigger
When the appliance is heated to the selected temperature and the temperature indicator
will extinguish, press the steam trigger with a little force, the steam will be sprayed from the
soleplate. When loosen the steam trigger, the appliance can only be used for dry ironing
without steam.
Cord clip
When not in use, the power cord can be tied with a cable tie and the steam supply hose can
be stored at the cord clips (see Fig.1 & Fig.2).
Correct placement of iron on the thermal insulation stand
When the iron is put on the thermal insulation stand, it must be placed on it correctly (see
Fig.3).

Correctplacement
Wrongplacement Wrongplacement
BEFORE FIRST USE
1. Remove any sticker or protective foil from the soleplate.
2. Fill the water tank with water and heat up the iron at the maximum temperature, and
then iron over a piece of damp cloth for several minutes for the purpose of removing any
residue on the soleplate according to the section of “Steam ironing”.
NOTE:
(1) It is normal that strange odor comes out from the unit for the first use. This will cease
after a short while.
(2) Some particles may come out of the soleplate when you use the iron for the first time.
this is normal, the particles are harmless and stop coming out of the iron after a short
while.
USING YOUR STEAM STATION
The appliance has two ironing ways. You can use dry ironing or steam ironing, the details
refer to the following.
Dry ironing
1. Put the unit base on a stable and level surface.
2. Put the iron on the thermal insulation stand of unit base correctly (see Fig.3).
3. Connect the plug to wall outlet, and then turn the temperature dial to select your desired
temperature setting, which is depended on the fabric of garment. Refer to IRONING TIPS
and ADDITIONAL TABLEas below when select temperature.
4. And then the temperature indicator illuminates and the iron starts heating.
5. When the temperature of soleplate reaches the selected temperature, the temperature
indicator turns off, and you can start ironing now.
WARNING: Never touch hot soleplate at any time before cooling down!

Steam ironing
The machine works with normal tap water. In case of very hard water (hardness above
suggest using normal bottled drinking water. The use of de-ionized water is not
recommended.
1. Put the unit base on a stable and level surface.
2. Grasp the water tank handle and then pull out the water tank horizontally, fill the water
tank with water through the filling aperture and then replace the water tank well in position
(see Fig.4). Make sure the water tank shall be pulled out horizontally when removing the
water tank. You had better use purified water with less calcium particles. The maximum
capacity of water tank is 1.2L, the water level shall not be exceeded the maximum level.
Fig.4
3. Put the iron on the thermal insulation stand of unit base correctly (see Fig.3).
4. Connect the plug to wall outlet, and then turn the temperature dial to select your desired
temperature setting, which is depended on the fabric of garment. Refer to IRONING TIPS
and ADDITIONAL TABLEas below when select temperature.
5. And then the temperature indicator illuminates and the iron starts heating.
6. After a few minutes, the temperature indicator extinguishes, which indicates the soleplate
temperature has achieved the selected temperature. And you can start ironing with steam
now.
7. Press the steam trigger with a little force, the steam will be sprayed from the soleplate
continuously, and then you can iron the garment with steam.
NOTE: There may be dripping water during spraying steam when the temperature is lower
than that of the second setting. This is normal.
CAUTIONS:
(1) Do not touch hot soleplate at any time before cooling down!
(2) Never direct the steam at people!
(3) Do not activate the steam function when the iron is placed on the unit base to avoid
being scalded by steam.

8. After ironing, remove the plug from the wall socket and the appliance will be turned off.
But the soleplate is still hot, never touch it with hand, place it on the thermal insulation
stand correctly until it cools down completely.
CLEANING AND MAINTENANCE
Before cleaning, firstly disconnect the power outlet and let the appliance cools down.
1. Wipe the residues and any other deposits on the soleplate with a damp cloth or a non-
abrasive (liquid) cleaner.
NOTE: Do not use chemical, steel, wooden or abrasive cleaners to scrape the soleplate.
2. Clean the upper part of iron with a soft damp cloth. Wipe the water drop on the unit base
and the thermal insulation stand with dry cloth.
3. When do not use the appliance for a long time, empty the water in the water tank, turn
the temperature dial to the minimum setting and store the steam supply hose and power
cord at the cord clips, then put the appliance at a place out of the reach of children.
IRONING TIPS
-Always check first whether a label with ironing instructions is attached to the article. Follow
these ironing instructions in any case.
-The iron heats up quicker than cooling it down, therefore, you should start ironing the
articles requiring the lower temperature such as those made of synthetic fiber.
-If the fabric consists of various kinds of fibers, you must always select the lowest ironing
temperature to iron the composition of those fibers.
- Synthetic fibre and silk fabrics should be ironed on their inner side to avoid being shone.
-Velvet and other textures that rapidly become shiny should be ironed in one direction with
light pressure applied. Always keeps the iron moving at any moment.
-Pure wool fabrics (100% wool) may be ironed with the steam iron. Use a dry cloth as a mat
and then select the corresponding fabric setting for ironing.
- Never iron over zip, rivet in the cloth. This will damage the soleplate. Iron around any such
object.
NOTE: When ironing woolen fabrics, shining of the fabric may occur. So it is suggested that
you should turn the article inside out and iron the reverse side.
ADDITIONAL TABLE
Setting
Temperature (℃)
Fabric
The first setting
70<T<120
Acetate,elastane,polyamide,polypropylene
The second setting
100<T<160
Cupro,polyester,silk
The third setting
140<T<210
Triacetate, viscose, wool
Maximum
170<T<225
Cotton, flax

At the end of its working life, the product must not be disposed of as urban waste. It must be
taken to a special local authority differentiated waste collection center or to a dealer providing
this service.
Disposing of a household appliance separately avoids possible negative consequences for the
environment and health, deriving from inappropriate disposal and enables the constituent
materials to be recovered to obtain significant savings in energy and resources. As a reminder
of the need to dispose of household appliances separately, the product is marked with a
crossed-out wheeled dustbin.

Table of contents
Languages:
Other Stiroplus Iron manuals

Stiroplus
Stiroplus SP1070 User manual

Stiroplus
Stiroplus SP1035 User manual

Stiroplus
Stiroplus SP1029 User manual

Stiroplus
Stiroplus SP1050 User manual

Stiroplus
Stiroplus SP1045 User manual

Stiroplus
Stiroplus SP2020 User manual

Stiroplus
Stiroplus SP 1024 User manual

Stiroplus
Stiroplus SP1055 User manual

Stiroplus
Stiroplus SP-1021 User manual

Stiroplus
Stiroplus SP2010 User manual


 owner's manual")


