Smarter lx-6010 User manual

Don't work harder. Work smarter.
MODEL
LX-6010
MINI PALM
NAILER
OPERATOR’S MANUAL
Revision: AB Issue Date: October 2011 Manual No.: 0-LX60101011
We Appreciate Your Business.
Thank you and congratulations on choosing Smarter Tools. Now you can stop
working harder and start working smarter.
This Operating Manual has been designed to instruct you on the correct use and
operation of your Smarter Tools’ product. Your satisfaction with this product and
its safe operation is our ultimate concern. Therefore please take the time to read
the entire manual, especially the Safety Precautions. They will help you to avoid
potential hazards that may exist when working with this product.
WARNING!
READ AND UNDERSTAND ALL SAFETY PRECAUTIONS
IN THIS MANUAL BEFORE OPERATING. FAILURE TO
COMPLY WITH INSTRUCTIONS IN THIS MANUAL
COULD RESULT IN PERSONAL INJURY, PROPERTY
DAMAGE, AND/ OR VOIDING OF YOUR WARRANTY.
SMARTER TOOLS WILL NOT BE LIABLE FOR ANY
DAMAGE BECAUSE OF FAILURE TO FOLLOW THESE
INSTRUCTIONS.
Operating Manual Number 0-LX60101011
Smarter Tools LX-6010 Mini Palm Nailer Part No. LX-6010
Published by:
Smarter Tools, Inc.
12195 Harley Club Drive
Ashland, VA 23005
(804) 798.8588
www.usesmartertools.com
Copyright © 2011 by
Smarter Tools, Inc.
Reproductions of this work, in whole or in part, without written permission of
the publisher are strictly prohibited.
The publisher does not assume and herby disclaims any liability to any party
for any loss or damage caused by any error or omission in this Manual,
whether such error results from negligence, accident, or any other cause.
Publication Date: 10.30.11

SPECIFICATIONS
MODEL LX-6010
FASTENER LENGTH Nails up to 16d
FASTENER HEAD DIA. 5/16” (8 mm)
NAIL TYPE Hand Driven
MAX AIR PRESSURE 120 psi (8.3 bars)
MIN AIR PRESSURE 70 psi (4.8 bars)
TOOL WEIGHT 1 lbs. (.45 kg)
TOOL LENGTH 4” (101.6 mm)
TOOL HEIGHT 2.75” (69.9 mm)
TOOL WIDTH 2.19” (55.6 mm)
TRIGGER TYPE AUTO
AIR CONNECTION QUICK CONNECT
LUBRICATION 10W Air Tool Oil (Provided)
SAFETY INSTRUCTIONS
Read and understand all safety precautions in this manual before operating.
Failure to comply with instructions in this manual could result in personal injury,
property damage, and/ or voiding of your warranty.
WEAR SAFETY GLASSES
Always wear safety glasses with side shields that meet ANSI Z87.1 requirements
when operating the tool. Make sure all others in work area wear safety glasses.
WEAR HEARING PROTECTION
Wear hearing protection to protect your hearing from noise.
Prolonged exposure to loud noise can result in hearing loss.
NEVER OPERATE THE TOOL WITH OXYGEN OR OTHER
BOTTLED GASES
Oxygen and other reactive or high-pressure bottled gases can cause the tool to
explode. Use clean, dry regulated compressed air from a properly operating air
compressor.
DO NOT EXCEED MAXIMUM RECOMMENDED OPERATING AIR
PRESSURE OF 120 PSI /8.3 Bar.
Exceeding the maximum recommended air pressure can cause the tool housing
to burst, or cause premature failure of components.
NEVER CONNECT THE TOOL TO AN AIR SUPPLY THAT HAS
THE POTENTIAL TO EXCEED 180 PSI/12.4 Bar.
Using a regulated air supply with a line or tank pressure greater than 180 psi can
cause the tool to burst if the air line regulator fails suddenly.
USE AN AIR HOSE RATED FOR 180 PSI/12.4 Bar OR GREATER
Always use air hose rated to handle 180 psi or the maximum
potential pressure of the air supply.

DO NOT ATTEMPT TO OPERATE THE TOOL IF THE TOOL’S
OPERATING CONTROLS HAVE BEEN MODIFIED OR ARE NOT
WORKING PROPERLY.
Attempting to use a tool with modified or malfunctioning trigger or workpiece
contact can result in a fastener being driven unintentionally.
USE CORRECT FASTENERS
Only use the correct fastener for the tool. Using fasteners with incorrect
specifications can jam the tool or cause serious injuries.
USE THE CORRECT FASTENERS FOR THE APPLICATION.
Using the wrong fasteners can cause the workpiece to split and allow the
fastener to fly free.
DO NOT DEPRESS TOOL NOSE WHEN LOADING FASTENERS
Depressing the tool nose during loading can result in tool actuation and an
unintentional fastener drive
AVOID DRIVING FASTENERS INTO KNOTS, ON TOP OF OTHER
FASTENERS, AT WORKPIECE EDGES, OR INTO BRITTLE MATERIALS.
Driving fasteners into extremely hard materials, or driving into workpiece edges,
can cause fasteners to deflect away from the workpiece. Flying fasteners can
cause serious injuries.
KEEP HANDS AND BODY PARTS AWAY FROM AREA BEING FASTENED.
Fasteners can deflect and turn as they are being driven into the workpiece, and
penetrate fingers, hands, and other body parts that may be in the fastening area.
DO NOT OVERREACH OR WORK WHILE ON UNSTABLE FOOTING
If you lose your balance while fastening, you could drive a fastener into yourself
or a bystander.
DO NOT USE TOOL IF TOOL MALFUNCTIONS OR BEGINS LEAKING AIR.
Operating a malfunctioning tool can result in an injury to yourself or others.
DISCONNECT THE TOOL FROM THE AIR SUPPLY TO PERFORM
MAINTENANCE.
Never attempt to reload a tool, clear a jam, or perform maintenance without first
disconnecting the air supply.
NEVER LEAVE A PRESSURIZED TOOL
UNATTENDED
A pressurized tool could be picked up or handled by someone who is unfamiliar
with the tool or that has not read the tool manual.
KEEP TOOLS OUT OF THE REACH OF CHILDREN
Place the tool back in the tool box after use, and store the tool out of reach.
DO NOT MODIFY TOOL
Modifications can cause a tool to be unsafe and can cause the tool to operate
improperly.
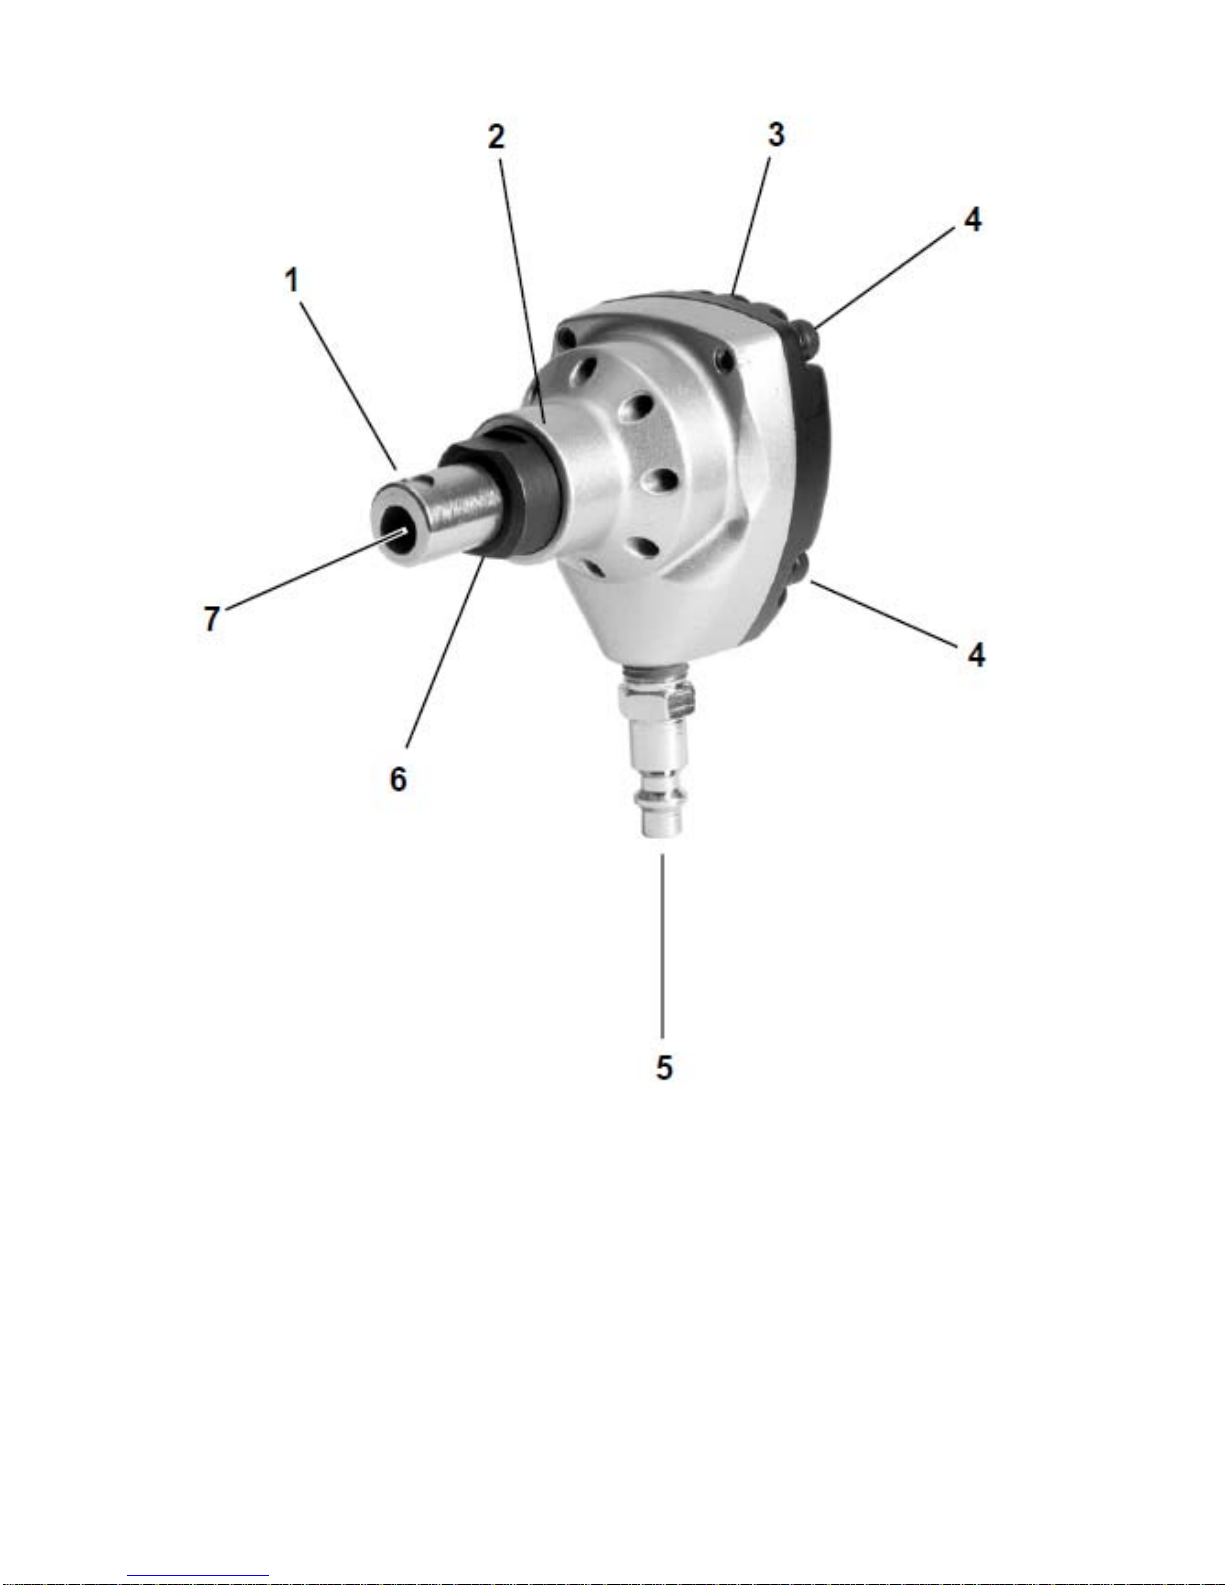
PART DESCRIPTIONS
1. Nail Guide - Narrow profile design permits accurate nail
placement.
2. Tool Body - Contains nail driver parts and acts as a handgrip.
3. Tool Cap - Covers nail driver assembly.
4. Cap Screw - Secures cap to tool body
5. Air Coupling - Quick-disconnect male coupling allows quick
connection to air hose.
6. Guide Box - Secures Nail Guide.
7. Magnetic Nail Holder - Helps keep nail in place while
positioning nailer for driving.
Metric Hex Wrench - Included with tool to allow tightening of metric
screws. Keep tools in tool case for periodic tightening of screws.
Air Tool Oil - Lightweight oil formulated for use in air tools provides
proper lubrication to o-rings and internal parts.
LOADING INSTRUCTIONS
Read and understand all loading instructions in this manual before operating.
Failure to comply with instructions in this manual could result in personal injury,
property damage, and/ or voiding of your warranty.
WARNING!
THE PALM NAILER IS AUTOMATICALLY ACTUATED
WHEN THE NAIL IN THE NOSE IS PRESSED AGAINST
THE WORK SURFACE. THE NAILER CONTINUES TO
DELIVER MULTIPLE HAMMER BLOWS UNTIL THE NAIL
IS FULLY DRIVEN, OR TOOL IS LIFTED OFF WORK
SURFACE. NEVER PRESS TOOL NOSE DOWN UNLESS
IT HAS BEEN PROPERLY POSITIONED TO DRIVE A
NAIL INTO A SAFE WORK SURFACE.
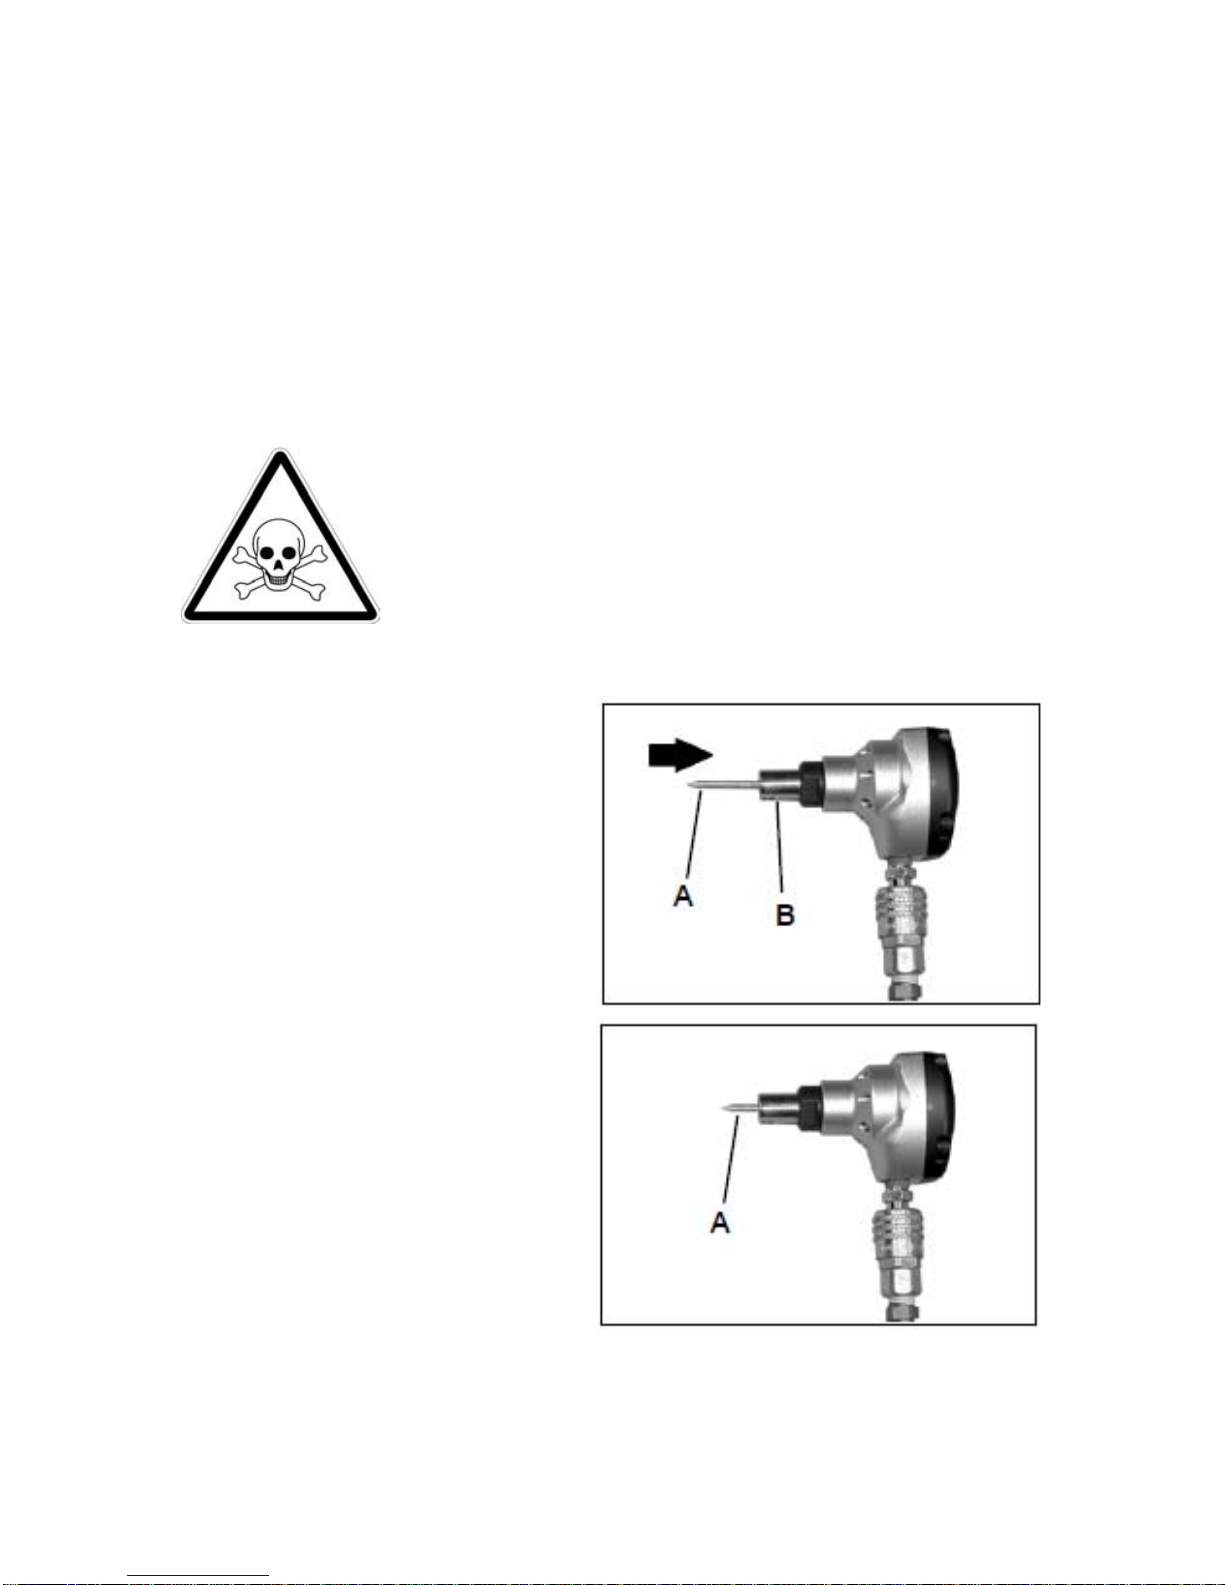
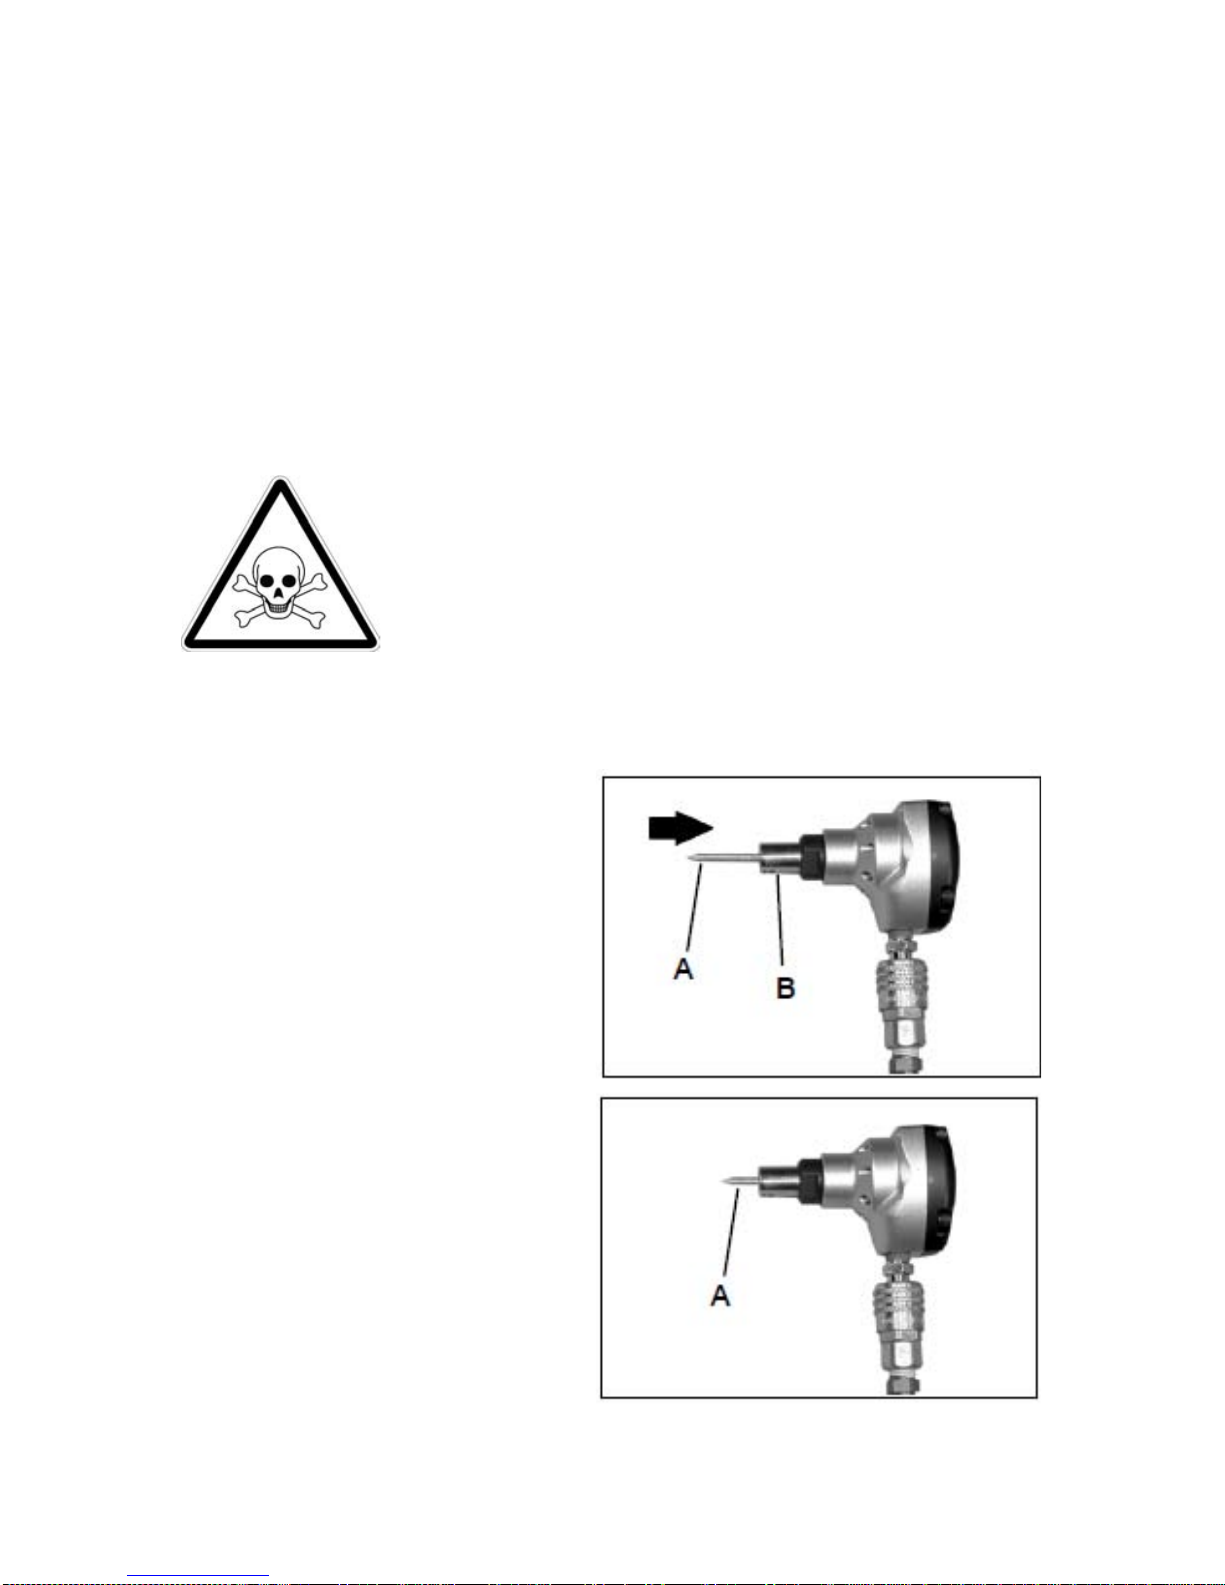
1. Connect tool to air
supply using quick-
connect coupling.
2. Insert nail (A) into guide
(B), head first. DO NOT
press nail into guide
forcefullly, or nailer may
begin operating.
Magnetic holder helps
keep nail in place while
positioning nailer for
driving.
3. Tool is now loaded and
ready to drive the nail
into the desired work
surface.

OPERATION
Read and understand all safety precautions in this manual before operating.
Failure to comply with instructions in this manual could result in personal injury,
property damage, and/ or voiding of your warranty.
1. Hold the tool securely
using the housing as a
handgrip. Do not
depress tool nose until
tool is in driving position
and you are ready to
drive a nail.
2. Position the nail on the
workpiece, placing the
nail point in driving
position at the desired
driving location.
IMPORTANT - If nail is
being driven to secure a joist
hanger or other metal
connector, make sure nail
point is centered in punched
hole in connector.
3. Press the tool firmly to
begin driving the nail,
and continue pushing
until the nail is fully
driven. Use firm, steady
pressure.
4. After the nail is fully driven, lift the tool off of the work surface.
5. Reload the nailer, and place the tool in position for the next nail
to be driven.
6. Repeat steps 1 through 5 until all desired nails have been driven.
7. Increase air pressure to drive into harder materials. Reduce air
pressure to drive into softer materials. For longest tool and part
life, always use the lowest air pressure necessary to drive
fasteners.
8. Disconnect tool from air supply when nailing is completed.

MAINTENANCE
Your tool will last longer and perform better if periodic maintenance is performed.
Please use the information below to keep your tool operating in top condition.
ALWAYS DISCONNECT TOOL FROM AIR SUPPLY
BEFORE PERFORMING ANY SERVICE ON TOOL.
CORRECTING A PROBLEM WHILE THE TOOL IS
PRESSURIZED MAY RESULT IN INJURY FROM NAIL
DRIVE OR TOOL OPERATION.
Lubrication
Disconnect tool from the air supply. Apply three drops of air tool oil
(provided) in the air inlet before each use, and after every 1000 fasteners
driven. If the tool will be used outside in the winter, use a winter grade air
tool oil to help keep frost from forming inside the tool. Do not use other
types of lubricants on this tool, as other lubricants may contain chemicals
harmful to o-rings and other tool components.
Cleaning
Disconnect tool from the air supply. Brush tool off using a parts cleaning
brush or clean rag.
Daily Inspection
• Check for broken, damaged, or excessively worn parts, and repair or
replace as needed.
• Check for air leaks at cap, and nose. Disconnect tool from air supply
immediately if leaks are present, and see dealer for service.
• Make sure all screws are tightened securely.
TOOL TROUBLESHOOTING
Your pneumatic fastening tool has been designed for long life and trouble-free
operation. However, if operating problems arise, please use the troubleshooting
information below to determine how to remedy the problem.
FASTENER DRIVING PROBLEMS
PROBLEM CORRECTIVE ACTION
Fasteners do not drive completely.
Increase air pressure. Do not exceed
120 psi
(8.3 bars). Add 2-3 drops of air tool oil
to inlet.
Fasteners do not drive completely after
air pressure is increased. Driver blade worn or broken. See
dealer for replacement.
Tool leaks air. Check for source of leak, and tighten
fittings and screws as required.

ESPECIFICACIONES
MODELO LX-6010
SUJETADOR LARGO Clavos de hasta 16d
SUJETADOR DIÁMETRO DE LA CABEZA 5/16” (8 mm)
TIPO DE UÑAS Máquinas a mano
MÁXIMA PRESIÓN DE AIRE 120 psi (8.3 bars)
PRESIÓN MÍNIMA DE AIRE 70 psi (4.8 bars)
PESO DE LA HERRAMIENTA 1 lbs. (.45 kg)
LONGITUD DE LA HERRAMIENTA 4” (101.6 mm)
ALTURA DE LA HERRAMIENTA 2.75” (69.9 mm)
ANCHO DE LA HERRAMIENTA 2.19” (55.6 mm)
TIPO DE DISPARO Auto
CONEXIÓN DE AIRE CONEXIÓN RÁPIDA
LUBRICACIÓN 10W Aceite para herramientas de aire (previsto)
INSTRUCCIONES DE SEGURIDAD
Lea y comprenda todas las medidas de seguridad en este manual antes de operar. El
incumplimiento de las instrucciones de este manual puede resultar en lesiones
personales, daños materiales y / o anulación de la garantía.
USE ANTEOJOS DE SEGURIDAD
Siempre use anteojos de seguridad con protectores laterales que cumplan con los
requisitos ANSI Z87.1 al operar la herramienta. Asegúrese de que todos los demás
en el área de trabajo use anteojos de seguridad.
PROTECCIÓN PARA EL OÍDO
Use protección para los oídos para protegerse los oídos contra el ruido.
La exposición prolongada a ruidos fuertes puede resultar en la pérdida de audición.
NUNCA OPERE LA HERRAMIENTA CON OXÍGENO U OTROS
GASES ALMACENADOS
Oxígeno y otros gases reactivos o de alta presión puede hacer que la herramienta
para explotar. Utilice aire limpio y seco comprimido regulado de un compresor de aire
que funcione debidamente.
NO SUPERE LA MÁXIMA DE AIRE RECOMENDADA DE FUNCIONAMIENTO
Presión de 120 PSI / Bar 8.3.
Superior a la máxima presión de aire recomendada puede causar la caja de
herramientas a punto de estallar, o causar la falla prematura de los componentes.
NUNCA CONECTE LA HERRAMIENTA A UN SUMINISTRO DE AIRE QUE HA
EL POTENCIAL PARA SUPERAR 180 PSI/12.4 Bar.
El uso de un suministro de aire regulado con una tubería o un depósito de más de
180 psi puede hacer que la herramienta reviente si el regulador de la línea aérea no
de repente.
USE UNA MANGUERA DE AIRE CLASIFICADOS PARA 180 PSI/12.4 Bar O
MAYOR
Use siempre una manguera clasificado a 180 psi o la máxima presión potencial del
suministro de aire.

NO TRATE DE HACER FUNCIONAR LA HERRAMIENTA SI de la herramienta
CONTROLES DE OPERACIÓN HAN SIDO MODIFICADOS O NO FUNCIONAN
CORRECTAMENTE.
El intento de utilizar una herramienta con un mal funcionamiento o gatillo o el
contacto puede resultar en un cierre de forma no intencionada.
USE SUJETADORES CORRECTOS
Use solamente los sujetadores correctos para la herramienta. El uso de sujetadores
con especificaciones incorrectas puede atascar la herramienta o causar lesiones
graves.
USE LOS SUJETADORES CORRECTOS PARA LA APLICACIÓN.
El uso de sujetadores equivocados puede hacer que la pieza de trabajo para dividir y
permitir que el sujetador salga disparado.
NO PRESIONE PUNTA DE LA HERRAMIENTA AL CARGAR LOS SUJETADORES
Al oprimir el punta de la herramienta durante la carga puede resultar en la actuación
de la herramienta y fijar un sujetador
NO FIJE SUJETADORES EN NUDOS, ENCIMA DE SUJETADORES, EN LOS
BORDES DE UNA SUPERFICIE, O EN MATERIALES QUEBRADIZOS.
La fijación de sujetadores en materiales muy duros, o en bordes de superficie puede
hacer que se desvíen de la pieza. Sujetadores puede causar lesiones graves.
MANTENGA LAS MANOS Y LAS PARTES DEL CUERPO AL ÁREA DONDE SE
SUJETAS.
Los sujetadores pueden desviarse y girar a medida que están siendo impulsados en
la superficie, y penetrar los dedos, las manos y otras partes del cuerpo que pueden
estar en el área de fijación.
NO EXTIENDA LOS BRAZOS NI TRABAJO EN UNA POSICIÓN INESTABLE
Si usted pierde el equilibrio durante la fijación, puede introducirse un sujetador o
introducirlo en un espectador.
NO UTILICE HERRAMIENTA SI FUNCIONA MAL O EMPIEZA A PERDER AIRE.
El funcionamiento de una herramienta que no funcione puede resultar en un daño a
sí mismo oa otros.
DESCONECTE LA HERRAMIENTA DEL SUMINISTRO DE AIRE PARA
EFECTUAR EL MANTENIMIENTO.
Nunca intente cargar la herramienta, un atasco, o realizar el mantenimiento sin
desconectar primero el suministro de aire.
NUNCA DEJE UNA HERRAMIENTA DE PRESIÓN DESATENDIDOS
Una herramienta de presión pueden ser recogidos o manipulados por alguien que no
está familiarizado con la herramienta o el que no ha leído el manual de la máquina.
MANTENGA LAS HERRAMIENTAS FUERA DEL ALCANCE DE LOS NIÑOS
Coloque la herramienta en la caja de herramientas después de usarla, y guarde la
herramienta fuera de su alcance.
NO MODIFIQUE LA HERRAMIENTA
Modificaciones pueden hacer que una herramienta puede ser peligroso y puede
causar que la herramienta funcione correctamente.

DESCRIPCIÓN DE LA PARTE
1. Guía de las uñas - Diseño de perfil estrecho permite la colocación precisa
de uñas.
2. Cuerpo Herramienta - Contiene piezas de uñas conductor y actúa como un
asidero.
3. Herramienta para Tapas - Cubre las uñas de montaje del conductor.
4. Tapón de Rosca - Asegura tapa de cuerpo de la herramienta
5. De Acoplamiento a Presión - De desconexión rápida de acoplamiento
macho permite la conexión rápida con la manguera de aire.
6. Guía de Caja - Asegura Nail Guía.
7. Soporte Magnético de uñas - Ayuda a mantener las uñas en su lugar
mientras clavadora de posicionamiento para la conducción.
Llave Hexagonal Métrica - Incluyen con la herramienta para poder
apretar tornillos métricos. Mantenga las herramientas en la caja para
apretar tornillos de forma periódica.
Aceite para Herramientas de Aire - Aceite ligero formulado para su uso
en herramientas neumáticas que permite una lubricación adecuada para
las juntas tóricas y las piezas internas.
INSTRUCCIONES DE CARGA
Lea y comprenda todas las instrucciones de carga en este manual antes de
operar. El incumplimiento de las instrucciones de este manual puede resultar en
lesiones personales, daños materiales y / o anulación de la garantía.
ADVERTENCIA!
La clavadora PALM se activa automáticamente cuando
el clavo en la nariz se presiona contra la superficie de
trabajo. La clavadora sigue ofreciendo múltiples golpes
martillo hasta que el clavo es TOTALMENTE
ORIENTADA o herramienta se levanta superficie de
trabajo. No presione punta de la herramienta abajo a
menos que haya sido debidamente posicionados para
clavar un clavo en una superficie de trabajo segura.
1. Conectar el aparato al
suministro de aire con
acoplamiento de
conexión rápida.
2. Introduzca las uñas (A)
en la guía (B), de
cabeza. NO presione las
uñas en la guía
forcefullly, o clavadora
puede comenzar a
funcionar. Soporte
magnético ayuda a
mantener las uñas en su
lugar mientras clavadora
de posicionamiento para
la conducción.
3. Herramienta está
cargado y listo para
conducir el clavo en la
superficie de trabajo
deseada.

FUNCIONAMIENTO
Lea y comprenda todas las medidas de seguridad en este manual antes de
operar. El incumplimiento de las instrucciones de este manual puede resultar en
lesiones personales, daños materiales y / o anulación de la garantía.
1. Sostenga la herramienta
de forma segura
utilizando la caja como
una empuñadura. No
presione punta de la
herramienta hasta que la
herramienta está en
posición de conducción y
estará listo para clavar
un clavo.
2. Coloque el dedo en la
pieza de trabajo,
colocando la punta del
clavo en el puesto de
conducción en la
posición de conducción
deseada.
IMPORTANTE - Si las uñas
se está impulsado para
asegurar una suspensión de
viga o el conector de metal,
hacer punta del clavo que se
centra en el agujero
perforado en el conector.
3. Presione firmemente la herramienta para comenzar a conducir el
clavo, y seguir empujando hasta que la uña está totalmente
impulsado. Use la empresa, la presión constante.
4. Después de la uña es totalmente impulsado, levante la
herramienta de la superficie de trabajo.
5. Actualizar el fabricante de clavos, y el lugar de la herramienta en
posición para el siguiente clavo para ser utilizado.
6. Repita los pasos 1 a 5 hasta que todos los clavos deseados se
han conducido.
7. Aumento de la presión de aire para impulsar en materiales más
duros. Reducir la presión de aire para impulsar en materiales
más blandos. Para prolongar al máximo la herramienta y las
piezas, use la presión de aire mínima para fijar sujetadores.
8. Desconecte la herramienta del suministro de aire al clavar se ha
completado.

MANTENIMIENTO
Su herramienta durará más y funcionará mejor si se realiza un mantenimiento
periódico. Por favor, use la siguiente información para mantener la herramienta
funcionando en las mejores condiciones.
Desconecte siempre la herramienta del suministro de
aire ANTES DE REALIZAR CUALQUIER servicio en la
herramienta. Solución de un problema cuando la
herramienta esté a presión puede producir lesiones
debido a los sujetadores o al funcionamiento de la
herramienta.
Lubricación
Desconecte la herramienta del suministro de aire. Aplique tres gotas de aceite
para herramientas neumáticas (incluido) en la entrada de aire antes de cada
uso, y después de cada 1000 impulsado por los sujetadores. Si la herramienta
se utiliza fuera en el invierno, use un grado en invierno el aire de aceite
herramienta para ayudar a mantener la formación de hielo dentro de la
herramienta. No utilice otro tipo de lubricante en esta herramienta, ya que otros
lubricantes pueden contener productos químicos dañinos para las juntas tóricas
y otros componentes de la herramienta.
Limpieza
Desconecte la herramienta del suministro de aire. Cepille la herramienta usando
un cepillo de limpieza de las partes o un trapo limpio.
Inspección diaria
•Compruebe si hay piezas rotas, dañadas o excesivamente desgastadas, y
repare o reemplace según sea necesario.
•Compruebe si hay fugas de aire en la tapa, y la nariz. Desconecte la
herramienta del suministro de aire de inmediato si hay fugas presentes, y
acuda al distribuidor para el servicio.
•Asegúrese de que todos los tornillos estén bien apretados.
Table of contents
Languages:
Popular Nail Gun manuals by other brands


Clas Ohlson
Clas Ohlson Besco SB1840 user manual

Scheppach
Scheppach Aero2 Spade Original operating manual

Max
Max NF201/18-35 Operating and maintenance manual

Omer
Omer TN.715 Use, maintenance and spare parts manual

Bostitch
Bostitch RN45B Operation and maintenance manual

Makita
Makita GN420C instruction manual


