smartmi ZLBPKQXHS02ZM User manual
Smartmi Air Circulator Fan Instruction Manual
Manuel d'Utilisation Smartmi Ventilateur de circulation d'air
Инструкция по использованию вентилятором
циркуляции воздуха Smartmi
Instrukcja obsługi wentylatora cyrkulacyjnego Smartmi
01
15
30
46
1
Improper product use may lead to electrical
shocks, accidental fire, personal injuries, and
other damages.
Please do not operate the product on an uneven or
unsteady surface where it may topple over.
Please do not operate the product near other objects
which may topple over.
Please do not operate the product in a hot and humid
environment, such as a bathroom.
Please discontinue your use of the product if the
adapter cord is damaged or the adapter plug is loose.
Please do not operate the product if the fan grille is not
properly installed or the rear fan grille is loose/missing.
Ensure that the fan is switched off from the supply
mains before removing the guard.
This appliance can be used by children aged from 8
years and above and persons with reduced physical,
sensory or mental capabilities or lack of experience and
knowledge if they have been given supervision or
instruction concerning use of the appliance in a
safe way and understand the hazards involved.
Only use the supply unit provided with this
appliance.
When the power adapter is damaged, it must
be replaced with a genuine power adapter
purchased from the manufacturer or after-sales
service department.
Children shall not play with the appliance.
Cleaning and user maintenance shall not be
made by children without supervision.
Please do not take the product apart on your own.
Please do not fold, bend, or twist the adapter
cord with excessive force to prevent exposed or
broken wires.
WARNING
READ AND SAVE THESE INSTRUCTIONS

2
Please do not insert your finger or foreign objects
into the front fan grille, rear fan grille, or the fan
blades while the fan is in operation.
Please keep your hair or fabrics away from the fan to
prevent objects from becoming entangled in the fan
blades.
Please do not use the supplied adapter with any
other product.
This appliance contains batteries that are only
replaceable by skilled persons.
The remote controller is powered by 1 LRAAA
battery, insert 1 LRAAA battery with the correct
polarity in the battery compartment. The supply
terminals are not to be short-circuited.
Non-rechargeable battery used for remote contoller
is not to be recharged. Exhausted batteries are
to be removed from the appliance and safely
disposed of.
If the remote controller is to be stored unused for
a long period, the battery in the remote controller
should be removed.
This appliance must only be supplied at safety
extra low voltage corresponding to the marking on
the appliance.
WARNING: For the purposes of recharging
the battery, only use the detachable supply
unit <BLJ36W150240P-VF> provided with this
appliance.
The battery must be removed from the appliance
before it is scrapped.
3
Precautions
Safety instructions
Installation
Handling
Always turn the fan off and unplug it before moving it.
Hold the fan column firmly to prevent falling and personal injuries.
To avoid fire, electric shocks, or other damage,use the power adapter and
electrical outlet as instructed below:
Do not excessively pull, twist or bend the power adapter, as this may
expose or break the cord's core.
The power adapter must be plugged into a suitable electrical outlet.
Use the power adapter that is provided with the fan, do not use any third
party power adapters.
Always unplug the fan before carrying out maintenance to or moving the fan.
In use
If you encounter any of the following: abnormal sound, strange
odor, high temperature, inconsistent fan rotation, etc., stop the fan
immediately.
Do not lean on the fan or tilt the fan while it is running.
Do not dismantle the device by yourself. In case repair or consultation
is needed, please contact Smartmi customer service.
Adapter
Be sure to properly install the product according to the instructions
to avoid electric shocks, fire hazards, personal injuries, and any other
accidents.
When installing and dismantling the device, be sure to first disconnect
the power.This fan contains a battery. When assembling the unit,
mount the fan cover and fan blades first, and then assemble the base
to prevent the fan from starting accidentally and causing mechanical
hazards.
The appliance must be disconnected from the
supply mains when removing the battery.
The battery is to be disposed of safely.
Details on how to remove the battery:
1. Turn off and unplug the fan before disassemble.
2. Remove the base bolts with an Allen wrench to separate
the column.
3. Remove the foot pad with a sharp tool, and then use a
Phillips-head screwdriver to remove the the base screws.
4. Detach the upper cover of the base.
5. Use a Phillips-head screwdriver to remove the screws on the
battery compartment cover. Remove the cover and take out the
lithium battery.

4
3
45
8
10
9
Package list
1
Column
2
Base
Fan blade knob
Screw for fan cover Power Adapter
Remote control/
AAA battery
Fan assembly
Fan cover knob
6
Allen wrench
7
Base bolt

5
Magnetic
charging port
On/Off button
Temperature-sensing
mode / Set Level button
Horizontal
Oscillation button
Vertical button
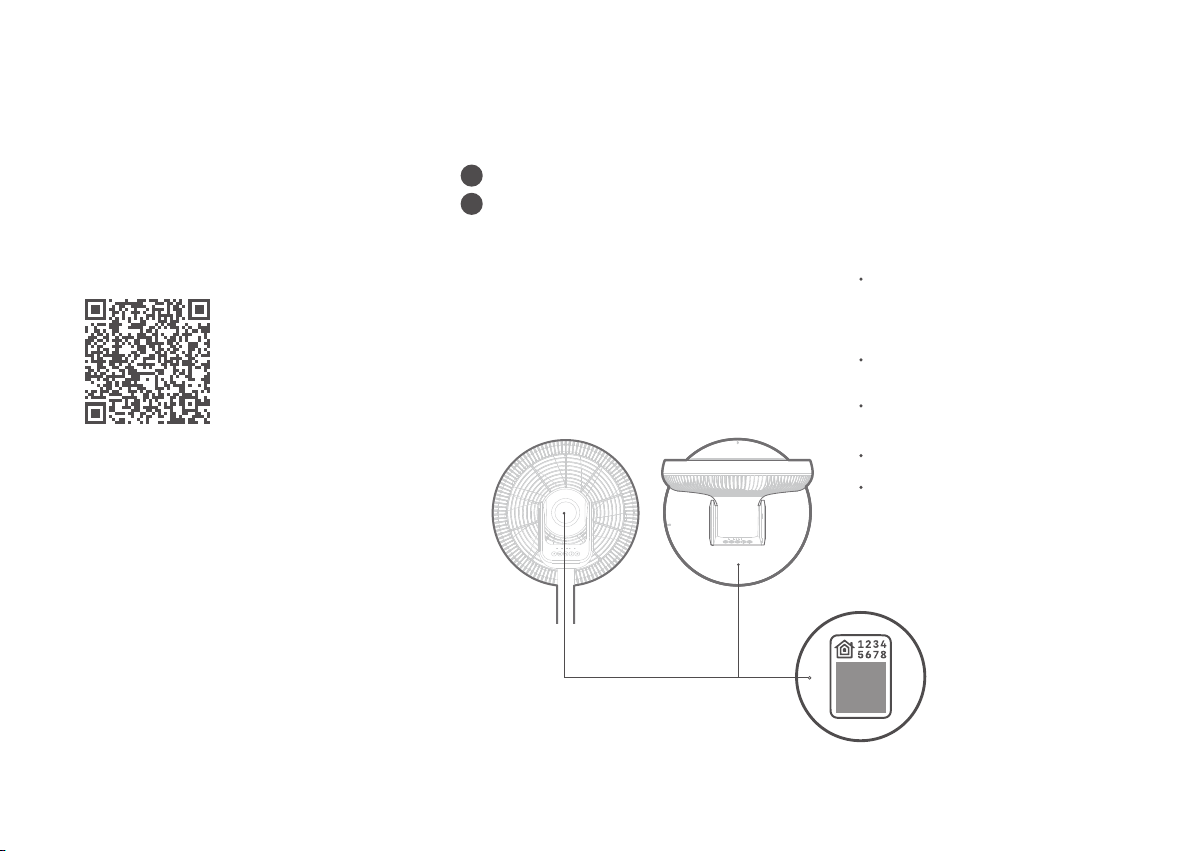
Magnetic charging port
Product overview
Home position
Home position for fan
oscillation. If the fan is turned
off while oscillation is on, the
wind speed will be reduced
and the fan cover will slowly
rotate back to home position.
If the fan's power supply is
cut off, the fan cover will
not return to home position
and will remain in it's current
position at the time.
Column
Display
Base
1
2
6
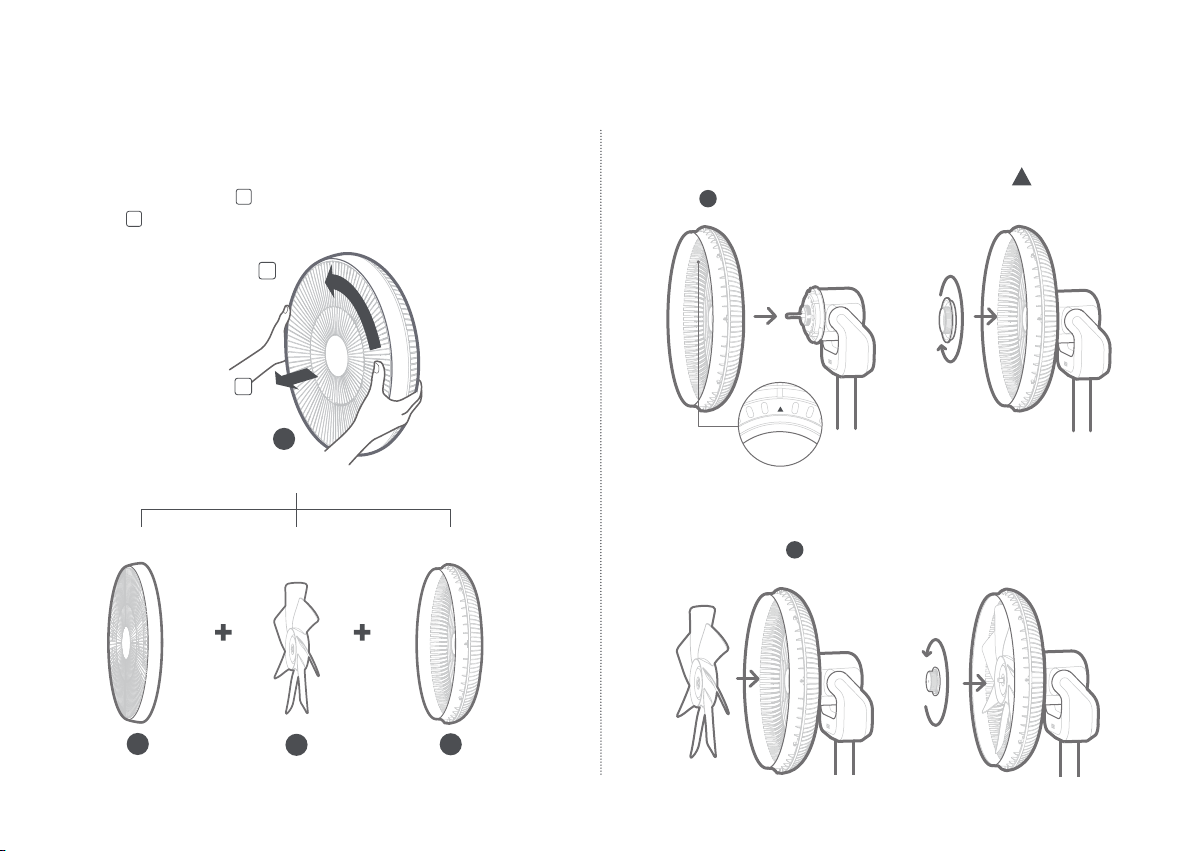
Installation
Take out the fan assembly. Rotate the fan grille counterclockwise until it is
loose, as shown in Fig. below. Remove the fan grille as per the directions
in Fig. and remove fan blades.
Dismantling the fan assembly
2
Fan assembly
11 13
12
Fan grille Fan blades Rear fan cover
Installing the rear fan cover
Align the center hole of fan blades with the motor shaft and push into
position. Tighten the blade knob counterclockwise to attach fan
blades to motor that has the rear fan cover installed.
Installing the fan blades
Place the rear fan cover on the motor aligned at the top position.
Tighten fan cover knob clockwise to attach the rear fan cover to motor.
5
1
2
4

7
Insert the screw for fan cover
into the hole at the bottom of the
fan cover, then fasten it clockwise
with a Phillips head screwdriver.
Place the fan grille into the frame of the rear fan cover, then rotate the fan
grille clockwise to align with the engraved markings on the rear cover.
Installing the fan grille
Fastening the fan grille
Unfasten Fasten
Tighten the base bolt clockwise
with the Allen wrench to secure
column to base.
Insert the base bolt
into the hole at the bottom
of the base.
Align column to base socket
as illustrated, and insert lower end
of column into base socket.
Installing the base
1
2
3
8
7
6
7
1 3
8
Magnetic charging port
Operating on the battery
Note: If pairing is not successful within 10 seconds, the fan will resume normal
operation and clear existing pairing information.
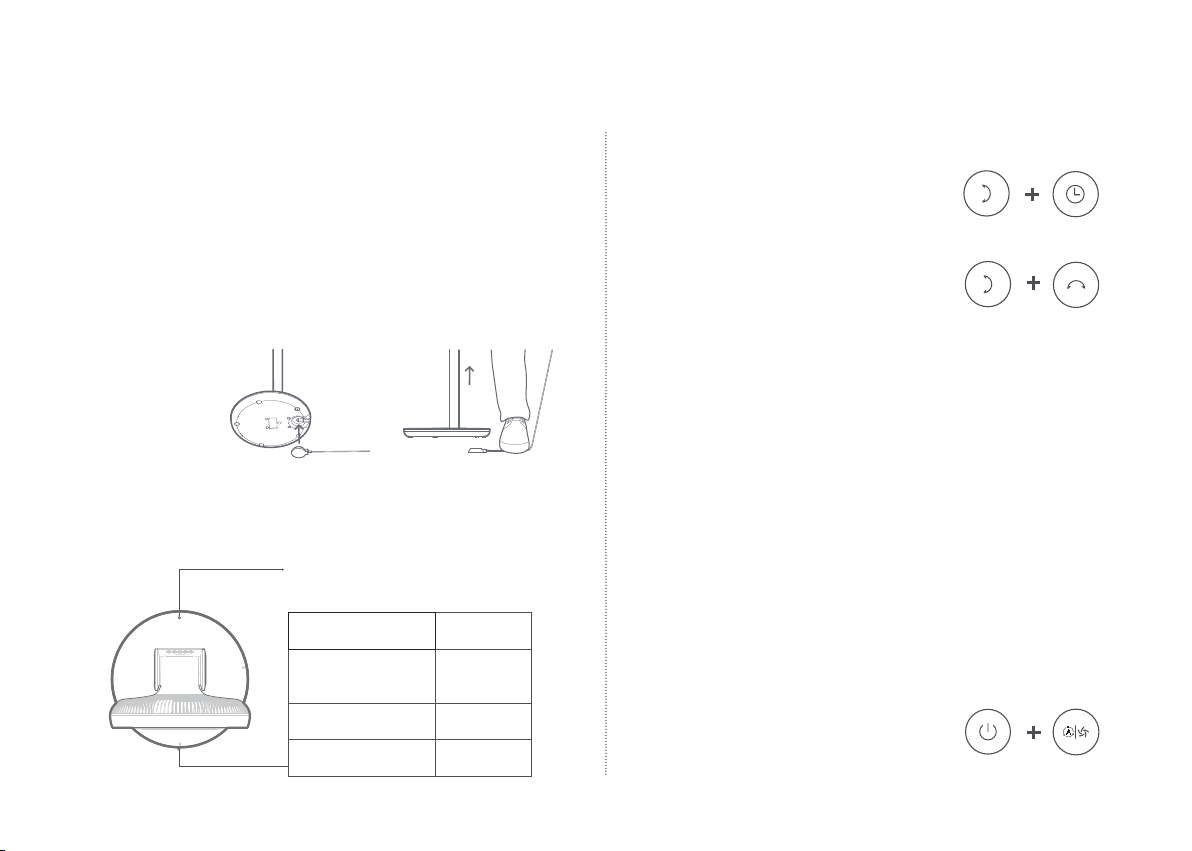
Pairing Procedure for Fan Remote Control
Child Lock Setting
Turning Wi-Fi on/off
Resetting Wi-Fi
Press and hold both the “vertical oscillation”
button and the "timer”button located on the
air circulator fan for 2 seconds. When you hear
a long beep, the fan has entered pairing mode.
Within 30 seconds, press and hold both the
"vertical oscillation”button and the "horizontal
oscillation”button" for 2 seconds. When you hear
a long beep, the remote control has been paired.
Setting child lock: The child lock must be enabled on the app. Disable
child lock: Press and hold both the "horizontal oscillation”button and the
"timer”button for 2 seconds. When you hear a long beep, the child lock has
been disabled.
Turning Wi-Fi off: Press and hold both the "mode”button and the "timer”
button for 2 seconds. When you hear a long beep, Wi-Fi has been turned off
and the Wi-Fi indicator on the unit will turn off.
Turning Wi-Fi on: When Wi-Fi is off, press and hold both the "mode”button
and "timer”button for 2 seconds. When you hear a long beep, Wi-Fi has
been turned on and the Wi-Fi indicator on the unit will blink.
Press both the "power”button and the "level/
mode”button for 5 seconds. When you hear a long
beep, Wi-Fi has been reset.
Installation
Connecting to power supply/charging the battery
Charging
Insert the adapter plug into a power supply. Place the magnetic charging base
connected to the adapter on a flat surface. Align charging port on fan base to
charging base. Bring charging port close to the charging base, and they will
connect automatically (see the left figure below).
There is a battery contained inside the fan base. When it is sufficiently
charged, gently step on the adapter cord to separate the adapter from the
device. The device can then be used independently (see the right figure below).
If the fan is connected to a power supply, no battery power will be consumed while
it is running, and the battery will be charged to full capacity.
When the battery level is between 0%–90%, the indicator light is orange and
slowly fades off in 12 seconds.
When the battery level is between 91%–100%, the indicator light remains solid
green for 12 seconds.
Indicator status Battery level
Green light solid for
20 seconds 21%-100%
Orange light solid 11%-20%
Orange light blinking 0%-10%
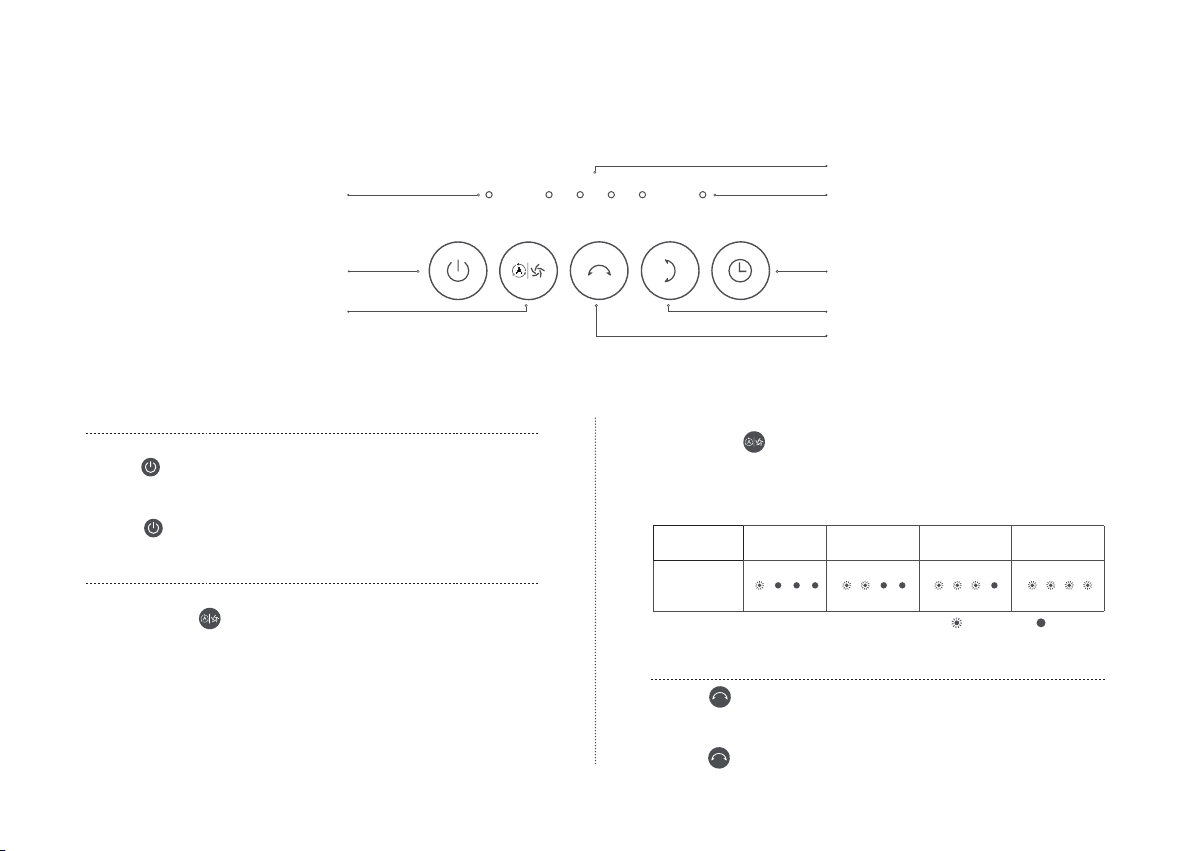
Body buttons
Body buttons
Remote control buttons
9
Intelligent Control with Apple HomeKitLinking the Device to
Smartmi Link
Open the Home app on your iPhone/iPad
Tap "Add Accessory" and then scan the HomeKit setup code on the product sticker (two stickers on the
device unit, see illustration), or enter the eight-digit setup code above the HomeKit Setup Code. The
device will then be linked to the Apple Home app
This product has been linked to the Smartmi Link
and can be controlled using the app.
Scan the QR code or search for "Smartmi Link" on
the app store to download and install the app. Go to
the app's homepage, click "+" in the middle of the
page, then add the device as prompted.
Note: Please ensure that your Wi-Fi network is both available
and has Internet access. Place your phone as close to this
product as possible. (This product does not support 5G This
product will be listed as "Smartmi Air Circulator Fan" in the
app's device listingnetworks)
Tap "Add Accessory" and then scan the HomeKit setup
code on the product sticker (two stickers on the device
unit, see illustration), or enter the eight-digit setup
code above the HomeKit Setup Code. The device will
then be linked to the Apple Home app
Devices linked to Smartmi Link can also be added to
HomeKit. Go to the Device Control page on Smartmi
Link. Tap "Add to HomeKit" in "Settings" and then link
the device to HomeKit as prompted
Note:
Please ensure that your Wi-Fi network is
both available and has Internet access.
Place your phone as close to this product as
possible. (This product does not support 5G
networks)
To control this accessory which is compatible
with HomeKit, it is recommended to use iOS
13.0 or a later version.
Please keep the HomeKit setup code, as you
will need to scan the code to link the device to
HomeKit after a factory reset.
iPad and iPhone are trademarks of Apple Inc.,
registered in the U.S. and other countries.
Controlling this HomeKit-enabled accessory
automatically and away from home requires a
HomePod, Apple TV, or iPad set up as a home
hub. It is recommended that you update to the
latest software and operating system.
1
2
HomeKit Setup Code
10
Use
Features
Scheduled off
Level indicator
Vertical button
Horizontal Oscillation button
Wi-Fi status indicator
On/Off button
Temperature-sensing
mode indicator
Temperature-sensing
mode / Set Level button
Temperature-sensing Mode
Press and hold the button to switch to temperature-sensing mode. In
temperature-sensing mode, the temperature-sensing mode indicator remains
on. The next time the fan is switched on, it will return to its previous mode by
default. Press and hold this button again to return to normal mode.
Both temperature-sensing and standard modes feature four fan speed options.
In temperature-sensing mode, the starting wind speed varies dependent on
fan speed selection, which corresponds to four temperature sensing frequency
conversion algorithms.
Level-setting mode
Short press the button to change level setting. For every press, the fan
speed will cycle between levels 1, 2, 3, and 4, indicated by the corresponding
level indicator (see table below).
Press the button to enable or disable horizontal oscillation. The next
time the fan is switched on, it will return to its previous horizontal oscillation
setting by default.
Press the button again to disable horizontal oscillation.
Power on
Press the button to start the fan. When it is turned on for the first time,
the wind speed will be set at Level 1. When it is turned on again after being
turned off, the wind speed will default to the level set when last powered on.
Press the button again to turn off fan.
Power on/off
Set Level button
Set horizontal oscillation
Wind speed Level 1 Level 2 Level 3 Level 4
Status
indicators
Indicator offIndicator on

11
Use
Short press the button to cycle timer through 1 - 2 - 3 - 4 hours and off. The
corresponding timer indicator will be lit for 5 seconds. After 5 seconds, the timer
indicator will return to level indicator mode.
Setting the shutdown timer
120°
100°
Timer Switch off 1 hour 2 hours 3 hours 4 hours
Status
indicators
Indicator offIndicator on
Screen display
Wind speed Power
off
Level
1
Level
2
Level
3
Level
4
Status
indicators
Indicator offIndicator on
Wi-Fi status indicator
Temperature-sensing indicator
Wind speed status indicators
Natural breeze status indicator
Enable or disable in the app.
Both temperature-sensing and standard modes feature four fan speed
options. In temperature-sensing mode, the starting wind speed varies
dependent on fan speed selection, which corresponds to four temperature
sensing frequency conversion algorithms.
Note: Natural mode can be enabled or disabled in the app.
The wind speed can be switched between level 1, 2, 3, and 4. The
corresponding status indicators will illuminate accordingly (refer to the
table below).
Press the button to enable or disable vertical oscillation. The next time
the fan is switched on, it will return to its previous vertical oscillation setting
by default.
Press the button again to disable vertical oscillation.
Set vertical oscillation

12
Maintenance and care
Parts that can be cleaned
The following parts can be cleaned with clean water or diluted neutral
detergent using a soft cloth or sponge.
Parts that cannot be cleaned
Gently wipe the following parts with a soft, dry cloth.
5
Fan cover knob
Fan grille Fan blades Rear fan cover
Do not flush the above parts with water.
Do not use thinner, lightweight gasoline, detergent or alkaline-based cleaners.
1
3
Column
Base
4
Fan blade knob
Fan cleaning
Be sure to stop the fan and power it off before disassembly. Before dismantling
Fan Cover, remove the metal column from base to prevent the fan from starting
accidentally and causing mechanical hazards.
After cleaning, ensure all parts are completely dry before re-installation and use, and
avoid direct sunlight.
11 13
12
13
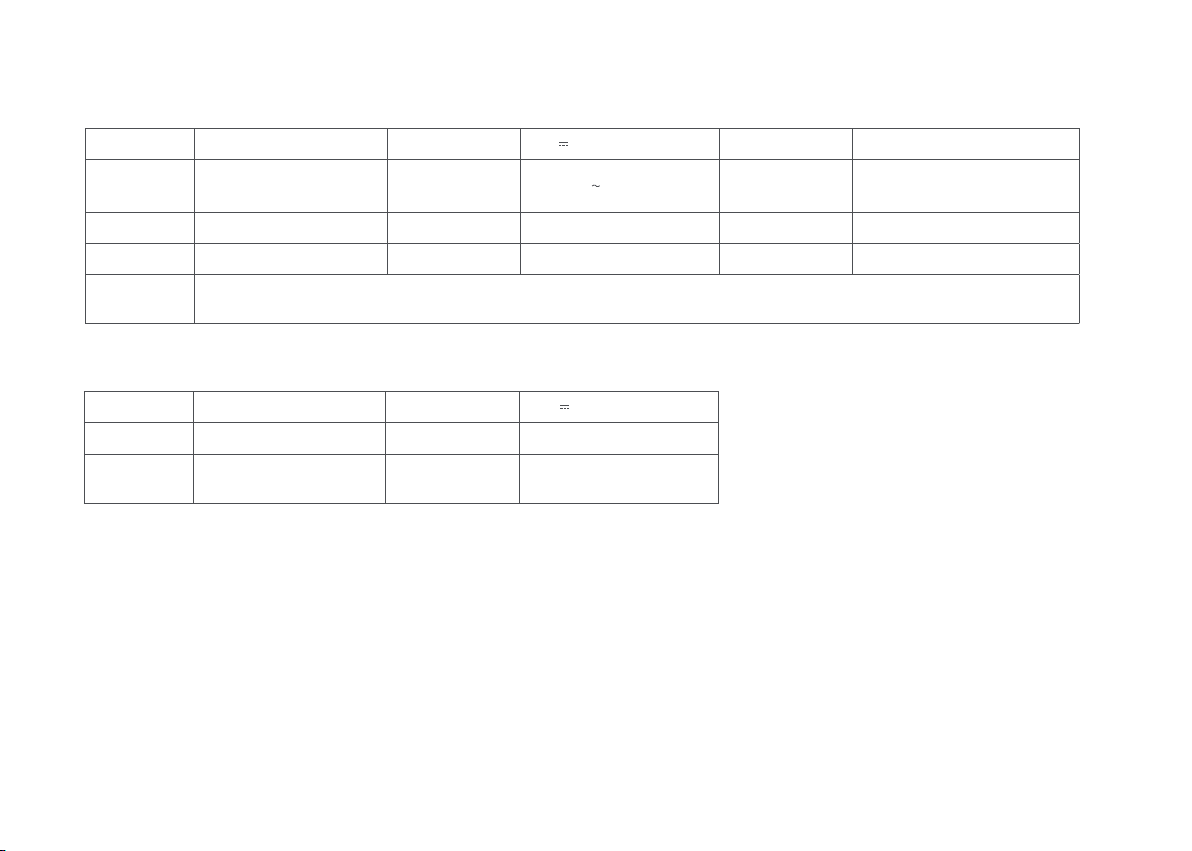
Specifications
RF Specification
Wi-Fi 2.4G (2400 - 2483.5 MHz), 2.4G SRD(2402-2480MHz) ,Max. RF Output Power:≤20 dBm
Under normal use of condition ,this equipment should be kept a separation distance of at least 20cm between the antenna and the body of the user.
Name Smartmi Air Circulator Fan Rated voltage 15V Battery type Lithium-ion battery pack
Model ZLBPKQXHS02ZM
ZLBPKQXHS02ZM/DG
Power Adapter
Rated Input 100-240V , 50/60Hz, 1.0A Rated capacity
of battery 5200mAh
Type DC fan Rated power 36W Noise ≤60dB(A)
Net weight Approx.3.8kg Item dimensions 325mm×340mm×990mm RF output power ≤20dBm
Wireless
connection Wi-Fi IEEE 802.11 b/g/n 2.4GHz ; 2.4G SRD
Name Remote Control Rated voltage 1.5V , One LRAAA
Model KQXHSYKQ02ZM Item dimensions 126mm×28mm×14mm
Wireless
connection 2.4G SRD RF output power ≤20dBm

Hereby, Beijing Smartmi Electronic Technology Co., Ltd. declares that the radio equipment type ZLBPKQXHS02ZM, ZLBPKQXHS02ZM/DG
are in compliance with Directive 2014/53/EU. The full text of the EU declaration of conformity is available at the following internet address:
https://smartmiglobal.com/doc.html
All products bearing this symbol are waste electrical and electronic equipment (WEEE as in directive 2012/19/EU) which should not be mixed
with unsorted household waste. Instead, you should protect human health and the environment by handing over your waste equipment to a
designated collection point for the recycling of waste electrical and electronic equipment, appointed by the government or local authorities.
Correct disposal and recycling will help prevent potential negative consequences to the environment and human health. Please contact the
installer or local authorities for more information about the location as well as terms and conditions of such collection points.
Regulatory Compliance Information
Europe — EU declaration of conformity
14

15
warnung
Eine unsachgemäße Verwendung des
Produkts kann zu Stromschlägen, Bränden,
Personenschäden und anderen Schäden führen.
Stellen Sie das Produkt bitte nicht auf einer
unebenen oder instabilen Oberfläche auf, wo es
umkippen könnte.
Stellen Sie das Produkt bitte nicht in der Nähe
von Gegenständen auf, die umkippen könnten.
Stellen Sie das Produkt bitte nicht in einer
heißen und feuchten Umgebung auf, wie z.B. in
einem Badezimmer.
Verwenden Sie das Produkt bitte nicht mehr,
wenn das Netzkabel beschädigt oder der
Netzstecker locker ist.
Verwenden Sie das Produkt bitte nicht, wenn
das Lüftergitter nicht ordnungsgemäß installiert
ist oder das hintere Lüftergitter lose ist/fehlt.
Stellen Sie sicher, dass der Ventilator von der
Stromversorgung getrennt ist, bevor Sie die
Schutzgitter entfernen.
Dieses Gerät kann von Kindern ab 8Jahren sowie
von Personen mit eingeschränkten physischen,
sensorischen oder geistigen Fähigkeiten,
mangelnder Erfahrung und mangelnden
Kenntnissen verwendet werden, solange sie
durch eine für ihre Sicherheit zuständige Person
beaufsichtigt werden und von ihr Anweisungen
erhielten, wie das Gerät sicher zu verwenden
ist, und sie die damit verbundenen Gefahren
verstehen.
Verwenden Sie nur das mit diesem Gerät
mitgelieferte Netzteil.
Wenn das Netzteil beschädigt ist, muss es
durch ein beim Hersteller oder Kundendienst
erworbenes Original-Netzteil ersetzt werden.
Kinder dürfen nicht mit dem Gerät spielen.
Die Reinigung und die Wartung durch den

16
Benutzer dürfen nicht von Kindern ohne Aufsicht
durchgeführt werden.
Demontieren Sie das Produkt bitte nicht
selbstständig.
Knicken, biegen oder verdrehen Sie bitte nicht
das Netzkabel mit übermäßiger Kraft, um ein
Freilegen oder Brechen des Kabels zu vermeiden.
Stecken Sie bitte keine Finger oder Fremdkörper
in das vordere oder hintere Lüftergitter oder in die
Lüfterflügel, während der Ventilator in Betrieb ist.
Halten Sie bitte Ihre Haare oder Stoffe vom Lüfter
fern, um zu vermeiden, dass sich Gegenstände in
den Lüfterflügeln verfangen.
Verwenden Sie bitte nicht das mitgelieferte
Netzteil mit einem anderen Produkt.
Die in diesem Gerät enthaltenen Batterien dürfen
nur von Fachkräften ausgetauscht werden.
Die Fernbedienung wird von 1LRAAA-Batterie
gespeist; legen Sie die LRAAA-Batterie mit
der richtigen Polarität in das Batteriefach
ein. Die Anschlusskontakte dürfen nicht
kurzgeschlossen werden.
Die für die Fernbedienung verwendete nicht
wiederaufladbare Batterie darf nicht wieder
aufgeladen werden. Leere Batterien müssen aus
dem Gerät entfernt und sicher entsorgt werden.
Wenn die Fernbedienung über einen längeren
Zeitraum nicht benutzt wird, sollten die Batterien
aus der Fernbedienung entfernt werden.
Dieses Gerät darf nur mit Schutzkleinspannung
entsprechend der Kennzeichnung auf dem Gerät
versorgt werden.
WARNUNG: Verwenden Sie zum Aufladen der
Batterie nur die abnehmbare Versorgungseinheit
17
Vorsichtsmaßnahmen
Sicherheitshinweise
Installation
Handhabung
Schalten Sie den Ventilator immer aus, und ziehen Sie den Netzstecker
aus der Steckdose, bevor Sie ihn bewegen.
Halten Sie die Ventilatorstange fest, um Verletzungen durch Umkippen
zu vermeiden.
Um Brände, Stromschläge oder andere Schäden zu vermeiden,
verwenden Sie das Netzteil und die Steckdose wie unten beschrieben:
Ziehen, verdrehen oder biegen Sie das Kabel des Netzteilsnicht
übermäßig, da dadurch der Kern des Kabels freigelegt oder gebrochen
werden kann.
Das Netzteil muss in eine geeignete Steckdose eingesteckt werden.
Verwenden Sie das mit dem Ventilator mitgelieferte Netzteil;
verwenden Sie keine Netzteile von Drittanbietern.
Ziehen Sie immer den Netzstecker aus der Steckdose, bevor Sie
Wartungsarbeiten durchführen oder den Ventilator bewegen.
Verwendung
Wenn Sie eines der folgenden Probleme, wie ein abnormales Geräusch,
einen seltsamen Geruch, eine hohe Temperatur, eine unregelmäßige
Lüfterdrehung usw. feststellen, schalten Sie den Ventilator sofort aus.
Stützen Sie sich nicht auf den Ventilator, oder kippen Sie ihn nicht,
während er läuft.
Demontieren Sie das Gerät nicht selbstständig. Falls eine Reparatur
oder Beratung erforderlich ist, wenden Sie sich bitte an den
Kundendienst von Smartmi.
Netzteil
Stellen Sie sicher, dass Sie das Gerät ordnungsgemäß gemäß
den Anweisungen installieren, um Stromschläge, Brände,
Personenschäden und andere Unfälle zu vermeiden.
Achten Sie bei der Installation und Demontage des Geräts darauf,
zuerst die Stromversorgung zu unterbrechen. Dieser Ventilator enthält
eine Batterie. Montieren Sie beim Zusammenbau des Geräts zuerst die
Lüftergitter und die Lüfterflügel und dann den Standfuß, um zu vermeiden,
dass der Lüfter versehentlich anläuft und mechanische Gefährdungen
verursacht.
<BLJ36W150240P-VF>, die mit diesem Gerät
geliefert wurde.
Die Batterie muss vor der Entsorgung des Geräts
entfernt werden.
Beim Entfernen der Batterie muss das Gerät von
der Stromversorgung getrennt sein.
Die Batterie muss sicher entsorgt werden.
Wie lässt sich die eingebaute Batterie entfernen:
1. Schalten Sie den Lüfter aus und ziehen Sie den Netzstecker, bevor Sie ihn zerlegen.
2. Lösen Sie die unteren Schrauben mit einem Inbusschlüssel, um die Stange zu
entfernen.
3. Entfernen Sie die unteren Fußpolster mit einem scharfen Werkzeug, und lösen Sie
anschließend die unteren Schrauben mit einem Kreuzschlitzschraubendreher.
4. Trennen Sie das obere Gehäuse vom Unterteil.
5. Lösen Sie die Schrauben des Batteriefachdeckels mit einem
Kreuzschlitzschraubendreher, und entfernen Sie den Batteriefachdeckel, um die
Lithiumbatterie herauszunehmen.

18
3
45
8
10
9
Lieferumfang
1
Ständer
2
Standfuß
Rotorblatthalterung
Befestigungsschraube
für Schutzgitter
Magnetisches
Netzkabel
Fernbedienung/AAA-Batterie
Lüftereinheit
Schutzgitterhalterung
6
Innensechskant
schlüssel
7
Befestigungsschraube
für Standfußmontage

19
Magnetischer
Ladeanschluss
Ein-/Ausschalttaste
Temperaturerfassungsmodus/
Einstellungstaste für
Geschwindigkeitsstufe
Horizontales
Schwenken-Taste
Vertikales
Schwenken-Taste
Magnetischer
Ladeanschluss
Produktübersicht
Grundstellung
Grundstellung für Schwenkfunktion
des Umluftventilators. Wenn der
Umluftventilator ausgeschaltet
wird, während die Schwenkfunktion
aktiviert ist, reduziert sich die
Drehgeschwindigkeit und das
Schutzgitter bewegt sich zurück
in die Grundstellung. Wird
der Umluftventilator von der
Stromversorgung getrennt, bewegt
sich das Schutzgitter nicht zurück
in die Grundstellung und verharrt
in der Position, in der es sich zum
Zeitpunkt der Unterbrechung der
Stromversorgung befand.
Ständer
Bildschirm
Standfuß
This manual suits for next models
1
Table of contents
Languages:
Other smartmi Fan manuals


Popular Fan manuals by other brands

Somogyi Elektronic
Somogyi Elektronic home PVRO 40 instruction manual

ATMOX
ATMOX 01-360-100 quick start guide

Panasonic
Panasonic Whisper Wall FV-08WQ1 installation instructions

Fantasia
Fantasia Alpha Owner's instruction manual

Hunter
Hunter 59072 owner's guide

Helios
Helios MegaBox-EC Series Installation and operating instructions


 owner's manual")


