SmartOne 74.226 User manual
1
TM
Effective: August 1999
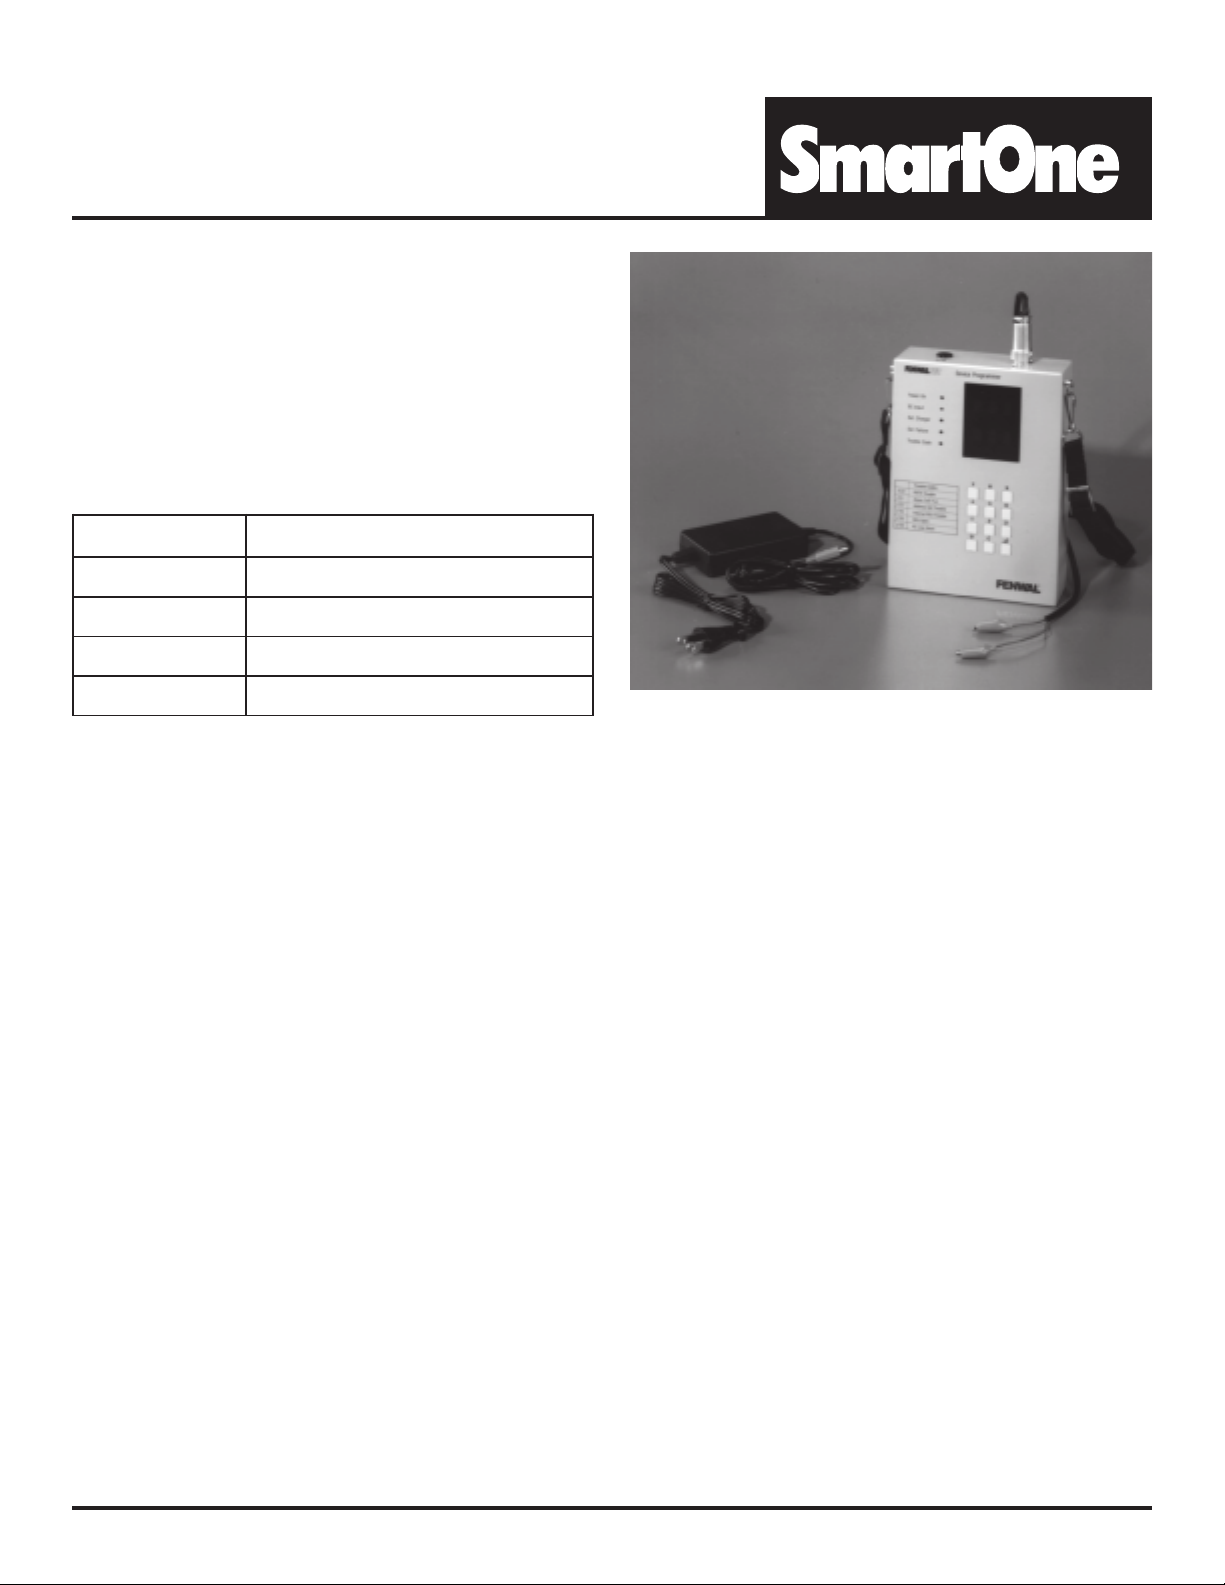
HAND-HELD DEVICE
PROGRAMMER
For SmartOne Devices
74.226
DESCRIPTION
The Hand-Held Device Programmer (the programmer ) provides
the system installer/service person with a convenient means to
assign device address information and test device operation. The
programmer is designed to support all SmartOne intelligent/ad-
dressable devices. A table of supported devices is provided on the
other side of this instruction sheet.
NOTE: Prior to using the programmer, you need to ensure that
you have the supplied accessories, listed in the table be-
low.
.oNtraPnoitpircseD
100-310002-47)tinuetelpmoc(remmargorPeciveD
100-999711-60*kcaPrewoPCD/CA
100-300811-60*droCCA
100-899711-60*)ecivednidellatsni(kcaPyrettaB
100-310002-47N/PlevelpotnideilppusllA*
PREPARING FOR OPERATION
Prepare the programmer for operation with AC adapter as follows
1. Connect device interface cable to the PC line connector on
the top of the programmer.
2. Connect the small plug of the power pack to the DC input
connector on the top of the programmer and then plug the line
cord into a 115 VAC, 60 Hz outlet.
3. Verify that the green DC Input LED is lit. The yellow Bat.
Charger LED will also light if the batteries are not fully charged.
4. Set the power switch to the ON position (up direction).
5. Verify that the green Power On LED is lit and that the display
is flashing each segment of the six characters.
6. After 30 seconds ensure the top row of the display is flashing.
The bottom row of the display should be blank.
PREPARING FOR OPERATION
WITH INTERNAL BATTERIES
1. Connect Interface Cable to the PC line connector on the top of
the programmer.
2. Set the power switch to the ON position (up direction).
3. Verify that the green Power On LED is lit and that the display
is flashing each segment of the six characters.
4. If the Bat. Failure LED is lit or no LEDs are lit, charge the
batteries according to procedure.
BATTERY CHARGING
If the Bat. Failure LED lights on the programmer, go to AC opera-
tion or charge the batteries as described below:
1. Ensure that the power switch is in the off position (down direc-
tion).
2. Connect the small plug of the power pack to the DC IN con-
nector on the top of the Programmer and then plug the line
cord into a 115 VAC, 60 Hz outlet.
3. Verify that the DC Input and Bat. Charger LEDs are lit.
4. Charge batteries for at least 1 hour. If the Bat. Failure LED is
illuminated after the charge. Replace the Programmers bat-
teries.
TO CHANGE OR SET
THE ADDRESS OF A DE ICE
1. Connect the alligator clips of the interface cable to the termi-
nals of an addressable device.
2. After about 17 seconds, the top row of the display should indi-
cate the device address (000 to 255), and shortly after, the
bottom row of the display should indicate ooo .
NOTE: All new addressable devices should have an address of
zero.
3. If the Programmer Trouble Code LED lights, or if the Pro-
grammer beeps or if a trouble code is displayed, replace the
device with an operational device and repeat step 2. If trouble
indications persist, go to troubleshooting section.
4. To change the address, enter a value between 001 and 255
into the key pad. The selected value will appear in the bottom
row of the display. Press the <enter> key.

This literature is provided for informational purposes only. KIDDE-FENWAL,IN . assumes no
responsibility for the product's suitability for a particular application. The product must be prop-
erly applied to work correctly.
If you need more information on this product, or if you have a particular problem or question,
contact KIDDE-FENWAL IN ., Ashland, MA 01721. Telephone: (508) 881-2000
TM
KIDDE-FENWAL INC.
400 MAIN STREET, ASHLAND, MA 01721
TEL: (508) 881-2000 FAX: (508) 881-8920
74.226 08/99 ©Kidde-Fenwal Inc. Printed in USA
5. After about 10 seconds, the selected address will be displayed
on the top row of the display.
6. Repeat steps 1 through 6 for each device required.
BATTERY REPLACEMENT
1. Ensure that the power switch is off (down position) and that
the power cord is disconnected.
2. Remove the four Phillips head screws from the back panel of
the Programmer.
3. Lift the rear panel from the unit carefully preventing tension to
the wiring connected to the rear panel P.C. board. Place rear
panel on the side of the unit. Do not disconnect interconnect-
ing wiring.
4. Remove the two Phillips head screws securing the battery
bracket. Lift out the bracket.
5. Remove battery pack and disconnect battery connector.
6. Install new battery pack by reversing the procedure steps.
SUPPORTED DE ICES
eciveDenOtramS.oNtraP
srotceteDnoitazinoI
001-100204-07
000-100104-07
000-200104-07
000-400104-07
srotceteDcirtceleotohP
001-100204-17
000-100104-17
000-200104-17
000-400104-17
rotceteDtaeHrotsimrehT001-100404-07
seciveDtupnItcatnoCelbasserddA
X00-200704-07
100-300704-07
100-400704-07
seciveDyaleR 000-100804-07
000-300804-07
SPECIFICATIONS
AC Input Rating: 120 VAC, 250 A (Max.)
DC Output Rating: 12 VDC, 1.75 A (Max.)
Battery Rating: 7.2 VDC, 700 mAH
edoCelbuorT
00E
elbuortlanretninA-elbuorTXTXR ehtnihtiwdetcetedneebsahnoitidnoc -eR.fforewopehtteS.eludomXTXR fI.ezilaitinierottinuehtwolladnaezigrene elbuortXTXR(etarepotonseodtinueht yrotcafotremmargorPnruteR.)sniamer .riaperrof
10E
eciveddetcennocehT-liaFtseTmralA ecivedevomeR.tseTmralAdeliafsah hcatta-eR.raelcotremmargorPwolla .ecivedfosserddaegnahC.eciveddeliaf eritneetelpmocotremmargorPwollA morfsdaelgnitcennocsiderofebssecorp ,niagatsetsliafecivedfI.ecivedeht .riaperrofecivednruter
20E
ehT-elbuorTteSelbasserddA elbuortadetcetedsahremmargorP fognittessserddagnirudnoitidnoc tcennocsiD.eciveddetcennoc .raelcottiwolladnaremmargorP nosserddatesdnaecivedhcattaeR ecivednruter,niagasliafecivedfI.ecived .riaperrof
59E
sahremmargorPehT-nepOUCRlanretnI ehtmorfnoitidnocelbuortadeviecer detcennocyfireV.eciveddetcennoc detcennocrotsiser.C.O.Esahecived tonsi.C.O.EehtfI.)tupnidda( saecivedehtottitcennoc,detcennoc morfecivedtcennocsiD.deriuqer .raelcottiwolladnaremmargorP tesdnaremmargorPottinuhcattaeR .ecivednosserdda
69E
detcetedsahremmargorP-nepOUCR gniebsaeciveddetcennoceht noitcennoceniLCPyfireV.detcennocsid .raelcottiwolladnaremmargorPot .yrterdnahcattaeR
99E fosdaeleniLCP-trohSeniLCP detrohsemacebevahremmargorP .rehtegot
TROUBLE CODES
Table of contents


