SmartRooms Comfort User manual

Getting started with your SmartRooms
Comfort Controller is as easy as ... 1,2,3.
1
ENTER/
MENU
CANCEL
OCC.
SmartRooms
Thermal Comfort System
By Therma-Ray
Press Cancel/Occ. to put
Comfort Controller in
manual mode
3
2Verify that the green light
is on indicating manual
mode.
Choose the desired room
temperature using the
Up or Down arrows. You
can change this
temperature at any time.
Notes:
º Your Floor or Earth Storage System is calling for heat when a Down arrow is displayed.
º Your System will turn ON when the temperature difference between the Comfort Settings and the actual floor
temperature is more than 2° Fahrenheit (1° Celsius).
º Your Ceiling System is calling for heat when an Up arrow is displayed.
º Your Floor and Ceiling Systems are calling for heat when a Both arrow is displayed..
º Your Low Voltage Comfort Controller must be connected to the SmartRooms Distribution Panel (SRDP) in order
for the heating system to function.

Whether you're a contractor, architect, builder
or homeowner, creating the perfect indoor
environment has always been a challenge.
Therma-Ray, the world's #1 name in thermal
comfort systems, introduces you to the ultimate
solution: SmartRooms . Please take the time to
read this operation guide carefully before you
begin. A diagram of the menu display system is
found at the end of this guide for
easy reference.
COMFORT CONTROLLER FOR LOW VOLTAGE Owners Manual
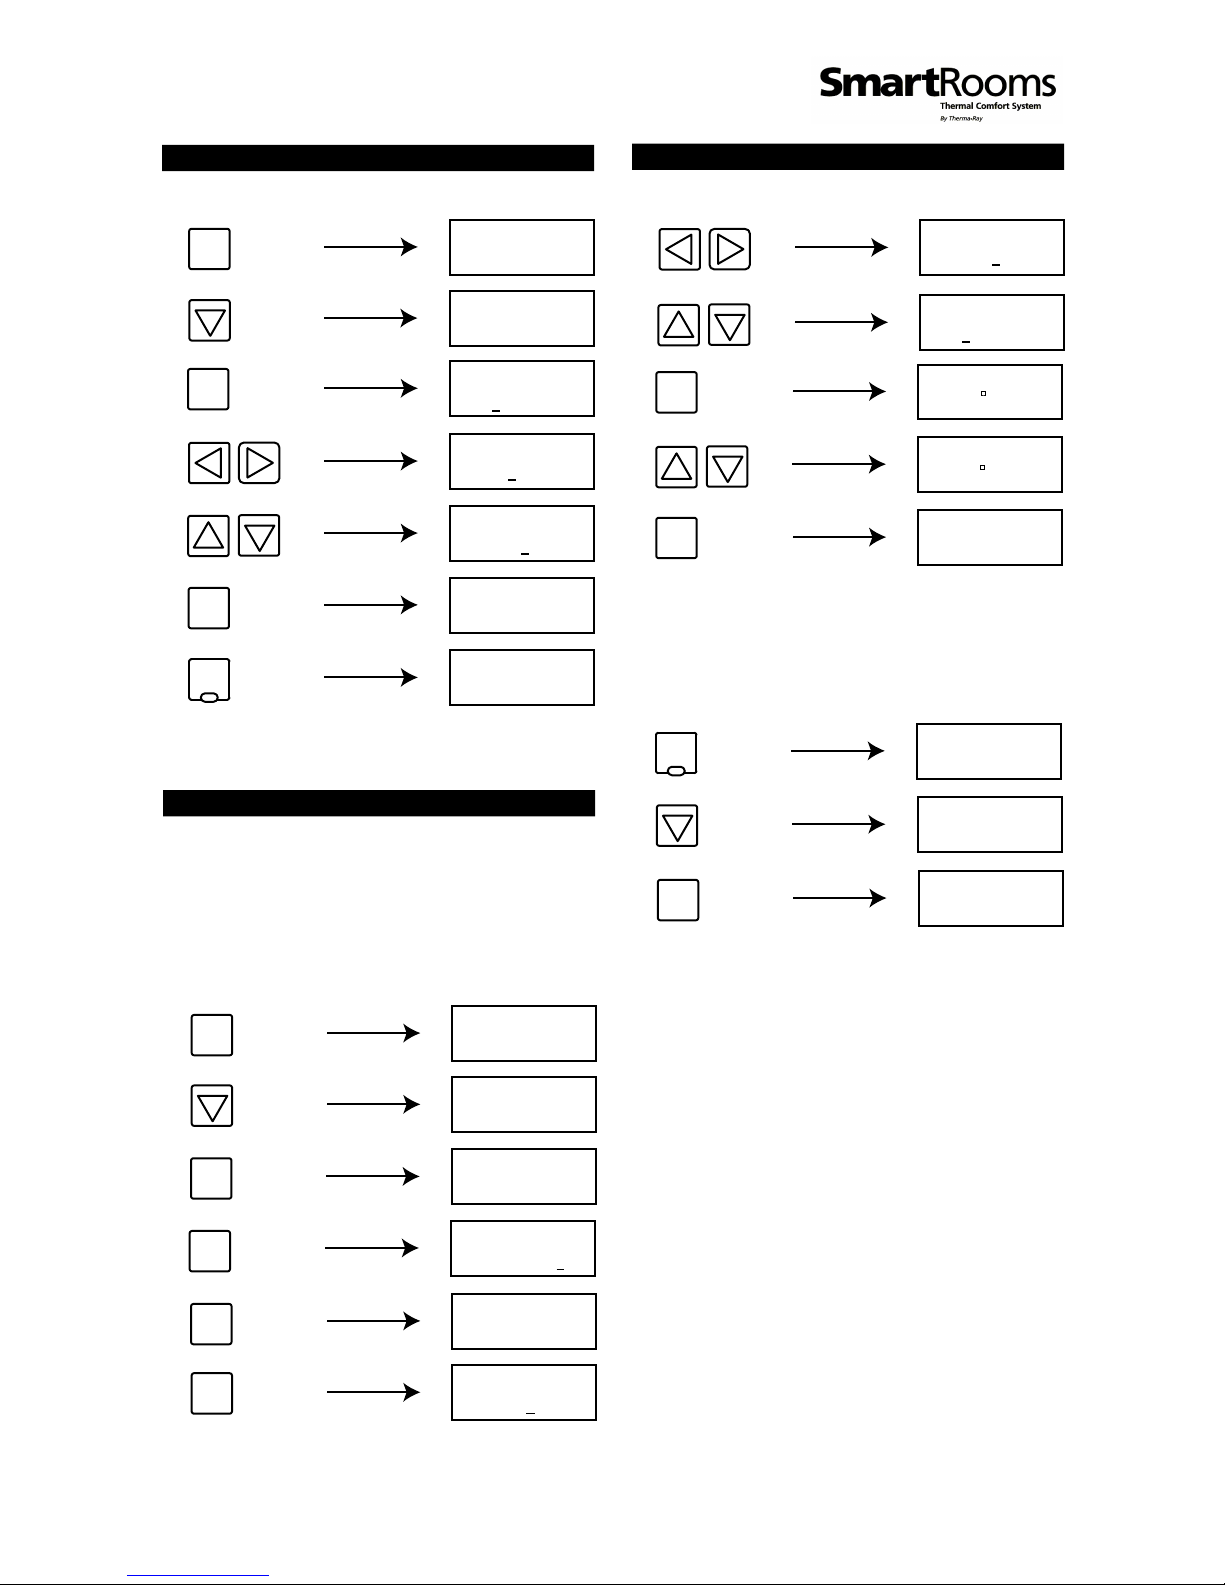
Earth Storage System Setup
1/8
A. Connect high limit sensor to controller.
B. Connect floor sensor to controller.
C. When taking advantage of off-peak electrical rates
make sure that your programming hours correspond
with your utility's off-peak times. Consult the following
programming steps titled “Set Date”, “Set Time” and
“Set Daily Programs” to establish these parameters.
D. If your utility does not have the capability of remotely
turning off the power to your ETS system, we suggest
that you set your programs to turn off 10 minutes
before peak rates come into effect. This should avoid
the ETS system from being on during peak hours due to
clock misalignments.
E. If you have several controllers you should set each
individual controller's address before programming your
hours. Refer to the "Set Address" Section. Then go to
following sections “Set Date” and “Set Time” to set the
current date and time.
F. Consult the Advanced Features Section to
personalize your preferences.
SmartRooms Comfort Controller displays the current time and room temperature. It also displays the day of the
week and the given temperature set point. It is programmable and operational in both English and French. See the
Secondary Features section on Page ‘4/8’ to set language preference.
CANCEL
OCC.
Press Display
1. ENTER/
MENU
2. ENTER/
MENU
5. ENTER/
MENU
3.
MM, DD or YY
Select
4.
Numbers
Set
Set Date
6.
The steps in this section are required when you have an
Earth Storage System designed to take advantage of
off-peak electrical rates:
Press Display
1. ENTER/
MENU
3. ENTER/
MENU
6. ENTER/
MENU
4. HH or MM
Select
5. Numbers
Set
Set Time
2.
CANCEL
OCC.
7.
2/8
8.
9.
Press Display
1. ENTER/
MENU
2.
5. ENTER/
MENU
3.
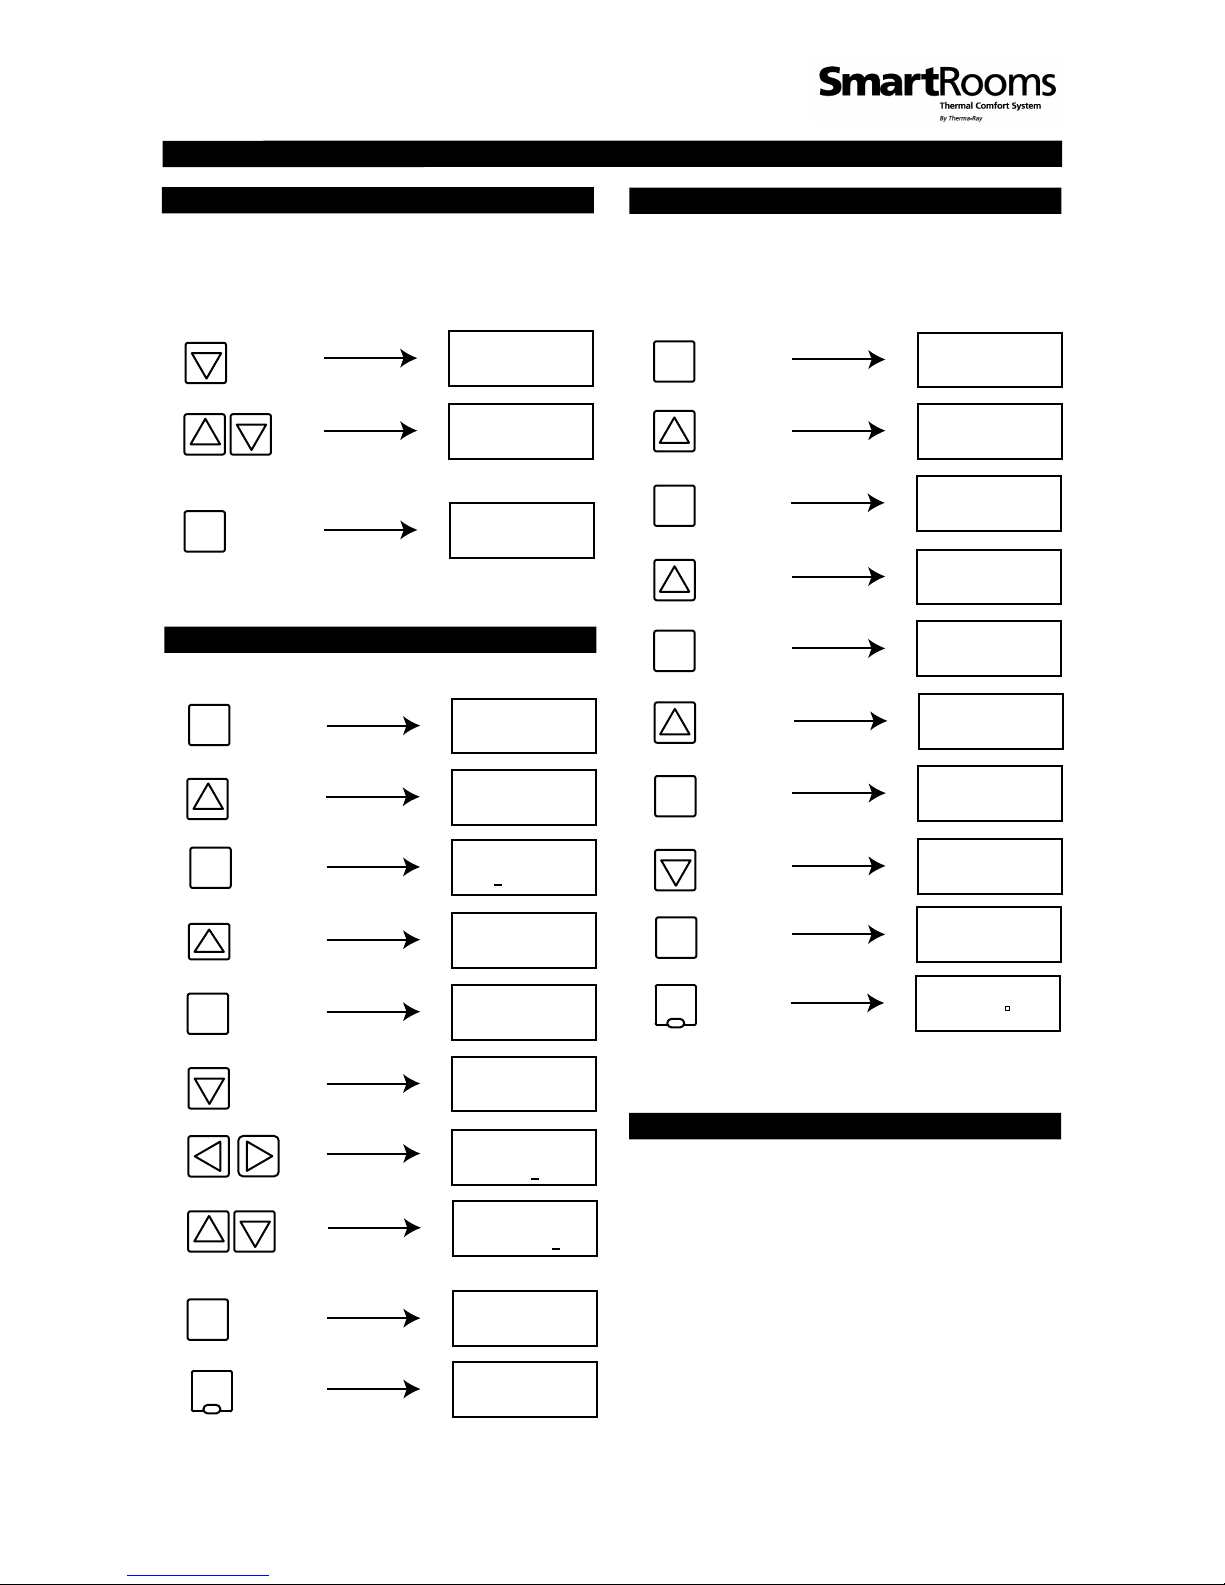
Set Daily Programs
6.
ENTER/
MENU
Use this function to program your temperature
set points for each day of the week. The contro-
ller accepts up to five set points per day, the first
starting at 12:00am, the last finishing at
11:59pm.
x 5
4. ENTER/
MENU
ENTER/
MENU
End Time
Set
ENTER/
MENU
10. Floor Temp
Set
11. ENTER/
MENU
Repeat steps 5-10 until you reach program 5 or
until you reach 11:59PM.
To copy all the programs from Sunday to the rest
of the six remaining days:
7. HH or MM
Select
CANCEL
OCC.
1.
2.
Set Daily Programs (Cont’d)
3. ENTER/
MENU
Note: “Copy Days” saves you programming time. If you
prefer your weekdays programmed differently from the
weekend, program Sunday as if it were Monday. Use
“Copy Days” to make all days the same then return to
step 4 and modify the weekend program.
Ready to Operate
After setting all of your day's programs your SmartRooms
Comfort Controller is ready to start operating on its own.
If at any time you wish to override your day program
temperature settings, you can easily press the Cancel/Occ
button to activate the Occupied Temperature Override.
The light below the button will be on when the override
is activated. Pressing the Cancel/Occ button again will
reactivate the regular schedules. Should you forget to
cancel the override, the SmartRooms Comfort Controller
will remain in Manual Mode - your programmed schedule
will not become activated. The occupied temperature
setting can also be easily changed by pressing the Up
and Down arrows when your time, date and temp-
erature are being displayed.
Press Display

Press Display
1. ENTER/
MENU
2.
5. ENTER/
MENU
3.
Set Language
ENTER/
MENU
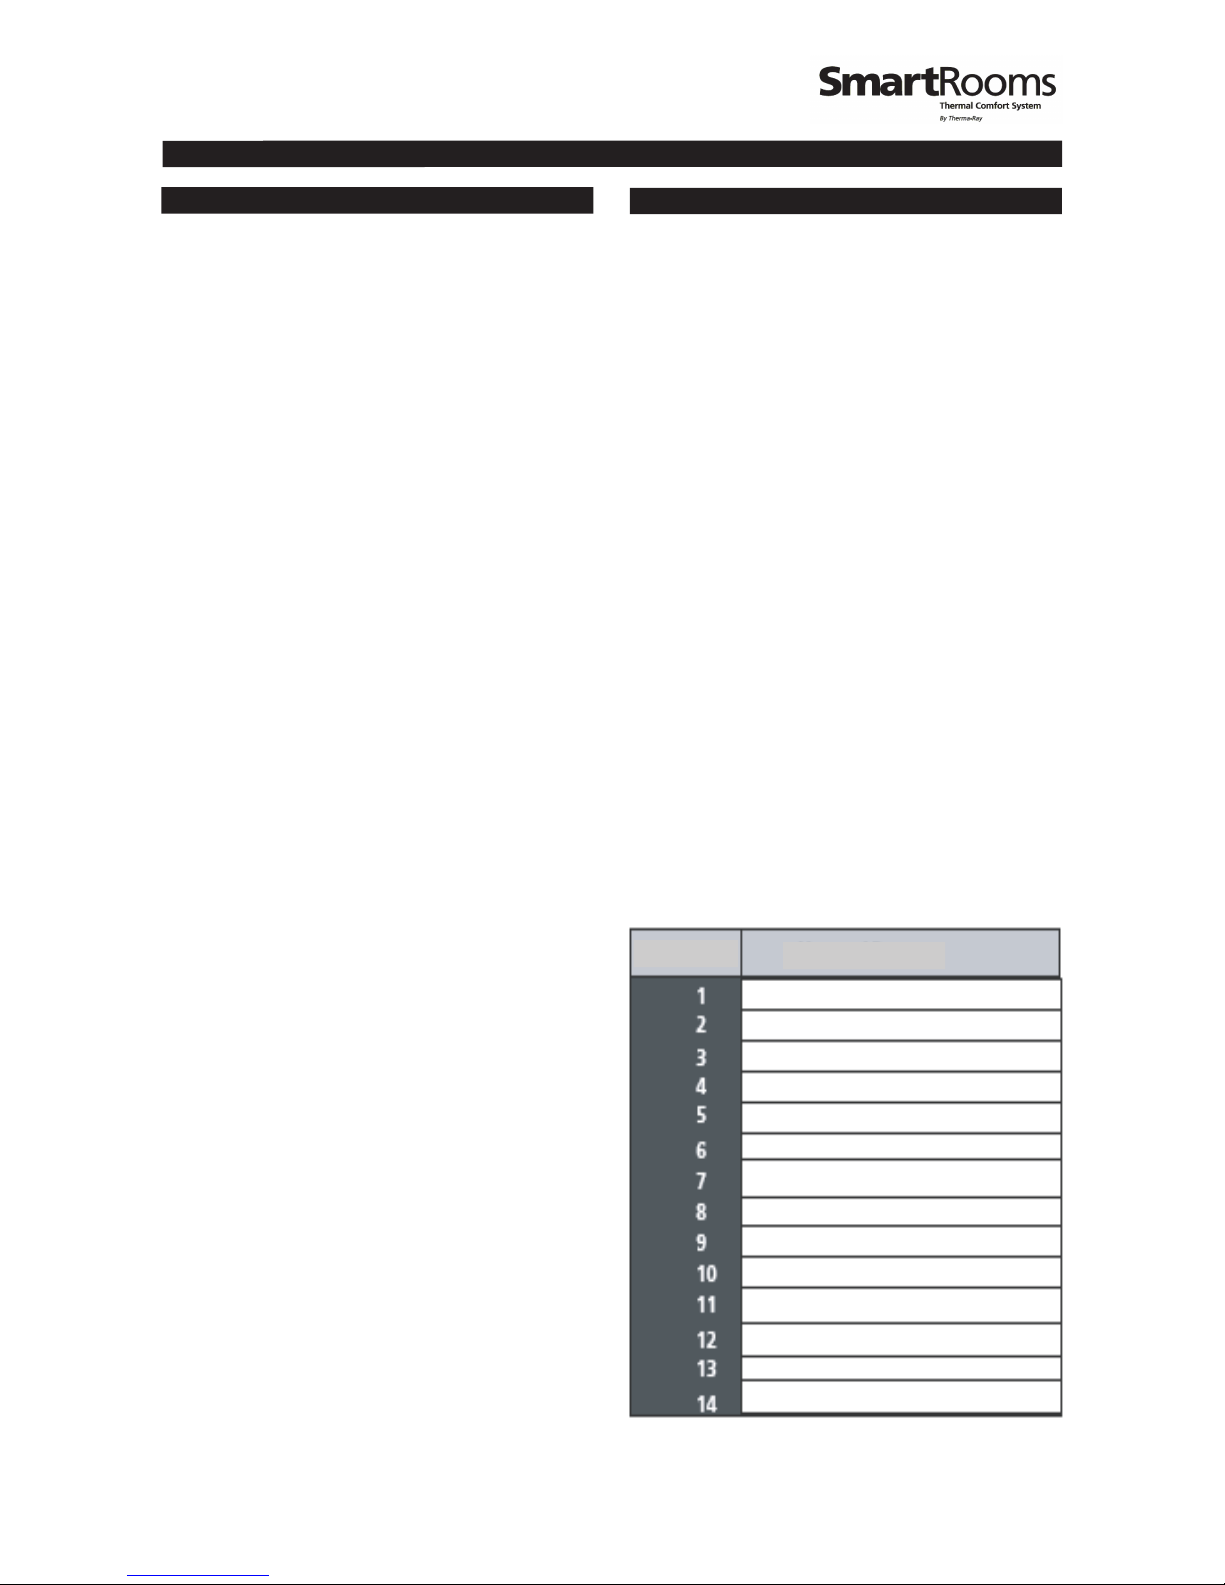
Use this chart to keep track of your preferred program schedules.
Enter the program end-time and desired temperature in each of the given boxes.
Secondary Features
4. Language
Set
CANCEL
OCC.
6.
3/8
x 2
CANCEL
OCC.
Press Display
1. ENTER/
MENU
2.
5. ENTER/
MENU
3.
4. Temp
Set
Set Occupied Temp
6.
ENTER/
MENU
Use this function to set the default room temp-
erature when you choose to override your daily
programs. To override the daily programs, press
the Occupied button to set the controller in
manual mode (Green LED on).
x 2

4/8
Press Display
1. ENTER/
MENU
2.
6. ENTER/
MENU
3.
Set Time Format
ENTER/
MENU
x 3
5. Format
Set
CANCEL
OCC.
7.
4. ENTER/
MENU
x 3
Set Mode
This option needs to be set as it allows you to input
which system (Floor, Ceiling, or ETS) or systems are being
controlled by this particular controller.
BOTH - Ceiling and Floor Systems
ES + DHW - Earth Storage and Domestic Hot Water
FLOOR - Floor System Only
CEILING - Ceiling System Only
Press Display
1. ENTER/
MENU
2.
7. ENTER/
MENU
3.
ENTER/
MENU
x 3
6. Ex. ‘Floor’
Set Mode
CANCEL
OCC.
8.
5. ENTER/
MENU
x 3
4.
Set Mode (cont’d)
Press Display
Press Display
1. ENTER/
MENU
2.
3.
Set Temp Scale
ENTER/
MENU
x 3
4.
5. ENTER/
MENU
x 2
7. ENTER/
MENU
6. Scale
Set
CANCEL
OCC.
8.
x 2
Press Display
1. ENTER/
MENU
2.
3.
Set Vacation Temp
ENTER/
MENU
x 3
Use this function to program the temperature
set point used by the vacation function.

Secondary Features (Continued)
5/8
7. ENTER/
MENU
6. Vac Temp
Set
4.
x 4
5. ENTER/
MENU
CANCEL
OCC.
8.
x 2
Set Vacation Temp (Cont’d)
Press Display
Press Display
1. ENTER/
MENU
2.
3.
Activate Vacation Temp
ENTER/
MENU
x 3
4. On or Off
Set
5. ENTER/
MENU
CANCEL
OCC.
6.
Use this function to override your programs. This
function is especially useful when you go on vaca-
tion and you want to keep your residence at a
constant low temperature to save on energy
costs.
Press Display
The Global option copies the following common
features to all the controllers connected on the network:
Date, Occupied, Vacation, Schedule, Programs, Time,
Temp Scale (ºC or ºF) , Daylight Savings (On or Off).
Set Global Option
1.
3. ENTER/
MENU
4.
5.
2.
x 3
ENTER/
MENU
ENTER/
MENU
x 2
6.
Toggle between
ON or OFF
ENTER/
MENU
7.
CANCEL
OCC.
8.
x 2
Press Display
1.
3. ENTER/
MENU
4.
5.
Set Address
2.
x 3
ENTER/
MENU
ENTER/
MENU
Secondary Features (Continued)
Set Daylight Savings Time
This function is factory set to ON. If your area
does not use daylight savings time, set to OFF.
Press Display
1. ENTER/
MENU
2.
3.
ENTER/
MENU
x 3
8. Daylight OFF
Set
4.
5. ENTER/
MENU
6.
x 2
7. ENTER/
MENU
6/8
9. ENTER/
MENU
CANCEL
OCC.
10.
x 3
6.
ENTER/
MENU
Between 1 & 254
Select Number
7.
1
x 2
Note: Make sure there are no duplicate addresses within the
same network of controllers.
8.
Set Address (Cont’d)
Press Display
Press Display
1.
3. ENTER/
MENU
6.
ENTER/
MENU
4.
5.
Between A & Z
Select Letter
Set Name
2.
8.
x 3
ENTER/
MENU
x 3
Note: Extra ‘?’ symbols will disappear once ‘Enter’ is pressed.
9.
ENTER/
MENU
7.
Room Name
Select Unique
CANCEL
OCC.
10.
x 2
To Lock the Thermostat, Go to MENU->LOCK
and press MENU key, System is now locked.
Only ‘override’ is enabled in this mode. Pressing
MENU key when locked will show SYSTEM
LOCKED then it will ask you for a CODE ? Use
the “Up and Down” keys to enter code.
There are two codes to enter: first one is 12 then
press MENU key, cursor will show another
number to enter, 2nd Code is 06. Any other
combinations will lock the system again.
Lockout Option
Secondary Features (Continued)
Troubleshooting
Use the following information to troubleshoot
your comfort controller.
Room T* - This indicates that the floor sensor is not
working properly and may be damaged. No need to
worry, your SmartRooms Controller has a back up sensor
located in the face plate. Your floor warming or earth storage
system will continue to function normally. You may want to
do one of the following:
A) Remove the face plate and check to see if the sensor is properly
connected to the back of the face plate.
B) Leave everything as is.
C) Replace the sensor. To do this you will likely have to remove tiles.
Caution should be taken not to damage the heating cable.
Garbled Screen - Press 'Menu', if this does not work,
unplug the controller, wait a few minutes and plug it in
again.
No Answer - This is a remote function error. Check
that the thermostat is firmly plugged in.
7/8
Testing / Viewing Current Temperature Readings
From Available Sources - To test / view the currently
read temperatures from both the ceiling and the floor
sensors, go to the Menu screen, select Setup from the
options, then scroll to the Sensors option. Select the
option, press Enter/Menu and with the “Up and
Down” arrows, you can choose which sensor for which
you wish to view the reading. Once you are done, press
the Cancel/Occ button until you have returned to the
“Time/Date/Temperature” display screen.
High Limit Temperature - Do not change this feature.
It is used for ETS, Ceiling and other special applications.
Selecting The Appropriate Sensor - You can set the
SmartRooms Controller to measure temperatures from
either the Floor sensor, Ceiling (onboard sensor) or
both. To toggle between these three options, go into
the Menu screen and scroll through to the Mode
option. Press Enter/Menu to choose the option and
press the “Up and Down” keys to toggle. Press the
Enter/Menu button again to accept the changes.
Note: If you do not have a floor sensor installed, the
controller will see it's not present and be shut off, thus
disabling temperature control. The Both option is only
functional with the Low Voltage System. For use with
the Earth Storage System, the floor sensor is the one to
use.
Connecting To A Remote Controller - If you wish to
choose settings for a particular controller connected
within the same network from a different controller,
you can remote into that particular controller by doing
the following: From the Menu screen, select the
Setup submenu and scroll down through to the
Remote option. You will be prompted to enter it
correctly, you may configure it as you would the current
controller. However, if the controller for the address you
entered is invalid or not found, you will receive a 'No
Answer' status message. From this point, please try
entering the address again, ensuring you are entering
the correct one.
Ground Fault Circuit Interrupter (GFCI) - A separate
GFCI breaker is required when using the floor warming
system.
Multiple Sources Options
Address Name of Room
NAMES CHART
Example:
ADDRESS 1 = KITCHEN
ADDRESS 2 = OFFICE
Therma-Ray Inc.
670 Wilsey Road, Fredericton, NB
Canada E3B 7K4
Tel: 506-457-4600 Fax: 506-457-4699
E-mail: sales@thermaray.com
www.thermaray.com
Printed in Canada April 2006 8/8
Warranty
Therma-Ray Inc. one (1) Year Limited Warranty. Therma-Ray Inc. warrants the controller is free of defects in material and workmanship after
proper installation for a one (1) year period from the date of installation. During this period, Therma-Ray Inc. will replace or repair the controller
without charge if it has been used under normal conditions. This warranty does not cover delivery costs. The warranty does not apply if poorly
installed or damaged after installation. Therma-Ray Inc. will not compensate for consequential damage, direct or indirect, resulting from the failure
of the controller. All other representations, warranties and conditions, whether oral or written, express or implied, statutory or otherwise are
expressly excluded. The defective controller must be returned to the place of purchase or sent prepaid to Therma-Ray Inc.
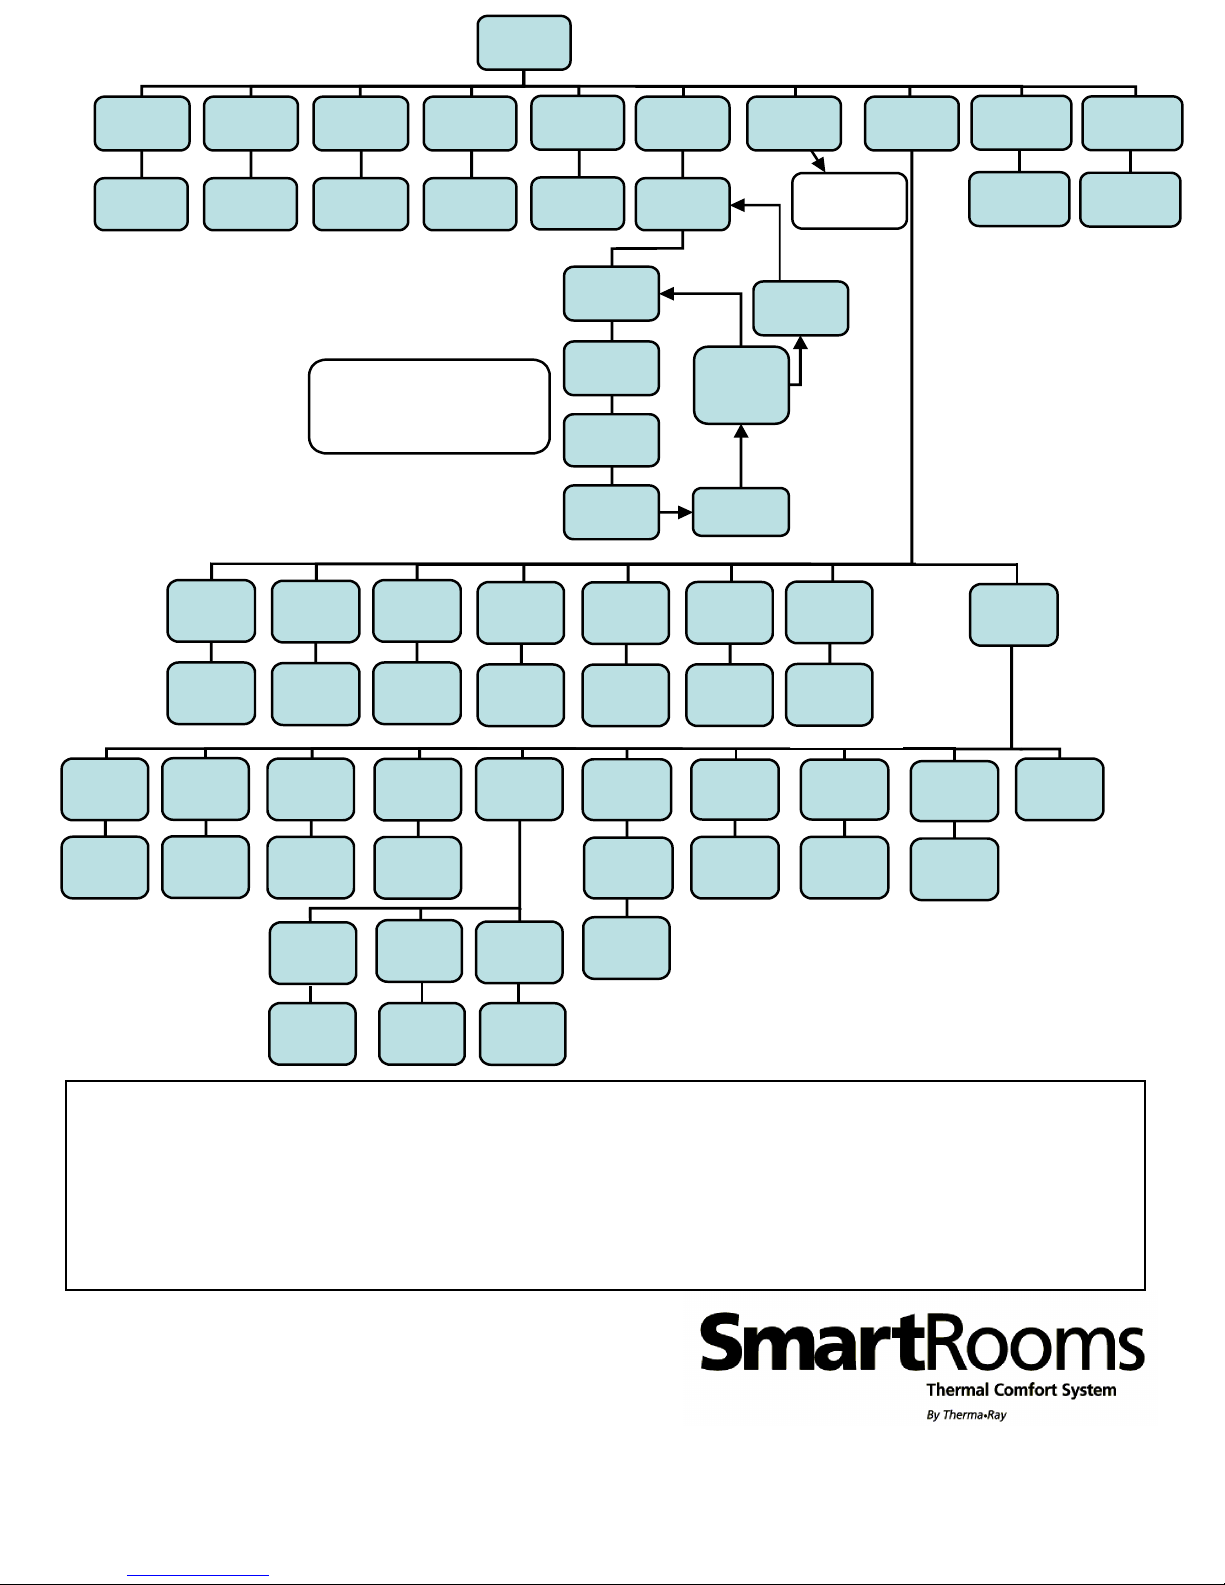
MENU
DATE TIME OCCUPIED VACATION SCHEDULE COPYDAYS
MM/DD/YY
01/11/04
HH:MM
12:00 AM
OCCUPIED
20.0ºC
VACATION
OFF or ON
Weekday
Sunday
Sunday
Prog 01
Starts At:
12:00 AM
Ends At:
06:00 AM
FLOOR
20.0ºC
Repeat until
Prog 05 is
done OR until
you reach
11:59pm
Repeat until
Saturday is
done
CEILING
20.0ºC
- Prog 01 always begins at 12 am
- Prog 05 always ends at 11:59 pm
- As soon as 11:59 pm is reached
(by any Prog), the menu skips to
"Weekday".
Copy Sunday's
program onto all
other days
TIME FMT SCALE ? VAC TEMP
AM/PM or
24 HR
CENTI
or
FAREN
VAC TEMP
10.0ºC
INSTALL
CONTRAST
GFI TEST
VER X.XX
PRESS UP
OR DOWN
PASSED
FAILED
DAYLIGHT
ON
or
OFF
SETUP LANGUAGE
ENGLISH
or
FRANCAIS
System Diagram
FLOOROCC
FLOOROCC
20.0ºC
MODE
FLOOR,
CEILING
ETS & DHW,
BOTH,
DIFF
01 TO 20
REMOTE
01 to 254
GLOBAL
OFF
REMOTE
DIFF
LIMIT T ADDRESS
ADDRESS
01 to 254
LIMIT T
60.0ºC
MY NAME
MY NAME
(8 characters)
SENSORS
LIMIT T
ROOM T
20.0ºC
FLOOR
20.0ºC
LIMIT T
20.0ºC
TEMP CAL
ROOM T
20.0ºC
DEF SENS
LIMIT
or
FACE T
GFI
ROOM T FLOOR or
ON
or
PADLOCK
LOCK
or
UNLOCK
Table of contents
Popular Thermostat manuals by other brands


Aube Technologies
Aube Technologies TH115-AF-GA owner's guide

BECA
BECA BHT-001 Series user guide

Crestron
Crestron DIN-TSTAT-FCU installation guide

Danfoss
Danfoss TP4000 Range installation instructions

Aprilaire
Aprilaire 8910W owner's manual

Johnson Controls
Johnson Controls TEC3000 Series installation guide


