Smeg UG405DUK User manual

1
Summary
1 PRODUCTIDENTIFICATION.................................................................................................................................3
1.1 Application,general functions and intended use........................................................................................ 3
1.2 Name and address of manufacturer or distributor...................................................................................... 3
Smeg S.p.A............................................................................................................................................................. 3
1.3 Declarationof conformity to product standards......................................................................................... 3
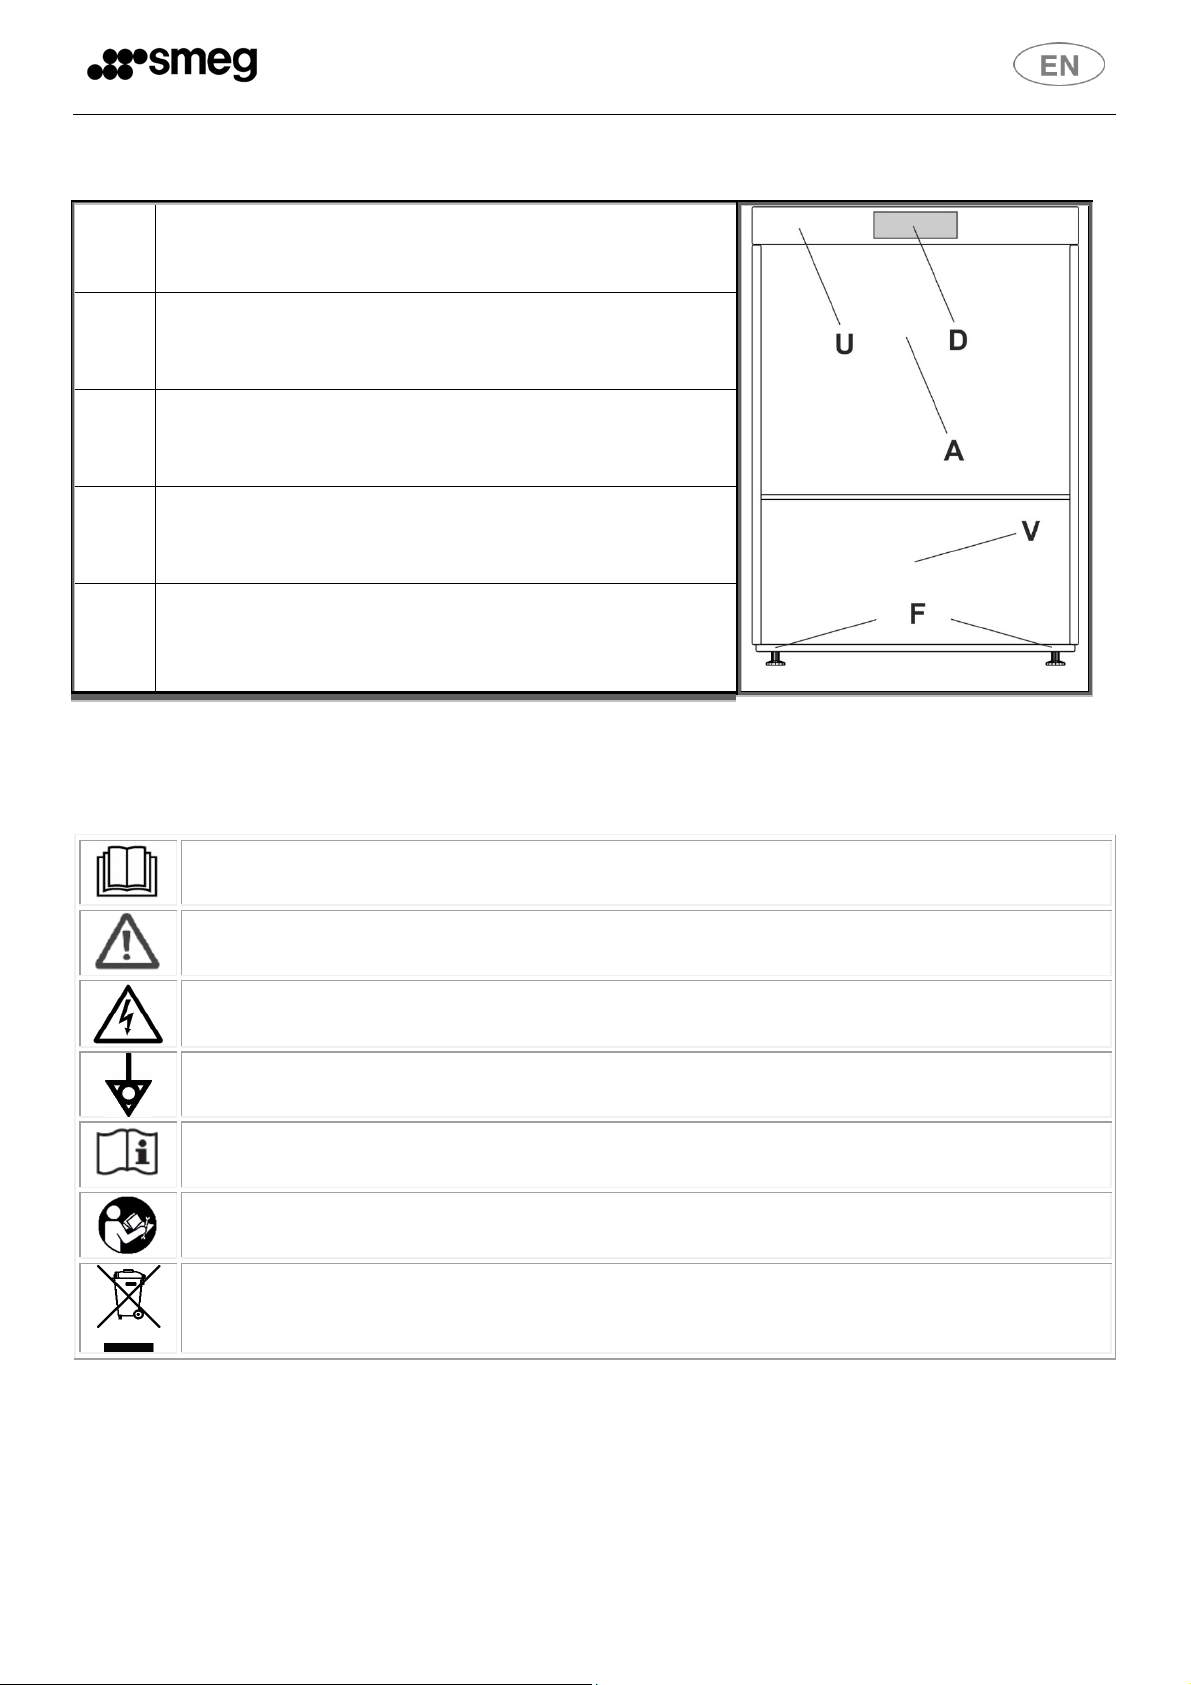
1.4 Description of the appliance....................................................................................................................... 4
2. SYMBOLS USED IN THE MANUAL........................................................................................................................ 4
3. SAFETYPRECAUTIONSAND INSTRUCTIONS........................................................................................................5
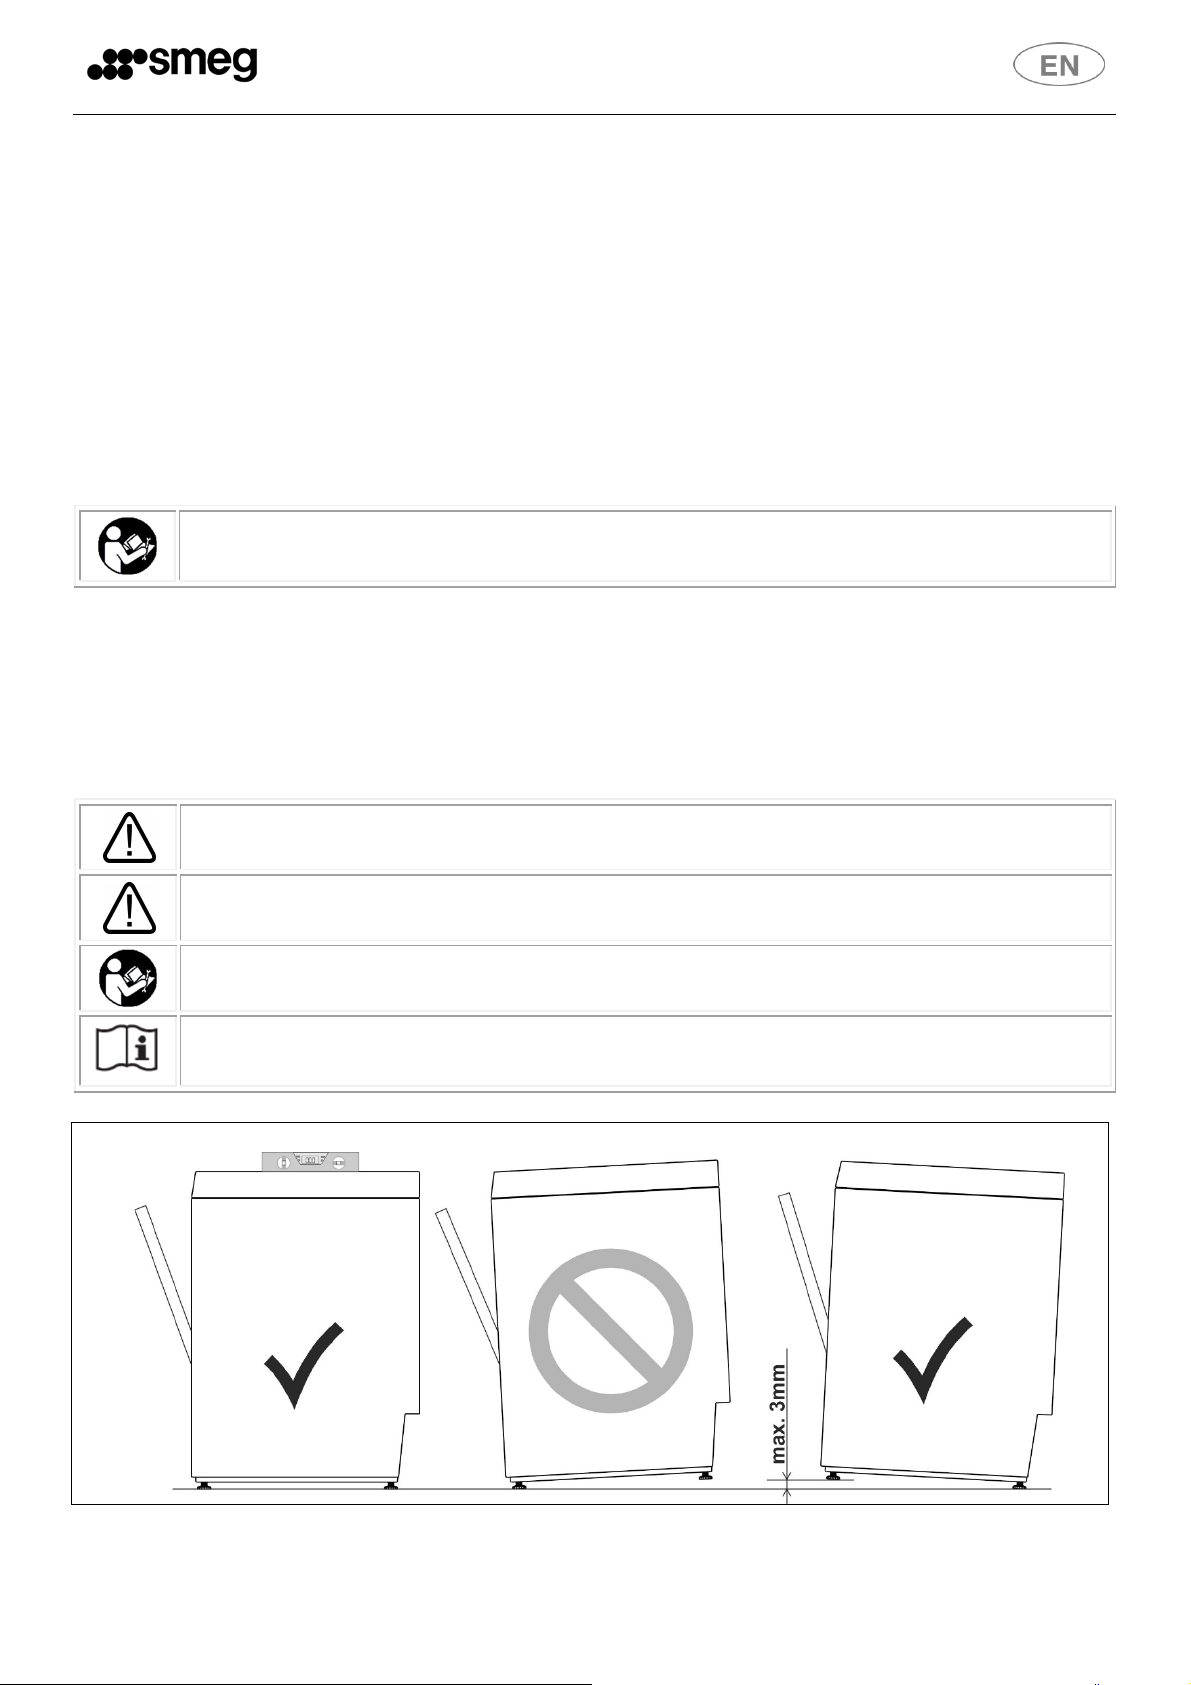
3.1Correctinstallation ..........................................................................................................................................5
3.2 Safe use........................................................................................................................................................... 6
3.3Correctmaintenance .......................................................................................................................................6
4. PRODUCT CHARACTERISTICS.............................................................................................................................. 7
4.1Overall dimensionsforbuilt-under installation.................................................................................................7
4.2Technical characteristics..................................................................................................................................8
5. PREPARINGTHEAPPLIANCEFOR USE.................................................................................................................9
5.1Positioning andinstallation.............................................................................................................................. 9
5.2 Connection to the watersupply..................................................................................................................... 10
5.3Drain connection............................................................................................................................................ 10
5.4 Connection to the electricity supply............................................................................................................... 11
6. FIRSTSTART-UP...............................................................................................................................................11
6.1 Using the water softener (on models with this feature only).................................................................... 12
7. SET-UP (Authorised technical staff only) .......................................................................................................... 13
7.1 Contentsofdisplay................................................................................................................................... 14
7.2 Note on display of temperatures.............................................................................................................. 14
7.3 Parameter programming procedure (setup)............................................................................................. 14
7.4 Modifiable parameters............................................................................................................................. 15
7.5 Adjusting detergent and rinse aid dispensing (only available on certain models)...................................... 15
Rinse aid – Grams/liter dosage (depends on model)- The display reads “ri”..................................................... 15
Detergent - Grams/liter dosage (depends on model) - The display reads “dE”................................................. 15
7.6 Starting the peristaltic pumps in manual mode – rapid filling of detergent and rinse aid circuit................ 16
7.7 Adjusting the regeneration frequency (models with softener only) .......................................................... 16
7.8 Mains waterhardnesssetting table.......................................................................................................... 16
7.9 Extra rinse option (long rinse). -Display reads “E.r”.................................................................................. 16
7.10 "Clean water cycle" option - Display reads “CL”........................................................................................ 17

2
7.11 “Thermostop” option -Display reads “tS”................................................................................................. 17
7.12 Fast/ecostarting option - Display reads “Fi”............................................................................................. 17
8. MALFUNCTIONS SHOWN ON THEDISPLAY (FOR THE TECHNICIAN).................................................................. 18
9. INSTRUCTIONSFOR THE USER.......................................................................................................................... 19
9.1 Control panel........................................................................................................................................... 19
9.2 Before washing ........................................................................................................................................ 20
9.3 First use each day (tank and boiler empty) ............................................................................................... 21
9.4 Choosing the program.............................................................................................................................. 22
9.5 Changing the program.............................................................................................................................. 22
10 MAINTENANCE ANDCLEANING.................................................................................................................... 24
10.1 Daily cleaning of filters............................................................................................................................. 25
10.2 Routine inspectionof the spray arms (once a week)................................................................................. 26
10.3 Lengthy periods out of use....................................................................................................................... 27
11 TROUBLESHOOTING.....................................................................................................................................27
12 MALFUNCTIONS SHOWN ON THEDISPLAY (FOR THEUSER) ......................................................................... 29
SMEG thanks you for choosing one of its products.
This manual is an integral part of the appliance. Take good care of it and keep it to hand throughout the
appliance’s life cycle, since itcontains important informationaboutassembly,safety, useand maintenance.
In the event that the appliance is sold on, consign this manual to the new owner.
Before putting the appliance into operation, read all the instructions in this manual carefully to become
familiar with the right conditions for the proper use of your professional dishwasher.

3
1PRODUCT IDENTIFICATION
1.1 Application, general functions and intended use
This dishwasher is intended for professional use in the restaurant and institutional catering sector and
complies with the relevant safety regulations. However, misuse may cause injury and/or damage, and
therefore the dishwasher must only be used by suitably trainedstaff.
This dishwasher is designed for use in non-mobile premises and is intended only for washing cutlery and
dishes (plates, ovenware, cups, glasses, bowls, etc.) stable at the temperature and humidity generated by
the appliance. Any other type of use is not permitted and may be dangerous.
Persons whose physical, sensory or mental capabilities, inexperience or lack of knowledge render them
unable to use the dishwasher safely must not use it without the supervision and guidance of a responsible
person.
The manufacturer is not liable for any injury or damage caused by failure to comply with the instructions
given in this manual, misuse, tampering with even a single part of the appliance, or the use of non-genuine
spare parts.
1.2 Name and address of manufacturer or distributor
Smeg S.p.A.
Via Leonardo da Vinci, 4 - 42016 Guastalla (RE) Tel. +39 0522 8211 - Fax + 39 0522 821453
Our Sales Department staff will be able to provide you with information about prices and special offers.
OurAfter-SalesDepartmentwillbeabletoprovideyouwithguidanceaboutkeepingyourdevicefunctioning
correctly and put you in touch withyour nearest authorised Service Centre. Our entire product offering can
be viewed at our website.
1.3 Declaration of conformity to product standards
Thisappliance complies withthe relevant safety regulationsandconforms tothe requirements of directives
2006/42/EC and 2004/108/EC.
The dishwasher is also marked in compliance with European Directive 2002/96/EC on Waste Electrical and
Electronic Equipment (WEEE).
For information on the treatment, recovery and recycling of this product, contact the local
authority, domestic waste collection service, or your Smeg reseller.
Make sure that this product is scrapped correctly to safeguard the environment and health.

4
1.4 Description of the appliance
U COVER (TOP)
D DISPLAY AND CONTROL PANEL
A FRONT LOADING/UNLOADING DOOR
V SERVICE COMPARTMENT
F ADJUSTABLE FEET
2. SYMBOLS USED IN THE MANUAL
This symbol instructs the user to read the instructions in the manual with care.
This symbol appears next to information important for the safety of people and the
appliance.
This symbol is applied tosome parts which contain live electrical components and indicates
the risk of electric shock.
This symbol is applied close to the terminal used to earth the appliance's electrical system.
This symbol appears next to important information. Read the instructions provided with care
and comply with the procedures and rules described.
This symbol appears next to information and technical instructions intended for the qualified
staff whoare to install, commission and test the appliance and carry out any repairs.
This symbol indicates that at the end of its working life, the appliance must be consigned to
a disposal plant for recovery and recycling in accordance with the relevant legislation in the
country of installation. Contact a specialist centre for disposal.

5
3. SAFETY PRECAUTIONS AND INSTRUCTIONS
The precautions and instructions below contain importantinformation and must be read withcare.
The manufacturer does not accept responsibility for damage caused by failure to comply with the safety
precautions and instructions.
3.1 Correct installation
The dishwasher must be installed by an authorised technician.
When handling and installing the dishwasher, always wear the most suitable personal protection
equipment (PPE) for the task in hand.
Do not install a dishwasher which has been damaged during transport. If in doubt, consult your
dealer.
If the power supply cable is damaged, do not run the dishwasher.
Do not install the dishwasher in areas subject to freezing temperatures or in atmospheres with
explosion risk (ATEX).
Any accessories may only be installed on the appliance if authorised by the manufacturer.
Donotinstallthedishwashernexttoapplianceswhichirradiatestrongheat(e.g.gasburners,stoves,
etc.) since they could cause damage.
Ifthedishwasherisinstalledabovetheground,makesurethatthestandanddishwasheraresecured
properly and do not constitute a hazard.
Electricalsafety is only ensured if the dishwasheris connected toan earth conductor compliant with
the relevant electrical regulations. If in doubt, have the system inspected by a qualified electrician.
A circuit breaker and overcurrent protection device (magnetothermal switch or fuses) must be
installedinan easilyaccessible positiononthedishwasher'spowersupplyline.Thisdevicemust only
serve the dishwasher and must be suitable for its rated electrical characteristics.
Do not connect the dishwasher to the electrical mains by means of adapters or extensions, since
they do not guarantee the safety required.
Ifthedishwasherisconnectedtotheelectricalmainsbymeansofa plug,itmust beofthe sametype
as the power socket, suitable for the appliance's rated electrical characteristics and compliant with
the relevant national regulations on electrical systems. The power plug must be easily accessible
after the appliance has been installed.
Only use new hoses for connection to the water supply. Old hoses or hoses salvaged from previous
installations must not be used.
The drain connection must be made in accordance with the relevant national regulations.
Substandard connections may cause flowback and in some cases pollution.

6
3.2 Safe use
The staff assigned to use the dishwasher must be suitably trained and instructed.
The appliance is not suitable for use by juveniles or persons with reduced physical, sensorial or
mentalcapacities,orthosewithoutthenecessaryknowledgeandexperience.Suchpersonsmayonly
use the appliance under the supervision of a person responsible for their safety.
Do not leave the dishwasher door open. Risk of tripping or injury against the edges of the door.
Do not sit or lean on the open door. This may tip over or damage the appliance.
The water inside the dishwasher is not drinkable.
Do not use the dishwasher for washing or soaking foods.
Do not use the water inside the dishwasher for defrosting foods, even if they are in airtight
containers.
When using the dishwasher, remember that the plates are very hot at the end of a wash cycle.
Knives and pointed kitchen equipment must be placed in the basket with their tips downwards, or
horizontally, taking care not to allow them to protrude from the basket
The dishwasher is only intended for use with water and detergents suitable for washing in
professional dishwashers. The useof otherproducts maydamage boththe dishesand theappliance.
Do not operate the dishwasher with organic solvents or flammable liquids. Never load dishes dirty
with ash, wax or paint.
Whenhandling detergents comply strictly withthe instructions provided bythe detergentproducer.
Always keep the detergent safety datasheets within reach so that the operator can consult them
easily if necessary.
Swallowing or inhaling detergents may cause serious injury to the nose, mouth and throat. If
detergent has been inhaled or swallowed, seek medicaladvice immediately.
3.3 Correct maintenance
Do not spray jets of water or steam directly at the appliance since they could cause infiltrations of
liquids, damaging for the appliance and hazardous for the operator.
Before performing any maintenance procedure on the appliance disconnect it from the mains
electricity supply. Touching live electrical components, even accidentally, may be very dangerous.
Neveropen the dishwasher's case. Electric shock hazard.Onlythe authorised technicianmay access
the internal parts of the dishwasher.
The dishwasher may only be repaired by the authorised service organisation. Substandard repairs
may cause damage or danger for the user.
No alterations or changes of any kind to the appliance's electrical circuits or mechanical structure
are permitted. The manufacturer declines all responsibility for damage arising from unauthorised
alterations.
Replace any faulty parts only with genuine spare parts. The manufacturer declines all liability for
damage resulting from the use of non-genuine spare parts.
The power supply cable, if fitted, must be replaced by the manufacturer or an authorised service
centre in accordance with the technical data specified on the wiring diagram supplied with the
appliance, to prevent all risks.

7
4. PRODUCT CHARACTERISTICS
4.1 Overall dimensions for built-under installation
R
LOWER BACK PANEL
C
FILLER HOSE
Q
EARTH TERMINAL
E
ELECTRICITY SUPPLY CAB
LE
P
PERISTALTIC HOSES
S
DRAIN HOSE
T
EXTERNAL DISPENSER POWER CABLE ENTRY POINT

8
4.2 Technical characteristics
Electricity supply - See technical data plate and
electrical wiring diagram
supplied with the appliance
Intake water pressure -
Intake water temperature -
Use - Indoor
Max. working altitude m 2000
Working ambient temperature °C 10 - 35
Relative humidity
80% for temperatures up to
25°C with linear decrease to
50% at the temperature of
35°C
Intake water hardness
(models with softener) °f ≤ 60
Intake water hardness
(models without softener) °f ≤ 15
Water intake flow rate
(models with rinsing pump) L/min min 6
Water intake flow rate
(models without rinsing pump) L/min min 12
Intake hose connection - threaded 3/4 “
Drain minimum diameter mm 25
Drain height (above appliance
installation surface) mm max 600
Rinse cycle water consumption L 2.3
Boiler capacity L 4
Tank capacity L 8
Standard cycle duration with water
intake at 50°C s 90/150/240
Noise level dB(A) < 60
Degree of protection IPX 4
Net weight kg ˜ 32/36
Power supply cable type ◄HAR►H07RN-F

9
5. PREPARING THE APPLIANCE FOR USE
Convey the dishwasher to the installation site, remove the packaging and check the appliance and
components for damage; any damage found must be reported tothe transporter in writing. The packaging
components (plastic bags, expanded polystyrene, nails, etc.) must not be left within reach of children and
pets since they are potentially dangerous. All packaging materials used are environment-friendly. They can
be kept without constituting any hazard, or may be disposed of at a specialist waste disposal centre. The
plastic components suitable for recycling are marked as follows:
PE -polyethylene: external packaging film, bag containing the instructions, protective bags.
PP - polypropylene: straps used to close the packaging.
PS -expanded polystyrene: cornerguards, top of packaging.
Wooden and cardboard components can be disposed of in accordance with the local regulations.
5.1 Positioning and installation
Placethedishwasherinthechosenpointandremovetheprotectivefilm.Levelthedishwasher(withtheaid
ofa spirit level)onitsfour feet, adjusting themto ensurethat itisstable.Ifthe dishwasheris installedabove
the ground, make sure that the stand and dishwasher are secured properly and do not constitute a hazard.
All operations described in this section must be carried out and/or checked by the qualified
staff who install and commission the dishwasher.
The systems and premises in which the dishwasher is installed must comply with the
relevant regulations.
If the dishwasher is installed next to another appliance, also check the recommendations
provided by the manufacturer of the adjacent appliance.
Installations other than those described must first be approved by the manufacturer.
Use only professional furnishings and units in the vicinity of the dishwasher. Any other types
of furnishing may be damaged.

10
5.2 Connection to the water supply
Check thattheintake waterpressure,flow rateandtemperature areas stated inthe dishwasher's technical
characteristics. If the dynamic pressure exceeds the limit stated in the technical
characteristics, a pressure reducer must be installed. If the pressure is lower, it might
be necessary to fit a special pump to ensure optimal performance. Connect the water
intakehosetoaconnectorwith¾”gasthreadedfitting,insertingthefilter"A"provided.
The tap must be easily accessible after installation of the appliance.
5.3 Drain connection
The dishwasher is fitted with a drain pump and can operate with drain connections on the floor or wall.
Before connecting the hose, check that the diameter and height of the wall drain connection are as stated
in the dishwasher's technical characteristics. When connecting the dishwasher's drain hose, take care to
avoid kinks, sharp bends or crushing. Since the drain water temperature can be very high, the end ofthe
drain hose must be fixed to the drain connection using the hose clamps provided.
Only use new hoses for connection to the water supply. Old hoses or hoses salvaged from
previous installations must not be used.
If the water supply system has been unused for a long time or if work has been done on it,
before connecting the appliance's intake hose run the water to flush the air and dirt from
the pipes.
FOR MODELS WITH A WATER SOFTENER
An “approved” double check valve or some other no less effective device providing backflow
prevention protection to at least fluid category two shall be fitted at the point of connection
between the water supply and the fitting or appliance.
FOR MODELS WITHOUT A WATER SOFTENER
An “approved” single check valve or some other no less effective device providing backflow
prevention protection to at least fluid category two shall be fitted at the point of connection
between the water supply and the fitting or appliance.
The drain connection must be made in accordance with the relevant national regulations.
Substandard connections may cause flowback and in some cases pollution.
No extensions must be added to the drain hose supplied with the appliance. Any extensions
might cause drainage problems.

11
5.4 Connection to the electricity supply
The dishwasher must be connected to the electrical system by authorised, skilled staff, in accordance with
the relevant regulations. Also comply with the technical instructions for the connection provided with the
appliance. The dishwasher's rated electrical characteristics are provided on its technical data plate. A circuit
breaker with contact gap rated for category II overvoltage and an overcurrent protection device
(magnetothermal switch or fuses) must be installed in an easily accessible position on the dishwasher's
powersupplyline.Thesedevicesmustonlyservethedishwasherandmustbe suitable foritsratedelectrical
characteristics. The electrical protection devices must undergo a functional test before the dishwasher is
put into operation. If the dishwasher is connected to the electrical mains by means of a plug, it must be of
thesametypeasthepowersocket,suitablefortheappliance'sratedelectricalcharacteristicsandcompliant
with the relevant national regulations. The power plug must be easily accessible after the appliance has
been installed.
6. FIRST START-UP
First start-up
The electrical protection system must undergo a functional test before the appliance is put into operation.
Theappliancemustbeinstalledand/orinspectedbyqualifiedstaff,whowill startitupforthefirsttimeandprovidetherelevant
operating instructions.
Preparing for use (important)
The rinse aid dispenser is fitted on all models, the detergent dispenser only on some.
If both dispensers are present put the external detergent and rinse aid containers in place and insert the respective intake
hoses on the rear of the appliance into them. Red hose: detergent, blue hose: rinse aid
Before inserting the hoses into the containers, fit the weights (needed to ensure that they
always draw in
liquid from the bottoms of the containers) and the filters onto their ends as shown. If the detergent
dispenser is not factory-fitted, it can be retrofitted after ordering the relative kit.
Electrical safety is only ensured if the dishwasher is connected to an earth conductor
compliant with the relevant electrical regulations. If in doubt, have the system inspected by
a qualified electrician.
Do not connectthe dishwasher to the electrical mains by means of adapters orextensions,
since they may cause dangerous overheating.
Connect the appliance to the earth system. The earth connection terminal is low down on
the back of the appliance and is marked with the symbol.
The dishwasher is always powered up unless the master switchis turned off or, on
appliances with power plug, the plug is disconnected.

12
IMPORTANT
Whenever the type of detergent or rinse aidis changed, itis ABSOLUTELYESSENTIAL to flush out the peristaltic pumps by placing
the external intake pipes in water for a few cycles. Always use only products specifically recommended for use in a professional
dishwasher.Failuretocomplywiththisrecommendationleadstoforfeitureofthewarrantyentitlementontheappliance’swater
system. Replacement of the internal tube of the detergentand rinse aid peristaltic pumps is recommended every 12 months or
15.000 wash cycles, by the After-Sales Service.
6.1 Using the water softener (on models with this feature only)
The quantity of lime in the water (which indicates its hardness) causes whitish marks on dry dishes and
dishes alsotend tolose their shine over time. The dishwasher is equipped with an automatic water softener
which removes the substances that cause hardness from the water with the aid of regenerating salt.
The first time thedishwasher is used, a litreof water must be pouredinto the tank with the salt. Whenever
the tank isfilled, alwaystake care toensure thatthecap isfirmlyclosed.The mixtureof water anddetergent
must not get into the salt tank, as this would impair operation of the regeneration system. In this case
warranty cover will be forfeited.

13
7. SET-UP (Authorised technical staff only)
Set
-
up
During first start-up, the functions/parameters listed belowmust be set oradjusted.
Control Panel
Key to Symbols
On/off button
Total pump-out (tank -boiler) button
Regenerating salt symbol (only if softener is fitted)
Short programme button
Medium programme button
Long programme button
L1Short programme Led
L2Medium programme Led
L3Long programme Led
L4Drainage Led
L5Appliance on Led
L6No salt Led (only if softener is fitted)
Key to messages on display
CLOSE Close the door
FILL Machine preparing for cycle
End End of operation requested
PrF
400/500/CAP
Machine model
(viewed when the machine is started withmaster switch)
F x xx r xxx
Version/revision
of the installed
firmware.
(viewed when the machine is started with master switch, after themodel code)
UnLoad Pump-out
OFF Energizedmachine OFF

14
Using the buttons
Button Short press Pressed for 2” Pressed for 5” Long press, release, press
again
Display temperatures
Boiler and tank On/OF
Door open and machine OFF.
Long press >>> display reads
“- -“ >>> release and press
again: Access Setup Menu (1)
Scroll through Setup
options (2) Start Pump-out Total pump-out (tank+boiler)
Set Short Programme Start Short Programme
Set Medium Programme Start Medium Programme
Set Long Programme Start Long Programme
Set P0(Empty tank) Start P0
Door closed
Peristaltic pumps
in Manual
mode to prime pipes Reset to DEFAULT
parameters(1)
Technician user only
1) Restores the default parameters, for new settings see point (6.3)
Aseriesofoperations canbe carried outwhen the dishwasheris first installedto customise ittothe user's
requirements.
7.1 Contents of display
The display provides the following information:
• Machine off but energized: OFF
• Machine on and ready for use: End/P1-P2-OP3
• Wash phase: ||||||||||
• Programming phase: See parameter programming section
• Error message: See error messages section
7.2 Note on display of temperatures
Temperaturesshownonthe displaymightnotindicatetheactualtemperature inthe tankand/or boilerduring heating-wait
about 1’ after the heating elements switch off to see thereal temperature.
7.3 Parameter programming procedure (setup)
To modify the parameters, proceed as follows starting withthe appliance in “OF” status with the door open.
1) Switch the appliance using the On/OF button
2) Press and hold the button until the display shows “- -“ , release and press again.
3) Press the pump-out button to scroll through the parameters for modification
4) Modify the parameter by pressing button P1
5) During setup operations,the description and value oftheparameteralternate on the display.
6) Select the other parameters for modification in the same way and proceed as described above
7) To exit the setupmenu press andhold until thedisplay shows “OFF”, pressP2 orP3 orwait atleast 3 minutes
without pressing any key; in this way the machine automatically exits the setup menu.

15
7.4 Modifiable parameters
This table lists the model choice or programme and temperature option parameters.
Display
Settings available
Description
°b From 85° to 71° Boiler temperature
°t From 62° to 52° Tank temperature
ri 0 – 2 gr/lt (in steps of 0,1) Rinse aid batching
dE
0
-
10 gr/lt
(0-3in steps of 0,2; 3-10 in stepsof 1,0)
Detergent batching
St On - OF Auto-start:
washing programme starts when door is closed On enabled OF disabled
HA H0 – H6 Water hardness setting (see table 6.8 in the following pages)
Er On-OF Prolonged rinse at the end of the washing cycle (+8”).
CL On-OF Clean water cycle. On enabled OF disabled
TS On - OF Thermostop On enabled OF disabled
Fi
FS-EC
Starting the
machine
in FAST o
r
ECO
mode
(models without rinsing pump only)
Sr - Access Service menu (for Authorised Engineer only)
7.5 Adjusting detergent and rinse aid dispensing(only available on certain models)
Rinse aid – Grams/liter dosage (depends on model)- The display reads “ri”
Every time is pressed, the
value increases of 0,1 g/l up to a
max. of 2 g/l.
Default: 1,2 g/l.
Detergent - Grams/liter dosage (depends on model) - The display reads “dE”
Factory-set default value = 2 gr/lt.
From
0,0 g/l
to
3,0 g/l
every time
ispressed,thevalueincreases
of 0,2 g/l.
Beyond 3,0 g/l every time is
pressed,thevalueincreases1,0g/l
up to 10,0 g/l (maximum value).

16
7.6 Starting the peristaltic pumps in manual mode – rapid filling of detergent and rinse
aid circuit
Energized dishwasher and full tank:press for 5 seconds buttons P2 +P3 simultaneously.
The peristaltic pumps work until P1 or P2 are pressed again; during the procedure the indicator lights stay on and
the display shows “rd”. The rinse aid circuit is filled in 7 minutes, the detergent circuit is filled in 2 minutes.
Sincethe pumpswork at the sametime, onlythe rinse aid (blue tube in the rinse aid jerrycan) must bewithdrawn for
5 minutes, then the detergent (red tube in the detergent jerrycan) is withdrawn too for the last two minutes.
7.7 Adjusting the regeneration frequency (models with softener only)
See appliance setup menu (point 6.4)
With values over 60°dF
/33°dH
an external water tre
atmentdevice must be used and the regeneration
frequency must be set at H0
7.8 Mains water hardness setting table
After a number of washing cycles corresponding to the set water hardness has been started, the dishwasher starts
automatically the resin regeneration cycle, that lasts about 90 seconds. During this phase the machine load or unloads
automatically, even though it isn’t performing a washing cycle.
Hardness
(°dH German degrees) Hardness
(°dF French degrees)
Setting
level
Regeneration off HA: 00
8.5 15 HA:
11 20 HA: 02
17 30 HA_ 03 default
22.5 40 HA: 04
28 50 HA: 05
33.5
60
HA: 06
7.9 Extra rinse option (long rinse). - Display reads “E.r”
Rinse is 8” longer than the standard in every washing cycle.
Press to enable (On)/disable (OF)

17
7.10 "Clean water cycle" option - Display reads “CL”
When this option is activated, theappliance pumps out all the water
from the tank and then refills it with clean water at every wash cycle.
How long this operationtakes depends on the washing water
temperature.
Press to enable (On)/disable (OF)
7.11 “Thermostop” option - Display reads “tS”
“on” = the minimum temperature of rinse as set, independently from
the intake water temperature, the nominal duration of cycle may be
extended by a few seconds.
“off” = the minimum temperature of rinse may be a few degrees lower
than the set one, if hot intake water is not used.
Press to enable (On)/disable (OF)
7.12 Fast/eco starting option - Display reads “Fi”
Fast (FS): it allows to start the machine in less time than the standard;
it involvesa greater waterconsumption at thefirst start.
Eco starting (EC): the machine starts in standard time, without any
additional water consumption.
Press to enable (On)/disable (OF)

18
8. MALFUNCTIONS SHOWN ON THE DISPLAY (FOR THE TECHNICIAN)
The dishwasher is able to identify a number of malfunctions and show them on the display. If the problem persists after the
dishwasherhas beenswitched off andbackon, proceed as described below:
Er 04
Tank temperature probe
malfunction
Tank temperature probe disconnected or not working.
Er 05
Tank wate
r filling malfunction
-
The tank wasn’t filled in the expected time: check the water supplytap,
the
dynamic supply pressure, cleanliness of the inlet water filter, cleanliness of
the rinse nozzles, anydamage of the watercharging hose. Ifthe problemstill
occurs during the “FILL”:
- Work level tank pressure switch damaged (it always detects “empty”: check
if the tank safety pressure switch starts operating).
-Leakagefromthetubeconnectedtotheairtrap;iftheproblemisnotsolved,
it occurs during the work program.
- vent valve of the drain pipe obstructed with dirt: with siphonage, the tank
gets completely empty at the end of a washing program.
Er 06
Water pump
-
out malfunction
Check:
- filter cleanliness; obstructions, bending and narrowing of the drain pipe.
- possible obstructions of the drain pump (blocked with a foreign body).
In case the problem isnot solved, pleasecontact the After-Sales Service.
Er 23
Boiler does not heat up as
expected.
The problem might occur because water isconti
nually entering the tank (the
causes are as for “Er 05” – see above) If the boiler heating element is
damaged, this might be due to operation with no water in the boiler - the
pressure switch is indicating full even with the boilerempty:- damagedboiler
heating element – conta ctor failure -open on boiler safety thermostat side. -
boilertemperatureprobefaultyorincorrectly positioned-motherboardrelay
failure,Important:If theboilerheatingelementisdamaged,thismightbedue
to operationwithno water in the boiler, pressure switch continues togivefull
reading even with boiler empty: check boiler air trap and/or relative pressure
switch and replace if necessary.
Er 24
Boiler temperature probe
malfunction
Boiler temperature probe disconnected
or not working
Er 25
Boiler water fillingmalfunction
The boiler wasn’t filled in theexpected time
:
check the water supply tap
,
the
dynamic supply pressure, cleanliness of the inlet water filter, any damage of
the water charging hose, or check the following in this order:
- faulty boiler pressure switch (it always detects “empty”),
- leakageor unbinding of thetube (water runsinside the tube)
- menu service wron setting “rP”
Er 26
Boiler emptying malfunction
-
check
cleanliness of therinse nozzles
- faulty boiler pressure switch (it always detects “full”)
- leakage or unbinding of the tube (water runs inside the tube)
- rinsing pump malfunction (if present)
Er 27
Boiler emptying malfunction
–
with
tank full
Or boiler full signal on models
without rinsing pump
Faulty boiler pressure switch
(
it always detects “full”
).
If thisoccurs in models
without rinsing pump, the boiler pressure switch is wrongly detected: check
settings in the service menu on entry “rP”
“rp” = on for models with rinsing pump
“rp” = of formodels without rinsing pump

19
9. INSTRUCTIONS FOR THE USER
9.1 Control panel
Key to Symbols
On/off button
Total pump-out (tank -boiler) button
Regenerating salt symbol (only if softener is fitted)
Short programme button
Medium programme button
Long programme button
L1Short programme Led
L2Medium programme Led
L3Long programme Led
L4Drainage Led
L5Appliance on Led
L6No salt Led (only if softener is fitted)
Key to messages on display
CLOSE Close the door
FILL Machine preparing for cycle
End End of operation requested
PrF
400/500/CAP Appliance model (displayed when the appliance is switched on with the master switch).
UnLoad Pump-out
OFF Energizedmachine OFF

20
Using the buttons
Button Short press Pressed for 2” Pressed for 5”
Display of temperatures in
Boiler (L3) and tank (L1) On/OF
Start total drain (tank + boiler)
Start Short Programme
Start Medium
Programme
Start Long Programme
Set P0
Start programme P0: emptying of tank to clean filters.
Switch off and back on to allow reuse.
9.2 Before washing
Use only detergents and rinse aids for industrial dishwashers. Do not use detergents intended for hand washing.
We recommend the use of Smeg products, specially developed for this dishwasher.
When topping up the tanks, take care not to swap the products; this might damage the dishwasher andcause
malfunctions.
Do not mix different detergents; this would damage the dispenser device. Failure to comply with thisrecommendation
leads to forfeiture of the warranty entitlement on the appliance’s water system.
Industrial dishwasher detergents may cause serious irritation. Comply carefully with the instructions provided by the
detergent producer on the pack.
Check
1. Turn on the mains water tap (user)
2. The level of detergent and rinse aid in the containers.
3. That there is regenerating salt in the relative container (if fitted).
Table of contents
Other Smeg Dishwasher manuals
Popular Dishwasher manuals by other brands

Hotpoint Ariston
Hotpoint Ariston LSTF 9H114 operating instructions

CDA
CDA WC140 Manual for installation, use and maintenance

Maidaid Halcyon
Maidaid Halcyon C615WS User's installation guide

Atag
Atag DW7113XA operating instructions

Siemens
Siemens SN63HX60AE INFORMATION FOR USE

Hoover
Hoover HDP 3DO62DX User instructions