Smeg SO4902M1N User manual

42 - PRECAUTIONS 91477A641/C
PRECAUTIONS 42
General safety instructions 42
For this appliance 47
Appliance purpose 48
This user manual 48
Manufacturer’s liability 48
Identification plate 48
Disposal 48
To save energy 48
Light sources 49
How to read the user manual 49
DESCRIPTION 49
General description 49
Control panel 50
Other parts 50
Accessories 50
Optional accessories (can be purchased separately)
51
Microwaves 52
USE 52
Preliminary operations 52
Materials suitable for use with microwaves 52
Using the accessories 53
Digital programmer 54
First use 54
Using the oven 54
Cooking advice 60
Mini guide to accessories 61
Discover the recipes 61
Special functions 61
Secondary functions 66
Other settings 69
CLEANING AND MAINTENANCE 69
Cleaning the appliance 69
Cleaning the oven cavity 70
Special cleaning functions 71
Vapor Clean (on some models only) 71
Extraordinary maintenance 72
INSTALLATION 72
Electrical connection 72
Positioning 73
We advise you to read this manual carefully, which contains all the instructions for maintaining the
appliance’s aesthetic and functional qualities. For further information on the product: www.smeg.com
PRECAUTIONS
IMPORTANT SAFETY INSTRUCTIONS
PLEASE READ CAREFULLY AND RETAIN FOR FUTURE USE
General safety instructions
Risk of personal injury
• ATTENTION: during use, the
appliance and its accessible
parts become very hot.
Children must be kept away
from the appliance.
• ATTENTION: during use, the
appliance and its accessible
parts become very hot. Never
touch the heating elements
during use.
• Protect your hands by wearing
oven gloves when moving food
inside the oven.
• Never try to put out a fire or
flames with water: turn off the
appliance and smother the
flames with a fire blanket or
other appropriate cover.
• This appliance may be used by
children aged at least 8 and by
people of reduced physical,
sensory or mental capacity, or
lacking in experience in the use
of electrical appliances,
provided that they are
supervised or instructed by

PRECAUTIONS - 4391477A641/C
e
adults who are responsible for
their safety.
• Children must not play with the
appliance.
• Keep children under the age of
8 at a safe distance unless they
are constantly supervised.
• Keep children under the age of
8 away from the appliance
when it is in use.
• Cleaning and maintenance
must not be carried out by
unsupervised children.
• The cooking process must
always be monitored. A short
cooking process must be
continuously surveyed.
• Never leave the appliance
unattended during cooking
operations where fats or oils
could be released, as these
could then heat up and catch
fire. Be very careful.
• Do not pour water directly onto
very hot trays.
• Keep the oven door closed
during cooking.
• If you need to move food or at
the end of cooking, open the
door 5 cm for a few seconds,
let the steam come out, then
open it fully.
• Do not insert pointed metal
objects (cutlery or utensils) into
the slots in the appliance.
• Switch off the appliance
immediately after use.
• DO NOT USE OR STORE
FLAMMABLE MATERIALS
NEAR THE APPLIANCE.
• DO NOT USE AEROSOLS IN
THE VICINITY OF THIS
APPLIANCE WHILST IT IS IN
USE.
• DO NOT MODIFY THIS
APPLIANCE.
• Installation and servicing should
be carried out by qualified
personnel in accordance with
current standards.
• Do not try to repair the
appliance yourself or without
the assistance of a qualified
technician.
• Do not pull the cable to unplug
the appliance.
For microwave appliances
• WARNING: If the door or the
door seal is damaged, the
appliance must not be used
until it has been repaired by a
qualified person.
• WARNING: It is hazardous for
anyone other than a competent
person to carry out any service
or repair operation which
involves the removal of a cover
which offers protection against
exposure to microwave energy.
• WARNING: Liquids and other
foods must not be heated in
sealed containers since they
are liable to explode.
• When a combined function is
used, children should use the
appliance only when
supervised by an adult, as very

44 - PRECAUTIONS 91477A641/C
high temperatures are
generated.
• Check the appliance visually
during the cooking of foods in
plastic or paper containers.
• Use the microwave only for the
preparation of food for
consumption. Other types of
applications are strictly
forbidden (e.g. drying clothes,
warming slippers, sponges, wet
cloths or the like, dehydrating
foods) because they can lead
to the risk of injury or fire.
• Microwave heating of
beverages can cause delayed
eruptive boiling, so care must
be taken when handling the
container.
• Clean the appliance constantly
and remove any food residue.
• Failure to clean the oven cavity
encourages deterioration of the
surface, which could adversely
affect the life of the appliance
and possibly lead to a
dangerous situation.
• Do not use the microwave to
dry food.
• Do not use the microwave to
heat oils or fry.
• Do not use the appliance to
heat foods or beverages
containing alcohol.
• Do not heat eggs in their shells
or whole hard boiled eggs;
they may explode even after
the heating process has
completed.
• Do not heat food contained in
food packages.
• Do not use the combination
functions to heat or boil liquids.
• Baby food should not be
heated in sealed containers.
Remove the cover or the teat (in
the case of baby bottles).
Improper use
Danger of explosion
• When using the microwave to
heat or reheat liquids, the
boiling process may be
delayed – boiling temperature
can be reached without the
formation of the usual "rolling
boil".
• This delayed boiling and
consequent superheating of the
liquid can generate an
explosion inside the appliance,
or sudden boiling over of the
superheated liquid can occur
when removing the container
from the appliance.
• To avoid these dangers, it is
necessary to insert the supplied
boiling rod (or a heat-resistant
plastic spoon) in the container
while heating.

PRECAUTIONS - 4591477A641/C
e
Always check the temperature
of the preparation after it has
been heated, it should not be
too high. For an even
temperature and to avoid
scalding stir or shake the
contents.
• Puncture the skin of food that
has a hard skin or peel (e.g.
potatoes, apples, etc.) before
cooking.
• Do not use the microwave
functions when the oven is
empty.
• Use kitchenware and utensils
that are suitable for use in a
microwave oven.
• Do not use aluminium
containers to cook food.
• Do not use metal containers for
cooking food or beverages.
• Do not use dishes with metallic
decorations (gold-plated or
silver).
• If present, do not use the tray
and/or deep tray for
microwave cooking ONLY.
• If smoke is present, switch off or
unplug the appliance from the
power socket and keep the
door closed to smother any
flames.
• This appliance complies with
the current standards and
directives regarding safety and
electromagnetic compatibility.
However, it is recommended
that people who wear
pacemakers maintain a
minimum distance of 20-30 cm
between the pacemaker and
the microwave oven when it is
in operation. Contact the
pacemaker manufacturer for
further information.
• The appliance operates in the
2.4 GHz ISM band.
• In compliance with the
provisions regarding
electromagnetic compatibility,
the appliance belongs to group
2 and class B (EN 55011).
• If the appliance is installed in a
cabinet, it must be operated
with any cabinet door open.
Improper use
Risk of damage to the appliance
• When using the microwave, the
food (or its container) must not
be placed on the bottom of the
oven cavity. Use the supplied
accessories inserted in the
shelves suitable for the recipe
you want to make.
• DO NOT USE
CONTAINERS/
ACCESSORIES (trays, glass
dishes, etc.) RESTING
DIRECTLY ON THE BOTTOM
OF THE OVEN CAVITY.

46 - PRECAUTIONS 91477A641/C
Risk of damaging the appliance
• Do not use abrasive or
corrosive detergents (e.g.
scouring powders, stain
removers and metallic
sponges), rough or abrasive
materials or sharp metal
scrapers on glass parts as this
could cause scratch the surface
and break the glass. Use
wooden or plastic utensils.
• Do not sit on the appliance.
• Do not use cleaning products
containing chlorine, ammonia
or bleach on parts made of
steel or that have metallic
surface finishes (e.g. anodizing,
nickel- or chromium-plating).
• Racks and trays should be
inserted as far as they will go
into the side guides. The
mechanical safety locks that
prevent them from being
removed must face downwards
and towards the back of the
oven cavity.
• Do not use steam jets to clean
the appliance.
• Do not spray any spray product
near the appliance.
• Do not obstruct ventilation
openings and heat dispersal
slots.
• Fire hazard: never leave
objects in the oven cavity.
• DO NOT FOR ANY REASON
USE THE APPLIANCE AS A
SPACE HEATER.
• Do not use plastic cookware or
containers when cooking food.
• Do not place sealed tins or
containers in the oven cavity.
• Remove all trays and racks
which are not required during
cooking.
• Do not cover the bottom of the
oven cavity with aluminium or
tin foil sheets.
• Do not place pans or trays
directly on the bottom of the
oven cavity.
• If necessary, you can use the
tray rack (supplied or sold
separately, depending on the
model) by placing it on the
bottom as a support for
cooking.
• If you wish to use greaseproof
paper, place it so that it will not
interfere with the hot air
circulation inside the oven
cavity.
• Do not use the open door to
rest pans or trays on the internal
glass pane.
• Never use the oven door to
lever the appliance into place
when fitting.
• Avoid exerting too much
pressure on the door when
open.
• Do not use the handle to lift or

PRECAUTIONS - 4791477A641/C
e
move this appliance.
Installation and maintenance
• THIS APPLIANCE MUST NOT
BE INSTALLED IN A BOAT OR
CARAVAN.
• The appliance must not be
installed on a pedestal.
• Position the appliance into the
cabinet cut-out with the help of
a second person.
• To prevent any possible
overheating, the appliance
should not be installed behind
a decoration door or a panel.
• Installation and servicing should
be carried out by qualified
personnel in accordance with
current standards.
• Have the electrical connection
performed by authorised
technical personnel.
• The appliance must be
connected to earth in
compliance with electrical
system safety standards.
• Use cables withstanding a
temperature of at least 90 °C.
• The tightening torque of the
screws of the terminal supply
wires must be 1.5 - 2 Nm.
• If the power cable becomes
damaged, contact technical
support immediately to arrange
for it to be replaced in order to
avoid possible hazards.
• WARNING: while positioning
the appliance, make sure that
the power supply cable is not
caught or damaged.
• Always use any necessary/
required personal protective
equipment (PPE) before
performing any work on the
appliance (installation,
maintenance, positioning or
movement).
• Before performing any work on
the appliance, switch off the
power supply.
• Allow the appliance to be
disconnected after installation,
via an accessible plug or a
switch in the case of a fixed
connection.
• Fit the power line with an all-
pole circuit breaker with a
contact separation distance
sufficient to provide complete
disconnection in category III
overvoltage conditions,
pursuant to installation
regulations.
• This appliance can be used up
to a maximum altitude of 4,000
metres above sea level.
For this appliance
• Do not rest any weight or sit
on the open door of the
appliance.
• Take care that no objects are
stuck in the doors.
• Do not install/use the
appliance outdoors.
• (on some models only) Only
use the temperature probe
provided or recommended by

48 - PRECAUTIONS 91477A641/C
the manufacturer.
Appliance purpose
This appliance is intended for
cooking food in the home
environment. Every other use is
considered inappropriate. It
cannot be used:
• in employee kitchens, shops,
offices and other working
environments.
• in farms/farmhouses.
• by guests in hotels, motels and
residential environments.
• In bed and breakfast
accommodation.
This user manual
• This user manual is an integral part of the
appliance and must therefore be kept in its
entirety and within the user's reach for the
whole working life of the appliance.
• Read this user manual carefully before using
the appliance.
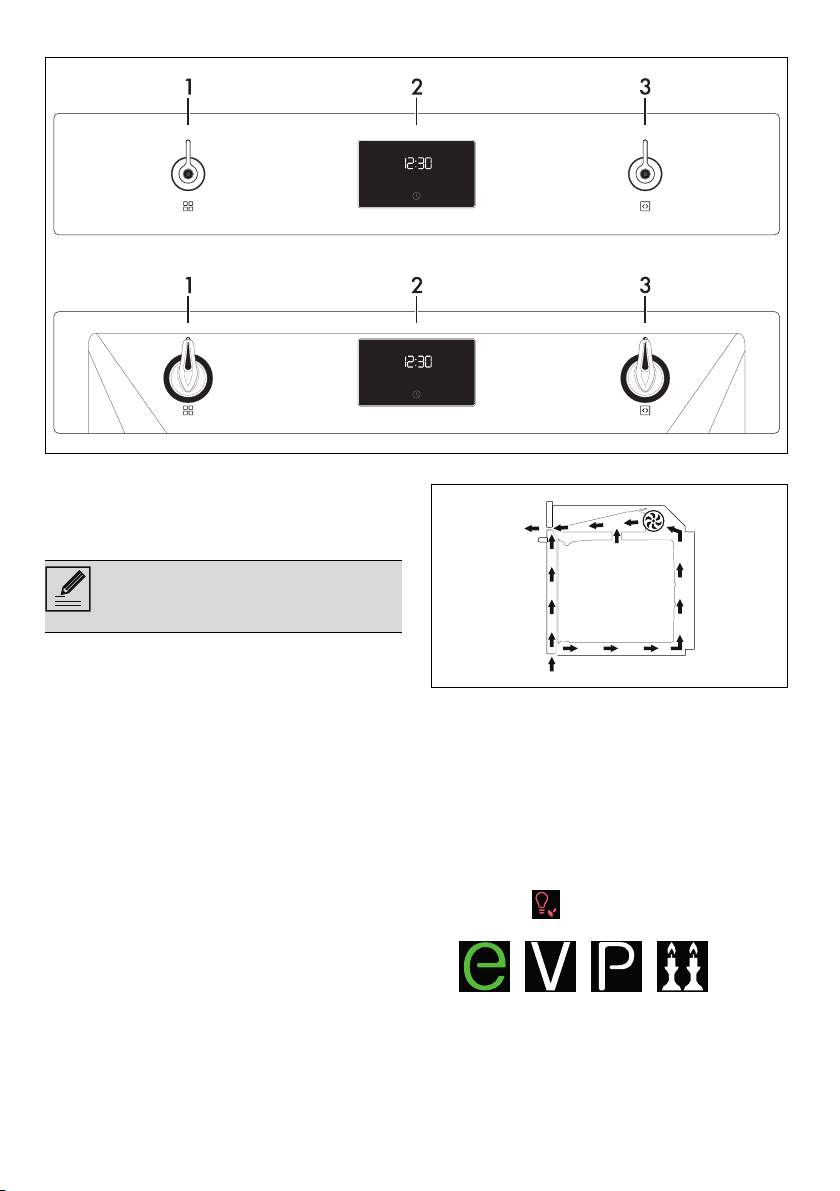
• The explanations in this manual include
images, which describe all that regularly
appears on the display. However, it should
be kept in mind that the appliance may be
equipped with an updated version of the
system, and as such, all that appears on the
display may differ from those in the manual.
Manufacturer’s liability
The manufacturer declines all liability for
damage to persons or property caused by:
• use of the appliance other than that
specified;
• failure to comply with the instructions in the
user manual;
• tampering with any part of the appliance;
• use of non-original spare parts.
Identification plate
The identification plate bears the technical data,
serial number and brand name of the
appliance. Do not remove the identification
plate for any reason.
Disposal
This appliance conforms to the WEEE
European directive (2012/19/EU) and
must be disposed of separately from
other waste at the end of its service life.
The appliance does not contain substances in
quantities sufficient to be considered hazardous
to health and the environment, in accordance
with current European directives.
To dispose of the appliance:
• Cut the power cable and remove it.
• Deliver the appliance to the appropriate
recycling centre for electrical and electronic
equipment waste, or return it to the retailer
when purchasing an equivalent product, on
a one for one basis.
Our appliances are packaged in non-polluting
and recyclable materials.
• Deliver the packing materials to the
appropriate recycling centre.
To save energy
• Only preheat the appliance if the recipe
requires you to do so. The preheating stage
can be disabled for all functions (see
chapter “Preheating”) apart from the PIZZA
(preheating cannot be disabled) and ECO
functions (no preheating stage).
• When using the functions (including the
ECO function), avoid opening the door
during cooking.
• Unless otherwise indicated on the package,
defrost frozen foods before placing them in
the oven.
• When cooking several types of food it is
recommended to cook the foods one after
the other to make the best use of the already
hot oven.
Power voltage
Danger of electrocution
• Disconnect the mains power supply.
• Unplug the appliance.
Plastic packaging
Danger of suffocation
• Do not leave the packaging or any part of it
unattended.
• Do not let children play with the plastic
bags.

DESCRIPTION - 4991477A641/C
e
• Use dark metal moulds: They help to absorb
the heat better.
• Remove all trays and racks which are not
required during cooking.
• Stop cooking a few minutes before the time
normally used. Cooking will continue for the
remaining minutes with the heat which has
accumulated inside the oven.
• Reduce any opening of the door to a
minimum to avoid heat dispersal.
• Keep the inside of the oven clean at all
times.
Light sources
• This appliance contains light sources which
cannot be replaced by the user and must
only be replaced by the technical assistance
service.
• The light sources contained in the appliance
are declared suitable for operation at
ambient temperature ≥300°C and intended
for use in high temperature applications such
as ovens.
• This appliance contains light sources of
efficiency class "G".
How to read the user manual
This user manual uses the following reading
conventions:
DESCRIPTION
General description
1 Control panel
2 Seal
3 Light bulb
4 Door
5 Fan
Frame shelf
Warning/Caution
Information/Advice

50 - DESCRIPTION 91477A641/C
Control panel
1 Function knob
This knob can be used to:
• turn the appliance on and off;
• select a function.
2 Digital programmer
Displays the current time, the selected cooking
temperature, power and function and any time
set.
3 Temperature knob
This knob can be used to set:
• the cooking temperature;
• the duration of a function;
• programmed cooking cycles;
• the current time;
• temporarily start or stop a function.
Other parts
Shelves
The appliance features shelves to position trays
and racks at different heights. The insertion
heights are indicated from the bottom upwards.
Cooling fan
The fan cools the appliance and comes into
operation during cooking.
The fan causes a steady outflow of air from
above the door which may continue for a short
period of time even after the appliance has
been turned off.
Oven cavity lighting
The appliance’s interior lighting comes on:
• when the door is opened;
• when the key on the display is pressed;
• when any function is selected, apart from the
- - - functions
(depending on the models).
Accessories
• Not all accessories are available on some
models.
• The accessories intended to come into
contact with food are made of materials that
Turn the Function knob to the position 0
to immediately complete any cooking
operation.

DESCRIPTION - 5191477A641/C
e
comply with the provisions of current
legislation.
• Original supplied and optional accessories
can be requested to Authorised Assistance
Centres. Use only original accessories
supplied by the manufacturer.
• It is recommended to mount the pull-out
slides on the first shelf of the frames. In this
way, it is possible to optimise the space
inside the oven cavity with an intermediate
level between the first and the second shelf.
Boiling rod
To be placed in containers when heating liquids,
necessary to avoid delayed boiling.
Lowered pan stand
Used for supporting containers with food during
cooking.
Glass dish
Useful for any type of cooking and collecting fat
from foods placed on the rack above. To be
placed on top of the lowered pan stand, it is
particularly suitable for microwave cooking.
Tray rack
To be placed above the glass dish. To cook
foods which may drip.
Optional accessories (can be
purchased separately)
Deep tray
Useful for collecting fat from foods placed on
the rack above and for cooking pies, pizzas,
baked desserts, biscuits, etc.
PPR2 or STONE(refractory stone)
Ideal accessory for baking bread (pizza,
bread, focaccia...), but you can also use it for
more delicate preparations such as biscuits.
BBQ (teflon-coated barbecue grill pan)
Double-use accessory: the striped side is
recommended for grilling meat (fillets,
hamburgers...), while the smooth surface can be
used for cooking vegetables, fruit, fish...
In this manual, suggestions for the
second or middle shelf refer to the use
of pull-out slides.
WARNING: The deep tray can be
used for combined microwave cooking.
Do not use it for microwave cooking
ONLY.

52 - USE 91477A641/C
AIRFRY (oil-free frying grill)
Recommended accessory for air-frying
previously breaded, precooked and/or frozen
food (chips, potato or meat croquettes, small
mozzarella bites...).
Microwaves
The appliance is equipped with a microwave
generator called a magnetron. The microwaves
generated are evenly emitted into the oven
cavity in order to reach the food and heat it.
Heating takes place through friction between
the molecules contained in the food (mainly
water molecules), with the consequent
generation of heat.
The heat generated directly inside the food
allows it to be defrosted, re-heated or cooked
in a shorter time compared to traditional
cooking.
The use of suitable containers for microwave
cooking leads to the microwaves reaching the
food in a uniform manner.
USE
Preliminary operations
• Remove any protective film from the outside
or inside of the appliance, including
accessories.
• Remove any labels (apart from the technical
data plate) from the accessories and
shelves.
• Remove and wash all the appliance
accessories (see chapter "CLEANING
AND MAINTENANCE").
First heating
1. Set a cooking time of at least one hour (see
paragraph "Using the oven").
2. Heat the empty oven compartment at the
maximum temperature to burn off any
residues left by the manufacturing process.
When heating the appliance
•airtheroom;
•don'tstay.
Materials suitable for use with
microwaves
In general, in order for all of the food to be
reached, the materials used for microwave
cooking must be transparent to microwave
energy.
Below is a table of materials to use and those
not to use:
MATERIALS TO USE:
- Glass (always remove the lids)*
• Baking ware
• Glasses
•Jars
- Porcelain
- Earthenware
- Plastic (only where suitable for microwave
use)*
•Containers
• Plastic wrap (must not come into contact
with the food)
*only if heat-resistant.
MATERIALS NOT TO USE
- Metals (can lead to arcing or sparks)
• Aluminium foil
•Aluminiumtrays
•Plates
• Metal utensils
• Freezer bags tie wraps
- Wood
- Crystal glasses
- Paper (risk of fire)
- Polystyrene containers (danger of
contamination of foodstuffs)
See General safety instructions.
Dishes must be free of metal
decorations.
Do not use metal accessory trays in the
microwave or combined microwave
functions.

USE - 5391477A641/C
e
Testing dishes
To check whether the cookware is suitable for
use with microwave cooking, carry out this
simple test:
1. Remove all accessories from the oven
cavity.
2. Place the cookware to be tested on the rack
inserted in the first shelf.
3. Select the microwave function at maximum
power level (e.g. 1000 W).
4. Set a cooking time of 30 seconds.
5. Start cooking.
At the end of the test the cookware must be
either cold or slightly warm. If the cookware is
hot then it should be considered as unsuitable
for microwave use.
Using the accessories
Racks and trays
Racks and trays have to be inserted into the side
guides until they come to a complete stop.
• The mechanical safety locks that prevent the
rack from being removed accidentally must
face downwards and towards the back of
the oven cavity.
Glass racks and glass dish
The glass dish must be placed on the lowered
pan stand.
The tray rack has to be inserted into the glass
dish. In this way fat can be collected separately
from the food which is being cooked.
Boiling rod
When using the microwave to heat or reheat
liquids, the boiling process may be delayed. To
avoid this, place the boiling rod (or a heat-
resistant plastic spoon) supplied into the
container while heating.
The microwave function can be used
without any food inside the oven only
for this test.
Unsuitable cookware
Risk of damage to the appliance
• Stop the test immediately if there is a
cracking sound or if sparks are emitted from
the cookware. If this happens, it means that
the cookware is not suitable for microwave
cooking.
Gently insert racks and trays into the
oven until they come to a stop.
Clean the trays before using them for
the first time to remove any residues left
by the manufacturing process.
Improper use
Danger of explosion/burns
• To avoid the danger of explosion inside the
appliance or the sudden boiling over of
superheated liquids, always place a boiling
rod in the liquid that is being heated.
High temperature
Risk of damage to the accessory
• Use the boiling rod only with Microwave
functions. The rod must not be used with
combination and traditional functions.

54 - USE 91477A641/C
Digital programmer
The parameters and values for the currently
selected function will be indicated on the
display. To use it, simply turn the functions and
temperature knobs and/or press the buttons on
the lower part of the display, depending on the
operations to be performed by the appliance.
First use
On the first use, or after a long power failure,
and the button flash on the
appliance display. To be able to start any
cooking function, the current time must be set.
Time setting
1. Press the button.
2. Turn the temperature knob to select the time
format to display ( or ).
3. Press the button to confirm the
modification and go on to adjust the time.
4. Turn the temperature knob to set the current
time.
5. Press the button to set the current time
and go to the selection of minutes.
6. Turn the temperature knob to select the
minutes of the current time.
7. Press the button to confirm.
Modifying the time
1. In the main menu, hold down the button
for a few seconds.
2. Modify the time as described in point 2 in
the previous chapter.
Using the oven
Microwave cooking
If the time is not set, the oven will not
switch on.
When the version is selected,
the display shows (morning) or
(afternoon).
It may become necessary to change the
current time, for example for daylight
saving time.
When the current time is visible, after 2
minutes from the last knob operation it is
displayed with low brightness.
To cancel the operation, turn the
function knob or hold down the button
for a few seconds.
See General safety instructions.
Given that they penetrate directly into
the food, microwaves allow cooking to
take place in a very short period of time
and with a considerable saving of
energy. They are suitable for cooking
without fat and also for defrosting and
re-heating food while maintaining its
original appearance and fragrance.

USE - 5591477A641/C
e
1. Open the door.
2. Place the dish into the oven cavity.
3. Close the door.
4. From position 0, turn the function knob to the
left by one position to select the
MICROWAVE function .
The button and the text start
flashing.
5. Turn the temperature knob to change the
power level from 150 W to 850 W (e.g.
"550 watt").
For a reference on microwave power, see the
paragraph Microwave power.
6. Press the button.
The and indicator lights on the display
flashes.
7. Turn the temperature knob to set the cooking
time (from 5 seconds to 1 hour and a half)
(e.g. "5 minutes").
Press the button to modify the cooking
duration.
Press the button to start the function.
8. Check the cooking status of the food by
turning on the internal light.
At the end of the cooking process an acoustic
signal sounds and the display shows .
9. Turn the function knob to position 0 to exit
the function.
Microwave power levels
Below is a list of the power levels that can be
selected:
When using the microwave, the food
(or its container) must not be placed on
the bottom of the oven cavity. Use the
supplied accessories inserted in the
shelves suitable for the recipe you want
to make.
DO NOT USE CONTAINERS/
ACCESSORIES (trays, glass dishes,
etc.) RESTING DIRECTLY ON THE
BOTTOM OF THE OVEN CAVITY.
When the door is opened, the function
in progress is interrupted.
The function resumes automatically
when the door is closed.
Cooking functions can be interrupted at
any time by turning the function knob to
the 0 position.
Power (W) Uses
150
Thawing food250
350
450 Delicate cooking
550
650 Re-heating and cooking food
750

56 - USE 91477A641/C
Combination cooking
1. From position 0, turn the function knob until a
combination function is selected (e.g.
MICROWAVE + FAN-ASSISTED +
).
The button and the text start
flashing.
2. Turn the temperature knob to the right or to
the left to select the wished temperature (for
example "200°C").
3. Press the button.
4. Turn the temperature knob to change the
power level from 150 W to 450 W (e.g.
"350 watt").
5. Press the button to confirm the
microwave power.
6. Press the button.
The and indicator lights on the display
flashes.
7. Turn the temperature knob to set the cooking
time (from 1 minute to 13 hours) (e.g. "15
minutes").
8. Press the button to modify the cooking
duration.
9. Press the button again to start the
function.
Preheating stage
Cooking itself is preceded by a preheating
stage, which allows the appliance to heat to the
cooking temperature more quickly.
850 Heating liquids
Combination cooking is a mix of
traditional cooking and microwave
operation. These functions are marked
by the microwave function icon and the
symbol of a traditional function
switching on.
Power (W) Uses

USE - 5791477A641/C
e
This stage is indicated by the switching on of the
indicator light and by a progressive
increase in the temperature level reached
.
At the end of preheating:
• the indicator light switches off;
• the appliance beeps;
• the words and the button
flash to indicate that the food can be
introduced into the oven cavity.
Cooking phase
1. Open the door
2. Place the dish with the food to be cooked
into the oven cavity.
3. Close the door.
or
• If the dish with the food is already inside the
oven cavity, press the button to start
cooking.
4. Check the cooking status of the food by
turning on the internal light.
End of cooking
At the end of the cooking process an acoustic
signal sounds and the display shows .
5. Turn the function knob to position 0 to exit
the function.
List of combined cooking functions
MICROWAVE + FAN-ASSISTED
MICROWAVE + THERMO-VENTILATED
MICROWAVE + GRILL
Traditional cooking
1. Turn the function knob to the right or to the
left to select the wished function (for
example "FAN-ASSISTED ").
The button and the text start
flashing.
2 Turn the temperature knob to the right or to
the left to select the wished temperature (for
example "200°C").
3. Press the button to start the function.
Preheating stage
Cooking itself is preceded by a preheating
stage, which allows the appliance to heat to the
cooking temperature more quickly.
This stage is indicated by the switching on of the
indicator light and by a progressive
increase in the temperature level reached
.
At the end of preheating:
You can skip the preheating phase by
holding down the button for a few
seconds.
The operation of the fan, combined with
traditional cooking, ensures consistent
cooking even with complex recipes.
Using the microwave on the other hand
leads to rapid internal cooking of the
food.
For combination cooking of food in a
short time thanks to the microwave
action working together with hot air
circulation.
The use of the grill results in perfect
browning of the food’s surface. Using
the microwave on the other hand leads
to rapid internal cooking of the food.
Cooking functions can be interrupted at
any time by turning the function knob to
the 0 position.
When the door is opened, the function
in progress is interrupted.
The function resumes automatically
when the door is closed.
You can skip the preheating phase by
holding down the button for a few
seconds.

58 - USE 91477A641/C
• the indicator light switches off;
• the appliance beeps;
• the words and the button
flash to indicate that the food can be
introduced into the oven cavity.
Cooking phase
1. Open the door
2. Place the dish with the food to be cooked
into the oven cavity.
3. Close the door.
or
• If the dish with the food is already inside the
oven cavity, press the button to start
cooking.
4. Check the cooking status of the food by
turning on the internal light.
End of cooking
5. To end cooking, turn the function knob to
position 0 to exit the function.
Timed cooking
1. After selecting a cooking function and
temperature, press the key.
The and indicator lights on the display
flashes.
2. Turn the temperature knob to set the cooking
time (from 1 minute to 13 hours) (e.g. "25
minutes").
3. Press the button to modify the cooking
duration.
4. Press the button to start the function.
At the end of preheating:
5. Place the food inside the oven cavity.
6. Press the button to start cooking.
Timed cooking is indicated by the progressive
decrease in time on the numerical display and
the progressive decrease in the segment bar
.
At the end of the cooking process an acoustic
signal sounds and the display shows .
7. Return the function knob to the 0 position.
To delete a timed cooking
1. Press the button for a few seconds.
2. Turn the temperature knob counter-
clockwise until the cooking time is reset.
3. Press the button to confirm.
Programmed cooking
1. After selecting a cooking function and
temperature, press the key.
The and indicator lights on the display
flashes.
2. Turn the temperature knob to set the cooking
time (from 1 minute to 13 hours) (e.g. "25
minutes").
3. Press the button.
Timed cooking is the function which
allows a cooking operation to be
started and then ended after a specific
length of time set by the user.
Bear in mind that a few minutes for oven
preheating must be added to the
cooking time.
Programmed cooking is the function
which allows a time-controlled cooking
operation to be stopped at an
established time depending on the time
set by the user, after which the
appliance will switch off automatically.
For safety reasons, it is not possible to
set the end of cooking time by itself
without setting the cooking duration.

USE - 5991477A641/C
e
The and indicator lights on the display
flashes.
4. Turn the temperature knob to set the end-of-
cooking time (e.g. "13:15").
5. Press the button to confirm end-of-
cooking time.
6. Press the button to start the function.
The appliance waits for the set start time.
At the end of the cooking process an acoustic
signal sounds and the display shows .
7. Return the function knob to the 0 position.
To delete a programmed cooking
1. Press the button for a few seconds.
The and indicator lights on the display
flashes.
2. Press the button shortly.
The and indicator lights on the display
flashes.
3. Turn the temperature knob counter-
clockwise until the cooking time is reset.
4. Press the button to confirm.
Minute minder timing during a cooking
process
1. Press the button.
The and indicator lights on the display
flashes.
2. Press the button.
The display shows and the indicator
light flashing.
3. Turn the temperature knob to set the duration
of the minute minder (from 1 minute to 13
hours).
4. Press the button to confirm.
At the end of the minute minder timer, an
acoustic signal sounds and the indicator light
flashes on the display.
5. Press the button to quit the function.
List of traditional cooking functions
STATIC
FAN ASSISTED
CIRCULAIRE
GRILL
The minutes required for preheating are
already included in the end-of-cooking
time.
In this way, only the programmed
cooking is cancelled. Timed cooking
starts immediately with the preheating
phase.
To stop every cooking process, always
return the function knob to the 0
position.
The minute minder timer does not stop
the cooking operation but rather informs
the user when the set time has run out.
Not all functions are available on some
models.
Traditional cooking suitable for the
preparation of one dish at a time. Ideal
for cooking roasts, fatty meats, bread,
pies.
Intense and uniform cooking. Ideal for
biscuits, cakes and multilevel cooking.
The heat is distributed quickly and
uniformly. Suitable for all dishes, ideal
for cooking on multiple levels without
mixing smells or flavours.
It allows to obtain excellent grilling and
grating results. Used at the end of
cooking, it gives a uniform browning to
the dishes.

60 - USE 91477A641/C
BOTTOM HEAT
ECO
Cooking advice
General advice
• Use a fan assisted function to achieve
consistent cooking at several levels.
• It is not possible to shorten cooking times by
increasing the temperature (the food could
be overcooked on the outside and
undercooked on the inside).
Advice for cooking meat
• Cooking times vary according to the
thickness and quality of the food and to
consumer taste.
• Use a meat thermometer when roasting
meat, or simply press on the roast with a
spoon. If it is hard, it is ready; If not, it needs
another few minutes cooking.
Advice for cooking with the Grill and the Fan
with grill
• Meat can be grilled even when it is put into
the cold oven or into the preheated oven if
you wish to change the effect of the
cooking.
• When using the fan-assisted with grill
function, we recommend that you preheat
the oven before grilling.
• We recommend placing the food at the
centre of the rack.
• With the Grill function, we recommend that
you set the temperature to the maximum
value to optimise cooking.
Advice for cooking desserts/pastries and
biscuits
• Use dark metal moulds: They help to absorb
the heat better.
• The temperature and the cooking time
depend on the quality and consistency of
the dough.
• To check whether the dessert is cooked right
through: At the end of the cooking time, put
a toothpick into the highest point of the
dessert. If the dough does not stick to the
toothpick, the dessert is cooked.
• If the dessert collapses when it comes out of
the oven, on the next occasion reduce the
set temperature by about 10°C, selecting a
longer cooking time if necessary.
Advice for defrosting and proving
• Place frozen foods without their packaging
in a lidless container on the first shelf of the
oven.
• Avoid overlapping the food.
• To defrost meat, use the rack placed on the
second level and a tray on the first level. In
this way, the liquid from the defrosting food
drains away from the food.
• The most delicate parts can be covered with
aluminium foil.
• For successful proving, a container of water
should be placed in the bottom of the oven.
To save energy
• Stop cooking a few minutes before the time
normally used. Cooking will continue for the
remaining minutes with the heat which has
accumulated inside the oven.
• Reduce any opening of the door to a
minimum to avoid heat dispersal.
• Keep the inside of the appliance clean at all
times.
The heat comes from the bottom of the
cavity. Perfect for cakes, pies, tarts and
pizzas.
This function is particularly suitable for
cooking on a single shelf with low
energy consumption.
It is recommended for all types of food,
excluding those that can create a lot of
humidity (such as vegetables).
To obtain maximum energy savings and
reduce cooking times, it is
recommended to place food in the
oven without preheating.
When using the ECO function, avoid
opening the door during cooking.
Cooking (and preheating) times are
longer with the ECO function and may
depend on the amount of food in the
oven.
The ECO function is a delicate cooking
function and is recommended for food
withstanding temperatures lower than
210°C; in case of cooking at higher
temperatures, select another function.

USE - 6191477A641/C
e
Mini guide to accessories
Discover the recipes
To consult the recipes developed for various
categories of food and to get more information
on cooking suggestions, we recommend visiting
the dedicated page on the www.smeg.com
website, which can be reached using the QR
code on the leaflet supplied with the product.
Special functions
• From position 0, turn the function knob to the
left by one position. The button flashes.
DEFROSTING
1. After entering the special functions menu,
press the button until the
function is selected.
2. Open the door.
3. Place the food to be defrosted inside the
oven.
4. Close the door.
5. Press the button to confirm.
6. Turn the temperature knob to set the
defrosting time (from 1 minute to 30 minutes)
Lowered pan
stand
We recommend the use of the grill as a support surface for baking moulds/casseroles.
In the absence of the baking tray grill, the grill can be used as a base for grilling with the deep
baking tray placed on a shelf below to collect the juices.
For multi-level cooking, place two racks keeping an empty level between one and the other
and use the FAN-HEATED function .
Glass dish
Use the glass dish by placing it on the grid .
It is suitable for microwave and combination microwave cooking.
Tray rack
We recommend using the baking tray grill as a base for food to grill. The pan below collects
the juices from the grills.
Deep tray
We recommend the use of the deep baking tray for cooking on one level only.
Place the deep baking tray on the centre shelf when using the fan-assisted functions. When
using the STATIC function, place the deep baking tray on the required shelf.
Place the baking tray on the last shelf with the baking tray grill to cook in GRILL mode .
WARNING: The deep tray can be used for combined microwave cooking. Do not use it for
microwave cooking only.
To scroll through the available functions,
press the button until the desired
special function is selected.
To exit the selected function (not yet
started), hold down the button .
This function allows you to defrost food
on the basis of a selectable time.
If the indoor temperature is higher than
expected, the function is not activated
and every time the button is pressed
the appliance makes a beep.
Let the appliance cool down before
activating the function.
It is recommended placing the food to
be defrosted on the first shelf from the
bottom.
Table of contents
Other Smeg Oven manuals