Smeg SF9800PRO User manual

Contents
29
EN
1 Instructions 30
1.1 General safety instructions 30
1.2 Identification plate 31
1.3 Manufacturer liability 31
1.4 Appliance purpose 31
1.5 Disposal 31
1.6 This user manual 32
1.7 How to read the user manual 32
2 Description 33
2.1 General Description 33
2.2 Control panel 34
2.3 Other parts 34
2.4 Available accessories 35
3 Use 36
3.1 Instructions 36
3.2 First use 36
3.3 Using the accessories 37
3.4 Using the oven 37
3.5 Cooking advice 39
3.6 Analogue programmer 41
4 Cleaning and maintenance 43
4.1 Instructions 43
4.2 Cleaning the surfaces 43
4.3 Ordinary daily cleaning 43
4.4 Food stains or residues 43
4.5 Removing the door 44
4.6 Cleaning the door glazing 45
4.7 Removing the internal glass panes 45
4.8 Cleaning the inside of the oven 46
4.9 Vapor Clean 48
4.10 Extraordinary maintenance 50
5 Installation 51
5.1 Electrical connection 51
5.2 Cable replacement 51
5.3 Positioning 52
We advise you to read this manual carefully, which contains all the instructions for
maintaining the appliance’s aesthetic and functional qualities.
For further information on the product: www.smeg.com

Instructions
30
1 Instructions
1.1 General safety instructions
Risk of personal injury
• During use the appliance and its
accessible parts become very hot.
• Never touch the heating elements
during use.
• Keep children under eight years
of age at a safe distance if they
are not constantly supervised.
• Children must never play with the
appliance.
• This appliance may be used by
children aged at least 8 and by
people of reduced physical and
mental capacity, or lacking in
experience in the use of electrical
appliances, as long they are
supervised or instructed by adults
who are responsible for their
safety.
• Never try to put out a fire or
flames with water: Turn off the
appliance and smother the flames
with a fire blanket or other
appropriate cover.
• The appliance must never be
cleaned by unsupervised children.
• Do not insert pointed metal
objects (cutlery or utensils) into the
slots in the appliance.
• Switch off the appliance
immediately after use.
• Do not modify this appliance.
• Have qualified personnel carry
out installation and assistance
interventions according to the
standards in force.
• Do not try to repair the appliance
yourself or without the intervention
of a qualified technician.
• If the power supply cable is
damaged, contact technical
support immediately and they will
replace it.
• Do not open the storage
compartment when the oven is on
and still hot.
• The items inside the storage
compartment could be very hot
after using the oven.
Risk of damaging the appliance
• Do not use abrasive or corrosive
detergents on glass parts (e.g.
powder products, stain removers
and metallic sponges).
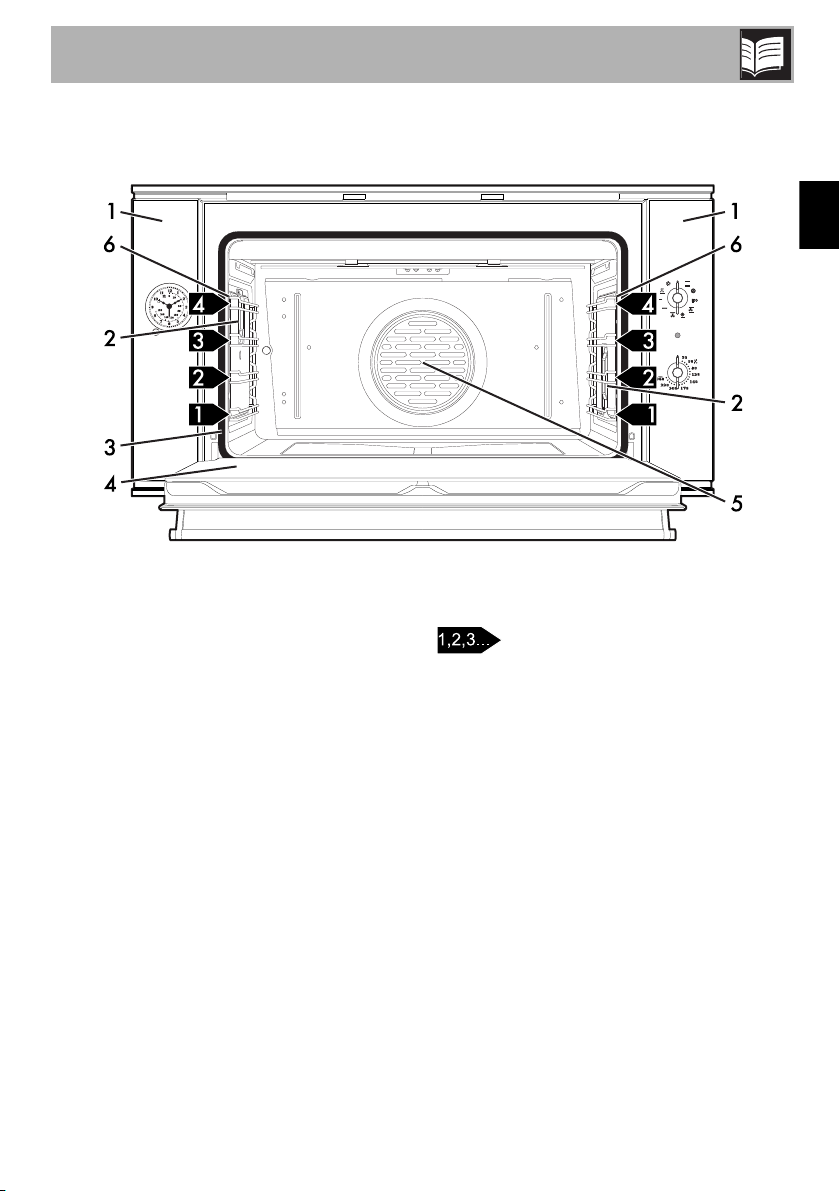
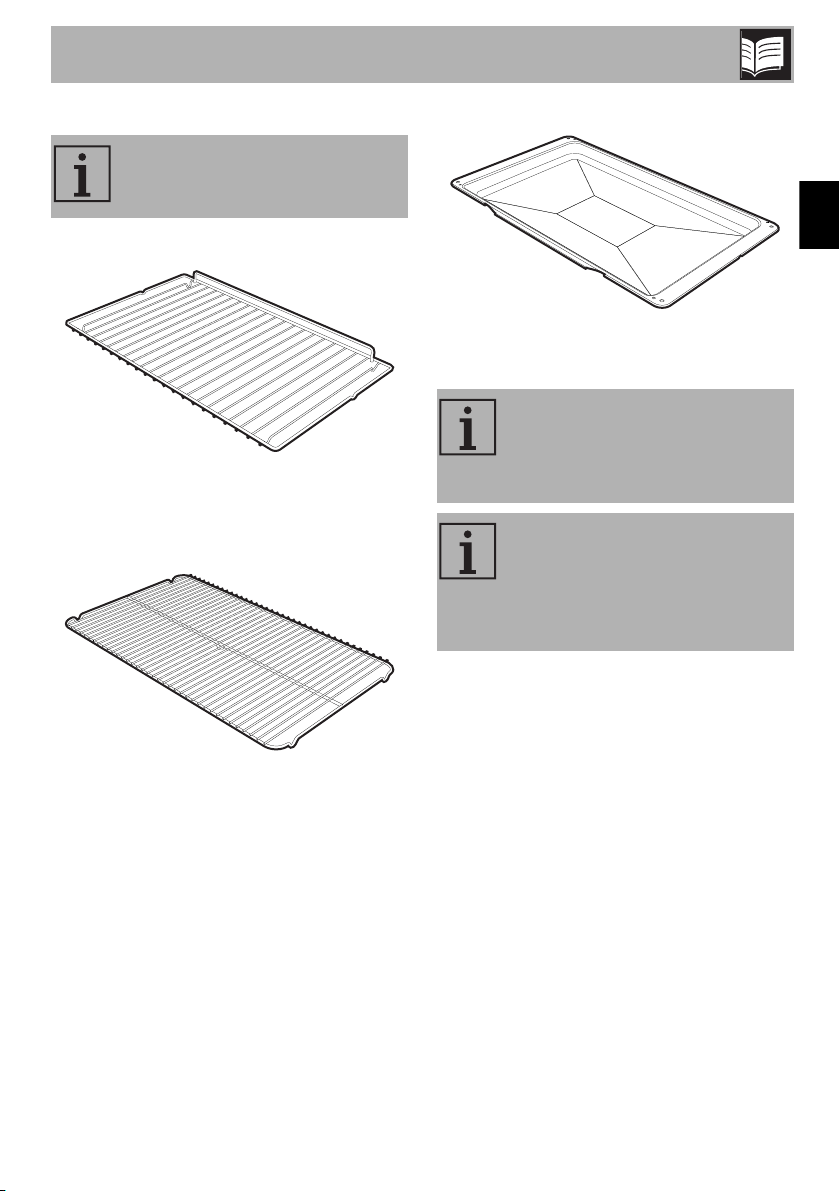
• Racks and trays have to be
inserted into the side guides until
they come to a complete stop.
The mechanical safety locks that
prevent the rack from being taken
out accidentally have to face
downwards and towards the
oven back.

Instructions
31
EN
• Use wooden or plastic utensils.
• Do not seat on the appliance.
• Do not use steam jets to clean the
appliance.
• Do not obstruct ventilation
openings and heat dispersal slots.
• Never leave the appliance
unattended during cooking
operations where fats or oils
could be released.
• Never leave objects on the
cooking surface.
• Do not use the appliance to heat
rooms for any reason.
• Remove any food residues or
large spills from previous cooking
operations from the inside of the
oven.
For this appliance
• Before replacing the bulb, switch off
the power supply to the appliance.
• Do not rest any weight or sit on the
open door of the appliance.
• Take care that no objects are stuck in
the doors.
1.2 Identification plate
• The identification plate bears the technical
data, serial number and brand name of the
appliance. Do not remove the identification
plate for any reason.
1.3 Manufacturer liability
The manufacturer declines all liability for
damage to persons or property caused by:
• Use of the appliance other than the one
envisaged;
• Non-observance of the user manual
provisions;
• Tampering with any part of the
appliance;
• Use of non-original spare parts.
1.4 Appliance purpose
• This appliance is intended for cooking
food in the home environment. Every
other use is considered improper.
• The appliance is not designed to
operate with external timers or with
remote-control systems.
1.5 Disposal
This appliance must be disposed of
separately from other waste
(Directives 2002/95/EC, 2002/
96/EC, 2003/108/EC). The appliance
does not contain substances in quantities
sufficient to be considered hazardous to
health and the environment, in accordance
with current European directives.
To dispose of the appliance:
• Cut the power supply cable and remove
it along with the plug.
Power voltage
Danger of electrocution
• Disconnect the main power supply.
• Disconnect the power cable from the
electrical system.

Instructions
32
• Deliver the appliance to the appropriate
recycling centre for electrical and
electronic equipment waste, or return it to
the retailer when purchasing an
equivalent product, on a one for one
basis.
Our appliances are packed in non-
polluting and recyclable materials.
• Deliver the packing materials to the
appropriate recycling centre.
1.6 This user manual
This user manual is an integral part of the
appliance and must therefore be kept in its
entirety and within the user’s reach for the
whole working life of the appliance.
Read this user manual carefully before using
the appliance.
1.7 How to read the user manual
This user manual uses the following reading
conventions:
1. Use instruction sequence.
• Single use instruction.
Plastic packaging
Danger of suffocation
• Do not leave the packaging or any part
of it unattended.
• Do not let children play with the
packaging plastic bags.
Instructions
General information on this user
manual, on safety and final
disposal.
Description
Description of the appliance and its
accessories.
Use
Information on the use of the
appliance and its accessories,
cooking advice.
Cleaning and maintenance
Information for proper cleaning and
maintenance of the appliance.
Installation
Information for the qualified
technician: Installation, operation
and inspection.
Safety instructions
Information
Advice

Description
33
EN
2 Description
2.1 General Description
1 Control panel
2 Oven light
3 Seal
4 Door
5 Fan
6 Rack/tray support frames
Frame shelf

Description
34
2.2 Control panel
1 Analogue programmer
Useful for displaying the current time, setting
programmed cooking operations and
programming the minute minder timer.
2 Function knob
The oven's various functions are suitable for
different cooking methods. After selecting
the required function, set the cooking
temperature using the temperature knob.
3 Thermostat indicator light
The indicator light comes on to indicate that
the oven is heating up. It turns off as soon as
it reaches the set temperature. It flashes
regularly to indicate that the temperature set
inside the oven is kept constant.
4 Temperature knob
This knob allows you to select the cooking
temperature.
Turn the knob clockwise to the required
value, between the minimum and maximum
setting.
2.3 Other parts
Shelves
The appliance features shelves for
positioning trays and racks at different
heights. The insertion heights are indicated
from the bottom upwards (see 2.1 General
Description).
Cooling fan
The fan cools the oven and comes into
operation during cooking.
The fan causes a steady outflow of air from
above the door which may continue even
after the appliance has been turned off.
Interior lighting
The oven light comes on when any function
is selected.

Description
35
EN
2.4 Available accessories
Rack
Useful for supporting containers with food
during cooking.
Tray rack
To be placed over the top of the oven tray;
for cooking foods which may drip.
Oven tray
Useful for collecting fat from foods placed
on the rack above.
Some models are not provided
with all accessories.
The oven accessories intended to
come into contact with food are
made of materials that comply with
the provisions of current legislation.
Original supplied and optional
accessories can be requested to
Authorised Assistance Centres.
Use only original accessories
supplied by the manufacturer.

Use
36
3 Use
3.1 Instructions
3.2 First use
1. Remove any protective film from the
outside or inside of the appliance,
including accessories.
2. Remove any labels (apart from the
technical data plate) from the
accessories and from the oven cavity.
3. Remove and wash all appliance
accessories (see 4 Cleaning and
maintenance).
4. Heat the empty oven at the maximum
temperature to burn off any residues left
by the manufacturing process.
High temperature inside the oven
during use
Danger of burns
• Keep the oven door closed during
cooking.
• Protect your hands wearing heat
resistant gloves when moving food
inside the oven.
• Do not touch the heating elements inside
the oven.
• Do not pour water directly onto very hot
trays.
• Do not allow children to get near the
oven when it is in operation.
High temperature inside the oven
during use
Danger of fire or explosion
• Do not spray any spray products near
the oven.
• Do not use or leave flammable materials
near the oven.
• Do not use plastic kitchenware or
containers when cooking food.
• Do not put sealed tins or containers in
the oven.
• Do not leave the oven unattended
during cooking operations where fats or
oils could be released.
• Remove all trays and racks which are
not required during cooking.
Improper use
Risk of damage to enamelled
surfaces
• Do not cover the bottom of the oven
cavity with aluminium or tin foil sheets.
• If you wish to use greaseproof paper,
place it so that it will not interfere with the
hot air circulation inside the oven.
• Do not place pans or trays directly on
the bottom of the oven cavity.
• Do not pour water directly onto very hot
trays.

Use
37
EN
3.3 Using the accessories
Racks and trays
Racks and trays have to be inserted into the
side guides until they come to a complete
stop.
• The mechanical safety locks that prevent
the rack from being taken out
accidentally have to face downwards
and towards the oven back.
Tray rack
The tray rack has to be inserted into the tray.
In this way fat can be collected separately
from the food which is being cooked.
3.4 Using the oven
Switching on the oven
To switch on the oven:
1. Select the cooking function using the
function knob.
2. Select the temperature using the
temperature knob.
Gently insert racks and trays into
the oven until they come to a stop.
Clean the trays before using them
for the first time to remove any
residues left by the manufacturing
process.
Regular flashing of the thermostat
indicator light during cooking is
normal and indicates that the
temperature is being maintained
constant inside the oven.
Grilling processes must never last
more than 60 minutes.

Use
38
Functions list
Static
As the heat comes from above and
below at the same time, this system
is particularly suitable for certain
types of food. Traditional cooking,
also known as static cooking, is
suitable for cooking just one dish at
a time. Perfect for all types of roasts,
bread and cakes and in any case
particularly suitable for fatty meats
such as goose and duck.
Fan with circulaire
The combination of the fan and the
circulaire heating element
(incorporated in the rear of the
oven) allows you to cook different
foods on several levels, as long as
they need the same temperatures
and same type of cooking. Hot air
circulation ensures instant and even
distribution of heat. It will be
possible, for instance, to cook fish,
vegetables and biscuits
simultaneously (on different levels)
without odours and flavours
mingling.
Eco
Using the grill and the lower heating
element in combination is
particularly suitable for cooking on
a single shelf, as it provides low
energy consumption. Ideal for
cooking meat, fish and vegetables.
Not recommended for desserts
which must rise.
Fan assisted
The operation of the fan, combined
with traditional cooking, ensures
consistent cooking even with
complex recipes. Perfect for biscuits
and cakes, even when
simultaneously cooked on several
levels. (For multiple-level cooking,
we recommend using the 2nd and
4th shelves).
Lower element + fan with circulaire
Fan-assisted cooking is combined
with the heat coming from the
bottom and allows you at the same
time to slightly brown food. Perfect
for any type of food
Fan with grill
The air produced by the fan softens
the strong heatwave generated by
the grill, grilling perfectly even very
thick foods. Perfect for large cuts of
meat (e.g. shin of pork).

Use
39
EN
3.5 Cooking advice
General advice
• Use a fan assisted function to achieve
consistent cooking at several levels.
• It is not possible to shorten cooking times
by increasing the temperature (the food
could be overcooked on the outside and
undercooked on the inside).
Advice for cooking meat
• Cooking times vary according to the
thickness and quality of the food and to
consumer taste.
• Use a meat thermometer when roasting
meat, or simply press on the roast with a
spoon. If it is hard, it is ready; If not, it
needs another few minutes cooking.
Grill
The heat coming from the grill
element gives perfect grilling results
above all for thin and medium
thickness meat and in combination
with the rotisserie (where fitted)
gives the food an even browning at
the end of cooking. Perfect for
sausages, spare ribs and bacon.
This function enables large
quantities of food, particularly meat,
to be grilled evenly.
Small grill (on some models only)
Using only the heat released from
the central element, this function
allows you to grill small portions of
meat and fish for making kebabs,
toasted sandwiches and any types
of grilled vegetable side dishes.
Lower element
The heat coming just from the
bottom allows you to complete the
cooking of foods that require a
higher bottom temperature, without
affecting their browning. Perfect for
cakes, pies, tarts and pizzas.
Light
In this position the oven light can be
turned on during normal operations.
Vapor Clean
This function makes cleaning easier
using the steam produced by a
small quantity of water poured into
a tray on the first shelf level.

Use
40
Advice for cooking with the Grill and the
Fan with grill
• Meat can be grilled even when it is put
into the cold oven or into the preheated
oven if you wish to change the effect of
the cooking.
• With the Fan with grill function, we
recommend that you preheat the oven
before grilling.
• We recommend placing the food at the
centre of the rack.
• With the Grill function, we recommend
that you turn the temperature knob to the
maximum value near the symbol to
optimise cooking.
Advice for cooking desserts/pastries and
biscuits
• Use dark metal moulds: They help to
absorb the heat better.
• The temperature and the cooking time
depend on the quality and consistency
of the dough.
• To check whether the dessert is cooked
right through: At the end of the cooking
time, put a toothpick into the highest point
of the dessert. If the dough does not stick
to the toothpick, the dessert is cooked.
• If the dessert collapses when it comes
out of the oven, on the next occasion
reduce the set temperature by about
10°C, selecting a longer cooking time if
necessary.
Advice for defrosting and proving
• Place frozen foods without their
packaging in a lidless container on the
first shelf of the oven.
• Avoid overlapping the food.
• To defrost meat, use the rack placed on
the second level and a tray on the first
level. In this way, the liquid from the
defrosting food drains away from the
food.
• The most delicate parts can be covered
with aluminium foil.
• For successful proving, a container of
water should be placed in the bottom of
the oven.
To save energy
• Stop cooking a few minutes before the
time normally used. Cooking will
continue for the remaining minutes with
the heat which has accumulated inside
the oven.
• Reduce any opening of the door to a
minimum to avoid heat dispersal.
• Keep the inside of the appliance clean
at all times.

Use
41
EN
3.6 Analogue programmer
ASetting knob
BCooking start pointer
Setting the time
To set the time, pull out setting knob Aand
turn it clockwise.
Manual cooking
Turn setting knob Aclockwise until the
cooking start pointer Blines up with the
symbol.
Timed cooking
1. After selecting a cooking function and
temperature, turn the setting knob A.
2. Move the cooking start pointer Bto the
required time indicated in the centre of
the clock (0... 180 minutes).
3. When the set time has elapsed, all
heating elements will turn off and a
buzzer will sound.
4. To turn off the buzzer, turn the setting
knob Aclockwise to the symbol.
Timed cooking is the function
which allows a cooking operation
to be started and then ended after
a specific length of time set by the
user.

Use
42
Cooking information table
Food Weight (Kg) Function
Runner
position from
the bottom
Temperature
(°C) Time (minutes)
Lasagne 3 - 4 Static 1 220 - 230 50 - 60
Pasta bake 2 Static 1 220 - 230 40
Roast veal 1.2 Fan assisted 2 180 - 190 70 - 80
Pork loin 1.2 Fan assisted 2 180 - 190 70 - 80
Pork shoulder 1.2 Fan assisted 2 180 - 190 90 - 100
Roast rabbit 1.2 Fan assisted 2 180 - 190 70 - 80
Turkey breast 1.5 Fan assisted 2 180 - 190 80 - 90
Roast pork neck 2 Fan assisted 2 180 - 190 190 - 210
Roast chicken 1.2 Fan assisted 2 190 - 200 60 - 70
1st surface 2nd surface
Pork sausages 1.2 Fan with grill 3 260 7 - 9 5 - 6
Pork chops 1.2 Grill 4 260 15 5
Hamburgers 0.8 Grill 4 260 9 5
Bacon 0.8 Fan with grill 3 260 13 3
Spit-roast chicken 1.2 Grill + Rotisserie 260 70 - 80
Salmon trout 1.2 Lower element 2 150 - 160 35 - 40
Pizza 1 Lower element 1 260 6 - 10
Bread 1 Fan assisted 2 190 - 200 25 - 30
Focaccia 1 Fan assisted 2 180 - 190 15 - 20
Bundt cake 1 Fan assisted 2 160 50 - 60
Tart 1 Fan assisted 2 160 30 - 35
Short pastry 0.5 Lower element 2 160 - 170 20 - 25
Jam tarts 1.2 Fan assisted 2 160 - 170 40 - 50
Paradise cake 1.2 Fan assisted 2 160 50 - 60
Profiteroles 0.8 Fan assisted 2 150 - 160 40 - 50
Sponge cake 0.8 Fan assisted 2 150 - 160 45 - 50
Rice pudding 1 Static 2 160 40 - 50
Brioches 0.6 Fan assisted 2 160 25 - 30
Short pastry biscuits Fan assisted 1-3 160 - 170 16 - 20
The times indicated in the table do not include preheating times and are provided only as a
guide.

Cleaning and maintenance
43
EN
4 Cleaning and maintenance
4.1 Instructions
4.2 Cleaning the surfaces
To keep the surfaces in good condition,
they should be cleaned regularly after use.
Let them cool first.
4.3 Ordinary daily cleaning
Always use only specific products that do
not contain abrasives or chlorine-based
acids.
Pour the product onto a damp cloth and
wipe the surface, rinse thoroughly and dry
with a soft cloth or a microfibre cloth.
4.4 Food stains or residues
Do not use metallic sponges or sharp
scrapers as they will damage the surfaces.
Use ordinary non-abrasive products with
the aid of wooden or plastic utensils if
necessary. Rinse thoroughly and dry with a
soft cloth or a microfibre cloth.
Do not allow residues of sugary foods (such
as jam) to set inside the oven. If left to set for
too long, they might damage the enamel
lining of the oven.
Improper use
Risk of damage to surfaces
• Do not use steam jets to clean the
appliance.
• Do not use cleaning products containing
chlorine, ammonia or bleach on steel
parts or parts with metallic finishes on the
surface (e.g. anodizing, nickel- or
chromium-plating).
• Do not use abrasive or corrosive
detergents on glass parts (e.g. powder
products, stain removers and metallic
sponges).
• Do not use rough or abrasive materials
or sharp metal scrapers.

Cleaning and maintenance
44
4.5 Removing the door
For easier cleaning, the door can be
removed and placed on a canvas.
1. Open the door completely and insert two
pins into the holes on the hinges
indicated in the figure.
2. Grasp the door on both sides with both
hands, lift it forming an angle of around
30° and remove it.
3. To reassemble the door, put the hinges in
the relevant slots in the oven, making sure
that grooved sections Aare resting
completely in the slots. Lower the door
and once it is in place remove the pins
from the holes in the hinges.

Cleaning and maintenance
45
EN
4.6 Cleaning the door glazing
The glass in the door should always be kept
thoroughly clean. Use absorbent kitchen
roll. In case of stubborn dirt, wash with a
damp sponge and an ordinary detergent.
4.7 Removing the internal glass panes
For easier cleaning the door internal glass
panes can be disassembled.
1. Remove the internal glass pane by
pulling the rear part gently upwards,
following the movement indicated by the
arrows (1).
2. Then, pull the front part upwards (2). In
this way, the 4 pins attached to the glass
detach from their housings in the oven
door.
3. Some models have an intermediate glass
pane. Remove the intermediate glass
pane by lifting it upwards.
We recommend the use of
cleaning products distributed by
the manufacturer.

Cleaning and maintenance
46
4. Clean the external glass pane and the
panes previously removed. Use
absorbent kitchen roll. In case of
stubborn dirt, wash with a damp sponge
and neutral detergent.
5. Refit the panes in the reverse order in
which they were removed.
6. Reposition the internal glass pane. Take
care to centre and insert the 4 pins into
their housings in the oven door by
applying slight pressure.
4.8 Cleaning the inside of the oven
For the best oven upkeep, clean it regularly
after having allowed it to cool.
Take out all removable parts.
Clean the oven racks with warm water and
non-abrasive detergent. Carefully rinse and
dry damp parts.
The oven should be operated at
the maximum temperature for
about 15-20 minutes after the use
of specific products, to burn off the
residues left inside the oven.
For easier cleaning, remove the
door.

Cleaning and maintenance
47
EN
Removing racks/trays support frames
Removing the guide frames enables the
sides to be cleaned more easily. This
operation should be performed each time
the automatic cleaning cycle is used (on
some models only).
To remove the guide frames: Pull the frame
towards the inside of the oven to unhook it
from its groove A, then slide it out of the
seats Bat the back.
When cleaning is complete, repeat the
above procedures to put the guide frames
back in.
Cleaning the roof of the oven (on some
models only)
The appliance is fitted with a tilting heating
element which facilitates cleaning the top
part (roof) of the oven.
1. Pull the top heating element supports
gently towards you.
2. Gently lower the element until it stops.
3. When you have finished cleaning, push
the heating element back into position on
its supports.
Improper use
Risk of damage to the appliance
• Do not bend the heating element
excessively while cleaning.

Cleaning and maintenance
48
4.9 Vapor Clean
Preliminary operations
Before starting the Vapor Clean function:
• Place a tray on the first shelf.
• Pour approximately 40 cl of water into
the tray. Make sure it does not overflow
out of the cavity.
• Spray a water and washing up liquid
solution inside the oven using a spray
nozzle. Direct the spray against the side
walls, upwards, downwards and
towards the deflector.
• Close the door.
Vapor Clean is an assisted
cleaning procedure which
facilitates the removal of dirt.
Thanks to this process, it is possible
to clean the inside of the oven very
easily. The dirt residues are
softened by the heat and water
vapour for easier removal
afterwards.
Improper use
Risk of damage to surfaces
• Remove any food residues or large spills
from previous cooking operations from
the inside of the oven.
• Carry out assisted oven cleaning
operations only when the oven is cold.
We recommend spraying approx.
20 times at the most.
Table of contents
Other Smeg Oven manuals
Popular Oven manuals by other brands

Wood Stone
Wood Stone WS-DS-6348 Installation and operation manual

Euromaid
Euromaid ES7 Installation and operating instructions

EFBE-SCHOTT
EFBE-SCHOTT OT 800 manual

Bosch
Bosch CSG656R 7 Series User manual and installation instructions

Vulcan Fitness
Vulcan Fitness V0004 thermionic Service and parts manual

Viking
Viking Professional VEOS100TSS use and care manual

Blodgett
Blodgett COS-20E Operating and maintenance

Siemens
Siemens CS656GB 6B Series instruction manual

Coopers of Stortford
Coopers of Stortford Cyclone Air Oven Instructions for use

DeLonghi
DeLonghi DO2058 Instructions for use

Beper
Beper 90.376N use instructions

Hotpoint Ariston
Hotpoint Ariston H5G62AE UA operation instruction