Smith & Noble TH-AFO23BL User manual

Model No.: TH-AFO23BL
Read this instruction manual carefully before use and
keep for future reference.
Instruction Manual
18 LITRE AIR FRYER OVEN


SHORT CORD INSTRUCTIONS
Do not use with an extension cord. A short power supply cord is provided to reduce
the risks resulng from being entangled in or tripping over a long cord.
OVERHEATING PROTECTION:
Should the inner temperature control system fail, the overheang protecon system
will be acvated, and the unit will not funcon. Should this happen, unplug the power
cord. Allow me for the unit to cool completely before restarng or storing.
ELECTRIC POWER:
If the electrical circuit is overloaded with other appliances, your unit may not operate
properly. It should be operated on a dedicated electrical circuit (power point).
AUTOMATIC SHUT-OFF:
The appliance has a built-in shut-offdevice that will automacally shut down the unit
when the mer LED reaches zero. You can manually switch offthe appliance by
selecng the Power Buon. The fan will connue running for close to One Minute to
cool down the unit.
PREPARATION FOR USE:
Before using the air fryer for the first me:
Warning: when using for the first me, the air fryer may emit a slight odour which is
not harmful and will disappear aer a few minutes. This is because a protecve oil
was applied to protect parts from possible fricon in transport.
Carefully unpack the air fryer and remove all the packing materials.
Place the air fryer on a flat, heat-resistant non-flammable surface.
Use a sosponge and soapy water to remove any dust on the surface that may happen
during packing and transport. Allow the air fryer to dry before use.
When the air fryer is first connected to a power point, all the lights on the control panel
will come on and then go off. The ON/OFF buon will remain illuminated. Press the
ON/OFF buon to turn the air fryer on.
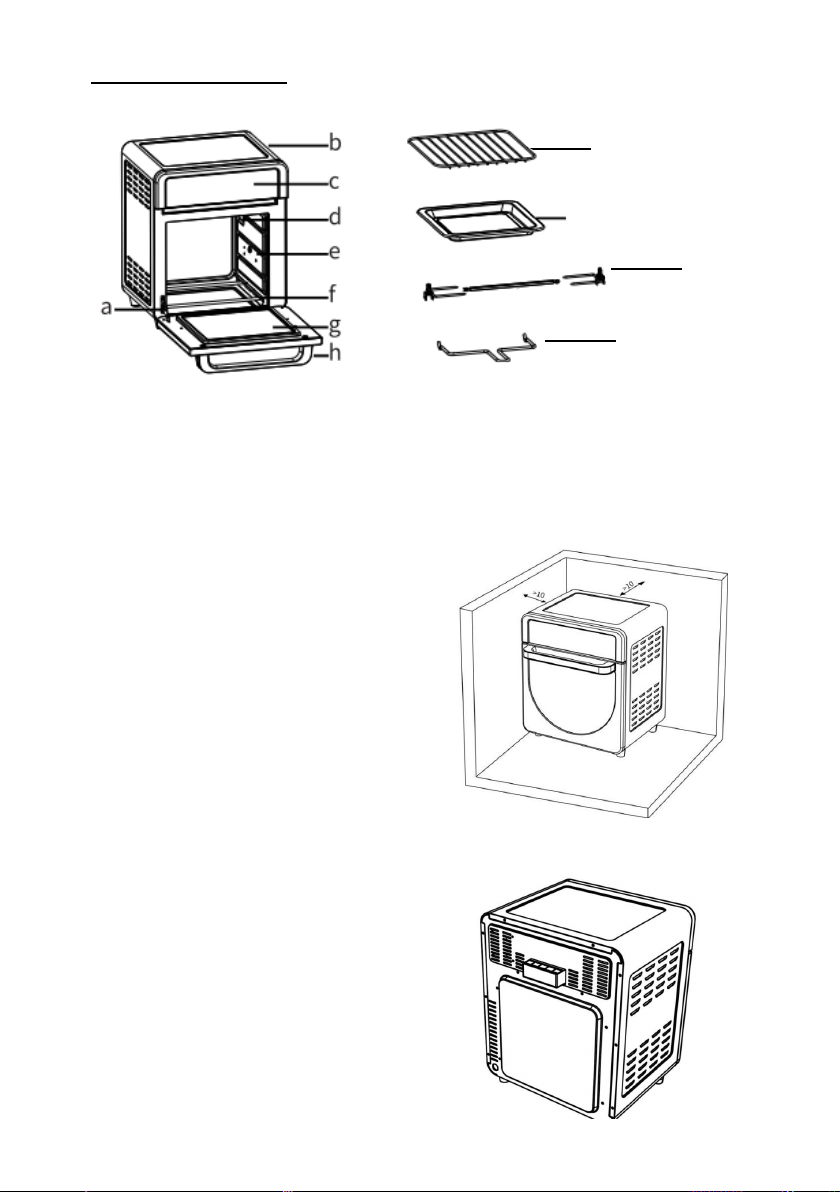
PRODUCT COMPONENTS:
b. Housing
f. Heang element
j. Baking tray k. Rotang rosserie fork
c. Control panel
g. Glass door
l. Fetch tool
d. Liner lamp
h. Door handle
a. Door hook
e. Rotang grill sleeve
i. Oven rack
i
k
l
j
Place the appliance on a horizontal
surface. Maintain a minimum of 10cm of
empty space from the back and sides, and
pay aenon to keep the machine away
from curtains /wall coverings and other
combusble materials.
Please install the wall paron manually
before using as below.

BAKING TRAY:
Insert the baking tray into the unit according to the diagram below
DRIP TRAY:
Opening the door, Put the drip tray into the unit according to the diagram below:
The drip tray slides in underneath the boom heang element.
OVEN RACK:
Insert the oven rack into the unit according to the diagram below:

ROTISSERIE STICK, FORK AND SCREWS:
Use for roasts or a whole chicken.
Force the sha length ways through the meat and center.
Slide the forks onto the shafrom either end into the meat. Then lock into place with
the screws.
You can adjust the screws closer to the middle if needed, but never outwards towards
the ends.
Ensure that the roast meat or chicken are not too large and are able to rotate freely
inside the air fryer.
Tie up the chicken or other roast meat with cooking string to hold it ghtly around the
rosserie sck.
(1) (2) (3)
(4) (5) (6)
Note:
Please always keep the drip tray at the boom inside the air fryer for gathering oil
from fried food.
The ingredients inside may increase in size during the cooking process, ensure that the
heated volume of food will not touch the inside walls of the air fryer.
There is a safety switch on the unit. The air fryer will only operate when the door is
closed.

USING THE AIR FRYER:
CONTROL PANEL:
COOKING USING A PRESET OPTION:
MENU:
Press the MENU buon repeatedly to choose between 16 different cooking opons
Switch
already programmed into the air fryer.
When your chosen cooking opon is illuminated, press the ON/OFF buon to begin
the cooking process.

PRESET COOKING OPTIONS:
The preset cooking opons are:
CHICKEN 220°C45 mins
DEFROST
80
°
C
10 mins
GRILL
230
°
C
30 mins
DEHYDRATE
70
°
C
8 hours
STEAK 200°C12 mins
FRENCH FRIES 220°C20 mins
FISH
180
°
C
15 mins
VEGETABIES
180
°
C
12 mins
CHICKEN WINGS
220
°
C
13 mins
PROOF40°C90 mins
CAKE 180°C30 mins
BAKE
165
°
C
30 mins
PIZZA
180
°
C
10 mins
KEEP WARM 80°C30 mins
TOAST 220°C6 mins
COOKIE
180
°
C
12 mins
MANUALLY SETTING YOUR CHOSEN TIME AND TEMPERATURE:
Note: The larger the amount of food, the more me and higher temperature it may take.
TEMP:
Aer pressing the menu buon and before pressing the ON/OFF buon to begin a
cooking program, press the TEMP buon to adjust the temperature.
Press the + and – buons to adjust the temperature.
The temperature range can be set between 50 and 230 Degrees in 10 degree
increments on all opons other than dehydrate or proof.
The temperature range on DEFROST and DEHYDRATE can be set between 50 and 100
degrees.
The temperature on PROOF can only be used at 40 degrees.

TIME:
Aer pressing the menu buon and before pressing the ON/OFF buon to begin a
cooking program, press the TIME buon to adjust the mer.
Press the + and – buons to adjust the mer.
Adjustable me
The maximum adjustable me for defrost and cake is 4 hours
The maximum adjustable me for Dehydrate and keep warm is 9 hours and 59 minutes
The maximum adjustable me for the other menus is 2 hours
Adjustable temperature
The maximum adjustable temperature for Defrost and Dehydrate is 50˚C - 100˚C
The maximum adjustable temperature for Proof and heat keep warm is not adjustable
The maximum adjustable temperature of other menus is 50˚C - 230˚C
Aer manually seng the temperature and the mer, press the ON/OFF buon to
begin cooking.
+ and –
Adjustment buons, which can be pressed to adjust the temperature.
BOTTOM HEATING AND TOP HEATING:
Some pre-set cooking opons will use both boom and top heang elements.
By default, Dehydrate, Chicken, Proof and Keep Warm pre-set opons are programmed
to use only the top element.
The other 12 pre-set opons will use both the top and boom elements.
Should you wish to use both of the elements or only one of the elements, the BOTTOM
HEATING buon or TOP HEATING buon can be pressed, when either buon is
illuminated, that element will be used.
ROTISSERIE:
Press the ROTISSERIE buon to turn the rosserie funcon on. When it is on, the
rosserie buon will be illuminated. Press the rosserie buon again to turn the
rosserie funcon off.
The rosserie funcon is already on by default on chicken mode.
PRESET:
This air fryer allows for a countdown mer to be set, and the air fryer will come on at
the end of that mer (e.g.: set the mer for 2 hours and in 2 hours me, the air fryer
will turn on).
To use this funcon, first you need to choose one of the cooking opons or manually
set your own chosen cooking temperature and cooking me.
Once this has been done:
Press the PRESET buon. The preset buon will be illuminated. The default me of
1:00 will be flashing on the screen.
Press the + and – buons to adjust the countdown mer.

The countdown mer can be set between 1 minute and 9 hours and 59 minutes.
When the countdown me you have chosen is shown on the screen, press the
ON/OFF buon.
The air fryer will then countdown and at the end of the set mer, the air fryer will turn
on and cooking will begin.
PAUSE:
Cooking will be paused when the door is opened. When the door is closed, cooking
will resume.
If the door is not closed within 10 minutes, the air fryer will shut down. The air fryer
will need to be turned on and a cooking opon set again.
CLEANING AND MAINTENANCE:
Note: Unplug the air fryer and allow it to cool down completely before handling,
cleaning or storing.
Wash the accessories in warm soapy water aer use.
The inside of the air fryer can be cleaned with hot water, a mild detergent and a non-
abrasive sponge.
Wipe the air fryers outer housing body with a so damp cloth. Do not use detergents
or cleaners.
Do not immerse the power cord, plug or the air fryer housing body in water or any
other liquids as it may result in damage, fire, electric shock or injury.
STORING:
Allow the air fryer to cool down completely before storing. Store the air fryer in an
upright posion in a dry locaon. Do not place any heavy items on top of the air fryer
during storage as this may result in possible damage to the air fryer.
TECHNICAL SPECIFICATIONS:
Voltage: 220~240V
Power: 1600 Was
Frequency: 50/60Hz
Temperature Range: 50 - 230°C
Time Seng Range: 1 minute – 2 hour
Dehydrate Temperature Range: 50 - 100°C
Dehydrate Time Seng Range: 1 minute - 9 hours 59minutes
Proof Temperature: 40°C
Proof Time Seng Range 1 minute – 2 hours

One Year Warranty Statement
DS Opco Pty Ltd
Level 4, 111 Cecil Street, South Melbourne, Victoria 3205, Australia
Table of contents
Popular Oven manuals by other brands


Frigidaire
Frigidaire Gallery FGEW3045K Specifications

Bosch
Bosch HBG656R 1 Series instruction manual

Bosch
Bosch HMG6764 1 Series instruction manual

Atag
Atag OX6093R Instruction for use & installation instructions

Fisher & Paykel
Fisher & Paykel OS301 Installation information

Miele
Miele H6500BM Operating and installation instructions