Smiths Medical level 1 User manual
Convective Warmer
Chauffage convectif
Konvektives Wärmegerät
Riscaldatore a convezione
Calefactor convectivo
Aquecedor convectivo
Convectieve verwarmer
Konvektionsvärmare
Konvektionsvarmer
Konveksjonsvarmer
Lämpöpuhallin
Θερμοπομπός
Konvekční ohřívač
Konvektívny ohrievač
Konvekciós melegítőkészülék
Ogrzewacz konwekcyjny
Konvektiivne soojendi
Konvektīvā sildītāja
Konvekcinis šildytuvas
Конвекторен нагревател
Dispozitiv de încălzire prin convecție
Konvekcijski grelnik
- Operator’s Manual
. Manuel d’utilisation
/ Bedienungsanleitung
0 Manuale dell’operatore
1 Manual del operador
2 Manual do operador
3 Gebruikershandleiding
4 Bruksanvisning
5 Brugervejledning
6 Operatørhåndbok
7 Käyttöohjekirja
8 Εγχειρίδιο χειριστή
< Uživatelská příručka
=Príručka operátora
?Kezelői kézikönyv
> Podręcznik obsługi
AKasutusjuhend
BLietotāja rokasgrāmata
D Operatoriaus vadovas
NРъководство за оператора
G Manual de operare
C Uporabniški priročnik

Contents
English 5
Français 42
Deutsch 79
Italiano 116
Español 153
Português 190
Nederlands 227
Svenska 264
Dansk 301
Norsk 338
Suomi 375
Eλληνικά 412
Česky 449
Slovenčina 486
Magyar 523
Polski 560
Eesti keel 597
Latviešu valoda 634
Lietuvių 671
Български 708
Română 745
Slovenščina 782

Convective Warmer
TO OBTAIN A PAPER COPY: contact Smiths Medical customer service at 1 800 258 5361

Level 1®CONVECTIVE WARMER | Operator’s Manual
6
General Information
Level 1® Convective Warmer Operator’s Manual
Part Number: ML-0001-558 Rev. 303 (04/19)
This revision supersedes all previous revisions.
Every eort has been made to ensure that the information in this manual is accurate and details
provided are correct at the time of printing. The company, however, reserves the right to improve the
equipment shown. Mention of third-party products is for informational purposes only and constitutes
neither an endorsement nor a recommendation. Smiths Medical ASD, Inc. (“Smiths Medical”) assumes
no responsibility with regard to the performance or use of these products.
The Smiths Medical and Level 1 design marks are trademarks of Smiths Medical. The symbol ®indicates
the trademark is registered in the U.S. Patent and Trademark oce and certain other countries.
All other names and marks mentioned are the trade names, trademarks, or service marks of the
respective owners.
For further information, please call your local Smiths Medical distributor or Smiths Medical direct
at 1 800 258 5361 or +1 614 210 7300.
©2019 Smiths Medical.
All rights reserved.

Level 1®CONVECTIVE WARMER | Operator’s Manual 7
Contents
Contents
1 About this Manual 9
Indications for Use 9
Conventions Used in this Manual 9
2 Description 10
Convective Warmer Components 10
3 Important Safety Information 12
Warnings 12
Precautions 15
4 User Interface 16
Control Panel 16
Controls, Indicators, and Displays 17
5 Initial Setup and Daily Use 18
Assembly
Step 1: Unpack the Convective Warmer 18
Step 2: Attach the Hose to the Convective Warmer 19
Step 3: Install the Convective Warmer 20
Step 4: Perform Electrical, Functional, and Safety Tests 20
Daily Use
Step 1: Plug into Mains Power 21
Step 2: Select Convective Warming Blanket 21
Step 3: Attach the Hose to Convective Warming Blanket 22
Step 4: Attach the Sheet Clip to the Sheet Under the Patient 22
Step 5: Using the Convective Warmer 22
Step 6: After Use 23
Step 7: Storage 23
6 Cleaning/Maintenance 24
Cleaning the Convective Warmer and Hose 24
Replace Air Filter 25
7 Troubleshooting 26
8 Specications 29
9 Symbols 35
10 Limited Warranty 37
11 Service 39

Level 1®CONVECTIVE WARMER | Operator’s Manual
8
This page intentionally left blank.

Level 1®CONVECTIVE WARMER | Operator’s Manual 9
SECTION 1 • About this Manual
SECTION 1
About this Manual
This Operator’s Manual describes the assembly, use, and maintenance of the Level 1® Convective
Warmer. This manual is intended for use by individuals trained in the healthcare and biomedical
professions.
WARNING: These instructions contain important information for safe use of the product. Read the entire contents
of this Operator’s Manual, including Warnings and Precautions, before using this product. Failure to properly
follow warnings, precautions, and instructions could result in death or serious injury to the patient.
Indications for Use
The Level 1® Convective Warmer is intended to prevent and treat hypothermia when temperature
therapy is clinically indicated. The warmer can also be used to provide thermal comfort when
conditions exist that may cause patients to become too warm or too cold. The Level 1® Convective
Warmer can be used with adult or pediatric patients and is intended for use by healthcare professionals
in clinical environments.
Conventions Used in this Manual
This manual uses the following text and text conventions:
Convention Description
Note A Note statement alerts the user to important information that requires attention.
WARNING A Warning statement alerts the user to conditions that may cause death or serious
injury to the patient or user.
PRECAUTION A Precaution statement alerts the user to conditions that may cause malfunction,
failure, or damage to the device.

Level 1®CONVECTIVE WARMER | Operator’s Manual
10
SECTION 2 • Description
SECTION 2
Description
The Level 1® Convective Warming system consists of a high-ow convective warmer with hose-end
temperature control, a convective warming blanket, and accessories.
The convective warmer draws ambient-temperature air through a HEPA air lter. The ltered air is
warmed to a selected temperature. The warmed air enters the convective warming blanket through the
hose and is distributed through delivery channels. Perforations on the patient side of the air delivery
channels in the blanket gently disperse warm air over the patient.
The convective warmer has three outlet temperature settings, which provide exibility in patient
treatment: 37°C, 40°C, and 43°C. These three temperature settings are controlled by thermistors
placed at the end of the hose where the hose connects to the convective warming blanket. A fourth
temperature setting delivers ambient-temperature air. The temperature at the end of the hose is stable
at the set point indicated on the control panel when the selected set point LED stops blinking.
The safety circuit provides an independent means of shuto which discontinues power to the heater.
This prevents patient exposure to excessive temperatures. Over-temperature is monitored and alarms
separately for each temperature setting.
See Appendix A (page 41) for Product and Accessory information.
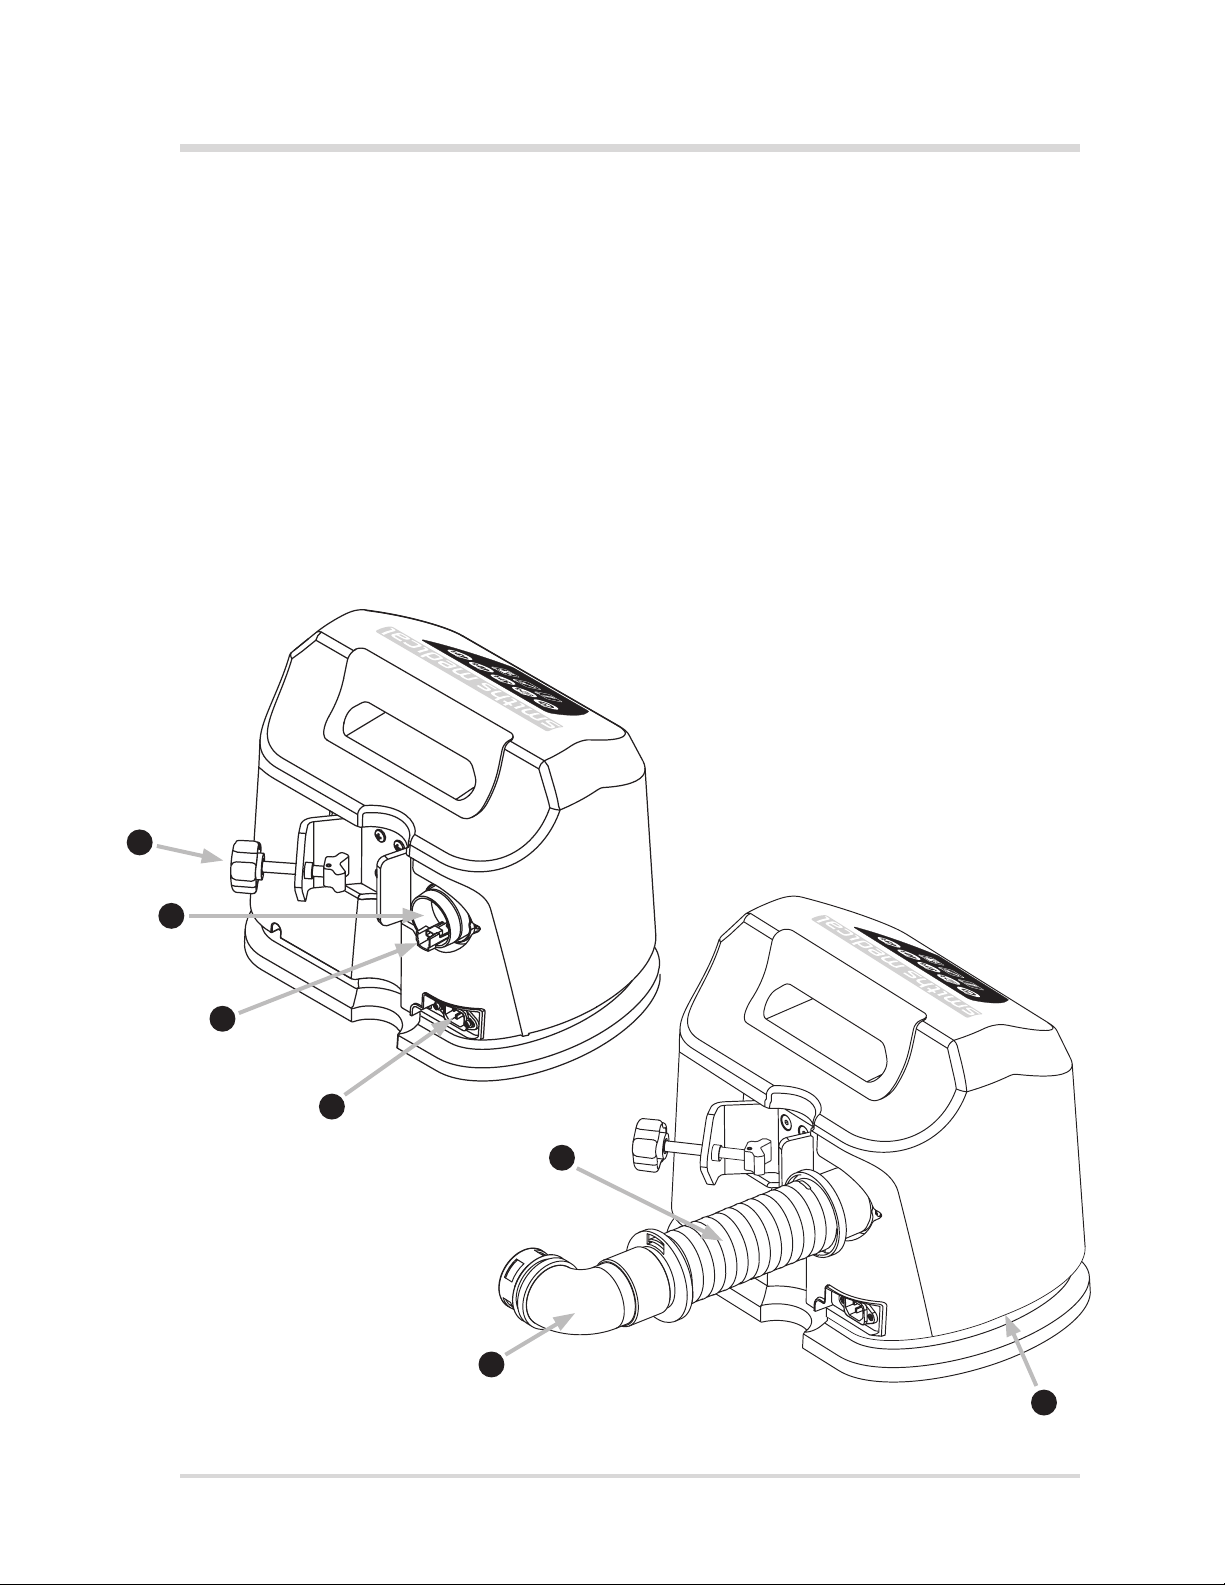
Convective Warmer Components
REAR VIEW (without clamp) and FRONT VIEW
1. Handle – used to lift and move the convective warmer
2. Control Panel – contains controls and displays used during operation
1
REAR VIEW FRONT VIEW
2
Level 1®CONVECTIVE WARMER | Operator’s Manual 11
SECTION 2 • Description
Rear View with clamp
3. Pole Clamp (Optional) – mounts the convective warmer on a pole
4. Air Outlet – opening where the hose attaches to the convective warmer
5. Thermistor Receptacle – connection for the thermistor cable
6. Power Cord Receptacle – connector for the power cord (MAINS connect/disconnect)
Rear View with Hose Attached
7. Hose – transports air to the convective warming blanket
8. Hose Nozzle and Elbow – hose end that attaches to the convective warming blanket
9. Air Intake – air enters the convective warmer through the vents located under the
top housing
7
8
3
4
5
6
9

Level 1®CONVECTIVE WARMER | Operator’s Manual
12
SECTION 3 • Important Safety Information
SECTION 3
Important Safety Information
This section covers information for prescribers and guidelines for safe use of the Level 1®
Convective Warmer.
Warnings
Death or serious injury may occur to the patient or users if these warnings are not followed:
These instructions contain important information for safe use of the product. Read the entire
contents of this Operator’s Manual, including Warnings and Cautions (Precautions), before using
this product. Failure to properly follow warnings, precautions, and instructions could result in
death or serious injury to the patient.
• Thermal injury may occur if convective warming therapy is applied to lower extremities during
aortic cross-clamping procedures.
• Thermal injury may occur if convective warming therapy is applied to ischemic limbs.
• To prevent thermal injury, closely observe patient's cutaneous circulation distal to arterial cross-
clamping. To prevent thermal injury, do not use the highest temperature setting when treating
patients who have poor perfusion.
• Electrocution Hazard. There are no user-serviceable parts inside the enclosure. Only competent
personnel knowledgeable in the safety procedures required for servicing live primary MAINS parts
shall be allowed to open the enclosure.
• Grounding reliability can only be achieved when the MAINS power cord is connected to a properly
grounded receptacle. Risk of electrical shock exists if the equipment is not connected to a
properly grounded receptacle.
• Exposed conductor on the MAINS power cord can cause an electrocution hazard. Remove the
device from service if the MAINS power cord has exposed wires.
If mounting to an IV pole using the optional pole mounting clamp, the IV pole must have a
minimum of 5 or more legs, a minimum diameter of 1.9 cm ( 0.75 in) and a minimum base
diameter of 56 cm (22 in). Failure to use a proper IV pole may cause tipping that may injure the
patient or user.
While in use, do not mount the convective warmer higher than 116 cm (46 in) from the oor on
the IV pole. Mounting the convective warmer above 116 cm (46 in) may result in instability of the
pole and cause tipping that may injure the patient or user.
The hose must be removed and transported separately or stored within the cart shelf
compartment if the convective warmer is being transported while mounted on the cart shelf
accessory. Failure to properly transport the warmer could cause tipping that may injure the user
or patient.

Level 1®CONVECTIVE WARMER | Operator’s Manual 13
SECTION 3 • Important Safety Information
Warnings [continued]
• During use, do not position the convective warmer such that it is dicult to disconnect the power
cord from the wall or from the warmer. Thermal injury may occur if the device cannot be powered o
easily if needed.
• In compliance with safety standard IEC 80601-2-35, there is a possible risk of electrical shock, burns,
or electromagnetic interference with the use of High Frequency surgical instruments or endocardial
catheters in the presence of active Heating Devices.
• The convective warmer meets the international electrical interference requirements of EN 60601-1-2.
MRI, Portable and mobile RF communications equipment, and other such devices can aect
the convective warmer.
• Do not operate the convective warmer in the presence of a ammable anesthetic mixture with air,
oxygen, or nitrous oxide. The risk of explosion exists if the device is operated in a potentially
explosive environment.
• To prevent re hazard and possible damage to the convective warmer, use only fuses specied. Only
competent personnel knowledgeable in the safety procedures required for servicing live primary
MAINS parts shall be allowed to open the enclosure.
• If so equipped, ensure that the convective warmer IV pole mounting clamp is properly tightened
before each use. Failure to securely mount the convective warmer onto the IV pole may cause it to
slide down the IV pole, and injure the patient or user.
• Do not perform maintenance while the convective warmer is operating. Risk of thermal injury exists
if the device is operating.
• This device can only be used in conjunction with a Smiths Medical convective warming blanket. For
the safe operation of this device, the user must follow all warnings, precautions, and instructions
provided in the Instructions for Use supplied with the compatible convective warming blanket,
in addition to this Operator’s Manual.
• Continuously monitor patient’s body core temperature, vital signs, and observe cutaneous response
at regular intervals to prevent thermal injury. If erythema or instability in vital signs is evident,
decrease the temperature setting or discontinue use of convective warming therapy.
• To prevent thermal injury in hypotensive or hypoperfused patients, observe cutaneous response
more frequently. Reduce the temperature setting or discontinue use of convective warming therapy
if instability in vital signs or erythema occurs.
• If the patient’s nose or mouth is positioned against the convective warming blanket or the plastic
drape, closely monitor the patient’s breathing to prevent suocation injury.
• Cover all open wounds in contact with the convective warming blanket to prevent airborne
contamination.

Level 1®CONVECTIVE WARMER | Operator’s Manual
14
SECTION 3 • Important Safety Information
Warnings [continued]
• Use only one convective warmer and one hose. Use of multiple convective warmers in multiple inlet
ports of the same convective warming blanket may cause damage to the blanket and thermal
injury to the patient.
• To prevent thermal injury, do not allow any of the patient’s body parts to rest on the active hose inlet.
Do not allow the hose to contact the patient.
• Use of the device in loud environments may prevent the audio alarm from being heard. Visually
monitor patient temperature and device visual indications.
• Do not use a convective warming blanket over transdermal medications (patches) as this may lead
to increased drug delivery that may result in patient injury or death.
• To prevent thermal injury to the patient, if Over Temperature alarm sounds and/or Over Temperature
alarm indicator illuminates (Amber), restart, select temperature, and determine if the problem persists
before placing back in service. If condition persists, remove from service and contact Smiths Medical
or your local Smiths Medical distributor.
• The convective warmer must be serviced by competent personnel authorized by Smiths Medical.
Failure to service the device correctly may result in thermal injury to the patient.
• To prevent insucient or excessive heat therapy, the convective warmer should only be used in
operating temperatures of 10°C – 40°C.
• The use of materials of good thermal conductivity, such as water, gel and similar substances, with the
convective warmer not operating can decrease the temperature of the body of a patient.
• Use of this equipment adjacent to or stacked with other equipment should be avoided because it
could result in improper operation. If such use is necessary, this equipment and the other equipment
should be observed to verify that they are operating normally.
• This device can only be used in conjunction with a Smiths Medical convective warming hose and
power cord. Failure to use this device with the Smiths Medical hose and power cord could result in
increased electromagnetic emissions or decreased electromagnetic immunity of this equipment and
result in improper operation.
• Portable and mobile RF communications equipment should be used no closer to any part of the
convective warmer, including cables, than the recommended separation distance specied in
Section8, Specications.

Level 1®CONVECTIVE WARMER | Operator’s Manual 15
SECTION 3 • Important Safety Information
Precautions
Malfunction, failure, or damage to the device may occur if these precautions are not followed:
• No modication of this equipment is allowed.
• Hose nozzle MUST be connected to a compatible forced air blanket or thermal injury may occur.
• If the convective warmer does not perform its self-test properly, fails to operate, or stops while
running, discontinue use of the convective warmer to prevent thermal injury to the patient. Remove
the device from service. Contact Smiths Medical or your local Smiths Medical distributor.
• Do not use strong solvents to clean the hose or exterior surfaces. These solutions may damage labels
and other parts.
• Never use organic solvents (e.g., acetone), strong acids, or bases to clean any portion of the
convective warmer.
• Do not place the convective warmer directly under a faucet or use a faucet sprayer to rinse. Never
spray cleaning or other uids into openings on the convective warmer or into the external connectors.
• Caution: Federal (U.S.A.) law restricts this device to sale by or on the order of a physician.
Level 1®CONVECTIVE WARMER | Operator’s Manual
16
SECTION 4 • User Interface
SECTION 4
User Interface
Operation of the Level 1® Convective Warmer is monitored and controlled by the control panel (User
Interface). This section describes the control panel and the modes of operation.
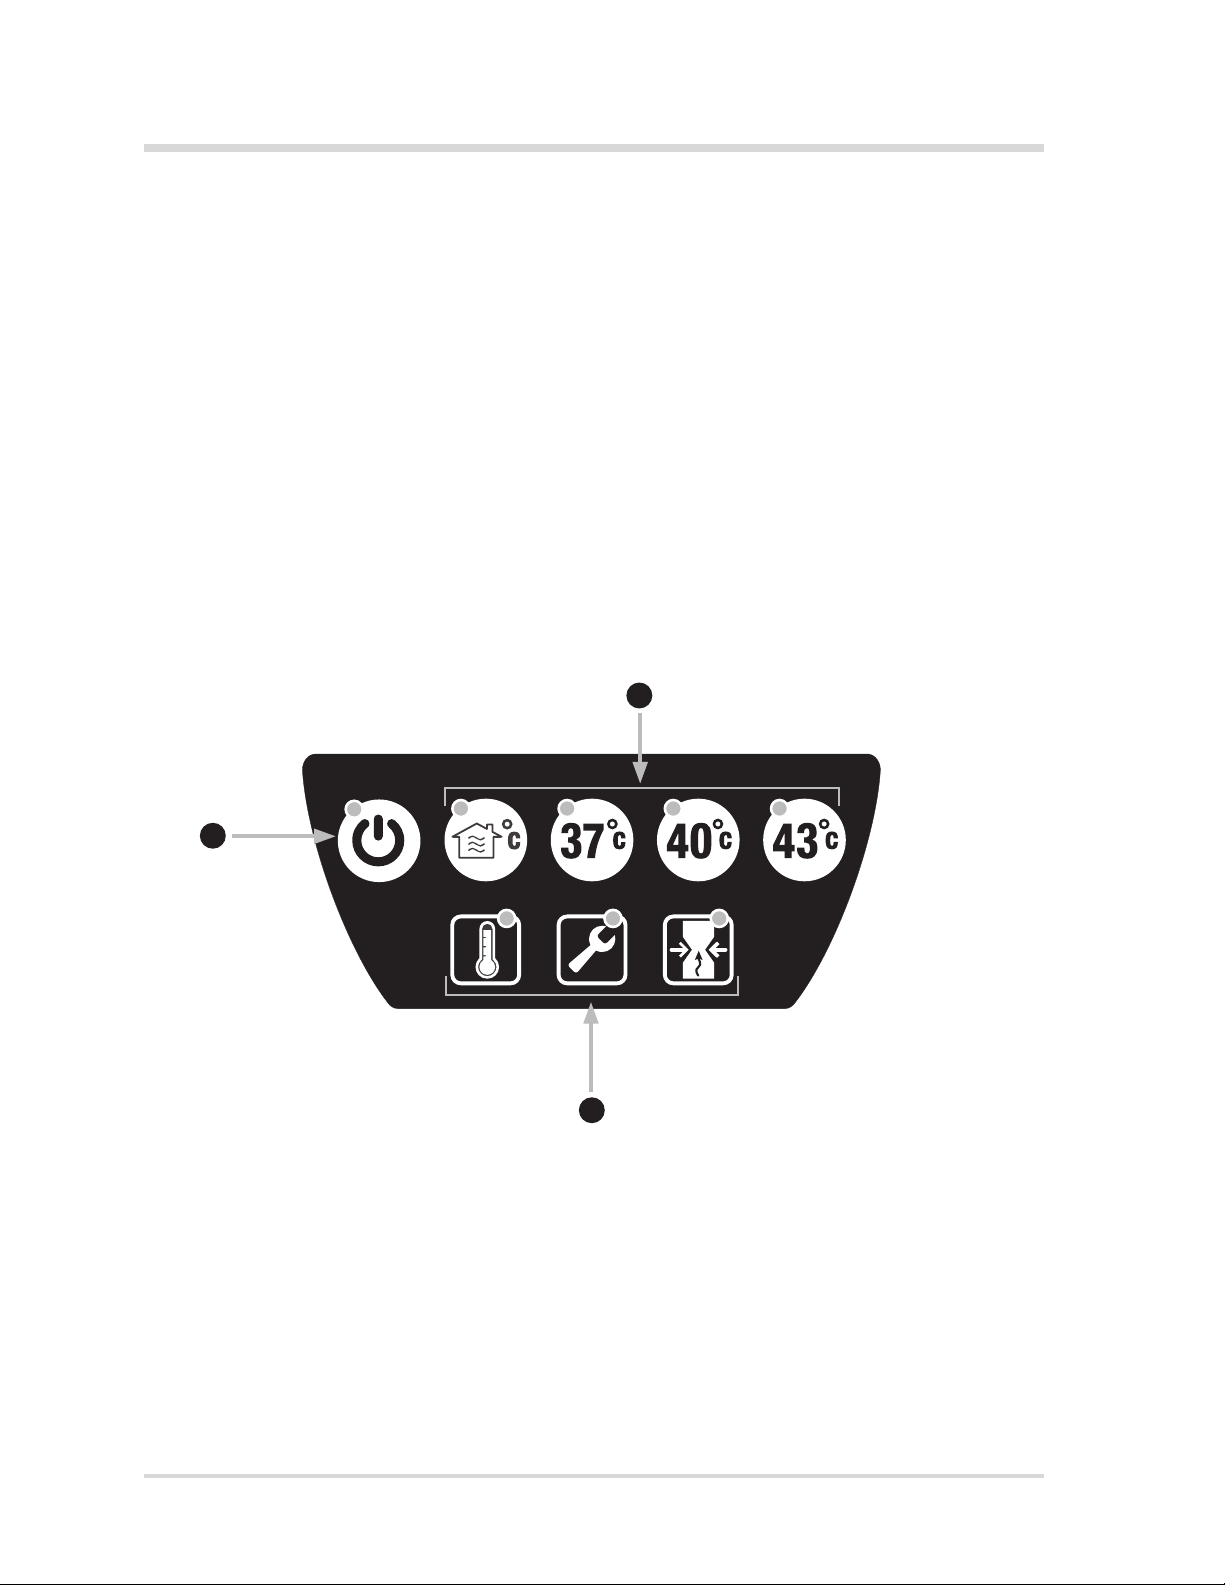
Control Panel
The Control Panel provides the controls, indicators, and displays used during operation
of the convective warmer.
1. Standby Button
2. Temperature Setting Buttons
3. Operation Indicators
2
3
1

Level 1®CONVECTIVE WARMER | Operator’s Manual 17
SECTION 4 • User Interface
Controls, Indicators, and Displays
The following table denes each control, indicator, display and the modes of operation.
Control/Indicator Denition
Visual
Indicator
Audible Beep
Standby Button/Indicator
A solid lit LED indicates that the system is powered on but that
the heater is OFF and the blower is OFF.
Green LED None
Ambient Air Temperature Setting Button
When selected, the heater is turned OFF and the blower is ON
(air ows).
Green LED None
37° C Temperature Setting Button
When selected, the air temperature is set to 37° C at the
hose end. A blinking LED indicates that the system has not yet
reached the selected temperature.
Green LED None
40° C Temperature Setting Button
When selected, the air temperature is set to 40° C at the
hose end. A blinking LED indicates that the system has not yet
reached the selected temperature.
Green LED None
43° C Temperature Setting Button
When selected, the air temperature is set to 43° C at the
hose end. A blinking LED indicates that the system has not yet
reached the selected temperature.
Green LED None
Over Temperature indicator
Blinking or solid lit Indicator LED indicates that the system has
detected a temperature that is too high.
Amber LED Dependent
on condition*
Maintenance indicator
Blinking or solid lit Indicator LED indicates that an error
has occurred which requires maintenance or that routine
maintenance
is needed.
Amber LED Dependent
on condition*
Occlusion indicator
A solid lit Indicator LED indicates that an occlusion in the hose or
blanket has been detected.
Amber LED Dependent
on condition*
*See Section 7, Troubleshooting for error condition remedies and solutions.

Level 1®CONVECTIVE WARMER | Operator’s Manual
18
SECTION 5 • Initial Setup and Daily Use
SECTION 5
Initial Setup and Daily Use
Assembly
The Level 1® Convective Warmer must be assembled and tested by authorized Smiths Medical
personnel, an authorized distributor of Smiths Medical, or competent personnel prior to placing
the convective warmer in service. Read through the instructions completely prior to assembling
the convective warmer.
The following steps describe how to assemble and do preliminary set up of the convective warmer.
Step 1: Unpack the Convective Warmer
1. Check the contents and verify that all components are present. If any parts are missing or
damaged, do not use the convective warmer. Contact Smiths Medical for replacement parts.
Refer to the following list of components that are part of the convective warmer:
• Level 1® Convective Warmer
• Operator’s Manual CD
• Power Cord
• Hose
• Sheet Clip Assembly
• Cord Wrap
Note: The Power Cord and Cord Wrap are packaged separately from the Warmer.
Note: After unpacking all the contents, please recycle packaging material according to
hospital policy for recyclable materials.

Level 1®CONVECTIVE WARMER | Operator’s Manual 19
SECTION 5 • Initial Setup and Daily Use
Step 2: Attach the Hose to the Convective Warmer
1. Connect the thermistor cable (a) from the hose to the thermistor receptacle (b) mounted
inside the air outlet (c). To connect, align the three prongs in the thermistor with the three
holes in the receptacle, then gently push the thermistor inward to secure it in the receptacle.
2. Attach the hose (d) to the air outlet. Push the hose rmly into the outlet.
abc
d(shown with optional pole clamp installed)
Level 1®CONVECTIVE WARMER | Operator’s Manual
20
SECTION 5 • Initial Setup and Daily Use
Step 3: Install the Convective Warmer
The convective warmer can be placed on a at surface, mounted to an IV Pole, or mounted to the
Level 1® Convective Warmer cart. See Cart or Pole Clamp Installation and Use Instructions for installing.
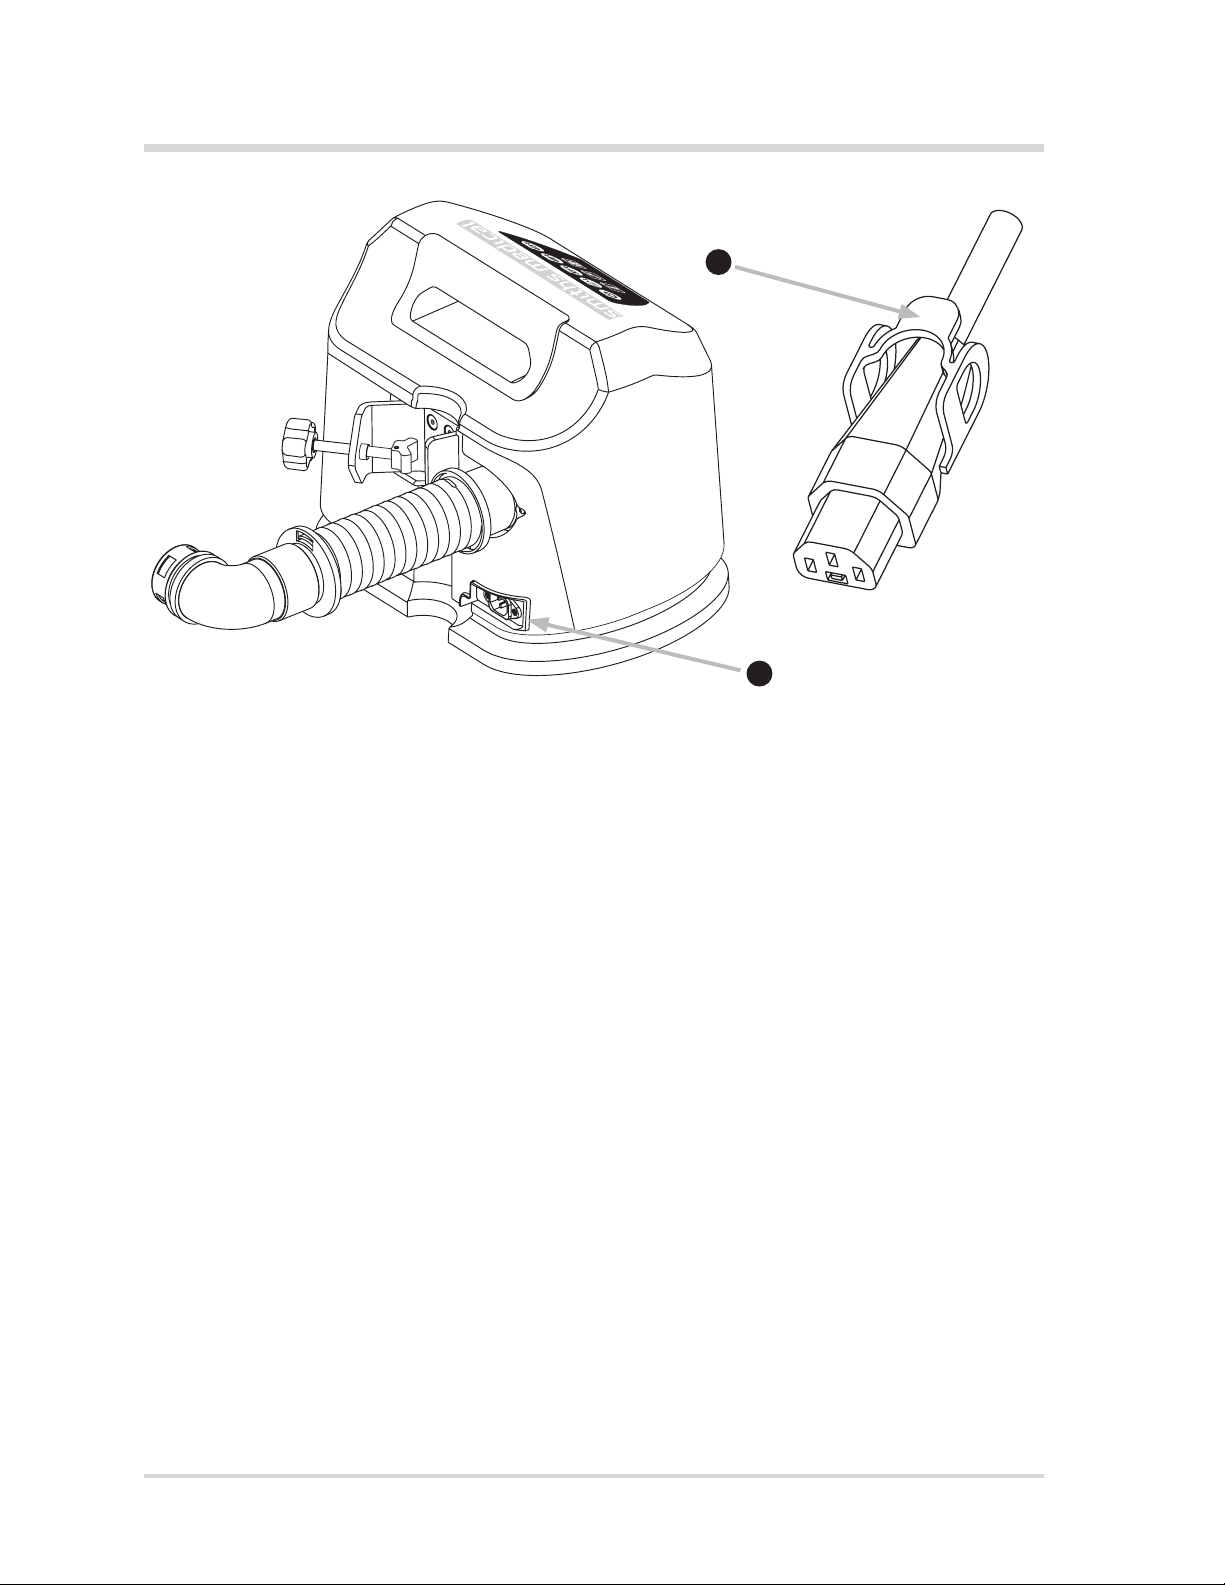
Install Power Cord
1. Insert the plug on the power cord into the power cord receptacle (MAINS connection) (e) on
the rear of the Convective Warmer.
2. Push the power cord lock (f) over the plug to secure it in the receptacle. The indicated lock
feature is spring-loaded and self-locking. The lock must be intentionally pulled back to
release the power cord.
Step 4: Perform Electrical, Functional, and Safety Tests
Perform all applicable electrical, functional, and safety tests as required per institutional procedure.
Electrical safety check must be performed by competent personnel authorized by the institution to
perform such testing. These tests include, but are not limited to: leakage current, ground bond test,
and hipot.
Refer to the Level 1® Convective Warmer Service Manual for further information about electrical,
functional, and safety testing. Perform all safety checks on a routine basis according to
institutional policy.
f
e
(shown with optional pole clamp installed)

Level 1®CONVECTIVE WARMER | Operator’s Manual 21
SECTION 5 • Initial Setup and Daily Use
Daily Use
The Operating Instructions for the Level 1® Convective Warmer are grouped into six steps.
Read through each step before performing a procedure.
Step 1: Plug Into Mains Power
1. Plug the power cord into a properly grounded MAINS receptacle to power on the warmer.
2. Verify that the LED indicators for Standby (a), Ambient Air, 37° C, 40° C, 43° C (b), Over
Temperature, Maintenance, and Occlusion (c) all light in turn during the automatic selftest.
When the self test is complete the Standby LED lights green.
3. Ensure hose connection to back of warmer is rmly seated.
4. Ensure the standby indicator is lit, signifying electrical power is applied.
Step 2: Select the Convective Warming Blanket
Warning!
Refer to the Warnings and Precautions in the Instructions for Use supplied with each
Smiths Medical convective warming blanket.
Determine which convective warming blanket is appropriate for the patient. Contact Smiths Medical
or your local Smiths Medical distributor for a list of convective warming blankets available.
b
c
a

Level 1®CONVECTIVE WARMER | Operator’s Manual
22
SECTION 5 • Initial Setup and Daily Use
Step 3: Attach the Hose to Convective Warming Blanket
1. Insert the hose nozzle (a) into the collar ring (b).
2. Ensure the hose barb (c) snaps into the collar ring (b).
Step 4: Attach the Sheet Clip to the Sheet Under the Patient
Attaching the Sheet Clip
1. Squeeze the handles (d) on the sheet clip to open the fastener jaws.
2. Insert the sheet into the open jaws (e) and release the handles to
lock in place.
Note: Proper attachment of the sheet clip to the sheet under the patient
is essential to the proper function of the sheet clip assembly.
Step 5: Using the Convective Warmer
1. Press the desired Temperature setting to begin the delivery of therapy. The standby LED
indicator will turn o and the selected temperature LED will blink green until the temperature
setting is reached. Once the set temperature has been achieved, the temperature LED
indicator will be lit green. The temperature setting may be adjusted up or down as required
for appropriate therapy by pressing a dierent temperature setting button.
2. Monitor the patient’s temperature and vital signs continuously. Visually examine the heated
skin surface at regular intervals. Adjust the temperature setting or discontinue therapy
as required.
a
b
bc
d
e
Other manuals for level 1
1
This manual suits for next models
3
Table of contents
Other Smiths Medical Food Warmer manuals


