Makita CW004G User manual

CW004G
EN Cordless Cooler & Warmer Box INSTRUCTION MANUAL 7
FR MANUEL D’INSTRUCTIONS 19
DE Akku-Kühl- und Warmhaltebox BETRIEBSANLEITUNG 32
IT
Contenitore termico
refrigerante e riscaldante a
batteria
ISTRUZIONI PER L’USO 46
NL Accukoelbox en
-verwarmingsbox GEBRUIKSAANWIJZING 60
ES Caja Enfriadora & Térmica
Inalámbrica
MANUAL DE
INSTRUCCIONES 73
PT Refrigerador e aquecedor a
Bateria MANUAL DE INSTRUÇÕES 86
EL
99
TR KULLANMA KILAVUZU 113
ZHCN 充电/车载冷热二用保温箱 使用说明书 124
ID Kotak Pendingin & Penghangat
Nirkabel PETUNJUK PENGGUNAAN 136
MS Peti Penyejuk & Pemanas
Tanpa Kord MANUAL ARAHAN 149
VI
161
TH 172

2
1
2
345
2
6
7
10
11
8
12
9
13 14 15
16
17
18
2824 272625
1920212223
6
8
9
Fig.1

3
1
2
Fig.2
11
1
2
2
3
3
Fig.3
1
2
3
Fig.4
1
2
3
Fig.5
1
2
Fig.6
Fig.7
Fig.8

4
Fig.9
Fig.10
Fig.11
11
1
1
2
Fig.12
1
2
2
1
Fig.13
30°
30°
30°30°
Fig.14
Fig.15
Fig.16

5
2
1
Fig.17
Fig.18
1
Fig.19
Fig.20
Fig.21
Fig.22
Fig.23

6
Fig.24

7ENGLISH
ENGLISH (Original instructions)
WARNING
• See the chapter “MAINTENANCE” for the appropriate procedures and precautions during user
maintenance.
• For users in Europe:
This appliance can be used by children aged from 8 years and above and persons with reduced
physical, sensory or mental capabilities or lack of experience and knowledge if they have been given
supervision or instruction concerning use of the appliance in a safe way and understand the hazards
involved. Children shall not play with the appliance. Cleaning and user maintenance shall not be made
by children without supervision.
• For users in areas other than Europe:
This appliance is not intended for use by persons (including children) with reduced physical, sensory
or mental capabilities, or lack of experience and knowledge, unless they have been given supervision
or instruction concerning use of the appliance by a person responsible for their safety. Children should
be supervised to ensure that they do not play with the appliance.
• If the supply cord is damaged, it must be replaced by a special cord or assembly available from the
manufacturer or its service agent.
•
• See the section “Installing or removing battery cartridge” for how to remove or install the battery.
• When disposing the battery cartridge, remove it from the appliance and dispose of it in a safe place.
Follow your local regulations relating to disposal of battery.
• If the appliance is not used for a long period of time, the battery must be removed from the appliance.
• Do not short the battery cartridge.
INTRODUCTION
Model: CW004G
Input Battery cartridge D.C. 18 V
D.C. 36 V - 40 V max
AC adapter
(Optional accessory)
Refer the indication on the AC adapter.
(Input voltage varies depending on the country.)
Cigarette lighter adapter D.C. 12 V / D.C. 24 V
Power consumption 80 W
Anti-shock protection class III
USB power supply port Output voltage D.C. 5 V / Output current D.C. 2.4 A / Type A
Capacity 29 L
Refrigerant R-1234yf (33 g)
Insulation material / Foaming material Polyurethane foam / Cyclopentane (C5H10)
Protection degree IPX4 (only when powered by battery cartridge)
Net weight
(Without
accessories)
Without battery cartridge 17.1 kg
With BL4080F x2 20.9 kg
Dimensions
(L x W x H)
External dimensions 676 mm x 345 mm x 471 mm
(With the handles and carrying handle lowered position)
Inside of the chamber 343 mm x 240 mm x 338 mm
Climate type SN / N / ST / T
without notice.

8ENGLISH
Selectable temperature
°C -18 -15 -10 -5 0 5 10 15 20 25 30 35 40 45 50 55 60
°F 0 5 15 25 30 40 50 60 70 75 85 95 105 115 120 130 140
Applicable battery cartridge and charger
Battery cartridge D.C.18 V Model BL1815N / BL1820B / BL1830B / BL1840B / BL1850B / BL1860B
D.C. 36 V - 40 V max Model BL4020 / BL4025 / BL4040 / BL4050F / BL4080F
Charger D.C.18 V Model DC18RC / DC18RD / DC18RE / DC18SD / DC18SE / DC18SF /
DC18SH / DC18WC
D.C. 36 V - 40 V max Model DC40RA / DC40RB / DC40RC
• Some of the battery cartridges and chargers listed above may not be available depending on your region of
residence.
WARNING: Only use the battery cartridges and chargers listed above. Use of any other battery cartridges
WARNING: Do not use a corded power supply such as battery adapter or portable power pack with
this appliance.
Operating time
NOTE: The operating time is measured from the state that the inside of the chamber reaches the control
temperature.
NOTE:
condition.
When operating as single chamber
Voltage Battery cartridge
(When using two
of the same battery
cartridges)
Operating time for each control temperature (hours)
Ambient temperature is 30°C (85°F) Ambient temperature is
0°C (30°F)
-18°C (0°F) 5°C (40°F) 60°C (140°F)
D.C. 18 V
BL1815N 1.5 4.0 1.5
BL1820B 2.0 5.5 2.0
BL1830B 3.0 7.5 2.5
BL1840B 4.5 11.0 3.5
BL1850B 5.5 14.0 5.0
BL1860B 7.0 17.0 6.0
D.C. 36 V - 40 V max
BL4020 4.5 11.5 4.5
BL4025 6.0 15.0 5.5
BL4040 10.0 24.0 9.0
BL4050F 12.5 30.0 11.5
BL4080F 20.0 48.0 18.5
When operating as dual chamber
Voltage Battery cartridge
(When using two
of the same battery
cartridges)
Operating time for each control temperature (hours)
Ambient temperature is 30°C (85°F)
-18°C (0°F) 5°C (40°F)
D.C. 18 V BL1815N 1.5
BL1820B 2.5
BL1830B 3.5
BL1840B 5.0
BL1850B 6.5
BL1860B 8.0

9ENGLISH
Voltage Battery cartridge
(When using two
of the same battery
cartridges)
Operating time for each control temperature (hours)
Ambient temperature is 30°C (85°F)
-18°C (0°F) 5°C (40°F)
D.C. 36 V - 40 V max BL4020 4.5
BL4025 5.5
BL4040 9.0
BL4050F 11.0
BL4080F 18.0
Symbols
The followings show the symbols which may be used
for the equipment. Be sure that you understand their
meaning before use.
Read instruction manual.
Ni-MH
Li-ion
Only for EU countries
Due to the presence of hazardous com-
ponents in the equipment, waste electrical
and electronic equipment, accumulators
and batteries may have a negative impact
on the environment and human health.
Do not dispose of electrical and electronic
appliances or batteries with household
waste!
In accordance with the European Directive
on waste electrical and electronic equip-
ment and on accumulators and batteries
and waste accumulators and batteries,
as well as their adaptation to national law,
waste electrical equipment, batteries and
accumulators should be stored separately
and delivered to a separate collection point
for municipal waste, operating in accor-
dance with the regulations on environmen-
tal protection.
This is indicated by the symbol of the
crossed-out wheeled bin placed on the
equipment.
Warning;
Do not immerse the appliance in water. Do
not pour water on the appliance. Otherwise
electric shock or malfunction may occur.
Safety warnings
1. Only when the appliance is powered by battery
cartridge, the appliance is suitable for camping
use.
2.
Read and follow these instructions for han-
dling. Ask our service center for servicing.
When disposing the appliance, follow your
-
mable refrigerants.
3. WARNING: Keep ventilation openings or in the
appliance enclosure clear of obstruction.
4. WARNING: Do not use mechanical devices or
other means to accelerate the defrosting pro-
cess, other than those recommended by the
manufacturer.
5. WARNING: Do not use electrical appliances
inside the food storage compartments of the
appliance, unless they are of the type recom-
mended by the manufacturer.
6.
blowing gases inside. When disposing the
appliance, follow your local regulations relat-
-
ing gases.
7. Do not store explosive substances such as
this appliance.
8. This appliance is intended to be used in
household and similar applications such as
working environments;
— farm houses and by clients in hotels, motels
and other residential type environments;
— bed and breakfast type environments;
— catering and similar non-retail applications.
9.
to replace the illuminating lamps. All parts,
including the illumination lamp, should be
10. WARNING: Risk of child entrapment. Before
you throw away this appliance:
Additional safety warnings for cooler
& warmer box
1. Read the instruction manual carefully before
use.
2. Do not allow small children and pets to play
with this appliance. Keep the appliance out of
reach of children when storing. Otherwise seri-
ous incident such as an entrapment may occur.
3. Do not disassemble the appliance.
4. Any accessories not recommended by the
manufacturer may not be used. Otherwise
malfunction may occur.
5. Do not use this appliance as a stepstool or
chair.
6. Do not immerse the appliance in water or other
liquid to prevent electric shock. Do not expose
to rain.
7. Even if the appliance is not in use, do not place
the appliance upside down, or tilt it above 15°.
Otherwise malfunction may occur.
8. Do not place the appliance in hot places such
as in a car under the sun or near heating mate-
rials. Cooling performance may be reduced, or a

10 ENGLISH
9. When positioning the appliance, ensure the
power cord is not tapped or damaged.
10. Do not place the appliance near gas appli-
ances. Cooling performance may be reduced, or a
11. -
ance.
12. Do not use this appliance in the refrigerator
vehicle or refrigerator chamber. Dew conden-
sation easily occurs in the refrigerator vehicle and
refrigerator chamber, causing water droplets to fall
on the appliance and result in malfunctions.
13. When using the appliance in a car, be sure to
install the appliance in a stable place such as
the luggage space or the feet of the rear seats,
seat in an unstable state. If the car suddenly
starts or stops during driving, the appliance may
14. Do not use the AC adapter outdoors. Otherwise
electric shock may occur.
15. Do not insert metal foil or other conductive
short circuit.
16. Check if the voltage range used is the same
as that marked on the nameplate, whether
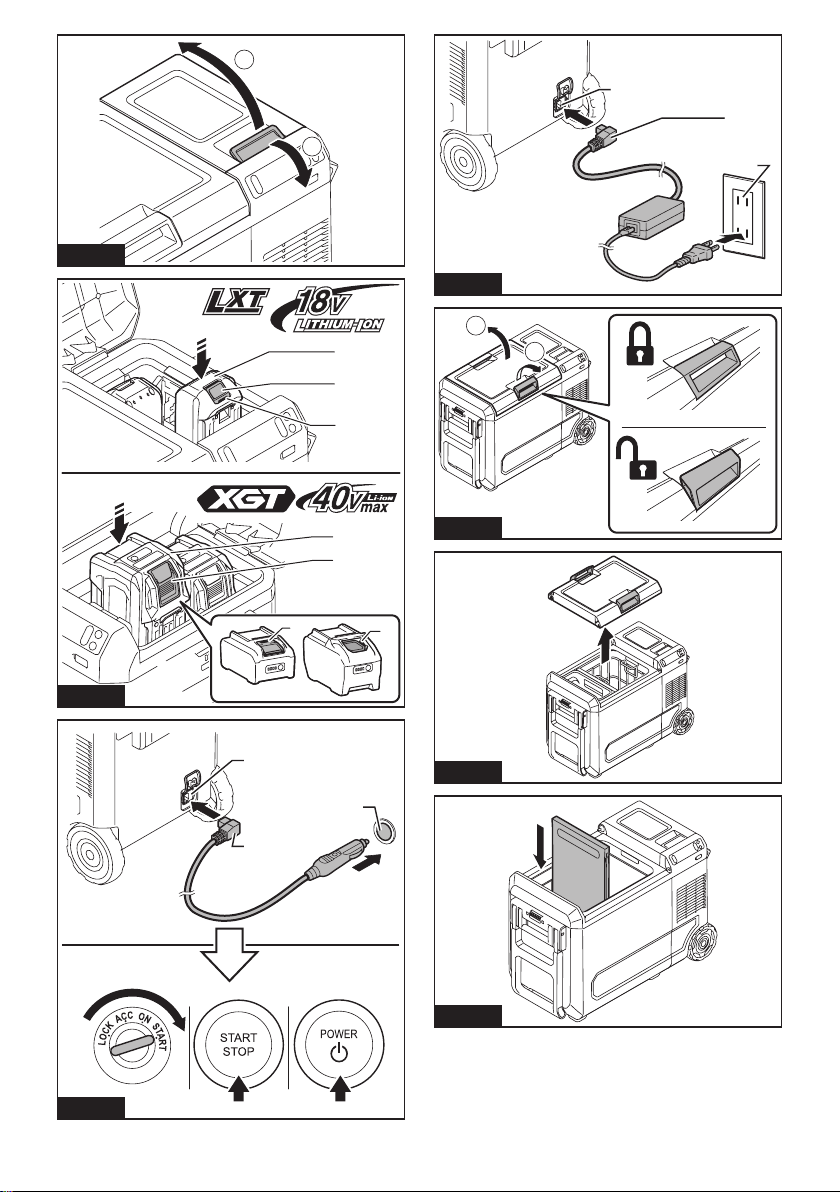
the power cord plug is match the socket, and
ensure that the socket is well grounded.
17. Do not abuse the AC adapter and cigarette
lighter adapter.
18. Do not put any objects on or around the AC
adapter when using.
19. Do not damage the cord of the AC adapter and
cigarette lighter adapter.
— Do not modify the cord.
— Do not bend, pull, or twist the cord
forcibly.
— Do not pinch the cord.
— Do not put heavy objects on the cord.
— Do not bundle the cord when using.
electric shock result.
20. Clean the plug of the AC adapter and cigarette
lighter adapter. Dirt such as water or salt adher-
ing to the plug may cause rust and result poor
21. Clean dust and ash from the cigarette lighter
adapter socket.
may occur.
22. Do not handle the plug with wet or greasy
hand. Doing so may cause electric shock.
23. Insert the plug completely into the “DC IN”
socket. Failure to do so may deform the plug or
24. Do not touch the plug of the AC adapter and
cigarette lighter adapter immediately after
operation. They may be extremely hot and could
burn your skin.
25. Do not use the DC output (DC) of the engine
generator as the power supply. Doing so may
cause a failure.
26. When the remaining automobile battery
capacity gets small, use the appliance with
the engine running. After using the appliance,
unplug the cigarette lighter socket to prevent
the loading on the automobile battery.
27. Do not charge the car battery while using the
appliance. Unacceptable voltage may be applied
28. Do not handle the appliance while driving.
Doing so may cause an accident.
29. If the fuse of the cigarette lighter adapter
by Makita. Contact your local Makita Service
Center for details.
30. To avoid damage to the compressor, do not
press the start button frequently. When start-
ing, always leave at least 5-minute interval
from the previous use.
31. When operating cooling mode, do not touch
the contents, especially those made of metal,
inside the appliance with wet hands. Doing so
may cause frostbite.
32. When operating heating mode, do not touch
the inside of the appliance with your hand for a
long time. Risk of low-temperature burns.
33.
closing and opening the door and the battery
cover.
34. Be careful not to run out of battery power while
keeping food and drink cool or warm. Do not
store opened foods for a long time. Food and
drink may rot.
35. When putting food or drink in the appliance,
keep the inside of the chamber clean. Risk of
food poisoning etc.
36. When putting food or drink in the appliance,
put a cold or hot thing in advance. This appli-
ance cannot cool or heat in a short time.
37.
Cooling performance may be reduced, causing
food and drink to rot.
38. Do not put things that are easily perishable
in the chamber when the appliance in heating
mode. The food or drink may rot.
39. Do not put creatures such as pets in the appli-
ance. This appliance cannot save creatures.
40. Do not put water etc. directly in the appliance.
Water may get inside the appliance and cause
a malfunction. If water has accumulated in the
41. Do not put a cold agent in a broken bag. If the
cold agent leak in the appliance, the metal part of
the appliance may be corroded. If the cold agent
wipe dry with a soft cloth.
42. Do not put such as medicines or academic
materials in the appliance. This appliance can-
not storage the materials that require strict tem-
perature control.
43.
Otherwise the appliance may fall and cause a mal-

11 ENGLISH
44. When carrying the appliance, keep the appli-
ance with the door facing up. Do not carry the
appliance with upside down. Otherwise mal-
function may occur.
45. When cleaning or not in use, remove the bat-
tery and unplug the power plug.
46. Do not use chemical washing liquids and hard
tools to clean the product.
47. Do not use a knife or a screwdriver to remove
ice or frost from the appliance. Doing so may
damage the inside of the appliance and cause a
malfunction, or the enclosed gas or oil may squirt.
48. When using in dusty environment, clean the
Dusty environment
Safety warnings for battery-operated
appliance
Battery-operated appliance use and care
1. Prevent unintentional starting. Ensure the
to battery pack, picking up or carrying the
appliance.
on the switch or energizing appliance that have
the switch on invites accidents.
2. Disconnect the battery pack from the appli-
ance before making any adjustments, chang-
ing accessories, or storing appliance. Such
preventive safety measures reduce the risk of
starting the appliance accidentally.
3.
the manufacturer. A charger that is suitable for
when used with another battery pack.
4. -
nated battery packs. Use of any other battery
5. When battery pack is not in use, keep it away
from other metal objects, like paper clips,
coins, keys, nails, screws or other small metal
objects, that can make a connection from one
terminal to another. Shorting the battery termi-
6. Under abusive conditions, liquid may be
ejected from the battery; avoid contact. If con-
liquid contacts eyes, additionally seek medical
help.
irritation or burns.
7. Do not use a battery pack or appliance that
batteries may exhibit unpredictable behaviour
8. Do not expose a battery pack or appliance
Exposure
explosion.
9. Follow all charging instructions and do not
charge the battery pack or appliance outside
-
tions. Charging improperly or at temperatures
10.
person using only identical replacement parts.
This will ensure that the safety of the product is
maintained.
11. Do not modify or attempt to repair the appli-
ance or the battery pack except as indicated in
the instructions for use and care.
Important safety instructions for battery
cartridge
1. Before using battery cartridge, read all instruc-
tions and cautionary markings on (1) battery
charger, (2) battery, and (3) product using
battery.
2. Do not disassemble or tamper with the battery
cartridge.
or explosion.
3. If operating time has become excessively
shorter, stop operating immediately. It may
result in a risk of overheating, possible burns
and even an explosion.
4. If electrolyte gets into your eyes, rinse them
out with clear water and seek medical atten-
tion right away. It may result in loss of your
eyesight.
5. Do not short the battery cartridge:
(1) Do not touch the terminals with any con-
ductive material.
(2) Avoid storing battery cartridge in a con-
tainer with other metal objects such as
nails, coins, etc.
(3) Do not expose battery cartridge to water
or rain.
A battery short can cause a large current
breakdown.
6. Do not store and use the appliance and battery
cartridge in locations where the temperature
may reach or exceed 50 °C (122 °F).
7. Do not incinerate the battery cartridge even if
it is severely damaged or is completely worn
8. Do not nail, cut, crush, throw, drop the battery
cartridge, or hit against a hard object to the
battery cartridge. Such conduct may result in a
9. Do not use a damaged battery.
10. Never service damaged battery packs. Service
of battery packs should only be performed by the
manufacturer or authorized service providers.
11. The contained lithium-ion batteries are subject
to the Dangerous Goods Legislation require-
ments.
For commercial transports e.g. by third parties,
forwarding agents, special requirement on pack-
aging and labeling must be observed.
For preparation of the item being shipped, consult-
ing an expert for hazardous material is required.
Please also observe possibly more detailed
national regulations.
battery in such a manner that it cannot move
around in the packaging.

12 ENGLISH
12. When disposing the battery cartridge, remove
it from the appliance and dispose of it in a safe
place. Follow your local regulations relating to
disposal of battery.
13. Use the batteries only with the products
Installing the batteries to
-
sive heat, explosion, or leak of electrolyte.
14. If the appliance is not used for a long period
of time, the battery must be removed from the
appliance.
15. During and after use, the battery cartridge may
take on heat which can cause burns or low
temperature burns. Pay attention to the han-
dling of hot battery cartridges.
16. Do not touch the terminal of the appliance
immediately after use as it may get hot enough
to cause burns.
17. Do not allow chips, dust, or soil stuck into the
terminals, holes, and grooves of the battery
cartridge. It may result in poor performance or
breakdown of the appliance or battery cartridge.
18. Unless the appliance supports the use near
high-voltage electrical power lines, do not use
the battery cartridge near high-voltage electri-
cal power lines. It may result in a malfunction or
breakdown of the appliance or battery cartridge.
19. Keep the battery away from children.
SAVE THESE INSTRUCTIONS.
CAUTION: Only use genuine Makita batteries.
Use of non-genuine Makita batteries, or batteries that
have been altered, may result in the battery bursting
void the Makita warranty for the Makita appliance and
charger.
Tips for maintaining maximum
battery life
1. Charge the battery cartridge before completely
discharged. Always stop appliance operation
and charge the battery cartridge when you
notice less appliance power.
2. Never recharge a fully charged battery car-
tridge. Overcharging shortens the battery
service life.
3. Charge the battery cartridge with room tem-
perature at 10 °C - 40 °C (50 °F - 104 °F). Let
a hot battery cartridge cool down before
charging it.
4. When not using the battery cartridge, remove
it from the appliance or the charger.
5. Charge the battery cartridge if you do not use
it for a long period (more than six months).
Parts description
Fig.1
1Control panel 2LED lamp
3Separator 4Inner basket
5Inner tray 6Carry handle
7Opener 8Air vent
9Wheel 10 USB cover
11 “DC IN” socket cover 12 “DC IN” socket
13 Battery cover 14 Door
15 Latch 16 Trolley handle
17 Drain 18 Power button
19 Lamp of “DC IN” 20 Unit of temperature
(degree Fahrenheit)
21 Unit of temperature
(degree Celsius)
22 Lamp of heating mode
23 Lamp of cooling mode 24 Temperature setting
button (left)
25 Temperature display 26 Battery indicator
27 Temperature setting
button (right)
28 Setting button
HOW TO USE
CAUTION: Do not put things that are easily
perishable in the chamber when the appliance in
heating mode. The food or drink may rot.
NOTE: When operating the appliance in high humid
environment, dew condensation may occur on the
appliance. This is not malfunction of the appliance.
appliance.
Connecting the power supply
When operating with battery
cartridge
CAUTION: -
ance before installing or removing the battery
cartridge.
CAUTION: Hold the appliance and the bat-
battery cartridge. Failure to hold the appliance and
your hands and result in damage to the appliance and
CAUTION: Always install the battery cartridge
fully until the red indicator cannot be seen. If not,
it may accidentally fall out of the appliance, causing
CAUTION: -
gers between the battery cartridge and the termi-
nals.

13 ENGLISH
To install the battery cartridge, open the battery cover.
Fig.2
Align the tongue on the battery cartridge with the groove
in the housing and slip it into place. Insert it all the way
until it locks in place with a little click. Then close the
battery cover.
To remove the battery cartridge, slide it from the
appliance while sliding the button on the front of the
cartridge.
Fig.3: 1. Red indicator 2. Button 3. Battery cartridge
CAUTION: Always install the battery cartridge
fully until the red indicator cannot be seen. If not,
it may accidentally fall out of the appliance, causing
CAUTION: Do not install the battery cartridge
forcibly. If the cartridge does not slide in easily, it is
not being inserted correctly.
NOTE: Up to two battery cartridges can be installed,
although the appliance uses one battery cartridge for
operation.
NOTE: If two batteries of the same type are installed,
the battery with lower remaining capacity will be used
NOTE:
installed, the D.C.36 V - 40V max (XGT) battery will
When operating with cigarette lighter
adapter
CAUTION: Do not use the cigarette lighter
adapter if the plug is unplugged easily, if the
connection is wobbly, or if the plug cannot be
connected properly.
When using the appliance with the cigarette lighter
socket, use the cigarette lighter adapter supplied with
the appliance. Insert the plug to “DC IN” socket and
then insert the other end to the cigarette lighter socket.
Start the engine or turn on the car.
Fig.4: 1. “DC IN” socket 2. Plug 3. Cigarette lighter
socket
When the appliance is operating with power from ciga-
rette lighter adapter, the lamp of “DC IN” lights up.
NOTICE: The cigarette lighter adapter is for D.C.
12 V / 24 V car battery. The cigarette lighter adapter
cannot be used with other D.C. power sources.
NOTICE: Do not use the appliance with the
engine key or engine switch in the “ACC” state.
Otherwise dead battery may result.
NOTICE: Do not use extension cords, branch
cords, etc. Use the cigarette lighter adapter pro-
vided with the appliance. Otherwise malfunction
may occur.
NOTICE: Do not pull the cord when unplugging.
Otherwise malfunction may occur.
NOTICE: If the car has an idle reduction function,
the appliance may not work properly because the
car battery becomes low voltage. In this case, we
NOTICE: Always close the “DC IN” socket
Otherwise foreign matter may enter the appliance and
cause a malfunction.
NOTE: When both of the cigarette lighter adapter
and the battery cartridge are installed, the appliance
operates by the power from cigarette lighter adapter.
NOTE: The battery power is consumed slightly even
the appliance operates by the power from cigarette
lighter adapter.
NOTE: The appliance does not charge the battery
cartridge.
NOTE: When the appliance shifts power supply, the
compressor will stop for about 3 minutes to protect
itself.
When operating with AC adapter
CAUTION: Do not use the AC adapter if the
plug is unplugged easily, if the connection is wob-
bly, or if the plug cannot be connected properly.
CAUTION: Use the AC adapter provided with
the appliance. Use of any other AC adapter may
When using the appliance with AC power, use the AC
adapter supplied with the appliance. Insert the plug
to “DC IN” socket and then insert the other end to an
outlet.
Fig.5: 1. “DC IN” socket 2. Plug 3. Outlet *
* The shape of the plug of the AC adapter on the
depending on the country.
When the appliance is operating with power from AC
adapter, the lamp of “DC IN” lights up.
NOTICE: Do not pull the cord when unplugging.
Otherwise malfunction may occur.
NOTICE: Always close the “DC IN” socket
Otherwise foreign matter may enter the appliance and
cause a malfunction.

14 ENGLISH
NOTE: When both of the AC adapter and the battery
cartridge are installed, the appliance operates by the
power from AC adapter.
NOTE: The battery power is consumed slightly even
the appliance operates by the power from AC adapter.
NOTE: The appliance does not charge the battery
cartridge.
NOTE: When the appliance shifts power supply, the
compressor will stop for about 3 minutes to protect
itself.
Putting food or drink in the
appliance
CAUTION:
before putting the ice cream or frozen food in the
chamber. Do not put the ice cream or frozen food
with other food and drink. Otherwise the ice cream
and frozen food may melt.
CAUTION: Do not put things that are easily
perishable in the chamber when the appliance in
heating mode. The food or drink may rot.
CAUTION: Do not put the food (especially raw
The food or
drink may rot.
CAUTION: Do not put foods in the chamber
directly. Wrap the food or put the food into the
plastic bag.
CAUTION: When operating in heating mode,
do not put plastic bottles without heat resistant.
Otherwise they may deform or break.
Opening or closing the door
Pull up the latch to release and open the door. The door
can be opened from either side.
Fig.6
Pull up the both latches to release and remove the door
from the body.
Fig.7
CAUTION: Make sure that the door is closed
with the latches. Otherwise the door may open
CAUTION: Do not force the door to open
with the latch locked.
result.
NOTICE: Close the door promptly. Opening the
decrease of the temperature in the chamber.
NOTE: When closing the door, be sure to lock the
latches manually. The latch does not lock automat-
ically. If the latch protrudes from the top face of the
door, the latch is not locked.
Separator
By using the separator, the appliance operates in dual
chamber mode.
temperature for each chamber. Refer to the section for
selecting the control temperature.
To install the separator, align the grooves in the separa-
tor with the rails on the chamber and slide it into place.
Fig.8
When operating in single chamber mode, remove or
store the separator as illustrated so that the appliance
does not detect the sensors in the separator. The sen-
sors are positioned in the bottom end of the separator
and in the bottom of the chamber.
Fig.9
NOTICE: -
ture after installing or removing the separator.
The control temperature changes automatically when
installing or removing the separator. Unexpected con-
trol temperature may cause food and drink rotted.
Operating the appliance
Turning on the appliance
Press the power button to turn on the appliance.
Press the power button
appliance.
Selecting the control temperature
Press the temperature setting button /to
select the control temperature. Refer the chap-
ter “SPECIFICATIONS” for the selectable control
temperature.
The appliance starts cooling/heating about 5 seconds
after without any operation, then the control tempera-
the current temperature.

15 ENGLISH
NOTE: The control temperature is approximate.
Current temperature may repeat going over and
below the control temperature. This is because the
-
ation to bring the temperature closer to the control
temperature.
control temperature may increase depending on
usage condition, operation settings, and the things
you put in the appliance.
NOTE: The current temperature may not reach the
control temperature depending on the usage environ-
ment (extremely hot/cold), etc.
NOTE: The appliance keeps the temperature
when the current temperature reaches the control
temperature.
NOTE: Once the compressor stops, the compressor
does not restart for 3 minutes to protect itself.
NOTE: When operating the appliance in high humid
environment, dew condensation may occur on the
appliance. This is not malfunction of the appliance.
appliance.
NOTE: During cooling operation, you may hear the
is not malfunction of the appliance. This is the sound
the chamber.
Single chamber mode
In the single chamber mode, the temperature display
heat the entire chamber to the control temperature.
Fig.10
Dual chamber mode
In the dual chamber mode, the temperature display
-
perature for left chamber and right chamber separately.
Fig.11
pressing the setting button . The temperature display
shows “ - - ” if the chamber does not have the control
temperature.
NOTICE: In the dual chamber mode, you can-
not set the control temperature if there is a 30°C
An error tone will sound if you try to set the tem-
FUNCTIONAL
DESCRIPTION
Indicating the remaining battery
capacity
The battery indicator shows the remaining battery
capacity. The remaining battery capacity is shown as
the following table.
Fig.12: 1. Battery cartridge 2. Battery indicator
Battery indicator status Remaining
capacity
50% to 100%
20% to 50%
0% to 20%
(Blinking)
Charge the battery.
NOTE: The error code “F2” is displayed on the tem-
to running out of the battery.
(Only for battery cartridges with the
indicator)
Press the check button on the battery cartridge to indi-
cate the remaining battery capacity. The indicator lamps
light up for a few seconds.
Fig.13: 1. Indicator lamps 2. Check button
Indicator lamps Remaining
capacity
Lighted Blinking
75% to 100%
50% to 75%
25% to 50%
0% to 25%
Charge the
battery.
The battery
may have
malfunctioned.

16 ENGLISH
NOTE: Depending on the conditions of use and the
from the actual capacity.
NOTE:
the battery protection system works.
Protection system
The appliance is equipped with the protection systems.
appliance and battery life.
Overdischarge protection
When the capacity of the battery cartridge becomes low,
the appliance stops automatically.
Remove the battery cartridge from the appliance and
charge the battery cartridge.
Error code
following code.
— F1: The appliance gets equal to or greater than
30° from level angle.
After the appliance back in level position, it takes
about 3 minutes to restart.
Code F1 is displayed only when the appliance is
operating in cooling mode.
Fig.14
— F2: Running out of battery.
— F3: The car input voltage is lower than the
rated voltage.
— F4: The car input voltage is higher than the
rated voltage.
— When the error codes other than the above is
displayed:
occurs, take the appliance to Makita Authorized or
Factory Service Centers.
Protection system for the car battery
The appliance automatically stops when the car input
“Hi” by following procedure.
1. Turn on the appliance.
2. Press and hold the setting button and the
temperature setting button on the left until the
mode (“Lo” or “Hi”) is displayed.
3. Press the temperature setting button /(on
either left or right) to switch “Lo” or “Hi”.
4. Press the setting button , or leave the appli-
ance about 5 seconds without any operation. The
threshold voltage is completed.
Lo The factory default.
Use this mode in conventional cars.
Hi The threshold voltage is higher than “Lo”.
For cars that continue to supply power from
the cigarette lighter socket even when the car
“Hi” mode. In “Hi” mode, the appliance detects a
dead battery.
The appliance may not work properly in “Hi” mode
if the car battery is low voltage, e.g., the vehicle
has an idle reduction function or the car battery is
depleted. In this case, change to “Lo” mode.
Protections against other causes
Protection system is also designed for other causes that
could damage the appliance and allows the appliance to
stop automatically. Take all the following steps to clear
the causes, when the appliance has been brought to a
temporary halt or stop in operation.
restart.
2. Charge the battery(ies) or replace it/them with
recharged battery(ies).
3. Let the appliance and battery(ies) cool down.
If no improvement can be found by restoring protection
system, then contact your local Makita Service Center.
Re-start function
When the appliance is operating with the AC adapter
or the cigarette lighter adapter, the re-start function is
activated.
If the appliance stops by any means other than pressing
the power button, the appliance turns on automatically
when the power supply of the AC adapter or the ciga-
rette lighter adapter is resumed.
When the appliance is operating with only battery car-
tridge, the re-start function is not activated.
Mute mode
Press and hold the setting button and temperature
setting button on the right to enter mute mode. All
In the mute mode, press and hold the setting but-
ton and temperature setting button on the right to
restore tones.
The all error tones always sound.
Switching the unit of temperature
Celsius) or °F (degree Fahrenheit) by following
procedure.
1. Turn on the appliance.
2. Press and hold the setting button until the unit
3. Press the temperature setting button /(on
either left or right) to select unit.
4. Press the setting button , or leave the appliance
about 5 seconds without any operation. The unit
selection is completed.

17 ENGLISH
Memory function
The appliance starts at the same setting as the last
setting.
USB charging
The USB port continuously outputs 5 V voltage in oper-
ation state.
NOTICE: Connect only devices which are com-
patible with the USB power supply port. Otherwise
it may cause malfunction to the appliance.
NOTICE: Do not connect the USB power supply
port of this appliance to the USB terminal of your
computer. It may cause malfunction.
NOTICE: Before connecting USB device to
the appliance, always backup your data of USB
device. Otherwise your data may be lost by any
possibility.
NOTICE: When not using devices or after
charging, remove the USB cable and close the
USB cover.
NOTE: The appliance may not supply power to some
USB devices.
Fig.15
Drain
When cleaning the chamber or water accumulates in
the chamber, open the drain cap to drain the water. After
drained the water, dry well the chamber. Always attach
the drain cap securely before using the appliance.
Fig.16
Storage items
The inner tray can be placed in the upper part of the
chamber.
The inner basket can only be placed on the right side of
the chamber.
The inner tray and the inner basket can be used
together.
The appliance also can available without the inner tray
and inner basket.
Fig.17: 1. Inner tray 2. Inner basket
NOTICE: Make sure that the inner tray seats
before closing the door.
Opener
Use to open the bottle crown cap.
Fig.18
Lamp
The LED lamps turn on automatically when the door is
Garbage bag hook
Use to hang a garbage bag.
Fig.19: 1. Garbage bag hook
Carrying
Carrying handle
Raise the both carrying handles when carrying the
appliance with both hands.
Fig.20
Trolley handle
Raise the trolley handle when carrying the appliance
with wheels.
Fig.21
Shoulder belt
CAUTION: Use the shoulder belt only for
carrying the appliance. Do not use for purposes
other than carrying the appliance (prevention of
dropping at high places, hanging with cranes,
dragging, wall hangings, etc.).
CAUTION: Inspect the appliance and shoul-
der belt for damage (including fabric and stitch-
ing). Do not use if damaged.
CAUTION: Make sure the shoulder belt
securely attached properly. Otherwise falling acci-
dent may occur.
CAUTION: Even when using the shoulder
belt, hold the appliance by your hand and keep it
level. Carrying the appliance using only the shoulder
belt makes it unstable. The shoulder belt may come
CAUTION: Do not apply excessive load on the
shoulder belt. Otherwise falling accident may occur.
Put the belt through the holes and buckle the belt as
Fig.22

18
MAINTENANCE
CAUTION: Always be sure that the appliance
-
tridge is removed before attempting to perform
inspection or maintenance.
CAUTION: Do not spray or pour water on
the appliance when cleaning. Do not wash with a
hose; avoid getting water inside of the appliance.
NOTICE: Never use gasoline, benzine, thinner,
alcohol or the like. Discoloration, deformation or
cracks may result.
be performed by Makita Authorized or Factory Service
Centers, always using Makita replacement parts.
Cleaning
• Clean the oil stain in the chamber regularly.
• Clean around the interior of the chamber to pre-
vent odor.
• The sealing strip of the upper cover is easy to get
dirty, clean it in time.
Defrosting
CAUTION:
be sure to install it on the appliance. Operating
malfunction.
Fig.23
Fig.24
OPTIONAL
ACCESSORIES
CAUTION: These accessories or attachments
are recommended for use with your Makita appli-
The use of any other
accessories or attachments might present a risk of
for its stated purpose.
If you need any assistance for more details regard-
ing these accessories, ask your local Makita Service
Center.
• AC adapter
• Makita genuine battery and charger
NOTE: Some items in the list may be included in the
appliance package as standard accessories. They
ENGLISH

19 FRANÇAIS
FRANÇAIS (Instructions originales)
AVERTISSEMENT
• Voir le chapitre « ENTRETIEN » pour des procédures et précautions détaillées pendant l’entretien à la
charge de l’utilisateur.
• Pour les utilisateurs situés en Europe :
Cet appareil peut être utilisé par des enfants de 8 ans et plus, ainsi que par des personnes aux facultés
physiques, sensorielles ou mentales diminuées ou sans expérience ni expertise sous la surveillance
d’un adulte ou s’ils ont reçu des instructions concernant l’utilisation en toute sécurité de l’appareil et
s’ils comprennent les risques encourus. Ne laissez pas les enfants jouer avec l’appareil. Le nettoyage
et l’entretien à la charge de l’utilisateur ne doivent pas être réalisés par des enfants sans surveillance.
• Pour les utilisateurs situés ailleurs qu’en Europe :
Cet appareil n’est pas prévu pour être utilisé par des personnes (dont les enfants) aux capacités
physiques, sensorielles ou mentales réduites ou qui manquent d’expérience et de connaissances, à
moins qu’ils aient fait l’objet d’une supervision ou d’une formation à l’utilisation de l’appareil par une
qu’ils ne jouent avec l’appareil.
• Si le cordon d’alimentation est endommagé, il doit être remplacé par un cordon spécial ou un ensemble
disponible auprès du fabricant ou de son service après-vente.
•
• Voir la section « Insertion ou retrait de la batterie » pour la méthode de retrait ou d’insertion de la
batterie.
• Lors de la mise au rebut de la batterie, retirez-la de l’appareil et jetez-la en lieu sûr. Respectez la régle-
mentation locale en matière de mise au rebut des batteries.
• Lorsque vous n’utilisez pas l’appareil pendant une période prolongée, la batterie doit être retirée de
l’appareil.
• Ne court-circuitez pas la batterie.
INTRODUCTION
Modèle : CW004G
Entrée Batterie 18 V CC
36 V - 40 V CC max.
Adaptateur secteur
(Accessoire en option)
Reportez-vous à l’indication sur l’adaptateur secteur.
(La tension d’entrée dépend du pays.)
Adaptateur pour
allume-cigare
12 V CC / 24 V CC
Consommation électrique 80 W
Classe de protection contre les chocs III
Port USB Tension de sortie 5 V CC /Courant de sortie 2,4 A CC / Type A
Capacité 29 L
Fluide frigorigène R-1234yf (33 g)
Matériau isolant/Matériau expansible Mousse de polyuréthane/Cyclopentane (C5H10)
Degré de protection IPX4 (uniquement si alimenté par batterie)
Poids net
(Sans les
accessoires)
Sans la batterie 17,1 kg
Avec 2 batteries BL4080F 20,9 kg
Dimensions
(L x l x H)
Dimensions externes 676 mm x 345 mm x 471 mm
(Avec les poignées et la poignée de transport en position abaissée)
Intérieur du bac 343 mm x 240 mm x 338 mm
Type de climat SN/N/ST/T

20 FRANÇAIS
Température sélectionnable
°C -18 -15 -10 -5 0 5 10 15 20 25 30 35 40 45 50 55 60
°F 0 5 15 25 30 40 50 60 70 75 85 95 105 115 120 130 140
Batterie et chargeur applicables
Batterie Modèle 18 V CC BL1815N / BL1820B / BL1830B / BL1840B / BL1850B / BL1860B
Modèle 36 V - 40 V CC max. BL4020 / BL4025 / BL4040 / BL4050F / BL4080F
Chargeur Modèle 18 V CC DC18RC / DC18RD / DC18RE / DC18SD / DC18SE / DC18SF /
DC18SH / DC18WC
Modèle 36 V - 40 V CC max. DC40RA / DC40RB / DC40RC
• Certains chargeurs et batteries répertoriés ci-dessus peuvent ne pas être disponibles selon la région où vous
résidez.
AVERTISSEMENT : N’utilisez que les batteries et les chargeurs répertoriés ci-dessus. L’utilisation
d’autres batteries et chargeurs peut provoquer des blessures et/ou un incendie.
AVERTISSEMENT : N’utilisez pas de source d’alimentation câblée comme un adaptateur de batterie
ou un support d’alimentation portable avec cet appareil. Le câble de ce type de source d’alimentation pourrait
gêner le fonctionnement et provoquer des blessures corporelles.
Durée de fonctionnement
NOTE : La durée de fonctionnement est mesurée à partir du moment où l’intérieur du bac atteint la température de
contrôle.
NOTE :-
rie, le statut de la charge et les conditions d’utilisation.
En cas de fonctionnement en tant que bac simple
Tension Batterie
(Si vous utilisez deux
batteries identiques)
Durée de fonctionnement pour chaque température de contrôle (en heures)
Avec une température ambiante de 30 °C (85 °F) Avec une température
ambiante de 0 °C (30 °F)
-18 °C (0 °F) 5 °C (40 °F) 60 °C (140 °F)
18 V CC
BL1815N 1,5 4,0 1,5
BL1820B 2,0 5,5 2,0
BL1830B 3,0 7,5 2,5
BL1840B 4,5 11,0 3,5
BL1850B 5,5 14,0 5,0
BL1860B 7,0 17,0 6,0
36 V - 40 V CC max.
BL4020 4,5 11,5 4,5
BL4025 6,0 15,0 5,5
BL4040 10,0 24,0 9,0
BL4050F 12,5 30,0 11,5
BL4080F 20,0 48,0 18,5
Other manuals for CW004G
1
Table of contents
Languages:
Other Makita Food Warmer manuals
Popular Food Warmer manuals by other brands

Alto-Shaam
Alto-Shaam Halo Heat 1200-S Specification sheet

Alto-Shaam
Alto-Shaam Halo Heat 100-HW SERIES maintenance

heatco
heatco FAW Series Installation, operation and maintenance instructions

Alto-Shaam
Alto-Shaam HALO HEAT 200-HFT Specification sheet

Crock-Pot
Crock-Pot Lunch Crock owner's manual

Alto-Shaam
Alto-Shaam 400-HW Specification sheet