SMO DIPLE User manual

WARNING:
CHOKING HAZARD - Small parts.
Not for childre u der 3 years.
DIPLE
The Revolutio ary Microscope For A y Smartpho e
Tha ks for purchasi g DIPLE, a product desig ed a d
ma ufactured by SmartMicroOptics Srl.
With your smartpho e a d DIPLE you ca have a microscope
a ytime. Withi the portable box of size 175 mm x 100 mm x 40 mm
a d i less tha 0.5 Kg, you will get powerful a d extra-solid le ses
a d accessories for taki g videos or pictures at the microscopic
scale, with your pho e.
You do ot have to mou t a ythi g o the pho e; just lay your
device dow o the DIPLE box, alig i g the pho e camera with
the objective le s a d with the light source u der it.
You ca also use your pho e without removi g your perso al
protective cover.
A mi imal footpri t for a microscope;
but extremely powerful.
Pate t Pe di g
DIPLE
is a SMO Registered Trademark
SmartMicroOptics srl
Via Greto di Cor iglia o 6R – 16152 – Ge ova – Italy
i fo@smartmicrooptics.com – www.smartmicrooptics.com
diple.smartmicrooptics.com
(*) depe di g o the purchased item.
Pipette:
for liquid drops o slides.
Up to 3 screws for fi e
regulatio of the le s
elevatio .*
Box:
co tai er & structure supporti g
light, stage a d your pho e, whe
the product is i use.
Screwdriver:
use it for releasi g/adjusti g
the blocks that keep the le s
tiles i positio or, for the fi e
stage, the eleme ts that keep
the glass slide i positio .
Coverslips:
for coveri g your samples.
2 screw feet:
additio al mecha ical sta ds
for the pho e, if the box is ot
e ough.
Slide Shifter:
use it u der the glass slide, for
fast, ma ual shift of the sample.
Light source:
white LED for brightfield
microscopy.
Works with two CR2032 batteries.
Le s Tiles:
up to 3 differe t objective le ses.*
Red Le s (35x, res. 3 micro )
Grey Le s (75x, res. 1 micro )
Black Le s (150x, res. 0.75 micro )
3 prepared glasses:
1 Zoology, 1 Histology, 1 Bota ical
+1 plai slide for your samples.
Optio al:
1 microscope ruler
(0.01mm each divisio ).
Sta dard Stage:
remove the protective film from
its surface; with the sta dard
stage, the user shifts ma ually the
sample u der the DIPLE le s.*
Fi e Stage:
with fi e stage the user ca move
a sample o commo glass
Slide (76 mm x 26 mm) usi g two
screw-drive systems, alo g two
perpe dicular directio s. Rotati g
the two wheels it is possible to
shift the slide positio ed over the
light i co trolled way. The Fi e
Stage ca be used also like the
Sta dard Stage, removi g the
two lateral eleme ts that keep the
glass slide or the slide shifter i
positio .*
Screw feet use:
the ideal imagi g co ditio
is with horizo tal tile a d
horizo tal pho e.
If you look for a fi e tu i g,
you ca use the screw feet to
ma age the elevatio of the
pho e, i stead of the layi g
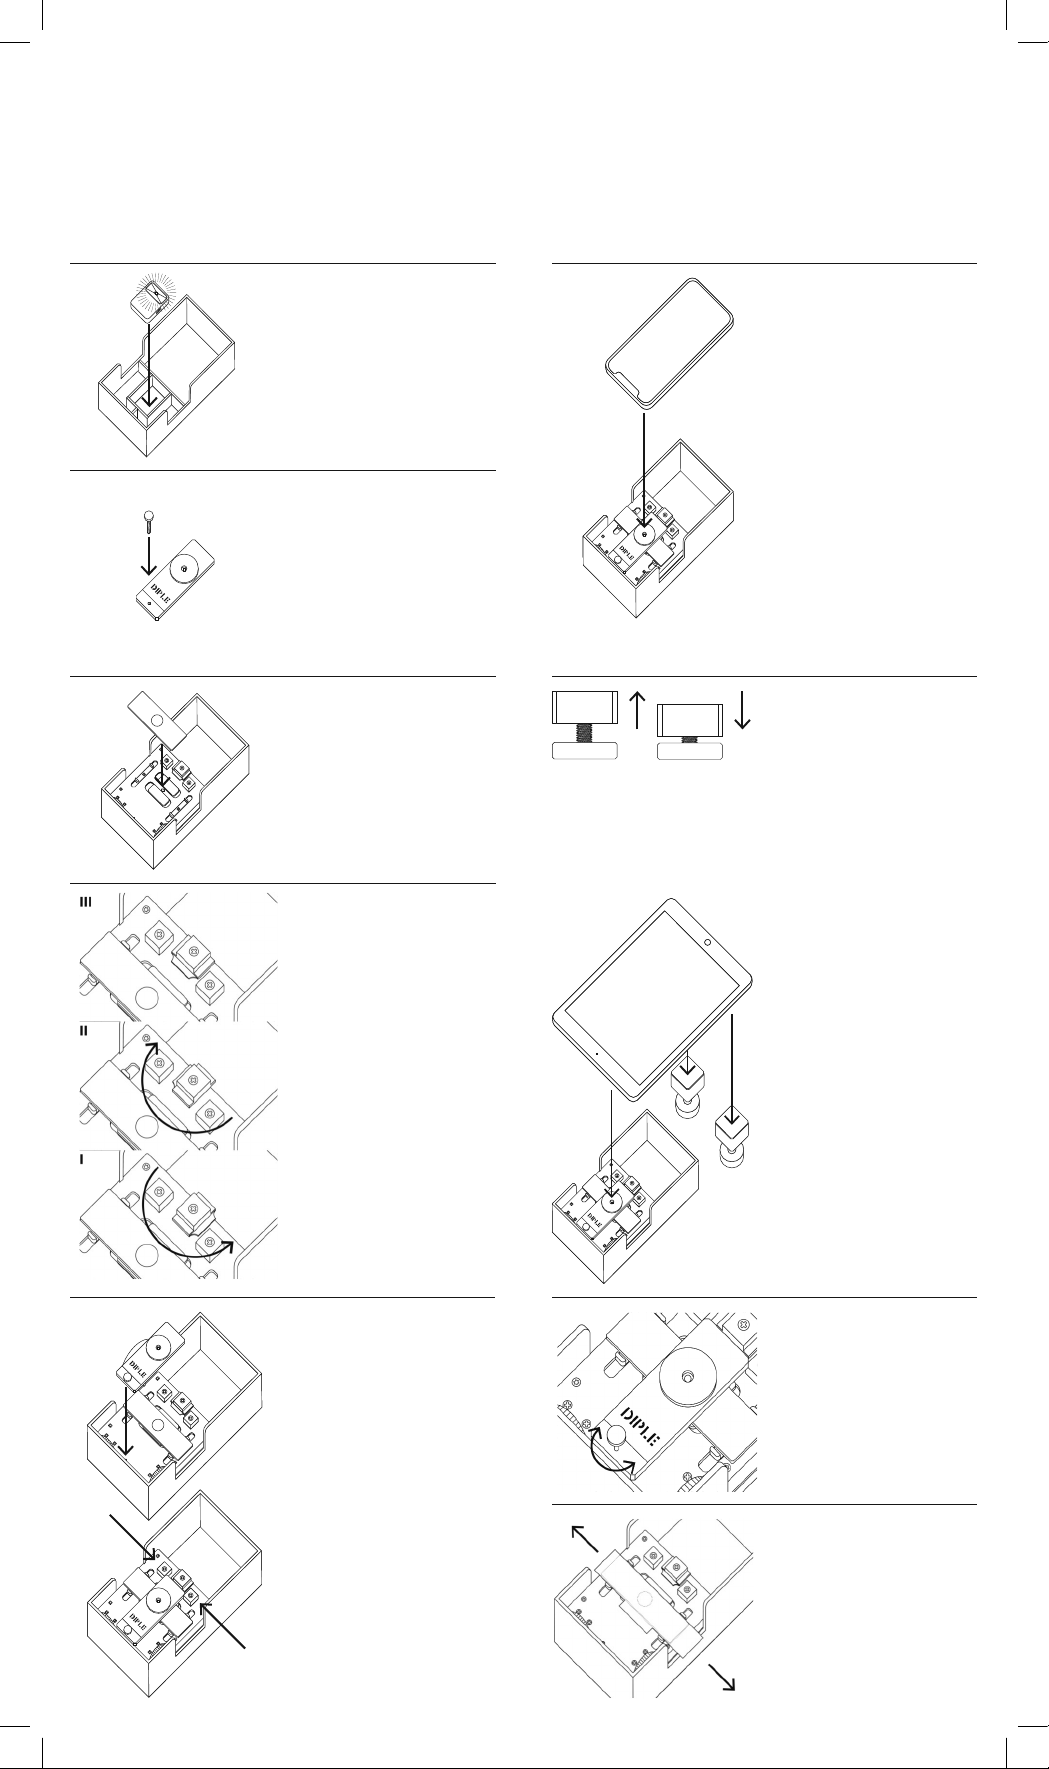
the pho e o the box sides.
Use the feet also for tablets
or large devices.
Focusi g:
lock the autofocus of your
pho e (feature that is also i
our app, freely available from
the website) o ce you see
the light o your scree .
Use the elevatio screw to
move up or dow the le s,
u til you get the right focus.
Tur -o the light:
lift the stage vertically.
The light source is i its site,
u der the stage. Remove
the i sulator foil from the
batteries, before switchi g it
o for the first time. Replace
the light i its origi al positio ,
with light o . The light must
be alig ed with the hole of
the stage.
Place the sample:
place your sample o a glass
slide a d positio it i the
ce ter of the illumi ated hole.
The first time use o e of the
prepared slides i the box, to
get practice o the focusi g
procedure.
Set the black foot:
Rotate the black foot with
3 steps followi g this rule
of thumb:
- Higher step (II)
- whe you use the Red tile
- Medium step (I)
- whe you use the
- Grey tile or the Black tile
- Low step (III)
- whe you use the Black tile
The higher the mag ificatio ,
the lower the
le s-sample dista ce.
Place the objective le s:
the objective tile must be
positio ed keepi g its side
with the screw ear the
exter al part of the box.
The screw must fit the little
hole o the metallic plate
of the stage. The writi g
DIPLE is o the top side of
the tile.
The tile must fit withi the
2 lateral blocks, whe it lays
o the selected step.
The mag et o the rear
side of the tile should help a
stable positio i g.
Tight/release the blocks
with a screwdriver, if eeded
(i particular, for the first
setti g).
Place the pho e:
ope your favorite camera
APP. For alig i g the pho e
le s o the DIPLE le s
look i your scree a d move
the pho e close to the tile,
poi ti g to hole i the black
ri g; lay the pho e o the
box a d o the black ri g of
the tile.
U der the stage you ca fi d
screws with k ob, for the
fi e elevatio of the objective
le ses (o e for each
objective le s of your kit).
I sert this screw i the hole
ear o e e d of DIPLE.
1
2
3
I structio s
Some steps i the use of DIPLE are i commo i the use of
Sta dard Stage a d Fi e Stage. The Fi e Stage ca be used
like a Sta dard Stage, after removi g the two eleme ts that guide
glass slides 76 mm x 26 mm, usi g a screwdriver.
I fo
Visit our website for examples,
tutorials, tips & troubleshooti g.
diple.smartmicrooptics.com
Slide shifter:
this part is a optio al tool
for helpi g fast, ma ual
shifti g of slides. Place it
u der the glass slide. It ca
be useful also i the case
of preparatio s o o -
sta dard slides, a d with
pho e with ce tral camera.
4
5
6
7
8
9


