manuals.online logo
Brands
  1. Home
  2. •
  3. Brands
  4. •
  5. Smoke hollow
  6. •
  7. Smoke Alarm
  8. •
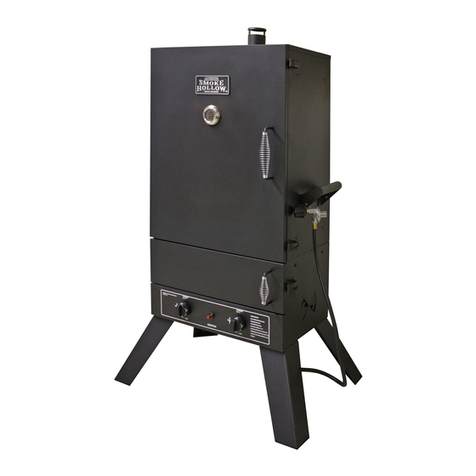
  9. Smoke hollow SH36GW Installation instructions

Smoke hollow SH36GW Installation instructions

SH36GW
36
37
30
3
5
Door Handle
Handle Bezel
#10 Spring Washers
SH36GWSH36GW
36
2
21
4
3
13
13A
23
87A
25
14
9
10
6
11
19
5
12
15
17
22
7
SH36GW-01
SH36GW-02
SH36GW-03
SH36GW-04
SH36GW-05
SH36GW-06
SH36GW-07
SH36GW-08
1
1
1
1
1
5
1
SH36GW
SH36GW-13
SH36GW-13A
SH36GW-14
SH36GW-15
SH36GW-17
PS4415-19
-12
12
11
34162G-22
Small Damper 3A02000
27A
38205GW-3
38205GW-3A
1
24
37
Locate: Smoke cabinet, Big Damper(7), (1)10-24x1/2"
bolt,(1)10-24 hex nut and(1)#10 washer
Tools needed: Pliers or 3/8"&7/16" Wrench,Phillips Head
Screwdriver
Attach the Big Damper(7) to the inside of the back side of
upper cabinet using (1)10-24x1/2" bolt,(1)10-24 hex nut
and(1)#10 washer. Fig 3.1.
Step 3
Locate: Lower Cabinet assembly. Leg(10&11),(12)1/4-20x5/8"
bolts
Tools needed: Phillips Head Screwdriver
Procedure: Turn the Lower Cabinet Assembly upside down.
Place each leg at the corner of the smoker cabinet assembly.
Fasten each leg with three 1/4-20x5/8" bolts. Turn the Lower
Cabinet assembly right side up.
Note: The right front leg contains an extra hole on its side. This
hole will be used later to secure the gas hose to the leg with a
zip-tip. Fig 1.1
Locate: Lower Cabinet assembly. Small Damper(7A), (2)10-
24x1/2" bolts, (2)10-24 hex nuts and (2) #10 washers.
Tools needed: Pliers or 3/8" & 7/16" wrench, Phillips Head
Screwdriver
Procedure: Attach the damper to the inside of the right
side of lower cabinet using (1) 10-24x1/2" bolt, (1) 10-24 hex
nut and (1) washer. Repeat for left side of lower cabinet.
Small
#10
Procedure: Place(6)Cooking Grid Supports on EACH side of
she Smoker Cabinet at the same height opposite each
other.These will hold the Cooking Grids and Water Pan
when they are slid in place.fig6.1
6
6
6
6
25
Step 7
Locate: Water Pan(15), Cooking Racks(17)
Tools needed: None
Procedure:Put the five Cooking Racks and Water Pan into the
Cooking Grid Support. Fig 7.1.
Locate: Control Knob
Tools needed: None
Procedure: Place the control knob over the valve stem, making
certain to align the flat portion of the stem with the flat portion of
the knob and push the control knob onto the stem until it is
firmly seated.
Note: When removing the wood chip box from the smoker, lift
up on the handle and pull out the .”wood chip box
Step 8
Fig8.1
Step 9
Fig9.1
Procedure: Put the Wood Chip Box Lid on the Wood Chip
Box,and slide Wood Chip Box onto theWood Chip Box Support
rail..Fig8.1
Locate: Door Assembly(2).
Tools needed: None
Procedure: Attach the Door Assembly on the Smoker Cabinet.
Fig 11.1.
Locate: Heat Indicator
Note: The Heat Indicator is supplied with one fiber washer and
one wing nut.
Tools needed: None
Procedure:
1. Insert Heat Indicator probe through the mounting hole in the
front of the door with window.
2. From the inside of the door window, place fiber washer and
nut onto the mounting thread pole and tighten by hand.
Note: Do not over tighten the nut. This may cause damage to the
glass.
Step 10
Step 11
Fig10.1
Fig11.1
Locate: Door Handle(3), Handle Bezel(4), (2)10-24x3/8"
shoulder bolts.
Tools needed: Phillips Head Screwdriver
Procedure: Attach the Door Handle and Handle to the
door with (2)10-24x3/8" shoulder bolts. Fig 12.1
Bezel
Locate: Locate: Door Latch Assembly, (4)10-24x1/20" bolts.
Tools needed: Phillips Head Screwdriver.
Procedure:
1.Attach the Door Latch Plate to the Door with (2)10-24x1/2
bolts. Fig 13.1
2.Attach the Door Latch to the Cabinet with (2)10-24x1/2 bolts.
Fig 13.1
Step 13
Fig13.1
Fig13.1
Step 15
Locate: Grease Pan(10).
Tools needed: None
Procedure: Slide the Grease Pan into the Grease Rails provided
in the bottom panel from left hand side, as shown in the figure.
Fig 14.1
Step 14
Fig14.1
slide the
box into the smoker.
To add wood chips while cooking, lift up on the wood
chip box handle and pull out the wood chip box from the
smoker. Dump the wood chip ash in a metal container
(Preferably with water) to extinguish the wood chip ash.
(Note: The wood chip box lid will stay on the wood chip
box when dumping the ash) Refill the wood chip box with
wood chips, close the lid and slide the wood chip box
back into the smoker.
CAUTION: The wood chip box gets very hot. Always use
protective mitts when handling hot components.
Fig 16.1
Fig 17.1
Fig 16.1
Fig 17.1
Fig 18.1
Fig 19.1
Fig 18.1
Fig 19.1

Other manuals for SH36GW

1

Other Smoke hollow Smoke Alarm manuals

Smoke hollow 44241G2 Installation instructions

Smoke hollow

Smoke hollow 44241G2 Installation instructions

Smoke hollow SH3616DW User manual

Smoke hollow

Smoke hollow SH3616DW User manual

Popular Smoke Alarm manuals by other brands

Linear DXS-73 installation instructions

Linear

Linear DXS-73 installation instructions

SITERWELL ELECTRONICS CO.,LIMITED GS522 user manual

SITERWELL ELECTRONICS CO.,LIMITED

SITERWELL ELECTRONICS CO.,LIMITED GS522 user manual

Tyco FireClass FIRERAY 50 manual

Tyco

Tyco FireClass FIRERAY 50 manual

First Alert ONELINK SA500 user manual

First Alert

First Alert ONELINK SA500 user manual

Johnson Controls DH300PL Installation and maintenance instructions

Johnson Controls

Johnson Controls DH300PL Installation and maintenance instructions

Siemens AD1-C11 quick guide

Siemens

Siemens AD1-C11 quick guide

Visonic SMD-429 PG2 Series Installation and operating instructions

Visonic

Visonic SMD-429 PG2 Series Installation and operating instructions

Brinkmann Vertical Gas Smoker owner's manual

Brinkmann

Brinkmann Vertical Gas Smoker owner's manual

Trox Technik RM-O-3-D Installation and operating manual

Trox Technik

Trox Technik RM-O-3-D Installation and operating manual

SEBSON GS506G operating instructions

SEBSON

SEBSON GS506G operating instructions

Code one A owner's manual

Code one

Code one A owner's manual

Bosch FCD-350 installation instructions

Bosch

Bosch FCD-350 installation instructions

Teknim TFD 1430 Installation and user manual

Teknim

Teknim TFD 1430 Installation and user manual

EDS RK 100 R Technical manual

EDS

EDS RK 100 R Technical manual

BRK electronic 83RN quick start guide

BRK electronic

BRK electronic 83RN quick start guide

wretro WR-5005-SD instruction manual

wretro

wretro WR-5005-SD instruction manual

Xtralis VESDA VLC-400 Product guide

Xtralis

Xtralis VESDA VLC-400 Product guide

Unite 7885653303 user manual

Unite

Unite 7885653303 user manual

manuals.online logo
manuals.online logoBrands
  • About & Mission
  • Contact us
  • Privacy Policy
  • Terms and Conditions

Copyright 2025 Manuals.Online. All Rights Reserved.