SmokerStore Taifun GT4 User manual

®
GT4
1
Instructions
Please read the following instructions carefully before using the product and keep them for future needs.
1. Usage and storage instructions
Do not expose the product to humid environments or extreme temperatures, it could be damaged. If water enters
by accident, stop the operation to prevent a short circuit. Do not use our product more often or for a longer pe-
riod than traditional cigarettes. Keep the product out of the reach of children, adolescents and pets.
2. Contraindications
hen using liquids with and without nicotine: Please note the warnings and instructions for use of the liquid pro-
ducts and do not mix them with other substances. Do not use the product if you have a known problem with
nicotine or other liquid ingredients. In case of nausea, dizziness or rash, discontinue use and consult a medic
immediately. The electronic cigarette is not for smoking cessation.
3. Warnings
Delivery to and use by children and adolescents under the age of 18 is prohibited. The product is not recom-
mended for non-smokers.
This product is not suitable for pregnant women, women who are breastfeeding, people with cardiovascular and
respiratory diseases, alcoholics and epileptics. Do not use the product if you have lung disease (such as
asthma, COPD, bronchitis, pneumonia). The released vapor may cause an asthma attack, shortness of breath
and coughing fits in the case of a previously damaged lung. If complaints occur, please seek medical attention
immediately. Do not use our product if you have a known problem (allergies, intolerances, etc.) with nicotine or
other ingredients of our product. Since the product contains glycerol, it can lead to hyperglycaemia or glucosuria
in diabetics.
hen using nicotine-containing liquids: nicotine-containing products are not suitable for people who, for medical
reasons, should abstain from nicotine products. If the liquid is swallowed, contact the emergency number. You
can also contact the poison emergency service in your area.
4. Information on possible adverse health effects
- none known, see the instructions of the liquid.
. Information on addictive effects
If you use products containing nicotine, the following warning is displayed on the packaging of the liquids: "This
product contains nicotine: a substance that is highly addictive.
6. Information on toxicological data
Overheating the liquid (over 240 ° C) in the electronic cigarette may cause toxicological substances. Please use
the electronic cigarette according to the manufacturer's recommendation and operating instructions. The use of
this product is at your own risk.
7. Contact
If you need additional information or if you have questions about the products and their use, please contact our
local shops or visit our website: www.smokerstore.de
Manufacturer:
SmokerStore GmbH,
Eisenwerkstraße 26,
58332 Schwelm, Deutschland
Email: info@smokerstore.de
Tel.: +49 (0)2336 / 935899-0
Fax: +49 (0)2336 / 4744870

®
GT4
2
1. PRODUCT DESCRIPTION
SCOPE OF DELIVERY
1x Taifun® GT4
1x mouthpiece
1x spare parts bag
1x user manual
1x card for authenticy verification
SPECIFICATIONS
Dimensions:
25 x 0 mm
Weight:
~ 100 g
Thread: 510 Fassungsvermögen:
~ 5 ml
Material:
Stainless steel (1.4301) / Borosilicate glass / POM / PEEK
2. SAFETY INSTRUCIONS
• Do not expose the device to extreme temperatures; Avoid exposure to direct sunlight and high humidity.
• Do not use the device in an environment that is enriched with flammable gases, vapors or dusts; There is a danger
of explosion!
• Do not drop, throw, or apply excessive force to the device to prevent damage; Do not use the device if you detect
damage.
• Refill the liquid early to prevent dry hit.
• The device heats up during use; Give it time to cool down again.
• Change the cotton if you change the flavour.
• Clean the device regularly, as condensate and dirt may settle.
• Make sure that the mod that you use with the device is capable of performance; Use of unregulated mods or mods
without protection is not recommended.
3. MANUFACTURER RECOMMENDATIONS
• The resistance of the used coil should not be less than 0.3 Ohms.
• Adjust the power of your mod to an appropriate level, depending on the used coil.
4. STORAGE INSTRUCTIONS
• If you don’t use the device for an extended period of time, close the airflow control or empty the tank, remove the
cotton and clean the device.
• Keep the device out of the reach of children and pets.
• Ensure that the device is firmly and securely in place.
• Store the device clean and dry; Avoid high humidity.
• Do not store the device under extreme temperatures; Avoid exposure to direct sunlight.
. DISPOSAL NOTICE
• The packaging must be disposed of in an environmentally friendly manner.
• Products marked with the crossed out bin, do not belong in the trash. These products can be disposed of free of
charge in your local trade or at community collection points. Check with your local council, town hall or local waste
management company.
®
GT4
3
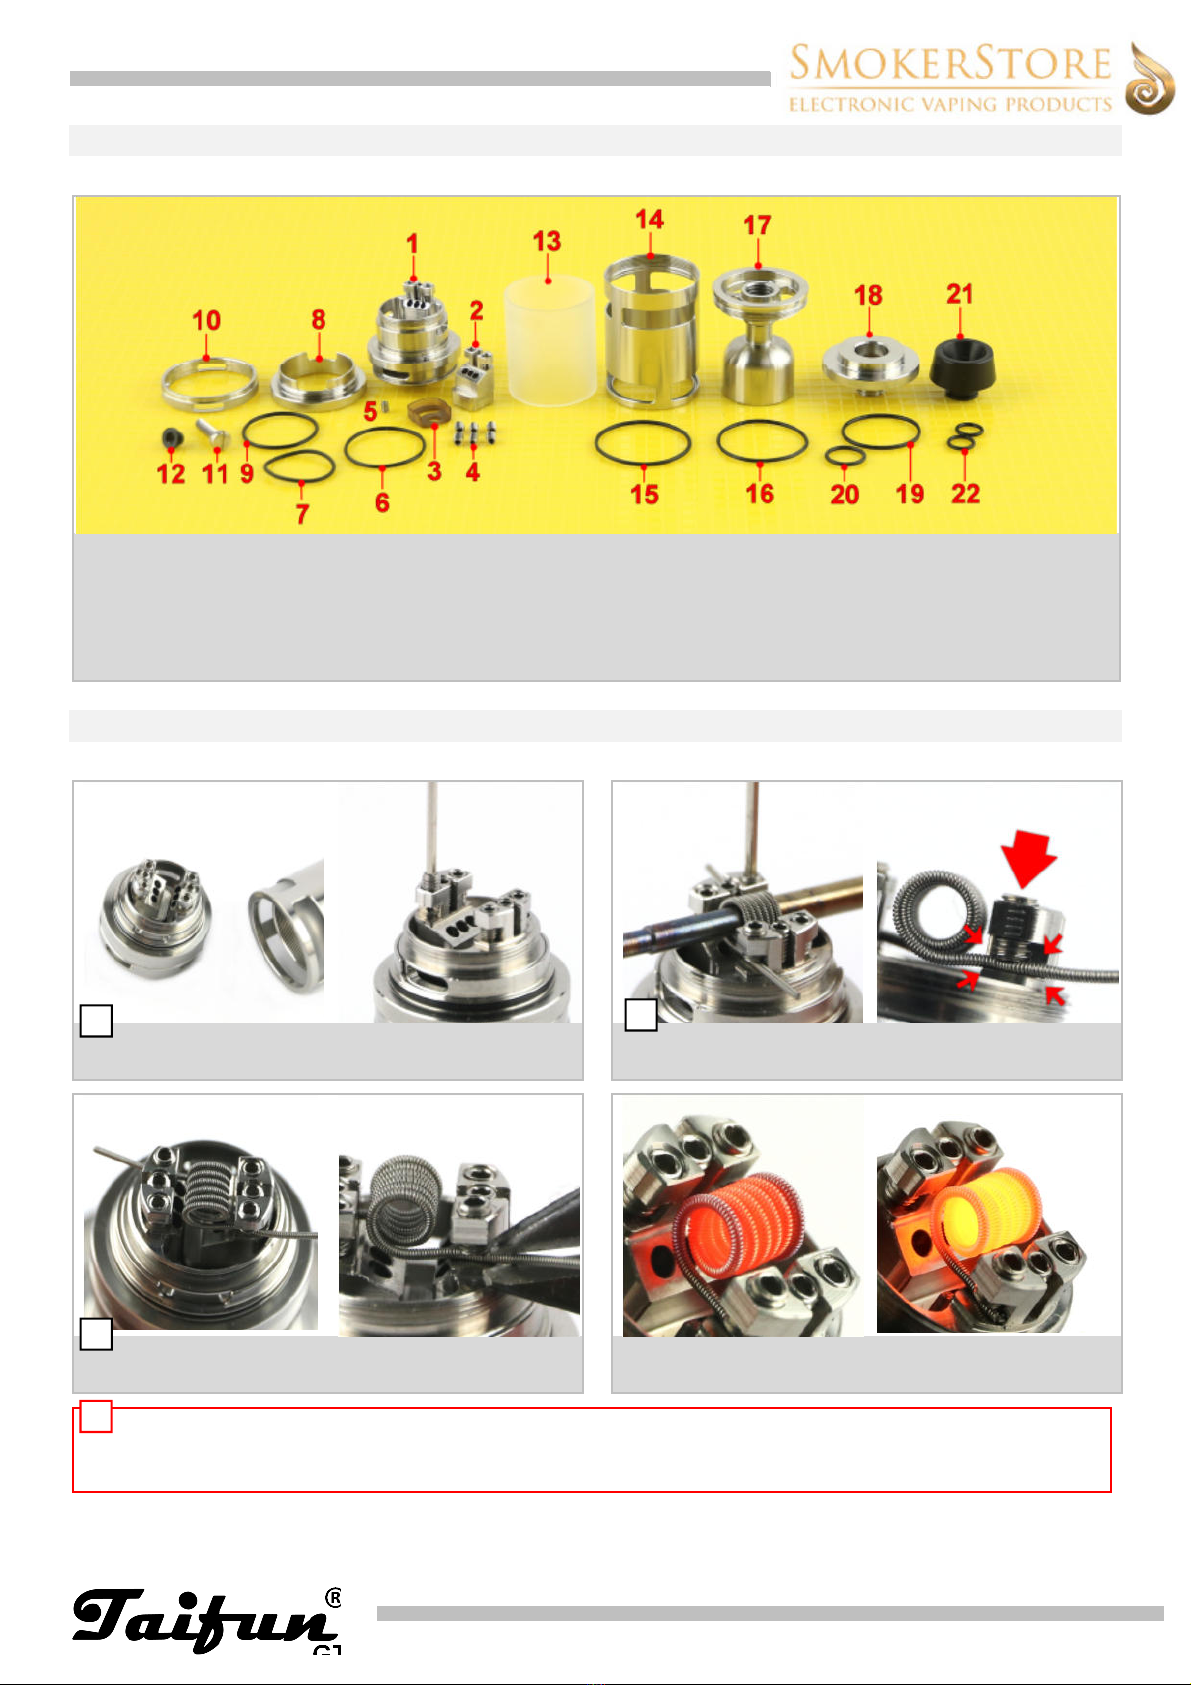
6. PRODUCT OVERVIEW
COMPONENT OVERVIEW
1 Base/Deck
2 Positive pole
3 Positive pole insolator
4 Hexagon socket screws (M2, x4mm)
Hexagon socket screws (M2x3mm)
6 O-ring (NBR 70 19x1 mm)
7 O-ring (NBR 0 1 x1 mm)
8
Liquid
c
ontrol
-
r
ing (LC)
9 O-ring (NBR 70 17x1 mm)
10 Aircontrol-ring (AFC)
11 Positive pole screw
12 Insulator
13 Glass tank
14 Tank cover
1 O-ring (NBR 70 22x1 mm)
1
6
O
-
r
ing
(
NBR 70 21x1 mm
)
17 Chamber/Chimney
18 Top cap
19 O-ring (NBR 70 17x1 mm)
20 O-ring (NBR 70 8x1 mm)
21 Drip tip
22 O-rings (NBR 70 x1)
7. START UP
ATTACHING A COIL
Screw the tank section from the base and
unscrew the required hexagon socket screws.
Insert the coil and fix it at the contact points
with the hexagon screws
Cut off the wire ends.
Let the coil light up slightly
(uniform glow pattern)
WARNING
• Use an ohm meter to check the resistance of the coil/device before using it. Don’t use the device, if a short circuit is de-
tected. This could lead to battery damage. Check if there is a contact between the coil ends and surrounding parts.
!
1
2
3

®
GT4
4
INSERT COTTON
Cut off an approximately 4 - 5 cm long strip of
cotton and sharpen it at one end.
Now pull the cotton through the coil and
push the cotton ends into the pockets.
The cotton should cover the liquid openings
well from the inside.
Moisten the cotton with liquid and
screw the tank section onto the base.
FILLING THE TANK
Before you fill the tank, the liquidcontrol
should be closed (liquid holes covered).
To fill, unscrew the top cap partially or completely.
Now the top cap is screwed on again.
The liquidcontrol has to be opened again,
before using.
WARNING
• Always make sure that the tank is filled sufficiently to avoid dry hit.
• Make sure that no liquid gets on your skin, otherwise wash these areas thoroughly.
!
1
2
3
1
2
3
®
GT4
5
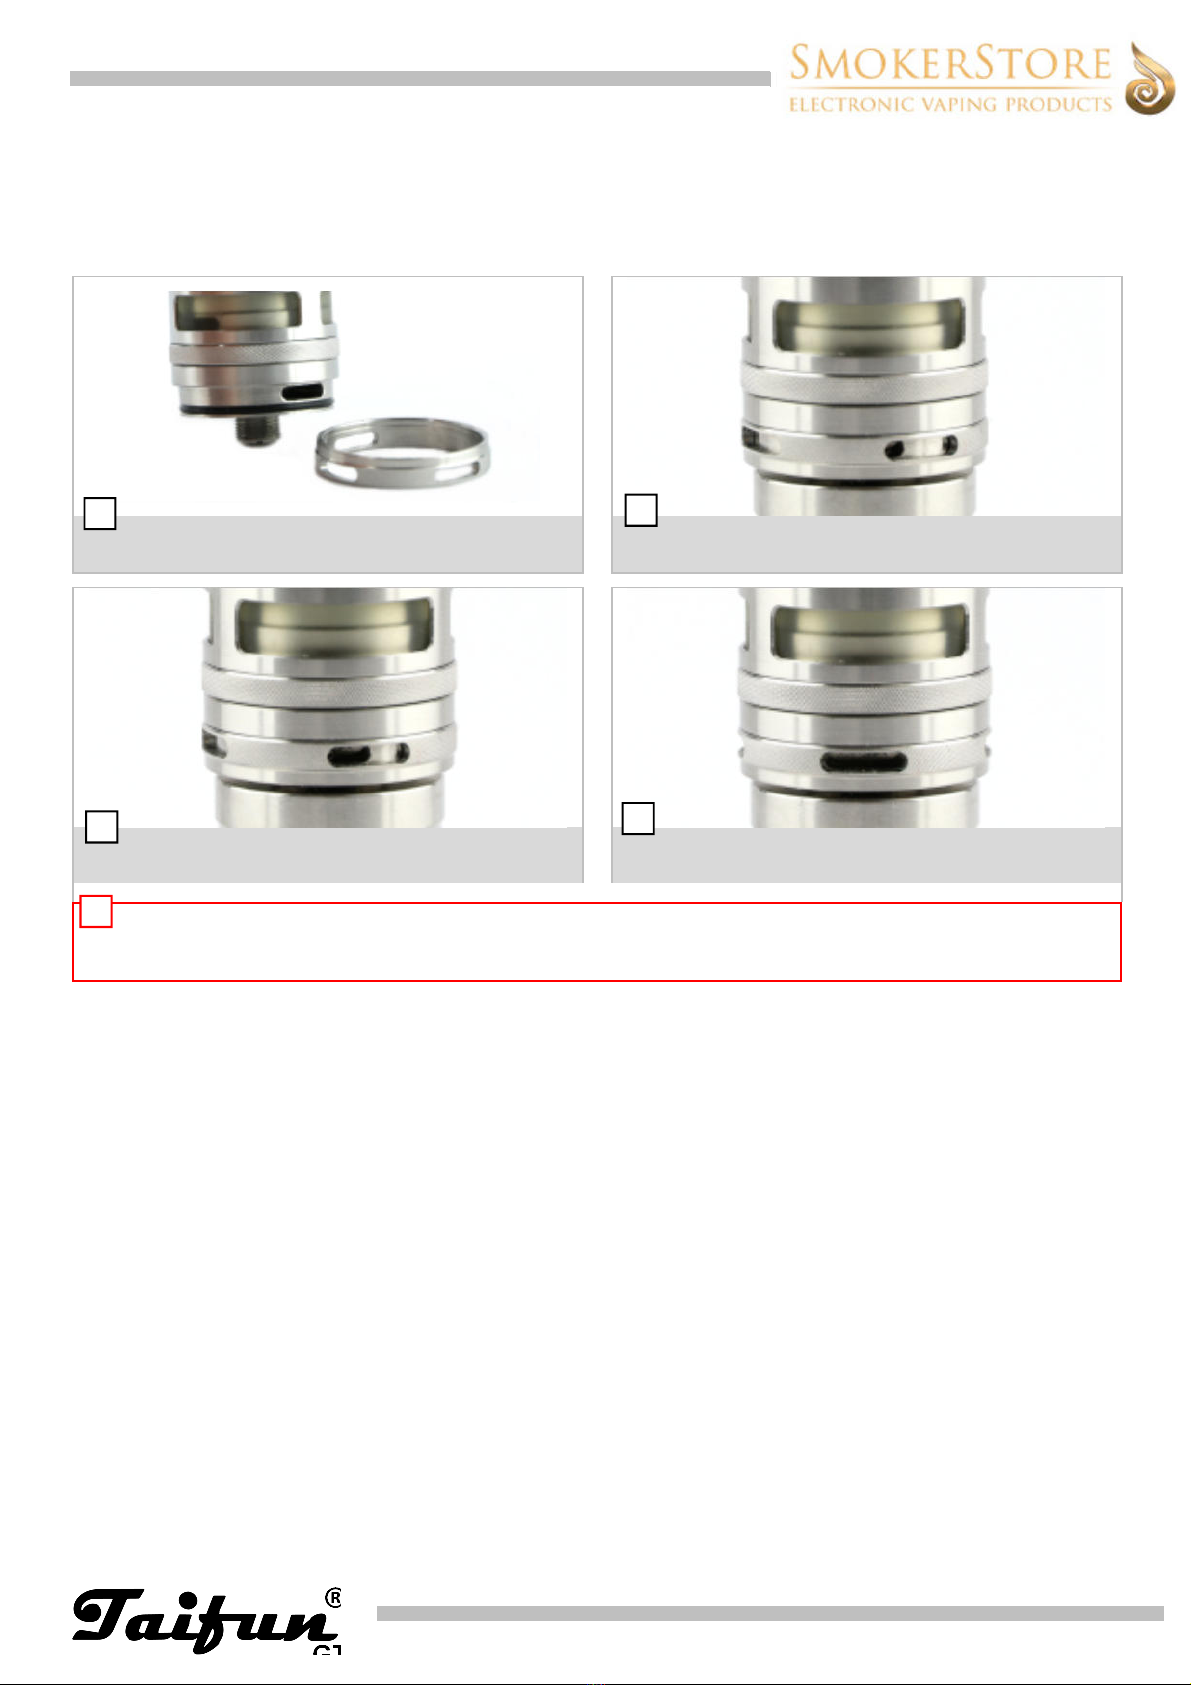
ADJUST AIRFLOW CONTROL
The air control can be adjusted via the lower ring. There are two air vents in the base and 3 holes in the AFC ring,
which can be pushed all the way or partially over the openings of the base by a lateral movement.
This gives you the opportunity to open one or two air holes.
Depending on the position of the AFC ring,
you can open the two airholes fully/partially.
Example: restrictive airflow (MTL)
Example: moderate airflow
Example: open draw
WARNUNG
• Never vape with completely closed airflow control.
• Make sure there is sufficient air supply at higher wattage levels.
!
1
2
3
4

®
GT4
8. CLEANING
Do not use cleaning agents as they could harm the o-rings.
Before assembling, check the completeness and positioning of the o-rings to prevent leakage of liquid.
• Disassemble the device into its components.
• Clean the components (not the cotton) with warm water or in an ultrasonic bath.
• Completely dry the components before reassembling the device.
9. MAINTANANCE
• ait until the device has completely cooled down before disassembling, to prevent burns.
• Make sure that there is no power supply by unscrewing the device from the mod or by switching off the mod.
ASSEMBLING DEVICE
• The device is usually delivered fully assembled, the following instructions are for the assembly after cleaning.
• Moistening the sealing rings with liquid makes the assembly easier.
Three hexagon socket screws (4) are screwed into the positive pole
(2) with the help of a suitable hexagon wrench.
Three hexagon socket screws (4) are screwed into the
deck (1) with the help of a suitable hexagon wrench.
The hexagon socket screw (5) will be
screwed into the base (1).
The insulator (3) is placed inside the base (1).
The positive pole (2) is now placed on the insulator (3),
The insulator (11) is plugged onto the positive pole screw (12).
The screw is now pushed from the bottom through the base (1)
and screwed into the positive pole (2). The screw (11) should be
tightened to seal the deck.
2
3
4
®
GT4
7
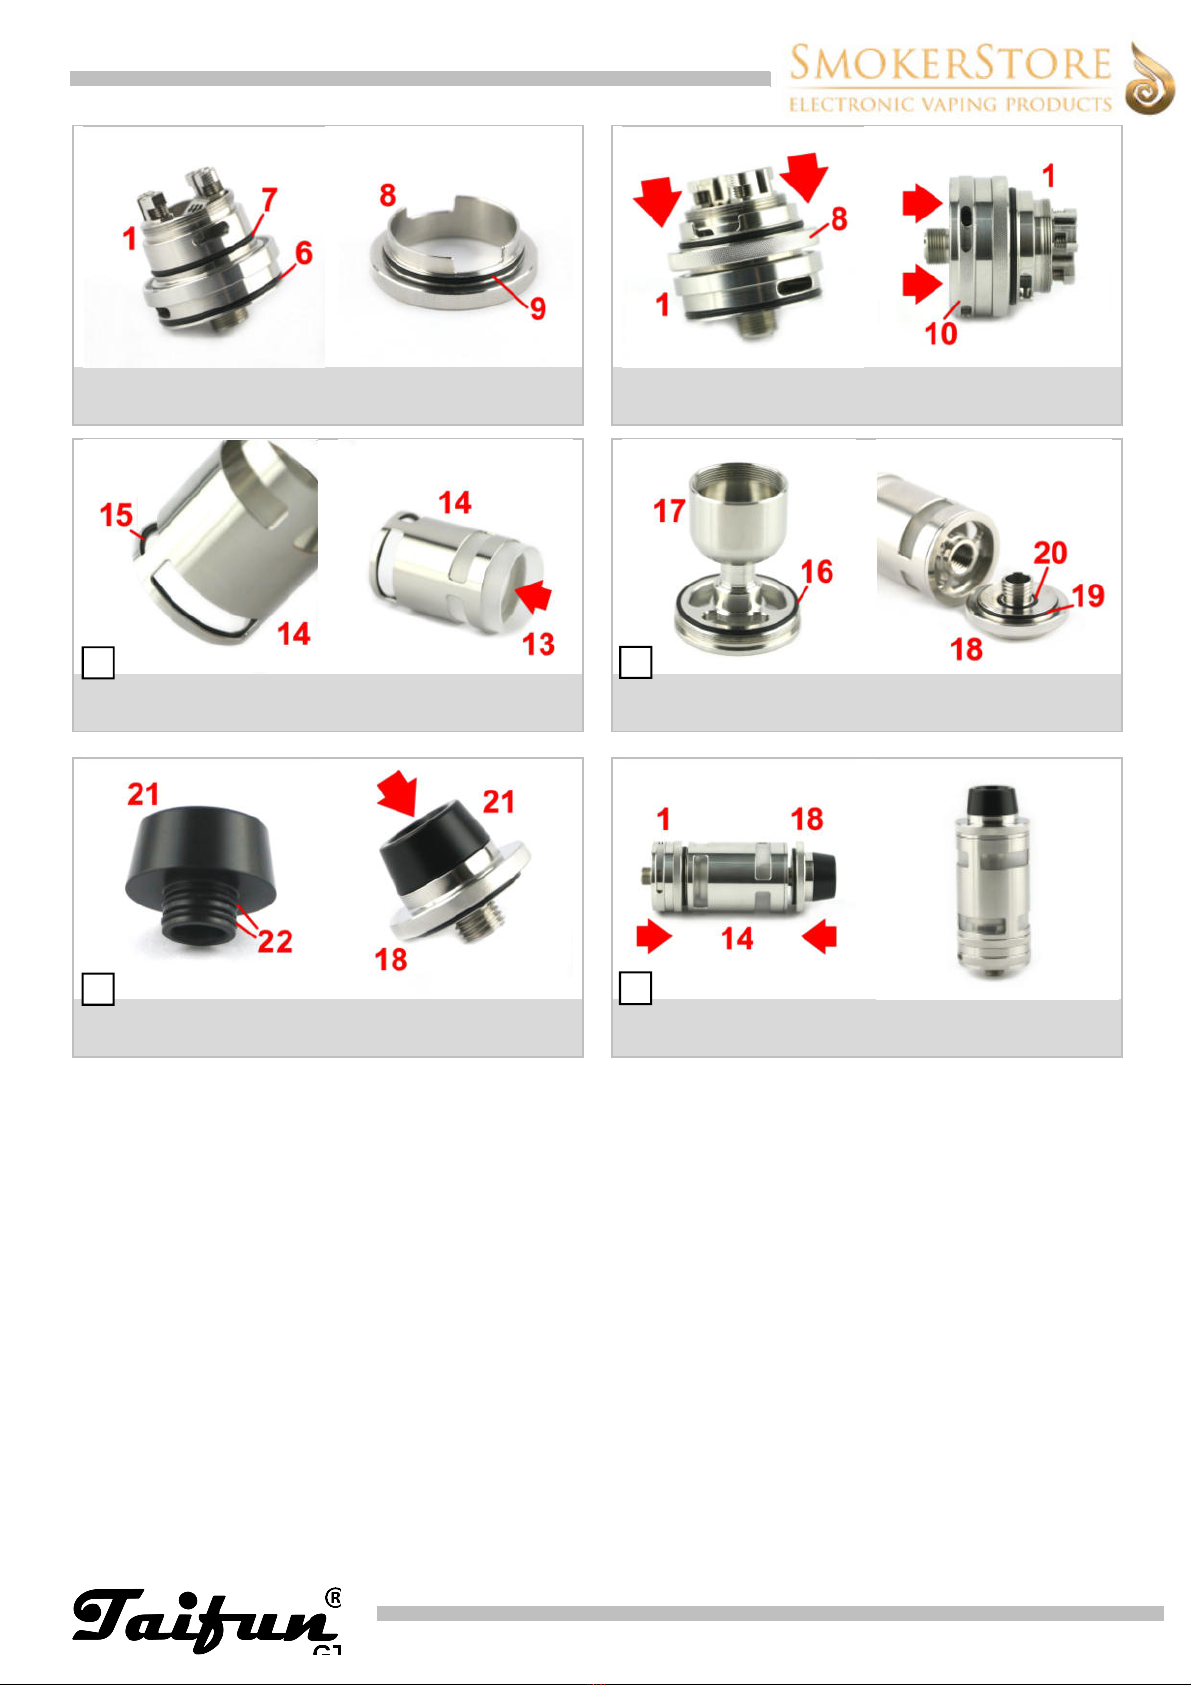
The O-rings (6, 7) are mounted to the base (1).
The O-ring (9) is mounted on the LC ring (8).
The LC ring (8) is pushed from above onto the base (1).
The AFC ring (10) is placed on the base (1) from below.
The O-ring (15) is mounted in the tank cover (14), then the glass
tank (13) is put into the tank sleeve (14).
The O-ring (16) are mounted on the chamber/chimney (17), and
the O-rings (19, 20) are mounted on the top cap (18).
The O-rings (22) are placed on the drip tip (21), then
the drip tip (21) is plugged onto the top cap (18).
Base (1), tank (14) and top cap (18) are now
screwed together. Done!
9
10
11
1
2

®
GT4
8
REPLACING THE GLAS
If the glass is damaged or broken, it must be replaced.
• Only use original spare parts, which can be obtained directly from www.smokerstore.de or from authorized dealers.
• Before replacing the glass tank, the evaporator must be completely emptied.
• After changing the glass, the tank section must be screwed together again to ensure the tightness of the tank.
WARNING
• If the glass is broken, glass splinters may be in the
tank and in the cotton. Immediately stop vaping,
thoroughly clean the entire device, and replace the seal-
ing rings and cotton according to the maintenance in-
structions.
First, unscrew the
top cap from the tank. Now the tank is screwd off the base.
Grab the upper tank cap and .. … unscrew it.
Now the glass can be replaced.
REPLACING SEALING RINGS
Sealing rings are used to seal the device.
• If you notice liquid or moisture leaking out of the device, the cause may be brittle seal rings that need to be replaced.
• Moistening the sealing rings with liquid makes the assembly easier.
A more comprehensive user guide can be downloaded at www.smokerstore.de as PDF.
!
1
3
4
INFO
Table of contents
Other SmokerStore Vaporizer manuals


