temperature
alarm.
If
the
grill
obtains an internal temperature reading
of
550 degrees as read by the
RTD
temperature sensing device the control
will
go into alarm state and the display
will
read "HEr': This
will
turn
off all
power to the internal components
of
the
grill.
The display
will
stay
in
this state until you turn
off
the main power switch. Whenever either
of
these alarm conditions occurs you should check
to see
what caused this condition and
fix
the problem.
Call
customer service
if
youneed help.
SECTION
4:
OPERATING
TIPS
1.
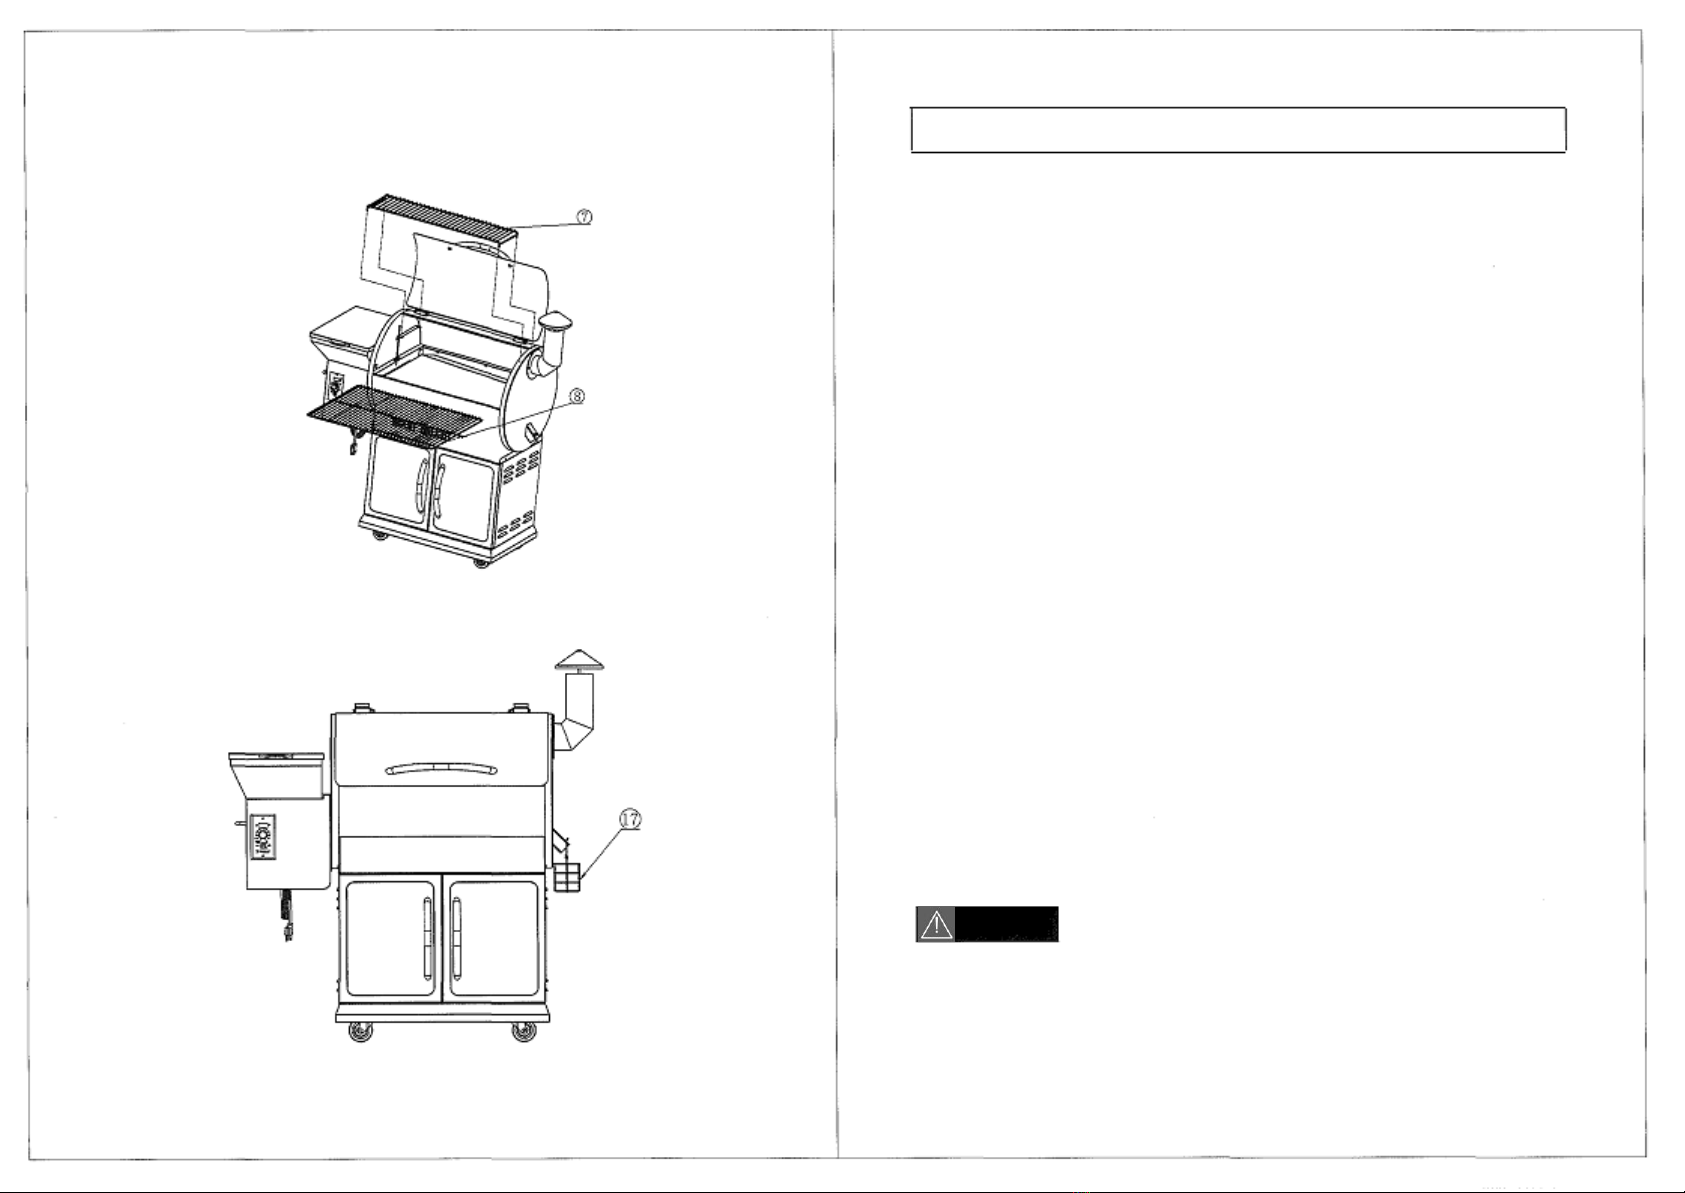
The
Temperature
Dial
can be changed at any time to increase or decrease the cooking temperature
of
the
Grill.
The HIGH/HIGHER
temperature settings are
for
Grilling. The MEDIUM/MID
RANGE
temperature
settings are
for
Slow Cooking. The
SMOKE
setting
is for
Smoking and adding Smoke
Flavor
to foodsbeing
cooked.
The
SMOKE
setting can also be used
to
"hold" foods at approximately
180to 200degrees
F.
2.
WARNING!
Your Smokey Bandit
Pellet
Grill
should never be moved while it
is
hot.
If
you are
transporting
your
Grill in
a vehicle after cooking on
it,
make sure the
fire is
completely out and the
Grill is
cold before
placing it
in
any vehicle. Never put water into the Firepot.
It will
jamthe
Auger.
3. Your Smokey bandit
Pellet
Grill is
designed to operate
with
the
Door
closed. Cooking with
the
Door open
greatly
lengthens your cookingtime.
4.
DANGER!
Never add pellets by hand to a hot Firepot. This
is
dangerous and you may be
seriously burned.
If
you run out
of
pellets and lose your
fire
while cooking, let the
Grill
completely
cool and
start
againwiththe
INITIAL
FIRING
INSTRUCTIONS.
5.
CAUTION!
Make sure the Heat Baffle
is
properly seated on its locating brackets. The long lips
of
the
Heat
Baffle
should be pointing down over the Firepot.
If
not seated properly, direct heat and
flamecould
come up out
of
the Firepotand cause a grease
fire in
the
Grill.
6.
When estimating cooking times, the outside temperature
will
be an important factor.
If
it
is
hot
outside,
it
will
take lesstime
for
food to cook.
If
it
is
cold, wet or windy,it
will
take longer.
7.
Digital
Thermostat ControlFunctions:
After selecting your cooking temperature (with the exception
of
"SMOKE") the Auger
will
operate
continuously until the selected temperature
is
reached. From that point forward, the Digital Control
will
cycle the Auger
off
and on to maintain the selected temperature until the Temperature/Dial
is
changed.
When operating
in
"S
moke"
mode, the Auger
will
cycle on
for
15 seconds and
off for
65 seconds. There
is
no temperature control withthe
"S
moke"
setting. Thistimed cycle setting
for
"S
moke"
is
a factorypre-set
recommended by
Smokey bandit
Pellet
Grills
to develop
a
"Smoking" temperature
of
150 to 180
degrees
F.
However you can change this timed cycle
to suit your particular needs. Refer to the Wiring Diagram
found
near the end
of
this manual and locate the Smoke Adjustment.
It is
a switch inside a small hole on
the
face
of
the Digital Controlto the right
of
the Readout. Whilethe Digital Control
is
on, use a very small
screwdriver or other pointed object
(a
bent paper clip works
well)
to gently depress the
switch.
When you
depress the switch,the Readout
will
change froma temperature
to "P"
followed by a number. The factory
pre-set mentioned earlier
is P-2.
The setting range
is
from
p-o
to
P-5.
The"P" readout
will
change each
time you depress the switch.With
all
"P
"
settings, the Auger on time remains constant at 15 seconds while
the
off
time
is
influencedby the "P"settings.
For
example:
A P-3
setting
will
result in an Augeron time
of
15 seconds and an Auger
off
time
of
75 seconds, an increase in the
off
time
of
10 seconds fromthe
P-2
setting. Each
change in
the
"P" number -up or down results in an increase or decrease
of
10 seconds
for
the
Auger
off
time. Increasing the number decreases Smoking Temperature. Decreasing the number
increases
Smoking Temperature. Service
Department recommends a setting no higher than P-4.
Also, if
you
do
make a Smoke Adjustment, the temperature on the Readout should be monitored.
If
the
temperature
is consistently below 160 degrees
F.
while"Smoking'; decrease the
"P
"
setting because there
is
a
risk
of
losingthe
fire
inthe
Firepot.
8.
Carbon monoxide:
WARNING
!
Follow
these guidelines to prevent this colorless, odorless gas from poisoning you,your
family
or
others.
Know the symptoms
of
carbon monoxide poisoning: headache, dizziness, weakness, nausea, vomiting,
sleepiness and confusion. Carbon monoxide reduces the blood's ability to carry oxygen.
Low
blood oxygen
levelscan result
in loss
of
consciousnessand
death.
See a doctor if you or others develop cold or flu-like symptoms while cooking or in the vicinity of this Grill.
Carbon monoxide poisoning, which can easily be mistaken for a cold or fiu, is often detected too late.
Alcohol consumption and drug use increase the effects of carbon monoxide poisoning.
Carbon monoxide
is
especially toxic to mother and child during pregnancy
,
infants, the elderly, smokers
and people
with blood or circulatory problems, such as anemia or heart disease.
9.
CAUTION!
Grease fires are caused by not properly maintaining the
Grill
by failing to clean
your
Grease Drain Pan, V-shaped Grease Drain and Grease Drain Tube
on a consistent basis. (See
Section 5 for
maintenance instructions)
In
the unlikely event
of
a grease
fire
while cooking, turn
the Switch
OFF
(0)
and Keep the Door closed until the
fire is
completely out. Never keep the Door
open during a grease fire.
If
it does not go out, lightly sprinkle baking soda on the
fire. CAUTION!
Be
careful not to burn yourself.
If
this does not work then carefully remove the food from the
Grill
and keep the Door closed until the
fire
is
completely out. Again, be careful not to burn yourself.
When the
Grill is
completely cool, remove
the
Porcelain
Grills
and replace the
foil
on the Grease
Drain Pan. Clean any grease accumulation from
the
V shaped Grease Drain and the Grease
Drain
Tube. Replace the Grease Drain Pan and the Porcelain
Grills
in
their proper positions, restart the
Grill
and resume cooking.